

Kannad Marine SafeLink EPIRB User Manual
SAFELINK
EPIRB
User Manual
SafeLink Category 1

SafeLink Category 2
Disclaim
e
Kannad M
a
publication
right to ch
a
as part o
f
publication
otherwise
w
inaccuraci
e
complete a
End of Lif
e
A
t the end
False alert
s
a consequ
e
Safe disp
A
lways dis
discard th
e
McMurdo
L
RECOM
M
Thi
s
Fal
s
acti
v
Re
a
En
s
En
s
Th
e
bat
t
Thi
sTak
Thi
s
har
m
r
rine is a
are to the
nge speci
f
our polic
y
may be re
p
ithout per
m
s or omis
s
nd accurat
e
Stateme
n
of the pro
d
cause ex
p
nce
.
osal
Con
reta
r
DO
pose of thi
s
product i
n
td for furth
e
ENDATI
O
EPIRB is
e alerts e
ate your e
d the com
p
ure you te
s
ure the EP
EPIRB c
o
ery replac
e
device c
o
e care if y
o
device e
m
ful; howe
v
brand of
M
best of ou
ications, e
q
of conti
n
roduced,
s
ission in
w
ions in th
e
as possib
t
ucts usef
u
ensive dis
tains trace
dants (BF
R
NOT INCI
N
product i
n
the dom
e
r advice.
NS AND
S
an emerge
n
ndanger li
v
quipment. I
lete manu
a
t the EPIR
B
IRB is regi
s
ntains no
ment or ot
h
ntains Lith
u need to
d
its radio f
r
er, it is ad
v
cMurdo L
r knowled
g
uipment, i
uous pro
d
tored in a
r
riting fro
m
publicati
o
le
.
l life, it is
v
ruption to
S
s of lithiu
m
s), both in
ERATE
a sensibl
e
stic waste
.
AFETY N
cy device
f
es. Help
t
ntentional
f
l before in
s
monthly
tered with
y
user servi
c
er service.
ium batteri
e
ispose of t
h
equency r
a
isable not
t
td. The in
f
e correct
a
nstallation
uct devel
o
etrieval sy
s
McMurdo
n, althoug
h
ital that th
earch and
, may co
n
the housin
g
and con
s
Instead,
t
OTICES
or use onl
y
o prevent
alse alerts
talling, tes
our local
a
eable par
t
s; do not
ese batte
r
diation wh
e
o handle t
h
ormation
a
t the time
and maint
e
pment an
d
tem or tra
n
Limited. N
o
every ca
r
e battery i
s
Rescue se
tain trace
s
material
a
iderate ma
ake it to a
in grave a
them; und
e
may involv
e
ting or usin
uthorities (
s. Do not
incinerate,
ies or the c
n activate
d
e antenna
nd illustra
t
of going t
o
nance inst
improve
m
smitted in
liability c
a
e has bee
removed
t
rvices and
of lead
a
nd circuit
b
nner. For
e
civil recy
c
nd immine
n
rstand ho
w
penalties
.
g the EPIR
Flag State
n
open. Ret
u
puncture,
d
omplete E
P
. This radi
while the u
ions conta
print. We
ructions wi
t
ent. No
p
any form,
e
n be acce
p
n taken to
o prevent
may enda
n
nd bromin
oards.
xample, d
o
ling facility
t danger.
to activ
a
B.
ation)
rn to you
eform or
s
IRB.
ation is no
t
nit is activ
a
ined in thi
s
reserve th
e
hout notic
e
art of thi
s
lectronic o
ted for an
y
make it a
s
false alert
s
ger lives a
s
ated flame
not simpl
y
, or conta
c
te and de
dealer fo
hort-circui
t
classed a
s
ted
.
r
.
-
t
-
r
.

CONTENTS
1. INTRODUCTION ........................................................................................................... 1
1.1. COSPAS-SARSAT system description ................................................................ 1
1.2. Immediate alerting and location calculation ....................................................... 1
2. APPLICATION .............................................................................................................. 1
3. REGISTRATION ........................................................................................................... 2
4. DESCRIPTION .............................................................................................................. 2
4.1. Container and mounting bracket description ..................................................... 2
4.2. Beacon Description ............................................................................................... 3
5. TEST INSTRUCTIONS ................................................................................................. 5
6. INSTRUCTIONS FOR USE ........................................................................................... 5
6.1. Automatic activation ............................................................................................. 5
6.2. Manual activation .................................................................................................. 5
6.2.1. Beacon removal ................................................................................................ 5
6.2.2. Activation by water switch sensor ..................................................................... 6
6.2.3. Manual Activation by ON pushbutton ................................................................ 6
7. FALSE ALARMS .......................................................................................................... 7
7.1. False alarms prevention ....................................................................................... 7
7.2. Beacon de-activation ............................................................................................ 7
7.2.1. Beacon overboard ............................................................................................. 7
7.2.2. Beacon manually activated ............................................................................... 7
7.2.3. Fully disabling the beacon................................................................................. 7
8. BEACON INSTALLATION ............................................................................................ 8
8.1. Mounting instructions plate.................................................................................. 8
8.2. SafeLink Auto Category 1 (Float Free) ................................................................ 9
8.2.1. Installation of container ..................................................................................... 9
8.2.2. Installation of beacon into container ................................................................ 10
8.3. SafeLink Manual+ Category 2 ............................................................................. 11
8.3.1. Mounting bracket installation........................................................................... 11
8.3.2. Installation of beacon into its mounting bracket .............................................. 12
9. TECHNICAL SPECIFICATIONS ................................................................................. 13
10. MANDATORY REGISTRATION .............................................................................. 13
10.1. Overview ........................................................................................................... 13
10.2. How to register ................................................................................................. 14
10.3. Radio licence .................................................................................................... 15
10.4. Sale or transfer ................................................................................................. 15
10.5. Mandatory information for Australia and New Zealand ................................ 15
10.6. USA Advice to owners of Emergency Position Indicating Radio Beacons . 15
10.7. Emergency Contact .......................................................................................... 15
11. MAINTENANCE ....................................................................................................... 16
11.1. Battery replacement ......................................................................................... 16
11.2. Servicing ........................................................................................................... 16
11.3. GMDSS inspections ......................................................................................... 16
12. TRANSPORTATION ................................................................................................ 16
13. BATTERY REPLACEMENT PROCEDURE ............................................................. 17
13.1. Battery pack removal ....................................................................................... 17
13.2. Battery pack reassembly ................................................................................. 18
14. AUTOMATIC RELEASE SYSTEM REPLACEMENT .............................................. 19
14.1. Description ....................................................................................................... 19
14.2. Replacement ..................................................................................................... 19
Page 1 of 25
1. INTRODUCTION
1.1. COSPAS-SARSAT system description
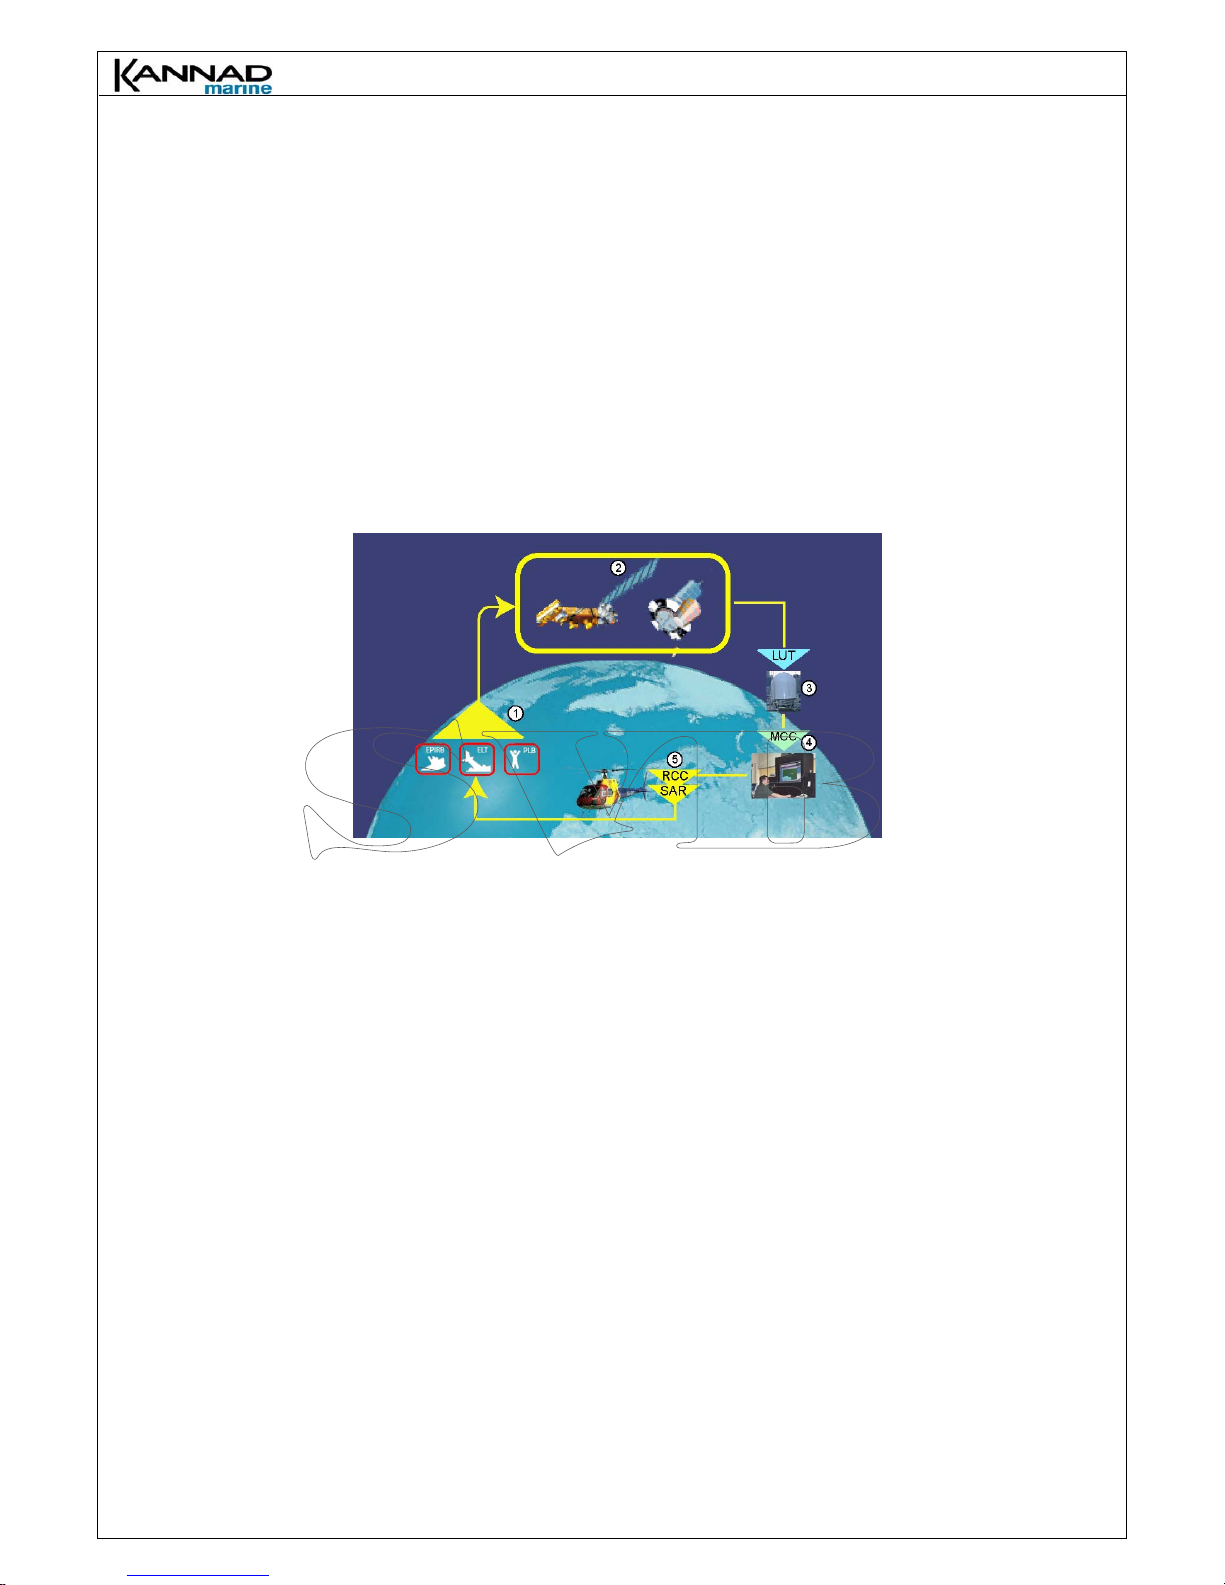
COSPAS-SARSAT is a global distress warning system operating in the 406.0 - 406.1 MHz
frequency band. The 406 MHz frequency coded with the beacon ID, is used to determine the
position of the beacon to alert the nearest Search and Rescue Services (S.A.R.).
The system consists of:
1. Distress beacons;
2. Satellites on polar orbits (LEOSAR) and geostationary satellites (GEOSAR);
3. Local User Terminals (LUTs);
4. Mission and Rescue Control Centers (MRCC's).
5. MCCs receive alerts produced by LUTs and forward them to Rescue Coordination
Centers (RCCs) or Search
6. and Rescue (S.A.R.) Points Of Contacts
Figure 1: Cospas-Sarsat System
1.2. Immediate alerting and location calculation
When activated, the SafeLink beacons transmit, in the 406 MHz frequency, a coded message with
a unique number to identify the distress and the beacon’s owner, and the GPS position. This
message is picked up by the COSPASSARSAT satellites which store it and continuously
retransmit it to the Local User Terminals (L.U.T) Thanks to the geostationary satellites (GEOSAR),
the distress is received within minutes and transmitted anywhere in the world.
Thanks to the orbital satellites (LEOSAR), the position of the distress is calculated within one
nautical mile anywhere in the world using Doppler techniques. The typical waiting time for
calculating a position in average latitudes is less than one hour.
Thanks to the built-in GPS receiver, its position (accuracy typically about 120 meters) will be
transmitted by the beacon within minutes following the distress.
The data are processed and retransmitted to Mission and Rescue Control Centers (MRCC's) and
to the Search And Rescue Center (RCC or S.A.R.) nearest to the distress to organize the rescue
operations.
The 121.5 MHz frequency is also transmitted by the beacon and is used as a homing frequency in
the final stages of rescue.
2. APPLICATION
This EPIRB (Emergency Position Indicating Radio Beacon) is designed for use in maritime
emergencies, and is approved for these contingencies.
It is not designed or recommended for use on land or in the air.
Use the EPIRB only in situations of grave and imminent danger. Intentional false alerts may result in
penalties.
Page 2 of 25
3. REGISTRATION
This EPIRB must be registered with the appropriate national authority.
Refer to Section 10. MANDATORY REGISTRATION page 12.
The function of the EPIRB is to send an alert to the COSPAS-SARSAT satellites. How soon an alert
is received depends on the positions of the satellites at the time, and can be influenced by overhead
obstructions aboard the vessel. Rescue time following an alert depends on the overall performance
of the Search and Rescue organisations.
4. DESCRIPTION
SafeLink beacons are Emergency Position Indicating Radio Beacons (EPIRB) Float Free version
category 1 (SafeLink Auto) or non Float Free version category 2 (SafeLink Manual+). Both versions
are fitted with a built-in GPS.
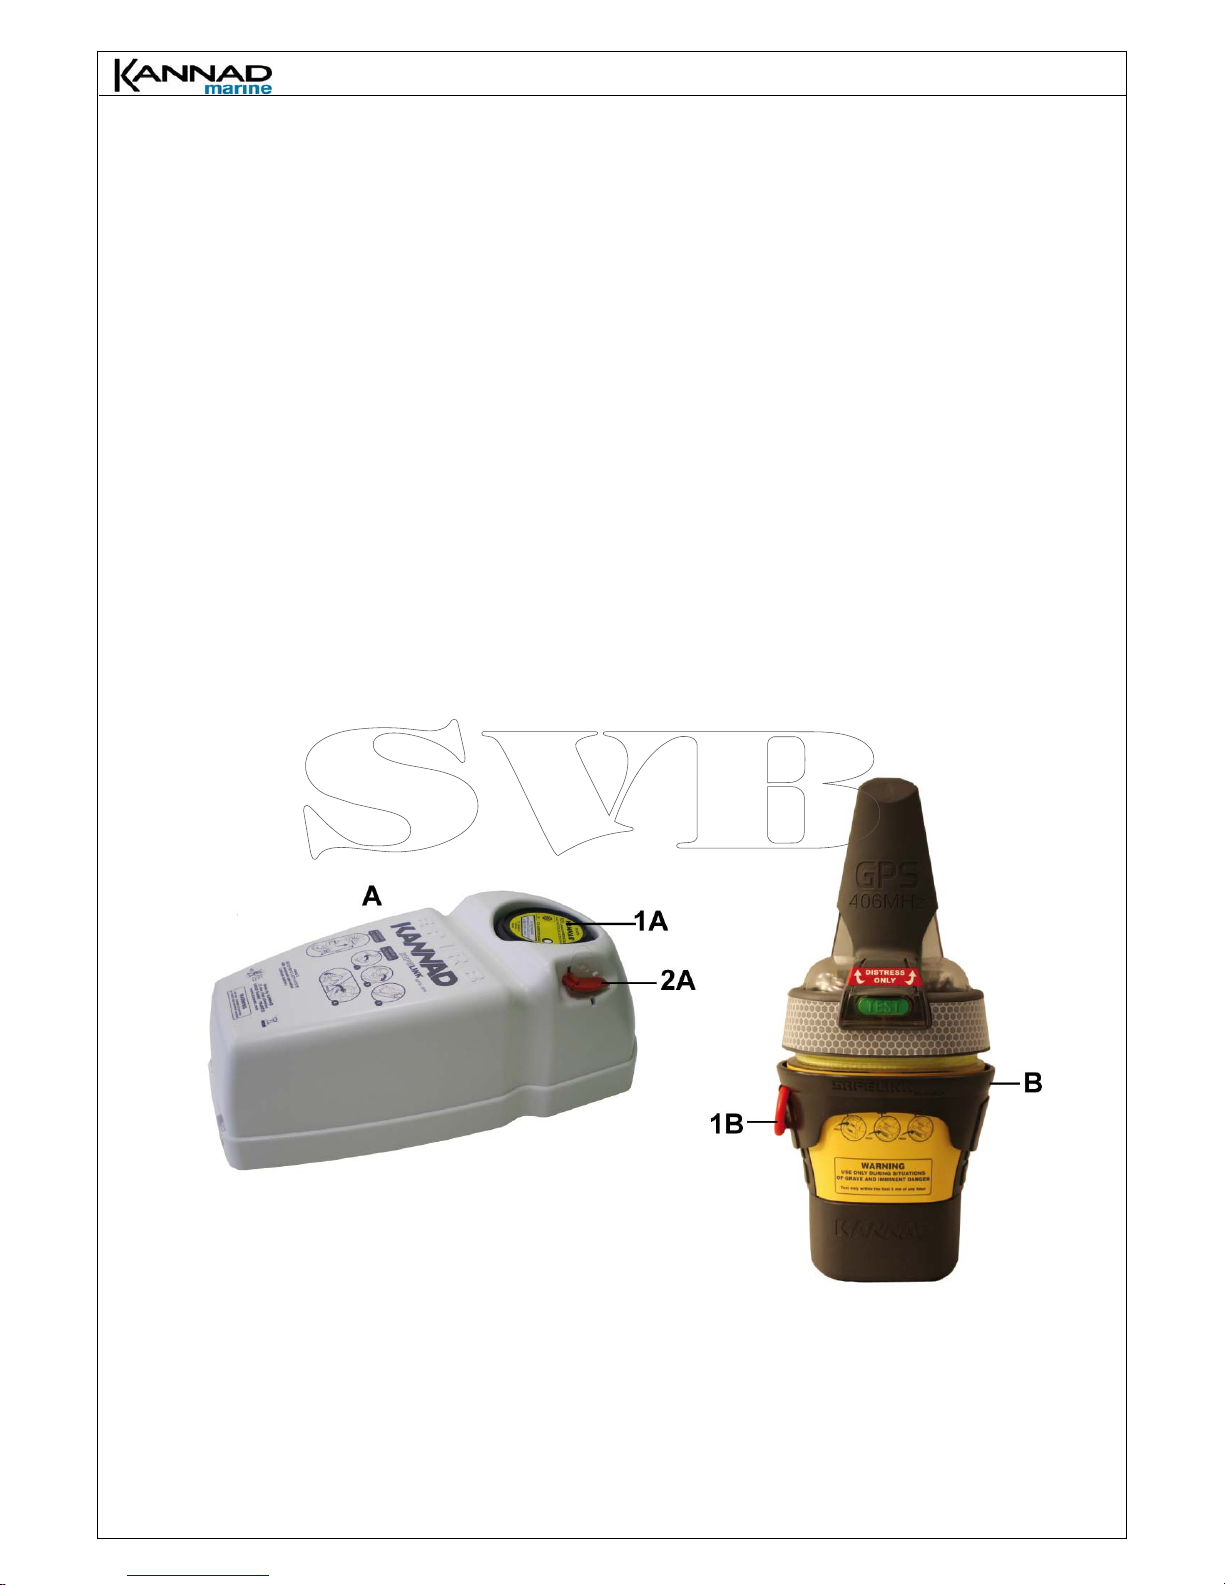
4.1. Container and mounting bracket description
The beacon is supplied either in an automatic container (A) for the Float Free version category 1,
or with a wall mounting bracket for the Non Float Free version category.
The container (A) is designed to protect the beacon and to ensure its automatic release in the
event of a ship wreck thanks to the HAMMAR H20 release system (1A). This container is also
fitted with a locking pin (2A). It is mounted either in horizontal position on the wheel house or deck
of the vessel, or in vertical position against a bulkhead or any vertical and flat surface (§ 8.2.1.
Installation of container).
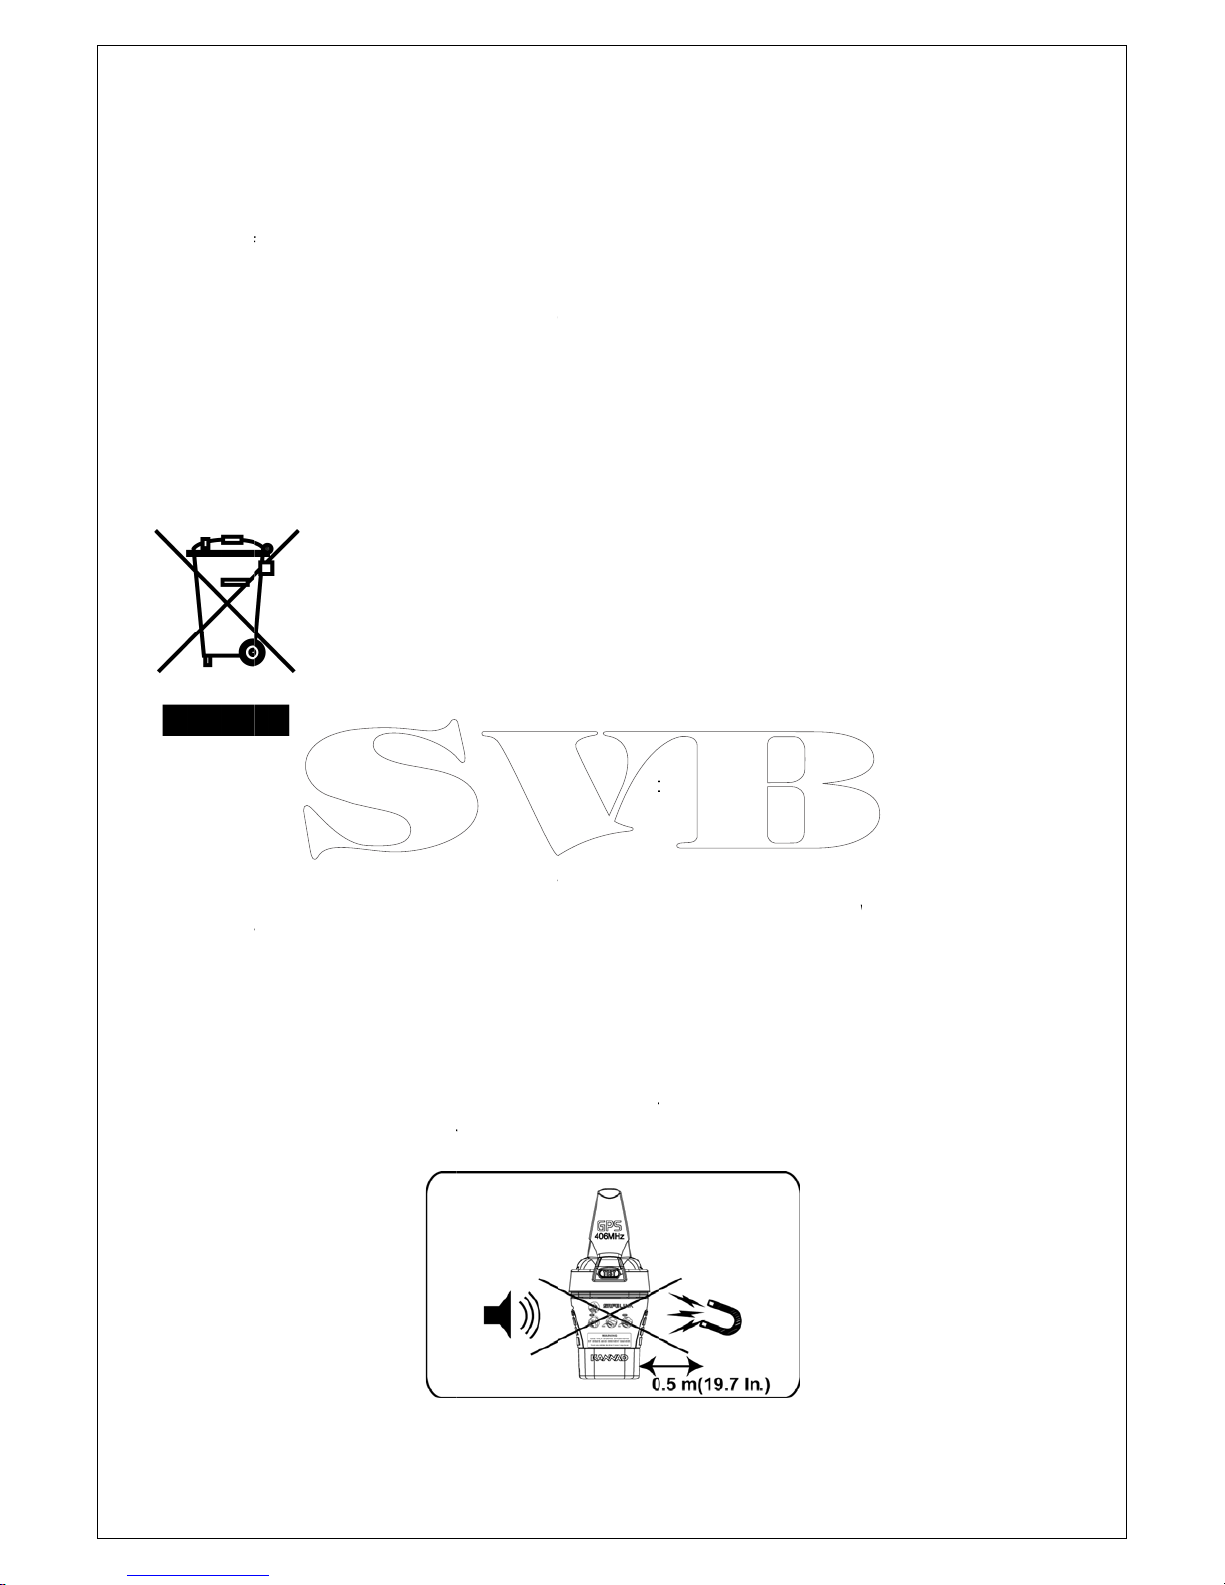
When installed in its container, a magnet avoids beacon activation (water, moisture).
The wall mounting bracket (B) is designed to be mounted vertically against a bulkhead or any
vertical flat surface. The mounting bracket is fitted with a locking pin (1B). When installed in its
mounting bracket, a magnet avoids beacon activation (water, moisture).

Page 3 of 25
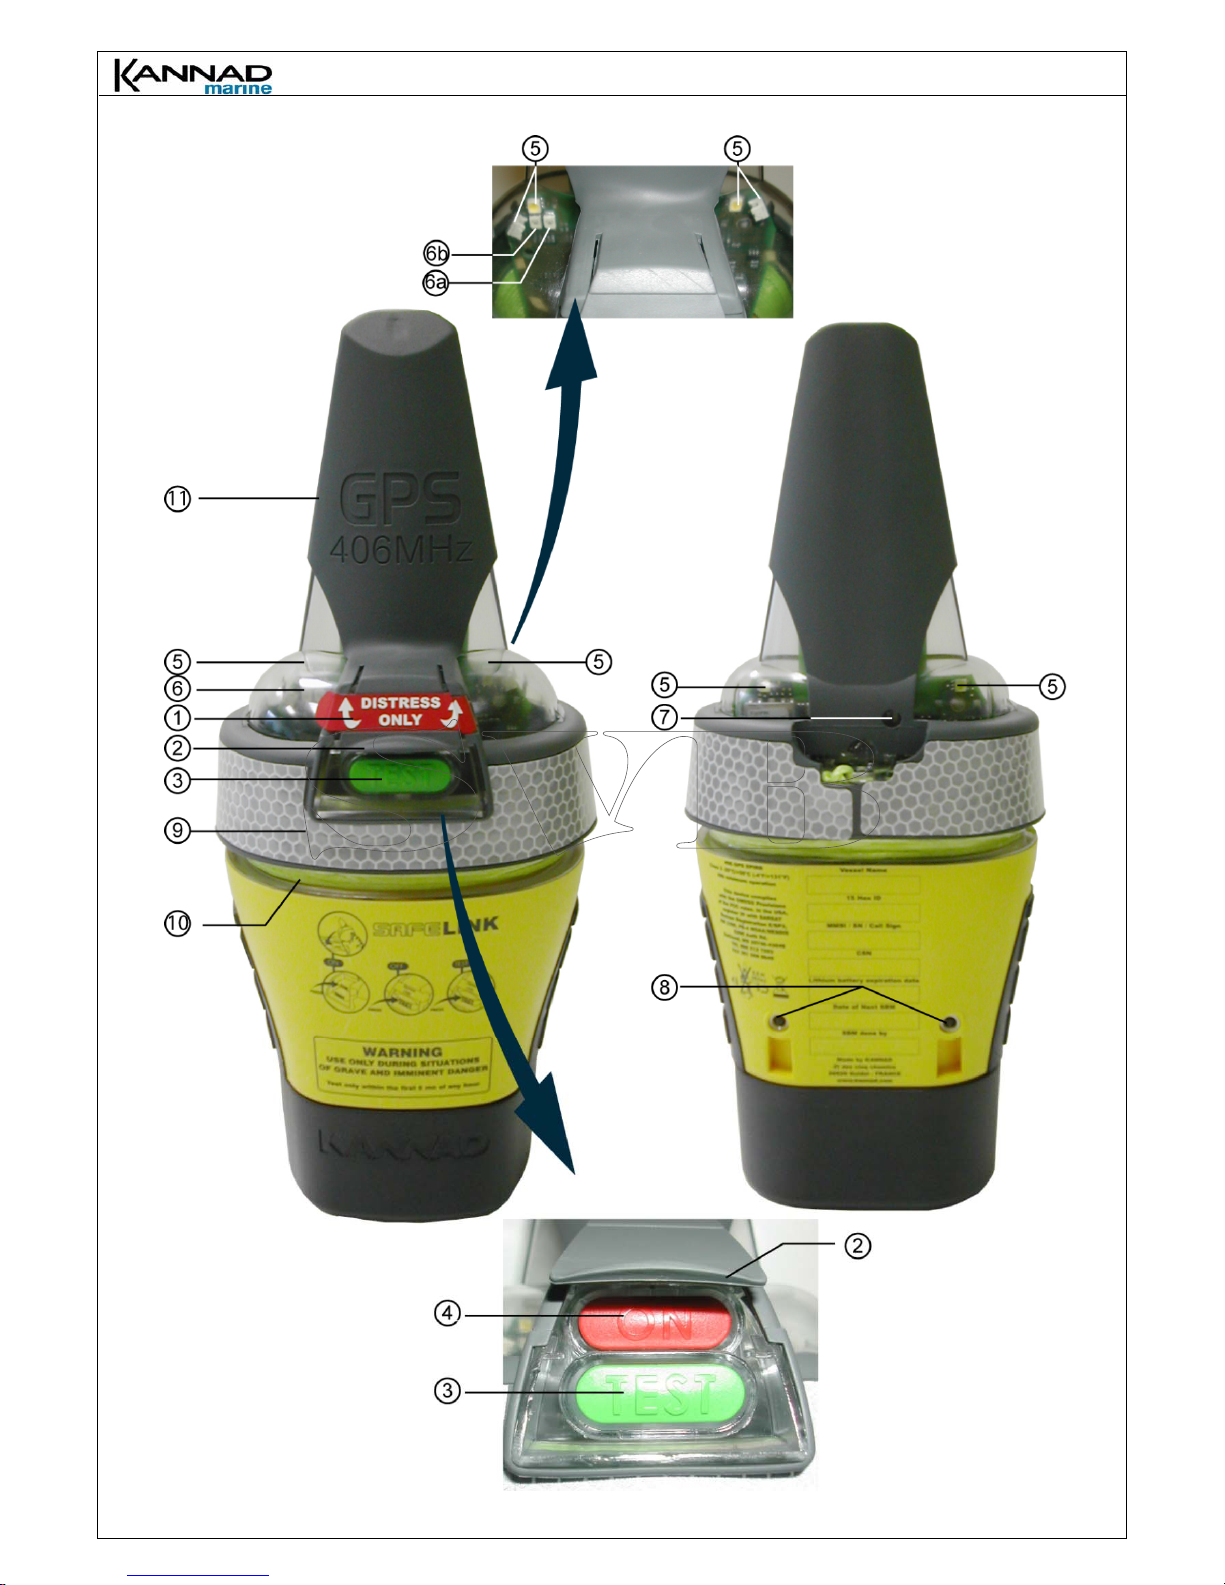
4.2. Beacon Description
1. Tamper proof seal
to prove the beacon has been intentionally activated.
2. Locking system
to avoid unintentional activation of the beacon.
3. TEST pushbutton:
to perform a self-test;
to stop the beacon transmission if manually activated by ON button if required by
authorities.
4. ON button:
to activate manually the beacon.
5. Strobe lights:
to improve or help visual localization of the beacon by the SAR operations.
6. Beacon control lamps (red and green):
to check good operation when activating the beacon;
to check good operation when performing a self-test;
7. Programming led:
to program the beacon (by manufacturer or authorized programming stations).
8. Water switch contact:
to activate automatically the beacon when submerged in water.
9. Retroreflective tape
10. Tether line:
to secure the beacon to a liferaft, life jacket, boat, etc.
Important: The tether line is used to moor the EPIRB when floating in the water. Do not
tie lanyard.
to ship when installing beacon inside bracket.
11. 406 / 121.5 MHz antenna.
Page 4 of 25
Page 5 of 25
5. TEST INSTRUCTIONS
Test of 406 / 121.5 MHz frequencies.
It is recommended to perform a self-test once a month. The self-test may be performed with the
beacon inside its bracket or container.
NOTE: This check shall only be conducted during the first five minutes of any UTC hour.
1. Press TEST / READY push button (3) for 2 seconds.
2. During the test, the strobe lights (5) blink, the buzzer transmits an audible signal, and the red
programming led (7) flashes once.
3. At the end of the test, the result is displayed by green (6a) or red (6b) leds:
- Green led (6a), 1 flash indicates the system is operational;
- Red led (6b), 1 flash indicates the test has failed.
Repeat 3 times to confirm failure before contacting agent.
NOTE: Do not confuse the red programming led (7) and the «default» red led (6b).
6. INSTRUCTIONS FOR USE
WARNING: It is unlawful to transmit a distress signal unless an emergency exists. Do not
operate inside life raft or under any similar cover of canopy. Do not obstruct GPS antenna's
view of sky to maximize self-locating performance (do not place the hands over the
transparent dome of the beacon).
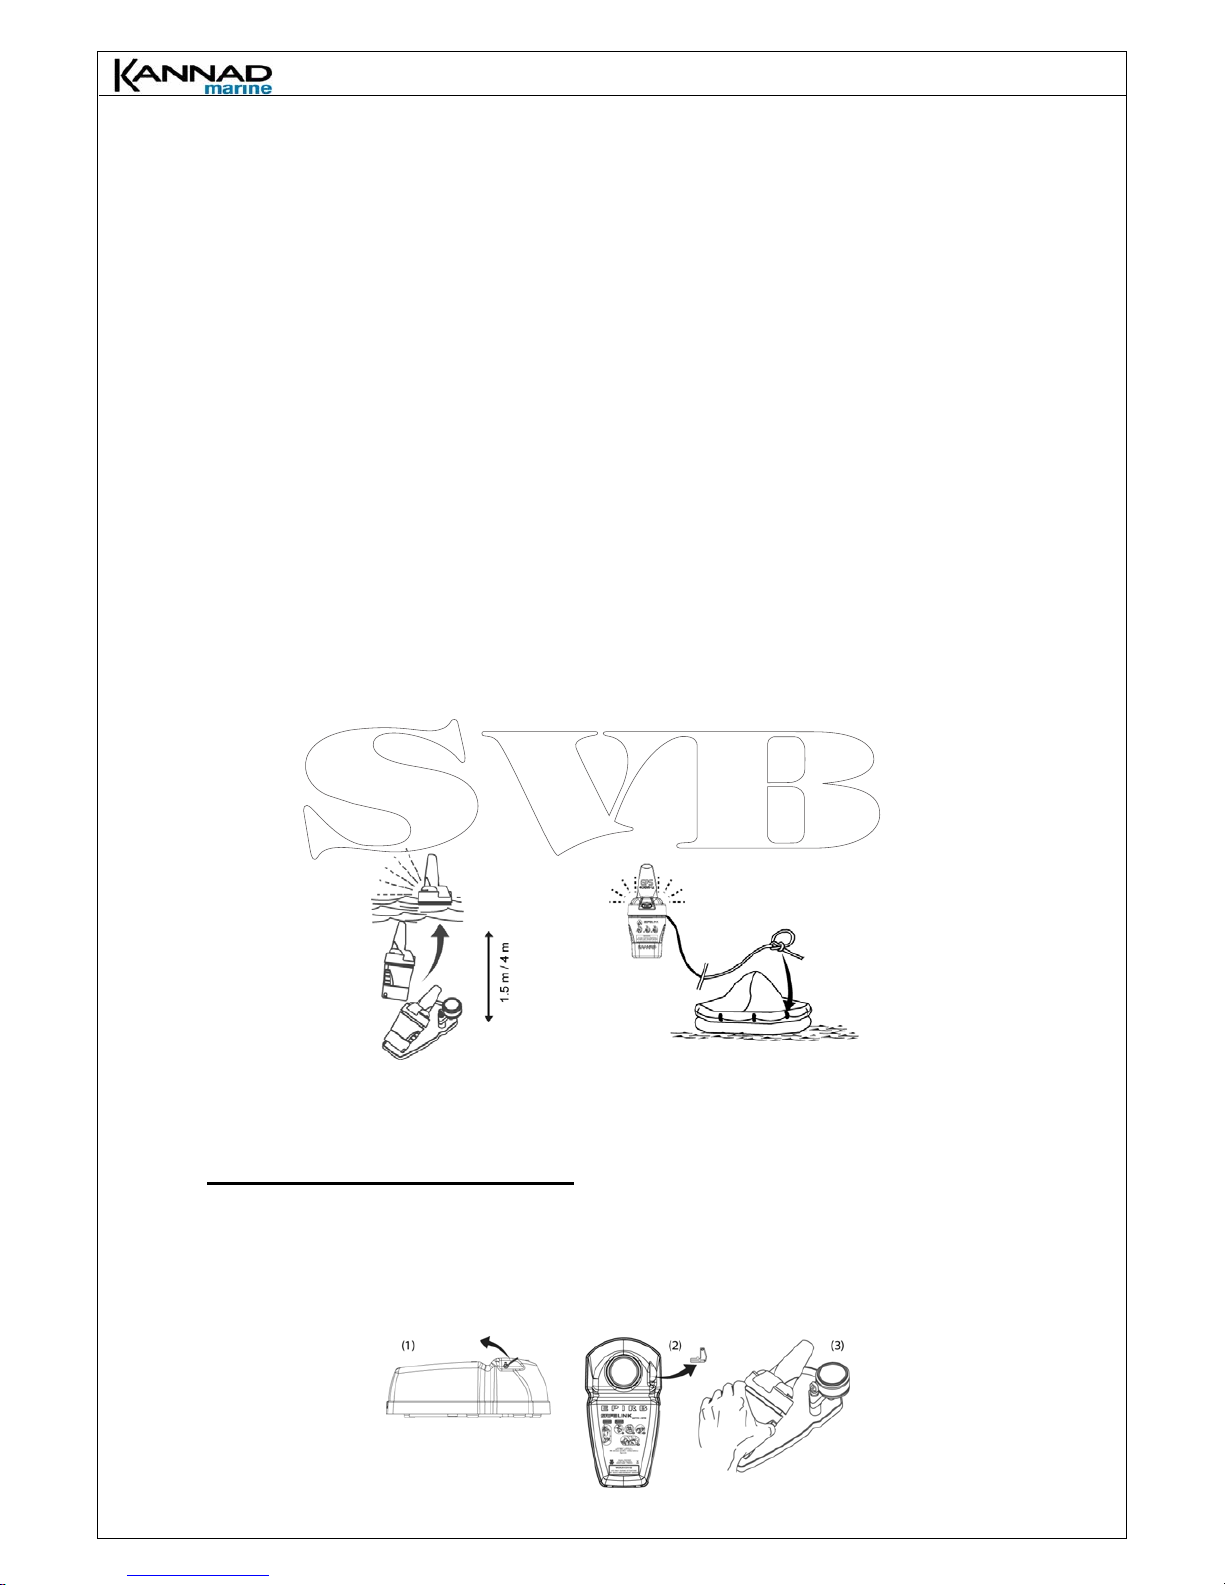
6.1. Automatic activation
IMPORTANT: Only for SafeLink Auto Float Free version, category 1.
If the vessel sinks, the release system ejects the cover to enable the beacon to rise to the surface.
The beacon is automatically activated when submerged in water and out of its container.
The beacon should be recovered and tied to a life raft to locate the survivors and not the wreck
location.
6.2. Manual activation
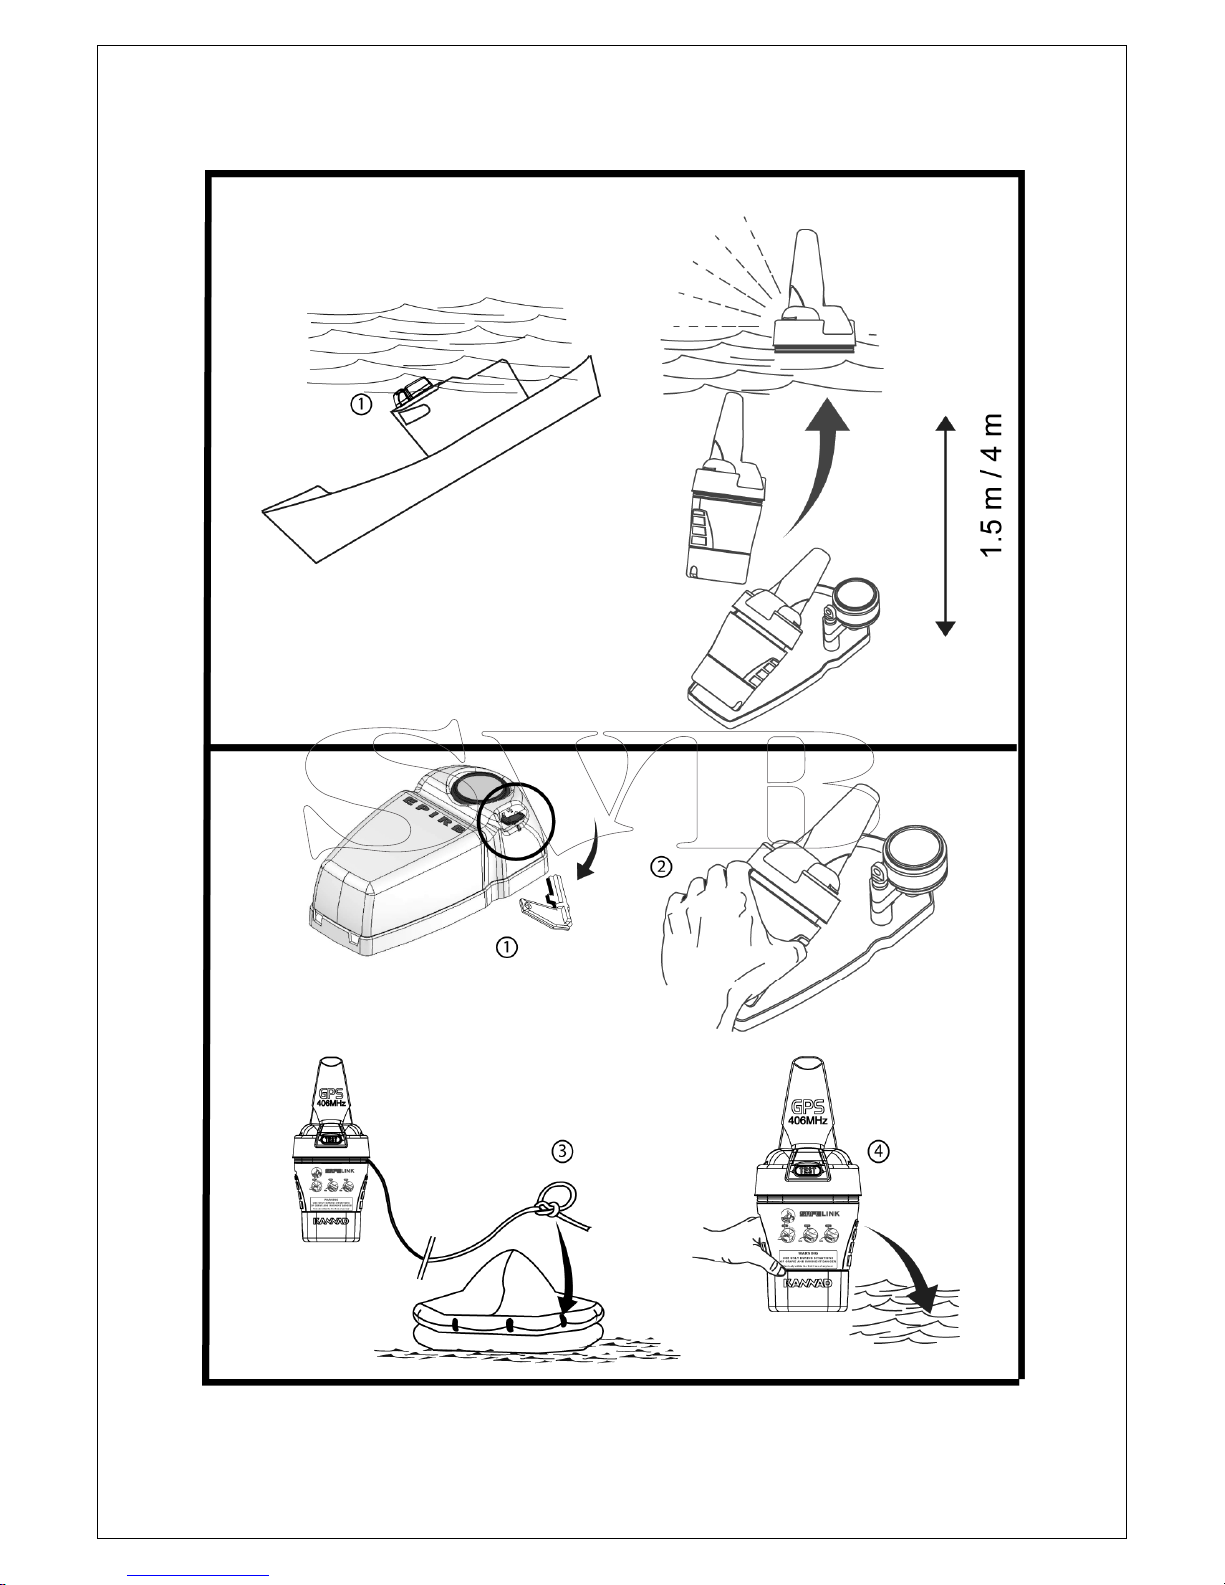
6.2.1. Beacon removal
SafeLink Auto category 1 (Float Free)
Remove the beacon from its container:
(1) Lift up the red locking pin of the container;
(2) Remove the locking pin;
(3) Remove the cover of the container and extract the beacon.
 Loading...