

Page 1

KANGURU USB DUPLICATOR
USER MANUAL
Copyright 2012, All Rights Reserved.
Model no. U2D2
Page 2

Notices and Information
BEFORE FIRST USE
This user’s manual is intended for use with the latest firmware version. If any of the functions on your
unit are different from those mentioned here, please contact Kanguru Solutions to receive the latest
firmware version.
Copyright© 2012, Kanguru Solutions. All rights reserved.
DOS®, Windows XP®, Windows Vista
Apple® and Macintosh® are registered trademarks of Apple Computer Inc. All other brand or product names
are trademarks of their respective companies or organizations.
TM
, and Windows 7TM are registered trademarks of Microsoft Inc.
DISCLAIMER
The Kanguru USB Duplicator only supports USB devices that are USB-IF compliant. If you are making
duplications using USB devices that are not USB-IF compliant, the USB Duplicator may not function properly.
The Kanguru USB Duplicator will also not work with hardware encrypted/protected USB devices.
In no event shall Kanguru Solutions’ liability exceed the price paid for the product from direct, indirect,
special, incidental, or consequential software, or its documentation. Kanguru Solutions offers no refunds
for its products. Kanguru Solutions makes no warranty or representation, expressed, implied, or statutory,
with respect to its products or the contents or use of this documentation and all accompanying software, and
specifically disclaims its quality, performance, merchantability, or fitness for any particular purpose. Kanguru
Solutions reserves the right to revise or update its products, software, or documentation without obligation to
notify any individual or entity.
Kanguru Solutions will not be held responsible for any illegal use of this product nor any losses incurred while
using this product. The user himself is responsible for the copyright laws, and is fully responsible for any
illegal actions taken.
CUSTOMER SERVICE
To obtain service or technical support for your system, please contact Kanguru Solutions Technical Support
Department at 508-376-4245, or visit www.Kanguru.com for web support.
LIMITED WARRANTY
Kanguru Solutions guarantees that every Kanguru USB Duplicator will be free from defects in workmanship
and materials for 1 year from the date of purchase. This product carries a *1 year limited warranty on the power
supply, controller, and all internal components. This warranty does not apply if, in the judgment of Kanguru
Solutions, the product fails due to damage from handling, accident, abuse, misuse, or if it has been used in a
manner not conforming to the product’s instructions, has been modified in anyway, or the warranty labels have
been removed. If the product proves defective during this warranty period, call Kanguru Solutions Technical
Support in order to obtain a RMA required for service.
Kanguru Solutions does not offer money back returns on its duplicator product lines due to the
unique nature of the product. All units will be fully supported under manufacturer’s and/or
extended warranty plans.
2
Page 3

Table of Contents
1. Introduction .......................................................................................... 4
1.1 Technical Specifications ............................................................... 5
1.2 Package Contents ..........................................................................5
2. Getting to Know Your Kanguru USB Duplicator ................................ 6
2.1 Parts and Functions........................................................................6
2.2 Hardware Setup .............................................................................7
2.3 Navigating the User Interface ....................................................... 8
3. USB Duplicator Operations .................................................................9
3.1 Synchronous Copy.........................................................................9
3.2 Asynchronous Copy....................................................................... 11
4. Device Menu Overview .......................................................................13
Table of Contents
5. Troubleshooting ...................................................................................17
6. Error Codes ..........................................................................................18
7. Notices and Safety ...............................................................................20
8. Warranty ............................................................................................... 23
9. Tech Support ........................................................................................23
10. RMA Procedure ...................................................................................24
3
Page 4

1. Introduction
Congratulations on your purchase of the Kanguru USB Duplicator by Kanguru Solutions. The Kanguru
USB Duplicator is a high speed, stand-alone USB2.0 duplicator with an internal hard drive that can
duplicate, erase or verify up to 7, 15, 23 or 31 USB devices (depending on model). The duplicator has
many advanced features for the IT professional, yet is easy enough to for a novice to use.
The Kanguru USB Duplicator copies data with fast copy speeds of up to 33MB/s*.
* Actual data transfer rate performance dependant upon drive
Note: The Kanguru USB Duplicator only supports USB drives that are USB-IF compliant. If you are
making duplications using USB drives that are not USB-IF compliant, the USB Duplicator may not
function properly. The Kanguru USB Duplicator will also not work with hardware encrypted/protected
USB drives.
Introduction
FEATURES
√ Supports: USB1.1, USB2.0 and USB3.0 A-type devices
√ Data Transfer Rate: up to 33MB/s (Per USB Port)*
√ Full and Brief copy modes
√ Synchronous and Asynchronous copy modes
√ Copy, Compare, Erase from 7, 15, 23 or 31 USB devices (depending on model)
√ Multi-task processing capability. Each USB port has an independent processing unit.
√ Drive size and brand independent
√ One-year Standard Warranty: This system comes complete with a one-year warranty that covers
parts.
√ Clones any file system: including DOS, FAT, FAT32, NTFS, HFS+, EXT2, EXT3, EXT4.
√ Complete stand-alone functionality. No PC required.
* Actual data transfer rate performance dependent upon drive
4
Page 5

Technical Specifications / Package Contents
1.1 Technical Specifications
Model # U2D2-7 U2D2-15 U2D2-23 U2D2-31
Display
Input
Max Number of Targets
Max number of external
USB hard drives supported
Supported Media
Transfer Speed
Dimensions
Weight
Voltage
Power
Operating Temperature
Operating Humidity
20 x 2 Monochrome LCD
4 x Push Buttons - Up, Down, OK, ESC
4 x Shortcut buttons
7 15 23 31
7 15 23 23
USB1.1, USB2.0, USB3.0 A-type devices
Up to 33MB/s
15.5”x7”x7” 15.5”x7”x10” 17.5”x7”x13.5” 18”x7”x17”
10 lbs. 19 lbs. 27 lbs. 31 lbs.
110/220V
300W
41ºF - 122ºF
15% - 90%
1.2 Package Contents
• Kanguru USB Duplicator unit
• AC Power Cord
• User manual
• User registration form
If any of the above items are missing, please call Kanguru Solutions’ Tech Support department at: (508)
376-4245, extension 2 and replacement parts will be shipped to you ASAP.
5
Page 6

Parts and Functions
2. Getting to Know Your Kanguru USB Duplicator
Before you start using your Kanguru USB Duplicator, please take a moment to read this chapter and
familiarize yourself with the duplicator.
2.1 Parts and Functions
1
3
2
4
5
1. LCD and user interface
2. Source port
3. LED status indicators
4. Target ports
5. System power On/Off button
6. Ventilation fans
7. Power cord input
8. 110/220 Voltage switch
9. Internal power supply switch
6
7
8
9
Note: The above image is a representation of a Kanguru USB Duplicator. Your duplicator may appear
different but operation is identical.
6
Page 7

Hardware Setup
2.2 Hardware Setup
To setup your Kanguru USB Duplicator for use:
1. Before plugging in the AC Power Cable, please make sure that the voltage switch located on the
back of the duplicator is adjusted to match your local voltage 110V/220V and the internal power
supply switch is in the On position.
2. Do not connect any USB drives before powering on the unit.
3. Push the power button located on the front of the unit to turn the system on.
The system will start up and you will see some initialization screens. When the system has finished
initializing you will enter the Main menu. You are now ready to use your Kanguru USB Duplicator.
Things to remember:
• The Kanguru USB Duplicator supplies USB bus power to all drives. Most USB flash drives can
operate using USB bus power alone. If your USB device normally requires an external power
source to operate (most external USB Hard Drives require an external power source), then it will
still require that power source.
• Throughout this manual we will be referring to Source and Targets. The Source refers to the
device that contains the master data. Targets refer to devices that will be copied to.
• It is OK to connect and disconnect Source or Target drives while the Kanguru USB Duplicator is
powered on. However, do NOT disconnect drives while the machine is executing an operation. Do
not unplug devices while their activity lights are blinking! Please wait until a solid green light or
solid red light appears next to the drive before removing it.
• Make sure that your USB drives are USB-IF compliant. USB drives that are not USB-IF compliant
may not work with the USB Duplicator.
• The USB Duplicator’s internal power supply is controlled by a switch located on the back of the
unit. Make sure that this switch is turned on.
• Every USB port has a set of LED status indicator lights, one Red the other Green. Reference the
following chart to understand the meaning of the lights.
Green LED Red LED Description
Off Off No device is connected to this port.
Blinking Off This port is actively in the process of reading/writing.
On Off A device is connected to this point and awaiting commands.
Off On An error occurred on this port
• Do not power off the USB Duplicator while the system is performing a task.
• Always use the Shutdown function before powering off your duplicator. Failure to do will increase
the risk of damaging the system.
7
Page 8

Navigating the User Interface
2.3 Navigating the User Interface
Kanguru Solutions designed the user interface with the professional in mind. The interface is fast,
responsive, and concise. This means that very few key presses are needed to achieve a desired action.
The user interface is controlled by 4 navigation buttons located to the right of the LCD screen: Up,
Down, ‘ENT’ and ‘ESC’.
• The Up and Down buttons are used to select different menu items.
• The ‘ENT’ button is your confirmation button and allows you to proceed to the next screen.
• The ‘ESC’ button is your cancel button and will return you to the previous screen.
Additionally, there are 4 shortcut buttons located under the LCD screen: F1, F2, F3, F4. The shortcut
buttons allow you to select a common function with a single button press.
• The F1 shortcut button will run a Brief Copy when pressed. Brief Copy is explained in the next
chapter.
• The F2 shortcut button will run a Full Copy when pressed. Full Copy is explained in the next
chapter.
• The F3 shortcut button will run a Device Scan when pressed. The duplicator will rescan all ports
and search for any connected USB devices.
• The F4 shortcut button will prepare the duplicator system for shutdown when pressed.
8
Page 9

3. USB Duplicator Operations
The main feature of the Kanguru USB Duplicator is the ability to quickly and accurately copy data from
a Source to Target devices. There are two copy modes: Brief and Full
• Brief Copy - This is the fastest and recommended copy mode. Brief Copy checks the format of
the USB device and copies only sectors that contain data. Brief Copy is only compatible with
FAT16/32, exFAT, NTFS, HFS+, HFSX and EXT2/3/4 file systems.
• Full Copy - This is slowest but most reliable copy mode. Full copy does a complete bit-by-bit
duplication.
Additionally, there are two duplication methods: Synchronous and Asynchronous.
• Synchronous Copy - All Target devices are connected at the start of the duplication and are
completed at the same time.
Synchronous Copy
• Asynchronous Copy - Target devices can be hotswapped in and out of the duplicator as they are
completed while the duplication job continues running.
3.1 Synchronous Copy
To execute a Synchronous copy:
1. Power on the duplicator.
2. Press the “F1 Brief Copy” shortcut button to initiate the copy process.
Note: If your Source device is formatted using a file system not supported by Brief Copy, please
press the “F2 Full Copy” shortcut button instead.
3. Insert the Source device (i.e. the drive to be copied) into the Source port. The Source port is located
on the top left and is marked with a “Source” label.
4. Connect your Target devices into any available ports. The LCD display will show you the number
of Target drives connected and a 30-second countdown timer. The countdown timer will reset every
time another USB device is connected.
5. Once all of your connected Target devices have been recognized by the system, press the ENT
button to start the duplication process. Note: Duplication will begin automatically when the
duplicator recognizes that all available USB ports are occupied.
WARNING! Do not remove any drives while they are in use. You can tell if a drive is in use if the green
LED next to it is blinking. Wait for a solid green or red LED before removing a drive.
9
Page 10

Synchronous Copy
6. During the duplication process you can view the following information displayed on the LCD
screen:
Amount of data
to be copied
Time remaining
Percentage
Completed
7. Once the duplication job has completed the screen will display the following:
Number of successful
duplications
Number of failed
duplications
Total # of duplications
made in this job
Drives that completed successfully will have a green LED displayed next to it, indicating that there
were no errors on that drive. Drives that failed the duplication process will have a red LED next
to it.
8. Remove all the target drives and you will return to the main menu. If you have more USB devices
to copy, repeat steps 3 - 8 until your project is complete.
9. Press the ESC button to return to the main menu.
10
Page 11

Asynchronous Copy
3.2 Asynchronous Copy
The Kanguru USB Duplicator’s asynchronous process allows you to add and remove Target USB devices
as they are completed, without having to wait for the current job to finish. Kanguru’s asynchronous copy
process is unique in that there are no performance sacrifices or capacity limitations.
To execute an Asynchronous Copy:
1. Power on the duplicator. When the duplicator is powered on and ready for operation, press the
DOWN button to navigate to “2. Async. Copy”.
2. Press the ENT button to start the asynchronous copy process.
3. Insert the Source device (i.e. the drive to be copied) into the Source port. The Source port is located
on the top left and is marked with a “Source” label.
4. Connect your Target device into any available port.
5. Once a Target device is inserted, the asynchronous copy process will start. During the Copy process,
additional Target devices can be inserted into any available port at any time without waiting for the
current job to finish.
Warning! Although you can insert USB devices at any time, do NOT remove devices while
a device is being copied to. Doing so can cause data corruption and could damage your USB
device. You must wait for copying to each device to finish before removing it. Please reference the
following chart to determine the status of each USB device.
Asynchronous Copy LED Display
Green LED Red LED Description
Blinking Off The device in this port is currently being copied to.
Do not disconnect.
On Off The device in this port is currently being detected
and waiting to be copied to. Do not disconnect.
Off Off There is no device connected to this port.
Off On An error occurred during the copy process on the
device connected to this port. OK to disconnect.
On On The device connected to this port has been
successfully copied to. OK to disconnect.
11
Page 12

Asynchronous Copy
6. During the asynchronous copy process, you will see the following two screens displayed alternately:
Amount of data
to be copied
The number of USB
devices being copied *
Percentage
Completed
* This number will increase as more devices are connected and decrease as devices have completed the copy
process.
Number of successful
duplications
Number of failed
duplications
7. Once both the Green LED and Red LED light up solid next to a Target device, duplication to this
device has completed and it is safe to disconnect that device. Note: If only the Red LED lights up
next to the Target device, duplication failed on this device and it is safe to disconnect that device.
8. During Asynchronous copy, once a Target device has finished being copied to and removed, another
USB device can be connected in its place and duplication will begin on the newly connected device.
9. When all of your Target devices have been duplicated, the on-screen “Working” indicator will be
reduced to “0”.
10. Remove the Source device and press the ESC button to return to the Main menu.
12
Page 13

4. Device Menu Overview
1. Copy
The Copy function copies the data from a USB storage device to one or more Target devices
in a synchronous operation, meaning that all Target devices are connected when the duplication
process begins and the duplication process has to finish before more devices can be inserted.
2. Async Copy
The Async Copy function copies the data from a USB storage device to one or more Target devices
in an asynchronous operation, meaning Target devices can be removed and inserted without having
to wait for the duplication process to finish.
3. Compare
The Compare function is used to verify the accuracy of the data duplicated on your Target devices.
The Compare process checks the data on the Target devices and compares it to the original data on
the Source device.
Device Menu Overview
4. Copy + Compare
The Copy+Compare function combines both the Copy function and the Compare function into one
convenient process. The function will first run the Copy process and then automatically run the
compare function after the copy has completed to ensure that the data was duplicated accurately.
5. Erase
The Erase function wipes the data from any devices connected to a Target port. Note: Devices
connected to the Source port will not be erased.
There are 4 erase modes you can choose from:
- Quick Erase : The fastest erase method. The Quick Erase will erase only the partition table,
which will make the device appear empty. The device will be formatted FAT32.
- Full Erase : Full Erase will erase all data on the USB device by writing 0’s to all sectors. The
device will be formatted FAT32.
- RAW Erase : Raw Erase is identical to Full Erase, except that the device will not be formatted.
- Secure Erase : Secure Erase uses a three-pass wipe method to thoroughly erase any data
on your device and prevents the data from being recoverable. Note: Due to wear leveling
technology utilized by most flash memory storage devices, some flash cells may not be
wiped.
6. Copy Mode
This setting allows you to select the Copy Mode. There are two options:
- Brief Copy : This is the fastest and recommended copy mode. Brief Copy checks the format
of the USB device and copies only sectors that contain data. Brief Copy is only compatible
with FAT16/32, exFAT, NTFS, HFS+, HFSX and EXT2/3/4 file systems.
- Full Copy : This is slowest but most reliable copy mode. Full copy does a complete bit-by-
bit duplication, allowing it to duplicate any file system.
13
Page 14

7. Setup Menu
1) Language
Select the language that the duplicator’s menus are displayed in.
2) Read Error Skip
Configure the number of times the system will skip over sectors when it encounters a read error
when reading from the Source device. By default, the duplicator will not skip ahead when it
encounter any read errors, it will simply result in a duplication job failure.
Note: This function does not fix errors; it will skip over the error and continue with copying
the remaining data.
3) Write Error Skip
Configure the number of times the system will skip over sectors when it encounters a write
error when copying to Target devices. By default, the duplicator will not skip ahead when it
encounter any write errors, it will simply result in a duplication job failure.
Note: This function does not fix errors; it will skip over the error and continue with copying
the remaining data.
Device Menu Overview
4) Size Tolerance
Not all storage devices have identical storage capacity, even when the capacity shown is
identical. Normally, the capacity of your Target drives are required to be of equal or greater
size than the Source drive so that all data can be copied over without loss. By defining Size
Tolerance, the duplicator will allow the Target flash devices to be less than the capacity of the
Source drive by the percentage specified.
5) Buzzer
Configure whether or not an audible beep sound will be accompanied whenever there is a
button press or if a task has been completed.
6) Screen Saver
Configure whether or not a Screen Saver is displayed when the system has been idle for an
extended period of time.
14
Page 15

8. Utilities
1) Device Info
Display information regarding the USB devices connected to the system. Push the UP and
DOWN buttons to navigate through the USB ports.
2) System Info
Displays information regarding the duplicator’s hardware and firmware version.
3) Measure Speed
This function scans any USB devices connected to the duplicator and then displays the reported
capacity and Read/Write speeds. Push the UP and DOWN buttons to navigate through the USB
ports.
4) Verify Source
This function will scan the USB device connected to the Source port and verify the device’s
readability.
Device Menu Overview
5) Rebuild Source
The Rebuild Source function will write to any unwritten sectors on the Source flash device.
Some USB flash drives may contain sectors which have never been written to. Unwritten
sectors are neither designated as a “1” or “0” and may cause read errors.
6) Load Default
This function will reset all of the settings back to their original manufacturer’s default
configuration. This is useful when the duplicator is behaving abnormally. You will have to
reboot the system for these changes to take effect.
7) Update Firmware
This function will update the duplicator’s firmware. To update:
a. Call Kanguru Technical Support at 508-376-4245 to receive your firmware update file.
b. Copy the firmware update file to a USB storage device.
c. Insert the USB storage device into the Source Port.
d. Navigate to the “Update Firmware” function and then press the ENT button.
e. Wait for the new firmware to load and then restart the system when prompted to do so.
Warning! Do not update your duplicators unless you have been instructed to do so by a Kanguru
Solutions technical support representative.
8) Save
This function will save all of the settings that were modified since the last time the duplicator
booted-up.
15
Page 16

Device Menu Overview
9. Manage Accounts
This menu allows the administrator to perform the following user administrative tasks. This feature
is disabled by default. Prior to activating this feature, the duplicator recognizes all users as the only
activated user defined as the administrator. The predefined password is “0000”.
1) View User
View all existing user accounts.
2) Create User
Allows you to create additional user accounts. Each user has individual settings. During this
process, there are prompts to enter a new user name (up to 8 alphanumeric letters or numbers)
and user password for a new account.
3) Edit User Info
Edit details for an existing user account. You can change the user account name as well as their
password.
Note: User account “Admin” is the administrative account and you can only change its password.
4) Delete Users
Allows you to delete an existing user account. During this process, there is a prompt to select
the existing account to be removed.
Note: User account “Admin” is the administrative account and cannot be deleted.
5) Password on Bootup
Allows you to enable or disable whether a password has to be entered during bootup.
10. Shutdown
This function will save any system settings that have been configured since the device was last
powered on, to make sure that it is safe to power down the system. Turning off the duplicator
without performing this function will increase the risk of damaging the system.
16
Page 17

5. Troubleshooting
Symptom Possible Cause Recommended Solution
There is no display
on the LCD or the
unit doesn’t power
on.
The internal power
switch is set to off.
The power voltage on
the duplicator doesn’t
match the voltage of the
power outlet.
Troubleshooting
Check the switch located on the back of the
duplicator, near the power supply and make sure that
it is switched to the On position.
Adjust the switch located on the back of the
duplicator, near the power connector, to the local
voltage rating.
The duplicator
doesn’t recognize the
Source device.
The duplication
process finishes
successfully but the
Target devices are not
readable.
The duplicator
was stored in cold
temperature.
The Source device is not
connected securely to
the Source port.
The Source device is
defective.
Your Source is a USB
flash drive that has
unwritten sectors.
There were issues that
occurred when running a
Brief Copy.
The data did not copy
over accurately.
If the duplicator was stored in a location where
temperatures dropped below 32°F (0°C) within the
past 24 hours, leave the system in a warm room with
a temperature of at least 65°F (19°C) for 4 hours
prior to turning it on.
Make sure that the device is connected, securely to
the Source port. The Source port is the top-left most
port and is marked with a label.
Run the “Verify Source” function to confirm that
the source is readable. If the device does not pass
the “Verify Source” check, try duplicating using a
different Source device.
Unwritten sectors on the Source can result in read
errors. Run the “Rebuild Source” function and then
try duplicating again.
Change the “Copy Mode” to Full Copy. This Copy
Mode will take longer to complete, but it will resolve
most data related issues.
Run the “Compare” function to check that the data
on the Targets and Source are identical.
The failure rate is
high.
Some Target devices
aren’t being copied
to.
The “Read Error Skip”
or “Write Error Skip”
settings are enabled.
Your Target devices’
quality is poor.
There are errors on the
Source device.
The duplication process
was started before the
device was recognized.
Your Target devices’
quality is poor.
It is possible that the skipped data is causing this
issue. Make sure that “Read Error Skip” and “Write
Error Skip” are turned off.
Try using a higher-quality brand of USB devices.
Run the “Verify Source” function to confirm that
the source is readable. If the device does not pass
the “Verify Source” check, try duplicating using a
different Source device.
Make sure that the Green indicator LED is lit next
to every inserted Target device before starting a
duplication job.
Try using a higher-quality brand of USB devices.
17
Page 18

6. Error Codes
Error Codes
Error Code #Error
Message
201 Bad Master
202 No Device
Found
203 Source
Removed
206 Targets &
Master Size
Mismatch!
Description & Recommended Solution
Description:
The Copy process failed due to a read error which occurred on
the Source device.
Possible Solution:
Check the Source device by running the “Verify Source”
function. If the device does not pass the “Verify Source” check,
try duplicating using a different Source device.
Description:
The duplicator does not detect any Target devices connected.
Possible Solution:
Remove and then reconnect the Target devices. Make sure that
the Green LED indicator is lit next to each Target device before
starting the duplication process.
Description:
The Asynchronous Copy process failed because the Source
device is not detected.
Possible Solution:
Remove and then reconnect the Source device. Make sure that
the Green LED indicator is lit next to the Source device before
starting the duplication process.
Description:
The Target devices are smaller in capacity than the Source
device.
260 No Update File
Possible Solution:
Target devices have to be equal or greater in capacity than the
Source. If the capacity on the Source and Targets are listed as
being identical, please enable the “Size Tolerance” option in the
Setup menu.
Description:
During the Update Firmware process, the duplicator was not
able to locate a firmware update file.
Possible Solution:
Confirm that the USB device containing the firmware update
file is formatted FAT32. Also confirm that the firmware update
file is not a “.zip” or “.rar” file. If it is, please extract it and
transfer the extracted files to the USB device.
18
Page 19

Error Codes
Error Code #Error
Message
261 Wrong Update
File
262 Unknown flash
model
Description & Recommended Solution
Description:
The firmware update file is not compatible with your duplicator
system, or the firmware update file is corrupted.
Possible Solution:
Contact Kanguru Solutions’ Technical Support to obtain the
correct firmware update file.
Description:
The firmware update file is not compatible with your duplicator.
Possible Solution:
Contact Kanguru Solutions’ Technical Support to obtain the
correct firmware update file.
19
Page 20

7. Notices and Safety
Please read the following instructions carefully before operating the machine and refer to them as needed
to ensure the continued safe operation of the machine.
This product and supplies have been designed and tested to meet strict safety requirements. These
include safety agency evaluation and certification, and compliance with electromagnetic regulations and
established environmental standards.
The safety and environment testing and performance of this product have been verified using certified
materials only.
Unauthorized alterations, which may include the addition of new parts/devices,
may impact the product certification. Please contact a sales representative for more
information.
Notices and Safety
FCC Notices for USA
This equipment has been tested and found to comply with the limits for a Class B digital device,
pursuant to Part 15 of the FCC Rules. These limits are designed to provide reasonable protection
against harmful interference in a residential installation. This equipment generates uses and can
radiate radio frequency energy and, if not installed and used in accordance with the instructions, may
cause harmful interference to radio communications. However, there is no guarantee that interference
will not occur in a particular installation. If this equipment does cause harmful interference to radio
or television reception, which can be determined by turning the equipment off and on, the user is
encouraged to try to correct the interference by one or more of the following measures:
- Reorient or relocate the receiving antenna.
- Increase the separation between the equipment and receiver.
- Connect the equipment into an outlet on a circuit different from that to which the receiver is
connected.
- Consult the dealer or an experienced radio/TV technician for help.
Changes or modifications to this equipment not specifically approved by the manufacture may void the
user’s authority to operate this equipment.
20
Page 21

Notices and Safety
Electrical Safety Information
• The power receptacle for the machine must meet the requirements stated on the data plate on the
rear of the machine. If there is uncertainty that the electrical supply meets the requirements, please
consult the local power company or an electrician for advice.
• The socket outlet shall be installed near the equipment and shall be easily accessible.
• Use the power cable that is supplied with the machine. Do not use an extension cord, remove, or
modify the power cord plug.
• Plug the power cable directly into a correctly grounded electrical outlet. If there is any doubt
regarding the correct grounding of the desired outlet, consult an electrician.
• Do not use an adapter to connect any equipment to an electrical outlet that lacks a ground connection
terminal.
• Do not place this equipment where people might step or trip on the power cable.
• Do not place objects on the power cable.
• Do not push objects into the slots or openings of the machine. Electrical shock or fire may result.
• Do not obstruct ventilation openings. These openings are used to provide proper cooling to the
machine.
Electrical Supply
• This product shall be operated from the type of electrical supply indicted on the product’s data
plate label. If there is uncertainty that the electrical supply meets the requirements, please consult
a licensed electrician for advice.
• Always connect equipment to a correctly grounded power outlet. If in doubt, have the outlet checked
by a qualified electrician.
This equipment must be connected to a protective grounded circuit. This equipment
is supplied with a plug that has a protective grounding pin. This plug will only fit
into a grounded electrical outlet. This is a safety feature. If you are unable to insert
the plug into the outlet, contact a licensed electrician to replace the outlet.
Disconnect Device
The power cable is the disconnect device for this equipment. It is attached to the back of the machine as
a plug-in device. To remove all electrical power from the equipment, disconnect the power cable from
the electrical outlet.
21
Page 22

Notices and Safety
Emergency Power Off
If any of the following conditions occur, turn off the machine immediately and disconnect the power
cable(s) from the electrical outlet(s). Contact an authorized Service Representative to correct the problem:
• The equipment emits unusual odors or makes unusual noises.
• The power cable is damaged or frayed.
• A wall panel circuit breaker, fuse, or other safety device has been tripped.
• Liquid is spilled into the machine.
• The machine is exposed to water.
• Any part of the machine is damaged
Maintenance Information
• Do not carry out any maintenance on this product which is not described in the user manual.
• Do not remove covers or guards that are fastened with screws. There are no parts behind these
covers that you can service.
Do not use aerosol cleaners. Aerosol cleaners can be explosive or flammable when
used on electromechanical equipment.
Regulatory Information
Certifications in Europe: CE Mark (European Union)
The CE mark applied to this equipment symbolizes the manufacturer’s declaration of conformity
with the following applicable Directives of the European Union as of the dates indicated.
2006/95/EC
December 12, 2006 Council Directive 2006/95/EC as amended. Approximation of the law of the
member states related to low voltage equipment.
2004/108/EC
December 15, 2004 Council Directive 2004/108/EC as amended. Approximation of the laws of the
member states related to electromagnetic compatibility.
In order to allow this equipment to operate in proximity of Industrial Scientific and
Medical (ISM) equipment, the external radiation from the ISM equipment may
have to be limited or special mitigation measures taken.
22
Page 23

Warranty / Tech Support
8. Warranty
This product carries a *1 year limited warranty on the power supply, controller, and all internal
components. Kanguru Solutions is not responsible for any damages incurred in the shipping process.
Any claims for loss or damage must be made to carrier directly. Claims for shipping errors should be
reported to Kanguru Solutions within three (3) working days of receipt of merchandise. Please refer to
the RMA Procedure section of this manual if your duplicator needs servicing.
Kanguru Solutions does not offer money back returns on its duplicator product lines due to the
unique nature of the product. All units will be fully supported under manufacturer’s and/or
extended warranty plans.
9. Tech Support
If you experience any problems installing your Kanguru product or have any technical questions
regarding any of our products, please call our tech support department. Our tech support is free and
available Monday thru Friday, 9am to 5pm EST.
Call 1-508-376-4245
Or visit our website at www.Kanguru.com
23
Page 24
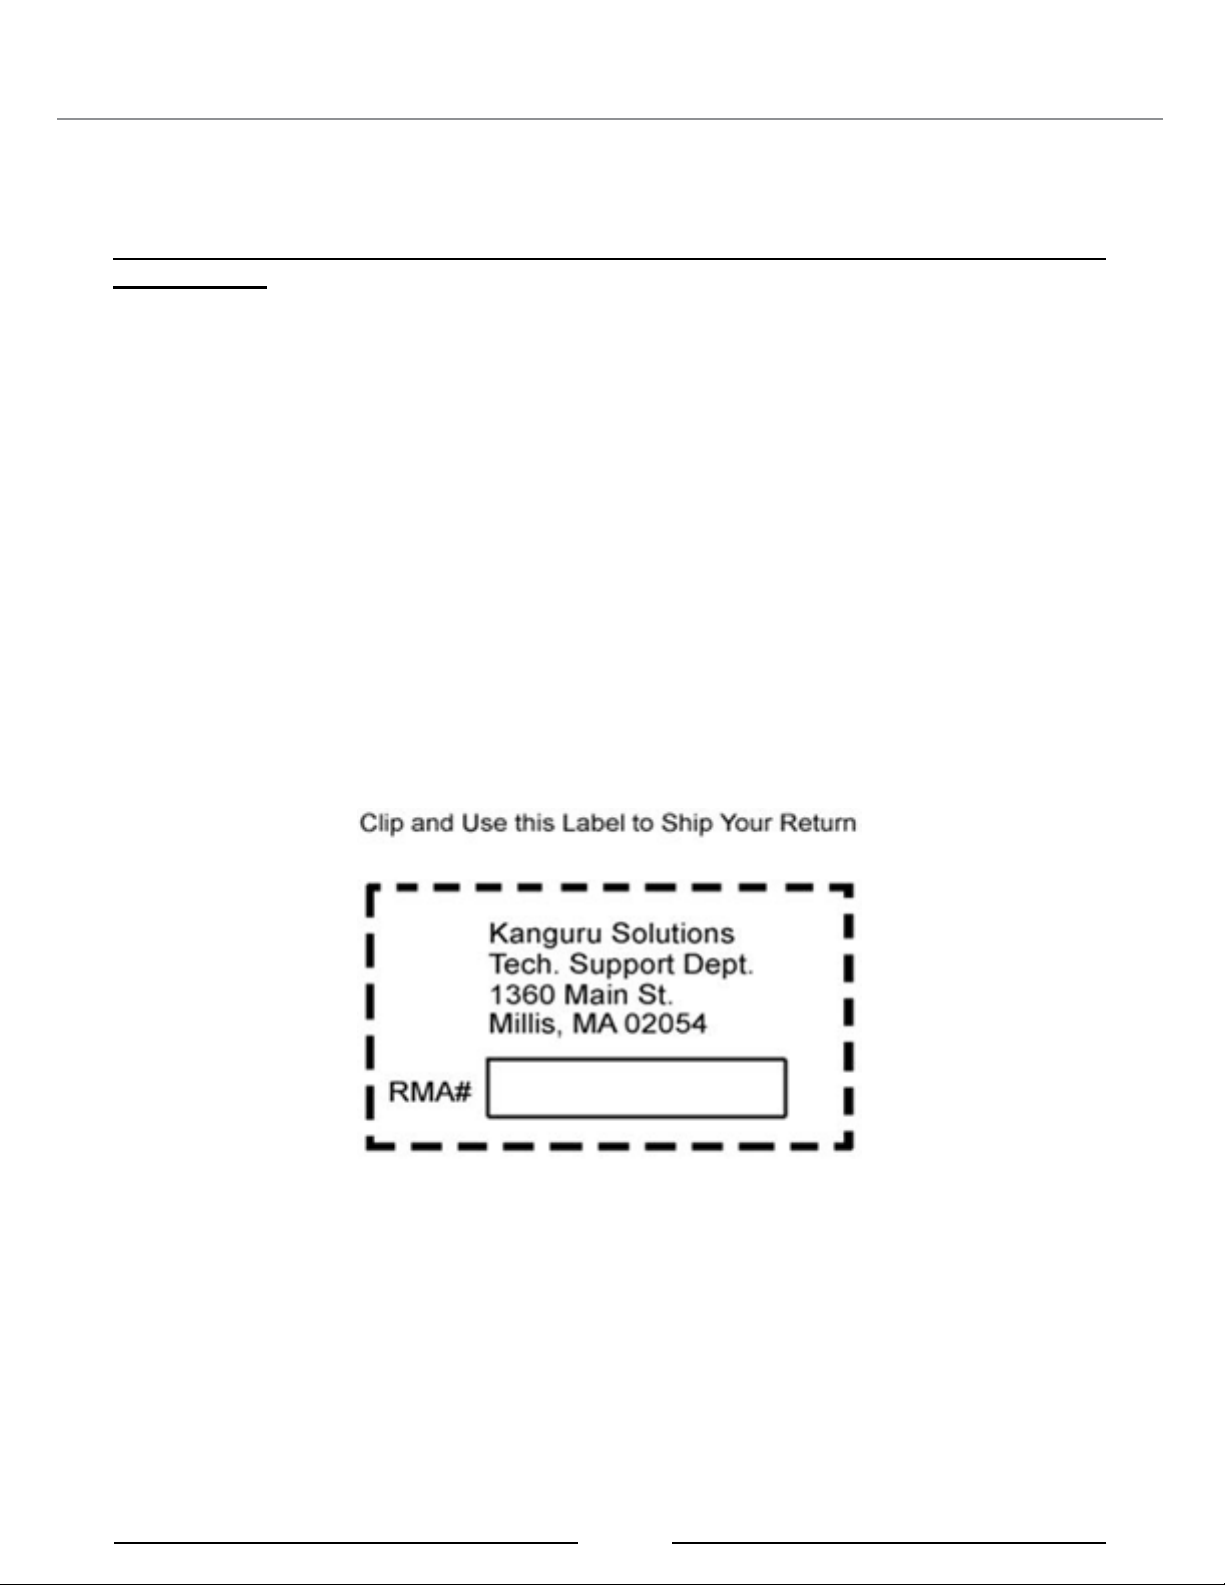
10. RMA PROCEDURE
ALL DUPLICATORS BEING SERVICED MUST BE PACKED IN THE ORIGINAL
PACKAGING. If you do not have your original packaging, you can purchase replacement packaging
for $25.00 from Kanguru’s Technical Support Department. Kanguru Solution’s warranty will not be
honored in the event that a duplicator is received improperly packaged, altered, or physically damaged.
STEP ONE: Call for a RMA Number: 508-376-4245
Duplicators will not be accepted for repair without a valid RMA number. RMA numbers are valid for
30 days upon assignment. Any return without a valid RMA number will be returned to the customer at
their expense.
STEP TWO: Ship and Insure your Duplicator
Kanguru Solutions strongly recommends you fully insure the duplicator for shipping. Kanguru Solutions
is not responsible for if the package is lost or damaged in transit. We suggest using a shipping company
that utilizes a “tracking” feature to verify “proof of delivery.” The customer is responsible for shipping
charges when returning a product outside of the warranty period. For product still within the warranty
period, the customer is only responsible for shipping the duplicator to Kanguru Solution’s service Center,
and shipping back to the customer is covered by Kanguru Solutions.
RMA Procedure
24
Page 25

Page 26

Kanguru Solutions
1360 Main Street
Millis, MA 02054
www.kanguru.com
12.14.12 v1.0 © 2012 Kanguru Solutions
Legal terms and conditions available at www.kanguru.com. Please review and agree before use. Thank you.
 Loading...