

Page 1
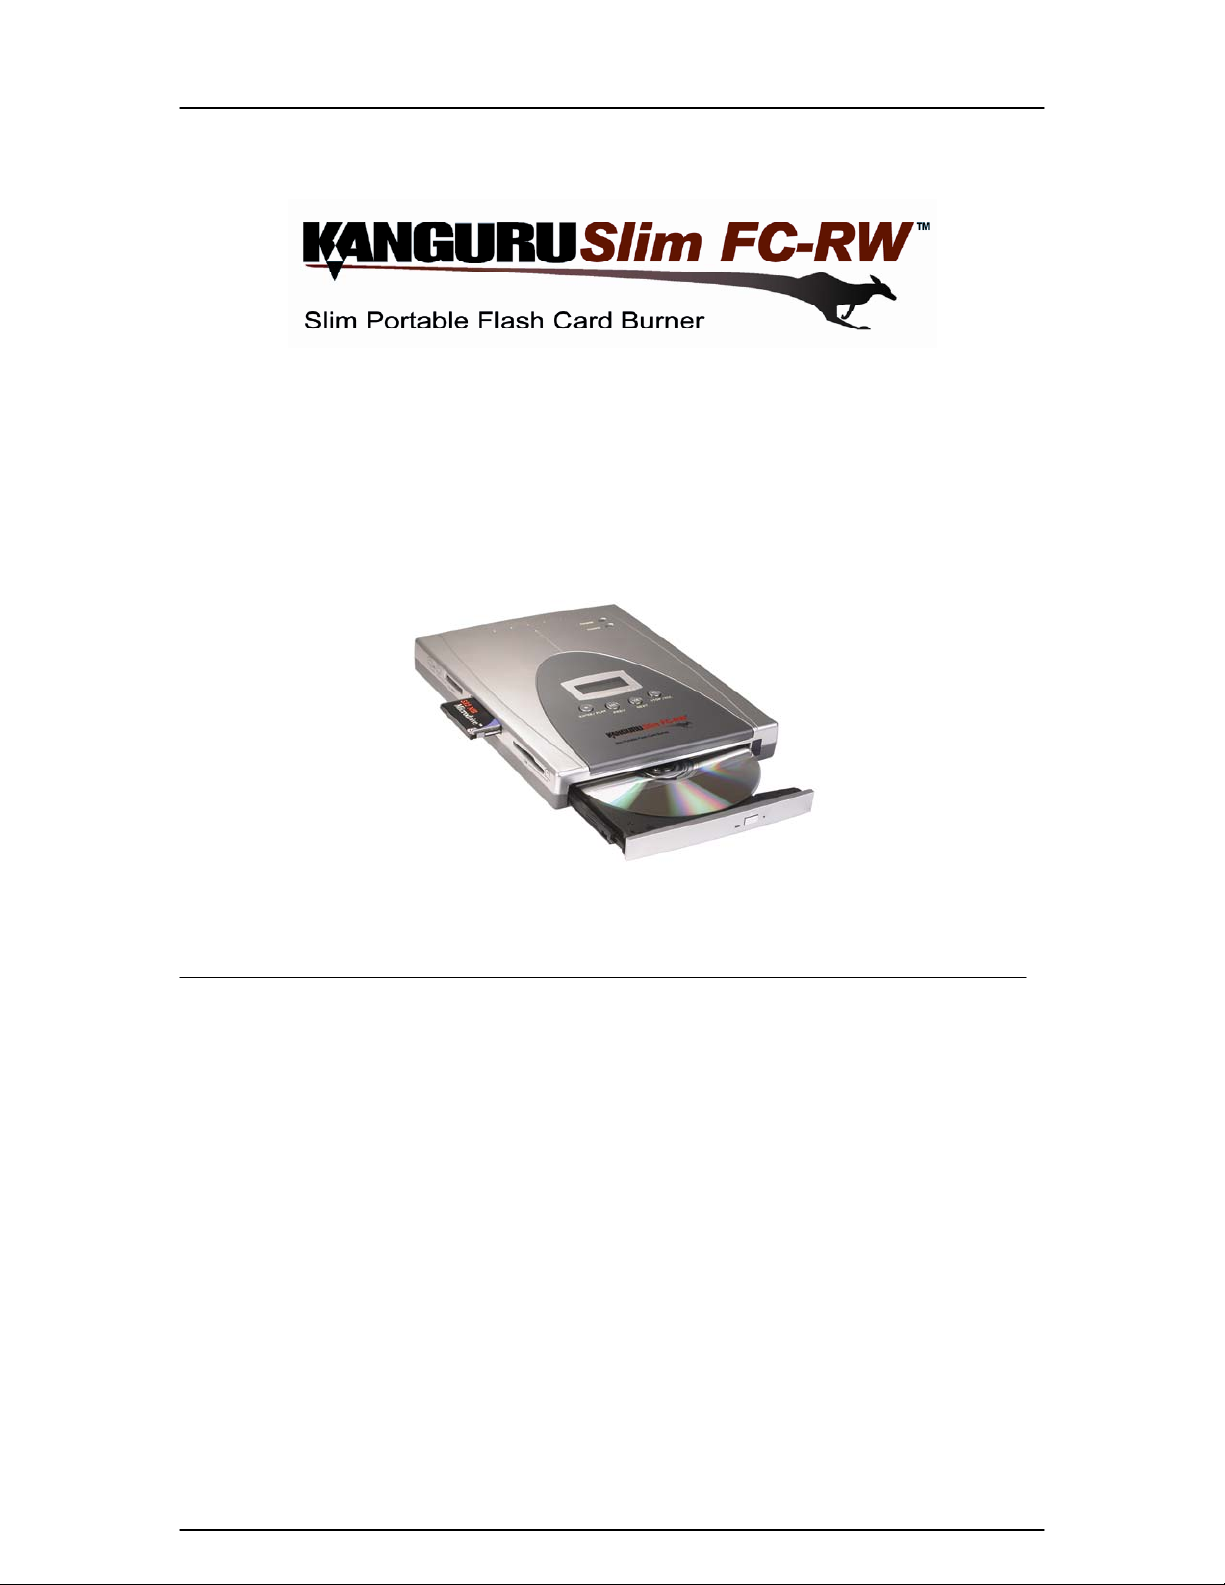
Kanguru Slim FC-RW
USER’S GUIDE
Copyright 2004, All Rights Reserved.
- 1 -
Page 2

Kanguru Slim FC-RW
Please be aware of the following points before using the Kanguru Slim FCRW.
Copyright© 2004, Kanguru Solutions. All rights reserved.
®
DOS
, Windows 95
®
XP
are registered trademarks of Microsoft Inc. Apple® and Macintosh® are registered trademarks
of Apple Computer Inc. IBM and OS/2 are registered trademarks of the International Business
Machines Corporation. All other brand or product names are trademarks of their respective
companies or organizations.
Kanguru Solutions will not be held responsible for any illegal use of this product nor any losses
incurred while using this product. The user himself is responsible for the copyright laws, and is
fully responsible for any illegal actions taken.
®,
Windows 98®, Windows NT
®,
Windows 2000
®,
Windows ME®, and Windows
CUSTOMER SERVICE
To obtain service or technical support for your system, please contact Kanguru Solutions
Technical Support Department at 508-376-4245, or visit www.Kanguru.com for web support.
LIMITED WARRANTY
Kanguru Solutions guarantees that every Kanguru Slim FCRW will be free from defects in
workmanship and materials for 1 year from the date of purchase. This warranty does not apply if,
in the judgment of Kanguru Solutions, the product fails due to damage from handling, accident,
abuse, misuse, or if it has been used in a manner not conforming to the product’s instructions,
has been modified in anyway, or the warranty labels have been removed. If the product proves
defective during this warranty period, call Kanguru Solutions Technical Support in order to obtain
a RMA required for service. When returning a product, mark the RMA number clearly on the
outside of the package, and include a copy of your original proof of purchase.
In no event shall Kanguru Solutions’ liability exceed the price paid for the product from direct,
indirect, special, incidental, or consequential software, or its documentation. Kanguru Solutions
offers no refunds for its products after 30 days of purchase. Kanguru Solutions makes no
warranty or representation, expressed, implied, or statutory, with respect to its products or the
contents or use of this documentation and all accompanying software, and specifically disclaims
its quality, performance, merchantability, or fitness for any particular purpose. Kanguru Solutions
reserves the right to revise or update its products, software, or documentation without obligation
to notify any individual or entity.
Kanguru Solutions
1360 Main St., Millis, MA 02054
508.376.4245 • Fax 508.376.4462
www.kanguru.com
- 2 -
Page 3

Kanguru Slim FC-RW
n
11.. IInnttrroodduuccttiioon
Kanguru Slim FCRW Package Contents: ............................................................................................. 5
Features:.................................................................................................................................................... 6
Specifications: ........................................................................................................................................... 7
............................................................................................................................................................................................................................................5
5
.
22.
PPrroodduucctt DDeessccrriippttiioon
About the Kanguru Slim FCRW:............................................................................................................. 8
About the Remote Control:.................................................................................................................... 10
33.. GGeettttiinngg SSttaarrtteed
Inserting and Replacing the Batteries: ................................................................................................ 12
Charging the Battery: ............................................................................................................................. 13
Inserting Flash Memory Cards: ............................................................................................................ 13
Inserting and Removing a CD: ............................................................................................................. 14
.
44.
OOppeerraattiioonn——CCooppyyiinngg FFllaasshh CCaarrdds
Basic Operation Mode ........................................................................................................................... 15
Disk Spanning ......................................................................................................................................... 15
Erasing a CD/RW ................................................................................................................................... 15
.
55.
OOppeerraattiioonn——UUSSBB22..00 CCDDRRWW aanndd CCaarrdd RReeaaddeer
Driver Installation.................................................................................................................................... 17
External CDRW....................................................................................................................................... 17
d
n
........................................................................................................................................................................................8
....................................................................................................................................................................................................................112
s
............................................................................................115
r
..................117
8
2
5
7
External Card Reader ............................................................................................................................ 18
k
66.. DDVVDD MMoovviiee PPllaayybbaacck
Playing a DVD......................................................................................................................................... 20
Basic Functions....................................................................................................................................... 20
66.. VViieewwiinngg FFllaasshh CCaarrddss oonn yyoouurr TTV
s
77.. SSeettuupp MMeennuus
Navigating the Menus ............................................................................................................................ 22
Adjusting the TV Settings ...................................................................................................................... 23
TV Display ............................................................................................................................................... 24
PIC MODE............................................................................................................................................... 24
Adjusting the Speaker Settings ............................................................................................................ 24
Audio Setup ............................................................................................................................................. 25
AUDIO OUT – the Kanguru Slim FCRW has three audio out options............................................ 25
- 3 -
..............................................................................................................................................................................................................................222
................................................................................................................................................................................119
V
..................................................................................................221
9
1
2
Page 4

Kanguru Slim FC-RW
OP Mode.................................................................................................................................................. 25
Preferences ............................................................................................................................................. 25
.
88.. FF..AA..QQ.
Q1. Can I duplicate Flash Cards that are larger than a blank CD?................................................. 27
Q2. Can I duplicate multiple Flash Cards to the same CD?............................................................. 27
..................................................................................................................................................................................................................................................................................227
7
.
77.
88.
TTrroouubblleesshhoooottiinng
It seems my flash cards do not fit in the card reader? ...................................................................... 28
Error Codes ............................................................................................................................................. 28
.
WWaarrrraanntty
Tech Support........................................................................................................................................... 29
y
..................................................................................................................................................................................................................................................229
g
..............................................................................................................................................................................................228
8
9
- 4 -
Page 5

Kanguru Slim FC-RW
1. Introduction
Thank you for purchasing the Kanguru Slim FCRW
allows you to quickly and easily copy or backup your flash card data onto a CD
without a computer. Simply turn on the battery powered unit, insert a blank CD
and a flash card to quickly and easily make copies of your photos to hand out to
friends and family. This lightweight portable flash card burner is extremely
versatile and works with 8 different media types including Compact Flash I & II,
IBM Micro Drive, Smart Media, Secure Digital, Memory Stick, Memory Stick
PRO, and Multimedia cards. The FC-RW also works as a CD-RW when plugged
into a USB2.0 port (backwards compatible with USB1.1) or a portable DVD/VCD
player.
Kanguru Slim FCRW Package Contents:
• 1 – Kanguru Slim FCRW.
• 1 – Rechargeable Battery.
• 1 – Audio Cable
• 1 – Video Cable
• 1 – USB Cable
• 1 – Remote Control
• 1 – 9V DC Power Adapter
• 1 – Quick Start Guide
• 1 – Driver and Manual CD.
• 1 – User registration form.
If any of the above items are missing, please call Kanguru Solutions’ Tech
Support department at: (508) 376-4245, extension 2 and replacement parts will
be shipped to you ASAP.
tm
. The Kanguru Slim FCRW
- 5 -
Page 6

Kanguru Slim FC-RW
Features:
• Backup flash card data to a CD without a computer.
• Includes a rechargeable battery for ultimate portability.
• Functions as a portable DVD player when connected to a TV.
• Supports DVD/VCD/SVCD/MP3/JPEG/MPEG/WAV playback.
• Video out for PAL/NTSC and stereo audio out.
• Supports disc-spanning for duplicating flash cards larger than 1GB.
• USB2.0 connectivity (backwards compatible with USB1.1)
• Works as a 24X CD-RW drive when connected to a computer.
• Works as an 8-1 Card Reader when connected to a computer.
• Includes a remote control for media playback and duplication.
• LCD Display with easy to use push button controls.
• 1 Year Limited Warranty.
- 6 -
Page 7

Kanguru Slim FC-RW
Specifications:
Recording:
Recording discs:
Compatible media:
Compatible flash cards: CF-Type I&II, MD, SM, MS, MS Pro, MMS, SD
Battery
Dimensions: 6.5” (W) x 8” (L) x 1” (H)
CD-RW: 24x write speed (CD-R)
12x rewrite speed (CD-RW)
8X DVD read speed (DVD-ROM)
48x CD read speed (CD-ROM)
12 cm 80min/700MB CD-R disc
12 cm 74min/650MB CD RW disc
8 cm 21min/180MB CD-R disc
CD-R, CD-RW
DVD-ROM, DVD-R/RW, DVD+R/RW
DVD, JPEG, MPEG, WAV
Audio CD, MP3 CDCD-DA
CD-ROM/XA
VCD, SVCD
2000 mAh, 7.4V, Lithium-Ion Rechargeable, UL approved.
500 Recharge Cycles
Playback time: approximately 2hrs of continuous usage.
Weight: 520g w/o battery, 620g w/ battery
Power (Adapter): 9V 2.5A AC/DC, DC input jack
Interface: USB 2.0 (for External Card Reader/CD-RW)
Video Output:
Audio output: Stereo and Optical 5.1 out with component-video out
Supports Operating
System:
Environmental conditions:
Operating:
Non-Operating:
Shock Rating 0.3G operating, 2.0G non-operating
Composite and S-Video for Pal and NTSC
Window98SE/ME/2000/XP, Mac OS X and above
Temperature: 5°C ~ 40°C
Humidity: 15%~80% (No condensation)
Temperature: -15°C ~ 40°C
Humidity: 15%~60% (No condensation)
- 7 -
Page 8
Kanguru Slim FC-RW
2. Product Description
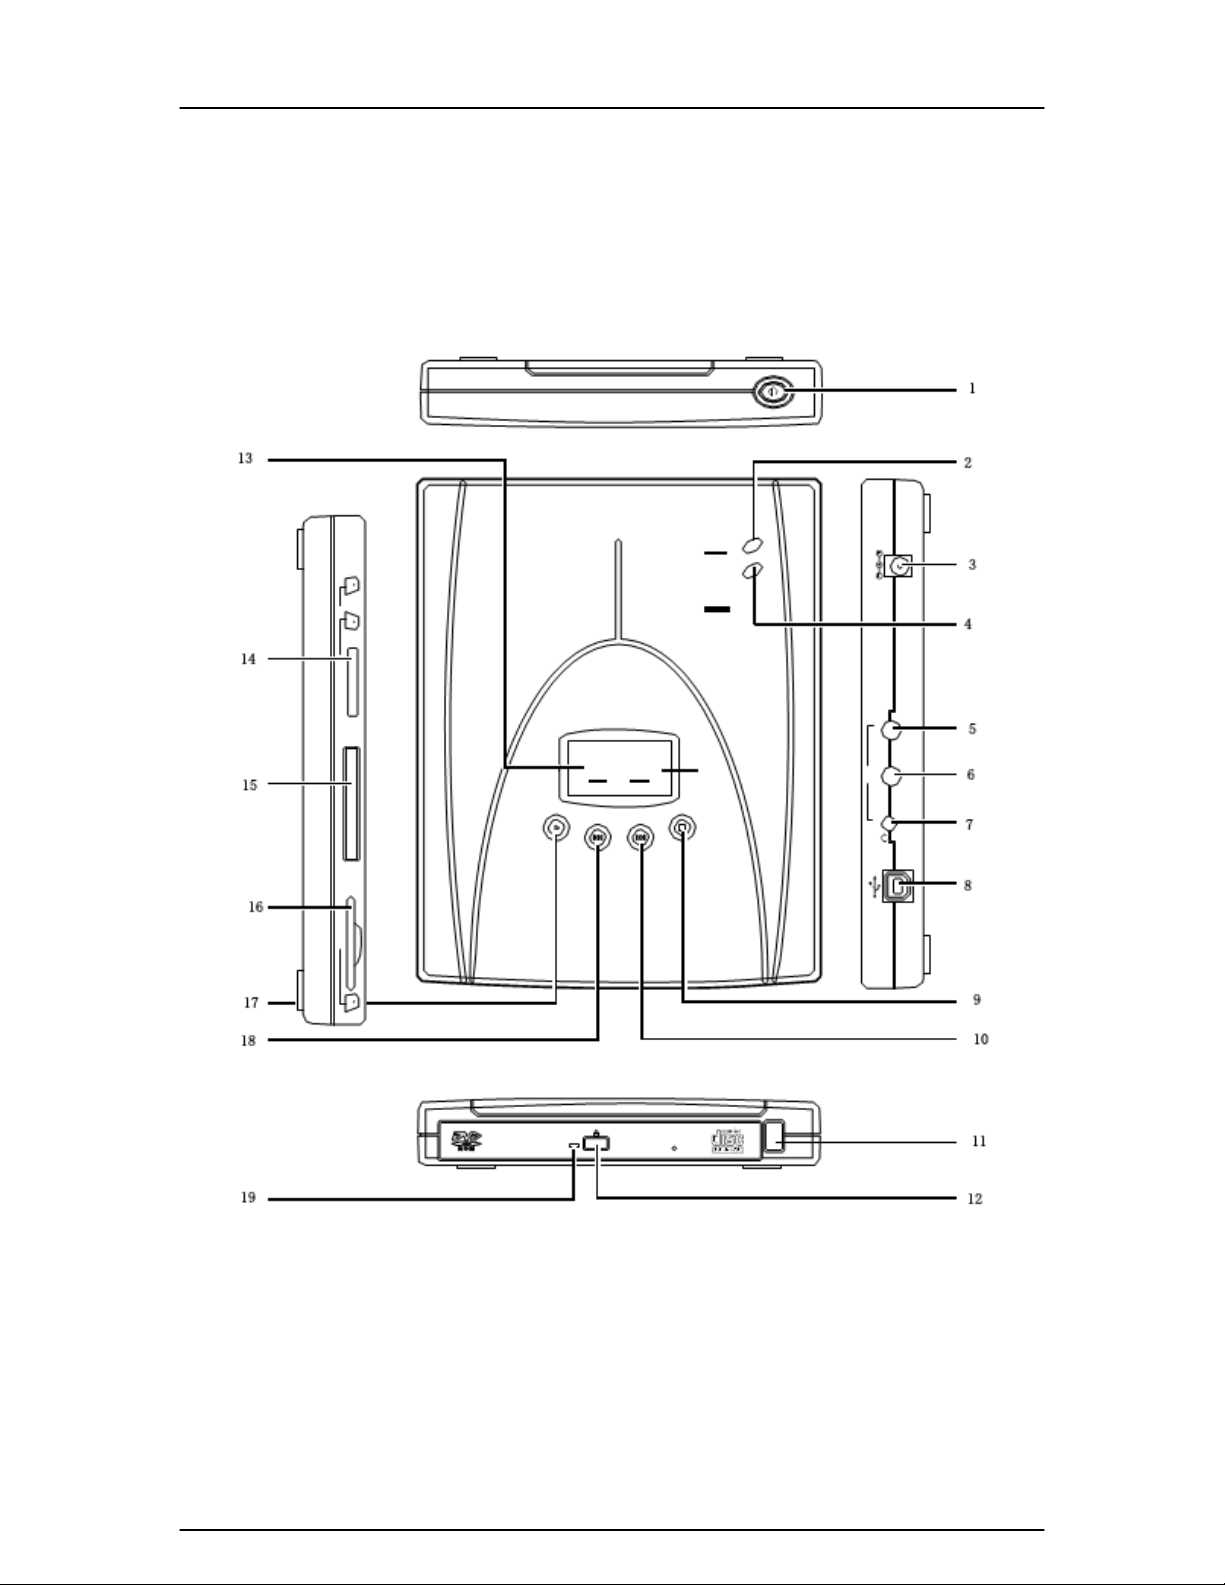
About the Kanguru Slim FCRW:
- 8 -
Page 9

Kanguru Slim FC-RW
ITEM
1. Power Button Turns the Kanguru Slim FCRW on and off
2. Power LED Indicates the power status
3. DC In Power socket for connecting to power adapter
4. Charge LED Flashes orange if the battery is charging
Solid green when the battery is fully charged
5. Video/S-Video Out Video output to a TV or a projector
6. Component Out Component video output to a TV or a projector
7. Audio/Optical Out Audio out to a TV, stereo, or headphones
8. USB Port USB Port for connecting to a computer
9. STOP/ESC Button Stops playback of CD
10. NEXT Button Skips to the next track/chapter
11. IR Port Signal in for the remote control
12. CD-RW Eject Button Ejects the CD
13. LCD Display Displays the status of the FCRW.
14. MS/SD/MMC slot Insert MS/SD/MMC flash cards here
15. CF/MD card slot Insert CF/MD flash cards here
FUNCTION
16. SM slot Insert SM flash cards here
17. ENTER/PLAY Button Starts playing inserted media
18. PREV Button Skips to the previous track/chapter
19. CD-RW LED Flashes green when in use
- 9 -
Page 10

Kanguru Slim FC-RW
About the Remote Control:
- 10 -
Page 11

Kanguru Slim FC-RW
ITEM FUNCTION
1. Power Button Turns the Kanguru Slim FCRW on and off
2. MODE Switches between CD and Flash Card mode
The On Screen Display (OSD) displays the status bar at the top of
3. OSD
4. PAUSE
5. PBC
6. PLAY
7. MENU CONTROL
8. MUTE
9. SUBTITLE
10. RESUME
the screen that indicates the current status of playback.
Pauses playback of movies or music.
If a video CD has “Playback control” (PBC) written on its disc, it means that
particular scenes or information can be selected for interactive viewing.
Press this button to use this feature.
Starts playback of multimedia files or CDs.
Used for navigating and entering menus.
Disables the sound during playback.
Changes the language of the DVD’s subtitles.
Used only in conjunction with the STEP button (25). Steps back through a
movie one frame at a time.
11. PROGRAM
12. RANDOM
13. PREV / NEXT
14. SHUFFLE
15. SETUP
16. REPEAT
17. REP A-B
18. EJECT
19. TITLE
20. ANGLE
21. AUDIO
22. ZOOM
23. COPY
24. STOP
25. STEP
26. SLOW
27. GO TO
28. L/R
29. FR/FF
30. VOLUME CONTROLS
31. MENU
32. CLEAR
33. NUMBER BUTTONS
Displays a screen where you can program the playback of an audio CD.
Not used.
Skips to the previous or next chapter of a DVD / VCD
Shuffles music tracks for random playback
Used for setting various options of the Kanguru Slim FCRW
Cycles through repeating of the current chapter / track, repeating of the
whole CD / DVD, and no repeat.
Marks the start (A) and end (B) points for repeated playback.
Ejects the disk
Displays the DVD’s title screen where you can set various settings such
as language and sound preferences. Use the MENU CONTROL buttons
(7) to navigate around the screen.
Some DVD movies have images shot at different camera angles. Use this
to select which angle you want to watch it from. This only works if there is
an angle mark on the DVD and you have selected “ON” for angle mark in
the GENERAL SETUP
Selects the language for the DVD’s audio output.
Cycles through three zoom levels: 1.5x, 2x, 3x, and zoom off
Copies (burns) files from the Flash Memory Card to the CD-RW
Stops the playback of movies or music
Steps through a movie one frame at a time. Press PLAY (6) to resume normal play
Cycles through 1/2x, 1/4x, and 1/8x of normal playback speed
Skips to a desired chapter
Not used.
Cycles through 2, 4, 6, and 8 times normal playback speeds for fast reverse
and fast forward respectively
Controls the volume level.
Displays a menu for playing a DVD and obtaining the playback status
Deletes numbers for GO TO play, repeated play, programmed play and
security codes
Selects a track or menu / submenu
- 11 -
Page 12

Kanguru Slim FC-RW
3. Getting Started
Inserting and Replacing the Batteries:
Inserting the Battery into the Kanguru Slim FCRW.
1. Slide the battery cover out.
2. Lift the battery cover up.
3. Insert the battery with the metal contacts
aligned with the metal contacts in the battery
compartment.
4. Close the battery cover.
Replacing the Remote Control’s Battery.
1. Press the clip in (1).
2. Gently slide the battery holder out (2).
3. Replace the battery with a new one as shown
in the diagram.
4. Gently slide the battery holder back into
place.
- 12 -
Page 13

Kanguru Slim FC-RW
Charging the Battery:
Plug the DC power adapter into a wall socket then connect the DC power
adaptor to the Kanguru Slim FCRW’s DC in 9V socket as show below.
If the rechargeable battery has been inserted, connecting the power
automatically recharges the battery. The Charge LED flashes orange while
charging and is a steady green when fully charged.
Inserting Flash Memory Cards:
Position the Flash Card in the direction shown in the diagram below. Make sure
the flash card is inserted in the correct slot, and oriented correctly. Please note a
slight amount of resistance will be felt if the card is inserted correctly.
To remove a Flash Card, grasp the end firmly between your thumb and index
finger and pull the card from the slot.
NOTE: Only one card can be copied at any one time.
- 13 -
Page 14

Kanguru Slim FC-RW
Inserting and Removing a CD:
To insert a CD press the eject button at the front of the Kanguru Slim FCRW.
Insert or remove a CD/DVD from the Kanguru Slim FCRW and gently close the
tray.
- 14 -
Page 15

Kanguru Slim FC-RW
4. Operation—Copying Flash Cards
Basic Operation Mode
1. Connect the power cable to the back of the device (if battery is dead).
2. Press and hold the power button for 2 seconds to turn on the device.
3. Insert a flash card into the appropriate card reader slot.
4. Insert a CD-R or CD-RW disc into the CD tray.
5. Press the STOP/ESC button to bring up the menu in the LCD panel.
6. Press the PREV or NEXT button until COPY appears in the LCD panel.
7. Press the ENTER/PLAY button to begin the copy process.
8. The unit will display the % left of the burning process.
9. Once the copying is finished the FCRW will CLOSE the CD and then
display END to complete the process.
Note1: Keep the Kanguru Slim FCRW on a flat surface during operation.
Do not tilt or pickup the device as it may cause damage to the unit.
Note2: Do not leave CDs in the device while transporting.
Disk Spanning
The Kanguru Slim FCRW supports discs spanning which allows you to copy from
flash cards that are larger than the space available on the CD-R/RW disc. When
the CD becomes full the Slim FCRW will prompt you to insert a new blank disc.
After inserting a new disc the burning will automatically continue. This can be
done up to four times in one burning session.
Erasing a CD/RW
There are two methods which you can use to erase a CD-RW.
To erase a CD-RW when the Slim FCRW is connected to a TV/Projector, please
follow the steps below.
1. Insert the CD-RW disc to be erased.
2. Select the ERASE CD-RW menu item and select YES
3. ERASE COMPLETED will appear on the LCD screen when the disc is
fully erased.
When the Slim FCRW is in stand –alone mode, please follow the steps below.
1. Insert the CD-RW disc to be erased.
2. Press the STOP/ESC button to bring up the menu in the LCD panel.
- 15 -
Page 16

Kanguru Slim FC-RW
3. Pres the PREV and NEXT buttons until ERASE appears on the screen.
4. Press the ENTER/PLAY button to enter this menu and GO will appear.
5. Press the ENTER/PLAY button to begin erasing the CD-RW and ERASE
will appear again. Wait until the END message appears before continuing.
6. Press the STOP/ESC button to get back to the main menu and again to
exit.
- 16 -
Page 17

Kanguru Slim FC-RW
5. Operation—USB2.0 CDRW and Card Reader
Driver Installation
Depending on your operating system, you may need to install drivers before
using your Slim FCRW as an external USB2.0 CD-R/RW burner or card reader.
Card reader drivers are required for Win98/98SE, 2000, and XP. CDRW drivers
are only required for Win98/98SE.
1. Insert the disc labeled “USB Driver” included with this device and the
following screen should appear.
2. Click on the appropriate selection according to the operating system you
are running.
3. An installation wizard will appear on your screen.
4. Please follow the installation wizard according to your operating system.
5. After the installation wizard has finished you may need to restart your PC
if prompted.
External CDRW
1. Install the drivers as described above if they are required for your
operating system.
2. Connect the power cable to the back of the device.
3. Press and hold the power button for 2 seconds to turn on the device.
4. Connect the included USB2.0 cable to the FCRW and then to your PC.
5. Your system should find the new hardware automatically.
- 17 -
Page 18

Kanguru Slim FC-RW
6. You should now find a new CD-RW drive available under “My Computer”.
If you are using Mac OS X, you will not see a drive icon until a CD or a
flash card is inserted in the FCRW.
7. To begin burning CDs, you must use burning software in conjunction with
this device.
External Card Reader
1. Install the drivers as described above if they are required for your
operating system.
2. Connect the power cable to the back of the device.
3. Press and hold the power button for 2 seconds to turn on the device.
4. Connect the included USB2.0 cable to the FCRW and then to your PC.
5. Your system should find the new hardware automatically.
6. You should now find 3 “Removable Disk” drives available under “My
Computer”. If you are using Mac OS X, you will not see these drives until a
cd or a flash card is inserted in the Slim FCRW.
- 18 -
Page 19

Kanguru Slim FC-RW
6. DVD Movie Playback
Connecting to a TV:
1. Connect the audio cable (red and white plugs) from the Audio/Optical
socket to the Audio In socket of your TV.
2. Connect the AV cable (yellow plug) from the Slim FCRW’s Video/S-Video
socket to the Video In or S-Video In socket of your TV.
If your TV has Component In sockets, follow these steps:
1. Connect the audio cable (red and white plugs) from the Audio/Optical
socket to the Audio In socket of your TV.
2. Connect the component cable from the Slim FCRW’s Component socket
to the RGB Component In sockets of your TV.
- 19 -
Page 20

Kanguru Slim FC-RW
Playing a DVD
1. Press the eject button at the front of the Slim FCRW.
2. Insert a DVD into the Slim FCRW and close the drive. The DVD should
automatically start playing.
3. The DVD’s audio, subtitle, and menu will automatically be set depending
on the available languages on the DVD and the settings of your Slim
FCRW.
Basic Functions
There are several functions that are available while playing a movie, each
described below:
• OSD – Cycles through the elapsed and remaining times for both the title and
chapter.
• ANGLE – Displays the movie from a different camera angle. This feature is only
available on DVDs that have been recorded with different camera angles.
• TITLE - Displays the title of the DVD movie.
• PAUSE – Pauses playback of a multimedia file. Press this again to continue
payback or press the Play button.
• PBC – If a video CD has “Playback Control” (PBC) written on its disc, it means
that particular scenes or information can be selected for interactive viewing.
Press this button to use this feature.
• ZOOM – Cycles through three zooms levels; 1.5x, 2x, 3x, and Zoom off.
• AUDIO – Cycles though the DVD’s available audio languages.
• PLAY – Starts playing a multimedia file or continues playback after pausing.
• ARROW BUTTONS – Selects a menu item in a DVD menu.
• ENTER – To choose an item on the DVD menu. Begins playback if the main
Kanguru Slim FCRW screen is being displayed.
• MUTE – Disables the sound during playback
• STOP – Stops playing the multimedia file.
• SUBTITLE – Cycles thought the DVD’s available subtitle languages during
playback.
• RESUME – Works only in conjunction with the STEP button and steps backward
a frame at a time.
• SLOW – Cycles through 1/2x, 1/4x, and 1/8x of normal playback speed in both a
backward and forward direction and then back to normal playing speeds.
• STEP – Used to step though a frame at a time. Press PLAY and ENTER together
to continue normal playback.
• PREV/NEXT – Skips to the previous or next chapter of a DVD.
• FR/FF – Cycle through 2,4,6, and 8 times normal playback speeds.
• SHUFFLE – Sets a random sequence for playing audio files.
• - and + - Volume controls.
• CLEAR – Clears repeated tracks/titles, randomized tracks, and programmed
tracks.
• MENU – Displays the DVD’s main menu.
- 20 -
Page 21

Kanguru Slim FC-RW
6. Viewing Flash Cards on your TV
To view pictures you will first need to:
1. Connect your Kanguru Slim FCRW to a TV.
2. Make sure the FCRW is in Flash Card viewing mode. You can use the
Mode button on the remote control to set this mode.
Viewing files with the Smart Navi menu.
1. After setting SMART NAV and exiting from the setup menu, the following
screen will appear.
2. Navigate through folders and select files using the remote control’s arrow
buttons. Pressing a number on the remote control will also select that file
or folder. If you are in a subfolder, the top right menu item will be “..” which
means to go back to the previous folder.
3. Use the left and right buttons on the remote control to rotate the image
90°. Use the up and down buttons to mirror the image on the horizontal
axis.
4. Press the STOP button to exit.
- 21 -
Page 22

Kanguru Slim FC-RW
7. Setup Menus
Navigating the Menus
1. To bring up the SETUP MENU, press the SETUP button on the remote
control.
2. In the MAIN PAGE of the SETUP MENU, press the UP and DOWN buttons
on the remote control to select the desired sub-menu.
3. Press the ENTER button on the remote control to enter the selected
submenu.
4. In the sub-menu, press the UP and DOWN buttons to select the desired
setting.
5. Press the RIGHT button on the remote control to move across to the
options for that setting in the right column, as shown below.
- 22 -
Page 23

Kanguru Slim FC-RW
6. Press the UP and DOWN buttons to select the options for that setting.
7. Press the ENTER button to confirm your option.
8. To exit, press the LEFT button to return to the submenu settings in the left
column. Scroll down to MAIN MENU and press ENTER to return to the
main menu.
Adjusting the TV Settings
1. Enter the SETUP MENU and enter the PREFERENCES page and select
TV Type.
2. Select the TV type required: Multi, NTSC, or PAL. Your selection must
also match the format of the source DVD.
3. Return to the main menu and enter the GENERAL SETUP page.
4. Scroll down to VIDEO OUTPUT.
5. Select the video output, S-VIDEO or COMPONENT that you will be
connecting to on the Kanguru Slim FCRW.
- 23 -
Page 24

Kanguru Slim FC-RW
TV Display
The Kanguru Slim FCRW has three options for choosing the display’s aspect
ratio.
• NORMAL / PS – for viewing on a normal TV.
• NORMAL / LB – for viewing similar to that of a movie at the theater. This
is best used on a normal TV. There will be two black sections at the top
and bottom of the screen.
• WIDE – This is similar to NORMAL / LB but meant for wide screen
televisions. If played on a normal television, the whole TV screen will
display a picture but the sides will be cut off.
PIC MODE
• AUTO – automatically chooses the best resolution for the unit being
displayed on.
• HIRES – for high-resolution picture mode.
• N-FLICKER – for non-flicker picture mode.
ANGLE MARK – can be turned on or off. Used to display different angles of a
DVD is they are available.
CAPTIONS – can be turned on or off.
SCR SAVER – can be turned on or off.
Adjusting the Speaker Settings
DOWNMIX – converts Dolby surround sound to normal stereo sound.
• LT/RT – is used when the DVD has been recorded in Dolby Pro-Logic
stereo.
• Stereo – produces only stereo sounds.
• OFF – turns off downmixing.
CENTER, REAR, and SUBWOOFER – can off be turned on or off. If the center
or rear speakers are turned on, the CNTR DELAY or REAR DELAY settings
become available. The center and rear delays have a slider to select the delay in
milliseconds.
TEST TONE enables you to test the sound of your system.
Note: To enable the speaker options, set DOWNMIX to off and AUDIO OUT to
ANALOG.
- 24 -
Page 25

Kanguru Slim FC-RW
Audio Setup
AUDIO OUT – the Kanguru Slim FCRW has three audio out options.
• Analog – This is used for normal speakers.
• SPDIF / RAW – Select this option if optical or coaxial cables are used.
• SPDIF / PCM – Select this option if optical or coaxial cables are used.
OP Mode
• Line Out – This is used in most configurations.
• RF Remod – Select this option when headphones are used.
DUAL MONO – can only be used with Dolby Digital discs that have dual mono
software encoded in them. You can select on of the following options: Stereo, LMono, R-Mono, or Mix-Mono.
DYNAMIC – Use the slider to adjust this mode.
PRO LOGIC – Can be set to On, Off, or Auto.
LPCM OUTPUT – Select 48K or 98K as the digitizing speed for LPCM. This is an
uncompressed format for audio.
Preferences
AUDIO / SUBTITLE / DISC MENU - DVDs may contain a number of different
languages for Audio, Subtitle, and Disc Menu. Setting these options
automatically selects the languages to be used by the DVD if those languages
are contained within the DVD itself.
PARENTAL / PASSWORD – are used together to set the age restriction for
preventing children from watching inappropriate material. To change or setup a
new parental password, follow the steps below.
1. Scroll to PASSWORD, select CHANGE and press ENTER.
2. Enter the older four digit password using the remote. The default
password is 3308 for new machines.
- 25 -
Page 26

Kanguru Slim FC-RW
3. Enter the new four digit password and then enter it a second time to
confirm.
4. Set and appropriate restriction level from the PARENTAL list.
5. Upon setting a restriction, a Password Verification Page is displayed.
Enter the four digit password and press ENTER.
- 26 -
Page 27

Kanguru Slim FC-RW
8. F.A.Q.
Q1. Can I duplicate Flash Cards that are larger than a blank CD?
A1. Yes, you can utilize the disc-spanning feature to duplicate flash cards that
are large than a 700MB CD-R disc.
Q2. Can I duplicate multiple Flash Cards to the same CD?
A2. Yes, you can copy different types of Flash Cards to the same CD until the
disc is full. The Kanguru Slim FCRW will display the % of storage left on the CDR/RW disc. The Flash Cards must be copied individually and must be within the
capacity left on the CD.
Q3. Can I duplicate the same Flash Cards to a CD multiple times?
A3. Yes, as long as the Flash Card’s capacity can fit on the space available on
the blank CD. For example, you could duplicate a full 128MB flash card to a
700MB CD 5 separate times.
Q4. Is there any way to only copy certain portions of a Flash Card?
A4. No, the Kanguru Slim FCRW only supports duplicating the entire Flash Card.
Q5. Will the Slim FCRW format my flash card after I’ve copied it?
A5. No, the Slim FCRW will leave the card as is.
- 27 -
Page 28

Kanguru Slim FC-RW
7. Troubleshooting
When I attempt to install the Kanguru FCRW on my Windows 2000 PC, my
system crashes during the install process.
You may need to install a new set of USB2.0 drivers from Microsoft. Please refer
to the installation section of this manual for detailed instructions.
When I connect the Kanguru FCRW to my PC I only have access to the CDRW drive but not the Card Reader.
If you are using Windows 98 or 2000 you will need to install drivers to use the
card reader. If you have installed these drivers and you are still having problems,
use device manager to update the correct drivers.
It seems my flash cards do not fit in the card reader?
Please make sure that you have the cards properly aligned with the card reader’s
slot. Use the images pictured on the front of the drive for guidance.
Error Codes
• Code 1: No Disc is detected
• Code 2: No Flash Card is detected
• Code 3: Read Flash Card error
• Code 4: Buffer error
• Code 5: CD is already closed
• Code 6: Not enough free space on disc
• Code 7: Write fail
• Code 8: Write pre-gap error
• Code 9: Write DVD error
• Code 10: CD not erasable
• Code 11: Erase fail
• Code 12: Device not ready
• Code 13: Verify Fail—Read Flash Memory Card Error
• Code 14: Verify Fail—Read Disk Error
- 28 -
Page 29

Kanguru Slim FC-RW
8. Warranty
Kanguru Solutions guarantees that every Kanguru FCRW will be free from
defects in workmanship and materials for 1 year from the date of purchase. This
warranty does not apply if, in the judgment of Kanguru Solutions, the product fails
due to damage from handling, accident, abuse, misuse, or if it has been used in
a manner not conforming to the product’s instructions, has been modified in any
way, or the warranty labels have been removed. If the product proves defective
during this warranty period, call Kanguru Solutions Technical Support in order to
obtain a RMA required for service. When returning a product, mark the RMA
number clearly on the outside of the package, and include a copy of your original
proof of purchase.
In no event shall Kanguru Solutions’ liability exceed the price paid for the product
from direct, indirect, special, incidental, or consequential software, or its
documentation. Kanguru Solutions offers no refunds for its products after 30 days
of purchase. Kanguru Solutions makes no warranty or representation, expressed,
implied, or statutory, with respect to its products or the contents or use of this
documentation and all accompanying software, and specifically disclaims its
quality, performance, merchantability, or fitness for any particular purpose.
Kanguru Solutions reserves the right to revise or update its products, software, or
documentation without obligation to notify any individual or entity.
Tech Support
If you experience any problems installing your Kanguru Slim FCRW or have any technical
questions regarding any of our products, please call our tech support department. Our tech
support is free and available Monday through Friday, 9am to 5pm EST.
Call 1-508-376-4245 or
Visit our website at http://www.kanguru.com
- 29 -
 Loading...