

Page 1
Copyright 2009, All Rights Reserved.
Kanguru QSX
User Guide
Page 2

2
Notices and Information
NOTICES AND INFORMATION
Please be aware of the following points before using your Kanguru QSX
Copyright© 2009, Kanguru Solutions. All rights reserved.
Windows XP® and Windows Vista® are registered trademarks of Microsoft Inc. Apple® and
Macintosh® are registered trademarks of Apple Computer Inc. IBM and OS/2 are registered
trademarks of the International Business Machines Corporation. All other brand or product names
are trademarks of their respective companies or organizations.
Kanguru Solutions will not be held responsible for any illegal use of this product nor any losses
incurred while using this product. The user himself is responsible for the copyright laws, and is fully
responsible for any illegal actions taken.
Customer Service
To obtain service or technical support for your system, please contact Kanguru Solutions Technical
Support Department at 508-376-4245, or visit www.Kanguru.com for web support.
Legal notice
In no event shall Kanguru Solutions’ liability exceed the price paid for the product from direct,
indirect, special, incidental, or consequential software, or its documentation. Kanguru Solutions
offers no refunds for its products. Kanguru Solutions makes no warranty or representation, expressed,
implied, or statutory, with respect to its products or the contents or use of this documentation and
all accompanying software, and specifically disclaims its quality, performance, merchantability, or
fitness for any particular purpose. Kanguru Solutions reserves the right to revise or update its products,
software, or documentation without obligation to notify any individual or entity.
Export Law Compliance
Regardless of any disclosure made to Kanguru Solutions pertaining to the ultimate destination of the
specific Kanguru product, you warrant that you will not export, directly or indirectly, any Kanguru
product without first obtaining the approval of Kanguru Solutions and the appropriate export license
from the Department of Commerce or other agency of the United States Government. Kanguru
Solutions has a wide range of products and each product family has different license requirements
relative to exports.
FCC Compliance Statements
This equipment has been tested and found to comply with the limits for a Class B digital device,
pursuant to Part 15 of the FCC Rules. These limits are designed to provide reasonable protection
against harmful interference in a residential installation. This equipment generates, uses and can
radiate radio frequency energy and, if not installed and used in accordance with the instructions,
there is no guarantee that interference will not occur in a particular installation. If this equipment
does cause harmful interference to equipment off and on, the user is encouraged to try to correct the
interference by one or more of the following measures:
Reorient or relocate the receiving antenna.•
Increase the Distance between the equipment and receiver.•
Connect the equipment into an outlet on a circuit different from that to which the receiver is •
connected.
Consult the dealer or an experienced radio/TV technician for help.•
Page 3

3
Table of Contents
Notices and Information .........................................................................2
1. Introduction .........................................................................................4
1.1 Package Contents .......................................................................................4
1.2 System Requirements ................................................................................5
1.3 Specifications ..............................................................................................5
2. Basic Operation ...................................................................................6
2.1 Parts and Functions ...................................................................................6
2.2 Setting up Your Kanguru QSX .................................................................6
2.2.1 eSATA Connection ..........................................................................7
2.3 Setting the Storage Mode ..........................................................................8
2.4 Formatting Large Volumes (for BIG and RAID0 modes) ......................9
2.5 Disconnecting the Kanguru QSX ...........................................................11
2.6 Using HotSwap! .......................................................................................12
2.6.1 Connecting the QSX using HotSwap! ........................................13
2.6.2 Disconnecting the QSX using HotSwap! ....................................13
Table of Contents
3. Storage Modes ...................................................................................14
3.1 BIG ..........................................................................................................14
3.2 JBOD ........................................................................................................15
3.3 RAID1 (SAFE) .........................................................................................16
3.4 RAID0 (FAST) ..........................................................................................17
3.5 Comparison of Storage Modes ................................................................17
4. Troubleshooting .................................................................................18
5. Warranty ...........................................................................................19
6. Tech Support......................................................................................19
Page 4

4
1. Introduction
Thank you for purchasing the Kanguru QSX from Kanguru Solutions. The Kanguru QSX features
dual SATA hard drives (HDDs), allowing for huge storage capacities. The QSX supports both USB2.0
and eSATA connectivity, providing you with the convenience of USB and the blazing fast transfer
rates of eSATA to create a perfect storage solution.
The Kanguru QSX is more than a basic storage device; it can be configured to operate in one of
several storage modes to fit your needs. You can configure the QSX to operate as two mirrored disks
for redundant data backup (RAID1), one large spanning volume (BIG), a striped array for faster
performance (RAID0), or two individual hard drives (JBOD).
Key Features
Dual SATA HDDs √
USB2.0 & eSATA interface √
BIG, JBOD, RAID0 or RAID1 storage modes √
Adjustable dip switches to change storage modes √
Durable aluminum housing √
LED indicators display the hard drives’ status √
Built-in cooling fan √
Introduction
1.1 Package Contents
If any of these items are missing, please contact the Kanguru Solutions Technical Support Department
at: (508) 376-4245 and replacement parts will be shipped ASAP.
Kanguru QSX•
Power adapter•
User Guide CD with HotSwap!•
Quick Start Guide•
USB Cable•
eSATA cable•
Page 5

5
Introduction
1.2 System Requirements
Operating System •
Windows 2000/XP/Server 2003/Vista/7 ○
Mac OS 10.3 or later ○
Linux ○
Intel Pentium-III 500MHz equivalent or faster •
128MB RAM or higher•
1 x USB port or 1 x eSATA port (for eSATA connection)•
Note: eSATA connection requires a Port Multiplier aware host adapter in order for your computer to
recognize both hard drives. If your eSATA host adapter is not Port Multiplier aware, only one hard
drive will be recognized by your computer. This does not apply to USB connection. For additional
information please see Chapter 4. Troubleshooting, p.18.
Kanguru Solutions recommends the following third party PCI and PCIe eSATA host adapters which
are Port Multiplier aware:
PCI – SYBA SATAII NCQ Host Controller Card•
PCIe – SIIG eSATAII PCIe i/e•
1.3 Specifications
Host Interface
Drive Interface SATA I or II
Hard Drives 2 x 3.5” SATA Hard drives
Storage Modes BIG, JBOD, RAID0 and RAID1
Operating System
Cooling Fan 4cm Ball Bearing Fan
Power Supply Input 100-240V
Dimensions 4.5”W x 7.7”L x 2.8”H
eSATA (3Gb/s)
USB2.0 (480 Mb/s)
Windows 2000/2003/XP/Vista/7
Mac OS X 10.3 or later
Linux
Page 6
6
2. Basic Operation
ON DIP
The Kanguru QSX is extremely versatile and can meet almost any storage need. It can be configured
to operate in several different storage modes, but is as simple to operate as a basic external hard
drive.
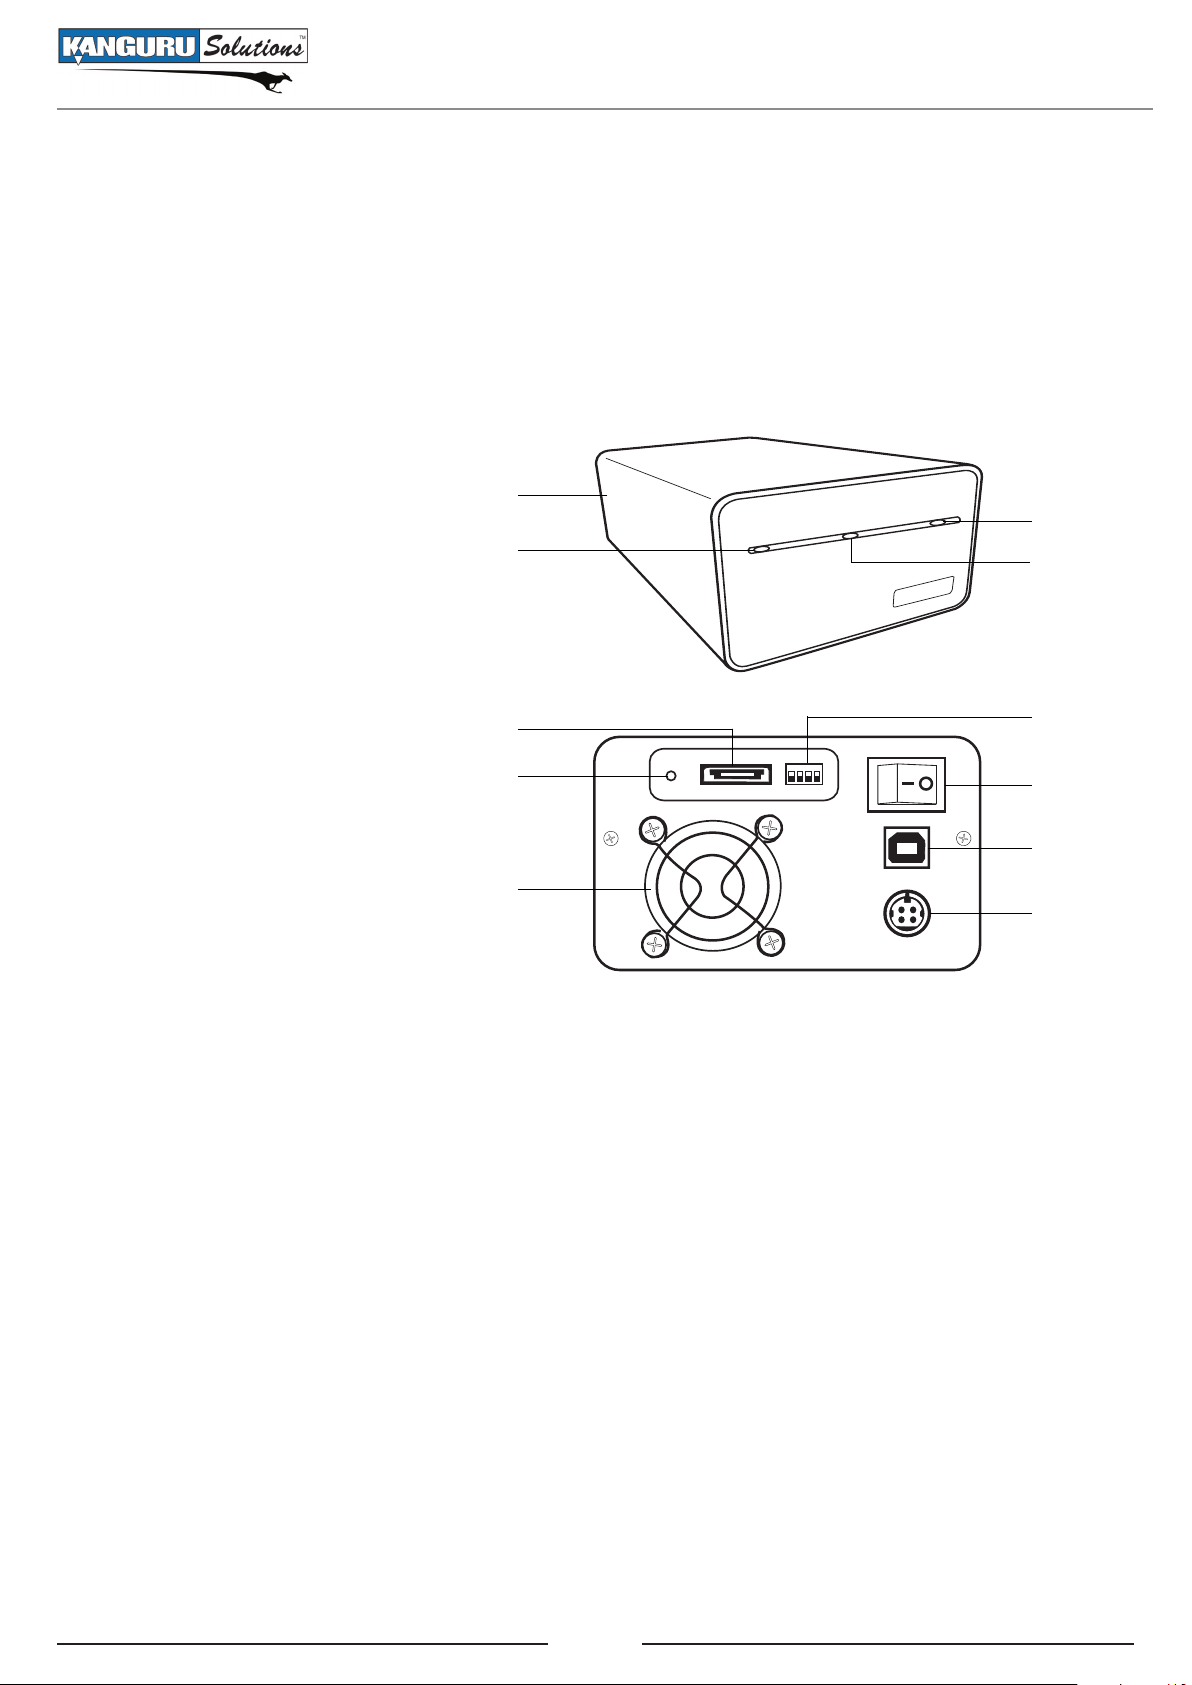
2.1 Parts and Functions
Front
Aluminum Housing1.
Hard Drive 2 LED Indicator2.
Hard Drive 1 LED Indicator3.
Power LED Indicator4.
1
2
Basic Operation
3
4
Back
5
eSATA interface5.
Reset Button6.
6
Cooling Fan7.
Dip Switches8.
Power On/Off Switch9.
USB Interface10.
7
Power Connector11.
2.2 Setting up Your Kanguru QSX
Please follow these instructions to setup and connect your Kanguru QSX to your computer.
Place the Kanguru QSX on a flat stable surface by your computer. 1.
Plug the Power Adapter into an appropriate electrical outlet and then plug the other end into the 2.
Power Connector (11).
Configure the QSX to the desired storage mode, turn on the QSX and then press the reset button 3.
(see section 2.3 Setting the Storage Mode, p.8).
Plug one end of the provided eSATA or USB cable into the QSX eSATA Interface (5) or USB 4.
Interface (10) and then connect the other end to the appropriate port on your computer. Although
the Kanguru QSX has connections for both eSATA and USB, only one connection can be used
at a time.
8
9
10
11
The Kanguru QSX will appear in My Computer if you are running Windows or it will appear on your
desktop if you are running Mac OS X. The QSX may appear as one or two hard drives depending
on the storage mode it is set in. If you are connecting the QSX via eSATA, it may not show up right
away, For more information, see section 2.2.1 eSATA Connection, p.7.
Page 7

7
Basic Operation
2.2.1 eSATA Connection
When connecting the QSX via eSATA, it may not appear in your computer right away. The Kanguru
QSX is hotswap compatible. However, based on your eSATA host controller, several tasks may need
to be performed in order to view the QSX.
Please do the following to rescan for newly connected eSATA devices:
Right click on the 1. My Computer icon and click Manage.
The Computer Management window appears. From the list on the left side of the window, select 2.
Device Manager.
On the right side of the window, there will be a list of devices. Right click on your computer; it 3.
should be at the very top, and then select Scan for hardware changes.
Wait for the scan to complete and then check the 4. My Computer screen again to see if the
Kanguru QSX has been recognized by the computer. The QSX may appear as one or two hard
drives depending on the storage mode it is set in.
If your computer still cannot recognize the Kanguru QSX, the computer may need to be restarted.
Note: For ease of use, the e-Flash comes with a 3rd party application HotSwap!. HotSwap! allows you
to easily add and remove eSATA devices similarly to Windows Add/Remove hardware wizard. For
more information on using HotSwap!, please see section 2.6 Using HotSwap!, p.12.
Page 8

8
ON DIP
Basic Operation
2.3 Setting the Storage Mode
You can configure the way the Kanguru QSX operates by adjusting the dip switches located on the
back of the unit (see section 2.1 Parts and Functions, p.6). The Kanguru QSX can be configured to
operate in any one of the following 4 storage modes:
BIG - • Combines two physical hard drives into a single volume (see section 3.1 BIG, p.14).
JBOD - • Each hard drive operates as an independent drive (see section 3.2 JBOD, p.15).
RAID1 (SAFE) - • Saves all data in duplicate on separate drives in a mirrored array to protect
against data loss due to drive failure (see section 3.3 RAID1 (SAFE), p.16)
RAID0 (FAST) - • Distributes data across both hard disks in a striped array. This allows for
improved read/write transfer rates. (see section 3.4 RAID0 (FAST), p.17)
Storage modes can be changed by adjusting the position of the dip switches. It is NOT recommended
to switch between storage modes after you have begun saving data to the Kanguru QSX.
Switching storage modes may require that you reformat your hard drives which will cause all data on
the hard drives to be erased.
To set the storage modes:
Make sure the Kanguru QSX is switched off.1.
Use a straightened paperclip or similar long, thin object to set a dip switch in either to the Up (0) 2.
position or Down (1) position.
0
→
1
→
Note: The switch furthest to the right is not used. Its position will not affect the storage mode.
The available storage mode settings are as follows:
BIG
000
N/A
JBOD
RAID0 (FAST)
RAID1 (SAFE)
Turn the power switch to the On position then press the reset button. You may need to use the 3.
same thin object to press the reset button.
001
010
011
Page 9

9
Basic Operation
2.4 Formatting Large Volumes (for BIG and RAID0 modes)
When using your Kanguru QSX in either BIG or RAID0 (FAST) storage modes, they will initially
appear at half capacity. In order to utilize the full capacity, you will need to reformat your hard drives
so that they appear as one large volume.
2.4.1 Formatting your hard drives using Windows
Right click on 1. My Computer and then select Manage from the drop down menu.
Select 2. Disk Management from the left side window. The Disk Management console will appear
in the right side window.
In the bottom right side window, locate the disk named 3. Kanguru. It should contain two partitions,
one Healthy and one Unallocated.
Right click on the blue bar on the Healthy partition and select 4. Delete Partition.
WARNING! Deleting a partition will also delete any data stored on that partition.
A confirmation window appears, warning you that all data in the partition will be deleted. Click 5.
on Yes to continue.
The Disk will now appear as one large unallocated partition. Right click on the black bar in the 6.
unallocated partition and select New Partition. The New Partition Wizard opens.
Follow the instructions in the New Partition Wizard to complete formatting your hard drives. 7.
Your disk should now appear as one large drive.
Page 10

10
Basic Operation
2.4.2 Formatting your hard drives using Mac OS
From the 1. Finder menu bar, select Utilities from the Go menu.
Double-click 2. Disk Utility in the Utilities folder.
The Disk Utility window will appear. Select the disk labeled 3. Kanguru from the list of available
hard drives.
Select the 4. Partition tab.
Under the 5. Volume Scheme section, select 1 partition.
In the 6. Volume Information section, enter a name for your new partition and choose the file
system.
Once you have finalized the volume options, click 7. Partition. Click Partition again when the
alert message appears asking you to confirm.
Mac Disk Utility will format and partition the disk according to your settings, and your drive 8.
will be ready to use.
Important for Mac OS X 10.5 Users
If you are using the QSX with Mac OS X 10.5 or later, you may encounter some issues when trying
to format/partition the QSX. In order to resolve these problems you will need to update the QSX
firmware. None of your data stored on the QSX will be affected by this firmware upgrade.
To update your firmware version:
Download and install version 5.1.24 of SteelVine manager. You will want to download “SiI57xx 1.
SteelVine Manager for Max OS X Leapord” or “SiI57xx SteelVine Manager for Max OS X
Tiger” depending on your version of Mac OS X. You can download SteelVine Manager here:
http://www.siliconimage.com/support/searchresults.aspx?pid=105&cat=24
Download the firmware version 1.1576. You will want to download the “Firmware for Upgrade 2.
by GUI” version. Unzip the contents of the file to a folder.
http://www.siliconimage.com/support/searchresults.aspx?pid=105&cat=23
After you have installed the SteelVine Manager, run the SteelVine Manager.3.
Click on the 4. Edit menu and then select Specify Firmware.
You will be required to enter a password in order to update the firmware. The default password 5.
is: admin
The Firmware Manager appears. Click on the 6. Browse button at the bottom of the window and
then direct the Firmware Manager to the .bin firmware file.
Select the firmware file that you downloaded and unzipped in Step 2 and then click on the 7. Open
button.
Click on the 8. Install Firmware button.
The firmware update process will begin automatically. Caution! Once the update process has begun,
do not turn off or disconnect the unit until the update process has completed. You will be prompted to
restart your computer once the update process is completed.
Page 11

11
Basic Operation
2.5 Disconnecting the Kanguru QSX
Do not disconnect the QSX from your computer while transferring files or while applications or files
stored on the drive are in use. Doing so may result in data loss or damage to the drive. If you do not
properly remove the drive from your system, then you may have to reboot your computer in order for
the drive to be recognized again.
WARNING! Failure to disconnect the QSX properly may result in data loss or corruption.
USB 2.0
Windows 2000 / XP / Vista / 7:• Click on the green Remove Hardware icon in the taskbar
and select the USB Mass Storage Device to safely remove the drive.
Mac:• When removing the drive from your Mac, close all windows and quit all applications that
are stored on the QSX and drag the drive icon(s) to the Trash/Eject to remove the drive from
your computer.
eSATA
Windows 2000 / XP / Vista / 7 •
Right click on the 1. My Computer icon and select Manage from the drop down menu.
The Computer Manager appears. Click on 2. Device Manager.
The Device Manager appears. Double click on 3. Disk Drives.
Right click on the device labeled4. SCSI Disk Device and select Uninstall.
When the confirm dialog appears, click 5. OK to remove the device.
It is now safe to unplug the device from your computer.6.
Note: For ease of use, the e-Flash comes with a 3rd party application HotSwap!. HotSwap! allows
you to easily add and remove eSATA devices similarly to Windows Add/Remove hardware
wizard. For more information on using HotSwap!, please see section 2.6 Using HotSwap!,
p.12.
Mac:• When removing the drive from your Mac, close all windows and quit all applications that
are stored on the QSX and drag the drive’s icon to the Trash/Eject to remove the drive from your
computer.
Page 12

12
Basic Operation
2.6 Using HotSwap!
The Kanguru QSX comes with a third party application, HotSwap!. HotSwap! allows you to easily
add and remove eSATA devices with a few clicks of your mouse. HotSwap! is extremely useful when
using eSATA devices like the QSX. We recommend that you install HotSwap! on any computer that
you will be using with the QSX. HotSwap! is only compatible with Windows XP / 2003 / Vista.
A Windows 2000 compatible version of HotSwap! is available for download from the HotSwap!
website.
Note: HotSwap! is a 3rd party application and is NOT supported by Kanguru Solutions. You are
not required to use HotSwap!, but we do feel that you will find it very convenient when connecting
or disconnecting eSATA devices. For more information regarding HotSwap! or to find HotSwap!
support, please visit their website: http://mysite.verizon.net/kaakoon/hotswap/index_enu.htm
To install HotSwap!:
Insert the provided Manual CD into your PC. 1.
Open the 2. HotSwap! folder.
Copy the 3. HotSwap!.exe application onto your desktop.
Double click on the 4. HotSwap!.exe file to run HotSwap!.
You will see the HotSwap! icon appear in the taskbar. The icon will look similar to the Safely
Remove Hardware icon, except that the icon’s arrow is red instead of green.
Note: This will install and autostart HotSwap!. To uninstall or to turn off autostart, right click on the
HotSwap! icon in the taskbar. A pop up menu will appear. Click on Autostart to turn Autostart On/
Off. Click on Uninstall to uninstall HotSwap!.
→
→
Page 13

13
2.6.1 Connecting the QSX using HotSwap!
To connect the QSX using HotSwap!:
Connect the QSX via the eSATA interface.1.
Right click on the 2. HotSwap! icon in the taskbar.
Select 3. Scan for hardware changes.
Basic Operation
This performs the same action as going into the Device Manager and running a Scan for hardware
changes action. You should now be able to see your device in My Computer.
2.6.2 Disconnecting the QSX using HotSwap!
To disconnect the QSX using HotSwap!:
Make sure that no data is being transferred to or from the device. The easiest way to determine 1.
that no data is being transferred to or from the device is to check that the neither of the Hard
Drive LED indicators are blinking.
Left click on the 2. HotSwap! icon in the taskbar. A popup menu appears, listing any connected
eSATA devices.
Select 3. QSX from the popup menu. You will receive a message notifying you that it is safe to hot
swap the hardware.
You can configure the way HotSwap! functions by right clicking on the taskbar icon. We recommend
that you leave these configurations in the default settings or that you read the HotSwap! documentation
at the link below before doing so. For more information regarding HotSwap! or to find HotSwap!
support, please visit their website: http://mysite.verizon.net/kaakoon/hotswap/index_enu.htm
Note: HotSwap! is a free application. If you enjoy HotSwap!, you can make a donation at their
website through PayPal.
Page 14

14
3. Storage Modes
The following sections will describe, in detail, each of the storage modes that are supported by the
Kanguru QSX.
3.1 BIG
BIG Configuration – 000
Before using the Kanguru QSX in BIG mode, you first have to reformat your hard drives. For more
information, please see section 2.4 Formatting Large Volumes (for BIG and RAID0 modes), p.9.
BIG storage mode combines the two physical hard drives into a single large volume; resulting in a
seamless expansion of virtual volumes beyond the physical limitations of a single hard drive. When
writing to the QSX in BIG mode, data will be saved to Disk 1 first. Once Disk 1 has run out of space
then data will be written to Disk 2. This process will happen transparently. Hard drive A and B are
combined into a single virtual volume, with a storage capacity that is equal to the sum of each of
the physical hard drives A and B. BIG mode does not provide any data redundancy or performance
gain.
Storage Modes
Disk 1
Disk 2
Virtual BIG volume
Capacity = Disk 1 + Disk 2
WARNING! If one of your hard drives fails, do not attempt to replace the faulty drive. Doing so will
void the warranty. If one of your hard drives fails, please contact Kanguru Solutions Tech Support at
508-966-4245.
Note: If Disk 2 fails, all data on Disk 1 will still be recoverable. Similarly, if Disk 1 fails, any data
in Disk 2 will be recoverable. It is advisable that you backup any data before sending the unit in for
repair. In order to access the uncorrupted data, change the QSX storage mode to JBOD (see section
3.2 JBOD, p.15). The remaining healthy disk will appear under My Computer.
Page 15

15
3.2 JBOD
JBOD Configuration – 001
JBOD (Just a Bunch of Disks) storage mode enables each hard drive to be seen and operate separately
as independent drives. JBOD mode does not provide any data redundancy or transfer performance
gain. When in JBOD mode, the QSX will show up as two separate drives in My Computer. Both Disk
1 and Disk 2 operate as individual drives.
Disk 1
Disk 2
When using an eSATA host controller, JBOD should only be used if the eSATA host controller is Port
Multiplier (PM) aware. If the host is not PM aware, only one drive will be detected by your system.
Kanguru Solutions recommends the following third party PM aware PCI eSATA host adapters:
PCI – SYBA SATAII NCQ Host Controller Card•
PCIe – SIIG eSATAII PCIe i/e•
There is no such limitation if you are connecting via a USB host connection.
Warning! If one of your hard drives fails, the data on the second drive will not be affected. Do not
attempt to replace the faulty drive. Doing so will void the warranty. If one of your hard drives fails,
please contact Kanguru Solutions Tech Support at 508-966-4245.
Page 16

16
Storage Modes
3.3 RAID1 (SAFE)
RAID1 (SAFE) Configuration – 011
RAID1 (SAFE) storage mode saves all data in duplicate on separate drives, providing real time backup
to protect against data loss due to drive failure. RAID1 provides the highest level of protection for
critical data. One drive mirrors the other at all times. The resulting storage capacity of the RAID1
volume will be equivalent to the size of one hard drive (half the total capacity). RAID 1 mode provides
data redundancy but reduces performance because all data has to be written twice.
Disk 1
RAID 1 Volume
Disk 2
Capacity = (Disk 1 + Disk 2) / 2
Building and Verifying the Mirrored Array
The first time you transfer data to your QSX in RAID1 storage mode, the QSX will automatically
begin building the mirrored array. After a few moments, both Hard Drive LED Indicators will turn
off, and then the Hard Drive 1 LED Indicator will blink rapidly. This indicates that the mirrored
array is being built. After the mirrored array is built the QSX will begin verifying the mirrored array.
During this time, the Hard Drive 1 LED Indicator will be on and the Hard Drive 2 LED Indicator will
blink rapidly. The entire process may take upwards of 4 hours to build the mirrored array depending
on the HDD capacity.
It is not necessary to build and verify the mirrored array in one session. You can disconnect and turn
off the QSX while the mirrored array is being built or verified and it will continue from the point
where it was stopped when power on the unit again. Warning! Until the mirrored array is built, data
is only stored to one drive and is not mirrored.
If one of the hard drive fails, the RAID1 volume is still usable, but it is in a vulnerable state because
there is no longer a mirror of your data. If this happens, one of the Hard Drive LED Indicators will
constantly blink even if there is no data being transferred.
Warning! If one of your hard drives fails, do not attempt to replace the faulty drive. Doing so will
void the warranty. If one of your hard drives fails, please contact Kanguru Solutions Tech Support at
508-966-4245.
Page 17

17
Storage Modes
3.4 RAID0 (FAST)
RAID0 (Fast) Configuration – 010
RAID0 (FAST) storage mode distributes data across both hard disks in a striped array. While in
RAID0 (FAST), data is transferred to both disks simultaneously, in parallel, improving data transfer
speed but offering no data redundancy. Kanguru QSX creates a single virtual volume that is striped
across both hard drives, with a storage capacity that is equal to the sum of both hard disk drives.
Disk 1
Disk 2
RAID 0 Volume
Warning! If one hard drive fails, all data stored on both hard drives will be corrupted. RAID0 doubles
your potential for data loss, since if either one of the two disks fails then all your data will be corrupted.
Do not attempt to replace the faulty drive. Doing so will void the warranty. If one of your hard drives
fails, please contact Kanguru Solutions Tech Support at 508-966-4245.
Before using the Kanguru QSX in RAID0, you first have to format your hard drives. For more
information, please see section 2.4 Formatting Large Volumes, p.9.
Capacity = Disk 1 + Disk 2
3.5 Comparison of Storage Modes
Please refer to the following chart to compare the different features available with each storage
mode.
Single large
volume
BIG
JBOD
RADI1
RAID0
* Only data on the remaining disk that did not fail can be recovered.
X X *
X X
Data recoverable
if 1 disk fails
X *
X X
Redundant data
mirroring
Increased
performance
Page 18

18
4. Troubleshooting
Problem Possible Cause Possible Solution
QSX is not powering
on.
Power adapter is not
connected correctly.
Troubleshooting
Make sure that the power adapter is
plugged into a compatible electrical
outlet and that the other end is securely
connected to the power connection.
QSX turns on but is
not recognized by the
computer or is not
displaying the correct
capacity.
USB or eSATA cable is not
connected securely.
Hard drive is not initialized
or formatted.
Hard drive is not formatted in
the right file system.
The QSX is not in the correct
storage mode.
Your system does not support
HotSwapping (eSATA
connection only).
Make sure that all cables connecting
the QSX to the computer are connected
securely.
Make sure your hard drives are
correctly initialized and formatted. If
the QSX is in BIG or RAID0 storage
mode, see section 2.4 Formatting Large
Volumes, p.9.
If you are using a Mac, make sure the
drive is formatted as FAT32 or another
Mac compatible file system. If you are
using windows, make sure the drive is
formatted as FAT32 or NTFS.
Make sure the dip switch configuration
is correct for the storage mode that you
want and then press the reset button.
See section 2.2.1 eSATA Connection, p.7
for more information.
One or both of the LED
hard drive indicator
lights are blinking
constantly even though
there is no activity or
are off.
Receiving a “Resource
Busy” error when
partitioning the hard
drive using Mac OS X
10.5.
I cannot format my
hard drive in FAT32.
In JBOD mode only
one drive is showing up
under My Computer.
One or both of the hard
drives are corrupted or have
failed.
This is a known issue with
Max OS X 10.5.
Windows hard drive
formatter limits FAT32
partitions to 32GB maximum
capacity per volume.
If you are connecting via
eSATA, your eSATA host
adapter is not Port Multiplier
aware.
Please call Kanguru Solutions
Technical Support for assistance. Under
no circumstances should you try to
service the unit yourself; doing so will
void the warranty.
Please update the firmware on your
unit. For more information, please see
section 2.4.2 Formatting your hard
drives using Mac OS, p.10.
Format your hard drive using a 3rd
party FAT32 format tool or format in
another compatible file system that
doesn’t have such limitations such as
NTFS.
You may need to purchase a PCI
eSATA card that is PM aware. You can
also connect the QSX via USB, as USB
does not have this limitation.
Page 19

19
Warranty / Tech Support
5. WARRANTY
This product carries a 1 year warranty from the date of purchase on the enclosure, and a 3 year
warranty from the date of purchase on the HDDs. Any claims for loss or damage must be made to
carrier directly. Claims for shipping errors should be reported to Kanguru Solutions within three (3)
working days of receipt of merchandise.
6. TECH SUPPORT
If you experience any problems installing your Kanguru product or have any technical questions
regarding any of our products, please call our tech support department. Our tech support is free and
available Monday thru Friday, 9am to 5pm EST.
Call 1-508-376-4245
Or visit our website at www.Kanguru.com
Page 20

Kanguru Solutions
1360 Main Street
Millis, MA 02054
www.kanguru.com
10.30.09 V1.1© 2009 Kanguru Solutions
Legal terms and conditions available at www.kanguru.com. Please review and agree before use. Thank you.
 Loading...