

Page 1
Copyright 2009, All Rights Reserved.
Kanguru miniClone 1HD SATA
User Guide
Page 2

Notices and Information
NOTICES AND INFORMATION
Please be aware of the following points before using your Kanguru miniClone
Copyright© 2009, Kanguru Solutions. All rights reserved.
DOS®, Windows 95® , Windows 98®, Windows NT®, Windows 2000®, Windows ME®, Windows
XP®, Windows Vista® and Windows 7TM are registered trademarks of Microsoft Inc. Apple® and
Macintosh® are registered trademarks of Apple Computer Inc. All other brand or product names are
trademarks of their respective companies or organizations.
Kanguru Solutions will not be held responsible for any illegal use of this product nor any losses incurred
while using this product. The user himself is responsible for the copyright laws, and is fully responsible
for any illegal actions taken.
Customer Service
To obtain service or technical support for your system, please contact Kanguru Solutions Technical
Support Department at 508-376-4245, or visit www.Kanguru.com for web support.
Legal notice
In no event shall Kanguru Solutions’ liability exceed the price paid for the product from direct, indirect,
special, incidental, or consequential software, or its documentation. Kanguru Solutions offers no refunds
for its products. Kanguru Solutions makes no warranty or representation, expressed, implied, or statutory,
with respect to its products or the contents or use of this documentation and all accompanying software,
and specifically disclaims its quality, performance, merchantability, or fitness for any particular purpose.
Kanguru Solutions reserves the right to revise or update its products, software, or documentation without
obligation to notify any individual or entity.
Export Law Compliance
Regardless of any disclosure made to Kanguru Solutions pertaining to the ultimate destination of the
specific Kanguru product, you warrant that you will not export, directly or indirectly, any Kanguru
product without first obtaining the approval of Kanguru Solutions and the appropriate export license from
the Department of Commerce or other agency of the United States Government. Kanguru Solutions has
a wide range of products and each product family has different license requirements relative to exports.
FCC Compliance Statements
This equipment has been tested and found to comply with the limits for a Class B digital device, pursuant
to Part 15 of the FCC Rules. These limits are designed to provide reasonable protection against harmful
interference in a residential installation. This equipment generates, uses and can radiate radio frequency
energy and, if not installed and used in accordance with the instructions, there is no guarantee that
interference will not occur in a particular installation. If this equipment does cause harmful interference
to equipment off and on, the user is encouraged to try to correct the interference by one or more of the
following measures:
• Reorient or relocate the receiving antenna.
• Increase the Distance between the equipment and receiver.
• Connect the equipment into an outlet on a circuit different from that to which the receiver is
connected.
• Consult the dealer or an experienced radio/TV technician for help.
2
Page 3

Table of Contents
Table of Contents
Notices and Information ............................................................................................. 2
1. Introduction ......................................................................................... 5
1.1 Package Contents ......................................................................................... 6
1.2 Specifications ................................................................................................ 6
2. Parts and Functions ............................................................................ 7
3. Connecting and Removing Hard Drives ...........................................8
3.1 Where to Connect Hard Drives .................................................................. 9
3.2 Connecting Bare Hard Drives................................................................... 10
3.3 Removing Bare Hard Drives ..................................................................... 11
3.4 Connecting External Hard Drives ............................................................ 12
4. Operating Your Kanguru miniClone .............................................. 13
4.1 The User Interface .................................................................................... 14
4.2 General Operation ..................................................................................... 15
4.3 Pausing and Cancelling a Process ............................................................ 17
4.4 Information Reporting .............................................................................. 18
5. Menu and Functions ......................................................................... 19
5.1 Device .......................................................................................................... 20
5.1.1 Connecting a Device ........................................................................ 21
5.1.2 Disconnecting a Device .................................................................... 22
5.2 Copy ............................................................................................................ 23
5.2.1 Disk Copy ........................................................................................ 23
5.2.2 Disk Copy & Compare .................................................................... 24
5.2.3 Partition Copy ................................................................................. 25
5.2.4 Partition Copy & Compare ............................................................ 26
5.3 Compare...................................................................................................... 27
5.3.1 Disk Compare ................................................................................... 27
5.3.2 Partition Compare ........................................................................... 28
3
Page 4

Table of Contents
5.4 Erase ............................................................................................................ 29
5.4.1 Quick Erase ...................................................................................... 29
5.4.2 Full Erase .......................................................................................... 30
5.4.3 3 x Wipe ............................................................................................ 30
5.4.4 7 x Wipe ............................................................................................ 31
5.5 Check ........................................................................................................... 32
5.5.1 Verify ................................................................................................. 32
5.5.2 Verify & Repair ................................................................................ 32
5.5.3 Seek Test ........................................................................................... 33
5.6 Option ......................................................................................................... 34
5.6.1 General Option ................................................................................. 35
5.6.2 Temperature Option ........................................................................ 36
5.6.3 Error Option .................................................................................... 37
5.6.4 Buzzer Option .................................................................................. 38
5.6.5 Display Option ................................................................................. 39
5.6.6 Information ...................................................................................... 40
5.6.7 Set to Defaults .................................................................................. 40
5.7 Power OFF .................................................................................................. 40
6. Error and Warning Messages Defined ............................................ 41
6.1 Initialization Errors ................................................................................... 41
6.2 Initialization Warnings .............................................................................. 42
6.3 Process Errors ............................................................................................ 43
6.4 Retry Errors ............................................................................................... 44
6.5 Timeout Errors ........................................................................................... 44
7. Troubleshooting ................................................................................. 45
8. FAQ .................................................................................................... 46
9. Warranty ............................................................................................ 48
10. Tech Support..................................................................................... 48
4
Page 5

1. Introduction
Congratulations on your purchase of the Kanguru miniClone from Kanguru Solutions.
The Kanguru miniClone is a high speed, stand-alone 1 to 1 SATA hard drive duplicator that creates hard
drive clones. The duplicator has many advanced features for the IT professional, yet a novice can begin
cloning hard drives within minutes of taking it out of the box.
The Kanguru miniClone is a 1 to 1 duplicator, meaning that it copies the content of a Source Drive to
a Destination Drive. With ultra fast copy speeds of up to 120MB/s, and an intuitive user interface, the
Kanguru miniClone is a versatile tool that makes your small duplication projects a snap.
The Kanguru miniClone can also be connected to a computer through USB or eSATA connection.
Features
√ Make copies of bare SATA HDDs (Hard Disk Drives), external hard drives (USB and eSATA
external hard drives supported) and USB flash drives.
Introduction
√ HDD Size and Brand independent: Supports all standard 2.5” / 3.5” SATA HDDs, SSDs and external
hard drives. Master & Target drives can be different sizes, brands and models.
√ Up to 120MB/s transfer rates (depending on hard drive).
√ Stand alone functionality, means no computer is required for operation.
√ Clear 128 x 64 OLED display.
√ Space saving, toaster style duplicator.
√ Clones any operating system: including DOS, Win98, Win2K, Win NT, Win XP, Win Vista, Linux,
Mac and many more.
√ Powerful diagnostic functions
√ Up to 7 x Wipe erase function.
√ Six copy / compare Functions:
○ Disk Copy - Full copy, sector for sector
○ Disk Compare - Compares the content of two hard drives.
○ Disk Copy & Compare - After copying a hard drive, the two drives are compared to ensure
that the data on them are the same.
○ Partition Copy - Copies all active partitions on the Source Drive to a Destination Drive.
○ Partition Compare - Compares the content of the active partitions of two hard drives.
○ Partition Copy & Compare - After copying the active partitions on a hard drive, the partitions
are compared to ensure that the data on them are the same.
5
Page 6
Package Contents / Specifications
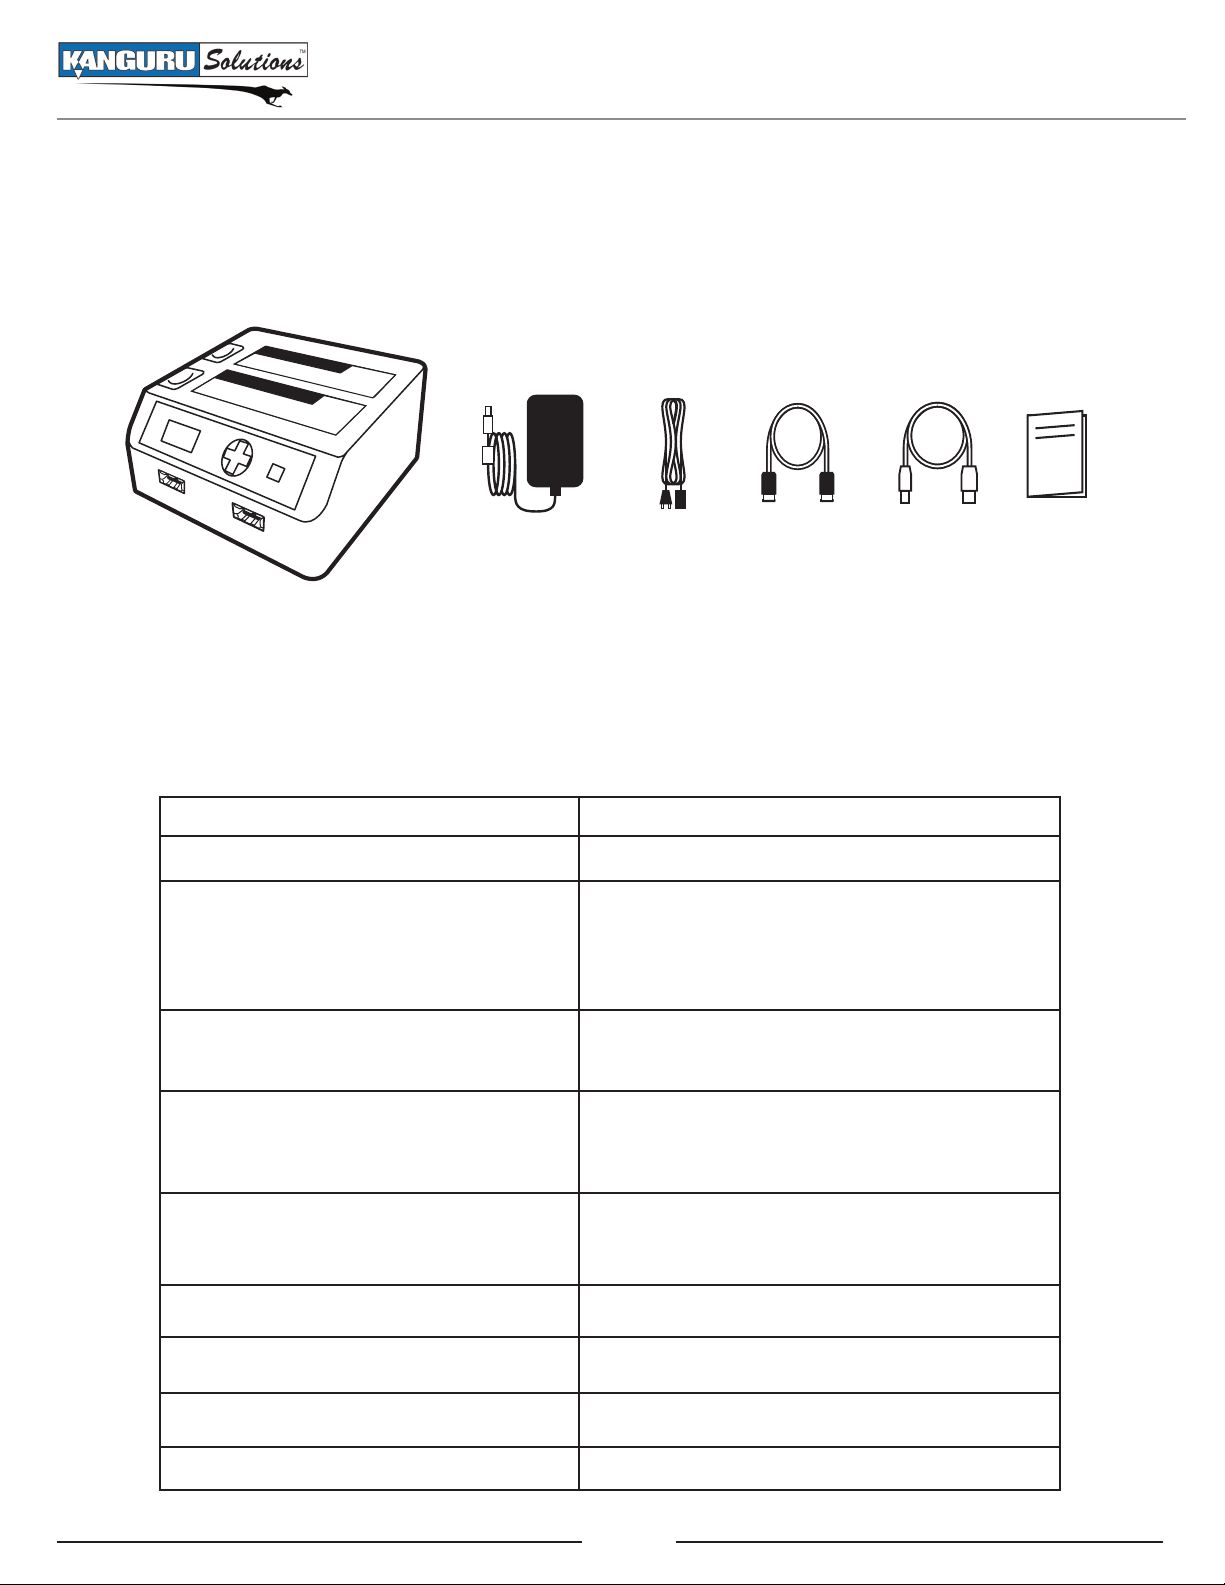
1.1 Package Contents
If any of the following items are missing, please call Kanguru Solutions’ Tech Support department at:
(508) 376-4245, extension 2 and replacement parts will be shipped to you immediately.
Kanguru miniClone AC power adapter Power cable eSATA cable USB cable Manual
1.2 Specifications
Model KCLONE-1HD-SATA
Display 128 x 64 OLED
Supported Hard Drives
PC Connection Interface
External Connection Interface
PC Connection Supported OS
Dimensions 6”x2¾”x5⅔”
2.5” / 3.5” SATA HDD
2.5” / 3.5” SATA SSD
External USB/eSATA HDD
USB / eSATA Flash Drive
USB 2.0
eSATA
SATA
eSATA
USB 2.0
Windows 2000, XP, Vista, 7
MacOSX 10.4 or above
Weight 1⅔lbs.
Operating Temperature 40ºF ~ 95ºF
Relative Humidity 20% ~ 80%
6
Page 7
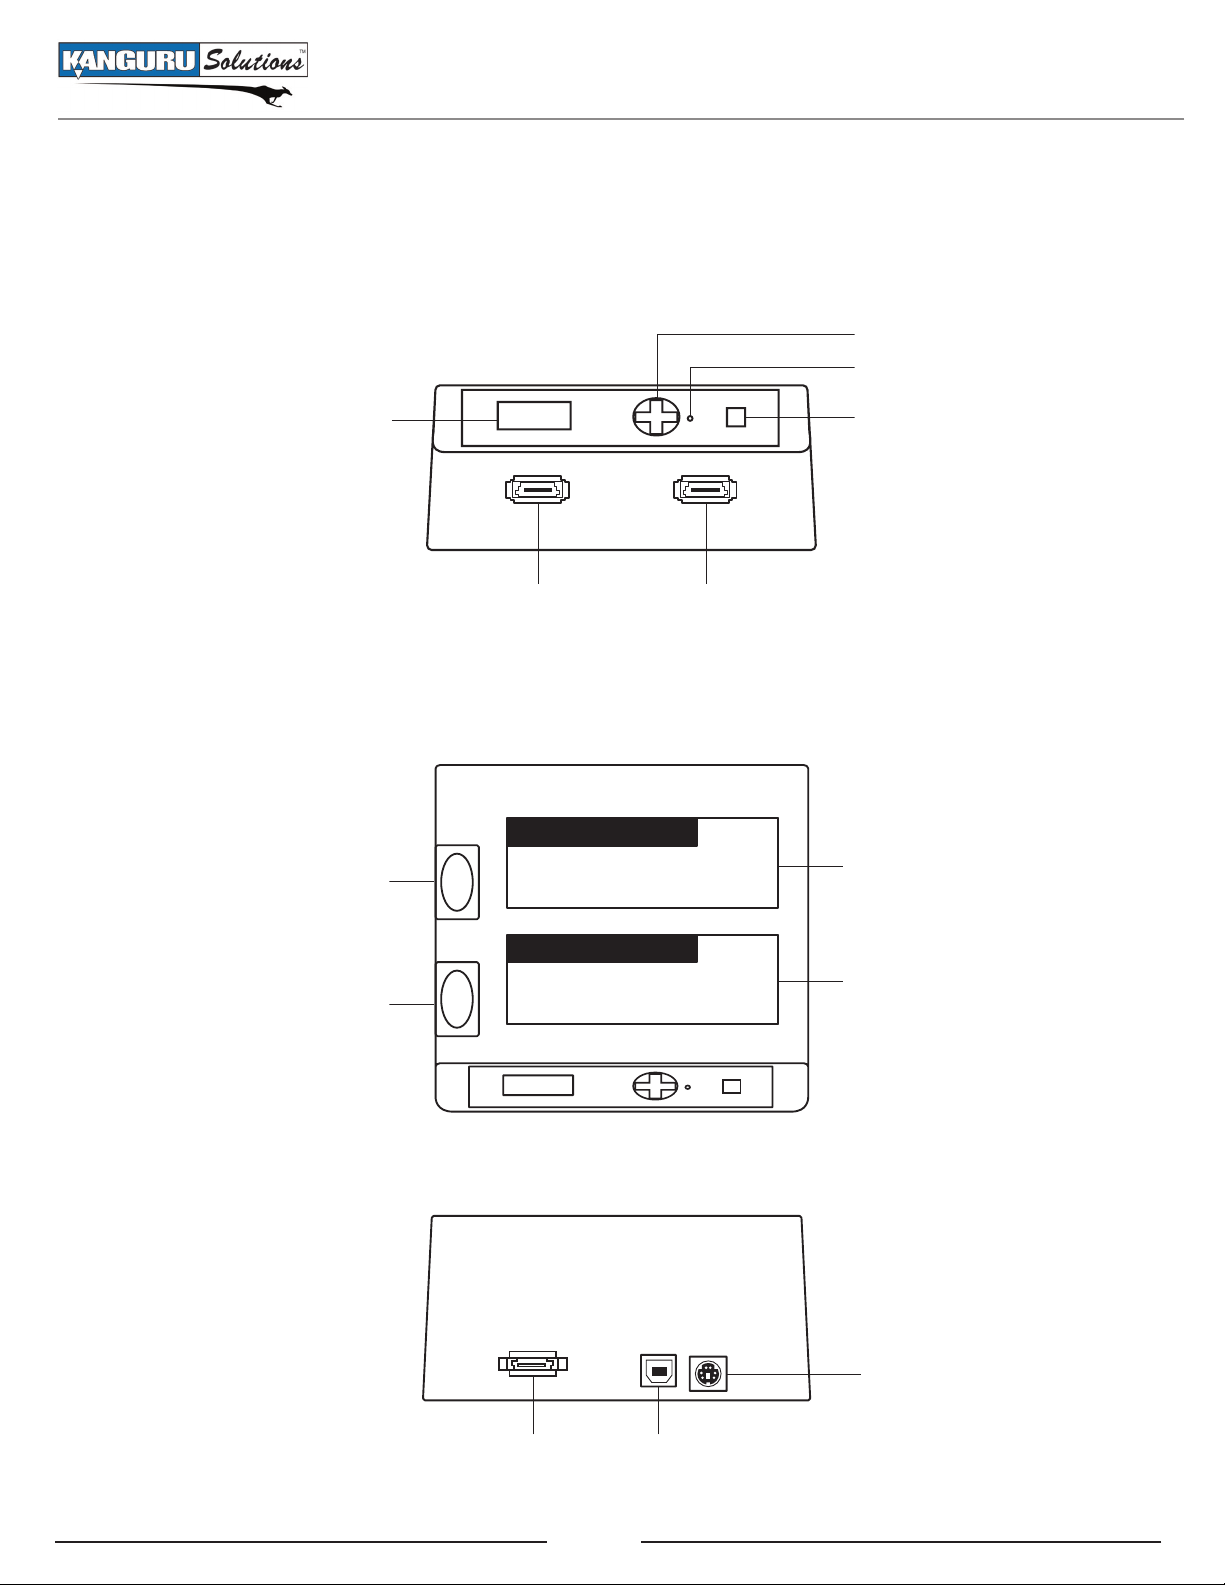
2. Parts and Functions
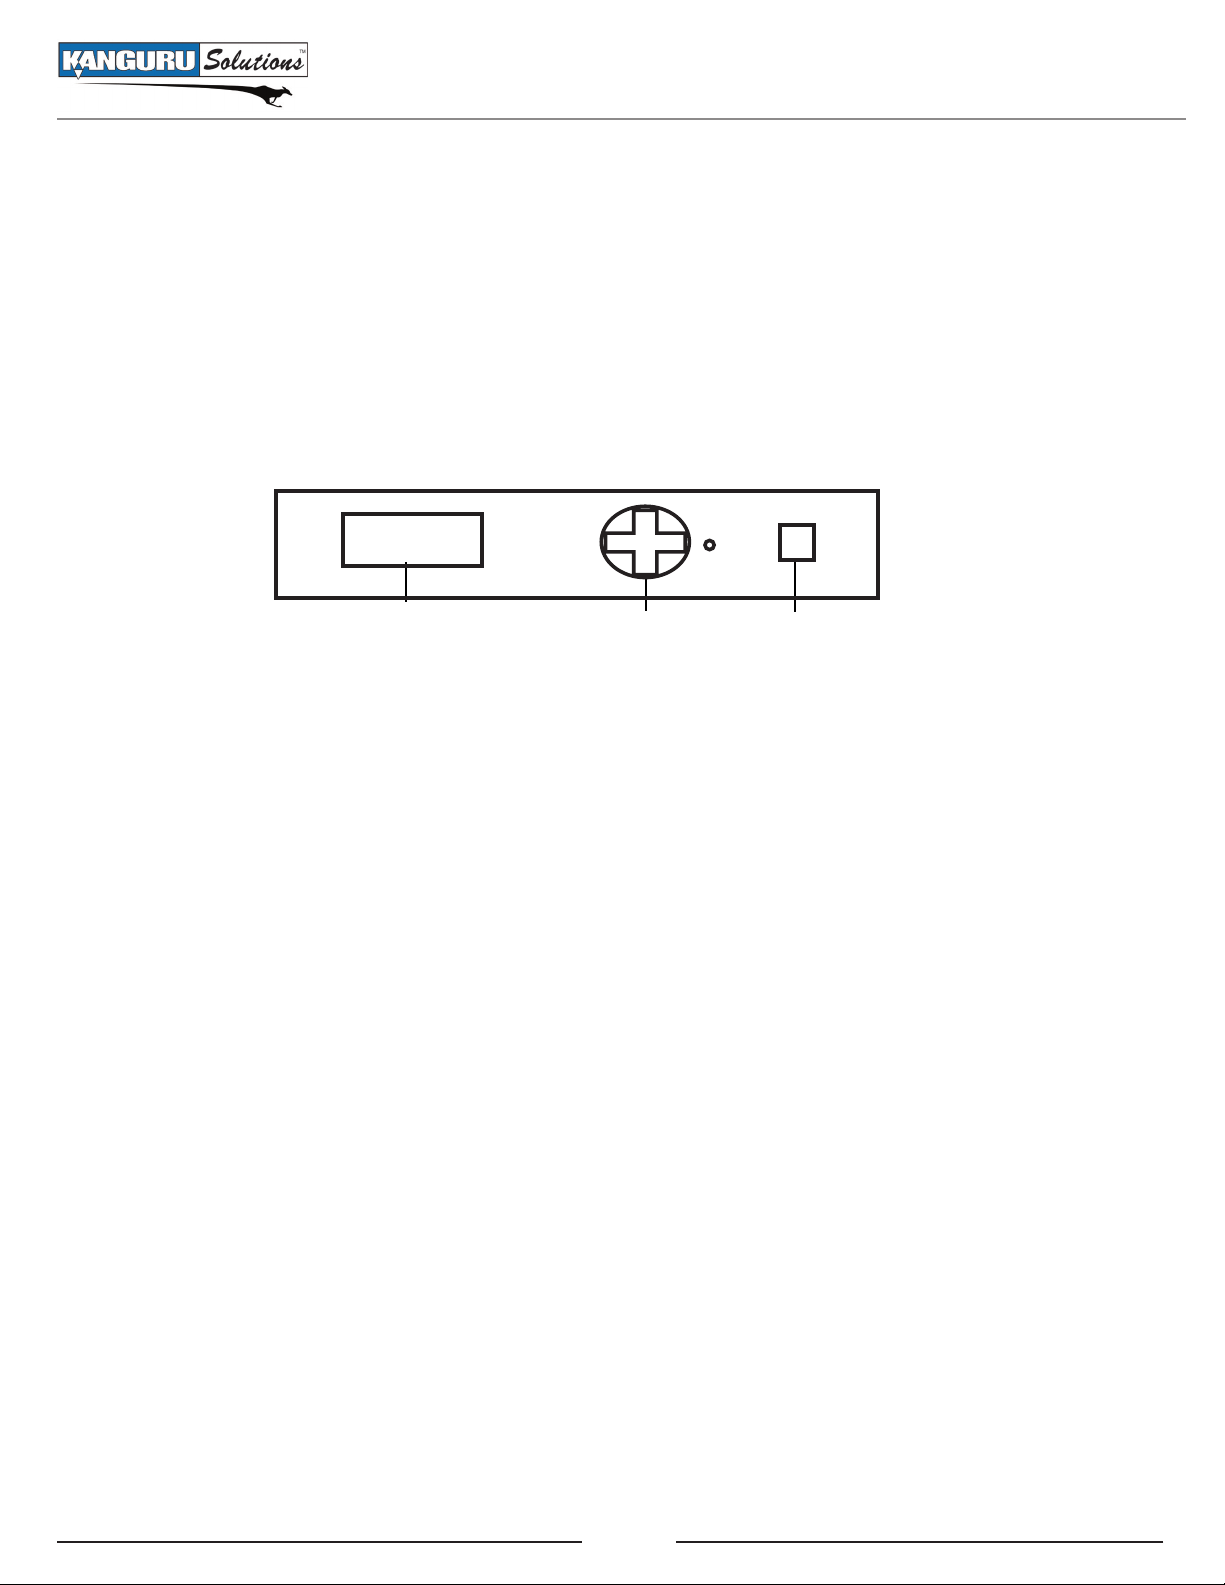
Front View
Parts and Functions
4 Direction Cursor
Speaker
OLED Display
Top View
Disk 1 Eject Button
Disk 2 Eject Button
Disk 3 Port
(USB 2.0 / eSATA)
DISK1 DISK2
POWER / ENTER
Button
Disk 4 Port
(USB 2.0 / eSATA)
Disk 1 Port
(SATA)
Disk 2 Port
(SATA)
Rear View
DC Input
eSATA Connector USB Connector
7
Page 8
Connecting and Removing Hard Drives
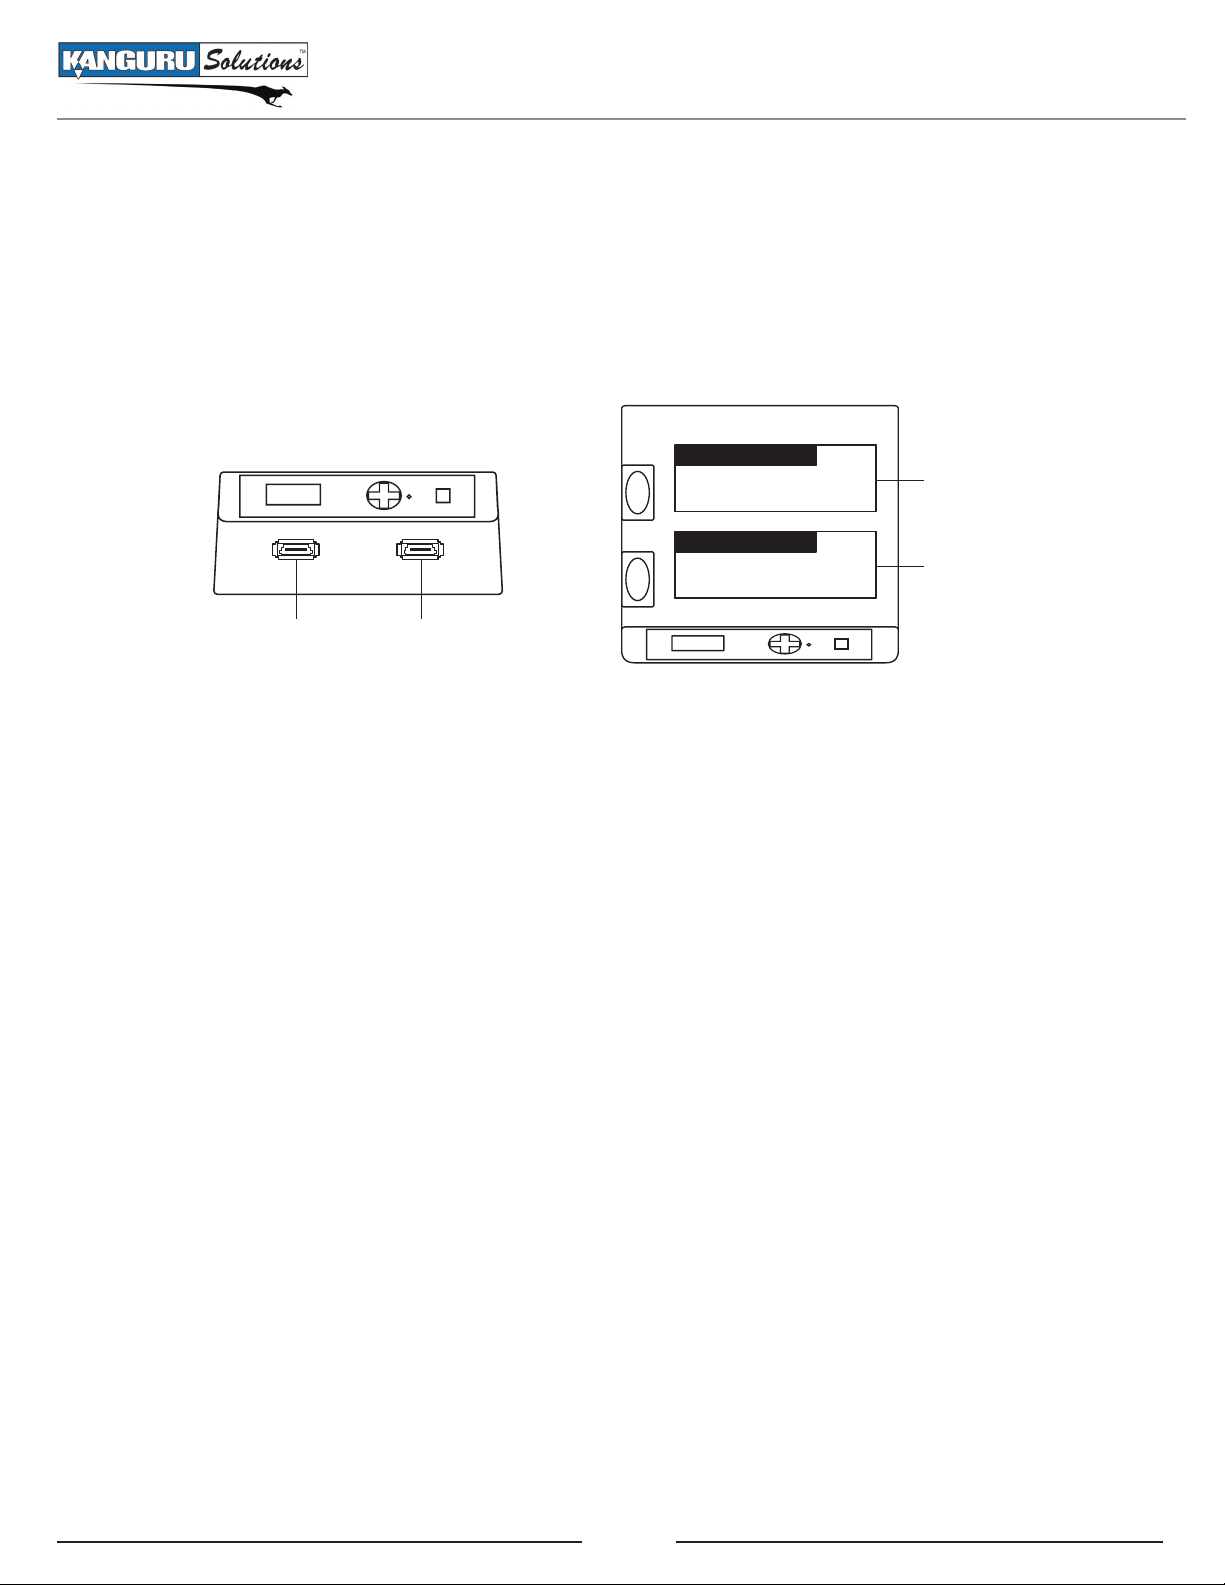
3. Connecting and Removing Hard Drives
There are 4 ports for connecting hard drives to your miniClone. The Disk 1 and Disk 2 ports on the top
of the unit are toaster style HDD cradles, used for connecting bare SATA drives. The Disk 3 and Disk 4
ports on the front of the unit are USB/eSATA ports for connecting external hard drives or flash drives.
DISK1 DISK2
Disk 1
Disk 2
Disk 3 Disk 4
Before connecting hard drives please notice:
• Hard drives precision instruments. Avoid bumping or dropping them.
• Hard drives are electrical devices. When handling bare drives, please be aware that static electricity
may damage your hard drive. Please discharge any static electricity before operating by touching a
metal frame or using electrostatic prevention bands.
• To protect your hard drives, please remove all hard drives from this product when not in use.
• SATA HDD connectors have a guaranteed number of times for connection/removal, specified by
the manufacturer. If an HDD is connected/removed more than this number of times, the quality
of the HDD cannot be guaranteed. Therefore please minimize the number of times you connect/
remove HDDs.
• The Disk 1 and Disk 2 connection ports are only for SATA HDDs. HDDs based on other standards
such as IDE (PATA) HDD, SCSI HDD or SAS HDD cannot be connected.
8
Page 9
Where to Connect Hard Drives
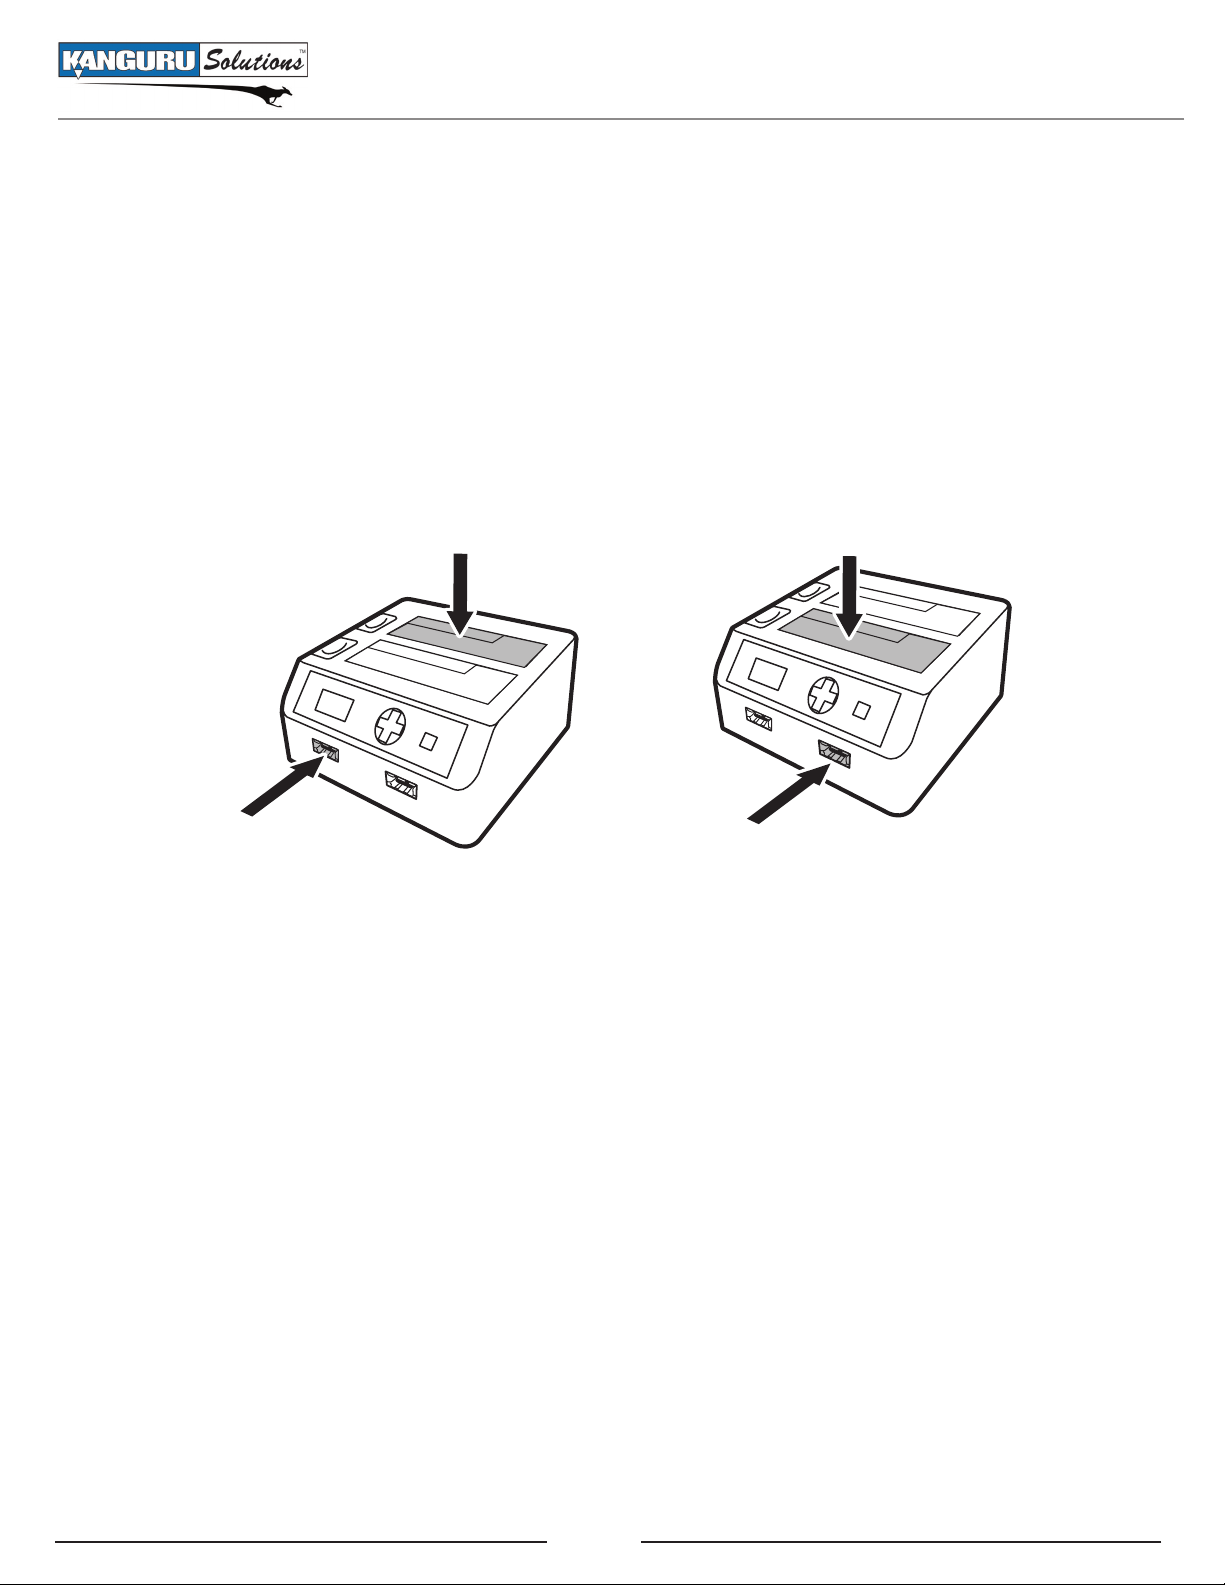
3.1 Where to Connect Hard Drives
It is important when connecting a hard drive that you are aware which position you are connecting your
hard drive to (Disk 1 / Disk 3 or Disk 2 / Disk 4). Disk 1 and Disk 3 are generally reserved for read
functions. Disk 2 and Disk 4 are generally reserved for write functions. Certain functions require you to
connect your hard drive to a specific Disk position.
Note: The Disk 1 and Disk 2 connection ports are only for SATA HDDs. HDDs based on other standard
such as IDE (PATA) HDD, SCSI HDD or SAS HDD cannot be connected.
Disk 1
Disk 3
COPY MODE
• Disk 1, Disk 3 - Source hard drive
• Disk 2, Disk 4 - Target hard drive
Disk 2
Disk 4
ERASE MODE
• Disk 2 or Disk 4
CHECK MODE
• HDD can be verified from any position, but when HDD is connected to Disk 1 or Disk 3, Verify &
Repairing function and Seek Test functions are not available.
CHECK MODE
• Disk 2 or Disk 4
9
Page 10
Connecting Bare Hard Drives
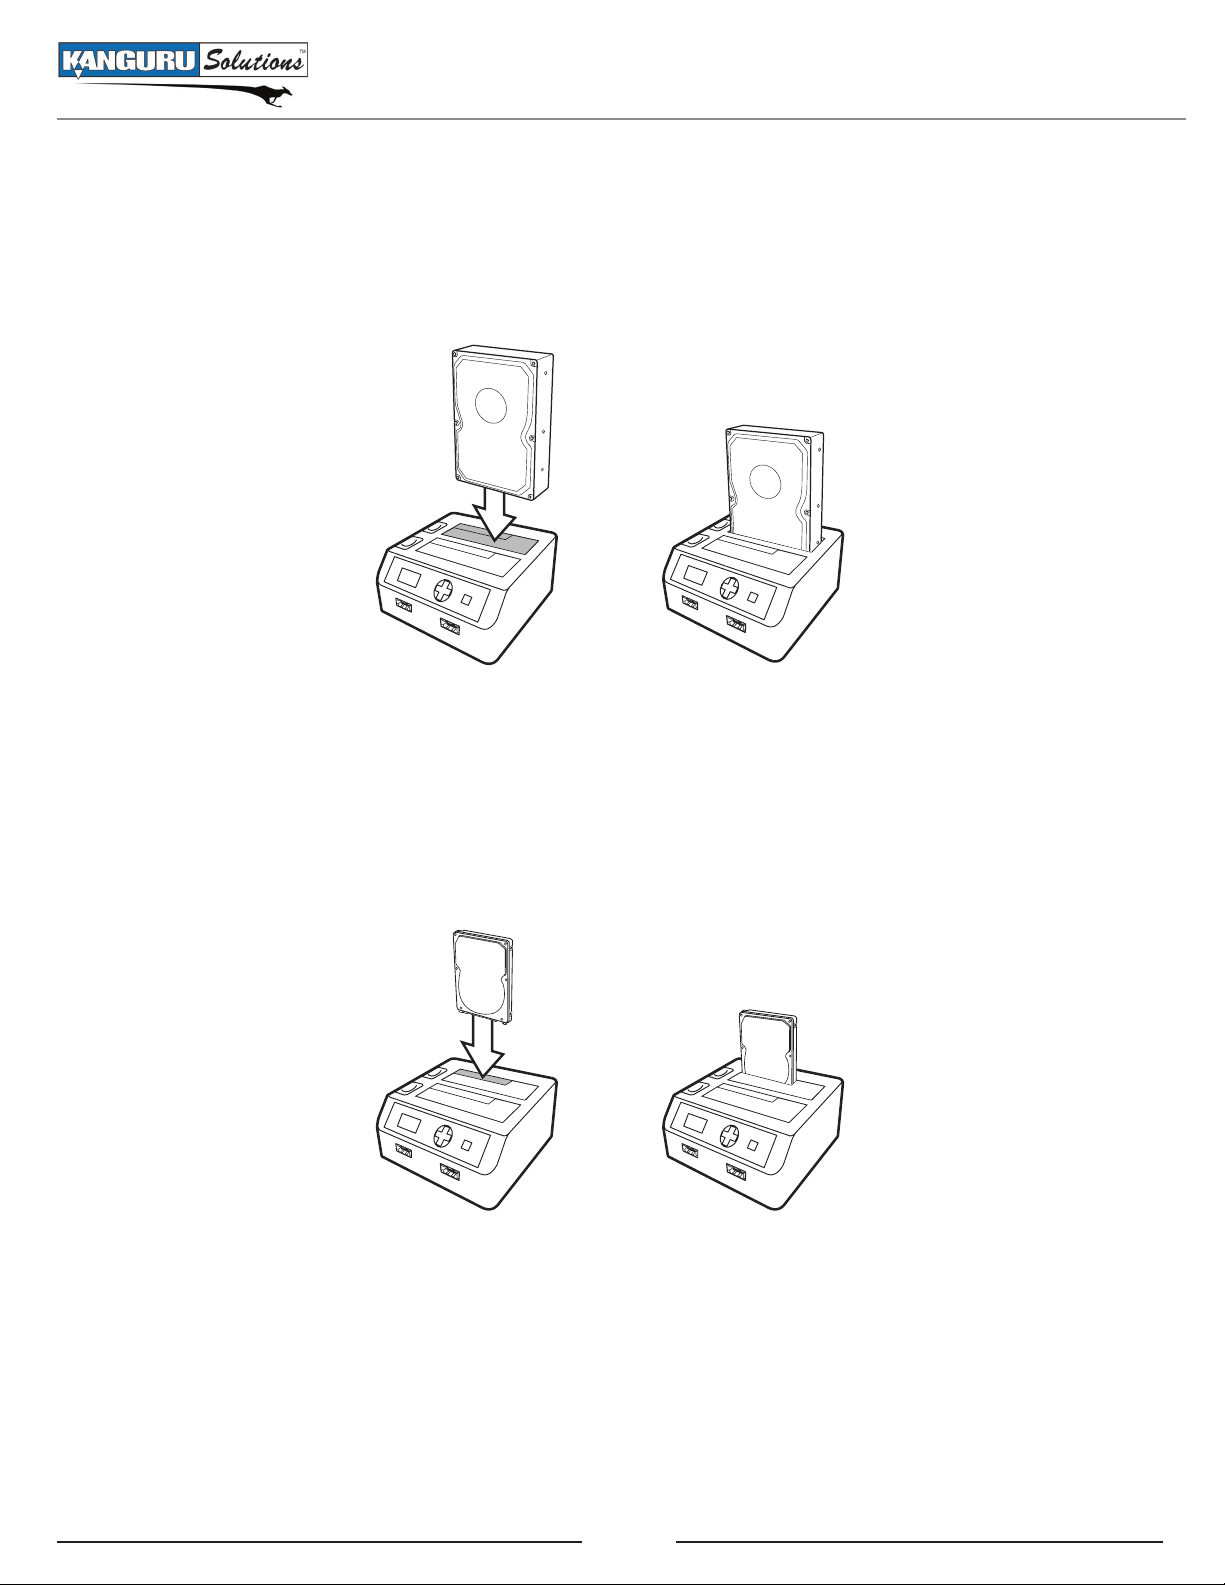
3.2 Connecting Bare Hard Drives
Connecting 3.5” HDDs
Hold the HDD vertically with the SATA connector at the bottom-left and then slowly insert it into the
cradle firmly.
Connecting 2.5” HDDs
Hold the HDD vertically with the SATA connector at the bottom-left and then slowly insert it into the
slot in the cradle firmly.
Warning! When connecting a bare HDD into the Disk 1 or Disk 2 port, please insert the HDD slowly.
Pay attention to the direction that the HDD is facing and the position of the SATA connector. If you insert
the HDD with too much force, it may cause damage to your hard drive or to the miniClone.
10
Page 11
Removing Bare Hard Drives
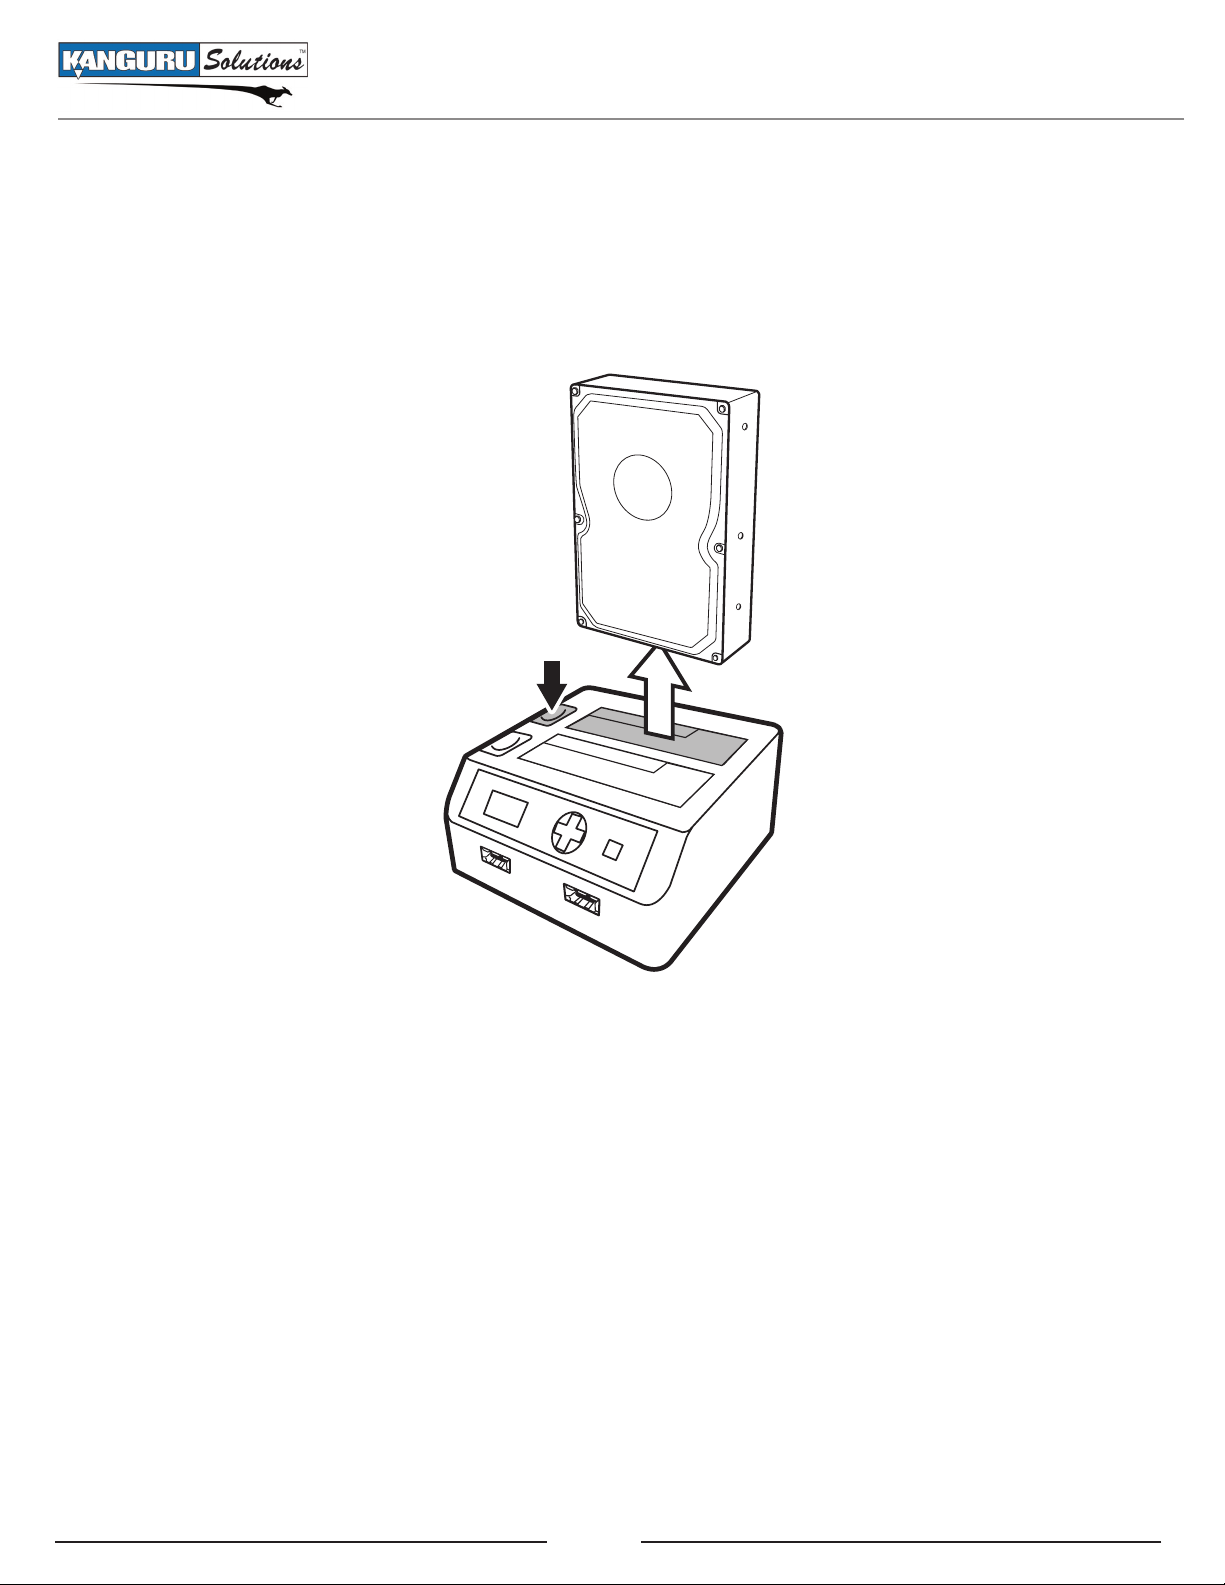
3.3 Removing Bare Hard Drives
To remove a bare hard drive, push the eject button to the left of the bare HDD that you want to remove.
This will cause the HDD to protrude. Then slowly remove the HDD straight out of the cradle.
Warning! Do not remove any hard drives while they are in use or being accessed by the miniClone.
Doing so may result in damage to your hard drive or the miniClone.
11
Page 12

Connecting External Hard Drives
3.4 Connecting External Hard Drives
The Disk 3 and Disk 4 ports are USB / eSATA combo ports. Both USB and eSATA external hard drives
or flash drives can be connected to these ports. Other USB storage devices like DVDRW drives or card
readers cannot be connected to these ports.
eSATA USB
It is possible to connect USB or eSATA devices that can operate on bus power to the USB / eSATA ports.
If the device requires more electricity than the miniClone’s rated value (500mA), it will not be possible
for the device to operate on bus power. You will need to connect the device’s external power supply in
order for the device to work with the miniClone.
Note: The Kanguru miniClone does not support devices secured by password protection or data
encryption.
12
Page 13

4. Operating Your Kanguru miniClone
Things to remember
• Make sure that sufficient power is supplied to the Kanguru miniClone. Incorrect power will cause
faulty operation.
• It is OK to connect and disconnect Master or Target drives while the Kanguru miniClone is
powered on. However, do NOT connect or disconnect drives while any function is running or is in
progress.
• Booting an OS using this product is not supported.
• This product may malfunction if it is located close to a radio, television or an audio device. Please
keep the miniClone away from these types of devices during operation.
Operating Your Kanguru miniClone
• This product is for 2.5 inch and 3.5 inch SATA HDD, SATA SSDs, USB / eSATA external hard
drives and flash drives exclusively. The operation of other devices (e.g. optical drives) are not
supported. Bare IDE HDDs are not supported.
• Bare SATA HDDs can be connected to the miniClone without any kind of enclosure. SATA HDDs
are designed to be used with an enclosure. When using this product with SATA HDDs the electrical
components are uncovered. Static electricity may cause damage to electronic devices. Please be
careful and use tools, like electrostatic prevention bands, when handling bare SATA HDDs.
Hardware Setup
1. Place the Kanguru miniClone where there is proper ventilation. Avoid using the Kanguru miniClone
in environments with high temperatures.
2. Before plugging in the AC Power Cable, please make sure that the voltage is adjusted to the same
as your local voltage 110V/220V.
Note: Make sure that sufficient power is supplied to the Kanguru miniClone. Incorrect power will
cause faulty operation.
3. You are now ready to begin using your Kanguru miniClone.
13
Page 14
4.1 The User Interface
Kanguru Solutions designed the Kanguru miniClone’s menu system with the professional in mind. The
menu system is fast, responsive, and easy to navigate. This means fewer key presses are needed to
achieve a desired action.
The menu system is controlled by a 4 Direction Cursor and a Power/Enter push button located to the
right of the OLED screen.
The User Interface
OLED Display
4 Direction Cursor Power / Enter button
14
Page 15
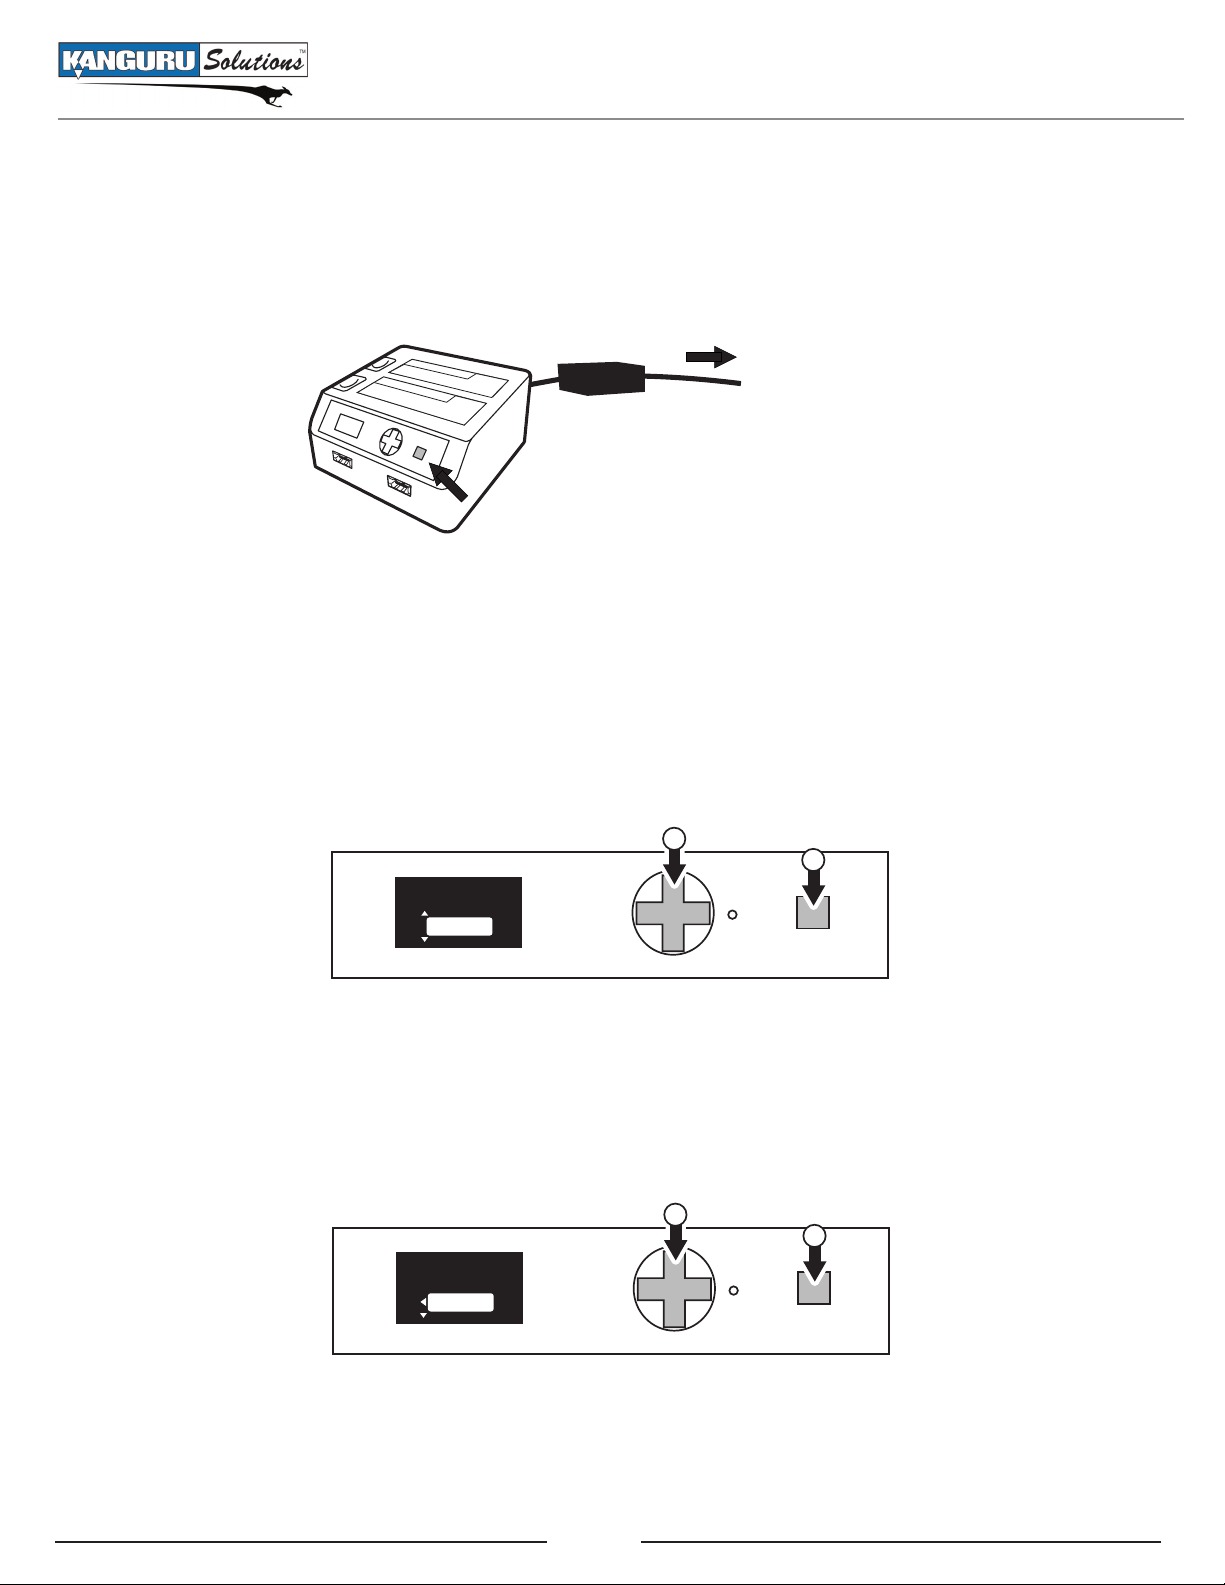
4.2 General Operation
Please follow these steps to execute the miniClone’s main functions (Copy, Compare, Erase, Seek):
1. Connect the AC adaptor and then power on the miniClone by pressing the POWER button.
Connect to outlet
Press POWER / ENTER button
2. Connect your hard drives to the miniClone. See chapter 3, Connecting and Removing Hard Drives,
p.8 for more information on connecting your hard drives.
General Operation
3. Select the desired mode from the main menu by pressing the Up or Down directional button. Press
the ENTER button to enter that mode.
1
2
Select Mode
Device
Copy
Compare
4. Select the desired function by pressing the Up or Down directional button. Press the ENTER
button to begin that function or press the Left directional button to cancel and return to the Main
Menu.
1
2
Copy
Select Mode
Disk Copy
Disk Copy&Comp
(Cont. p.15)
15
Page 16

General Operation
5. Select the hard drive by pressing the Up or Down directional button. Press the ENTER button to
confirm your selection.
1
2
Disk Copy
Source Disk
Disk1
Disk2
Note: If the process you select requires multiple disks (such as COPY or COMPARE), select the
Source Disk first and the Destination Disk second.
6. You will be asked to confirm the start of the process. Select YES by pressing the Up or Down
directional button and then press the ENTER button. The HDD will initialize and the process
begins.
Disk Copy
Disk1 Disk2
Start?
No
Yes
No
Disk Copy
Disk1 Disk2
Initializing...
7. When process is completed, [Past Time], [Speed] and [Total] will be displayed. Press the ENTER
button to return to the main menu.
Note: If the Auto Shutdown option is set to ON, this information will not be displayed and the
miniClone will automatically turn off. For more information about the Auto Shutdown option, see
section 6.6.1 General Options, p.35.
Powering Off your Kanguru miniClone
1. From the main menu, press the Down directional button to select Power OFF and then press the
ENTER button.
2. A confirmation screen appears. Press the Up or Down directional button to select Yes, and then
press the ENTER button.
16
Page 17

Disk Copy
Disk Copy
Disk Copy
Disk Copy
Pausing and Cancelling a Process
4.3 Pausing and Cancelling a Process
If you wish to pause the current process, press the ENTER button. Press the ENTER button again to
resume.
If you wish to cancel the current process:
1. Press the ENTER button to pause the process.
Disk1 Disk2
PAUSE
2. Press the Up or Down directional button to bring up the cancel menu.
Disk1 Disk2
Continue
Abort
3. Press the Down directional button to select Abort and then press the ENTER button.
Disk1 Disk2
Continue
Abort
4. A confirmation screen will appear. Press the Up or Down directional button to select Yes and then
press the ENTER button to cancel the process.
Disk1 Disk2
Abort?
No
Yes
No
5. Press the ENTER button to return to the main menu.
17
Page 18

Disk Copy
Disk1 Disk2
LBA
Prog 1 . 2% 38 . 80MB/s
Past 0 : 39 D1 : 95 F
Left 50 : 55 D2 : 106 F
0000 002C A400h
Information Reporting
4.4 Information Reporting
While a function is in progress, real time information is provided to you. Information can be displayed
in two modes: Detailed Display and Individual Display.
Note: Some hard drives will not have all information available for display.
Detailed Display
The Kanguru miniClone operates in the Detailed Display mode by default. During the process, the
display will report all information regarding your drive on a single screen:
Disk Copy
Disk1 Disk2
LBA
0000 002C A400h
Prog 1 . 2% 38 . 80MB/s
Past 0 : 39 D1 : 95 F
Left 50 : 55 D2 : 106 F
• LBA - Logical Block Address
• Progress - Percentage completed
• Past - Amount of time the process has been running
• Left - Amount of time left before the process is completed (estimate)
• Speed - Data transfer rate
• Temp - Temperature of the hard drive
Individual Display
While in the Detailed Display mode, push the Right directional button to switch to the Individual Display
mode.
Disk Copy
Disk1 Disk2
Past 8s
This will allow you to view each item individually. Press the Up or Down button to switch what item is
displayed. Press the Left directional button to return to the Detailed Display mode.
18
Page 19

5. Menu and Functions
• Device
• Copy
○ Disk Copy
○ Disk Copy & Compare
○ Partition Copy
○ Partition Copy & Compare
• Compare
○ Disk Compare
○ Partition Compare
• Erase
○ Quick Erase
○ Full Erase
○ 3 x Wipe
○ 7 x Wipe
Menu and Functions
• Check
○ Verify
○ Verify & Repair
○ Seek Test
• Option
○ General Option - 2TB Limit, Spin-up Wait Time, SMART Check Period, PIO Transfer Only,
Device Write Protect, Unplug Device, Auto Shutdown, Sector Count
○ Temperature Option - Warning Temperature, USB-FAN Temperature
○ Error Option - Auto Skip, Retry Count, Timeout Period, Timeout Retry
○ Buzzer Option - Buzzer Mode, Buzzer (Click), Buzzer (Normal), Buzzer (Error)
○ Display Option - Opening Animation, Smooth Scroll, Vertical Scroll, Horizontal Scroll,
Reverse Select, Contrast, Transfer Rate Display
○ Information
○ Set to Default
• Power Off
19
Page 20

5.1 Device
Device mode allows you to connect any one drive to a PC so that it can be used like an external HDD.
To connect a hard drive attached to the miniClone as a device on your PC you first need to connect the
miniClone to your PC through either the eSATA or USB port located on the back of the unit. Although
the miniClone has both USB and eSATA ports, they cannot both be connected at the same time. Please
connect through either USB or eSATA.
It is only necessary to connect the miniClone to a PC if you plan on using it in Device mode. Other
modes do not require a PC connection.
Note: If a USB device is connected to the miniClone and the miniClone is connected to the PC via
eSATA, the device will operate at USB speeds. If an eSATA device is connected to the miniClone and
the miniClone is connected to the PC via USB, the device will operate at USB speeds. In order to achieve
eSATA speeds, an eSATA device needs to be connected to the miniClone and the miniClone must be
connected to the PC via eSATA.
Device
Device Mode System Requirements
Connection: eSATA
• Supported systems
○ PC/AT compatible system
○ Macintosh equipped with eSATA I/F
Connection: USB
• Supported systems:
○ Windows 2000 / WindowsXP / Windows Vista / Windows 7
- PC/AT compatible system equipped with USB 2.0 interface port (for USB 2.0 devices)
- PC/AT compatible system equipped with USB 1.1 interface port (for USB 1.1 devices)
- Intel chipset is recommended
- 1 GHz processor
- 512 MB RAM
○ Mac OS X 10.4 or later
- MacPro, Power Macintosh G5, Mac mini, MacBook Pro, Mac Book, iBook G4 (equipped
with USB 2.0 interface)
Note: Booting an OS from a hard drive connected to the miniClone is not supported.
20
Page 21

Select Mode
Device mode
Device Mode
Connecting a Device
5.1.1 Connecting a Device
To connect a hard drive to your PC via the miniClone:
1. Connect the miniClone to your PC via the eSATA or USB port on the back of the unit.
2. Connect your hard drive, select Device from the main menu and then press the ENTER button.
Device
Copy
3. Select the Disk location that you want to connect from the Select Disk menu and press the ENTER
button.
Select Disk
Disk1
Disk2
4. Press the Up or Down button to select Yes, and then press the ENTER button to connect the device
to your computer.
Device Mode
Disk1
Yes
Start?
Your drive will now be connected to your computer and it will be recognized as an external hard drive.
It will appear in My Computer if you are running Windows, or it will appear on your desktop if you are
running Mac OSX.
The Kanguru miniClone will provide you with real-time status reporting of your connected device:
No
Yes
HDD location
HDD model
Read speed
Write speed
Disk1 117GB
WDC WD1200JS-00M
R
0.00MB/s
W
0.00MB/s
21
104 F
Connection type
HDD capacity
HDD temperature
Page 22

5.1.2 Disconnecting a Device
Device Mode
To disconnect a device connected to your PC via the miniClone:
1. Press the ENTER button. The unplug device menu appears.
Disconnecting a Device
Disk1 117GB
Unplug?
Yes
No
Yes
2. Press the Up or Down directional button to select Yes, and then press the ENTER button to
disconnect the device.
Caution! Make sure that no data is being transferred to the hard drive before disconnecting the hard
drive from your computer. If necessary, use your operating system’s Safe Hardware Removal procedure
to ensure that no programs are accessing the drive before you disconnect it.
22
Page 23

5.2 Copy
Copy mode allows you to copy data from a Source Drive to a Destination Drive.
• The Source Drive needs to be attached to either the Disk 1 or Disk 3.
• The Destination Drive needs to be attached to either Disk 2 or Disk 4.
There are four Copy functions that you can select: Disk Copy, Disk Copy & Compare, Partition Copy
and Partition Copy & Compare.
5.2.1 Disk Copy
Disk Copy copies all of the data from the Source Drive to the Destination Drive. It is recommended to
use two HDDs with the same capacity.
To run a Disk Copy:
1. From the main menu, select Copy and then press the ENTER button.
Copy / Disk Copy
2. From the Copy menu, select Disk Copy and then press the ENTER button.
3. Select the location of the Source Disk and then press the ENTER button. The Source Disk must be
connected to either Disk 1 or Disk 3.
4. Select the location of the Destination Disk and then press the ENTER button. The Destination Disk
must be connected to either Disk 2 or Disk 4.
5. A confirmation screen appears. Select Yes and then press the ENTER button. The Disk Copy
process begins.
Copying Disks with different Capacities
If the capacity of the Source Drive is smaller than the Destination Drive, the copy process will copy all
of the data and the unused space on the Destination Drive will remain as an empty partition (e.g. if you
copy the data of a 60GB HDD to a 100GB HDD, all 60GB of data will be copied to the Destination Drive
and the Destination drive will have an unallocated 40GB partition remaining).
If the capacity of the Destination Drive is smaller than the Source Drive, the copy process will only
copy up to the capacity of the Destination Drive (e.g. if you copy the data of a 100GB HDD to a 60GB
HDD, only 60GB of data will be copied). The miniClone will check both drives’ capacities during the
initialization period. If the miniClone detects that the Source Drive is a larger than the Destination drive,
it will display a warning message asking you to confirm whether you want to continue with the copy.
Select Yes to continue with the Disk Copy.
23
Page 24

Disk Copy & Compare
5.2.2 Disk Copy & Compare
Disk Copy & Compare copies all data from the Source Drive to the Destination Drive. Once the copy
process is completed it automatically runs the Disk Compare function, checking both disks to ensure
that all data was transferred successfully. See section 5.2.1 Disk Copy, p.23 for more information about
the Disk Copy function. See section 5.3.1 Disk Compare, p.27 for more information about the Disk
Compare function.
To run a Disk Copy & Compare:
1. From the main menu, select Copy and then press the ENTER button.
2. From the Copy menu, select Disk Copy & Compare and then press the ENTER button.
3. Select the location of the Source Disk and then press the ENTER button. The Source Disk must be
connected to either Disk 1 or Disk 3.
4. Select the location of the Destination Disk and then press the ENTER button. The Destination Disk
must be connected to either Disk 2 or Disk 4.
5. A confirmation screen appears. Select Yes and then press the ENTER button.
The Disk Copy process begins. Once the Disk Copy process has completed the Disk Compare process
automatically begins.
24
Page 25

Partition Copy
5.2.3 Partition Copy
If you have a Source Disk with unallocated space on it, Partition Copy allows you to duplicate only
primary and extended partitions. Unallocated space will not be duplicated.
To run a Partition Copy:
1. From the main menu, select Copy and then press the ENTER button.
2. From the Copy menu, select Partition Copy and then press the ENTER button.
3. Select the location of the Source Disk and then press the ENTER button. The Source Disk must be
connected to either Disk 1 or Disk 3.
4. Select the location of the Destination Disk and then press the ENTER button. The Destination Disk
must be connected to either Disk 2 or Disk 4.
5. A confirmation screen appears. Select Yes and then press the ENTER button. The Partition Copy
process begins.
If the capacity of the Destination Drive is smaller than the defined partition on the Source Drive, the
copy process will only copy up to the capacity of the Destination Drive (e.g. if you copy the data of a
100GB partition to a 60GB HDD, only 60GB of data will be copied). The miniClone will check both
drives’ capacities during the initialization period. If the miniClone detects that the defined partition on
the Source Drive is a larger than the Destination drive, it will display a warning message asking you to
confirm whether you want to continue with the copy. Select Yes to continue with the Partition Copy.
25
Page 26

Partition Copy & Compare
5.2.4 Partition Copy & Compare
Partition Copy & Compare copies all primary and extended partitions on the Source Drive to the
Destination Drive. Once the copy process is completed it automatically runs the Partition Compare
function, checking the copied partitions on both disks to ensure that all data was transferred successfully.
See section 5.2.3 Partition Copy, p.25 for more information about the Partition Copy function. See
section 5.3.2 Partition Compare, p.28 for more information about the Disk Compare function.
To run a Partition Copy & Compare:
1. From the main menu, select Copy and then press the ENTER button.
2. From the Copy menu, select Partition Copy & Compare and then press the ENTER button.
3. Select the location of the Source Disk and then press the ENTER button. The Source Disk must be
connected to either Disk 1 or Disk 3.
4. Select the location of the Destination Disk and then press the ENTER button. The Destination Disk
must be connected to either Disk 2 or Disk 4.
5. A confirmation screen appears. Select Yes and then press the ENTER button.
The Partition Copy process begins. Once the copy process has completed, the Partition Compare process
automatically begins.
26
Page 27

Disk Compare
Compare / Disk Compare
5.3 Compare
Compare mode checks the contents of two hard drives to make sure that the data on both drives are the
same.
There are two Compare functions that you can select: Disk Compare and Partition Compare.
Note: If you are comparing two hard drives with different capacities, the miniClone will only compare
up to the capacity of the smaller hard drive.
5.3.1 Disk Compare
Disk Compare checks the contents of two hard drives to make sure that the data on both hard drives are
the same.
To run a Disk Compare:
1. From the main menu, select Compare and then press the ENTER button.
2. From the Copy menu, select Disk Compare and then press the ENTER button.
3. Select the location of the first disk and then press the ENTER button.
4. Select the location of the second disk and then press the ENTER button.
5. A confirmation screen appears. Select Yes and then press the ENTER button. The Disk Copy
process begins.
Error reporting
If during the compare process there is an inconsistency detected, an error message will be displayed.
ERR: Compare error
Abort
Retry
Skip
If you receive an error message:
• Abort - Cancels the compare process.
• Retry - The miniClone will try to continue with the compare process.
• Skip - Skip the current error and continue with the compare process.
• Auto Skip - Automatically skip over any errors during the compare process. The total number of
errors skipped will be reported when the compare process has completed.
27
Page 28

Partition Compare
Partition Compare
5.3.2 Partition Compare
Partition Compare checks the contents of any primary or extended partitions on two hard drives to make
sure that the data on the defined partitions are the same. Unallocated space is not checked.
Note: If the Source Drive drive is smaller than the Destination Drive and the Source Drive is partitioned
with the GPT file system, do not run the Partition Copy and Partition Compare functions separately. The
GPT file system stores partition information at the end of the hard drive, which is automatically moved
to the end of the Destination Drive during the copy process. If Partition Copy and Partition Compare
are done separately, you will receive errors. In such cases, please use the Partition Copy & Compare
function as described in section 5.2.4 Partition Copy and Compare, p.26.
To run a Disk Compare:
1. From the main menu, select Compare and then press the ENTER button.
2. From the Copy menu, select Disk Compare and then press the ENTER button.
3. Select the location of the first disk and then press the ENTER button.
4. Select the location of the second disk and then press the ENTER button.
5. A confirmation screen appears. Select Yes and then press the ENTER button. The Disk Copy
process begins.
Error reporting
If during the compare process there is an inconsistency detected, an error message will be displayed.
ERR: Compare error
Abort
Retry
Skip
If you receive an error message:
• Abort - Cancels the compare process.
• Retry - The miniClone will try to continue with the compare process.
• Skip - Skip the current error and continue with the compare process.
• Auto Skip - Automatically skip over any errors during the compare process. The total number of
errors skipped will be reported when the compare process has completed.
28
Page 29

5.4 Erase
Erase mode allows you to erase data on a connected hard drive. The hard drive needs to be attached to
either Disk 2 or Disk 4.
There are four Erase functions that you can select: Quick Erase, Full Erase, 3 X Wipe and 7 X Wipe.
5.4.1 Quick Erase
Quick Erase deletes the information from the hard drive’s MBR (Master Boot Record) and Partition
Table.
Note: Quick Erase is faster than the other Erase modes because it only deletes the boot sector. Your data
is still recoverable after a Quick Erase. If you want to delete any sensitive data stored on your hard drive,
please use one of the other Erase modes.
Erase / Quick Erase
To run a Quick Erase:
1. From the main menu, select Erase and then press the ENTER button.
2. From the Erase menu, select Quick Erase and then press the ENTER button.
3. Select the location of the hard drive that you want to erase and then press the ENTER button. The
hard drive needs to be connected to either Disk 2 or Disk 4.
4. A confirmation screen appears. Select Yes and then press the ENTER button. The Quick Erase
process begins.
29
Page 30

Full Erase / 3 x Wipe
5.4.2 Full Erase
Full Erase deletes all data and file systems on the hard drive by writing “00” into all of the sectors. After
a Full Erase, any data previously stored on the hard drive will be permanently deleted. Make sure that
you back up any important data before running a Full Erase.
To run a Full Erase:
1. From the main menu, select Erase and then press the ENTER button.
2. From the Erase menu, select Full Erase and then press the ENTER button.
3. Select the location of the hard drive that you want to erase and then press the ENTER button. The
hard drive needs to be connected to either Disk 2 or Disk 4.
4. A confirmation screen appears. Select Yes and then press the ENTER button. The Full Erase
process begins.
5.4.3 3 x Wipe
3 x Wipe deletes all data and file systems on the hard drive by writing random data into all of the sectors.
After the random data is written, “00” is written into all of the sectors twice. 3 x Wipe complies with the
NSA standard.
Caution! After a 3 x Wipe, any data previously stored on the hard drive will be permanently deleted.
Make sure that you back up any important data before running a 3 x Wipe.
To run a 3 x Wipe:
1. From the main menu, select Erase and then press the ENTER button.
2. From the Erase menu, select 3 x Wipe and then press the ENTER button.
3. Select the location of the hard drive that you want to erase and then press the ENTER button. The
hard drive needs to be connected to either Disk 2 or Disk 4.
4. A confirmation screen appears. Select Yes and then press the ENTER button. The 3 x Wipe process
begins.
30
Page 31

7 x Wipe
5.4.4 7 x Wipe
7 x Wipe deletes all data and file systems on the hard drive by alternatively writing hexadecimals “00”
and “FF” into all of the sectors six times. “00” is written into all of the sectors during the seventh time.
7 x Wipe complies with the DOD 5220-22.M standard.
Caution! After a 7 x Wipe, any data previously stored on the hard drive will be permanently deleted.
Make sure that you back up any important data before running a 7 x Wipe.
To run a 7 x Wipe:
1. From the main menu, select Erase and then press the ENTER button.
2. From the Erase menu, select 7 x Wipe and then press the ENTER button.
3. Select the location of the hard drive that you want to erase and then press the ENTER button. The
hard drive needs to be connected to either Disk 2 or Disk 4.
4. A confirmation screen appears. Select Yes and then press the ENTER button. The 7 x Wipe process
begins.
31
Page 32

Check / Verify / Verify & Repair
5.5 Check
Check mode allows you to run several diagnostic functions that can run status reports on your hard
drives.
There are three Check functions that you can select: Verify, Verify & Repair and Seek Test
5.5.1 Verify
Verify checks all of the sectors on the disk for any bad sectors.
To run a Verify:
1. From the main menu, select Check and then press the ENTER button.
2. From the Check menu, select Verify and then press the ENTER button.
3. Select the location of the hard drive that you want to verify and then press the ENTER button.
4. A confirmation screen appears. Select Yes and then press the ENTER button. The Verify process
begins.
5.5.2 Verify & Repair
Verify & Repair checks all of the sectors on the disk for bad sectors. If there is a sector in which an error
occurrs, dummy data is written into the bad sector to repair it.
Caution! The repair process may change the data on your hard drive. Please make sure you backup any
important data before running the Verify & Repair function.
To run a Verify & Repair:
1. From the main menu, select Check and then press the ENTER button.
2. From the Check menu, select Verify & Repair and then press the ENTER button.
3. Select the location of the hard drive that you want to verify & repair and then press the ENTER
button. The hard drive needs to be connected to either Disk 2 or Disk 4.
4. A confirmation screen appears. Select Yes and then press the ENTER button. The Verify process
begins. If any bad sectors of found they will be automatically repaired.
32
Page 33

Seek Test
5.5.3 Seek Test
Seek Test performs a full-stroked seek test on a hard drive. The Seek Test checks the hard drive’s physical
status to make sure that no read heads are damaged.
To run a Seek Test:
1. From the main menu, select Check and then press the ENTER button.
2. From the Check menu, select Seek Test and then press the ENTER button.
3. Select the location of the hard drive that you want to the Seek Test on and then press the ENTER
button. The hard drive needs to be connected to either Disk 2 or Disk 4.
4. A confirmation screen appears. Select Yes and then press the ENTER button. The Seek Test process
begins.
Note: The Seek Test will not finish automatically, you need to manually cancel the Seek Test. For more
information about canceling a process, see section 4.3 Pausing and Cancelling a Process, p.17.
33
Page 34

5.6 Option
The Option menu provides you with option items that allow you to configure how your Kanguru
miniClone operates.
There are seven Option items that you can select: General Option, Temperature Option, Error Option,
Buzzer Option, Display Option, Information and Set to Default.
Note: These option items are configured to the optimal operation settings by default. Please do not adjust
any of these options unless you are sure of what you are doing.
Option
34
Page 35

Select Mode
General Option
5.6.1 General Option
From the Option menu:
1. Select General Option and then press the ENTER button. This will bring up the General Option
menu.
2. Press the Up or Down directional button to navigate the General Option items.
3. Press the Right or Left directional button to change any of the General Option items.
4. Press the ENTER button to save the current General Option configuration and return to the Options
menu.
General Option items include:
• 2TB Limit (ON / OFF) - Windows XP and earlier OS are not able to recognize HDDs larger than
2TB. 2TB Limit allows you to configure whether a HDD larger than 2TB in Device Mode will be
automatically limited to 2TB maximum capacity. The default setting is: ON.
• Spinup Wait Time (Auto, 1 - 30 sec.) - Configure the amount of time between when the first HDD
and second HDD spins up. The default setting is: Auto.
• SMART Check Period (OFF, 1 min - 3 hours) - Configure the amount of time between when the
miniClone checks the SMART status of your HDDs. The default setting is: 1 min.
• PIO Transfer Only (ON / OFF) - Configure whether the miniClone transfers data in PIO mode
only. The default setting is: OFF.
• Device Write Protection (ON / OFF) - Configure whether the hard drive that you connect through
Device mode (see section 5.1 Device, p.20) is write protected. If Write Protect is turned on, the
Device item in the main menu will be displayed “Device (WP)”. The default setting is: OFF.
Device(WP)
Copy
• Unplug Device (ON / OFF) - Configure whether you are able to disconnect a hard drive from your
PC in Device mode. The default setting is: ON.
• Auto Shutdown (ON / OFF) - Configure whether the miniClone automatically turns off after a
process (Copy, Compare, Erase or Check) is completed. The default setting is: OFF.
• Sector Count (8KB - 32MB) - Configure the capacity to assign to one sector. The default setting
is: 512KB. Caution! Changing this option may cause your HDD to malfunction.
35
Page 36

Temperature Option
5.6.2 Temperature Option
From the Option menu:
1. Select Temperature Option and then press the ENTER button. This will bring up the Temperature
Option menu.
2. Press the Up or Down directional button to navigate the Temperature Option items.
3. Press the Right or Left directional button to adjust any of the Temperature Option items.
4. Press the ENTER button to save the current Temperature Option configuration and return to the
Options menu.
Temperature Option items include:
• Temperature Unit (°F / °C) - Configure whether temperatures are displayed in degrees Fahrenheit
or degrees Celsius. The default setting is: °F
• Warning Temperature (OFF, 86 - 211°F) - Configure how high the hard drive’s temperature can
reach before the miniClone issues a warning. The default setting is 131°F.
• USB-FAN Temperature (OFF, 86 - 211°F) - A USB fan can be connected to the Disk 3 or Disk 4
USB / eSATA ports. When the temperature of a HDD goes above the temperature set here, the USB
fan will automatically be powered on by USB power. The default setting is 113°F.
Note: It is not possible to use a USB fan if the HDD connected cannot acquire the HDD temperature
in SMART.
36
Page 37

Error Option
5.6.3 Error Option
From the Option menu:
1. Select Error Option and then press the ENTER button. This will bring up the Error Option menu.
2. Press the Up or Down directional button to navigate the Error Option items.
3. Press the Right or Left directional button to adjust any of the Error Option items.
4. Press the ENTER button to save the current Error Option configuration and return to the Options
menu.
Error Option items include:
• Auto Skip (ON / OFF) - Configure whether errors will be automatically skipped when they occur.
The default setting is: OFF.
• Retry Count (OFF, 1 - 99) - Configure how many times a process will retry when an error occurs.
The default setting is: OFF.
• Timeout Period (OFF, 1 - 60 sec) - Configure how much time before a timeout is reported. The
default setting is: 10 sec.
• Timeout Retry (ON / OFF) - Configure whether the miniClone will attempt a retry when a timeout
occurs. The default setting is: ON.
37
Page 38

Buzzer Option
5.6.4 Buzzer Option
From the Option menu:
1. Select Buzzer Option and then press the ENTER button. This will bring up the Buzzer Option
menu.
2. Press the Up or Down directional button to navigate the Buzzer Option items.
3. Press the Right or Left directional button to adjust any of the Buzzer Option items.
4. Press the ENTER button to save the current Buzzer Option configuration and return to the Options
menu.
Buzzer Option items include:
• Buzzer Mode (Off, Low, Mid, High) - Configure the sound of the buzzer. The default setting :
High.
Note: If you turn this setting OFF, the other Buzzer Option items will be invalid.
• Buzzer Click (ON / OFF) - Configure whether there is an audible signal when you navigate the
different menus and items. The default setting is: ON.
• Buzzer Normal (ON / OFF) - Configure whether there is an audible signal that notifies you when
a process starts or is completed. The default setting is: ON.
• Buzzer Error (ON / OFF) - Configure whether there is an audible signal that notifies you when an
error occurs. The default setting is: ON.
38
Page 39

Display Option
5.6.5 Display Option
From the Option menu:
1. Select Display Option and then press the ENTER button. This will bring up the Display Option
menu.
2. Press the Up or Down directional button to navigate the Display Option items.
3. Press the Right or Left directional button to adjust any of the Display Option items.
4. Press the ENTER button to save the current Display Option configuration and return to the Options
menu.
Display Option items include:
• Smooth Scroll (ON / OFF) - Configure whether menu items are smooth scrolled during navigation.
The default setting is: OFF.
• Vertical Scroll (1 - 9) - Configure the speed of the vertical scroll display. 1 is the slowest and 9 is
the fastest. The default setting is: 6.
• Horizontal Scroll (1 - 9) - Configure the speed of the horizontal scroll display. 1 is the slowest and
9 is the fastest. The default setting is: 6.
• Contrast (1 - 10) - Adjust the contrast of the OLED display. 1 is the lowest contrast and 10 is the
highest contrast. The default setting is: 5.
• Transfer Rate Display (GRAPHICAL, DIGITAL) - Configure how the transfer speed is displayed
when a process is running. The default setting is: DIGITAL.
39
Page 40

Information / Set to Defaults / Power OFF
5.6.6 Information
The Information item displays the miniClone’s version, serial number and firmware. The information
displayed here is not configurable. It is for Kanguru Solution’s Tech Support reference, in case you need
to service your miniClone.
From the Option menu:
1. Select Information and then press the ENTER button. This will bring up the Information menu.
2. Press the Up or Down directional button to view the firmware version.
3. Press the ENTER button to return to the Options menu.
5.6.7 Set to Defaults
Set to Defaults will reset all of the Option items to the factory default settings.
From the Option menu:
1. Select Set to Default and then press the ENTER button.
2. A confirmation screen appears. Press the Left directional button to select Yes and then press the
ENTER button to reset the miniClone’s option settings.
5.7 Power OFF
Select Power OFF from the main menu and then press the ENTER button. A confirmation screen appears.
Press the Up or Down button to select Yes and then press the ENTER button to shut off the Kanguru
miniClone.
40
Page 41

Disk Copy
Error and Warning Messages Defined / Initialization Errors
6. Error and Warning Messages Defined
The following chapter describes the most common error messages that you may encounter while using
your Kanguru miniClone.
6.1 Initialization Errors
If an error occurs during the initialization stage, the error will be displayed as follows:
Disk1 Disk2
ERR:Diskx is
The error message will be displayed on the first line
Return
Error Message Definition
ERR : Diskx is not connected
ERR : Initialize Failure in Diskx Failed to initialize Disk x.
ERR : No Partition in Diskx
ERR : Partition is too large.
ERR : Diskx is Write Protected.
Any possible actions will be displayed on the second line
Disk x is not connected, there is no
detectable disk connected.
No partition information is found on
Disk x.
The partition information is larger
than the capacity of Disk x.
Disk x is set under Write Protect.
If an error occurs during initialization process, the function cannot be continued. Press the ENTER
button to cancel the process and return to the main menu.
41
Page 42

Disk Compare
Initialization Warnings
6.2 Initialization Warnings
If there is are any issues that the miniClone recognizes during the initialization process, the warning
message will be displayed as follows:
Disk1 Disk2
WARN:Capacity
Yes
Sure?
Warning Message Definition
No
The warning message will be displayed on the first line
Any possible actions will be displayed on the second line
WARN : Capacity mismatch (Diskx
><Disky)
WARN : Diskx is prefailure!
WARN : Diskx is too cold!
WARN : Diskx is too hot!
When the warning is displayed during the initialization process, press the Up or Down directional button
to select Yes or No. If you select Yes, the miniClone will ignore the warning and continue with the
process. Please be aware that depending on the warning, you may not achieve the desired result if you
choose to ignore the warning and continue with the process.
The capacity of the Disk x and the
capacity of the Disk y are not the
same.
Disk x is at risk of disk failure. (This
requires SMART information)
The disk temperature of Disk x is
too low. (This requires SMART
information)
The disk temperature of Disk x is
too high. (This requires SMART
information)
42
Page 43

6.3 Process Errors
Disk Copy
If an error occurs during a process, the error will be displayed as follows and the process will be
stopped:
Disk1 Disk2
ERR:Read erro
The error message will be displayed on the first line
Processing Errors
Return
Error Message Definition
ERR : Diskx was disconnected Disk x was removed during the process.
ERR : Read error in Diskx (status,
LBA=xxxxxxxx)
ERR : Write error in Diskx (status,
LBA=xxxxxxxx)
ERR : Read error in Diskx (status, GPT)
ERR : Write error in Diskx (status, GPT)
ERR : Verify error in Diskx (status,
LBA=xxxxxxxx)
Any possible actions will be displayed on the second line
Error while reading data from Disk x.
Error while writing data to Disk x.
Error while reading the partition information
of Disk x.
Error while writing the partition information
to Disk x.
Error while verifying the data of Disk x.
(during Check Mode)
ERR : Seek error in Diskx (status,
LBA=xxxxxxxx)
ERR : Compare error (status,
LBA=xxxxxxxx)
If an error occurs, please select an action by pressing the Up or Down directional button and then press
the ENTER button. If only “Return” is displayed when the error occurs, then it is not possible for the
process to continue.
If an error was skipped, the process may not successfully complete. For example, if error occurs during
a copy, and an error was skipped, the data on the Destination Disk may not be the same as the data on
the Source Disk.
Error while seeking Disk x. (during Seek
Test)
The data on the disks are not the same
(during Compare Mode)
43
Page 44

6.4 Retry Errors
Disk Copy
Disk Copy
Disk1 Disk2
Disk2 T=tt
If an error occurs and the miniClone retries the process, it can be displayed as follows:
Retry Errors / Timeout Errors
Disk1 Disk2
Disk2 R=rr
RD:xxxxxxxxxxxx
6.5 Timeout Errors
If an error occurs the miniClone retries the process, it can be displayed as follows:
The disk the error occurred on and the number of
retries (rr) will be displayed on the first line
The retry process and the LBA under process will be
displayed on the second line.
The disk under process and the timeout count (time left
until timeout period = tt) is displayed.
If the time left until timeout period (tt) reaches zero, then a timeout error occurs.
44
Page 45

7. Troubleshooting
Please check the followings if you are experiencing unusual behavior by your Kanguru miniClone.
Problem Possible Solution
• Check if the USB cable / eSATA cable /
AC cable are connected to the back of the
Hard drive is not recognized by my computer
in Device Mode.
miniClone.
• Check that Device Mode is on in the
display screen.
Troubleshooting
I loaded an OS on a hard drive connected to
the miniClone in Device mode, but it will
not boot.
Transfer speed is slow.
When formatting with Windows, a dialog
“format was not completed” appears and
format cannot be completed.
Even though several HDDs are connected,
only one HDD is detected in Device Mode.
• Booting an OS through an HDD
connected to the miniClone in Device
mode is not supported. The HDD must be
connected directly to the computer.
• Check the whether the connection is USB
1.1 or if your external hard drive is a USB
1.1 device. If so, high speed transfer is
not possible.
• Windows 2000 and later cannot make
FAT32 partitions larger than 32GB. In
this case, you need to format with NTFS
or format with a different OS such as
Windows 98SE beforehand.
• In Device Mode, only one HDD can be
detected by your computer.
45
Page 46

8. FAQ
Q : Is it possible to copy data between 2 HDDs with different capacities?
A : It is possible. If the capacity of the Destination Disk is larger than the Source Disk, then all of the data
can be copied and the unused space on the Destination Disk will remain as an unallocated partition.
If the capacity of the Destination Disk is smaller than the Source Disk, then not all of the data can be
copied. When the Destination Disk is full, the copying process will be stopped.
Q : If my Destination Disk is larger than the Source Disk, what will happen to the remaining space
after the copy process?
A : With Copy Mode, you can copy the partition of the HDD perfectly as it is. E.g. if you copy the data
from a 40GB HDD to a 80GB HDD, 40GB of data will be copied to the Destination Drive and the
remaining 40GB on the Destination Drive will be left as unallocated space.
FAQ
Q : Is it possible to copy data between two HDDs with different RPMs and transfer rates?
A : It is possible. This product supports copying data between SATA1 and SATA2, SATA1.5Gbps and
SATA3.0Gbps. It also supports copying between USB and eSATA.
Q : For copying is it possible to use an HDD with bad sectors?
A : The miniClone cannot read any partitions which cannot be read by a PC. It is possible to copy only
the readable data while skipping the unreadable parts to an HDD with no bad sectors.
Q : Can I copy data using two hard drives that are the same capacity but were produced by
different manufacturers?
A : Yes. Even though the both HDDs are the same capacity, you may receive a Capacity Mismatch error.
There may be a small difference in capacity depending on the HDD manufacturer.
Q : Is it possible to copy a HDD with SCSI or Serial SCSI?
A : This product does not support SCSI and Serial SCSI.
Q : Is it possible to make a copy of my PC’s hard drive through Device Mode?
A : When connecting through Device Mode, it may not be possible to copy your entire PC’s hard drive.
It may be necessary to remove the HDD from your computer and connect it directly to the miniClone.
46
Page 47

Q : The capacity of the Destination Disk is smaller than the Source Disk, but the total amount of
data on the Source Disk is equal to or less than the capacity of the Destination Disk. Will it copy
all of the data from the Source Disk to the Destination Disk?
A : Copying to a Destination Drive with a smaller capacity is possible, but when the capacity of the
Destination Disk is reached, the copy operation will be stopped. Therefore it is not guaranteed that
all of the data will be copied. For example, if you copy a 40GB Source Disk with 20GB of data, to
an 20GB Destination Disk, it is not certain that all of the data will be copied perfectly because the
miniClone cannot determine which part of the HDD the OS will write the data to.
Q : How long does it take to copy data?
A : It depends on the HDDs you use. It is possible for high-performance HDDs to copy with transfer
rates of 1GB – 4GB / minute.
FAQ
Q : Is it necessary to format the HDD before starting to copy?
A : No. It is not necessary to format the HDD beforehand.
Q : Is it possible to copy an IDE(PATA) HDD?
A : It is not possible to copy an IDE(PATA) HDD with the miniClone. If you need to copy data off of an
IDE(PATA) HDD, you will need to install the HDD in an external hard drive enclosure that supports
IDE HDDs and either USB or eSATA connection.
47
Page 48

Warranty / Tech Support
9. Warranty
This product carries a 1 year* warranty. Kanguru Solutions is not responsible for any damages incurred
in the shipping process. Any claims for loss or damage must be made to the carrier directly. Claims
for shipping errors should be reported to Kanguru Solutions within three (3) working days of receipt
of merchandise. Please refer to the 90-day warranty from the date of purchase. Any claims for loss or
damage must be made to carrier directly. Claims for shipping errors should be reported to Kanguru
Solutions within three (3) working days of receipt of merchandise.
*90-day warranty on labor. After 90 days, a $20 service charge will be applied to all RMAs. Shipping
back to the customer is covered during the first 90 days of purchase. After 90 days the customer is
responsible for shipping both ways.
Kanguru Solutions does not offer money back returns on its duplicator product lines due to the
unique nature of the product. All units will be fully supported under manufacturer’s warranty.
10. Tech Support
If you experience any problems installing your Kanguru product or have any technical questions regarding
any of our products, please call our tech support department. Our tech support is free and available
Monday thru Friday, 9am to 5pm EST.
Call 1-508-376-4245
Or visit our website at www.Kanguru.com
48
Page 49

Kanguru Solutions
1360 Main Street
Millis, MA 02054
www.kanguru.com
09.28.09 V1.0© 2009 Kanguru Solutions
Legal terms and conditions available at www.kanguru.com. Please review and agree before use. Thank you.
 Loading...