

Page 1

Kanguru Micro MP3 PRO
USB2.0
User’s Manual
MP3/WMA Player + Digital Voice Recorder
FM Tuner + USB Flash Drive
This manual applies to 1.1 or later versions of the Kanguru Micro MP3 PRO.
Copyright 2005, All Rights Reserved.
1
Page 2

Please be aware of the following points before
using the Kanguru Micro MP3 PRO.
Copyright© 2005, Kanguru Solutions. All rights reserved.
DOS®, Windows 95
ME®, and Windows XP® are registered trademarks of Microsoft Inc. Apple®
and Macintosh® are registered trademarks of Apple Computer Inc. IBM and
OS/2 are registered trademarks of the International Business Machines
Corporation. All other brand or product names are trademarks of their
respective companies or organizations.
Kanguru Solutions will not be held responsible for any illegal use of this
product nor any losses incurred while using this product. The user is
responsible for the copyright laws, and is fully responsible for any illegal
actions taken.
CUSTOMER SERVICE
To obtain service or technical support for your system, please contact
Kanguru Solutions Technical Support Department at 508-376-4245, or visit
www.Kanguru.com
®,
Windows 98®, Windows NT
for web support.
®,
Windows 2000
®,
Windows
Kanguru Solutions
1360 Main St., Millis, MA 02054
508.376.4245 • Fax 508.376.4462
www.kanguru.com
2
Page 3

TABLE OF CONTENTS
WELCOME...................................................................... 5
TECHNICAL SPECIFICATIONS..................................... 6
PACKAGE CONTENTS.................................................. 7
QUICK START ................................................................ 8
OPERATIONAL NOTES ................................................. 9
PLAYER CONTROLS ................................................... 10
FRONT VIEW ................................................................ 10
SIDE VIEW .................................................................... 11
LCD ...............................................................................12
DRIVER & UTILITY INSTALLATION ............................ 13
MAIN MENU.................................................................. 19
PLAYING MP3 MUSIC .................................................. 20
VOLUME CONTROL .................................................... 21
SETTINGS: TEMPO RATE........................................... 22
SETTINGS: EQ (EQUALIZER) ..................................... 23
SETTINGS: REPEAT.................................................... 24
SETTINGS: REPEAT A-B MODE ................................. 25
3
Page 4

VOICE RECORDING FUNCTION................................. 31
FM RADIO..................................................................... 38
SYSTEM SETTINGS..................................................... 40
DISCLAIMER ................................................................48
WARRANTY.................................................................. 49
TECH SUPPORT .......................................................... 49
4
Page 5

Welcome
The Kanguru Micro MP3 PRO is a high quality,
portable USB flash drive MP3/WMA Player and an
FM Tuner rolled into one! Store and play all your
favorite digital music as well as Word, PowerPoint
or any other file you need while on the go. The
Kanguru Micro MP3 PRO will play all files with an
MP3 or WMA extension! Plug this mini MP3 player
directly into any USB port for quick, easy
access! Simply drag and drop or save your files
directly to the drive! The Kanguru Micro MP3 PRO
will work with Windows, Macintosh and Linux, and is
driverless with most Operating Systems. With one
AAA battery, you can take advantage of 9 hours
non-stop playing time.
5
Page 6

Technical Specifications
- Supports USB specification version 2.0
- Supports Windows 2000, ME, XP, Mac OS 9.2 or above
and Linux 2.4.0 or above without device driver.
- Supports Windows 98/98SE with device driver.
- Key lock / write protect switch.
- Hot Plug & Play.
- Durable solid-state storage – data retention for at least
10 years.
- Erase Cycles: 100,000 times
- Support music format: MP3 / WMA
- LCD Display: 96x32 Dot Matrix
- Earphone jack: 3.5 mm
- Audio output: 5mW + 5mW
- Output frequency range: 20Hz – 20KHz
- Battery Life: 9 hrs of continuous playback
- EQ choices: Natural / Rock / Classical / Pop / Jazz / Soft
/ Bass
- ID3 Tag Display
- FM Radio Frequency Range: 76Mhz – 96MHz; 87MHz –
108MHz
- Digital voice record in ADPCM 8kbps
- Repeat read function (A - B).
- Unit weight: approximate 30g (not including battery)
- Bit Rates Supported: Supports 8Kbps ~ 320Kbps
- S/N Ration: 85dB~90dB
- Size: 99 x 31 x 22 mm
- CE and FCC certificate of approval
6
Page 7

Package Contents
Installation CD USB Cable
Earphones Manual
AAA Battery
7
Page 8

Quick Start
Please note: the following instructions are intended
to give you a brief overview, allowing you to use the
player right away. For detailed instructions please
refer to the rest of this manual.
1. Remove the back cover and insert the included AAA
battery.
2. Install the drivers if required (Win98/98SE)
3. Connect the drive to an available USB port on your PC
and the unit will appear as a “Removable Disk” under
“My Computer”.
4. Double click on the “Removable Disk” icon to view its
contents. To load audio files, simply save the desired
MP3/WMA file to this drive.
5. Remove the drive from the USB port, and press the Play
button to turn on the power.
6. Insert the headphones, and press the Play button again
to begin audio playback. Use the Mode scroll wheel on
the side of the unit to navigate through audio tracks.
8
Page 9

Operational Notes
1. Please remove the battery if you do not plan to
use the MP3 player for extended periods of time.
2. The MP3 player should be kept in areas free from
extreme temperature changes, moisture, and dust.
3. The MP3 player cannot be turned on if the HOLD
switch is in the ON position.
4. Please change the battery when the indicator
appears and “Low Battery” is displayed.
5. The Mode/FF/RW button on the side of the player
can be scrolled to the left or right and also pushed to
make selections in the menus.
6. The MP3 player must be formatted FAT or FAT16
to playback audio files.
NOTE: Only the 1GB Micro MP3 Pro must be
formatted in the FAT32 format for MP3 playback.
9
Page 10
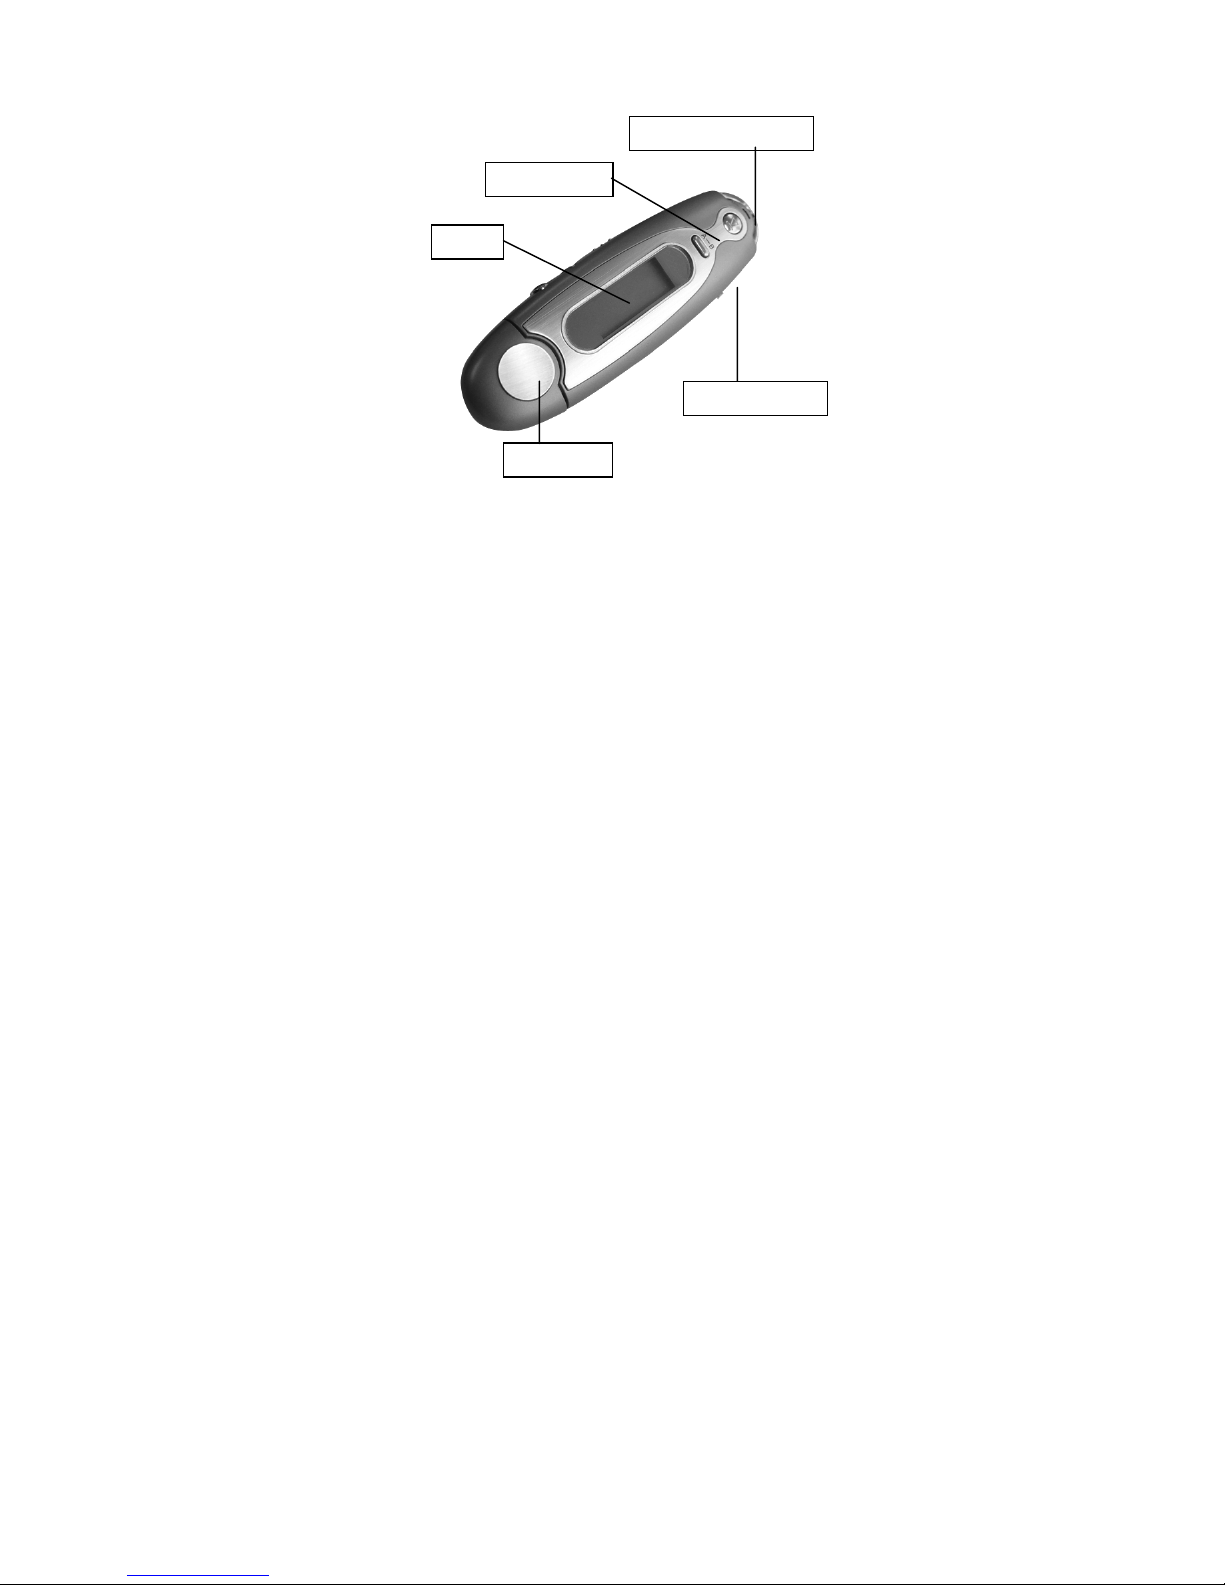
Player Controls
Front View
A-B Repeat
LCD
USB port
Play/pause/power
FF/Mode/Rew
10
Page 11
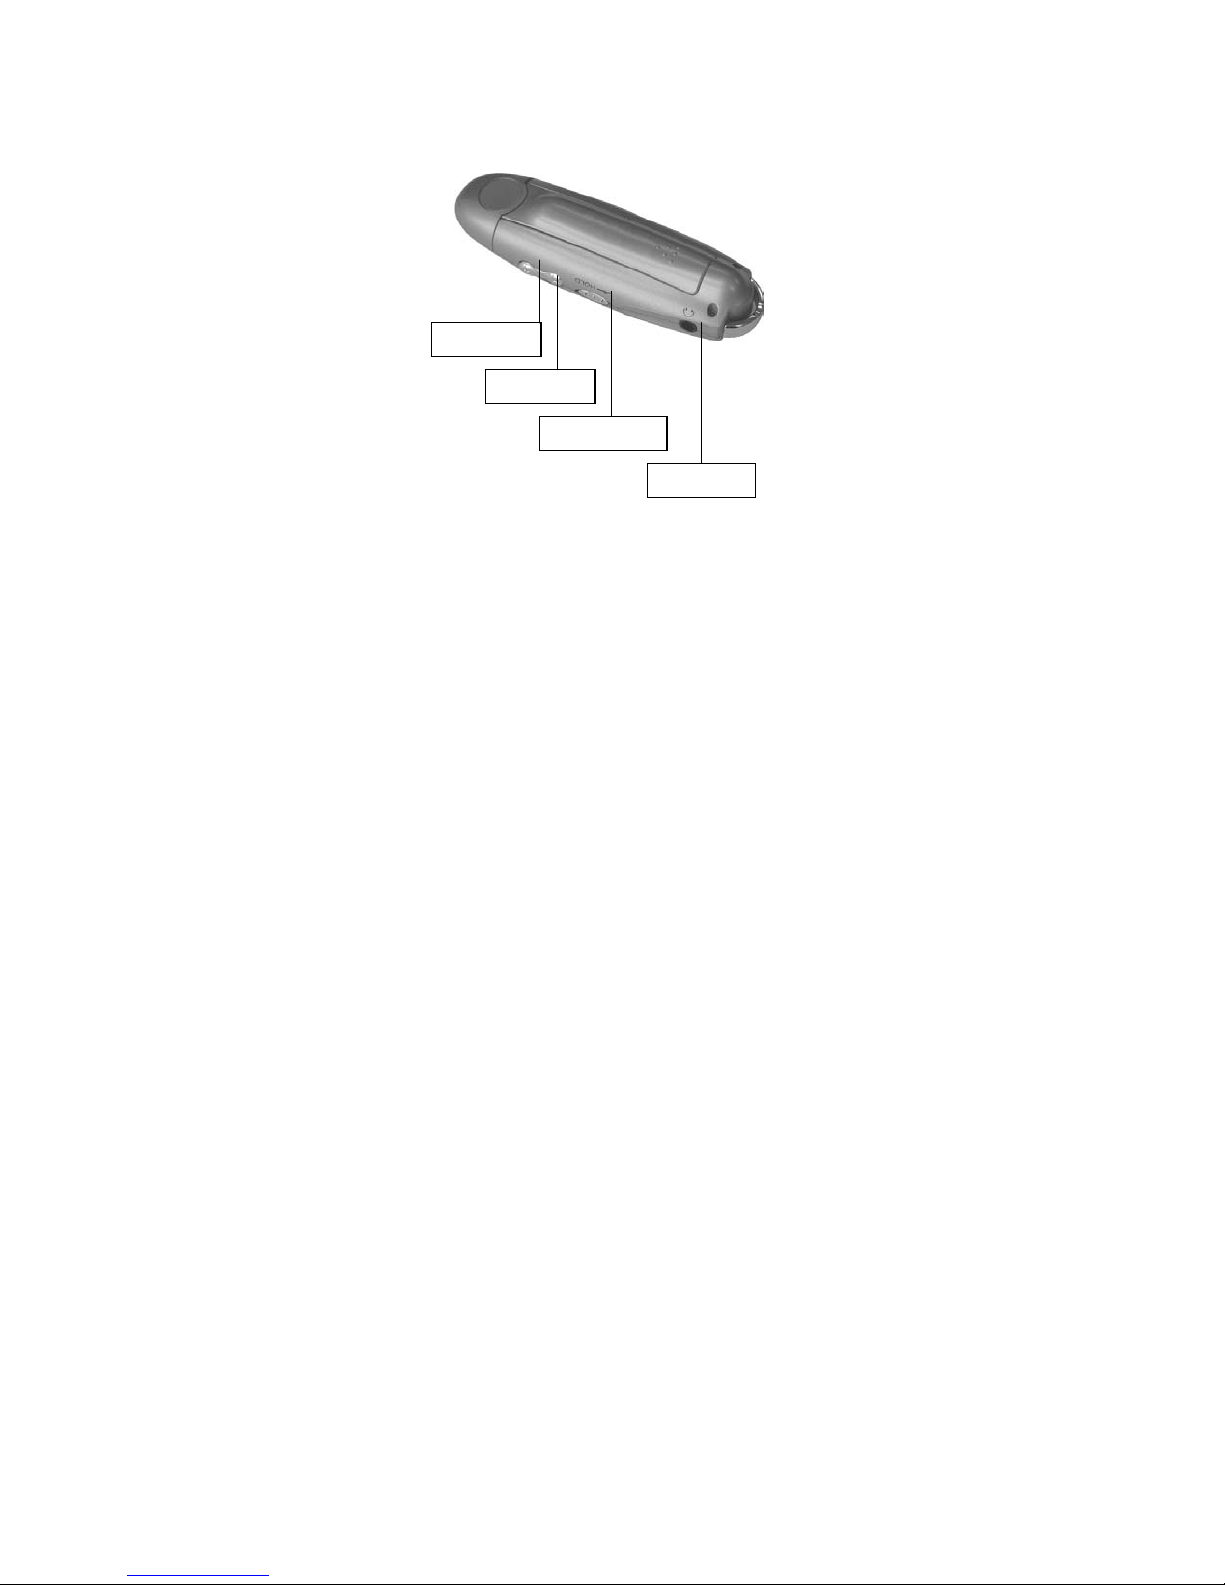
Side View
Volume -
Volume +
Hold button
Earphone
11
Page 12
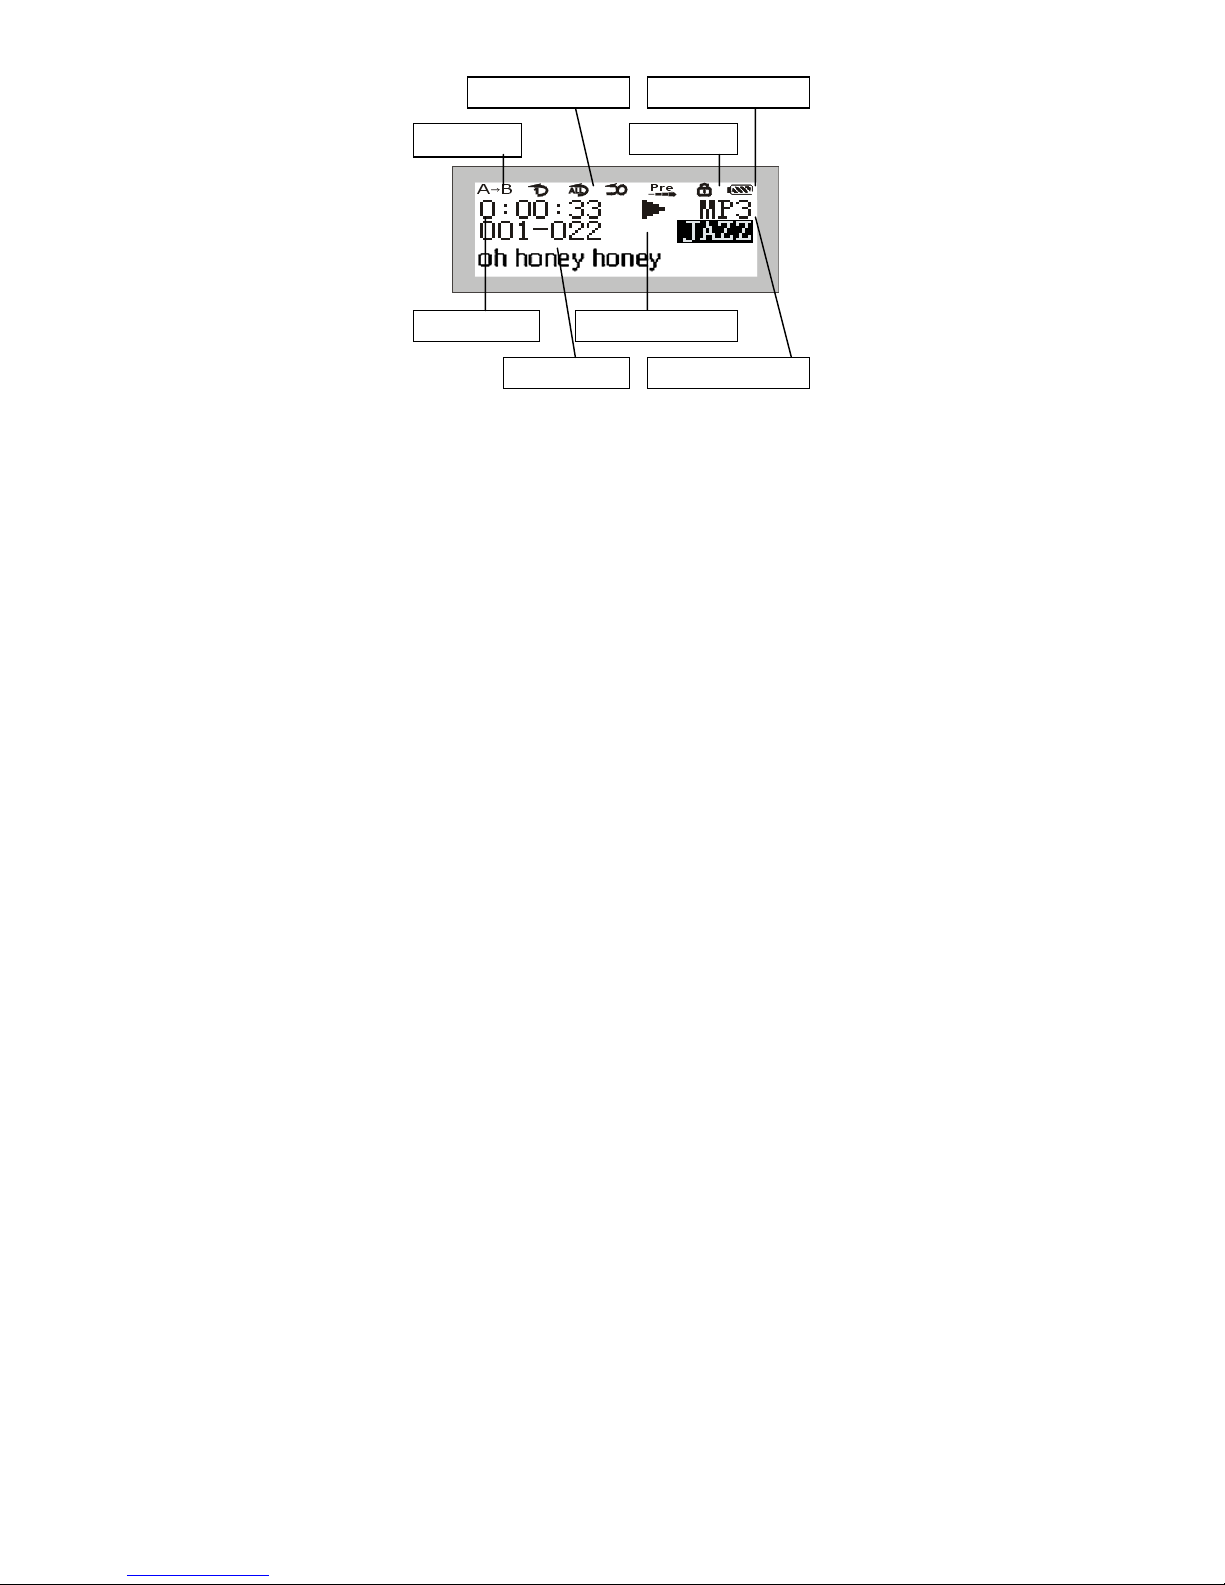
LCD
g
r
Play repeat mode
A-B Repeat
Battery indicato
Hold icon
Playback time
Current operation
Repeat modes: Repeat, Repeat All, Random,
Preview and Normal.
Equalizer modes: Bass, Jazz, Classical, Soft,
Rock, Pop and Normal.
Song Name
Type of the son
12
Page 13

Driver & Utility Installation
The Kanguru Micro MP3 Pro can work as a
standard USB flash drive and requires a one-time
driver installation for Windows 98/98SE. Following
these steps will also install the Sound Converter
Utility which can be used on Windows 98/98SE, ME,
2000 and XP. Please follow these steps to install the
drivers and utility on your computer:
1. Insert the include Drivers and Manuals CD into
your CDROM drive (Note: Do not insert the disc into
slot loading CD drives).
2. Browse to your CDROM drive in My Computer
and double click on the “MP3 Player Utilities and
Win98 Driver” folder.
3. Double click on “Setup.exe” and the installation
process will begin (shown below).
13
Page 14

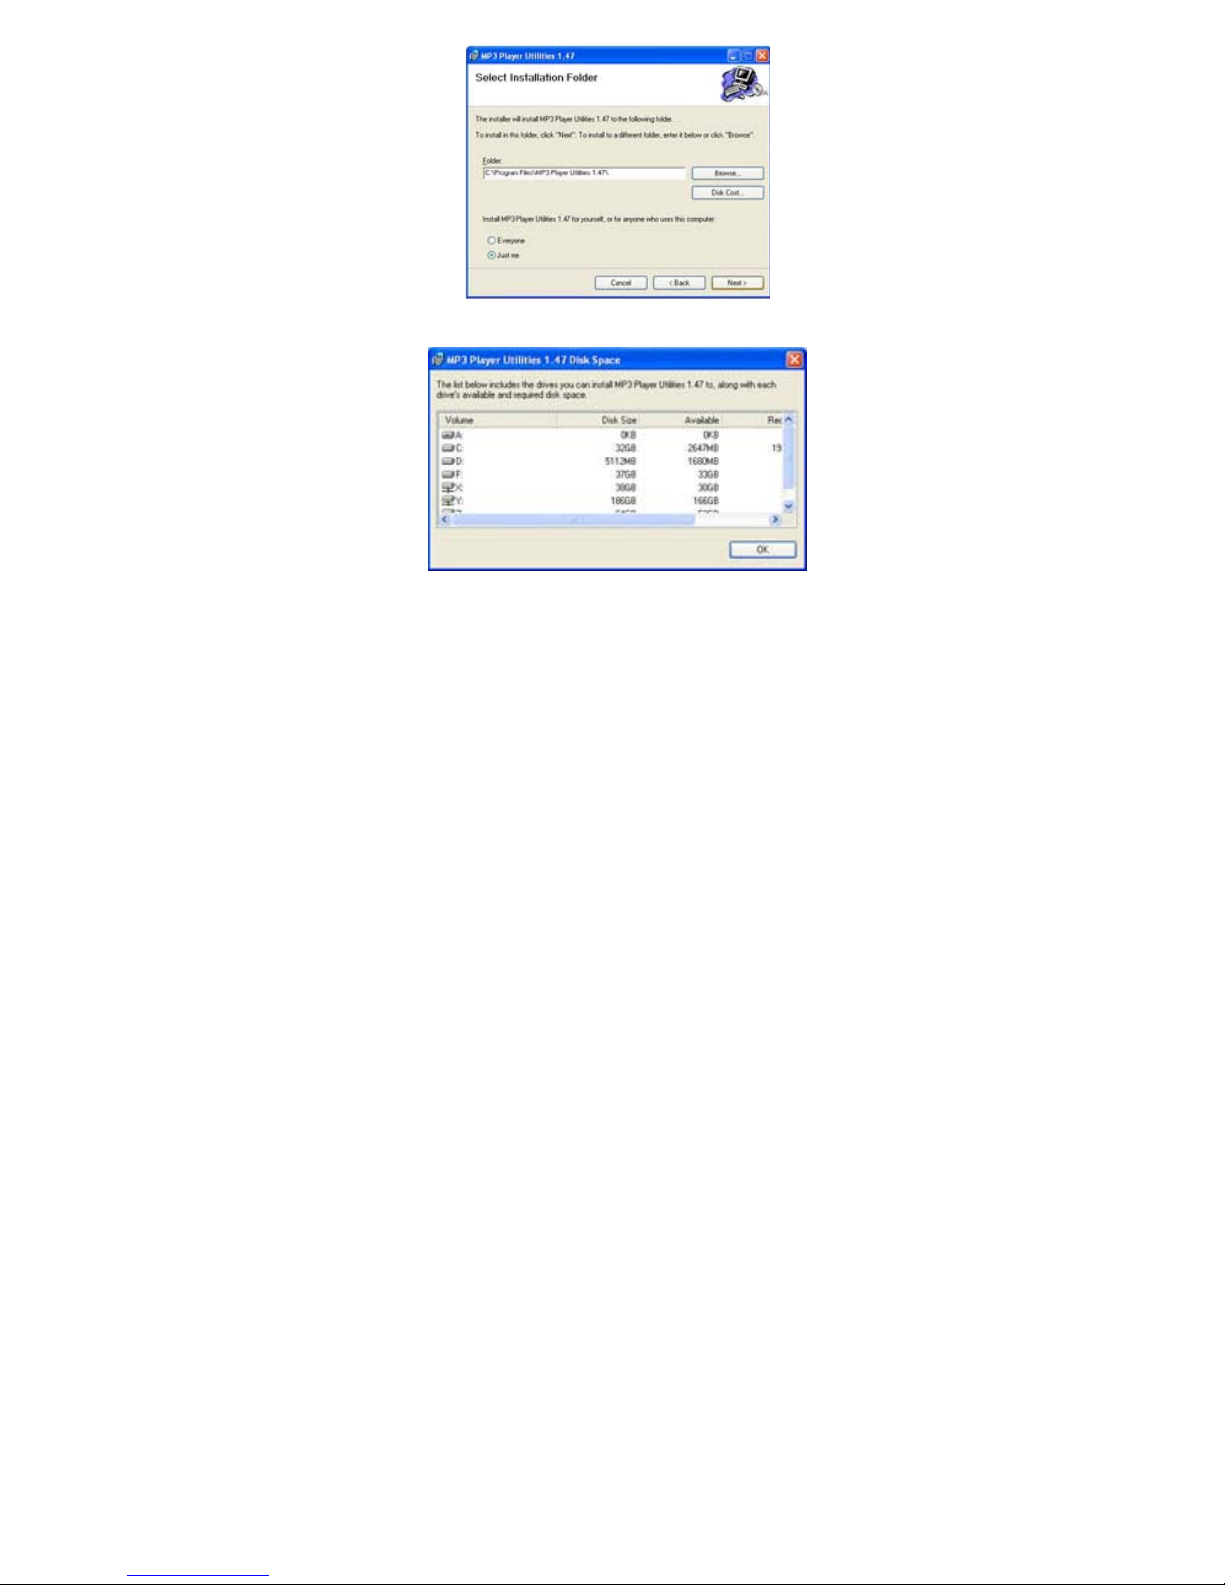
4. Click the “Next Button.”
5. Next select a path to install to. To change the
directory, click the “Browse” button. The “Disk
Cost” button will show you all available drives on
your computer and how much storage space is free
on each (shown below).
Note: Windows XP and 2000 users will be
prompted whether to install for “Everyone” on the
computer or “Just Me.”
14
Page 15
15
Page 16

6. After choosing an installation folder, click “Next”
to start the install.
7. Once the installation is complete, click “Finish” to
complete the installation.
Note: Windows 98 users will be asked to reboot
after installation is complete. Upon plugging in the
drive after reboot, the operating system will auto
detect the drive.
8. In your start menu there will be a program group
for the player labeled MP3 Player Utilities 1.47
16
Page 17

(shown below).
Sound Convert Tool
Please see the Playback Recorded Files section
for more information.
***MP3 Player Update Tool***
Do not use this function unless instructed to do
so by a Kanguru Solutions Technician. Doing so
can damage your player and/or void your
warranty.
17
Page 18

Turning the power on/off
To turn on the MP3 player, press and hold the PLAY
button for 2 seconds. Once the player powers on
the following image will be displayed on the LCD
screen.
Power On Screen
To turn off the MP3 player, press and hold the PLAY
button for 2 seconds. When the player has powered
off the following image will be displayed on the LCD
screen.
Power Off Screen
18
Page 19

Main Menu
Upon powering on the player you will be prompted
from the main menu to choose a mode. To enter the
main menu from any mode, press down on and hold
the Mode button (in the middle of the rolling wheel).
The LCD will display the following:
Power On Screen
The following 5 options are available to select:
Mode Icon
Music Playback Mode
Record Mode
Record Playback Mode
FM Mode
System Settings Mode
19
Page 20

Playing MP3 music
1. Turning on the power by pressing Play/Stop
button momentarily. Enter the Music Playback
Mode via the Main Menu and you will see the
following interface:
The 001-022 means there are 22 songs loaded on
this particular MP3 player, and the current song
2. When you press Play/Stop button again, the
current track will be played as shown above. The
top left corner is the playback time indicator.
3. If you want to select previous/next song, turn the
rolling wheel up and down to get the track. The
music will stop if you press Play/Stop.
4. By pressing the Play/Stop button for 3 seconds,
you can turn the power off.
20
Page 21

Volume Control
The volume steps (see illustration) will increase or
decrease when the VOL+/VOL- button is pressed
correspondingly. There are 32 volume steps and
the volume level ranges from 0 to 31.
21
Page 22

Settings: Tempo Rate
Tempo Rate allows you to change the playback
speeds (faster or slower) of music (MP3 files only)
and recorded files while not changing the tone of the
song.
1. While playing a music file, press the Mode
button to enter the submenu.
2. Select the Tempo Rate option by pressing the
Mode button.
3. Use the Next and Previous track buttons to
speed up or slow down the songs.
Note: Changing the speed of songs will apply to all
songs and will remain in effect until changed.
22
Page 23

Settings: EQ (Equalizer)
There are 7 Equalizer modes to select from: Natural,
Rock, Pop, Classical, Soft, Jazz and Bass.
1. In the Music Playback Mode, enter the
submenu by pressing the Mode Button when a
music file is being played.
2. Select the Equalizer option.
3. Scroll to the desired EQ setting (Natural, Rock,
Pop, Classical, Soft, Jazz or Bass) and press down
on the Mode button to select that setting.
4. After selecting the EQ setting you will be returned
to the Music Playback Mode.
5 The EQ setting will appear in the LCD, as show
below.
23
Page 24

Settings: Repeat
You can adjust the way files are played on your
MP3 player to one of 5 modes:
Normal: Plays the MP3s in order and stops after
the last file has been played. This is the default
playback setting.
Repeat One: Plays the current MP3 file repeatedly.
Repeat All: Plays all MP3s in order repeatedly until
another operation is performed.
Random: Plays all MP3s at random and then stops.
Preview: Plays the first 10 seconds of all MP3s in
order and stops after the last file has been played.
To change the playback setting, please follow these
steps:
1. Enter the Music Playback Mode and push the
Mode button while a music file is being played.
2. Select the REPEAT option by pushing down on
the mode button.
3. Scroll to the desired REPEAT setting (Normal,
Repeat One, Repeat All, Random or Preview) and
press down on the Mode button to select that
setting.
24
Page 25

Settings: Repeat A-B Mode
The MP3 player has a built in feature that allows you
to repeat a certain part of an audio track. This can
be a useful tool for things such as language learning
or memorization. Please follow these steps to
repeat a portion of a file:
1. While playing the desired track, enter the
submenu by pressing the Mode button then choose
the Replay setting.
2. The repeat icon “A-“ will begin flashing on the
screen waiting for you to set the beginning point. To
set the beginning point, push the A-B Button or the
Next Track button (shown below).
3. When the beginning point is selected the repeat
icon “B” flashes, waiting for you to set the ending
point. To set the ending point, push the A-B Button
or the Next Track button (shown below).
25
Page 26

4. When the A-B beginning and ending points are
set the repeat icon will appear below the Play icon
on the LCD screen (shown below). The player will
repeat the content between the A and B points and
will stop the repeat mode when the preset number
of replay times has been reached.
5. To cancel the function or move on to the next
track, select the “Repeat A-B” function again or
adjust the rolling wheel to reach the next designated
track.
Replay Times
To set how many times the player will repeat the
content between the A and B points, please follow
these steps change the number of times:
26
Page 27

1. When playing a music file, push the Mode button
to enter the submenu.
2. Select the Replay Times option and using the
scroll wheel, set how many times you want the A-B
content to repeat (Default setting is 5).
Replay Gap
The replay gap determines how long the player will
pause before it replays the A-B content (measured
in seconds). Please follow the following steps to
change the interval:
1. When playing a music file, push the Mode button
to enter the submenu.
2. Select the Replay Gap option and using the
scroll wheel; set how many seconds you want the
player to pause before repeating the A-B content
(Default setting is 1).
27
Page 28

Follow Reading Function
When using an A-B repeat, the Follow Reading
Function can be useful in helping to learn a
language. Please follow the following steps to use
this function:
Note: This function does not work with files in the
Record Playback Mode.
1. First setup an A-B Repeat on a music track (see
Repeat A-B Mode section for setting an A-B
Repeat).
2. Push the Next Track button to enter the Follow
Reading mode. The repeat icon changes into the
follow reading icon (see figure 1). Once the icon
appears, the player will record your voice for the
same amount of time between the A and B points.
When the recording time is up, the player will replay
the original audio and the icon will change (see
figure 2). At this time you can hit push the Next
Track Button to enter the Compare Function.
Pushing the Previous Track button will return you
to the A-B Repeat mode.
28
Page 29

Figure 1
Figure 2
Compare Function
Note: This function does not work with files in the
Record Playback Mode.
The Compare Function allows you hear your
recording from the Follow Reading Function
replayed after the original audio. Please follow the
following steps to use this function:
29
Page 30

1. After entering the Compare Function the icon will
change on the display (shown below) and the player
will play the original audio.
2. After finishing playing the original audio, the icon
will change to two speakers (shown below) and will
play the user’s voice that was recorded during the
Follow Reading Function.
3. After finishing playing the user’s voice, the player
will play the original audio. The process will repeat
until you press the Mode button to quit.
Pushing the Previous Track button will return you
the Follow Reading mode.
30
Page 31

Voice Recording Function
There are two ways you can enter the Voice
Recording function.
Real Time Recording
1. From the Music Playback Mode you can start a
recording immediately by pressing and holding the
A-B button for 3 seconds. The LCD will display
“Initiatilizing…” and automatically start the
recording.
2. Pressing the A-B button will pause the recording
(the time display will flash). Pressing and holding
the A-B button for 3 seconds will save the
recording and start a new one.
Record Mode
1. Enter the Main Menu by pressing holding the
Mode button.
2. Select the Record Mode by pressing the Mode
button on the icon.
31
Page 32

3. Start a recording by pressing the Play button
(shown below).
4. Pressing the A-B button will pause the recording
(the time display will flash). Pressing and holding
the A-B button for 3 seconds will save the
recording and start a new one.
Note: While recording, only the Play and A-B
buttons will respond.
Note: If the LCD displays “Memory Full”, there is not
enough memory to save a recording and you will
have to delete some files to free up space.
32
Page 33

Note: All recordings are saved in the current
directory that is set in the recording submenu.
Note: If the LCD displays “Directory Full”, it is
indicating that there are already 99 files in the
directory and a different directory will need to be
selected (see Selecting Different Directories for
more info).
Choosing Recording Type
1. When a recording is stopped, enter the submenu
by pressing the Mode button.
Select the option REC Type by pressing the
2.
Mode button.
3. Select the recording type you wish to use by
pushing the Mode button to select it (see table for
details on each mode).
33
Page 34

Record Types:
Icon Description
High Quality voice record, wav format,
good audio quality
Long-time voice record, act format, normal
audio quality
High Quality voice operated, wav format
Long-time voice operated, act format
Voice Operated Record
Selecting a VOR record type means sound will
control the recording process. The player will start
recording when there is sound and stop recording
when there isn’t. This will allow for storage to be
saved. It is recommended using this feature when
there is minimal background noise.
34
Page 35

Playback Recorded Files
1. From the Main Menu, select the Record
Playback Mode by pushing the Mode button.
2. Next choose the recording you want to playback
by using the previous and next track wheel.
3. Push the Play button on the desired track to
play.
Convert ACT recordings to WAV files
Recordings recorded in the ACT format with the
player can be converted into WAV format with the
included program on the CD (See Driver & Utility
Install section for installation instructions).
1. Run the “Sound Converter Tool” that can be
found in your Start Menu -> Programs -> MP3
Players Utilities 1.47 program group.
2. Click the open button to get the File Browser
window.
35
Page 36

3. Select the ACT file to be converted.
36
Page 37

4. Click the “Convert” button to start converting it to
a WAV file.
In addition to converting ACT files to WAV files, the
Sound Covert Tool can also play WAV and MP3
files.
37
Page 38

FM Radio
1. From the Main Menu, select the FM Mode with
by pressing the Mode button.
2. Auto Scanning: By holding the Previous or Next
track wheel for 2 seconds the player will search for
radio channels forward or backwards by 100KHz
frequencies and automatically stop when it finds a
channel.
3. Manual Scanning: Press the Previous track
once and the frequency will decrease by 100KHz;
Press the Next track once and the frequency will
increase by 100KHz.
4. Saving Favorite Channels: Enter the FM
submenu by pressing the Mode button then
pressing the Mode button again on Save.
5. Selecting Favorite Channels: If you have more
than one saved channel, you can navigate through
them by pressing the Play button.
Note: Up to 20 favorite channels can be saved.
38
Page 39

Note: To delete favorite channels, please refer to
the Delete Files section.
Built-in FM Record Function
1. In the FM Tuner, press the Mode button to enter
the submenu.
2. Scroll with the Next Track button and select
either Fine REC or Long REC by pressing the
Mode button.
3. The LCD will switch the recording screen and
automatically start recording. To save the recording
press the Mode button and it will save and exit
back to the FM Tuner.
39
Page 40

System Settings
How to System Settings
1. Press and hold the Mode button for 3 seconds to
enter the Main Menu.
2. Use the Next track button to scroll to System
Settings and press the Mode button to select it.
Brief Introduction to each setting
Backlight How long the backlight will
stay lit if no more buttons are
pushed after the backlight is
activated.
Language Set players language
Power off Set a time to shut down the
player automatically
Replay Mode Set the work status in
repeating
Contrast Adjust the LCD contrast
40
Page 41

Memory Info View memory size and usage
Firmware Version Displays current firmware
version
Firmware Upgrade See firmware update section
Exit Exit the settings menu
Backlight Setting
1. In System Settings menu, select the Backlight
setting by pressing the Mode button.
2. Using the Next and Previous track button,
select the time (in seconds) the backlight will stay lit.
Press the Mode button to save the setting.
Language Setting
1. In System Settings menu, select the Language
setting by pressing the Mode button.
2. Using the Next and Previous track button,
select the language of the player. Press the Mode
button to save the setting.
41
Page 42

Power Off Setting
1. Off Time allows you to set a time (in seconds)
that will automatically shut off the player if there
aren’t any operations when the playback or
recording is stopped. A setting of 0 will disable this
function.
2. Sleep Time allows you to set a time (in minutes)
to automatically shut off the player in any mode if
there aren’t any operations. This feature is a
one-time use and will need to be reset once the
player is powered back on.
Replay Mode
1. In System Settings menu, select Replay Mode
by pressing the Mode button.
2. Manual Mode will not automatically find the end
of sentences in A-B Repeat mode. You will have to
set the beginning and end points manually.
3. Auto Mode will automatically find the end of
sentences in A-B Repeat mode. This is best used
with English reading that has no background music.
42
Page 43

Contrast Adjustment
1. In System Settings menu, select Contrast by
pressing the Mode button.
2. Using the Next and Previous track button,
select the contrast of the LCD. Press the Mode
button to save the setting.
Storage Status
The number on the screen represents the total
capacity of the drive in megabytes and the
percentage represents the amount used.
Firmware Version
Displays the current version of the player.
Firmware Update
Do not use this function unless instructed to do so
by a Kanguru Solutions Technician. Doing so can
damage your player and/or void your warranty.
43
Page 44

Selecting Different Directories
The Kanguru Micro MP3 Pro allows for the user to
put files in different directories (the directories must
be created on a computer first) for classification and
management purposes. The player can support up
to 99 subfolders. Please follow the following steps
to use this function:
1. With the player in stop status, (Example shown in
Music playback mode, you can also select
directories in Record and Record Playback modes)
enter the submenu by pressing the Mode Button.
2. Select the Local Folder option by pressing the
Mode Button.
44
Page 45

3. Using the Next and Previous track buttons,
scroll through the subdirectories.
4. Select a subfolder by pressing the Mode button.
Note: You can set different directories for Music
Playback, Record and Record playback mode.
45
Page 46

Deleting Files
The player allows you to delete files from the drive
and saved FM channels in the Music Playback,
Record playback and FM Mode.
1. With the player in stop status enter the submenu
by pressing the Mode Button.
2. Select the Delete File or Delete All option by
pressing the Mode Button.
46
Page 47

3. Use the Next or Previous Track button to select
change the selection from “No” to “Yes”.
4. To delete the file press the Mode button and the
deleting process will start.
The Delete All function will delete all files in the
current mode under the current directory. For
example, if you choose the Delete All function in
Music mode, only music files will be deleted and
not any recordings you’ve made.
Note: Deleting saved FM channels requires only
steps 1 and 2.
Note: Deleting files is permanent and they will need
to be recopied to the drive from a computer once
deleted off the player.
47
Page 48

Disclaimer
All the information in this document is subject to
change without prior notice. The manufacturer does
not make any representations or any warranties
(implied or otherwise) regarding the accuracy and
completeness of this document and shall in no
event be liable for any loss of profit or any other
commercial damage, including but not limited to
special, incidental, consequential, or other
damages.
No part of this document may be reproduced or
transmitted in any form by any means without the
express written permission of the manufacturer.
All brand names and product names used in this
document are trademarks or registered trademarks
of their respective holders.
48
Page 49

Warranty
This product carries a 1-year limited warranty from
the date of purchase. 1 Year for the Flash Memory,
90 days labor.
Tech Support
If you experience any problems installing your
Kanguru Micro MP3 PRO player or have any
technical questions regarding any of our products,
please call our tech support department. Our tech
support is free and available Monday thru Friday,
9am to 5pm EST
Call 1-508-376-4245 or visit our website at
www.kanguru.com
Kanguru Solutions
1360 Main St.
Millis, MA 02054
49
 Loading...