

Page 1
Copyright 2014, All Rights Reserved.
KRMC Cloud User Manual
Version 3.1
Page 2

Notices and Information
NOTICES AND INFORMATION
Please be aware of the following points before using the Kanguru Remote Management Console
Copyright © 2014 Kanguru Solutions. All rights reserved.
Windows XP®, Windows VistaTM, Windows 7TM, Windows 8TM and .NET Framework are registered
trademarks of Microsoft Inc. All other brands or product names are trademarks of their respective
companies or organizations.
Kanguru Solutions will not be held responsible for any illegal use of this product nor any losses
incurred while using this product. The user himself is responsible for the copyright laws, and is fully
responsible for any illegal actions taken.
Customer Service
To obtain service or technical support for your system, please contact Kanguru Solutions Technical
Support Department at 508-376-4245, or visit www.Kanguru.com for web support.
Legal notice
In no event shall Kanguru Solutions’ liability exceed the price paid for the product from direct,
indirect, special, incidental, or consequential software, or its documentation. Kanguru Solutions
offers no refunds for its products. Kanguru Solutions makes no warranty or representation, expressed,
implied, or statutory, with respect to its products or the contents or use of this documentation and
all accompanying software, and specifically disclaims its quality, performance, merchantability, or
fitness for any particular purpose. Kanguru Solutions reserves the right to revise or update its products,
software, or documentation without obligation to notify any individual or entity.
Export Law Compliance
Regardless of any disclosure made to Kanguru Solutions pertaining to the ultimate destination of the
specific Kanguru product, you warrant that you will not export, directly or indirectly, any Kanguru
product without first obtaining the approval of Kanguru Solutions and the appropriate export license
from the Department of Commerce or other agency of the United States Government. Kanguru
Solutions has a wide range of products and each product family has different license requirements
relative to exports.
Note: This manual contains instructions for both basic KRMC Cloud as well as KRMC Cloud Pro.
Sections marked with “(KRMC Cloud Pro only)” refer to features that are only available to KRMC
Cloud Pro users. If you would like to upgrade your basic version of KRMC Cloud to KRMC Cloud
Pro, please contact Kanguru sales at 1-888-526-4878.
2
Page 3

End User License Agreement
End User License Agreement
This legal document is an agreement between you, the end user (“Licensee”), and Kanguru Solutions,
a division of Interactive Media Corporation (“Licensor”).
By downloading or obtaining and using this software, you are consenting to be bound by the terms of
this agreement, which includes the software license and software disclaimer of warranty.
This agreement constitutes the complete agreement between you and licensor. If you do not agree
to the terms of this agreement, cease to use the product immediately and destroy any copies that you
have made.
SOFTWARE LICENSE
“The software” shall be taken to mean the software contained in this package, downloaded from
Licensor’s website, or included within a hardware device and any subsequent versions or upgrades
received as a result of having purchased this package. “Licensee” shall be taken as the original
purchaser of the software.
Licensee has the non-exclusive right to use the software only on a single computer. Licensee may not
electronically transfer the program from one computer to another over any type of network. Licensee
may not distribute copies of the software or the accompanying documentation to others either for a
fee or without charge. Licensee may not modify or translate the program or documentation. Licensee
may not disassemble the program or allow it to be disassembled into its constituent source code.
This software is licensed only to you, the Licensee. You may not permit non-Licensees to use or
install it on computers or networks other than explicitly specified in this license without the prior
written consent of Licensor.
This license does not entitle you to any future upgrades or updates of software or configuration files,
although Licensor may decide to make such upgrades or configuration file updates available with or
without an associated fee.
Licensee’s use of the software indicates his/her acceptance of these terms and conditions. If Licensee
does not agree to these conditions, then he or she must return any distribution media, documentation,
and associated materials to the vendor from whom the software was purchased, and erase the software
from any and all storage devices upon which it may have been installed or otherwise stored.
DISCLAIMER OF WARRANTIES
The software is provided on an “AS IS” basis, without warranty of any kind, including without
limitation the warranties of merchantability, fitness for a particular purpose, and non-infringement.
The entire risk as to the results and performance of the software is assumed by you, the Licensee.
If the software is defective, you, and not Licensor or any distributor, agent or employee of Licensor
assumes the entire cost of all necessary servicing, repair, or correction.
3
Page 4

End User License Agreement
LIMITATION OF DAMAGES
In no event shall Licensor, or anyone else who has been involved in the creation, distribution, or
delivery of this product be liable for any direct, indirect, special, punitive, exemplary, consequential
or incidental damages (including but not limited to damages for loss of business profits, business
interruption, loss of business information, and the like) arising out of the use or inability to use such
product even if Licensor has been advised of the possibility of such damages. Because some states
do not allow the exclusion or limitation of liability for consequential or incidental damages, the above
limitation may not apply to you.
COPYRIGHT RESTRICTIONS
This software and any accompanying materials are copyrighted. Unauthorized copying of this software
or of any of the textual materials accompanying it is expressly forbidden.
You may not modify, adapt, translate, reverse engineer, decompile, disassemble (except to the
extent applicable laws specifically prohibit such restriction), or create derivative works based on the
software.
EXPORT RESTRICTIONS
You agree that you will not export the software to any country, person or entity subject to U.S. export
restrictions.
ENTIRE AGREEMENT
This written End User License Agreement is the exclusive agreement between you and Licensor
concerning the software and supersedes any and all prior oral or written agreements, negotiations or
other dealings between us concerning the software. This License Agreement may be modified only
by a writing signed by you and Licensor.
This agreement is subject to the laws and jurisdiction of the courts of the Commonwealth of
Massachusetts, USA. If a court of competent jurisdiction invalidates one or more of the terms of this
contract, the surviving terms continue in force.
This License Agreement is effective upon the earlier of your (1) use of the software; or (2) your
manifesting assent to these terms as by clicking on the I Agree button shown when you downloaded
or installed the software.
4
Page 5

Table of Contents
Table of Contents
1. Introduction ............................................................................................................. 6
2. System Requirements .............................................................................................. 7
3. Getting to Know KRMC Cloud ............................................................................. 8
3.1 Logging into KRMC Cloud ....................................................................... 8
3.2 Navigating KRMC Cloud .......................................................................... 10
3.3 Filtering and Sorting Lists ......................................................................... 12
4. Home / KRMC Overview page .............................................................................. 14
5. The Device Menu ..................................................................................................... 15
5.1 Device List ................................................................................................. 16
5.1.1 Editing Device Information ......................................................... 17
5.1.2 Creating Remote Actions ............................................................ 18
5.1.2.1 Create an action for a single device .............................. 19
5.1.2.2 Create an action for multiple devices ............................ 20
5.1.3 Managing Device Settings .......................................................... 21
5.2 Device Groups ........................................................................................... 23
5.2.1 Adding Groups ............................................................................ 24
5.2.2 Editing Groups ............................................................................ 25
5.2.3 Deleting Groups .......................................................................... 26
5.2.4 Running Actions on Groups ........................................................ 27
5.2.4.1 Create an actions for a single group .............................. 27
5.2.4.2 Create an action for multiple groups ............................. 28
5.3 KRMC Licenses ........................................................................................ 29
5.4 A/V Licenses ............................................................................................. 30
6. The Action Menu ..................................................................................................... 31
6.1 Create Global Actions ................................................................................ 32
6.2 Pending Actions ......................................................................................... 33
6.2.1 Editing Pending Actions .............................................................. 34
6.2.2 Deleting Pending Actions ............................................................ 34
6.3 Successful Actions ..................................................................................... 35
6.4 Failed Actions ............................................................................................ 35
7. Reports ..................................................................................................................... 36
7.1 Reports Charts ........................................................................................... 37
7.2 System Events............................................................................................ 38
8. Settings ..................................................................................................................... 39
8.1 Master Password ........................................................................................ 40
8.2 Administrators (KRMC Cloud Pro only) ................................................... 41
8.2.1 Creating New Administrators ...................................................... 42
8.2.2 Editing Existing Administrators .................................................. 43
8.2.3 Deleting Existing Administrators ................................................ 44
8.3 Support....................................................................................................... 45
8.3.1 Downloading the User Manual ................................................... 45
8.3.2 Changing Your KRMC Cloud Login Password .......................... 45
8.4 Logging Out ............................................................................................... 46
9. Technical Support .................................................................................................... 47
Appendix A : Description of Remote Actions ............................................................. 48
Appendix B: Description of Reports ........................................................................... 50
5
Page 6

Introduction
1. Introduction
Thank you for using the Kanguru Remote Management Console: Cloud Edition. Kanguru Remote
Management Console: Cloud Edition (referred to throughout this manual as KRMC Cloud) is a
revolutionary product that places a complete USB security policy into your hands giving you the
ability to remotely manage USB flash drives from anywhere in the world. KRMC Cloud was designed
to work specifically with Kanguru security drives.
Communication with KRMC Cloud is supported by the following devices:
Current Legacy
• Kanguru Defender Elite200 • Kanguru Defender V2
• Kanguru Defender Elite30 • Kanguru Defender Elite
• Kanguru Defender 2000 • Virtual Defender
• Kanguru Defender Basic+
• Kanguru Defender DualTrust
• Kanguru Defender HDD
• Kanguru Defender SSD
All communication with KRMC Cloud is routed through a secure encrypted tunnel to ensure that
your information is protected. For more information regarding the communication protocols used by
KRMC Cloud, please contact: Security@Kanguru.com
Important! Any Kanguru device that is configured to communicate with a KRMC Cloud account
will be permanently bound to that KRMC Cloud account. Resetting the device will not unbind it. You
can only stop communication by disabling KRMC Cloud on the device. For more information on
disabling KRMC Cloud on your device, please refer to the device’s user manual.
Main features of KRMC Cloud
√ Remote data deletion
√ Ability to modify or reset User Passwords
√ Administrator level auditing of actions and events
√ Ability to create groups consisting of multiple devices
√ Ability to create multiple admin users (KRMC Cloud Pro only)
√ Configurable offline settings
√ Remote re-provisioning of devices for security policy enforcement and compliance
√ Full feature reporting
√ Log where devices are being used via IP address and hostname
√ Log all system actions and events
√ Incorporated asset management systems through unique identifiers
√ Remotely disable lost or stolen devices
√ Send messages to remote devices
√ Full license management for both Anti-virus and KRMC licenses
√ Remote action scheduling for present or future date and times
√ Graphical Reports
6
Page 7

System Requirements
2. System Requirements
Client requirements for Admins using KRMC Cloud
These requirements are for any systems that will be used to log in to the KRMC Cloud web interface.
• Supported browsers: Internet Explorer 9 or later, Google Chrome, Firefox 3.0 or later
• Minimum Resolution: 1024 x 800
• Fully functional internet / network connections
• Valid internet connection
• 32 MB of available local storage
• Minimum of 512 MB RAM
IMPORTANT! Kanguru Local Administrator (KLA) should NOT be used to set a master password
on any device that will be used with KRMC Cloud. Using KLA to set the master password will cause
incompatibilities with your device and Cloud functionality.
Client requirements for end users
These requirements are for any systems that a remotely managed Kanguru USB device will be
connected to.
• Supported Operating Systems:
○ Windows
○ XP Home or Professional (Service Pack 2 is recommended)*
○ Vista (All versions)
○ 7
○ 8 / 8.1
○ Windows Server 2003
○ 32 & 64 bit compliant
○ Mac OS X 10.5 and above (compatible with Intel-based Macs only)
○ Linux Kernel 2.6.02 - 2.634 (Red Hat Enterprise Linux 5, Ubuntu 9/10, Open SUSE 11.1)
○ Note: Linux Red Hat users must have Super User or Root privileges
• Valid internet connection
• USB 2.0 or USB3.0 port
* In line with Microsoft’s End-of-Support announcement for Windows XP, Kanguru Solutions is
ending support for its line of products running on the Windows XP platform. While our products have
been quality tested internally on Windows XP, we cannot guarantee normal product operation on an
unsupported OS.
7
Page 8
Using KRMC Cloud / Logging into KRMC Cloud
3. Getting to Know KRMC Cloud
KRMC Cloud is a web based application that acts as the control center for your USB devices. Its
intuitive design simplifies the way you manage your fleet of Kanguru drives. KRMC Cloud is accessed
directly through your web browser. Once logged in to KRMC Cloud, you will be able to manage your
USB devices remotely from anywhere with a computer that has internet connection.
3.1 Logging into KRMC Cloud
To login to the Management Console:
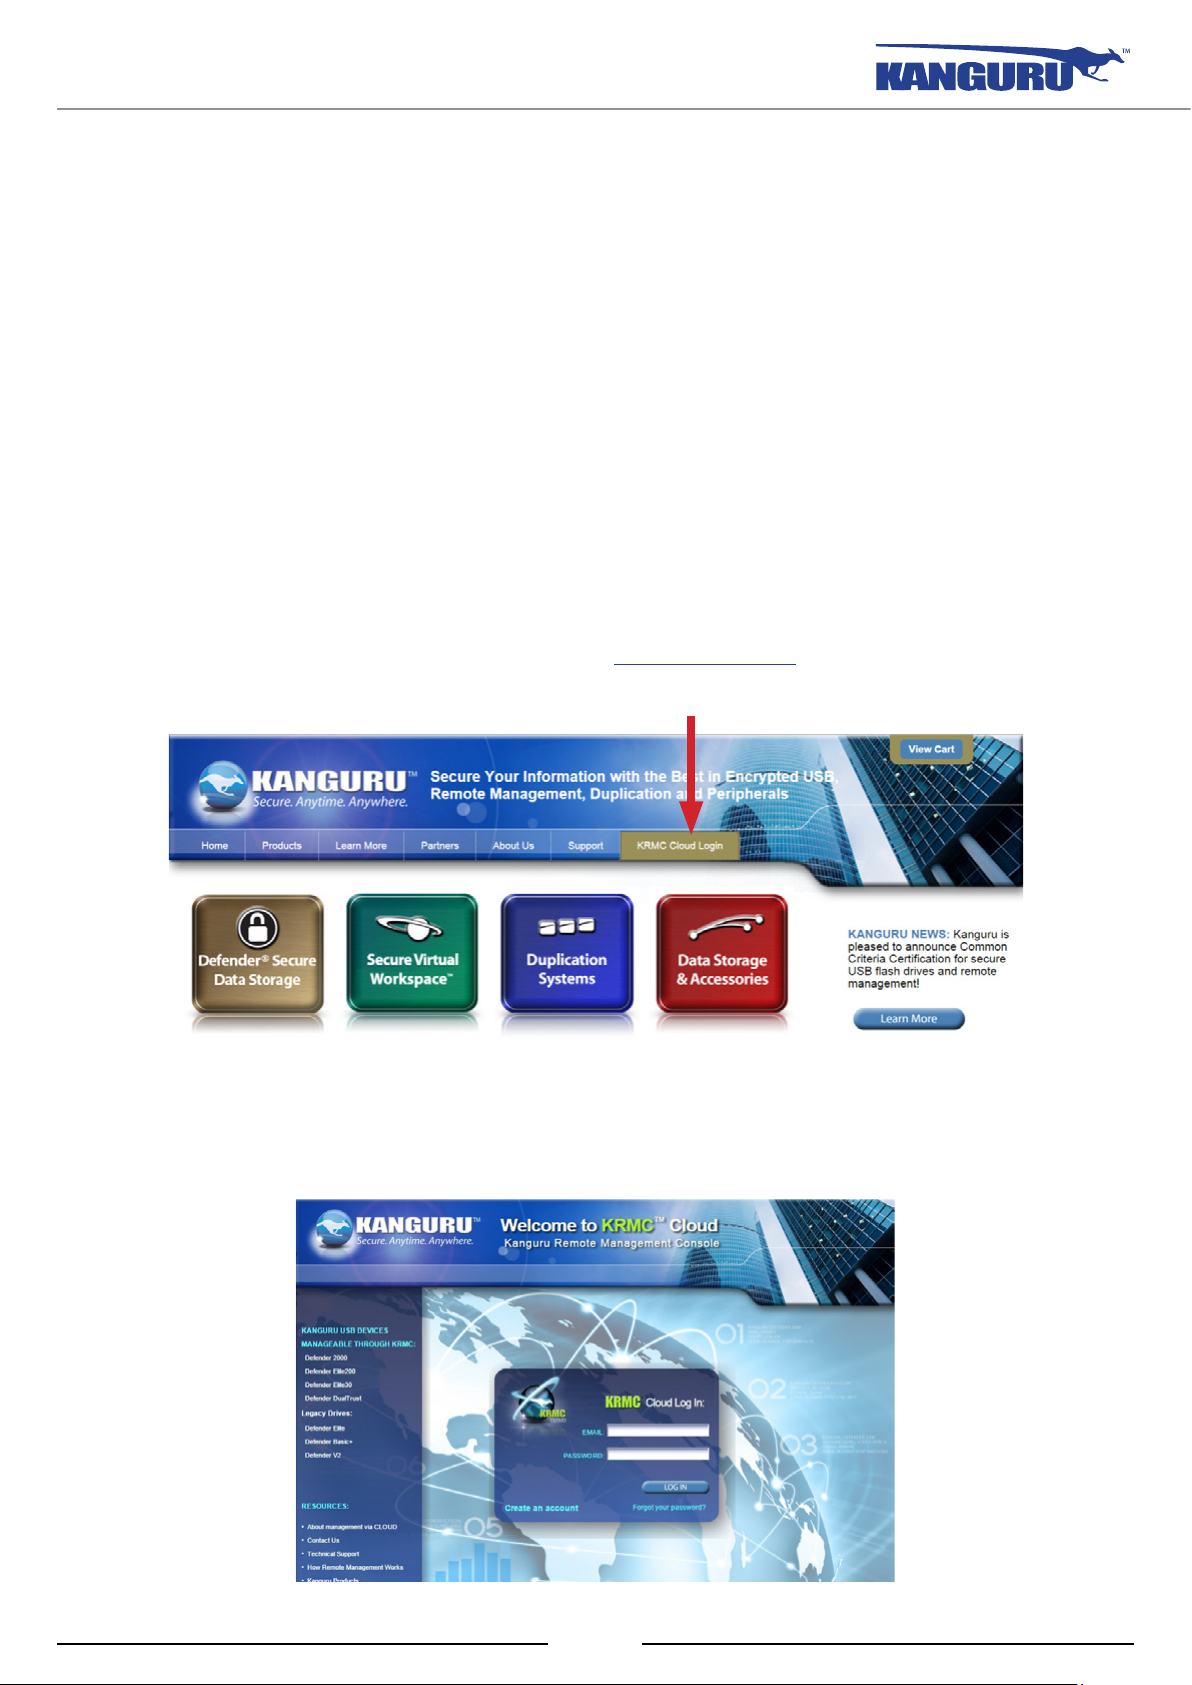
1. Open your web browser. The KRMC website is best viewed by using the latest version of
Microsoft Internet Explorer, Google Chrome or Mozilla Firefox. Supported browsers and
versions are described in chapter 2 System Requirements on p.7
2. Direct your browser to the Kanguru website at: www.kanguru.com and then click on the KRMC
Cloud Login link located in the site’s navigation menu.
3. You will be directed to the KRMC Cloud Login page. Enter your registered e-mail and password
and then click on the Login button. If you do not have an account setup yet, click on the Create
an Account button and create your account first.
8
Page 9
Logging into KRMC Cloud
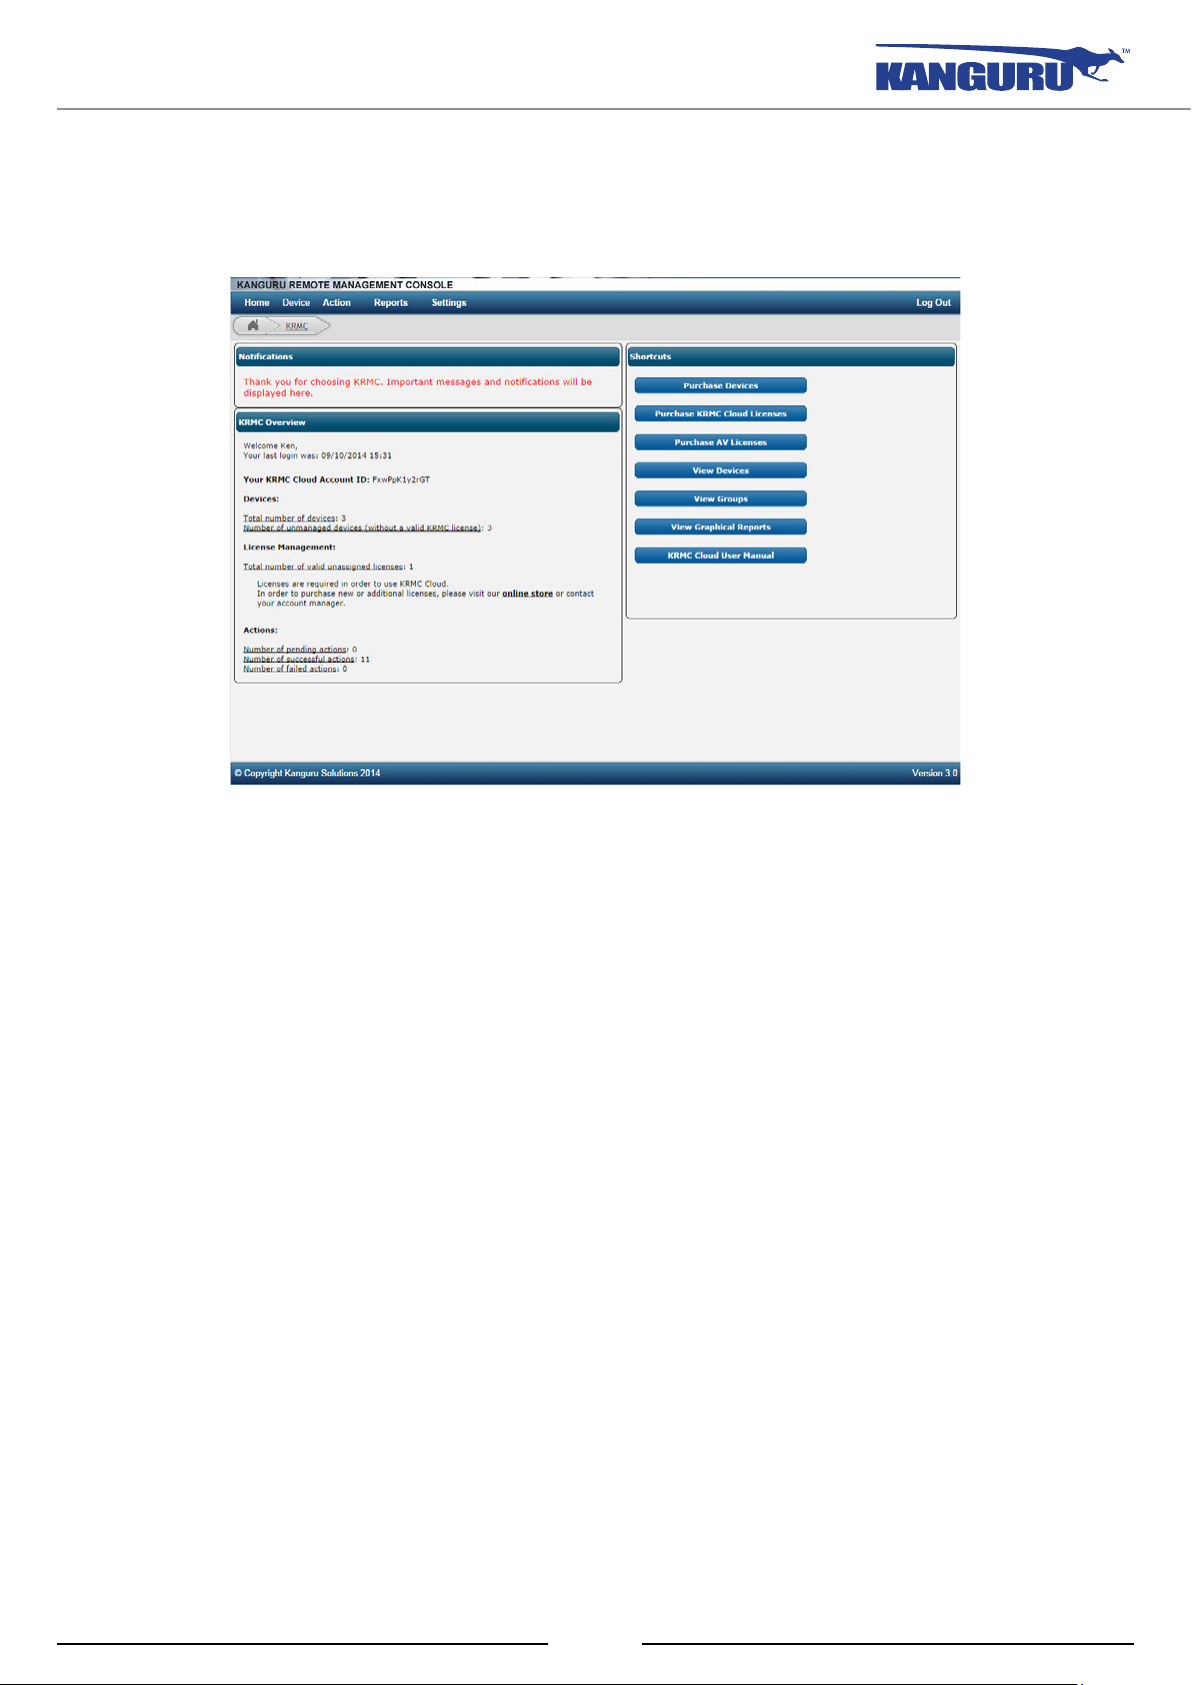
4. Once you have logged in with your account information, you will be directed to your KRMC
Cloud dashboard. You have now successfully logged into KRMC Cloud and will be directed to
the KRMC Overview page.
9
Page 10
Navigating KRMC Cloud
3.2 Navigating KRMC Cloud
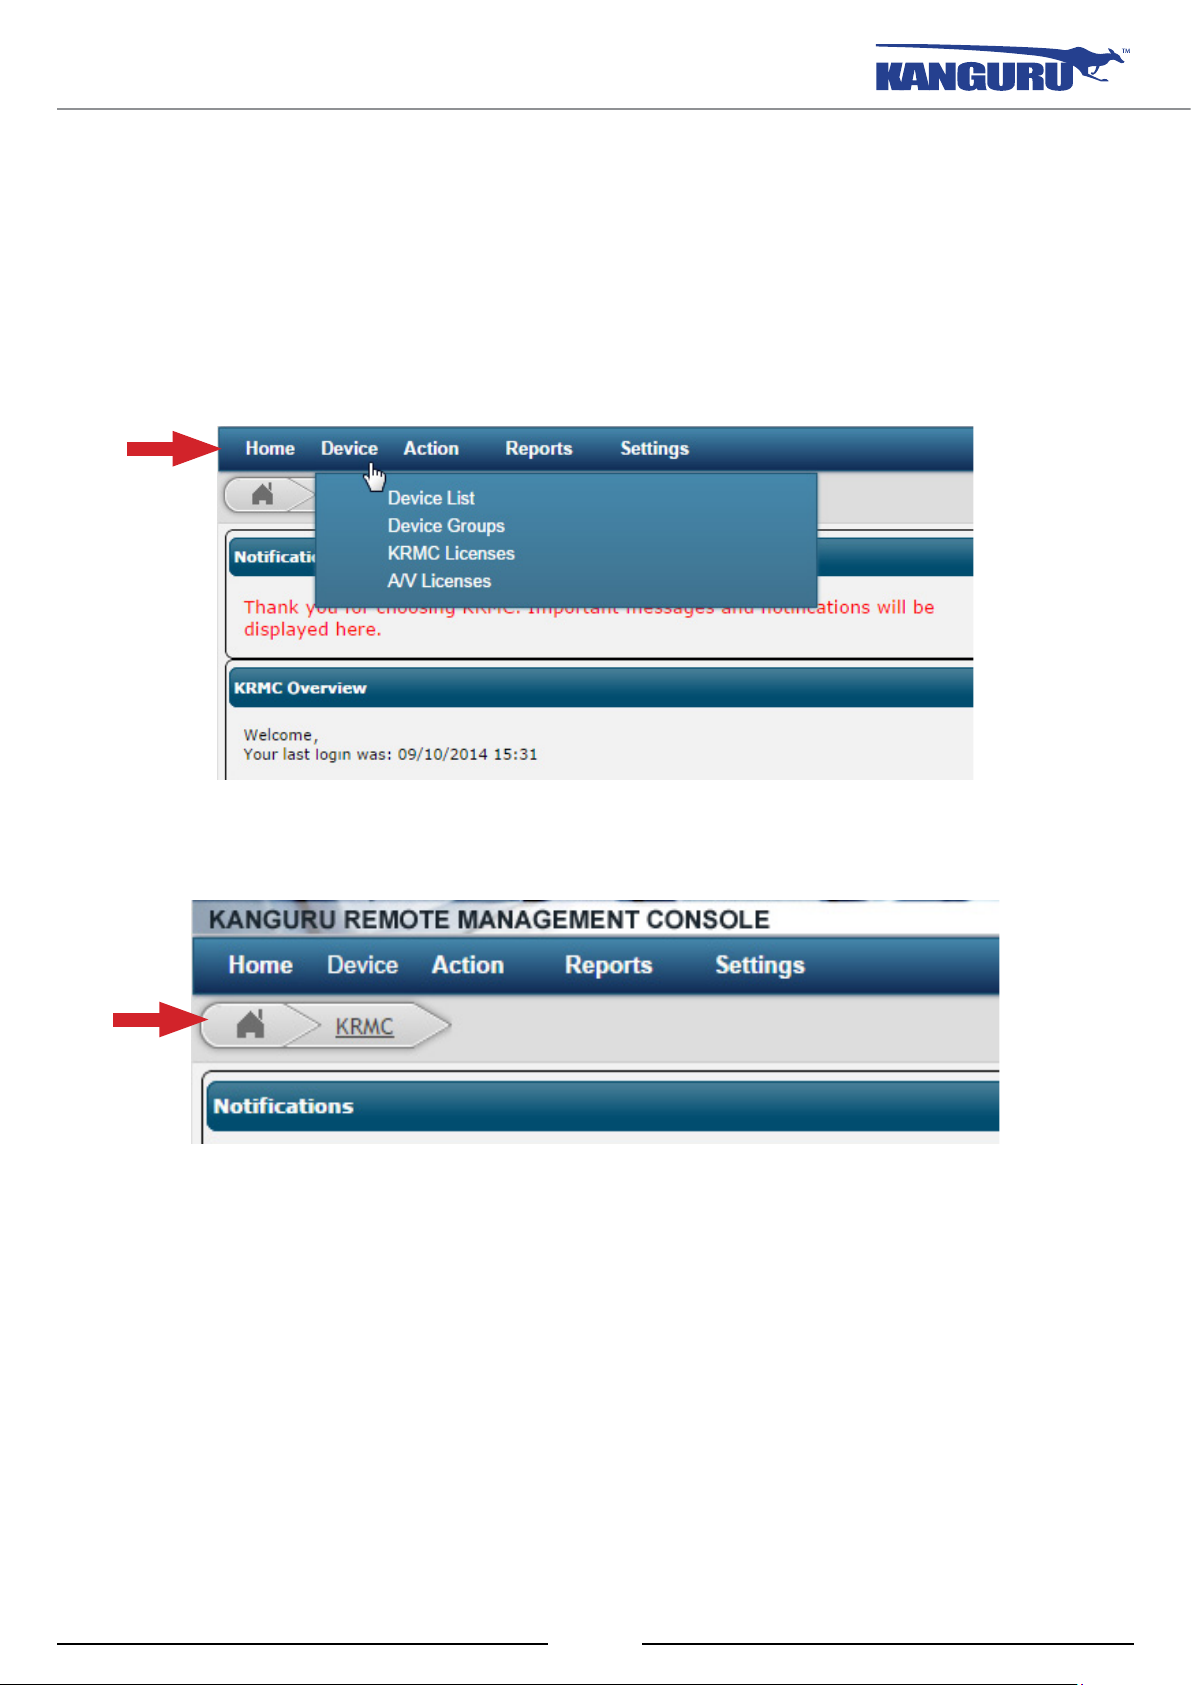
You can easily navigate KRMC Cloud using the drop down menus located in the menu bar at the top
of each page.
Each of the main sections of KRMC Cloud is listed in the horizontal menu bar at the top of every
page. When you place your mouse cursor over each menu item, a drop down menu appears listing the
options available for that section.
Directly below the menu bar is KRMC’s bread crumb navigation.
As you navigate further into KRMC Cloud, your bread crumb trail will show how you reached the
current page. You can click on any section of the bread crumb navigation to easily navigate back to
previous pages.
Note: Clicking on KRMC at the start of the bread crumb trail, or on the Home menu item, will return
you to the KRMC Overview page.
10
Page 11

Navigating KRMC Cloud
KRMC Menu Overview
The following is a list of the sections within KRMC Cloud and a brief description of their functions.
More information regarding these functions is provided later on in this manual.
• Home: Takes you to the KRMC Overview page where you can view your last log-in date, the
total number of devices registered with KRMC Cloud, the number of pending, successful, and
failed actions.
• Device
○ Device List: View a list of your devices registered with KRMC Cloud.
○ Device Groups: Create and view groups of devices and administrator users. Note: multiple
administrators are only available to KRMC Cloud Pro users.
○ KRMC Licenses: View your KRMC Cloud licenses and the total number of valid, unassigned
licenses.
○ A/V Licenses: View the total number of anti-virus licenses registered with your account.
• Action
○ Create Global Action: Create an action that will be performed on all devices registered with
○ Pending Actions: View and edit details about any actions that have not been executed yet.
○ Successful Actions: View details about any actions that were executed.
○ Failed Actions: View details about any actions that could not be executed.
• Reports
○ Report Charts: View charts that help visualize information about system events.
○ System Events: View a log of user activity and remote actions.
• Settings
○ Master Password: Set or modify a device Master Password. The device Master Password
○ Administrators (KRMC Cloud Pro only) : Manage other KRMC administrators. This feature
your KRMC Cloud account.
can be used to access drives in a situation where the device user forgets their login password.
This feature is only available to the KRMC Cloud Administrator who originally setup and
configured the KRMC Cloud account.
is only available to the KRMC Cloud Administrator who originally setup and configured the
KRMC Cloud account.
○ Support: Contains information about your system’s current system configuration, time zone
settings and information for contacting Kanguru’s Technical Support team. You can also
change the password you use to login to KRMC Cloud from here.
○ User Manual: Download a digital copy of this user manual.
• Log Out: Log out of KRMC Cloud.
11
Page 12
Filtering and Sorting Lists
3.3 Filtering and Sorting Lists
While navigating KRMC Cloud, some pages may return a long list of items. Most lists can be filtered
and sorted in order to facilitate the search for relevant items.
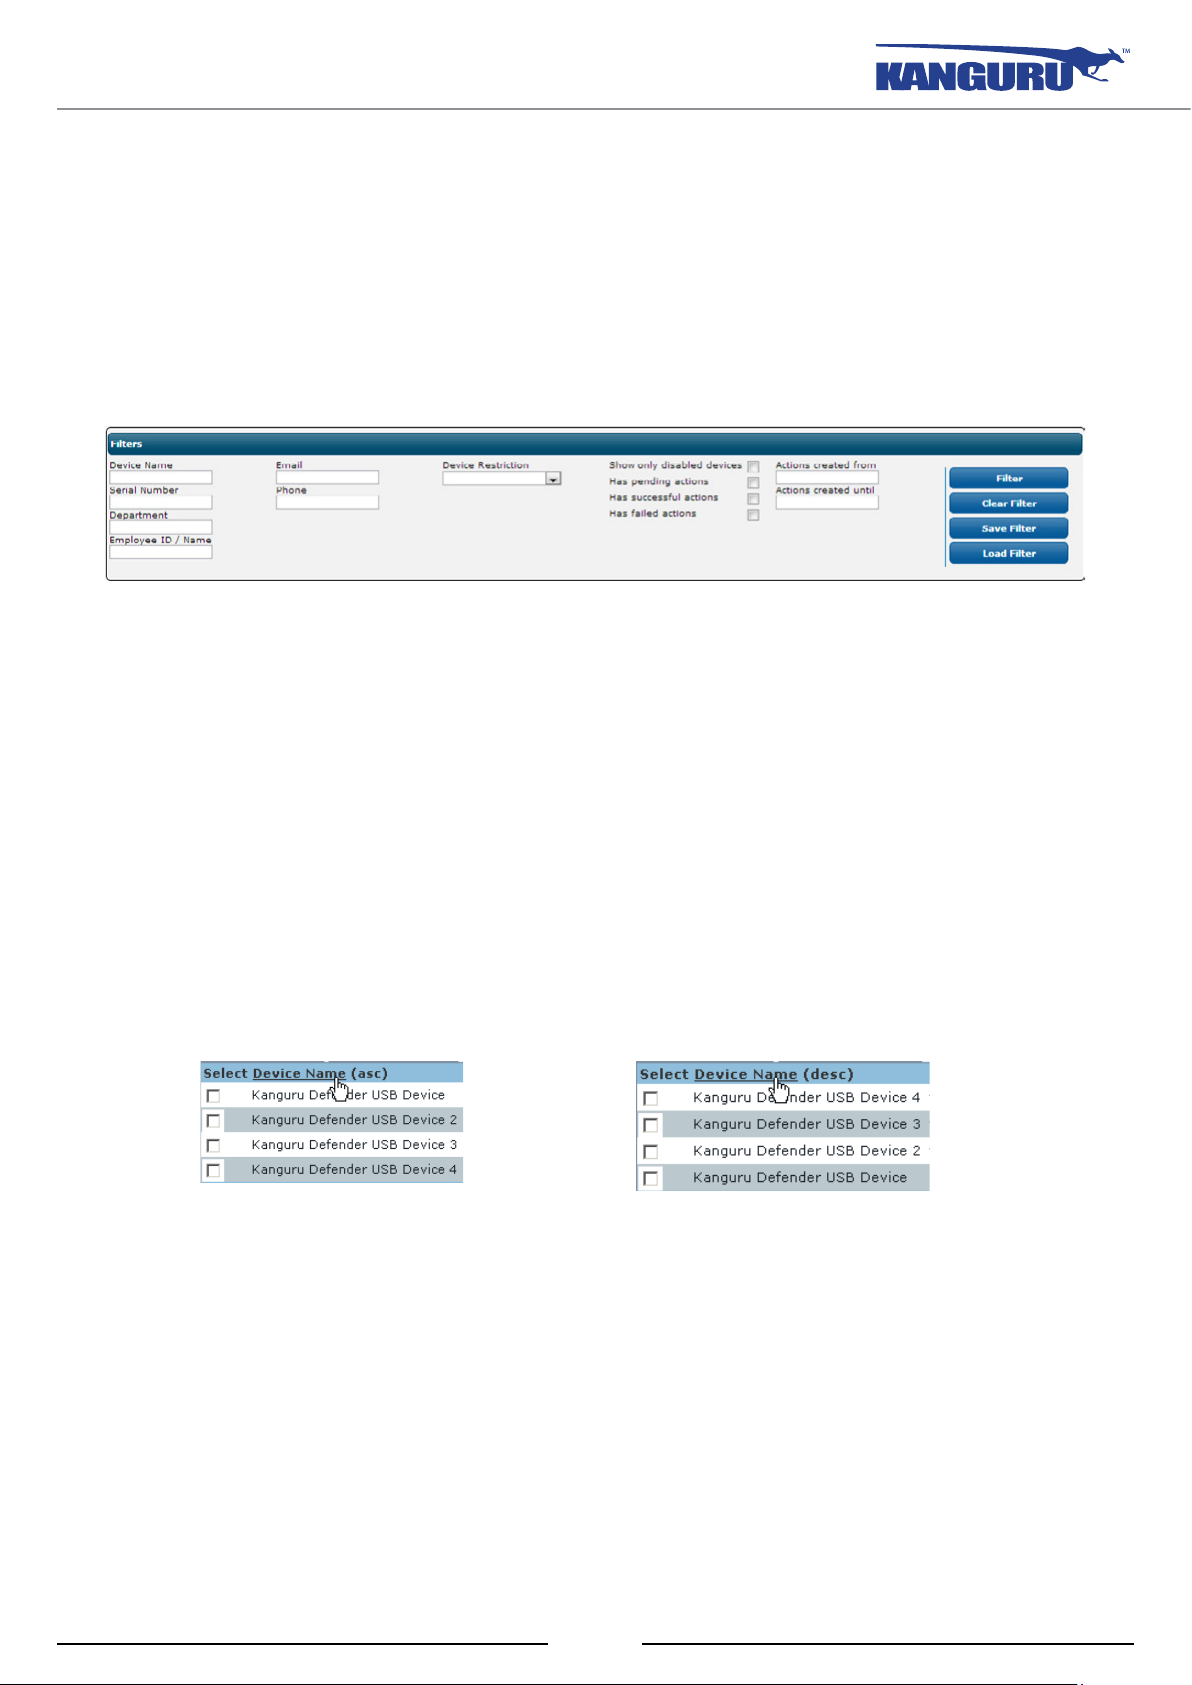
Filtering Lists
Filtering allows you to define lists that display only items that meet your specified search criteria.
Clicking on the Filter button will populate a new list that matches your search criteria. Partial entries
are acceptable. For example, if you are searching for a device that has “Defender” as part of its name,
enter in “Defender” in the ‘Device Name’ field. When you apply the filter, any devices that contain
“Defender” as part of the device name will be returned.
You can save a filter configuration for future use by clicking on the Save Filter button.
When you want to filter using the same filter configuration, simply click on the Load Filter button.
A list of all saved filters appears and you can click on the name of the filter that you want to load.
Sorting Lists
Lists can be sorted by clicking on the column titles. Clicking on the column title will arrange the items
in ascending order. Clicking on the column title again will arrange the items in descending order.
12
Page 13
Filtering and Sorting Lists
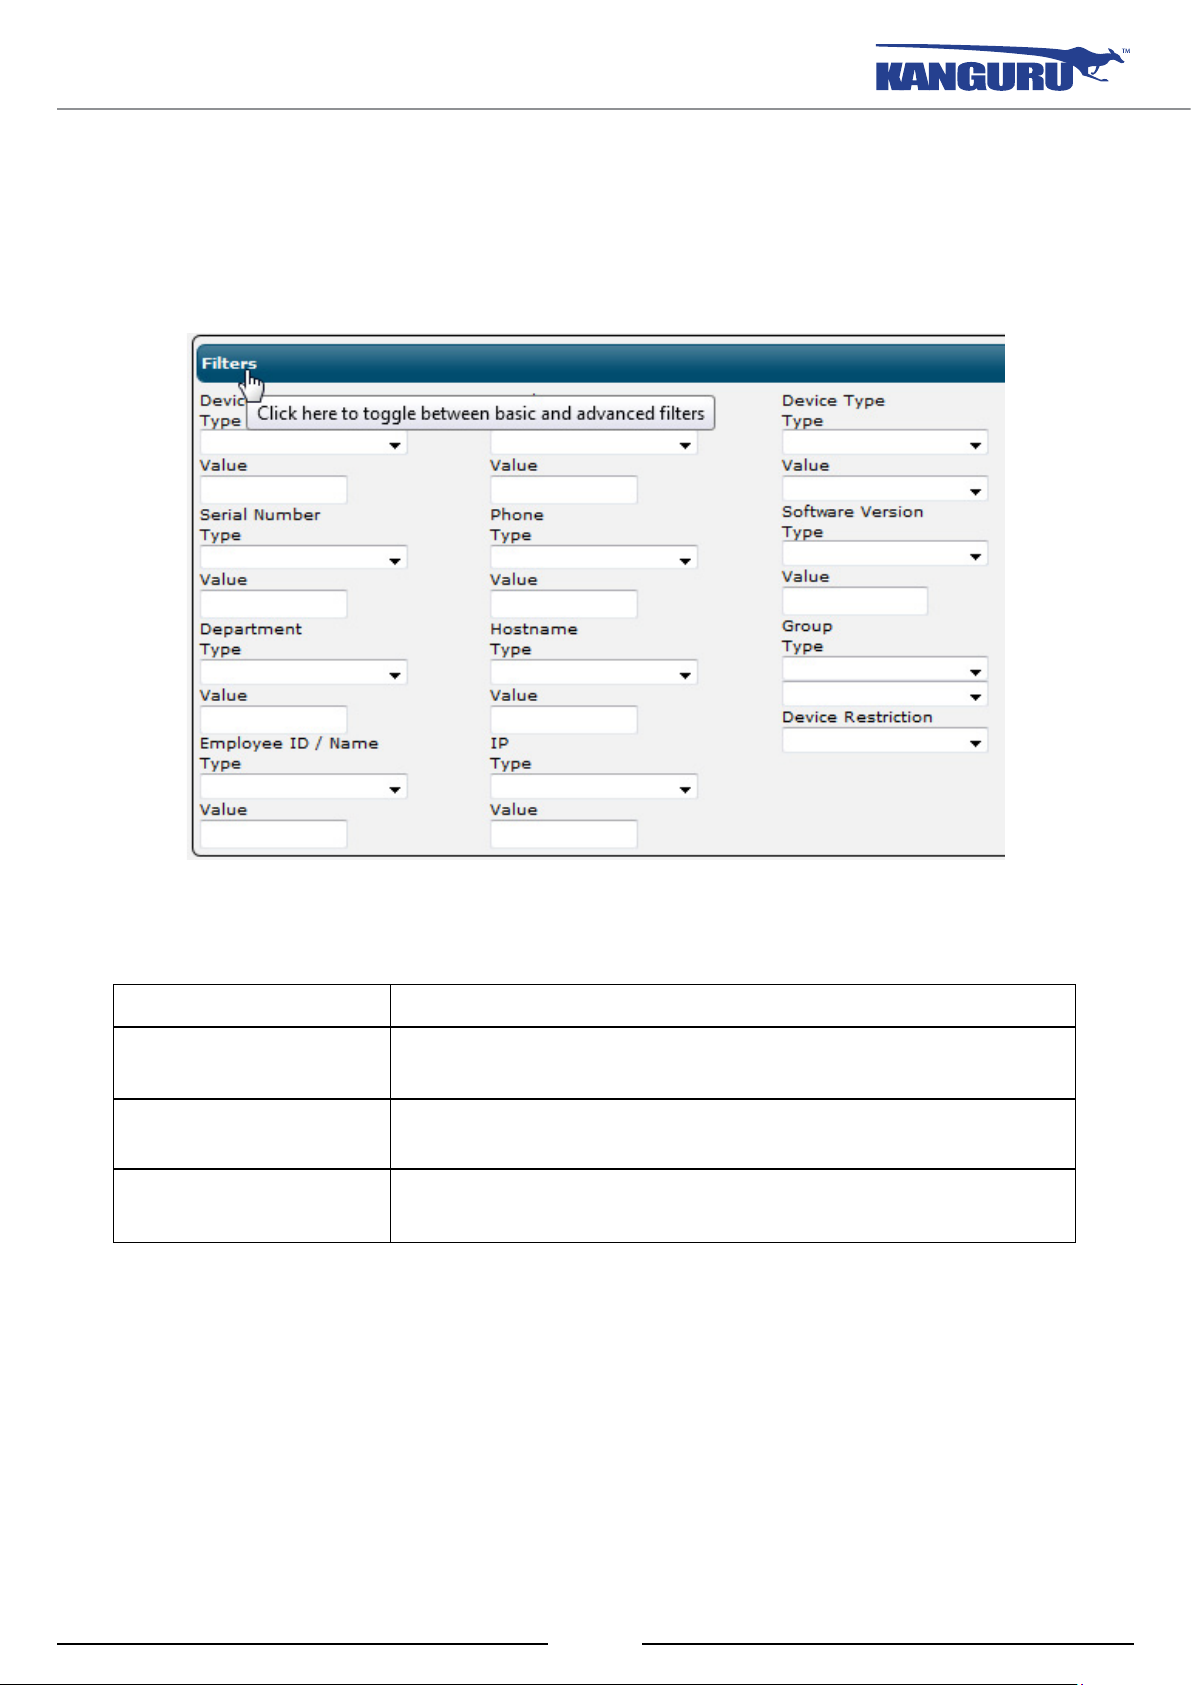
Advanced Boolean Filters
By clicking on the Filters heading, you can toggle the advanced filters on or off. The advanced filters
allow you to perform more precise searches by applying boolean logic that lets you omit or refine
specific search terms.
The advanced boolean filters are available by clicking on the ‘Type’ drop down menu under each
filter item.
Filter Type Description
Contains
Does not contain
Is equal to
Filter will return results that include the search term you entered
in the ‘Value’ field.
Filter will return results that do not include the search term you
entered in the ‘Value’ field.
Filer will return results that contain exactly the search term you
entered in the ‘Value’ field.
13
Page 14
Home / KRMC Overview page
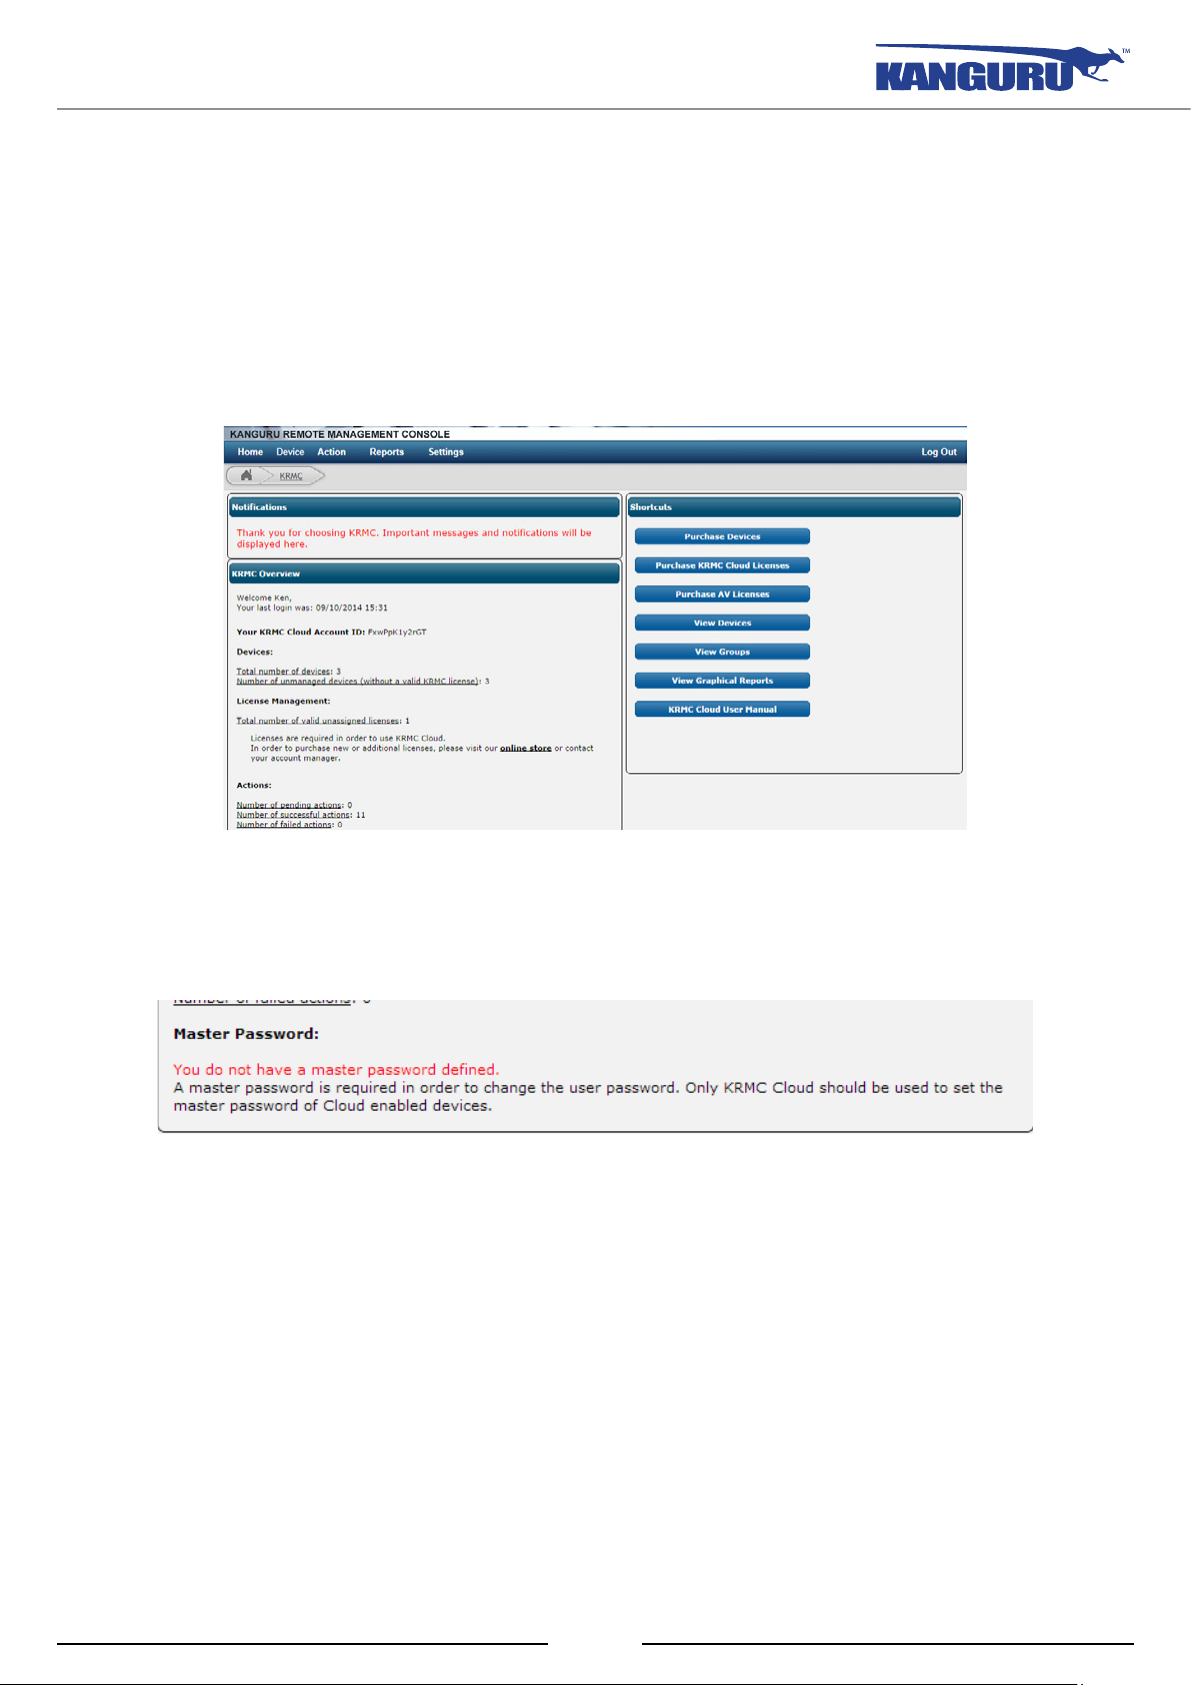
4. Home / KRMC Overview page
When you login to KRMC, you are automatically directed to the KRMC Overview page. The KRMC
Overview page provides you with details about the time of your last login, your devices, your licenses
of any successful, pending and failed actions.
The notification area at the top of the KRMC Overview page will display important messages and
other news from Kanguru Solutions.
Note: If this is your first time logging into KRMC Cloud, then you will also be displayed a message
asking you to define a Master Password. Defining a Master Password is optional. If a Cloud Master
Password is configured then all devices registered with your KRMC Cloud will be set with this
Master Password.
14
Page 15

The Device Menu
5. The Device Menu
The Device menu provides you with a list of options for viewing and managing your Defender devices.
• Device List ................................................. p.16
• Device Groups .......................................... p.23
• KRMC Licenses........................................ p.29
• A/V Licenses ............................................. p.30
15
Page 16
Device List
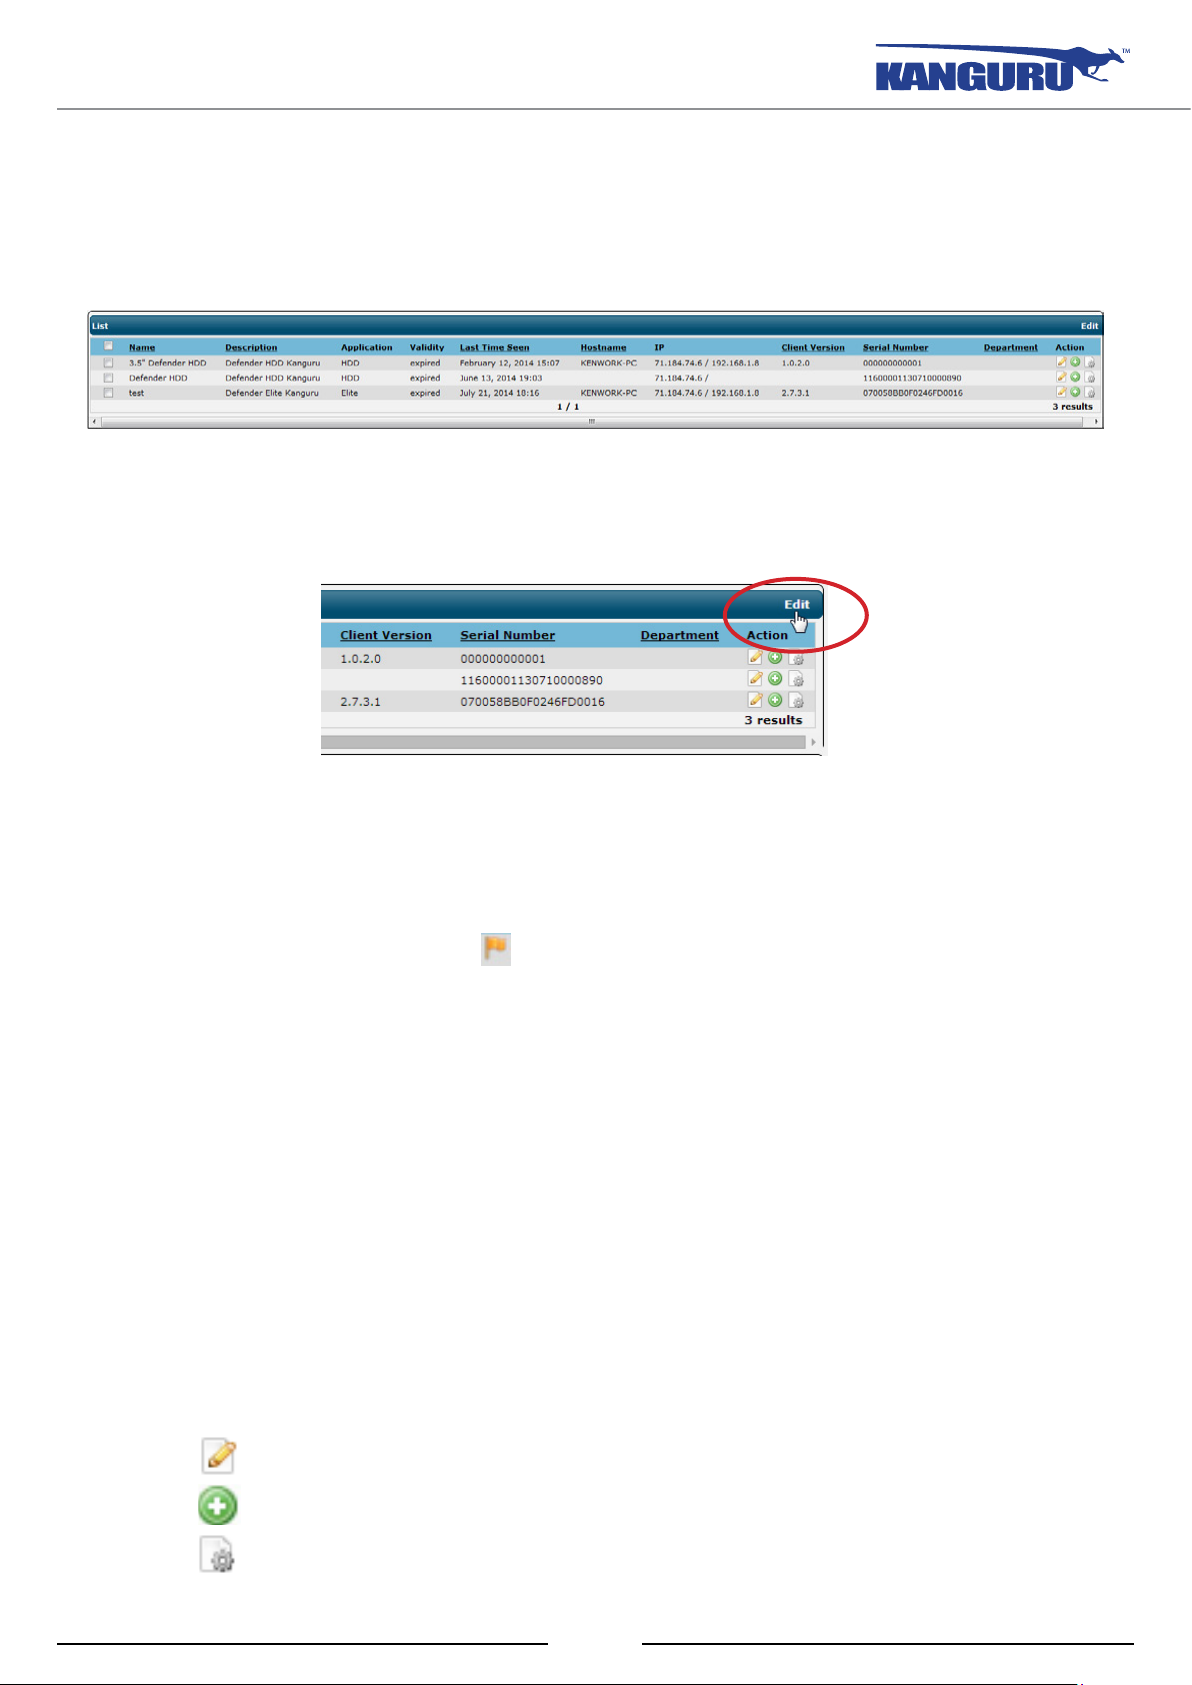
5.1 Device List
The Device List page allows you to view and edit information for all the devices assigned to you, as
well as schedule remote actions to be executed by your devices.
You can manually configure what information is displayed for all of your devices by clicking on the
Edit button located on the Device menu bar above the Actions column.
A list appears displaying all the available options for information that can be displayed for your
devices. Check off all of the options that you want displayed in the Devices list.
A list of all of your devices is displayed with the following information by default:
• Name – Name assigned to a device. Drives with their Device Name displayed in red font have
been disabled. Note: A flag icon
for that device.
• Description – Model of the Defender USB device.
• Application - The client application type running on the device.
• Validity - The total number of days that the assigned KRMC license is valid for.
• Last time seen – Date and time when the device was last seen by the server.
• Hostname – The name of the computer the device was connected to when last seen.
• IP - External/Internal IP address of the location the device was connected to last.
• Client Version - The current client application version the device is running.
• Serial Number - The unique serial number assigned to the device.
• Department - The department that the device belongs to (optional).
appears next to the device name if there is a pending action
• Actions
○
○ Run action – Create a remote action
○ Manage Settings – Manage device settings
Edit device – Add or modify device information
16
Page 17

Device List
5.1.1 Editing Device Information
The Edit Device action lets you add or modify device information. Adding device information will
help you identify your devices as well as maximize the effectiveness of filters applied to long lists of
devices. This information, which is pulled from the device, is created during the initial device setup.
To add or edit device information:
1. From the Device List page, click on the Edit icon for the device you want to modify.
The Edit Device window appears.
2. Under the ‘General’ tab enter the device’s information in the corresponding fields.
Note: If you enable the option for “Allow user to edit customer information for device”, then
any changes that the end user makes to the user information on their device will also update the
information shown in KRMC Cloud.
3. Under the ‘Details’ tab enter the device user’s information in the corresponding fields.
4. Click on the Update button. The device’s info will be updated and you will receive an
‘Information saved’ confirmation message.
5. Click on the Close button to close the Edit Device window and return to the Device List page.
17
Page 18

Device List
5.1.2 Creating Remote Actions
The main feature of KRMC Cloud is the ability to run remotely executable actions on your devices.
You can schedule actions to be executed on any device registered with KRMC Cloud, connected
to any PC with an internet connection. These actions can be scheduled for immediate execution or
execution at a specific date and time. If a USB device cannot communicate with the server at the
designated time, then the action will be executed the next time the device is seen by the server.
Remote Actions:
• Delete All Data – Deletes all data stored on the device’s secure partition and resets the device
to the factory default settings.
• Change User Password - Change the password used to mount the device’s secure partition.
Note: A KRMC Cloud Master Password is required to perform this action.
• Message – Send a notification message to the device.
• Refresh Device – Sends updates from the device to the server regarding any changes made
to the device’s information. Device information in KRMC is always updated with information
sent from the device at connection time. The device information is set through the setup wizard
when the device is configured initially .
• Reprovision – Remotely update device security policies.
• Delete all data & Disable device - Delete all data from the device and then disable the device.
Disabled devices are unusable until they are enabled by executing an ‘Enable Device’ remote
action.
• Disable Device - Remotely disable a device. All data on the device is retained. Disabled devices
are unusable until they are enabled by executing an ‘Enable Device’ remote action.
• IP/Domain/MAC Control - Create a list of IP Ranges, Domains or MAC addresses that you
will either allow or restrict access to the KRMC Cloud server from.
• Enable Device - Remotely enable a disabled device.
• Configure App Launcher - Configure a drive to auto-run a file stored on the drive’s secure
partition each time the end user logs into their device’s secure partition.
Note: For more detailed information regarding remote actions please see Appendix A : Description
of Remote Actions on p.48.
18
Page 19

Device List
5.1.2.1 Create an action for a single device
To create a remote action for a single device:
1. From the Device List page, click on the Add Action icon
The Create Action window appears.
to create an action for a device.
2. Click on the drop down menu next to Select Action and select an action from the menu.
3. Enter the necessary information into the data fields. Note: Information in the Notes field will be
saved in KRMC but will not be viewable by the device end user.
4. Click on the Schedule field to set the date and time that you want the action to be run. This time
represents the time at the server location. If this field is left empty, the action will be scheduled
for execution the next time that the device is seen by the server.
5. If you selected the action Change User Password, Change Master Password, Reprovision,
Upgrade Client Application, IP/Domain Control, or Configure App Launcher, then click on the
Action Details tab to configure the action’s details.
6. Click on the Create button and you will receive an ‘Action created’ confirmation message.
7. Click on the Close button to close the Add Action window and return to the Device List page.
19
Page 20

Device List
5.1.2.2 Create an action for multiple devices
If you want to create an action that will be executed on multiple devices:
1. From the My Devices page, select the device(s) you want to create the action for by clicking the
check box next to each device. A check mark means the device has been selected.
Note: If you want to select all of the devices listed on the page, click on the check box located
next to ‘Name’. If you want to select all of your devices, including devices that are listed on
other pages, click on the All Elements check box located under the Operations section.
2. Select ‘Add Action’ from the drop down menu located in the Operations section and then click
on the OK button.
The Create Action window appears.
3. Create your action the same as you would for a single device, but keep in mind that this action
will be performed on all selected devices.
20
Page 21

Device List
5.1.3 Managing Device Settings
The Device Settings feature allows you to configure device settings that will define your devices’
security policies. These settings are applied directly to the device. The Device Settings feature offers
the same functionality as the Reprovision action.
To configure the device settings:
1. From the Device List page, click on the Device Settings icon
configure.
for the device you want to
The Device Settings window appears.
2. Configure the device settings. Please refer to the next page for detailed information about each
of these device settings.
3. Click on the Apply button to save the updated device settings.
4. Click on the Close button to close the Device Settings window and return to the Device List
page.
After you have completed configuring the device’s settings, a new Reprovision action is created
based on the configured settings. The new Reprovision action will appear in the Pending Actions
screen, and will be executed the next time the device is seen by the server.
21
Page 22

Device List
Configurable Device Settings:
• Minimum Password Length (8 - 15 characters) – Set the mandatory minimum number of
characters a password must contain to be valid.
• Password expiration frequency (none, 30, 60, 90, 180, 360 days) – Set how often the system
will force the user to change their user password.
• Minimum letters/numbers/symbols required in password (0 - 5) – Configure the minimum
number of upper and lower case letters, symbols and digits a password must contain to be valid.
• Number of old passwords not allowed in the future (0-10): Define the number of previously
used passwords that may not be accepted as your current password.
• Allow Offline Profile (enabled / disabled) – When enabled, the user will be able to access
their device even if it cannot communicate with the KRMC Cloud server. When disabled, the
user will not be able to access their device if it cannot communicate with the KRMC Cloud
server.
• Maximum number of password attempts (3 – 15 attempts) - Set the number of times a user
can incorrectly enter their password. A warning message will appear to inform the user when
they have 1 attempt remaining.
• After Retries Expire
○ Format Device - When selected, the device will automatically format itself if the user
exceeds the number of allowed password retries. This will erase all admin settings and user
data stored on the device and reset the device to the factory default settings.
○ Activate Timeout Period - When selected, the device will automatically timeout if the user
exceeds the number of allowed password retries. The user will have to wait for the timeout
period to pass before they will be allowed to enter a password again.
○ Disable Device - When selected, the device will become disabled if the user exceeds the
number of allowed password retries. The device user will be unable to login to their device
or access the device’s secure partition again until it is enabled by an ‘Enable Device’ remote
action.
• Timeout Value (1 Min, 2 Min, 5 Min, 10 Min, 30 Min) - When Activate Timeout Period
has been selected, you can define how long the timeout period is. If the user exceeds the set
number of password retries, the user will have to wait this long before they are allowed to enter
a password again.
• Change Password at Next Login - If selected, the user will have to change their password the
next time they successfully login to their device.
22
Page 23

Device Groups
5.2 Device Groups
The Device Groups page displays a list of all Groups in your KRMC Cloud account. Groups consist
of devices that are associated with each other. Groups provide you with an efficient and easy way to
manage large numbers of associated devices.
The Device Groups page provides you with options for managing all of the groups registered with
the system:
• Add or delete groups
• Assign devices to a group
• Assign admins to a group (only available on KRMC Cloud Pro)
• Run actions for all devices in a group
A list of system groups is displayed on the Device Groups page with the following information:
• Name – Name of the group.
• Description – Description of the group.
• Actions
○
Edit – Modify the group.
○ Run action – Schedule a remote action for all devices associated with the group.
○ Delete – Remove the group from KRMC Cloud.
23
Page 24

Device Groups
5.2.1 Adding Groups
Creating a group is a simple process of associating devices with the group.
To add a new group:
1. From the Device Groups page, click on the Add New button located in the Operations section.
The Create Group window appears.
2. Set the group’s name and description settings under the ‘General’ tab.
3. Under the ‘Devices’ tab, you can add devices to the group by selecting the check box next to the
device name. Note: You can filter for specific devices by typing in the “Filter Device list” field.
The filter will search your device IDs, device names and device serial numbers for potential
matches. Filter results are updated in real time as you type.
4. If you have KRMC Cloud Pro, you can click on the ‘Administrators’ tab to select administrators
that will be assigned to this device group.
5. Click on the Create button to finish creating the group. You will receive a ‘Group created’
confirmation message.
6. Close the window to return to the Device Groups page. The new group will appear in the Device
Groups list.
24
Page 25

Device Groups
5.2.2 Editing Groups
The Edit Groups action allows you to make changes to the group’s settings. You can modify the
group’s name, description, what system devices are associated with the group.
To edit a group:
1. From the Device Groups page, click on the Edit Group icon
The Edit Group window appears.
for the group you want to edit.
2. Configure the group’s name and description settings under the ‘General’ tab.
3. Under the ‘Devices’ tab, you can add/remove devices to the group by selecting/deselecting the
check box next to the device name.
4. Under the ‘Administrator’ tab, you can add/remove administrators assigned to the group by
selecting/deselecting the check box next to the administrator’s name. This is only available to
KRMC Cloud Pro users.
5. Click on the Update button to finish editing the group. You will receive a ‘Group updated’
confirmation message.
6. Close the Edit Group window to return to the Device Groups page.
25
Page 26

Device Groups
5.2.3 Deleting Groups
The Delete Groups action allow you to remove any unwanted or unnecessary groups from KRMC
Cloud. Deleting a group will not delete devices associated with the group.
To delete a group:
1. From the Device Groups page, click on the Delete Group icon
to remove from the system.
2. A dialog box appears asking you to confirm whether you want to delete the selected item. Click
on the OK button to confirm.
for the group that you want
3. The group is removed from the Device Groups list.
26
Page 27

Device Groups
5.2.4 Running Actions on Groups
Creating an action for a group is similar to creating an action for a device. The only difference is
that when you create an action for a group, the action will be remotely executed on every device
associated with the group.
5.2.4.1 Create an actions for a single group
To schedule a remote action for a group:
1. From the Device Groups page, click on the Add Action icon
schedule a remote action to run on.
for the group that you want to
The Create Action window appears.
2. Create a new group action the same way you would create an action for a device (see section
5.1.2 Creating Remote Actions on p.18).
Note: Once a group action is created, an individual action is added for every device within the group.
27
Page 28
Device Groups
5.2.4.2 Create an action for multiple groups
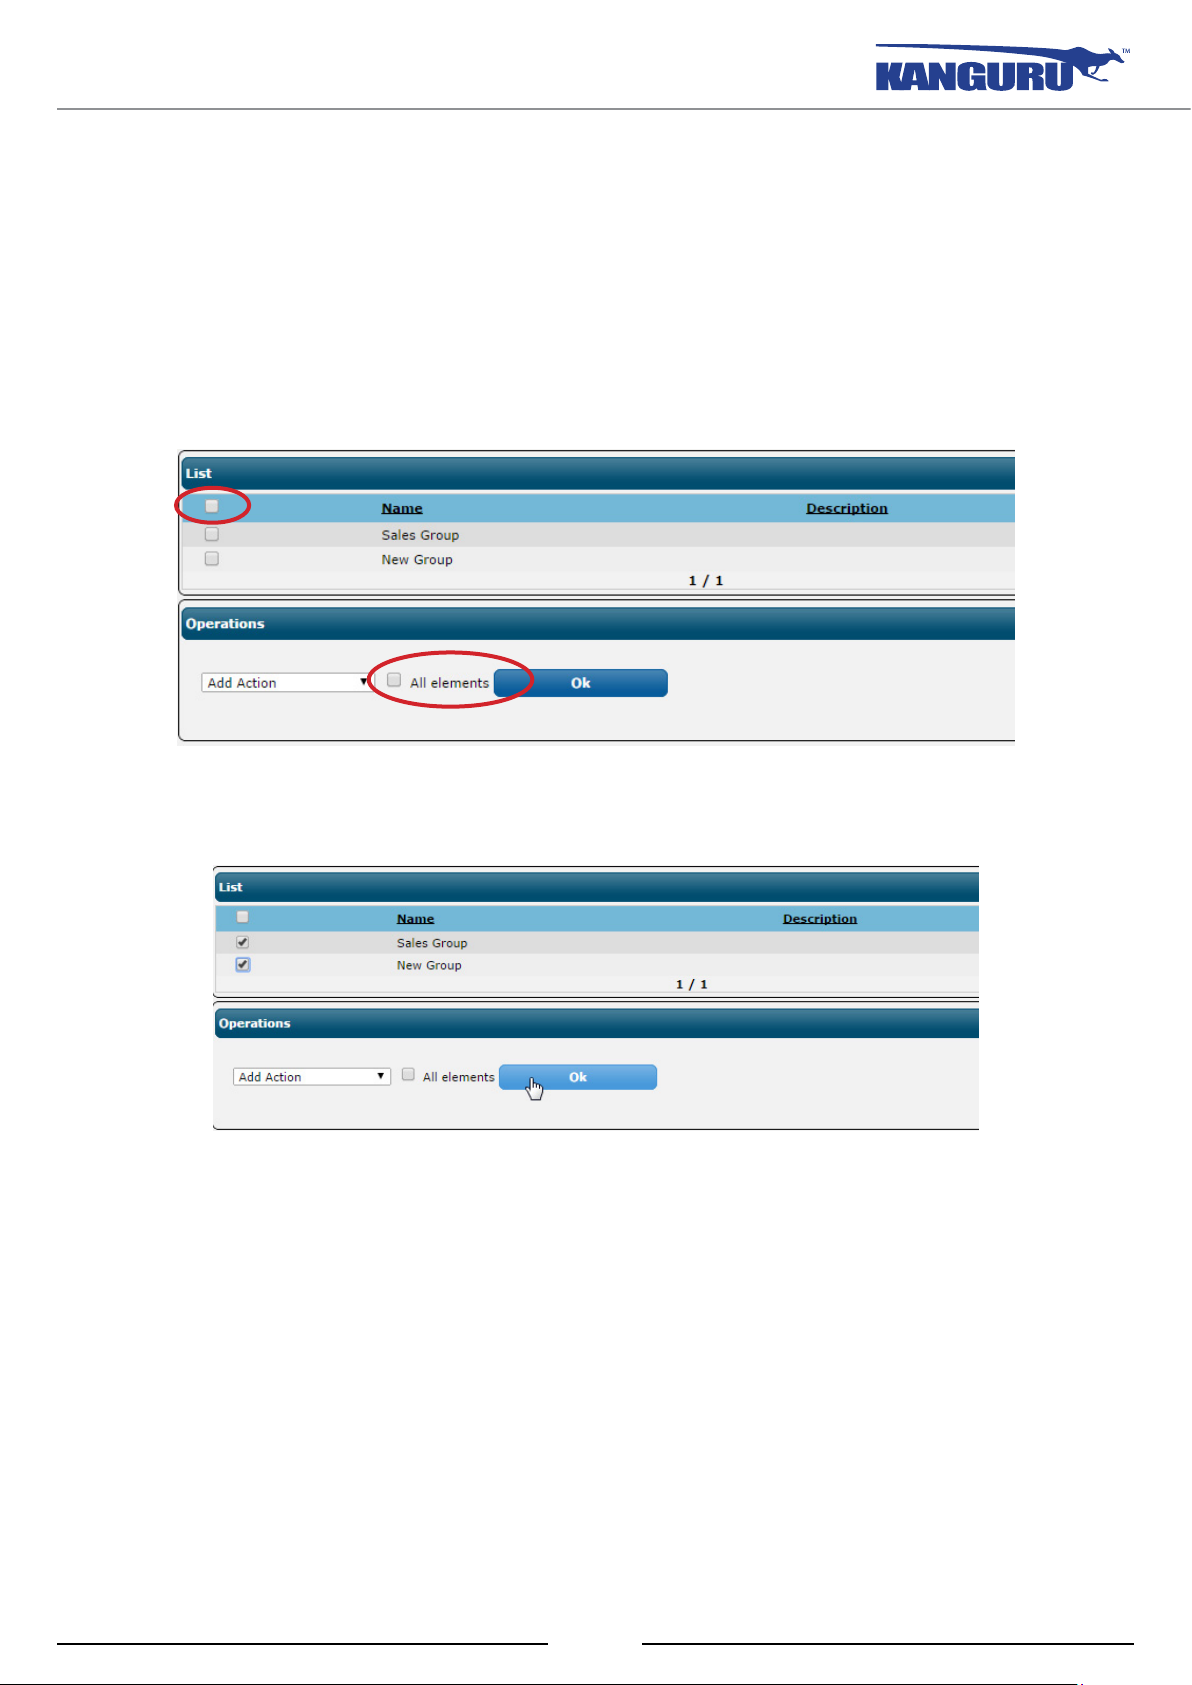
If you want to create an action that will be executed on more than one group:
1. From the Device Groups page, select the device(s) you want to create the action for by clicking
the check box next to each groups. A check mark means the groups has been selected.
Note: If you want to select all of the groups listed on the page, click on the check box located
next to ‘Name’. If you want to select all of your groups, including groups that are listed on other
pages, click on the All Elements check box located under the Operations section.
2. Select ‘Add Action’ from the drop down menu located in the Operations section and then click
on the OK button.
The Create Action window appears.
3. Create your action the same as you would for a single group, but keep in mind that this action
will be performed on all devices in all the selected groups.
28
Page 29

KRMC Licenses
5.3 KRMC Licenses
The KRMC Licenses page allows you to view your purchased licenses, unassigned licenses and
assign your licenses to your devices.
All the licenses that you currently own are listed with the following information:
• License Key – Every license key is composed of a 16 character serial number.
• Description - A custom description of the license. This field is empty by default but can be
customized for easy license management.
• Validity (days) - The number of days the license is valid for. This field will be blank if the
license has lifetime validity.
• Used by Device – The device that the license is assigned to. If no device is listed under ‘Used
by device’ it means that the license is unused and available to be assigned to a device.
• Actions
○ Edit License – Modify a license’s description.
○ Assign License - Assign the license to a device.
○ Release License – Release a license from a device.
KRMC licenses are fully transferable, so in the case that a device is lost or stolen the license can be
released from the device it was assigned to and then reassigned to a different device.
29
Page 30

A/V Licenses
5.4 A/V Licenses
The A/V Licenses page allows you to view your purchased anti-virus licenses, unassigned licenses
and assign unused licenses to your devices.
All the licenses that you currently own are listed with the following information:
• License Key – Every license key is composed of a 16 character serial number.
• Description - A custom description of the license. This field is empty by default but can be
customized for easy license management.
• Validity (days) - The number of days the license is valid for. This field will be blank if the
license has lifetime validity.
• Used by Device – The device that the license is assigned to. If no device is listed under ‘Used
by device’ it means that the license is unused and available to be assigned to a device.
• Actions
○ Edit License – Modify a license’s description.
○ Assign License - Assign the license to a device.
○ Release License – Release a license from a device.
Anti-virus licenses are fully transferable, so in the case that a device is lost or stolen the license can
be released from the device it was assigned to and then reassigned to a different device.
30
Page 31

The Action Menu
6. The Action Menu
The Action menu provides you with options for creating and viewing actions created in KRMC Cloud.
• Create Global Actions .............................. p.32
• Pending Actions ........................................ p.33
• Successful Actions .................................... p.35
• Failed Actions ........................................... p.35
31
Page 32

Create Global Actions
6.1 Create Global Actions
Unlike device actions, which are run on a specific device, global actions are executed on every device
registered with your KRMC Cloud account. This allows you to easily and conveniently push out
system wide changes (e.g. updating your device security policies through a global reprovision action).
Note for KRMC Cloud Pro users: Global actions created by sub admins will only be created for all
devices assigned to that admin.
The steps for creating a global action are the same as creating individual device actions (see section
5.1.2 Creating Remote Actions on p.18).
Adding a global action will create individual pending actions for every device. You can exclude
specific devices from the global action by deleting the action for the device(s) from the Pending
Actions page (see section 6.2 Pending Actions on p.33).
32
Page 33

Pending Actions
6.2 Pending Actions
The Pending Actions page displays a list of devices that have actions waiting to be executed. Actions
are not always scheduled for immediate execution. Some actions are scheduled for execution on a
designated date and time in the future. It is also possible that a USB device is not seen by the server
at the time that the action was scheduled for execution. Until the action has been executed, the action
will remain in the Pending Action list.
Each pending action contains the following information:
• Action – The type of action that is pending execution.
• Device – The name of the device that the action is scheduled to be executed on.
• Device Message – The message that will be displayed to the device user when the action is
executed. If no text is entered in this field, no message will be sent to the device.
• Notes - Notes are for the Administrator’s reference only. The device user will not see any
information entered as a Note. A Note may be partially displayed depending on its length.
Hover your mouse over a Note item and a popup window will appear, revealing the entire Note.
• Scheduled Time – Date and time when the action has been scheduled for execution. Note: If
the scheduled date and time for the action has already passed, the scheduled time is displayed
in red.
• Actions
○
Edit Action – Edit the details of a pending action.
○ Delete Action – Delete (cancel) a pending action.
33
Page 34

Pending Actions
6.2.1 Editing Pending Actions
Pending Actions can be modified before they are executed if necessary. Note: You cannot edit an IP/
Domain/MAC Control action. You cannot edit a Change User Password action.
To edit pending actions:
1. From the Pending Actions page, click on the Edit Action icon
to edit.
for the action that you want
2. Edit the fields for the action as needed. You cannot change the selected action or the device the
action will run on.
3. Click on the Update button. You will receive an ‘Action Updated’ confirmation message.
4. Close the Edit Action window and return to the Pending Actions page.
6.2.2 Deleting Pending Actions
If necessary, you can cancel Pending Actions before they are executed by deleting them from the
Pending Actions list. Note: You cannot delete a Change User Password action.
To delete a pending action:
1. From the Pending Actions page, click on the Delete Action icon for the action you want to
delete.
2. The action is removed from the Pending Actions list.
34
Page 35

Successful Actions / Failed Actions
6.3 Successful Actions
The Successful Actions page displays a list of all the actions that were executed successfully.
Each entry contains the following information:
• Action – The type of action that was executed.
• Device – The device the action was executed on.
• Message – The message sent to the device’s user when the action was executed. If no text is
entered in this field, no message will be sent to the remote device.
• Notes - Notes are for the Administrator’s reference only. The device user will not see this
information. A note may be partially displayed depending on its length. Hover your mouse over
a note item and a popup window will appear revealing the entire note.
• Schedule – The date and time that the action was scheduled to be executed.
• Date of Completion - The date and time that the action was successfully executed.
6.4 Failed Actions
The Failed Actions page displays a list of all the actions that could not be executed.
Each entry contains the following information:
• Action – The type of action that was supposed to be executed.
• Device – The device the action was supposed to be run on.
• Message – The message that was supposed to be sent to the USB device’s user. If no text is
entered in this field, no message will be sent to the device.
• Notes - Notes are for the Administrator’s reference only. The device user will not see this
information. A note may be partially displayed depending on its length. Hover your mouse over
a note item and a popup window will appear revealing the entire note.
• Schedule – The date and time that the action was scheduled for execution.
• Date of Failure - The date and time that the action failed.
35
Page 36

Reports
7. Reports
The Reports menu provides you with two options for viewing system related information, which
includes details about devices, logins, remote actions and licenses.
• Report Charts ........................................... p.37
• System Events ........................................... p.38
36
Page 37

Reports Charts
7.1 Reports Charts
The Reports Carts section provides visual break downs of all device, user and system activity.
To view a chart:
1. Select a time frame to generate report data from.
○ When - Select a specific number of days prior to today’s date to gather data from.
○ From / To - Select a specific date range to gather data from.
2. In order to display only relevant data, select a maximum number of results from the Limit drop
down menu.
3. Select a chart type from the Chart menu. After a few moments the chart will appear.
For a more detailed description of each report, see Appendix B: Description of Reports on p.50
37
Page 38

System Events
7.2 System Events
The System Events page allows you to view a list containing records of all user logins and actions
that have occurred.
38
Page 39

Settings
8. Settings
The Settings menu provides you with options for viewing and configuring KRMC system settings,
Note: The Administrators option is only available to KRMC Cloud Pro customers.
• Master Password ......................................p.40
• Administrators (Cloud Pro only) ............ p.41
• Support ......................................................p.45
39
Page 40

Master Password
8.1 Master Password
The Master Password page allows you to create or change the Master Password for your KRMC
Cloud devices.
Note: The Master Password page is only accessible to the primary administrator account. Subadministrators do not have access to Master Password functionality. If you need to access the Master
Password, please contact the primary Administrator account holder.
By setting a Master Password:
• The device end user will not be able to perform the ‘Reset to factory default’ action on their
drive from the client application’s login screen.
• Any device registered with KRMC and that has a user password already set can be accessed
using the Kanguru Local Administrator’s (KLA) Master Password login function. KLA is not
included with KRMC Cloud and must be purchased separately.
• If a user’s device is reset through a ‘Reset Device’ remote action, the end user will not be able
to disable KRMC Cloud functionality from the client application’s Setup Wizard. If you need
to change this behavior, please contact Kanguru Technical Support.
To set a master password:
1. Enter the master password in the New Device Master Password field.
2. Confirm the master password by entering it again in the field below.
3. Click on the Save button.
You can select the ‘Hide Device Message’ option, which will suppress any pop up messages that
would otherwise be displayed on the device user’s end.
40
Page 41

Administrators
8.2 Administrators (KRMC Cloud Pro only)
The ability to create additional sub-administrators is a feature only available to KRMC Cloud Pro
users.
The Administrators page allows you to view, add, remove and edit secondary sub-administrators.
Sub-administrators have limited abilities compared to the primary administrator. Sub-administrators
are able to login to KRMC Cloud to view and manage devices assigned to them, however they do not
have the ability to change the Master Password or manage other administrators.
The Administrator page is only available to the primary administrator who originally setup and
configured KRMC Cloud Pro. In the list of administrators, you can see all active and inactive admins
created within KRMC Cloud.
There are two icons under the Action column for each administrator:
•
•
Edit Admin - Change the administrator’s email address or KRMC Cloud login password.
Delete Admin - Remove the administrator from KRMC Cloud. Once an administrator is
removed from KRMC Cloud, they will no longer be able to login to KRMC Cloud.
41
Page 42

Administrators
8.2.1 Creating New Administrators
The KRMC Cloud Pro’s primary administrator has the ability to create up to four (4) sub-administrator
accounts, each whom will be give access to log into KRMC Cloud.
To create a new sub-administrator, you must be logged into the primary administrator account:
1. Click on the Add new button located in the Operations area.
2. The Create Administrator window appears.
3. Under the General tab enter the new administrator’s email address and password.
4. Click on the Groups tab and select any device groups that the administrator will be given
permission to manage.
5. Click on the Actions tab and select the types of remote actions that this administrator will be
able to create.
6. Click on the Account tab:
○ Check the box next to ‘Account Enabled’ to activate the administrator account.
○ Check the box next to ‘View System Events’ to allow the administrator to view system
events (see section 7.2 System Events on p.38).
○ Check the box next to ‘Is Administrator’ to allow administrative level access.
7. Click on the Create button. The new administrator appears in the list of administrators.
If you would like to have more than 4 additional administrators, then you may be interested in KRMC
Enterprise. Please contact Kanguru Sales at 1-888-526-4878 for more information.
42
Page 43

Administrators
8.2.2 Editing Existing Administrators
To edit an administrator, click on the Edit icon under the Action column of the administrator that you
want to configure.
The Edit Administrator window appears.
You can modify the following settings under each tab in the Edit Administrator window:
• General: Change the administrator’s email address and password.
• Groups: Change which device groups that the administrator is able to manage.
• Actions: Change the types of remote actions that this administrator will be able to create.
• Account:
○ Account Enabled allows you to activate and deactivate the administrator account.
○ View System Events allows the administrator to view system events when selected (see
section 7.2 System Events on p.38).
○ Is Administrator allows you to block or allow administrative level privileges (i.e. able to
create other administrators and set a Master Password).
• Devices : Change which devices are being managed by the administrator.
Click on the Update button to apply the changes, or click on Cancel to discard the changes and
return to the Administrators page.
43
Page 44

Administrators
8.2.3 Deleting Existing Administrators
There are two methods for removing an already existing secondary administrator from KRMC Cloud:
• To delete a single administrator, simply click on the Delete icon under the Action column of the
administrator that you wish to remove from your KRMC account.
• To delete multiple administrators, click on the check box located to the left of each administrator’s
username that you wish to remove from KRMC Cloud. In the Operations section, select
“Delete” from the menu and then click on the OK button.
44
Page 45

Support
8.3 Support
The Support page provides you with information regarding the current KRMC Cloud version and
information for contacting Kanguru’s Technical Support staff. You can also change the password you
use to login to KRMC Cloud.
8.3.1 Downloading the User Manual
You can download an electronic copy of this user manual by clicking on ‘User Manual’.
8.3.2 Changing Your KRMC Cloud Login Password
You can change the password that you use to login to KRMC Cloud at the bottom of the Support page.
To change the password you use to login to KRMC Cloud, under the Change Password section:
1. Enter your current password.
2. Enter your new password.
3. Confirm your new password.
4. Click on the Change button.
45
Page 46

Logging Out
8.4 Logging Out
Click on Log Out on the top-right of the page to exit KRMC Cloud.
46
Page 47

Technical Support
9. Technical Support
If you experience any problems using your Kanguru Remote Management Console : Cloud Edition,
please call our tech support department. Please have your KRMC Cloud Account ID number on
hand when contacting technical support. You Cloud Account ID number can be found in the KRMC
Overview section on the home page.
Kanguru tech support is available Monday thru Friday, 9am to 5pm EST.
Phone: 1-508-376-4245 Option 2
Website: www.Kanguru.com
Support: support.kanguru.com
47
Page 48

Appendix A : Description of Remote Actions
Appendix A : Description of Remote Actions
Delete All Data – Deletes all data stored on the device’s secure partition and resets the device to the
factory default settings. The admin settings are unaffected by this action.
Change User Password – Change the device’s user password.
• New Password: Enter the new user password for the device.
• Confirm Password: Enter the new user password again to confirm the password. This password
must match the password entered in the New Password field.
• Master Password: Enter the devices Master Password.
Message – Send a notification message to be displayed on the device host’s computer.
Refresh Device – Sends updates from the device to the server regarding any changes made to the
device’s information
Re-provision – Remotely update device security policies:
• Minimum Password Length (8-15): The minimum number of characters a password is
required to contain to be valid. The default value is “8”.
• Password Expiration Frequency (none, 30 days, 60 days, 90 days, 1 year): The number
of days before a password expires. Once expired, the user will be forced to change their user
password the next time they successfully login. The default value is “none”.
• Allow Offline Profile: When selected, the user will be able to access their device even if the
device cannot communicate with the server. When left unselected, the user will not be able to
access their device when it cannot communicate with the server. The default setting is selected.
• Minimum (Uppercase letters, Lowercase letters, Symbols, Numbers) required in
password: The mandatory minimum number of upper and lower case letters, symbols and
digits a password requires to be valid.
• Number of old passwords not allowed in the future (0-10): Define the number of previously used
passwords that may not be accepted as your current password.
• Maximum number of password attempts (3-15): The number of attempts the user has to
enter the correct login password. The default value is “7”.
• After Password Retries Expire: Select what the device should do if the number of allotted
password retries is exceeded. The default value is set to activate a timeout period.
○ Format device: When selected, if the number of password attempts is exceeded then the
device automatically deletes all data and resets to the factory default settings.
○ Activate timeout period: When selected, if the number of allowed password attempts is
exceeded the device automatically goes into timeout. The user will have to wait for the
timeout period to pass before they can enter a password again. This is the default setting.
○ Disable device: When selected, if the number of allowed retries is exceeded the device is
automatically disabled. The device user will be unable to login to their device or access the
device’s secure partition again until it is enabled by the administrator using KLA. For more
information on enabling devices please refer to your KLA user manual.
• Timeout Value (1, 2, 5, 10, 30 minutes): If Activate Timeout Period has been selected, the
user will have to wait this long before they can attempt to enter their password again when they
exceed the number of allowed password retries.
• Change Password at Next Login: When selected, the user will forced to change their user
password the next time they successfully login.
48
Page 49

Appendix A : Description of Remote Actions
Delete all data and Disable Device - Delete all the data stored on the device, and then disable the
device. Admin settings are not affected by this action. The device user will be unable to login to their
device or access the device’s secure partition again until it is enabled by an ‘Enable Device’ remote
action.
Disable Device - Remotely disable a device. Admin settings are not affected by this action. The
device user will be unable to login to their device or access the device’s secure partition again until it
is enabled by an ‘Enable Device’ remote action.
IP/Domain/MAC Control - Create a list of IP Ranges or Domains or MAC addresses that you will
either allow or restrict your devices to access KRMC from. You can include multiple IP Ranges or
Domains in the list.
• Enable Access Control: Check this box to enable IP/Domain control.
• Functionality: Select whether IP/Domain control will allow or deny certain IP ranges or
domains.
○ Allow All Except (blacklist): When selected, all devices will be allowed to access KRMC
unless it is located under any of the IP ranges or Domains listed.
○ Deny all Except (whitelist): When selected, only devices that are located under any of the
IP ranges or Domains listed will be able to access KRMC.
• Control Based: Select whether you want IP/Domain Control to be based on IP Range or
Domain.
• New Values: Select whether you want the newly added IP Range or Domain to either Append
or Overwrite the existing list of allowed or blocked IP Ranges/Domains.
• Add IP Range, Add Domain and Add MAC Address: Depending on whether control is
based upon IP Range, Domain or MAC Address, this entry will be either Add IP Range, Add
Domain, or Add MAC Address.
○ IP Range: Enter the start and end of the IP range that you wish to allow or deny.
○ Domain: Enter the domain that you wish to allow or deny.
○ MAC Address: Enter the MAC address for a network controller you wish to allow or deny.
Enable Device - Remotely enable a device that had been disabled by a ‘Disable Device’ remote
action.
Configure App Launcher - Configure a drive to auto-run a file stored on the drive’s secure partition.
Each time the end user logs into their drive, that file will automatically open.
• Enable App Launcher: when selected, this will enable the App Launcher functionality. Leave
unselected to disable the App Launcher functionality.
• Windows File / Linux File / Mac File: Enter the full name of the file that you want to auto-
execute whenever the device user logs into the device’s secure partition. You must enter in the
file’s entire name including file name and extension. If the file name is entered incorrectly or if
the file does not exist on the drive, the end user will receive the following error message, “The
process set for auto acquisition failed to start. File not found”.
Note: The operating system must be able to recognize the file extension and have a program
that can open the file type. If the operating system does not have a program associated with
the file extension then the end user will receive the following error message after logging into
their drive, “Windows (0x00000483): No application is associated with the specific file for this
operation”.
49
Page 50

Appendix B : Description of Reports
Appendix B: Description of Reports
Devices
• Registered devices - The number of devices that have been registered with KRMC within the
selected time period.
• Devices types - The number and percentage of different Defender model types that have been
registered with KRMC within the selected time period.
• Successful actions - The number of successful actions that have occurred for each device that
has had at least one successful action within the selected time period.
• Pending actions - The number of pending actions for all active devices with at least one pending
action within the selected time period.
• Failed actions - The number of failed actions that have occurred for each device that has had
at least one failed action within the selected time period.
• Connected devices - The number of devices that have not been connected within the selected
time period.
• Number of logs - The number of log events generated by each device within the selected time
period.
Actions
• Actions per days - The number of pending, successful and failed actions that have occurred
within the selected time period.
• Actions type per days - The number of action types that were created within the selected time
period.
• Actions status per type - The number of pending, successful and failed actions for each remote
action type that have occurred within the selected time period.
• Actions type - The number and percentage of action types which have been created within the
selected time period.
• Actions status - The number and percentage of action statuses within the selected time period.
• Events - The number and percentage of system events which occurred within the selected time
period.
Licenses
• A/V licenses - The number and percentage of AV licenses available and assigned to devices.
• A/V licenses validity - The number of days remaining on your AV licenses.
• KRMC licenses - The number and percentage of KRMC licenses available and assigned to
devices.
• KRMC licenses validity - The number of days remaining on your KRMC licenses.
50
Page 51

Kanguru Solutions
1360 Main Street
Millis, MA 02054
www.kanguru.com
12.15.14 v3.1.1 © 2014 Kanguru Solutions
Legal terms and conditions available at www.kanguru.com. Please review and agree before use. Thank you.
 Loading...