

Page 1

KanguruClone 7HDS, 15HDS & 23HDS
Copyright 2017, All Rights Reserved.
Pro Duplicator
User Manual
Model no.:
KCLONE-7HDS-PRO
KCLONE-15HDS-PRO
KCLONE-23HDS-PRO
Page 2

Notices and Information
Notices and Information
Please be aware of the following points before using your KanguruClone
Copyright© 2017, Kanguru Solutions. All rights reserved.
Windows XP®, Windows Vista®, Windows 7®, Windows 8® and Windows 10® are registered
trademarks of Microsoft Inc. Apple® and Macintosh® are registered trademarks of Apple Computer
Inc. IBM and OS/2 are registered trademarks of the International Business Machines Corporation. All
other brand or product names are trademarks of their respective companies or organizations.
Kanguru Solutions will not be held responsible for any illegal use of this product nor any losses
incurred while using this product. The user himself is responsible for the copyright laws, and is fully
responsible for any illegal actions taken.
Customer Service
To obtain service or technical support for your system, please contact Kanguru Solutions Technical
Support Department at 508-376-4245, or visit www.Kanguru.com for web support.
Legal notice
In no event shall Kanguru Solutions’ liability exceed the price paid for the product from direct,
indirect, special, incidental, or consequential software, or its documentation. Kanguru Solutions
offers no refunds for its products. Kanguru Solutions makes no warranty or representation, expressed,
implied, or statutory, with respect to its products or the contents or use of this documentation and
all accompanying software, and specifically disclaims its quality, performance, merchantability, or
fitness for any particular purpose. Kanguru Solutions reserves the right to revise or update its products,
software, or documentation without obligation to notify any individual or entity.
Export Law Compliance
Regardless of any disclosure made to Kanguru Solutions pertaining to the ultimate destination of the
specific Kanguru product, you warrant that you will not export, directly or indirectly, any Kanguru
product without first obtaining the approval of Kanguru Solutions and the appropriate export license
from the Department of Commerce or other agency of the United States Government. Kanguru
Solutions has a wide range of products and each product family has different license requirements
relative to exports.
FCC Compliance Statements
This equipment has been tested and found to comply with the limits for a Class B digital device,
pursuant to Part 15 of the FCC Rules. These limits are designed to provide reasonable protection
against harmful interference in a residential installation. This equipment generates, uses and can
radiate radio frequency energy and, if not installed and used in accordance with the instructions,
there is no guarantee that interference will not occur in a particular installation. If this equipment
does cause harmful interference to equipment off and on, the user is encouraged to try to correct the
interference by one or more of the following measures:
• Reorient or relocate the receiving antenna.
• Increase the Distance between the equipment and receiver.
• Connect the equipment into an outlet on a circuit different from that to which the receiver is
connected.
• Consult the dealer or an experienced radio/TV technician for help.
2
Page 3

Table of Contents
1. INTRODUCTION ..........................................................................................6
1.1 Package Contents ....................................................................................6
1.2 Specifications .........................................................................................7
1.3 Hardware Setup ......................................................................................8
1.4 Function Tree Diagram ...........................................................................9
2. THE USER INTERFACE .............................................................................10
2.1 The LCD Display and Control Panel ......................................................10
2.2 One Touch Operation ..............................................................................11
2.3 Understanding the LCD Display ............................................................11
2.4 The Menus ..............................................................................................12
2.4.1 The Main Menu ..........................................................................12
2.4.2 The Setup Selection Menu .........................................................12
2.4.3 The Setup Menus .......................................................................12
3. GENERAL OPERATION ............................................................................13
3.1 Duplication Modes .................................................................................13
3.1.1 Smart Copy ................................................................................13
3.1.2 Brief Copy ..................................................................................13
3.1.3 Resize Copy ...............................................................................14
3.1.4 Disk Copy .................................................................................15
3.1.5 Ratio ...........................................................................................15
Table of Contents
3.2 Duplication .............................................................................................16
3.2.1 Duplicating From a Master HDD ...............................................16
3.2.2 Duplicating From a Storage Center ...........................................18
3.2.3 Formatting a hard drive as a Storage Center ..............................18
3.2.4 Loading a Master HDD image to the Storage Center ................19
3.2.5 Duplicating an image file stored on a Storage Center ...............20
3.3 Kicking Slow Drives (15 and 23 target models only) ............................21
3.3.1 Manually Kick Slow Drives .......................................................21
3.3.2 Automatically Kick Slow Drives ...............................................22
4. OTHER OPERATIONS ...............................................................................23
4.1 Quick Erase ............................................................................................23
4.2 Disk Erase ...............................................................................................23
4.3 Disk Wipe ...............................................................................................23
4.4 Secure Erase ...........................................................................................24
4.5 Enhanced Secure Erase ...........................................................................24
4.6 Disk Diagnostic ......................................................................................25
4.7 Self Diagnostic .......................................................................................25
4.8 Load Image .............................................................................................25
5. LOGGING ......................................................................................................26
5.1 Logging Using a USB Flash Drive .........................................................27
5.2 Logging Using the Control Manager Software (Windows Only) ..........28
3
Page 4

6. THE SETUP MENUS ....................................................................................30
6.1 Main Setup..............................................................................................31
6.1.1 HPA Check .................................................................................31
6.1.2 DCO Check ................................................................................31
6.1.3 Keep Capacity ............................................................................31
6.1.4 SATA Speed ...............................................................................32
6.1.5 Show Checksum .........................................................................32
6.1.6 Verify Checksum ........................................................................32
6.1.7 SHA256 Check ..........................................................................32
6.1.8 Source Power Off .......................................................................33
6.1.9 Erase Source Port .......................................................................33
6.1.10 Verify Source Check ................................................................33
6.1.11 Set SMART Check ...................................................................34
6.1.12 SMART Warning ......................................................................34
6.1.13 Show EXE Time.......................................................................34
6.1.14 Show Binary Base ....................................................................35
6.1.15 Transfer Size ............................................................................35
6.1.16 Read Transfer Size ...................................................................35
6.1.17 Set Write Pat. ............................................................................36
6.1.18 Capacity Check ........................................................................36
6.1.19 Model Check ............................................................................36
6.1.20 Brief + Ratio ............................................................................37
6.1.21 Brief Immediate .......................................................................37
6.1.22 Optimize Log Table ..................................................................37
6.1.23 Advanced Brief Mode ..............................................................38
6.1.24 Scan Size ..................................................................................38
6.1.25 Set HDD Wipe .........................................................................39
6.1.26 Burn In .....................................................................................39
6.1.27 Total Copy Count .....................................................................39
6.1.28 Skip Read Error ........................................................................40
6.1.29 No Button Sound ......................................................................40
6.1.30 Keep LED Result .....................................................................40
6.1.31 Set UART Control ...................................................................41
6.1.32 Real Time Messaging ...............................................................41
Table of Contents
6.2 Advanced Setup ......................................................................................42
6.2.1 Set Password ..............................................................................42
6.2.2 Set Error Retry Count ................................................................42
6.2.3 Set Command Retry Count ........................................................42
6.2.4 Set Copy Retry Count ................................................................43
6.2.5 Set Compare Retry Count ..........................................................43
6.2.6 Set Physical Retry Count ...........................................................43
6.2.7 Set SATA Physical Count ...........................................................43
6.2.8 Auto Kick Slow (15 and 23 target duplicators only) .................44
6.2.9 Set Kick Time (15 and 23 target duplicators only) ....................44
6.2.10 Set Kick Speed (15 and 23 target duplicators only) ................44
6.2.11 Set Ratio Start ..........................................................................45
6.2.12 Set Ratio Length.......................................................................45
6.2.13 Set Ratio Erase Start ................................................................45
4
Page 5

6.2.14 Set Ratio Erase Length .............................................................45
6.2.15 Check DC Connect (15 and 23 target duplicators only) ..........46
6.2.16 Set Max DC Count (15 and 23 target duplicators only) ..........46
6.2.17 Set DC Connect Time (15 and 23 target duplicators only) ......46
6.2.18 Log Over Head .........................................................................47
6.2.19 Partition Full Copy ...................................................................47
6.2.20 Partition Gap Copy...................................................................47
6.2.21 Partition Unused Copy .............................................................47
6.2.22 No MBR Check ........................................................................48
6.2.23 MBR&HP Check .....................................................................48
6.2.24 Sector Size 4K ..........................................................................48
6.2.25 Keep Last Partition...................................................................48
6.2.26 Resize Last Partition ................................................................49
6.2.27 Need Resize ..............................................................................49
6.2.28 Brief Verify Source ..................................................................49
6.2.29 Disk Verify Source ...................................................................49
6.3 Storage Center Setup ..............................................................................50
6.3.1 Load Full Image .........................................................................50
6.3.2 Copy Storage Source ..................................................................50
6.3.3 Skip Select Image.......................................................................50
6.3.4 Select Image File ........................................................................51
6.3.5 Delete Image File .......................................................................51
6.3.6 Make Storage Center ..................................................................51
6.4 The Diagnostic Setup Menu ...................................................................52
6.5 The About Menu .....................................................................................53
6.5.1 Set to Default .............................................................................53
6.5.2 Update Firmware ........................................................................53
6.5.3 Format Update Disk ...................................................................54
6.5.4 Format USB Drive .....................................................................54
6.5.5 System Information ....................................................................54
7. FAQ ...................................................................................................................55
8. TROUBLESHOOTING ................................................................................56
9. WARRANTY INFORMATION ...................................................................57
10. TECHNICAL SUPPORT ............................................................................58
APPENDIX A: DAISY CHAIN CONNECTION ..........................................59
5
Page 6

1. INTRODUCTION
Congratulations on your purchase of the KanguruClone HD SATA Pro Disk Duplicator from Kanguru
Solutions.
The KanguruClone is a high speed, stand-alone SATA disk duplicator that can simultaneously create
up to 7, 14 or 23 SATA HDD or SSD copies (depending on model). The duplicator has many advanced
features for the IT professional, yet a novice can begin cloning hard drives within minutes of taking it
out of the box. With ultra fast copy speeds of up to 12GB/min, the KanguruClone is one of the fastest
cloning systems available.
Features
√ Up to 12GB/min transfer rates
√ HDD size and brand independent.
√ Supports all standard SATA hard drives.
√ IDE hard drives supported with adapters (sold separately)
√ One-year Standard Warranty: This system comes complete with a one-year parts and 90 day
labor warranty. One-year and two-year extended warranties available, contact Kanguru sales for
more information.
√ Clones any operating system: including Window, Linux, Mac and many more.
√ 5 Copy Operations:
○ Smart Copy - System automatically detects the most efficient copy method
○ Brief Copy - Copies only sectors with data (compatible with most major file systems)
○ Resize Copy - Copies HDDs with different capacities
○ Disk Copy - Sector for sector duplication
○ Ratio Copy - Copies a defined percentage of the Master HDD
√ Powerful diagnostic functions
√ Robust logging software (Windows only)
√ Supports HPA (Host Protection Area) and DCO (Device Configuration Overlay)
√ Up to 999 x wipe cycles (7 x wipe cycles complies with the 5220-22.M Standard)
√ Load disk images to a Storage Center for convenient storage
Introduction
1.1 Package Contents
If any of the following items are missing, please call Kanguru Solutions’ Tech Support department at:
(508) 376-4245, extension 2 and replacement parts will be shipped to you ASAP.
• KanguruClone Hard Drive Duplicator unit with internal power supply
• Quick Start Guide
• Power Cable
• RS-232 to USB2.0 Converter Cable
• SATA Connection Cables
○ 7 Target Models: 8x SATA data + power cable
○ 15 Target Models: 16x SATA data + power cable
○ 23 Target Models: 24x SATA data + power cable
• Daisy Chain Cable (15HDS and 23HDS models only)
Note: 3.5” IDE adapters sold separately
6
Page 7
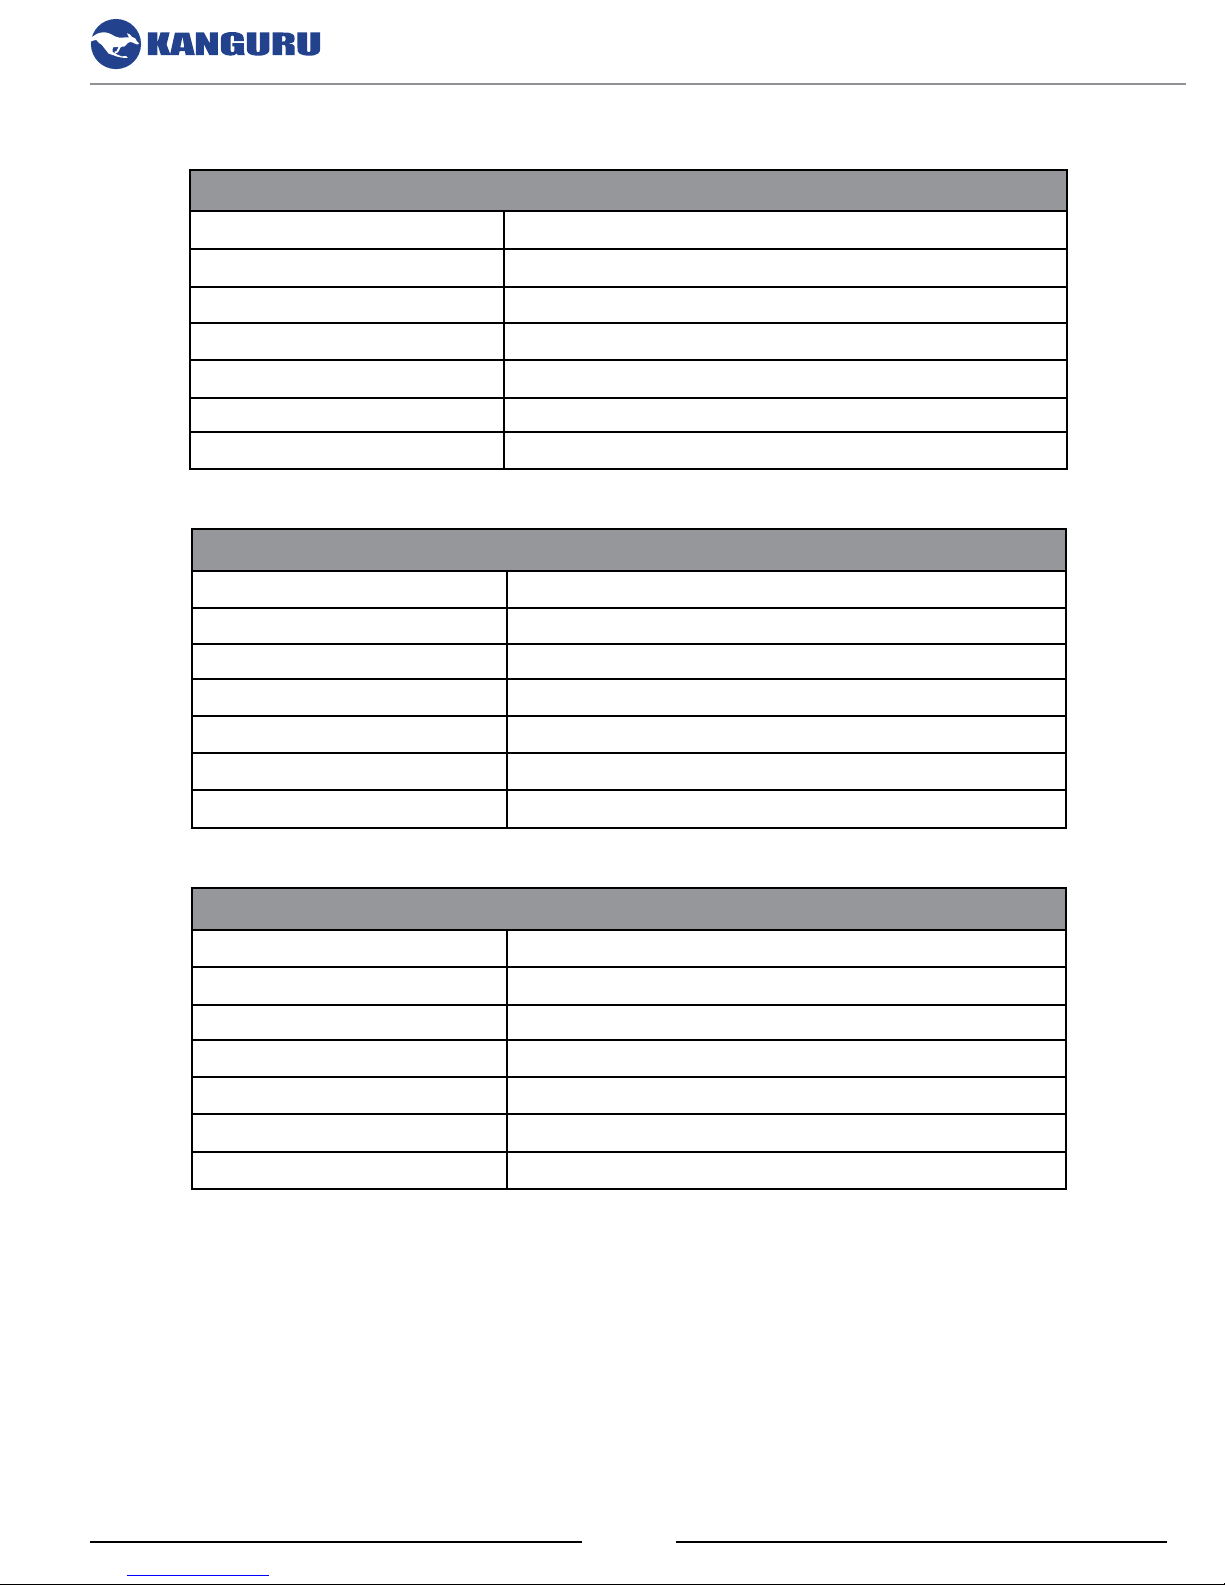
1.2 Specifications
KanguruClone 7HDS - PRO
LCD Screen 20 x 2 Characters back-lit LCD
Input Device 7 Push Buttons
Dimensions 15.5” x 13.5” x 9”
Weight 16.5 lbs.
Power Supply 400W 115V/230V 12A/6A Autoswitching
Operating Temperature 41ºF ~ 122ºF
Relative Humidity 15% ~ 90%
KanguruClone 15HDS - PRO
LCD Screen 20 x 2 Characters back-lit LCD
Input Device 7 Push Buttons
Introduction
Dimensions 16” x 21” x 9.5”
Weight 25 lbs.
Power Supply 800W 115V/230V 12A/6A Autoswitching
Operating Temperature 41ºF ~ 122ºF
Relative Humidity 15% ~ 90%
KanguruClone 23HDS - PRO
LCD Screen 20 x 2 Characters back-lit LCD
Input Device 7 Push Buttons
Dimensions 26” x 19.5” x 9.5”
Weight 39 lbs.
Power Supply 2x 600W 115V/230V 12A/6A Autoswitching
Operating Temperature 41ºF ~ 122ºF
Relative Humidity 15% ~ 90%
7
Page 8

1.3 Hardware Setup
1. Place the KanguruClone where there is proper ventilation. Avoid using the KanguruClone in
environments with high temperatures.
2. Make sure that sufficient power is supplied to the KanguruClone. Incorrect power will cause
faulty operation. It is highly recommended that you use a UPS (uninterruptible power supply)
with the KanguruClone.
3. You are now ready to begin using your KanguruClone. To begin, turn on the unit by flipping the
power switch located on the back panel.
Things to remember
• Make sure that sufficient power is supplied to the KanguruClone. Incorrect power will cause
faulty operation. It is highly recommended that you use a UPS (uninterruptible power supply)
with the KanguruClone.
Parts and Functions
• The KanguruClone is powered by an internal power supply that is controlled by a rocker switch
located at the rear of the unit.
• The KanguruClone supplies power to all drives during a cloning session. There is no need to
connect an external power source to the drives. The unit can supply up to 1.5A at 12V and up to
1A at 5V to each drive.
Note: the drives are not powered until you start a copy operation.
• It is OK to connect and disconnect Master or Target drives while the KanguruClone is powered
on. However, do NOT connect or disconnect drives while any operation is running or is in
progress. The green LED light will blink to indicate that the unit is cloning or operating.
• The supplied cables are NOT standard cables like the ones found in a PC. Do not attempt to use
these cables in a PC nor to use PC cables with the KanguruClone. Doing so may cause damage
to the unit and drives.
• Your the Source port is labeled ‘S’. Target ports are any other ports labeled with a number.
• Connect all Master and Target hard drives before you execute an operation.
8
Page 9
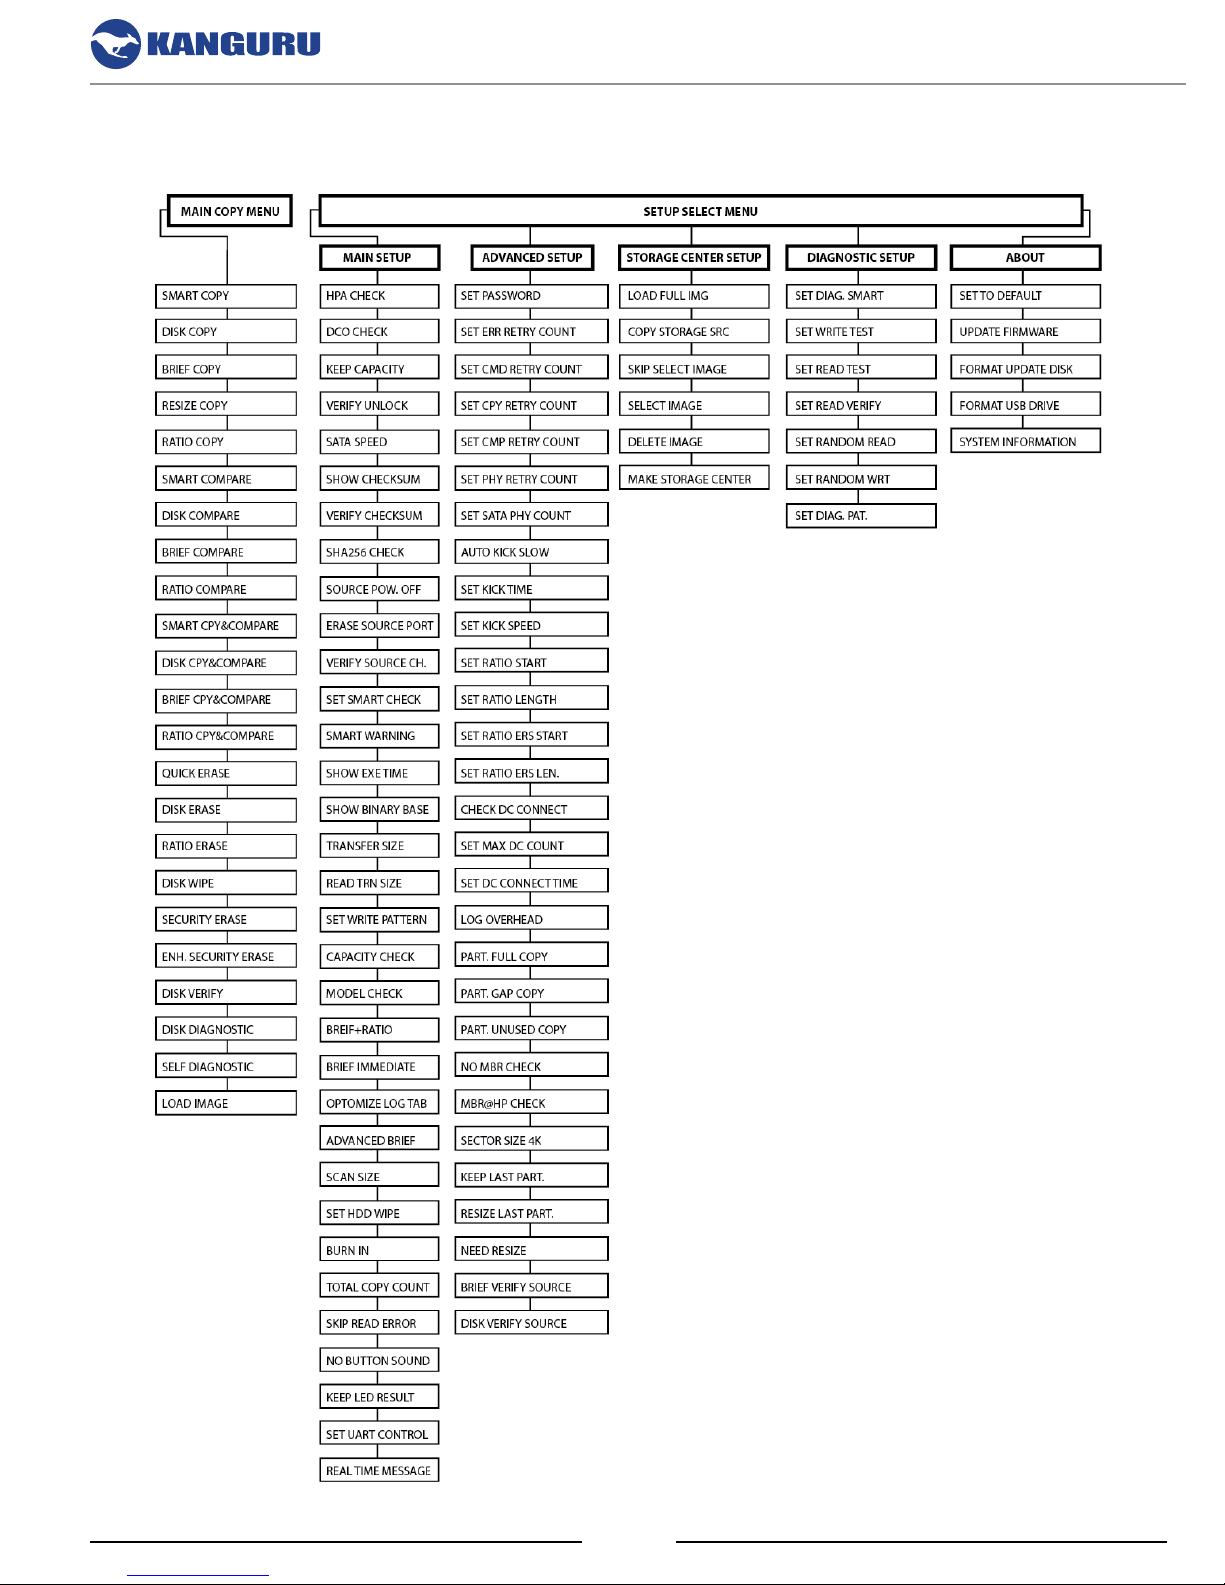
1.4 Function Tree Diagram
Parts and Functions
9
Page 10

2. THE USER INTERFACE
2.1 The LCD Display and Control Panel
HARD DRIVE DUPLICATOR
The User Interface
: Up (Menu/Option Scroll Up)
: Down (Menu/Option Scroll Down)
: Enter, Forward, OK, Execute
: Escape, Back, Cancel
: Shortcut button to BRIEF COPY
: Shortcut button to DISK ERASE
ESC
ENT
: Shortcut button to DISK COPY
10
Page 11
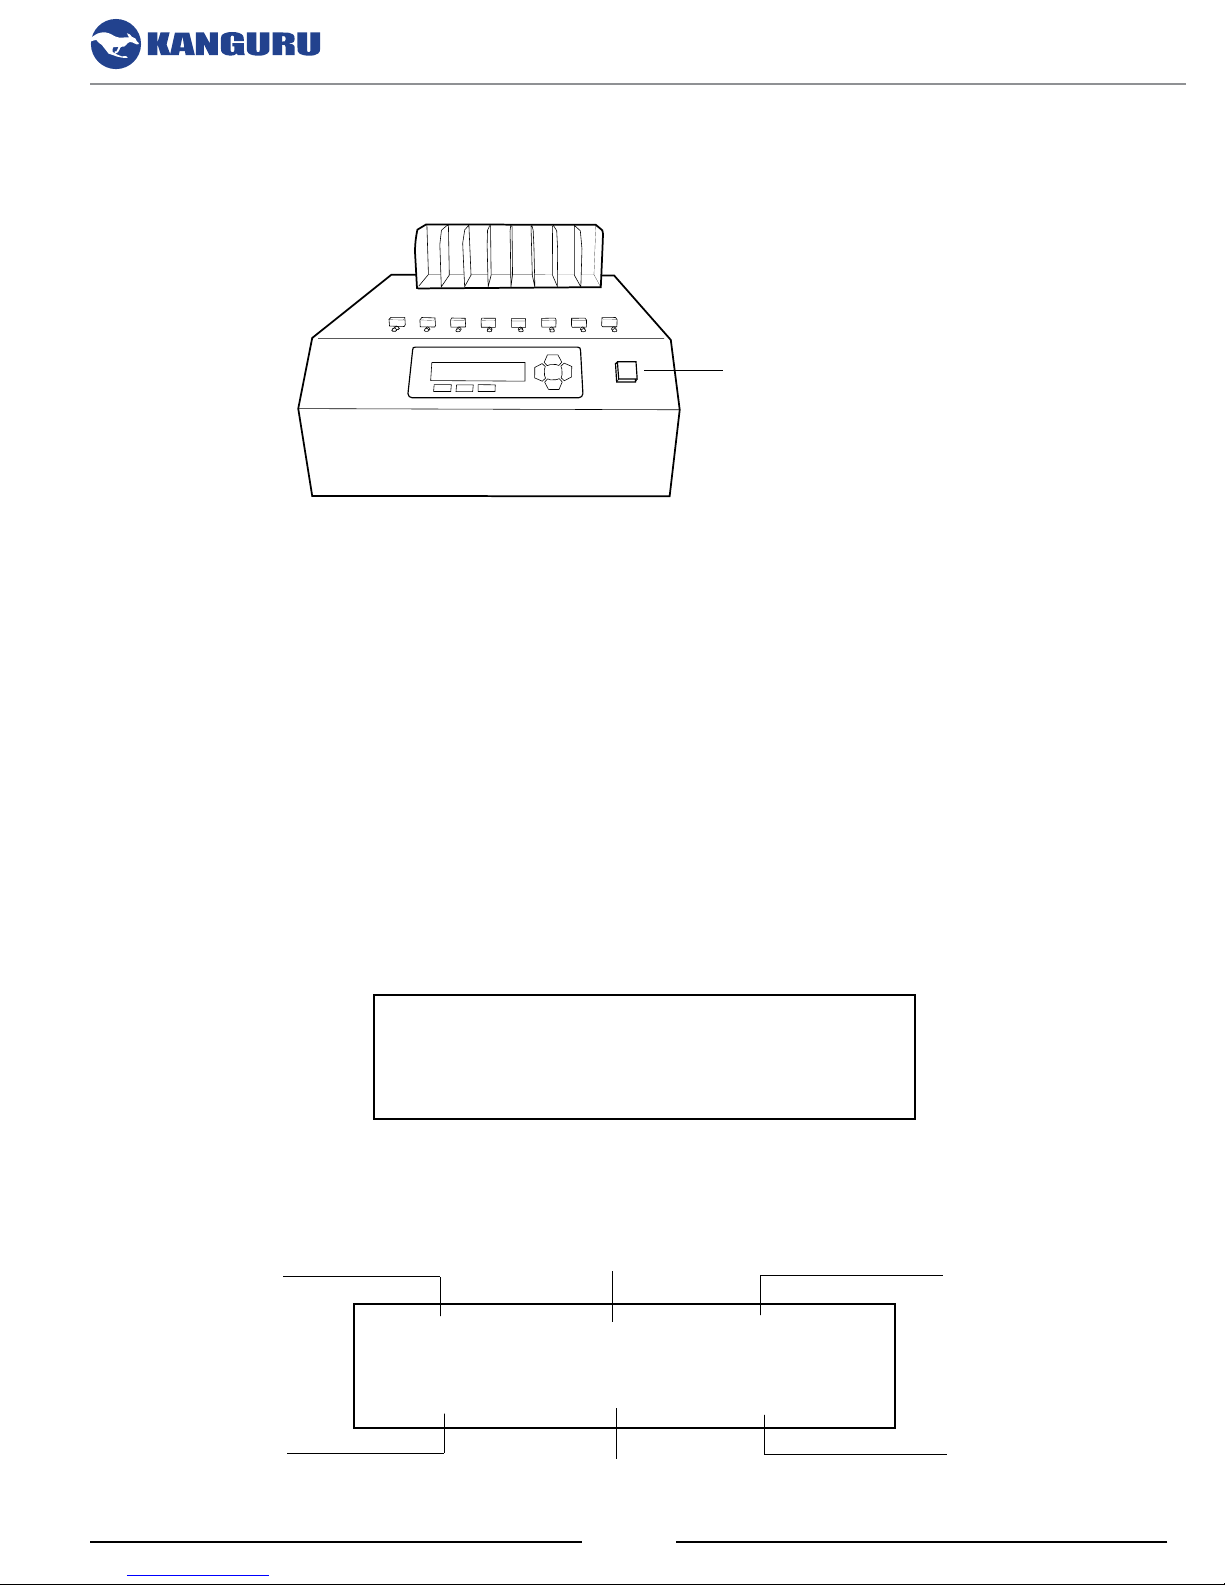
2.2 One Touch Operation
All HDS-PRO Duplicators feature a One Touch button.
One Touch button
The One Touch button simplifies operations by allowing you to press one buttong to start and clear
jobs. The button’s color changes depending on the duplicator’s status:
• Blue - Standby. Press the button to start the current job
• Blinking Green - Operation in progress. Pressing the button has no action.
• Solid Green - Operation completed, passed. Press the button to clear the job results and return
to standby.
• Red - Operation completed, failed. Press the button to clear the job results and return to standby.
The User Interface
2.3 Understanding the LCD Display
The LCD display allows you to easily navigate and operate the Kanguru Duplicator. After the Kanguru
Duplicator boots up, you will see the following screen.
BRIEF COPY 0
0 PASS 0 FAIL
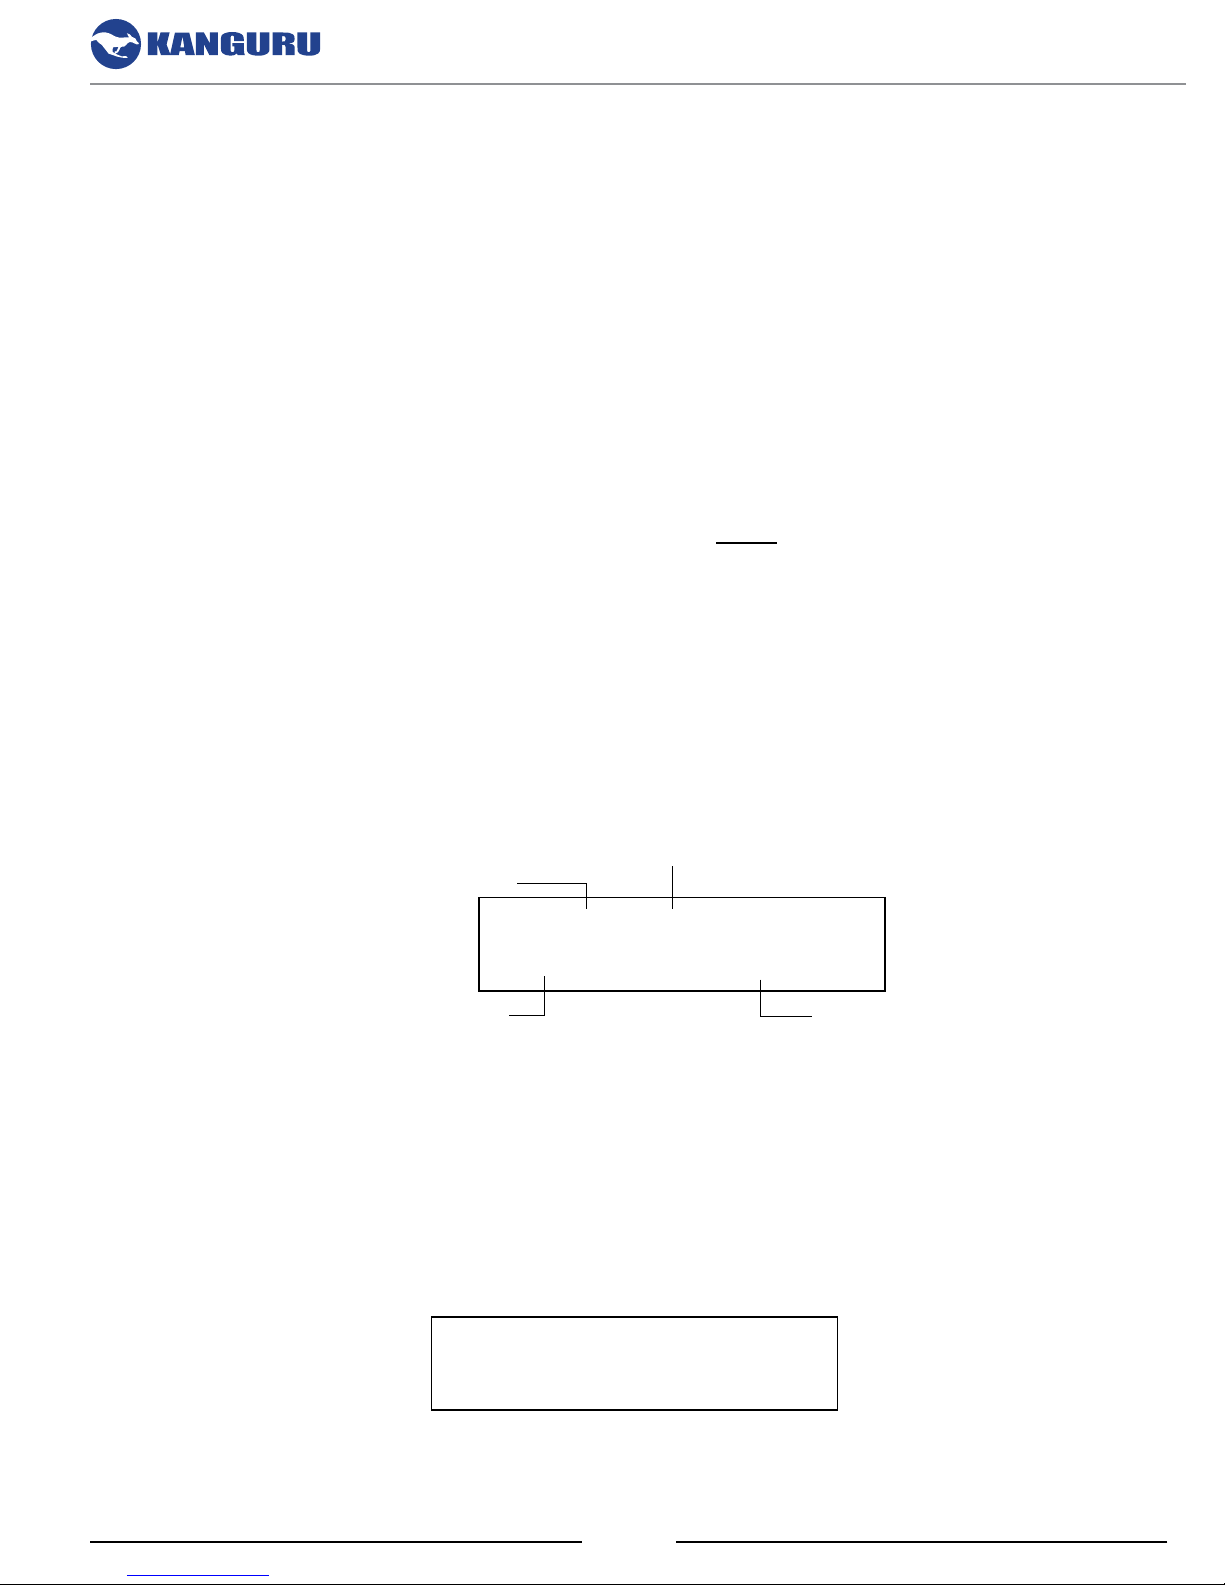
While the Kanguru Duplicator is executing certain functions (i.e. Copy, Compare, Copy & Compare,
Erase, Load) the LCD will display the following information on screen.
Number of drives
Current operation
Total amount of data
BRIEF COPY 7 250.0G
60.96G 25% 109MB/s
Data processed
Progress indicator
11
Transfer rate
Page 12

2.4 The Menus
There are three tiers to the duplicator user interface: Main menu, Setup Selection menu and the Setup
menus.
2.4.1 The Main Menu
The Main menu contains the main duplication operations (e.g. Copy, Compare, Erase, Load, etc.).
The duplicator will boot into this menu by default.
BRIEF COPY 0
0 PASS 0 FAIL
• Tap the UP/DOWN buttons to navigate through the different operations within the Main menu.
• Tap the ‘ENT’ button to execute an operation.
• Tap the ‘ESC’ button to enter the Setup Selection Menu
The User Interface
2.4.2 The Setup Selection Menu
From the Main Menu, tap the ‘ESC’ button to enter the Setup Selection Menu. The duplicator contains
four Setup subcategories used to configure the way different features on the duplicator operate. The
Setup sub-categories are: Main, Advanced, Storage Center and About
SETUP
SETUP-MAIN
• Tap the UP/DOWN buttons to navigate through the different Setup Options.
• Tap the ‘ENT’ button to enter the selected Setup Option.
• Tap the ‘ESC’ button to return to the Main Menu
2.4.3 The Setup Menus
Each of the individual Setup Menus contain options for configuring the way your duplicator operates.
SETUP-MAIN
• Tap the UP/DOWN buttons to navigate through the different menu options.
• Tap the ‘ENT’ button to select/configure an option.
• Tap the ‘ESC’ button to return to the Setup Selection Menu
[ ] HPA CHECK
12
Page 13

3. GENERAL OPERATION
3.1 Duplication Modes
The KanguruClone can copy hard drives in one of five ways: SMART mode, BRIEF mode, RESIZE
mode, DISK mode and RATIO mode.
After the Copy operation has been completed, you can manually run a Compare operation to compare
the data on the Source drive against the data on the Target drives to ensure that the all data was copied
successfully. If you select a ‘Copy & Compare’ action the duplicator will automatically run the
Compare operation after the Copy operation is completed.
3.1.1 Smart Copy
SMART mode checks the Source and Target drives and determines which copy mode is the most
efficient and automatically operates in that mode.
General Operation
1. First the duplicator will try to detect the Source drive’s file system. If it does not recognize the
file system then it will copy in Disk mode. The Duplicator recognizes the following file systems:
FAT, FAT32, exFAT, NTFS, EXT2, EXT3, EXT4, XFS, RFS, HFS, HFS+
2. If the duplicator is able to recognize the file system of the Source, it will compare the capacity
between the Source and the Target.
○ If the Source is formatted in a Windows file system and its capacity is smaller than the Target
then the duplicator will copy in Resize mode.
○ If the Source’s capacity is equal to the Target, then it will copy in Brief mode.
○ If the Target drives are of mixed capacities, it will determine a suitable copy mode based on
the capacity of the smallest Target drive.
3.1.2 Brief Copy
BRIEF mode copies only the sectors that contain data and skips any blank sectors (including
information hidden in sub channels). This mode supports the following file systems: FAT, FAT32,
exFAT, NTFS, EXT2, EXT3, EXT4, HFS, HFS+, JFS, XFS.
Note: If the Source is not formatted as a supported file system then the duplicator will automatically
switch to Disk mode. If you want to copy an unsupported file system in Brief mode, you will need to
enable Advanced Brief mode (see section 6.1.23 Advanced Brief Mode on page 38).
13
Page 14

General Operation
3.1.3 Resize Copy
Resize mode is used to copy between Source and Target drives of different capacities. Resize copy
supports the following file systems: FAT, FAT32, NTFS. If the Source is not formatted as a supported
file system then the duplicator will automatically switch to Disk mode. When duplicating in Resize
mode, Target drives should all be the same capacity.
All KanguruClone HD SATA Pro duplicators support copying from a smaller Source drive to larger
Target drives. Duplicators running firmware version 6.10 or later have the ability to copy from a
larger Source to a smaller Target. This is extremely useful when cloning an operating system from a
larger capacity HDD to a smaller capacity SSD.
In order to clone from a larger Source to a smaller Target, the following two conditions are met:
• The Master drive must be a Windows OS drive, formatted NTFS or FAT32. Large to small
resizing is not supported for Mac or Linux operating systems.
• The total data content on the Master must be smaller than the total capacity on the Target (e.g.
if the Master drive is a 500GB HDD with 100GB of used space, then the Target drive capacity
must be greater than 100GB.
Other things to be aware of:
• Encrypted partitions are not supported by Resize.
• The exFAT file system is not supported by Resize.
• Hidden/boot partitions are supported, as are multi-partitions as long as they are formatted NTFS
or FAT32.
• In a multi-partition situation, hidden/boot partitions are not resized. NTFS and FAT32 partitions
are resized proportionally.
• There is an option “Resize Last Partition” that can be enabled which will instruct the duplicator
to resize only the last FAT32/NTFS partition on the Master drive.
Note: When using Resize Copy to duplicate a drive with multiple partitions, each partition will be
expanded equally in proportion to the remaining unallocated space. If you want to resize only the
last partition on the drive, you will need to enable the Resize Last Partition setup option (see section
6.2.26 Resize Last Partition on page 49).
14
Page 15

General Operation
3.1.4 Disk Copy
Disk mode copies drives sector by sector from the Source to the Target(s), and supports all major OS
formats (DOS/Windows/Mac/Linux). This mode is the slowest copy mode, but the safest.
3.1.5 Ratio
The Ratio Copy operation allows you to copy a defined percentage of the Master hard drive. The
Master hard drive is divided in 1000 units. You must define the beginning and ending percentages
before using this operation. To define the percentages you have to enter the Advanced Setup menu,
and configure the SET RATIO START and SET RATIO LENGTH options. For more information see
section 6.2.11 Set Ratio Start on page 45 and section 6.2.12 Set Ratio Length on page 45.
15
Page 16
3.2 Duplication
The KanguruClone Duplicator can operate in either one of two duplication methods:
• With a Master HDD as the source
• With a Storage Center as the source
Both methods are described in the following sections.
3.2.1 Duplicating From a Master HDD
Using a Master HDD as the Source is the simplest and most convenient way to perform the duplication
process.
IMPORTANT! Connect all Master and Target hard drives before you execute an operation.
To execute the duplication of a Master HDD:
General Operation
1. From the Main menu, tap the UP/DOWN buttons to navigate to the desired copy mode. For
more information on the different available copy modes see chapter 3.1 Duplication Modes on
page 13.
The screen will display the following:
Number of Targets detected
Current Copy Mode
BRIEF COPY 0
0 PASS 0 FAIL
Total successful copies
Total failed copies
Note: The system will not detect any connected drives before the duplication starts. Therefore
the “Number of Targets detected” value will remain zero until you execute the copy process.
2. Once you have selected the desired copy mode, tap the ‘ENT’ button to execute. The duplication
process begins as the system initializes the connected disks. After this point the system will be
able to display the number of connected targets correctly.
BRIEF COPY 0
ANALYZING...
16
Page 17
General Operation
3. Once all connected disks have been detected and initialized, the duplication process begins.
During duplication the screen will display the following information:
Number of target drives
Current operation
Total amount of data
BRIEF COPY 7 250.0G
5 60.96G 25% 109MB/s
Target drive indicator
Data processed
Progress indicator
Transfer rate
WARNING! Do not disconnect any drives while they are in use. You can tell if a drive is in
use if the LED next to it is blinking. Wait for a solid green or red LED before disconnecting a
drive. If you want to cancel the current process, press and hold the ‘ESC’ button and wait for
a solid red LED to come on.
4. When the copy process has completed, you will receive a message saying “Remove xPS xFL”,
where “x” indicates the number of drives that passed (PS) and failed (FL). Target drives that
passed will have a green LED displayed next to it. Target drives that failed the duplication
process will display a red LED next to it.
5. Tap the ‘ENT’ button to return to the Main menu.
Note: The duplicator will keep a running count of the number of passed and failed drives until
you change copy modes.
BRIEF COPY 0
7 PASS 0 FAIL
17
Page 18

General Operation
3.2.2 Duplicating From a Storage Center
The KanguruClone hard drive duplicator allows you to turn a standard hard drive into a Storage
Center. You can load images of your Master HDDs directly to the Storage Center providing you with
a convenient way to store common Source files as images.
3.2.2.1 Formatting a hard drive as a Storage Center
First you need to format a hard drive as a Storage Center:
1. From the Main menu, tap the ‘ESC’ button to enter the Setup Selection Menu.
2. From the Setup Selection Menu, tap the UP/DOWN buttons to navigate to the ‘SETUPSTORAGE CENTER’ option.
3. Tap the ‘ENT’ button to enter the Storage Center Setup menu.
4. From the Storage Center Setup menu, tap the UP/DOWN buttons to navigate to the ‘MAKE
STORAGE CENTER’ operation.
5. Connect the hard drive that you want to format as a Storage Center to the Source port on the
duplicator. WARNING! Making a hard drive into a storage center drive will require it to be
formatted, which will erase any data previously saved to it.
6. Tap the ‘ENT’ button to execute the ‘MAKE STORAGE CENTER’ option.
7. A confirmation screen appears. Tap the ‘ENT’ button to proceed with formatting the hard drive
as a Storage Center ,or tap the ‘ESC’ button to cancel.
Caution! Formatting will erase any data currently stored on the hard drive.
Once the format has completed successfully, tap any button to return to the Storage Center Setup
menu. Your hard drive has now been formatted as a Storage Center. You can now load images of
Master HDD’s to the Storage Center for convenient duplication.
Note: When connected directly to a computer, a hard drive formatted as a Storage Center will not be
recognized by most operating systems. The Storage Center uses a proprietary format not recognized
by most operating systems.
18
Page 19

General Operation
3.2.2.2 Loading a Master HDD image to the Storage Center
Once you have formatted a hard drive to act as a Storage Center, you can use the duplicator to load
images of your Master HDD’s to the Storage Center. To load a Master HDD image to the Storage
Center:
1. Connect the Storage Center to the Source port.
2. Connect the Master drive you are imaging to the last Target port on the duplicator (either #7, #15
or #23 depending on model).
3. From the Main menu, tap the UP/DOWN buttons to navigate to ‘LOAD IMAGE’. You will see
the following screen:
LOAD IMAGE
0 PASS 0 FAIL
4. Tap the ‘ENT’ button. The duplicator will initialize the disks and then ask you to input a 3-digit
name for the image file. Up to 127 file names can be saved in the Storage Center.
Please input
[001] SELECT IMAGE
a) The file name consists of three digits. The digit furthest to the left will be blinking, indicating
that it is currently selected. Tap the UP/DOWN button to increase/decrease the digit by one.
b) Tap the ‘ENT’ button to select the next digit to the right. Tap the UP/DOWN button to
increase/decrease the digit by one.
Note: If your duplicator displays the error message, “TARGET NOT FORMATTED” then
the hard drive connected to the Source port has not been formatted as a Storage Center yet
(see section 3.2.2.1 Formatting a hard drive as a Storage Center on page 18).
5. When you have completed naming the image file, press and hold the ‘ENT’ button for three
seconds and the Load process will begin.
Note: If the image file name you entered already exists for an image file previously loaded on
the Storage Center, the system will ask you to confirm overwriting the previously saved file.
Tap the ‘ENT’ button to confirm or tap the ‘ESC’ button to cancel.
Size of Source data
Amount of data loaded
6. When the load process has completed you can remove the Master HDD.
LOAD IMAGE 1 63.63G
2.12G 3% 143M/s
Data transfer rate
Percentage completed
19
Page 20

General Operation
3.2.2.3 Duplicating an image file stored on a Storage Center
Now that you have loaded an image file on the Storage Center, you can begin the copy process:
1. Make sure the Storage Center is connected to the Source port. Connect your Target drives into
any available target ports.
2. From the Main menu, select a copy mode and then press the ‘ENT’ button.
3. When the duplicator recognizes the Storage Center drive it will ask you to input an image file.
Please input
[001] SELECT IMAGE
a) The file name consists of three digits. The digit furthest to the left will be blinking, indicating
that it is currently selected. Tap the UP/DOWN button to increase/decrease the digit by one.
b) Tap the ‘ENT’ button to select the next digit to the right. Tap the UP/DOWN button to
increase/decrease the digit by one.
In the example above, file number 001 is currently selected. Note: If the Skip Select Image
setting has been enabled then you will not be asked to enter an image file name (see section
6.3.3 Skip Select Image on page 50)
4. Once you have entered the image file name press and hold the ‘ENT’ button for 3 seconds to
begin copying. Note: If you receive the following error message: “NO DATA FOUND”, then
the image file that you selected does not contain any data.
After all connected Target disks have been detected and initialized, the duplication process
begins. During duplication the screen will display the following information:
Number of drives
Current operation
Total amount of data
BRIEF COPY 7 63.63G
S 3.96G 5% 109MB/s
Storage Center indicator
Data processed
Progress indicator
Transfer rate
WARNING! Do not remove any drives while they are in use. You can tell if a drive is in use if the
green LED next to it is blinking. Wait for a solid green or red LED before removing a drive. If you
want to interrupt the current process, press and hold the ‘ESC’ button for 3 seconds.
5. When the copy process has completed, you will receive a message saying “Remove xPS xFL”,
where “x” indicates the number of drives that passed (PS) and failed (FL). Target drives that
passed will have a green LED displayed next to it. Target drives that failed the duplication
process will display a red LED next to it.
Note: The duplicator will keep a running count of passed and failed drives until you change copy
modes.
20
Page 21

3.3 Kicking Slow Drives (15 and 23 target models only)
Kanguru’s 15 Target and 23 Target HDD Duplicators have the ability to kick slow functioning drives
from a copy/compare/erase operation.
KanguruClone HDD Duplicators duplicate drives in a synchronous process. Because of this, any
copy, compare or erase that you attempt will be limited by the speed of the slowest drive connected.
For example, if you are cloning to 23 target HDDs and out of those drives 22 have a max transfer
rate of 90MB/s and one has a max transfer rate of 15MB/s, then duplication speed will be capped at
15MB/s.
In order to prevent a single, faulty drive from disrupting an operation, you have the ability to either
manually kick a slow drive or configure settings which will automatically kick slow drives that fall
below a defined threshold.
3.3.1 Manually Kick Slow Drives
General Operation
During a copy, compare or erase operation, you can view the performance of each individual drive by
pressing the UP/DOWN buttons.
BRIEF COPY 14 250.0G
8 60.96G 25% 109MB/s
Target drive indicator
The Target Drive Indicator will inform you which drive is currently selected. The Transfer Rate will
show you the speed of this drive. Note: The transfer rate information is not static and can fluctuate,
sometimes significantly.
If you notice any slow drives, press and hold the ‘F1’ button. This will eject the slowest drive
connected from the operation. The red LED will appear next to the ejected drive. Do not disconnect
the ejected drive from the duplicator until the current operation is completed.
Transfer rate
21
Page 22

General Operation
3.3.2 Automatically Kick Slow Drives
You can configure some settings in the Advanced Settings menu that will allow the duplicator to
automatically kick any drives that meet a specific, defined criteria. The options that need to be
configured in the Advanced Setup menu are: Auto Kick Slow, Set Kick Time and Set Kick Speed.
To configure your duplicator to automatically kick slow drives:
1. Navigate to the Advanced Setup menu.
2. Navigate to the option ‘Auto Kick Slow’.
3. Enable the ‘Auto Kick Slow’ option (see section 6.2.8 Auto Kick Slow (15 and 23 target
duplicators only) on page 44).
4. Exit back to the Advanced Setup menu.
5. Navigate to the option ‘Set Kick Speed’.
6. Configure the ‘Set Kick Speed’ option to define the low speed threshold (see section 6.2.10 Set
Kick Speed (15 and 23 target duplicators only) on page 44). Drives that fall below this speed
will be kicked after a designated amount of time.
7. Exit back to the Advanced Setup menu.
8. Navigate to the option ‘Set Kick Time’.
9. Configure the ‘Set Kick Time’ option (see section 6.2.9 Set Kick Time (15 and 23 target
duplicators only) on page 44). Drives that fall below the speed designated in the Set Kick
Speed option for this amount of time will be kicked.
If ‘Auto Kick Slow’ is enabled, then during a copy, compare or erase operation, any drives that fall
below the ‘Set Kick Speed’ for the time defined by ‘Set Kick Time’ will automatically be ejected from
the operation. The red LED will appear next to the ejected drive. Do not disconnect the ejected drive
from the duplicator until the current operation is completed.
22
Page 23

4. OTHER OPERATIONS
Besides the Copy and Compare modes, the KanguruClone Hard Drive Duplicator has several
additional operations that are incredibly useful, including: QUICK ERASE, DISK ERASE, DISK
WIPE, SELF DIAGNOSTIC and LOAD IMAGE. The following chapter will cover these operations.
4.1 Quick Erase
The Quick Erase operation will delete the partition table from any connected Target drives. Without
the partition table, the drive will appear as a blank, unformatted drive to a computer operating system.
This is the quickest erase method and typically only takes a few seconds to complete.
Caution: The Quick Erase operation only deletes the drive’s partition table. The actual data saved
to the disk will still exist and with commonly available tools it is possible to recover the data from a
drive that has been erased using Quick Erase.
Other Operations
4.2 Disk Erase
Disk Erase deletes all data on any connected Target drives by writing zeroes to all sectors on the drive.
Disk Erase will ensure that all data previously saved the disk is overwritten.
Caution: Although Disk Erase will delete all data from your drive, with the high-level forensic tools
it may still be possible to recover the erased data. If you want to permanently delete data to point
where it is virtually impossible to recover, use the Disk Wipe or Secure Erase operation.
4.3 Disk Wipe
Disk Wipe deletes all information on any connected Target drives by writing zeros into each sector
of the hard drive, sector by sector. The Wipe permanently removes data, making it almost impossible
to recover.
The Disk Wipe is a four step process.
1. The duplicator writes 1’s to all sectors on the disk
2. The duplicator writes 0’s to all sectors on the disk
3. The duplicator writes a random pattern of 1’s and 0’s to all sectors on the disk
4. All sectors are verified
The multi-pass process ensures that any old data is virtually unrecoverable. By default the Disk Wipe
operation will execute the four-pass method once. The Disk Wipe can be executed repeatedly on the
same disk for additional security. To increase the number of times the Disk Wipe runs, see section
6.1.25 Set HDD Wipe on page 39
23
Page 24

4.4 Secure Erase
Secure Erase is a set of firmware commands available on many ATA drives. These commands are
used as a secure method of data sanitization by completely overwriting all data on a drive. When a
Secure Erase command is issued against a SSD, all of its cells will be marked as empty, restoring it to
factory default configuration. Unlike Disk Wipe and Disk Erase, the Secure Erase process is effective
at sanitizing SSDs because it can access and erase all sectors on a SSD.
Secure Erase is approved by the National Institute of Standards and Technology (NIST) Special
Publication 800-88 as a method for purging ATA hard disk drives.
Caution! Unlike Disk Wipe or Disk Erase , the duplicator only invokes the Secure Erase command.
The actual data wiping is done at the drive firmware level. Please keep the following points in mind:
• Although most ATA drive manufacturers include Secure Erase commands in firmware, not all
do. Please check with the drive manufacturer to verify that your drive model supports ATA
Secure Erase before attempting.
Other Operations
• Although the duplicator can report whether the function completed, it cannot guarantee that the
Secure Erase function was implemented correctly by the drive. It is recommended to check with
the drive manufacturer for verification that the data was actually wiped.
4.5 Enhanced Secure Erase
Secure Erase is a set of firmware commands available on many ATA drives. These commands are
used as a secure method of data sanitization by completely overwriting all data on a drive. The type
of sanitization method implemented by Enhanced Secure Erase is device-specific, and may vary from
drive to drive. In some cases, the Enhanced Secure Erase will overwrite all sectors with a predefined
pattern of ones and zeroes. In other cases, the drive has an internal encryption key which is simply
destroyed and regenerated. Unlike Disk Wipe and Disk Erase, the Enhanced Secure Erase process is
effective at sanitizing SSDs because it can access and erase all sectors on a SSD.
Enhanced Secure Erase is approved by the National Institute of Standards and Technology (NIST)
Special Publication 800-88 as a method for purging ATA hard disk drives.
Caution! Unlike Disk Wipe or Disk Erase , the duplicator only invokes the Enhanced Secure Erase
command. The actual data wiping is done at the drive firmware level. Please keep the following
points in mind:
• Only some ATA drive manufacturers include Secure Erase commands in firmware, most do
not. Please check with the drive manufacturer to verify that your drive model supports ATA
Enhanced Secure Erase before attempting.
• If there are kernel of firmware bugs, executing the ATA Enhanced Secure Erase command
could render a drive unusable. It is recommended to check with the drive manufacturer before
performing this function.
24
Page 25

4.6 Disk Diagnostic
The Disk Diagnostic feature allows you to run a series of tests to verify the health of the Target drives
connected to the duplicator. If you are experiencing a high rate of failures during the duplication
process, there could be something mechanically malfunctioning with the drives. The Disk Diagnostic
will run tests based on the configuration of the Diagnostic Setup menu (see section 6.4 The Diagnostic
Setup Menu on page 52) and generate a log file that can be saved to a USB flash drive. Providing
this log file will help a Kanguru support technician diagnose any problems that could cause duplication
failures.
To generate the log file:
1. Connect a USB flash drive formatted FAT32 to the back of the duplicator.
2. Run Disk Diagnostic.
3. When the Disk Diagnostic is complete, remove the USB flash drive and connect it to your PC.
There will be a new text document saved to the flash drive. Provide this log file to a Kanguru support
technician and they will be able to use it to determine any problems that could be causing duplication
failures.
Other Operations
4.7 Self Diagnostic
The Self Diagnostic feature allows you to run tests to verify the health of the duplicator and of
any connected drives. If you are experiencing a high rate of failures during the duplication process,
there could be something mechanically malfunctioning with the duplicator. The Self Diagnostic will
generate a log file that can be saved to a USB flash drive. Providing this log file will help a Kanguru
support technician diagnose any problems that could cause duplication failures.
To generate the log file:
1. Connect a USB flash drive formatted FAT32 to the back of the duplicator.
2. Run Self Diagnostic.
3. When the Self Diagnostic is complete, remove the USB flash drive and connect it to your PC.
There will be a new text document saved to the flash drive. Provide this log file to a Kanguru support
technician and they will be able to use it to determine any problems that could be causing duplication
failures.
4.8 Load Image
Load Image creates and saves a drive image to a Storage Center drive.
A Storage Center drive is a drive that has been formatted to store Master drive images. The Storage
Center allows you to quickly and conveniently access commonly duplicated Master drive images.
For detailed instructions on loading a drive image to a Storage Center drive, please refer to section
3.2.2.2 Loading a Master HDD image to the Storage Center on page 19.
25
Page 26

5. LOGGING
Logging capability is a useful function of the Kanguru HDD Duplicator. The logging feature can be
used to keep track of duplication and/or disk wipe jobs when logs are required for auditing, and they
are also provide useful information that can be used by Kanguru’s technical support staff to diagnose
problems.
There are two methods of creating a log file:
• Using a USB flash drive
• Using the Control Manger software application
Logging
26
Page 27

5.1 Logging Using a USB Flash Drive
Logging your duplicator’s operations using a USB flash drive is the simplest method, however it is
not recommended for auditing purposes. This is because all the duplicator’s operations are stored in
an unformatted, plain-text file which is difficult to decipher. Logs generated using a USB flash drive
are primarily used by Kanguru support technicians to troubleshoot problems with the duplicator.
To generate a log file using a USB flash drive:
1. Format a USB flash drive using the FAT32 file system.
2. Before powering on the Kanguru Clone duplicator, insert the USB flash drive into the USB port
located on the back of the duplicator.
3. Turn on the duplicator.
4. Perform a copy, compare or erase operation.
5. When the operation is completed, power off the duplicator. You can now remove the USB flash
drive.
Connect the USB flash drive to a computer. Contained within the USB flash drive will be two plain
text files containing all the logged data.
Logging
27
Page 28

5.2 Logging Using the Control Manager Software (Windows Only)
Users with a computer running Windows operating systems can connect the Kanguru Clone HDD
Duplicator to their PC for robust logging. The Control Manager software was provided on the CD that
accompanied your duplicator. If you did not receive a CD, or the CD was lost, please visit Kanguru’s
Support Site to download a copy of the Control Manager software: support.kanguru.com
To use the Kanguru Control Manager software for logging:
1. Connect the Kanguru Clone to the PC using the provided Serial to USB adapter cable.
○ The serial end of the cable connects to the port located on the back of the duplicator.
○ The USB end of the cable connects to a USB port on your PC.
Note: If this is your first time connecting the Serial to USB adapter cable to your computer,
you will need to install the device driver. The device driver can be found on the CD that came
with your duplicator, located in the “Serial to USB Driver” folder.
2. Power on the Kanguru Clone Duplicator. Make sure that Main Setup > Set UART Control
option has been enabled on the duplicator (see section 6.1.31 Set UART Control on page 41).
3. Load the CD that came with your duplicator into the PC and open the folder named “Kanguru
Control Manager”.
4. Double-click on the ControlManager.exe file to launch the Control Manager Software.
Logging
Once the Control Manager software is running, you need to establish the connection between the
Kanguru Clone Duplicator and the application. To establish the connection:
1. Click on the Configure menu in the Control Manager window.
28
Page 29

2. The Configure window appears.
a) Enter a prefix for the log’s filename. You can also choose to suffix the file name with a date
or time stamp.
b) Select the path where you want the log files saved to. It is recommended to save to a local
hard drive and not a removable device.
c) Select the COM port
d) Click on the Connect button.
Logging
3. When a connection between the duplicator and the Control Manager is established, you will see
the duplicator model appear in the top left.
Once connected, two plain text files will be created that will log all duplicator activity until you either
disconnect the duplicator from the computer or power off the duplicator.
29
Page 30

6. THE SETUP MENUS
To make it easier to navigate to the desired setting the Setup menu has been broken out into 4 setup
menus: Main Setup, Advanced Setup, Storage Center Setup and About
You can open any of these setup menus from Setup Select menu. To open the Setup Select menu,
simply tap the ‘ESC’ button while in the Main Copy menu.
Once you have entered the Setup Selection menu:
• Tap the UP/DOWN buttons to navigate the different Setup menus.
• Tap the ‘ENT’ button to enter a menu.
• Tap the ‘ESC’ button to exit to the Main copy menu
The Setup Menus
30
Page 31

6.1 Main Setup
6.1.1 HPA Check
The Host Protected Area (HPA), sometimes referred to as the Hidden Protected Area, is a partition on
the hard drive that is not normally visible to an operating system.
Tap the ‘ENT’ button to change this option’s setting.
• [ ] – HPA Check is disabled. The system will not check for HPA partitions.
• [ ٭ ] – HPA Check is enabled (default). When HPA Check is enabled the duplicator will support
Host Protection Areas. When you duplicate a Master drive that contains HPA, the system will
detect the HPA partition, unlock it, copy the area and then re-lock the area once duplication is
complete.
6.1.2 DCO Check
The Setup Menus
A Device Configuration Overlay (DCO), is a partition on the hard drive that is not normally visible
to an operating system. The DCO can report to the system that supported features are nonexistent or
that the drive is smaller in capacity than it actually is.
Tap the ‘ENT’ button to change this option’s setting.
• [ ] – DCO Check is disabled (default). The system will not check for DCO partitions.
• [ ٭ ] – DCO Check is enabled. When DCO Check is enabled the duplicator will support Device
Configuration Overlay configurations. When you duplicate a Master drive that contains a DCO
partition, detect the DCO partition, unlock it, copy the area and then re-lock the area once
duplication is complete.
6.1.3 Keep Capacity
The Keep Capacity option allows you to lock the amount of free space on the Target drives so the total
disk capacity appears the same as the Source drive.
Tap the ‘ENT’ button to change this option’s setting.
• [ ] – Keep Capacity is disabled (default). The system will leave any unused capacity on Target
drives as unallocated space. Example, if you use Brief Copy to duplicate a 250GB Master HDD
to a 500GB Target HDD, when the duplication completes the 500GB Target disk will appear as
500GB drive with a 250GB active partition and 250GB of unallocated space.
• [ ٭ ] – Any unused space will be separated into an HPA partition. Example, if you use Brief Copy
to duplicate a 250GB Master HDD to a 500GB Target HDD, when the duplication completes the
500GB Target disk will appear as a 250GB drive with zero unallocated space.
31
Page 32

The Setup Menus
6.1.4 SATA Speed
The SATA Speed option allows you to Select the data transfer mode.
Tap the ‘ENT’ button and then press the UP/DOWN buttons to change this option’s setting.
• AUTO - The system auto-selects the SATA speed mode based on the connected drives (default).
• 1.5G - Limit the data transfer mode to SATA I speeds (1.5Gbps)
• 3G - Limit the data transfer mode to SATA II speeds (3Gbps)
6.1.5 Show Checksum
The Show Checksum option allows you to configure whether the disk checksum is displayed on the
LCD screen when duplication is finished.
Tap the ‘ENT’ button to change this option’s setting.
• [ ] – Showing the disk checksum is disabled (default). The checksum information will not be
displayed at the end of each duplication process.
• [ ٭ ] – Showing the disk checksum is enabled. The checksum information will be displayed at
the end of each duplication process.
6.1.6 Verify Checksum
The Verify Checksum option allows you to configure whether the duplicator will compare the
checksum value of the Source against the Target drives when duplication is finished.
Tap the ‘ENT’ button to change this option’s setting.
• [ ] – Verifying the disk checksum is disabled (default).
• [ ٭ ] – Verifying the disk checksum is enabled.
6.1.7 SHA256 Check
The SHA256 Check option allows you to configure whether the system checks for a matching
SHA256 hash between the Master and Target drives when duplication completes successfully.
Tap the ‘ENT’ button to change this option’s setting.
• [ ] – SHA256 hash checking is disabled (default). The hash of the Master will not be checked
against the Target hash at the end of each duplication process.
• [ ٭ ] – SHA256 hash checking is enabled. The hash of the Master will be checked against the
Target hash at the end of each duplication process.
32
Page 33

The Setup Menus
6.1.8 Source Power Off
The Source Power Off option allows you to configure whether the system turns off power to the
Source drive after a process is completed.
Tap the ‘ENT’ button to change this option’s setting.
• [ ] – Source Power Off is disabled. The system will keep the Source drive powered on after a
process is completed.
• [ ٭ ] – Source Power Off is enabled (default). The system will shut off power to the Source
drive after a process is completed.
6.1.9 Erase Source Port
The Erase Source port option allows you to configure whether the system erases the disk connected
to the Source port when running Quick Erase, Disk Erase or Disk Wipe.
Tap the ‘ENT’ button to change this option’s setting.
• [ ] – Erase Source Port is disabled (default). A drive connected to the Source port will not be
erased if you run Quick Erase, Disk Erase or Disk Wipe.
• [ ٭ ] – Erase Source Port is enabled. A drive connected to the Source port will be erased if you
run Quick Erase, Disk Erase or Disk Wipe.
6.1.10 Verify Source Check
The Verify Source Check option allows you to configure whether the system checks the Source’s
CRC to ensure that the source data is healthy before starting a copy process.
Tap the ‘ENT’ button to change this option’s setting.
• [ ] – Verify Source Check is disabled (default). The duplicator will not check the Source’s
CRC before a copy process.
• [ ٭ ] – Verify Source Check is enabled. The duplicator will check the Source’s CRC and ensure
the source data is healthy before starting a copy process.
33
Page 34

The Setup Menus
6.1.11 Set SMART Check
The Set SMART Check option allows you to configure whether the system runs a SMART check
before starting a copy process. You can configure what level of SMART check is performed through
the SMART Warning option.
Tap the ‘ENT’ button to change this option’s setting.
• [ ] – Set SMART Check is disabled (default). The duplicator will not check the Source’s
SMART monitoring information before a copy process.
• [
] – Set SMART Check is enabled. The duplicator will check the Source’s SMART monitoring
٭
information before a copy process.
6.1.12 SMART Warning
If Set SMART Check is enabled, you can configure what level of SMART check performed. There
are 3 levels of SMART checking:
• [ 0 ] - Level 0: Checks for critical, uncorrectable errors (e.g. read/write errors)
• [ 1 ] - Level 1: Checks for any major errors that could force the drive to stop working.
• [ 2 ] - Level 2: Checks for any warning status errors that could force the drive to stop working.
6.1.13 Show EXE Time
The SHOW EXE TIME option allows you to enable or disable whether the total execution time for
an operation is displayed on the LCD screen. The total execution time will be displayed after an
operation has completed.
Tap the ‘ENT’ button to change this option’s setting.
• [ ] – Disabled (default). The total execution time is not displayed.
• [ ٭ ] – Enabled. The total execution time is displayed.
34
Page 35

The Setup Menus
6.1.14 Show Binary Base
The SHOW BINARY BASE option allows you to change whether capacities are displayed in decimal
form (e.g. 1KB=1000 bytes) or in binary form (e.g. 1KB = 1024 bytes)
Tap the ‘ENT’ button to change this option’s setting.
• [ ] – Disabled (default). Capacities are displayed in decimal form.
• [ ٭ ] – Enabled. Capacities are displayed in binary form.
6.1.15 Transfer Size
The Transfer Size setting allows you define the data transfer block size for each ATA write command.
Generally, larger transfer block sizes are better for duplication purposes than smaller sizes. However,
there are some hard drives which can only accept 2MB data transfer size per ATA command. If your
drives only support small data transfer block sizes, then you will need to change this setting.
The Transfer Size settings can be set to 8KB, 16KB, 32KB, 64KB, 128KB, 256KB, 512KB, 1MB,
2MB, 4MB, 8MB and 16MB. The default setting is 4MB.
Tap the ‘ENT’ button and then press the UP/DOWN buttons to change this option’s setting.
Tap the ‘ENT’ button to set the Transfer Size.
6.1.16 Read Transfer Size
The Transfer Size setting allows you define the data transfer block size for each ATA read command.
Generally, larger transfer block sizes are better for duplication purposes than smaller sizes. However,
there are some hard drives which can only accept 2MB data transfer size per ATA command. If your
drives only support small data transfer block sizes, then you will need to change this setting.
The Read Transfer Size settings can be set to 8KB, 16KB, 32KB, 64KB, 128KB, 256KB, 512KB,
1MB, 2MB, 4MB, 8MB and 16MB. The default setting is 16MB.
Tap the ‘ENT’ button and then press the UP/DOWN buttons to change this option’s setting.
Tap the ‘ENT’ button to set the Transfer Size.
35
Page 36

The Setup Menus
6.1.17 Set Write Pat.
The Set Write Pattern setting is used to define the data that you want written to all sectors of your
drives during a Disk Erase operation.
The Write Pattern can be set to 00, RM (random), AA, A5, 5A, C9, FF, E5 or F6. The default setting
is 00.
Tap the ‘ENT’ button and then press the UP/DOWN buttons to change this option’s setting.
Tap the ‘ENT’ button to set the Set Write Pattern.
6.1.18 Capacity Check
The duplicator has a built in capacity check function which will check the capacity of the Master hard
drive and the Target hard drive(s) during Disk or Brief copy processes and determine whether the
drives’ capacities are the same.
Tap the ‘ENT’ button to change this option’s setting.
• [ ] – Capacity Check is disabled. When a Disk or Brief copy process is executed the system
will not check the capacity between the Master and Target drive(s) and start the copy process as
normal.
• [ ٭ ] – Capacity Check is enabled (default). When a Disk or Brief copy process is executed the
system will check the capacity between the Master and Target drive(s) to determine whether the
capacity is the same. If the capacity is different the copy process will be cancelled.
6.1.19 Model Check
The duplicator has a built in capacity check function which will check the model of the Master drive
and the Target drive(s) during Disk or Brief copy processes and determine whether the drive models
are the same.
Tap the ‘ENT’ button to change this option’s setting.
• [ ] – Model Check is disabled (default). When a Disk or Brief copy process is executed the
system will not check the models of the Master and Target hard drive(s) and start the copy
process as normal.
• [ ٭ ] – Model Check is enabled. When a Disk or Brief copy process is executed the system will
check the model of the Master and Target drive(s) to determine whether the model is the same.
If the drives are different models then the copy process will be cancelled.
36
Page 37

The Setup Menus
6.1.20 Brief + Ratio
The Brief+Ratio option allows you to enable Brief+Ratio copy.
Tap the ‘ENT’ button to change this option’s setting.
• [ ] – Brief+Ratio is disabled (default). When a Brief copy process is executed the system will
execute the copy process as normal.
• [ ٭ ] – Brief+Ratio is enabled. When a Brief copy process is executed the system will run a
normal Brief Copy mode to copy the data first, and then use Ratio Copy to copy the user defined
area.
6.1.21 Brief Immediate
If you are experiencing issues when running Brief Copy, disabling the Brief Immediate function may
improve the chance of a successful duplication.
Tap the ‘ENT’ button to change this option’s setting.
• [ ٭ ] – Brief Immediate is enabled. When Brief Immediate is enabled, data copying and analysis
are done at the same time during Brief Copy. This is the fastest option.
• [ ] – Brief Immediate is disabled (default). When you run a Brief Copy the duplicator will
analyze the Source completely first, and then follow the analysis result to copy the data from
the Source to the Target drives. Duplication through Brief Copy will take longer when Brief
Immediate is disabled.
6.1.22 Optimize Log Table
The Optimize Log Table option can be enabled to help improve Brief Copy performance when
duplicating Linux drives by building a more extensive data map prior to copying.
Tap the ‘ENT’ button to change this option’s setting.
• [ ٭ ] – Optimize Log Table is enabled. When using Brief Copy to duplicate a Linux disk, the
duplicator will take additional time to build a comprehensive data map which will allow for
better duplication speed during the copy process.
• [ ] – Optimize Log Table is disabled (default). Brief Copy will operate as normal.
37
Page 38

The Setup Menus
6.1.23 Advanced Brief Mode
The Brief copy mode is usually the fastest duplication method available. However Brief mode only
supports a handful of file systems. The ADV. BRIEF MODE operation allows you to execute a Brief
copy of unsupported file systems.
The Advanced Brief copy mode requires loading a special Master drive image to a Storage Center
drive. For information on formatting a hard drive as a Storage Center, see section 6.3.6 Make Storage
Center on page 51.
To use the Advanced Brief Copy, first you will need to prepare a new Master disk that will be supported
by Advanced Brief Copy:
1. Tap the ‘ENT’ button and the press the UP/DOWN buttons to change the Advanced Brief
Mode setting. This will define the write pattern. The write pattern can be set to 00, RM (random),
AA, A5, 5A, C9, FF, E5 or F6. The default setting is 00. This will define the data that will be
written to all sectors of your drives during the Disk Erase operation.
2. Exit back to the Main Copy menu by tapping the ‘ESC’ button.
3. Connecting a blank drive to any Target port on the duplicator and then execute a Disk Erase
operation (see section 4.2 Disk Erase on page 23).
4. Use this newly erased hard drive to create your Master drive.
Now that you’ve created a Master drive we need to load an image of it to a Storage Center drive.
1. Connect a drive formatted as a Storage Center to the Source port.
2. Connect the Master drive to the last Target port on the duplicator (either #7, #15 or #23 depending
on model).
3. Navigate to the Load Image operation.
4. Tap the ‘ENT’ button to execute the Load Image operation.
5. Entering a name for the image file, then press and hold the ‘ENT’ button to start the Load
process. This will build a data map of the Master drive image onto the Storage Center.
A data map image of the Master drive has now been saved to the Storage Center. You can now execute
a Brief copy of this image file, regardless of the file system.
Set Advanced Brief Copy to ‘NO’ to disable this feature.
6.1.24 Scan Size
The Scan Size setting is used to define how the duplicator builds a data map of the Master drive
image into flash memory. The device scan performance is based on the Scan Size setting. The larger
the Scan Size setting, the faster the device scan performance, however there will be more unused data
when the data map is built. A smaller Scan Size will build a more precise data map, but will take more
time to build.
The Scan Size can be set to 128KB, 256KB, 512KB, 1MB or 2MB. The default setting is 128KB.
Tap the ‘ENT’ button and then press the UP/DOWN buttons to change this option’s setting.
Tap the ‘ENT’ button to set the Scan Size.
38
Page 39

The Setup Menus
6.1.25 Set HDD Wipe
The Set HDD Wipe option allows you to configure the number of wipe cycles that are executed when
you run the Disk Wipe operation (see section 4.3 Disk Wipe on page 23) The Disk Wipe operation
can be run once or consecutively up to 100 times. 7 wipe cycles complies with the American DOD
5220-22.M standard.
Note: The more Wipe Cycles you set, the longer the wipe process will take.
Tap the ‘ENT’ button and then press the UP/DOWN buttons to change this option’s setting.
Press the ‘ENT’ button to set the number of wipe cycles.
6.1.26 Burn In
The Burn In option allows the you to enable a continuous Copy, Compare, Verify, Erase or Load
function to stress test for endurance, reliability and stability of your drives.
The Burn In can be set to: 5, 10, 20, 50 or MX. The number here will tell the system how many times
it should repeat the Burn In test.
Tap the ‘ENT’ button and then press the UP/DOWN buttons to configure the Burn In option.
Tap the ‘ENT’ button to set Burn In.
The next time you run a Copy, Compare, Erase or Load operation, the duplicator will continue
running that function as normal. Once the operation has completed the screen will display the total
execution time and the operation count. Once this information has been displayed for a few seconds
the operation will start again automatically. This will be repeated until the Burn In value has been
reached. Note: If set to MX, the Burn In test will run continuously until you manually stop it.
You can stop the burn in test at any time by pressing and holding the “ESC” button for three
seconds. This will automatically disable the Burn In function and the duplicator will return to normal
functionality.
6.1.27 Total Copy Count
Total Copy Count keeps track of the total number of successful and unsuccessful duplications
produced by the system. This is a running count that includes all copy modes.
Tap the ‘ENT’ button to view the total copy count.
39
Page 40

The Setup Menus
6.1.28 Skip Read Error
The Skip Read Error option allows you to enable or disable error skipping during Disk, SMART,
Brief and Resize modes.
Tap the ‘ENT’ button to change this option.
• [ ] – Disabled (default). When an error is detected while reading from the Source, the duplicator
process will fail out.
• [ ٭ ] – Enabled. When an error is detected while reading from the Source, the duplicator will
skip the bad sector on the Source and fill the sector with zeroes on the Target.
6.1.29 No Button Sound
The No Button Sound option allows you to enable or disable the audible tone that sounds when you
tap or hold a button.
Tap the ‘ENT’ button to change this option.
• [ ٭ ] – Button sounds are disabled. No audible tones will sound when you tap or hold a button.
• [ ] – Button sounds are enabled (default). Tapping a button will be accompanied by a short
tone. Holding a button will sound a low tone followed immediately by a higher pitched tone.
6.1.30 Keep LED Result
The Keep LED Result option allows you to configure whether the LED status lights remain on after
a duplication completes.
• [ ٭ ] – LED Status lights from the previous duplication will remain on until the next duplication
process is started.
• [ ] – LED Status lights reset after duplication completes (default). After the duplication
completes and you exit from the completion screen, the LEDs will reset.
40
Page 41

The Setup Menus
6.1.31 Set UART Control
The Set UART Control option must be enabled in order to execute commands remotely via the Control
Manager software.
Tap the ‘ENT’ button to change this option.
• [ ٭ ] – UART Controls are enabled. You can execute commands on the duplicator from the
Control Manager software.
• [ ] – UART Controls disabled (default). You are unable to execute commands on the duplicator
from the Control Manager software.
6.1.32 Real Time Messaging
The Real Time Messaging option allows you to configure how the duplicator sends information
about the duplication process to a connected PC (see section 5.2 Logging Using the Control Manager
Software (Windows Only) on page 28).
Tap the ‘ENT’ button to change this option.
• [ ٭ ] – Real Time Messaging is enabled. Real time information about the operation process (e.g.
percentage complete, data transferred) can be displayed through the PC logging software.
• [ ] – Real Time Messaging is disabled (default). Information is sent to the logging software
only when the operation starts and when it ends.
41
Page 42

6.2 Advanced Setup
6.2.1 Set Password
The Set Password option allows you to enable a 4-digit password for the Setup menus, protecting the
system against unauthorized setting changes.
To set a password:
1. Tap the ‘ENT’ button. The digit furthest to the left will start blinking, indicating that it is
currently selected. Tap the UP/DOWN buttons to increase/decrease the digit by one.
2. Tap the ‘ENT’ button to select the next digit to the right. Tap the UP/DOWN buttons to
increase/decrease the digit by one.
3. Repeat step 2 until you have entered your password, then press and hold the ‘ENT’ button to
set your password.
Once your password is set, the user will be prompted to enter the password whenever they try to enter
the Setup Selection menu.
The Setup Menus
Enter the password as “0000” to disable password protection.
6.2.2 Set Error Retry Count
The Set Error Retry Count option allows you to configure the number of times that the duplicator
retries sending general error handling commands when it encounters an error before failing.
The number of error retries can be set from 0 to 9 times. The default setting is 1.
Tap the ‘ENT’ button and then press the UP/DOWN buttons to change this option’s setting.
Tap the ‘ENT’ button to set the Error Retry Count.
6.2.3 Set Command Retry Count
The Set Command Retry Count option allows you to configure the number of times that the duplicator
retries sending general ATA commands to the SATA port before failing.
The number of retries can be set from 0 to 9 times. The default setting is 1.
Tap the ‘ENT’ button and then press the UP/DOWN buttons to change this option’s setting.
Tap the ‘ENT’ button to set the Command Retry Count.
42
Page 43

The Setup Menus
6.2.4 Set Copy Retry Count
The Set Copy Retry Count option allows you to configure the number of times that the duplicator
retries sending ATA write commands to the SATA port before failing.
The number of retries can be set from 0 to 9 times. The default setting is 1.
Tap the ‘ENT’ button and then press the UP/DOWN buttons to change this option’s setting.
Tap the ‘ENT’ button to set the Copy Retry Count.
6.2.5 Set Compare Retry Count
The Set Compare Retry Count option allows you to configure the number of times that the duplicator
retries sending ATA read commands to the SATA port before failing.
The number of retries can be set from 0 to 9 times. The default setting is 1.
Tap the ‘ENT’ button and then press the UP/DOWN buttons to change this option’s setting.
Tap the ‘ENT’ button to set the Compare Retry Count.
6.2.6 Set Physical Retry Count
When the machine has major problem or a critical error, the Physical Retry Count is the number of
times that the duplicator will reset the drives in an attempt to allow the duplication to progress.
The number of retries can be set from 0 to 9 times. The default setting is 1.
Tap the ‘ENT’ button and then press the UP/DOWN buttons to change this option’s setting.
Tap the ‘ENT’ button to set the PHY Retry Count.
6.2.7 Set SATA Physical Count
The Set SATA Physical Retry Count option is used when the duplicator recognizes a major problem
with a drive or a critical error at the hardware level that is uncorrectable at the software level. The
SATA Physical Count is the number of times that the duplicator will reset the drives at the hardware
level in an attempt to allow the duplication to progress.
The number of retries can be set from 0 to 9 times. The default setting is 1.
Tap the ‘ENT’ button and then press the UP/DOWN buttons to change this option’s setting.
Tap the ‘ENT’ button to set the SATA PHY Count.
43
Page 44

The Setup Menus
6.2.8 Auto Kick Slow (15 and 23 target duplicators only)
Not all drives are equal, and some drives will be slower than others due to max performance, health
and other factors. Since the duplicator operates in a synchronous mode, the duplicator can only operate
as fast as the slowest drive attached. Enabling Auto Kick Slow option allows the duplicator to detect
any slow drives and automatically remove them from the operation.
Tap the ‘ENT’ button to change this option.
• [ ٭ ] – Auto Kick Slow is enabled. If a drive’s operating speed falls below a certain level for
a specified length of time (as defined by Set Kick Time and Set Kick Speed) the drive will be
automatically ejected from the operation.
• [ ] – Auto Kick Slow is disabled (default). Duplicator will operate as fast as the slowest
connected drive. Slow drives can be ejected manually by holding the ‘F1’ button.
6.2.9 Set Kick Time (15 and 23 target duplicators only)
If Auto Kick Slow has been enabled, the Set Kick Time option will define the how long a drive can
operate below the speed defined by Set Kick Speed before it is ejected from the operation.
The time can be set from 1 to 120 seconds. The default setting is 30 seconds.
Tap the ‘ENT’ button and then press the UP/DOWN buttons to change this option’s setting.
Tap the ‘ENT’ button to set the Kick Time.
6.2.10 Set Kick Speed (15 and 23 target duplicators only)
If Auto Kick Slow has been enabled, the Set Kick Time option will define the lowest speed that a
drive can operate at. If a drive remains below this speed threshold for the amount of time defined by
Set Kick Time, then it will be ejected from the operation.
The speed can be set between 1 and 255MB/s. The default setting is 60MB/s.
Tap the ‘ENT’ button and then press the UP/DOWN buttons to change this option’s setting.
Tap the ‘ENT’ button to set the Kick Speed.
44
Page 45

The Setup Menus
6.2.11 Set Ratio Start
Ratio Copy duplicates only a defined percentage of the Master drive. The Set Ratio Start option
allows you to define the starting point. The percentage of the disk duplicated from the start point is
defined by the Set Ratio Length option.
By default the Set Ratio Start is 0.0%, which is the very beginning of the drive.
Tap the ‘ENT’ button and then press the UP/DOWN buttons to change this option’s setting.
Tap the ‘ENT’ button to set the Ratio Start point.
6.2.12 Set Ratio Length
Ratio Copy duplicates only a defined percentage of the Master drive. The Set Ratio Length option
allows you to define the percentage of length to be duplicated. The starting point is defined by the Set
Ratio Start option.
By default the Set Ratio Length is 10.0%.
Tap the ‘ENT’ button and then press the UP/DOWN buttons to change this option’s setting.
Tap the ‘ENT’ button to set the Ratio Length.
6.2.13 Set Ratio Erase Start
Ratio Erase erases only a defined percentage of the Master drive. The Set Ratio Erase Start option
allows you to define the starting point. The percentage of the disk erased from the start point is
defined by the Set Ratio Erase Length option.
By default the Set Ratio Erase Start is 0.0%, which is the very beginning of the drive.
Tap the ‘ENT’ button and then press the UP/DOWN buttons to change this option’s setting.
Tap the ‘ENT’ button to set the Ratio Erase Start point.
6.2.14 Set Ratio Erase Length
Ratio Erase duplicates only a defined percentage of the Master drive. The Set Ratio Erase Length
option allows you to define the percentage of length to be erased. The starting point is defined by the
Set Ratio Erase Start option.
By default the Set Ratio Erase Length is 10.0%.
Tap the ‘ENT’ button and then press the UP/DOWN buttons to change this option’s setting.
Tap the ‘ENT’ button to set the Ratio Erase Length.
45
Page 46

The Setup Menus
6.2.15 Check DC Connect (15 and 23 target duplicators only)
The Check DC Connect option allows you to configure whether or not the duplicator checks for any
other daisy chain connected duplicators during bootup.
Tap the ‘ENT’ button to change this option.
• [ ٭ ] – Check DC Connect is enabled. When the duplicator is powered on, it will check for other
daisy chain connected duplicators while it is booting up.
• [ ] – Check DC Connect is disabled (default). When the duplicator is powered on, it will skip
checking for other daisy chain connected duplicators and proceed with booting up in standalone
mode.
6.2.16 Set Max DC Count (15 and 23 target duplicators only)
The more duplicators you have connected through daisy chain, the longer it will take to initialize
during bootup. The Set Max DC Count option allows you to configure the maximum number of
duplicators the system checks for during bootup. Each duplicator has a different value:
• 15 Target Duplicator value = 4
• 23 Target Duplicator value = 6
So for example, if you are connecting two 15 Target Duplicators then you would set this value to 8.
If you were connecting 2x 23 Target Duplicators then you would set this value to 12. If you were
connecting a 15 Target Duplicator to a 23 Target Duplicator then this value should be set to 10.
The Set Max DC Count can be set from 1 to 32.
Tap the ‘ENT’ button and then press the UP/DOWN buttons to change this option’s setting.
Tap the ‘ENT’ button to set the Max DC Count.
6.2.17 Set DC Connect Time (15 and 23 target duplicators only)
The more duplicators you have connected through daisy chain, the longer it will take to initialize
during bootup. The Set DC Connect Time option allows you to configure the maximum amount of
time that the system checks for daisy chain connected duplicators during bootup.
The Set DC Connect Time can be set from 0 to 999. The default value is set to 999.
Tap the ‘ENT’ button and then press the UP/DOWN buttons to change this option’s setting.
Tap the ‘ENT’ button to set the DC Connect Time.
46
Page 47

The Setup Menus
6.2.18 Log Over Head
Some Linux file systems uses a log-structure file system that allows for metadata to be written in
between blocks of data. Normally this metadata isn’t critical and does not need to be copied. However,
if you would like this information to be copied, you must define the gap size.
You can define the gap size as 2MB, 4MB, 8MB, 16MB or 64MB. By default Log Over Head is set
to NO, which means the metadata will not be copied.
Tap the ‘ENT’ button and then press the UP/DOWN buttons to change this option’s setting.
Tap the ‘ENT’ button to set the Log Over Head value.
6.2.19 Partition Full Copy
The Partition Full Copy option allows you to run a hybrid Brief/Disk Copy. This type of copy is useful
when duplicating a disk that contains hidden data or hidden partitions that would not be recognized
by Brief Copy.
Tap the ‘ENT’ button to change this option.
• [ ٭ ] – Partition Full Copy is enabled. The duplicator will make a Disk Copy of an assigned
partition after Brief Copy is completed.
• [ ] – Partition Full Copy is disabled (default). The duplicator will simply make a Brief Copy.
6.2.20 Partition Gap Copy
The Partition Gap Copy option allows the duplicator to copy any gap data that resides between
partitions when running Brief Copy. This is only required in rare circumstances.
Tap the ‘ENT’ button to change this option.
• [ ٭ ] – Partition Gap Copy is enabled. The duplicator will check for and copy any data that
resides between partitions. .
• [ ] – Partition Gap Copy is disabled (default). The duplicator will simply make a Brief Copy.
6.2.21 Partition Unused Copy
The Partition Unused Copy option allows the duplicator to copy any unused partitions.
Tap the ‘ENT’ button to change this option.
• [
• [ ] – Partition Unused Copy is disabled (default). The duplicator will skip any unused partitions
] – Partition Unused Copy is enabled. The duplicator will Brief Copy any unused partitions.
٭
during a Brief Copy.
47
Page 48

6.2.22 No MBR Check
The No MBR Check option will allow the duplicator to start a copy process without checking the
MBR table. This is because some drives do not have a standard MBR table, however the data residing
within are correct and the duplicator is able to copy them.
Tap the ‘ENT’ button to change this option.
• [ ٭ ] – No MBR Check is enabled. The duplicator will not check the MBR table before starting
the copy process.
• [ ] – No MBR Check is disabled (default). The duplicator will check the MBR table prior to
copying to ensure that it is healthy and intact.
6.2.23 MBR&HP Check
The MBR & HP check is specifically used when copying drives from certain HP computers which
need to have this function enabled for it to be successful.
Tap the ‘ENT’ button to change this option.
• [ ٭ ] – MBR&HP Check is enabled.
• [ ] – No MBR Check is disabled (default).
6.2.24 Sector Size 4K
The Sector Size 4K setting is used when the source drive is simulating 4K sector size. If your source
drive uses a special bridge chip to make the drive act like it has 4K sectors, then you must enable this
option when running Brief Copy.
Tap the ‘ENT’ button to change this option.
• [ ٭ ] – Sector Size 4K is enabled. You will be able to Brief Copy a source drive that is simulating
4K sector sizes.
• [ ] – Sector Size 4K is disabled (default).
6.2.25 Keep Last Partition
The Keep Last Partition setting is used to configure how Resize Copy functions when the Master
drive has multiple partitions.
Tap the ‘ENT’ button to change this option.
• [ ٭ ] – Keep Last Partition is enabled. When you run a Resize Copy operation, the last partition
on the Target drive will be the locked as the same size as the last partition on the Master drive.
• [ ] – Keep Last Partition is disabled (default). When you run a Resize Copy operation, the last
partition on the Target drive will be expanded to use up any unallocated space.
48
Page 49

6.2.26 Resize Last Partition
The Resize Last Partition setting is used to configure how Resize Copy functions when the Master
drive has multiple partitions.
Tap the ‘ENT’ button to change this option.
• [ ٭ ] – Resize Last Partition is enabled. When you run a Resize Copy operation, the last partition
on the Target drive will be expanded to use up any unallocated space.
• [ ] – Resize Last Partition is disabled (default). When you run a Resize Copy operation, all
partitions will be expanded equally to use up any unallocated space.
6.2.27 Need Resize
The Need Resize option configures the way that the Smart Copy operates. When you execute a
Smart Copy operation, the system checks the capacity between the Master drive and all connected
Target drives. If the capacity of any of the Target drives exceeds the capacity of the Source drive by
the tolerance percentage defined by the Need Resize option, then the duplicator will automatically
execute a Resize copy. Otherwise it will run a Brief Copy. The default value is: 3%
FAQ
For example:
• [ 0%] : All targets must be the same capacity. If the capacity between the Master and Target
drives is any different then the system will execute a Resize Copy.
• [10%] : If the capacity difference between the Master and Target drives is between 0% and
10% then the system will execute a Brief Copy. If the capacity of the Targets is larger than the
capacity of the Master by more than 10% then the system will execute a Resize Copy.
Tap the ‘ENT’ button and then press the UP/DOWN buttons to change this option’s setting.
Tap the ‘ENT’ button to set the Need Resize percentage.
6.2.28 Brief Verify Source
Enabling Brief Verify Source will allow the duplicator to create a Source CRC value (for data only)
and save it in the machine until the duplicator is turned off. After a Brief Copy is completed, the
duplicator will check the source’s CRC is correct or not. This will verify whether the source data was
transferred accurately during the copy process.
6.2.29 Disk Verify Source
Enabling Brief Verify Source will allow the duplicator to create a Source CRC value (for the whole
disk) and save it in the machine until the duplicator is turned off. After a Disk Copy is completed, the
duplicator will check the source’s CRC is correct or not. This will verify whether the source data was
transferred accurately during the copy process.
49
Page 50

6.3 Storage Center Setup
6.3.1 Load Full Image
The Load Full Image option allows you to control how image files are saved to a Storage Center
during a Load operation (see section 4.8 Load Image on page 25).
Tap the ‘ENT’ button to change this option.
• [ ] – Disabled (default). The system will analyze the Source’s file system before building the
image. If the Source’s file system is supported, the image will be a Brief image based on the file
system and data area. If the Source’s file system is unrecognized the image will be a full sector
by sector image.
Troubleshooting
• [
] – Enabled. When executing a Load process, the system will not analyze the Source’s file
٭
system and will automatically build the image sector by sector.
6.3.2 Copy Storage Source
The Copy Storage Source option allows you to make a duplicate of your Storage Center drive.
Tap the ‘ENT’ button to change this option.
• [ ] – Disabled (default). The system will analyze the Source’s file system before duplication.
If the Source’s file system is recognized as a Storage Center then the duplicator will ask you to
choose an image name to copy.
• [ ٭ ] – Enabled. The system will analyze the Source’s file system before duplication. If the
Source’s file system is recognized as a Storage Center then the duplicator will make a copy of
the entire Storage Center drive.
6.3.3 Skip Select Image
The Skip Select Image option allows you to set whether the duplicator asks you to select an image file
when it recognizes that the drive connected to the Source is a Storage Center.
Tap the ‘ENT’ button to change this option.
• [ ] – Disabled (default). The system will analyze the Source’s file system before duplication.
If the Source’s file system is recognized as a Storage Center then the duplicator will ask you to
choose a image name to copy.
• [ ٭ ] – Enabled. The system will analyze the Source’s file system before duplication. If the
Source’s file system is recognized as a Storage Center then the duplicator will automatically
make a copy of the image configured in the Select Image File option.
50
Page 51

Warranty Information
6.3.4 Select Image File
The Select Image File option is used to select an image file when the Skip Select Image option is
enabled. If Skip Select Image is enabled, the image file selected here will be used as the default
Source for any copy process.
To select an image file name:
1. Tap the ‘ENT’ button. The digit furthest to the left will start blinking, indicating that it is
currently selected. Tap the UP/DOWN buttons to increase/decrease the digit by one.
2. Tap the ‘ENT’ button to select the next digit to the right. Tap the UP/DOWN buttons to
increase/decrease the digit by one.
3. Repeat step 2 until you have entered the complete image name, then press and hold the ‘ENT’
button to set the default file image.
6.3.5 Delete Image File
The Delete Image File option is used to delete a specific image file that has been saved to the Storage
Center.
To delete an image file:
1. Connect your Storage Center drive to the Source port.
2. Tap the ‘ENT’ button. The digit furthest to the left will start blinking, indicating that it is
currently selected. Tap the UP/DOWN buttons to increase/decrease the digit by one.
3. Tap the ‘ENT’ button to select the next digit to the right. Tap the UP/DOWN buttons to
increase/decrease the digit by one.
4. Repeat step 2 until you have entered the complete image name, then press and hold the ‘ENT’
button to select the image file for deletion.
Note: If you receive a “File Not Found” error message, then there is no data saved to the image file
that you selected.
6.3.6 Make Storage Center
The Make Storage Center option allows you to format a normal drive as a Storage Center drive.
Storage Centers which can then be used to store multiple hard drive images for convenient access to
your most commonly used Master drives.
To format a hard drive as a Storage Center:
1. Connect the hard drive you want to format as a Storage Center to the duplicator’s Source port.
2. Tap the ‘ENT’ button.
3. You will receive a message asking you to confirm formatting the drive. Tap the ‘ENT’ button
to proceed or tap the ‘ESC’ button to cancel.
Caution! Formatting the internal hard drive will erase any saved image files stored on the hard
drive.
Once the format has completed you will receive a message confirming that the format was successful.
51
Page 52

6.4 The Diagnostic Setup Menu
The Diagnostic Setup menu will allow you to choose which disk diagnostic tests are enabled to run
when executing the Disk Diagnostic function (see section 4.6 Disk Diagnostic on page 25). Press
the UP and DOWN buttons to navigate through the options available under the Diagnostic Setup
menu.
Diagnostic tests that are enabled are marked with an asterisk [*]. Tap the ENT button to toggle a test
between enabled/disabled.
• SET DIAG SMART - S.M.A.R.T. (Self-Monitoring, Analysis and Reporting Technology) is a
monitoring system included in HDDs and SSDs that detects and reports on various indicators of
drive reliability, with the intent of enabling the anticipation of hardware failures.
• SET WRITE TEST - Checks the ability to write data to the target drives by sequentially writing
data to all sectors.
• SET READ TEST - Checks the ability to read data from the target drives by writing data to all
sectors and attempting to read them sequentially.
• SET RANDOM READ - Same as the Read Verify test, except sectors are written and read from
in a random pattern.
• SET RANDOM WRT - Same as the Write test, except sectors are written to in a random
pattern.
• SET DIAG. PAT. - Configure the data pattern value for Write and Random Write test
52
Page 53

6.5 The About Menu
6.5.1 Set to Default
The Set to Default option allows you to restore all system settings back to their factory default values.
Tap the ‘ENT’ button to reset your duplicator to its original default configuration. The screen will
display a message asking you to confirm the reset. Tap the ‘ENT’ button to confirm, or tap the ‘ESC’
button to cancel.
Once the reset has been completed, you will be shown a confirmation message on the screen. Press
any button to return to the About menu.
6.5.2 Update Firmware
The Update Firmware option allows you to upgrade your Kanguru Hard Drive Duplicator to the latest
firmware version.
Warning! Do not attempt to update your duplicator’s firmware unless specifically instructed to do so
by a Kanguru Technician.
To update your firmware:
1. Contact Kanguru Technical Support at 508-376-4245 to receive a firmware update file.
2. Format a SATA drive or USB flash drive as FAT32.
3. Copy the firmware file to the drive you just formatted.
4. Connect the hard drive to the duplicator’s Source port or USB flash drive to the USB port
located on the back of the duplicator.
5. From the About menu, navigate to UPDATE FIRMWARE and then tap the ‘ENT’ button.
6. Tap the ‘F1’ button if you are using a SATA drive or tap the ‘F3’ button if you are using a USB
flash drive.
7. Once the system has confirmed the firmware file, a message will be displayed on the screen
asking you to confirm the firmware update. Tap the ‘ENT’ button to proceed or tap the ‘ESC’
button to cancel.
8. Wait for the firmware update process to complete.
9. Once the firmware update process has completed, reboot your system and the new firmware
version and build number will be displayed on the startup screen.
Warning! Do not disconnect power or turn off the duplicator while updating the firmware. Doing so
may cause the duplicator to become non-functional.
53
Page 54

6.5.3 Format Update Disk
The Format Update Disk option allows you to format a connected SATA drive in a supported FAT32
file system. This drive can then be used to load firmware updates to the duplicator.
6.5.4 Format USB Drive
The Format USB Drive option allows you to format a connected USB drive in a supported FAT32 file
system. This USB drive can then be used to load firmware updates to the duplicator.
6.5.5 System Information
The System Information option allows you to view information regarding your duplicator’s firmware
version and build.
Tap the ‘ENT’ button to begin viewing the system’s information. Tap the ‘ESC’ button to exit back
to the About menu.
54
Page 55

7. FAQ
Q: Do all Target hard drives have to be the same capacity? Same Brand?
A: If you select Disk copy or Brief copy, the Target hard drives must have the same capacity as the
Master hard drive. The hard drive brand is not important but capacity must be identical.
Q: Can I clone a smaller capacity Master drive to larger capacity Target drives?
A: Yes, use the “RESIZE COPY“ operation to clone a smaller capacity Master to larger capacity
Targets. However, targets must all be the same size (i.e. you can clone a 20GB Master to five 100GB
Targets using RESIZE COPY).
Q: Can I clone to Targets of various brands simultaneously?
A: Yes, the machine is able to clone hard drives of different brands as long as they are the same
capacity.
Q: Can drives with different RPM speeds be cloned together?
A: Yes, the machine will adjust to hard drives with different RPMs.
Q: How does the duplicator handle multiple partitions on the Master drive?
A: The machine will auto-detect how many partitions in the source hard drive and then copy it, but
you are unable to select a specific partition to copy.
Q: How does the duplicator handle multiple partitions of varying formats on the Master drive?
A: The machine will analyze the File System of the Master drive before it begins cloning.
Q: Can the duplicator clone operating systems such as UNIX and OS/2?
A: Yes, use the Disk copy operation to copy any operating system.
Q: Can the duplicator defragment a partition?
A: No, this must be done directly by the operating system of your PC.
Q: Can the Duplicator copy Encrypted HDD’s?
A: The KanguruClone is able to copy a limited number of encrypted HDD types through Disk copy.
55
Page 56

8. TROUBLESHOOTING
Problem Possible Cause Solution
The KanguruClone will
not start or there is no
display on the LCD
screen.
The KanguruClone
cannot make copies of a
Master hard drive.
The power cable is damaged or
not connected securely.
The voltage of the outlet the
KanguruClone is plugged
into does not match the
KanguruClone.
The power supply switch or the
system power switch is in the
Off position.
The hard drive is not connected
or was not detected by the
Kanguru Clone.
The cables connecting the hard
drive are not connected securely.
The hard drive jumpers are not
set in the correct position.
The hard drive may be faulty.
Make sure that the power cable is not
damaged and is not loose.
Make sure that the voltage of the
outlet matches the voltage of the
KanguruClone.
Make sure that the power switch
located at the back of the unit is in the
On position.
Make sure that all connected hard
drives have been successfully detected
by the KanguruClone.
Make sure that no hard drive
connection cables are loose.
Make sure that all the hard drive
jumpers are set to the Master or Cable
Select position.
Make sure that the Master hard drive is
not broken and does not have errors.
The hard drive’s format is not
supported by Brief Copy or
Resize Copy.
The hard drive contains a Host
Protected Area.
The data cables from the
KanguruClone to the hard drives
are not connected securely.
The KanguruClone is
unstable or operates very
slowly.
A hard drive may have an error
that is affecting the other hard
drives, causing slow operation.
The cables do not meet the
UDMA standards.
When executing a Brief Copy or
Resize Copy, make sure that the format
of the Master hard drive is supported.
Enable the HPA CHECK option under
the Advanced Setup menu.
Make sure that none of the data or
power cables are loose.
Try to identify the faulty hard drive
and replace as needed.
Only use the cables provided
by Kanguru Solutions with the
KanguruClone.
56
Page 57

9. WARRANTY INFORMATION
This product carries a 1 year* limited warranty on the power supply, controller, and all internal
components. The warranty does not cover any IDE, SATA, or Power cables. Kanguru Solutions is not
responsible for any damages incurred in the shipping process. Any claims for loss or damage must be
made to carrier directly. Claims for shipping errors should be reported to Kanguru Solutions within
three (3) working days of receipt of merchandise. Please refer to the RMA Procedure section of this
manual if your duplicator needs servicing.
Kanguru Solutions does not offer money back returns on its duplicator product lines due to the
unique nature of the product. All units will be fully supported under manufacturer’s and/or
extended warranty plans.
57
Page 58

10. TECHNICAL SUPPORT
If you experience any problems using your Kanguru product or have any technical questions regarding
any of our products, please call our tech support department. Our tech support is free and available
Monday thru Friday, 9am to 5pm EST.
Call 1-508-376-4245
Or visit our website at www.Kanguru.com
RMA Procedure
All Duplicators being serviced MUST BE PACKED IN THE ORIGINAL PACKAGING. If
you do not have your original packaging, you can purchase replacement packaging for $25.00 from
Kanguru’s Tech Support Department. Kanguru Solution’s warranty will not be honored in the event
that a duplicator is received improperly packaged, altered, or physically damaged.
Technical Support
STEP ONE: Call for a RMA Number: 508-376-4245
Duplicators will not be accepted for repair without a valid RMA number. RMA numbers are valid for
30 days upon assignment. Any return without a valid RMA number will be returned to the customer
at their expense.
STEP TWO: Ship and Insure your Duplicator
Kanguru Solutions strongly recommends you fully insure the duplicator for shipping. Kanguru
Solutions is not responsible for if the package is lost or damaged in transit. We suggest using a
shipping company that utilizes a “tracking” feature to verify “proof of delivery.” The customer is
responsible for shipping charges when returning a product. Shipping back to the customer is covered
by Kanguru Solutions during the first 90 days of purchase. After 90 days of purchase the customer is
responsible for shipping both ways.
58
Page 59

Daisy Chain Connection
APPENDIX A: DAISY CHAIN CONNECTION
Kanguru Clone 15 target and 23 target HDD Duplicators can operate individually as standalone
systems. They can also be linked together to create a system of separate HDD Duplicators working
together in unison via a daisy chain connection. A maximum of four duplicators can be daisy chained
at once, although it is not recommended to have more than two systems connected together.
Note: Daisy Chain connectivity is not currently supported by Kanguru Clone 7 Target models.
Setting up the Daisy Chain Configuration
1. Arrange the duplicators side-by-side on a secure, elevated surface. It will make the setup process
easier if you have convenient access to the back of the duplicators.
○ The duplicator furthers to the left (when viewed from the front) is Duplicator #1. This will
be the Master system.
○ The duplicator to the right of Duplicator #1 is Duplicator #2
○ The duplicator to the right of Duplicator #2 is Duplicator #3, etc...
2. Locate the “OUT E-SATA” and “IN SATA” ports on the back of the duplicators. The ports
should be labeled clearly.
3. Connect all the duplicators together using the provided Daisy Chain cable (referred to as DC
Cable). The Daisy Chain cable should have been provided with your duplicator and has a SATA
connector on one end and an e-SATA connector on the other.
a) Starting with the Master system, connect the e-SATA end of the DC Cable to the port marked
“OUT E-SATA”
b) Connect the SATA end of the DC Cable to the “IN SATA” port located on the back of
Duplicator #2.
c) Continue in this fashion until all duplicators are connected.
4. Connect the duplicators to electrical outlets using the provided power cables.
5. Power on all duplicators. The duplicators have not been linked at this point, so they will operate
independently.
6. Oneachduplicator,navigatetotheSetupSelectMenu→AdvancedSetup→CheckDCConnect.
7. Enable the Check DC Connect option on all duplicators (see section 6.2.15 Check DC Connect
(15 and 23 target duplicators only) on page 46).
8. Power cycle all duplicators by switching the power switch off and on.
9. When the duplicators bootup, the connected duplicators will communicate with each other and
establish the daisy chain connection.
Note: If you reboot the duplicator and there is no connection to another duplicator, hold the ‘ESC’
button to cancel the Daisy Chain check and then disable the Check DC Connect option.
59
Page 60

Daisy Chain Connection
Duplicating in a Daisy Chain Configuration
Once connected, making disks copies with duplicators in a Daisy Chain configuration is similar to
making copies on independent, standalone systems.
1. Connect the Master disk to the Source port on Duplicator #1.
2. Connect Target disks to any remaining ports on any of the duplicators.
Note: A Target disk can be connected to the Source port on Duplicator #2 and it will be copied
to.
3. Navigate to the desired copy mode.
4. Press the ‘ENT’ button to start the duplication process.
60
Page 61

Kanguru Solutions
1360 Main Street
Millis, MA 02054
www.kanguru.com
07.19.17 v1.5 © 2017 Kanguru Solutions
Legal terms and conditions available at www.kanguru.com. Please review and agree before use. Thank you.
 Loading...