

Page 1
USER’S MANUAL
FCC COMPLIANCE STATEMENTS
This equipment has been tested and found to comply with the limits for a Class B digital device, pursuant to Part 15 of the
FCC Rules. These limits are designed to provide reasonable protection against harmful interference in a residential installation.
This equipment generates, uses and can radiate radio frequency energy and, if not installed and used in accordance with the
instructions, there is no guarantee that interference will not occur in a particular installation. If this equipment does cause
harmful interference to equipment off and on, the user is encouraged to try to correct the interference by one or more of the
following measures:
Reorient or relocate the receiving antenna.
Increase the Distance between the equipment and receiver.
Connect the equipment into an outlet on a circuit different from that to which the receiver is connected.
Consult the dealer or an experienced radio/TV technician for help.
TRADEMARKS
MS-DOS, Windows, Windows 98/2000/ME/XP are trademarks of Microsoft Corporation.
Macintosh and Mac are trademarks of Apple Computer
*All of the third-party brands and names are the property of their respective owners.
Page 2

Table of Contents:
Introduction ............…………………………………….….……1
System Requirements.........................……...…………….…..… 2
Installation Procedure ........……...…………………….………. 3
1. Introduction:
Thank you for purchasing a Kanguru Cable from Kanguru Solutions!
KanguruCables provide the true versatility of Kanguru products. Completely
interchangeable among our multi-interface products, they allow each product to, in
essence, connect to any computer! On one end, a special universal connector plugs into
the back of your Kanguru Device, and on the other end, a standard USB2, Firewire,
Cardbus/PCMCIA or Parallel connection.
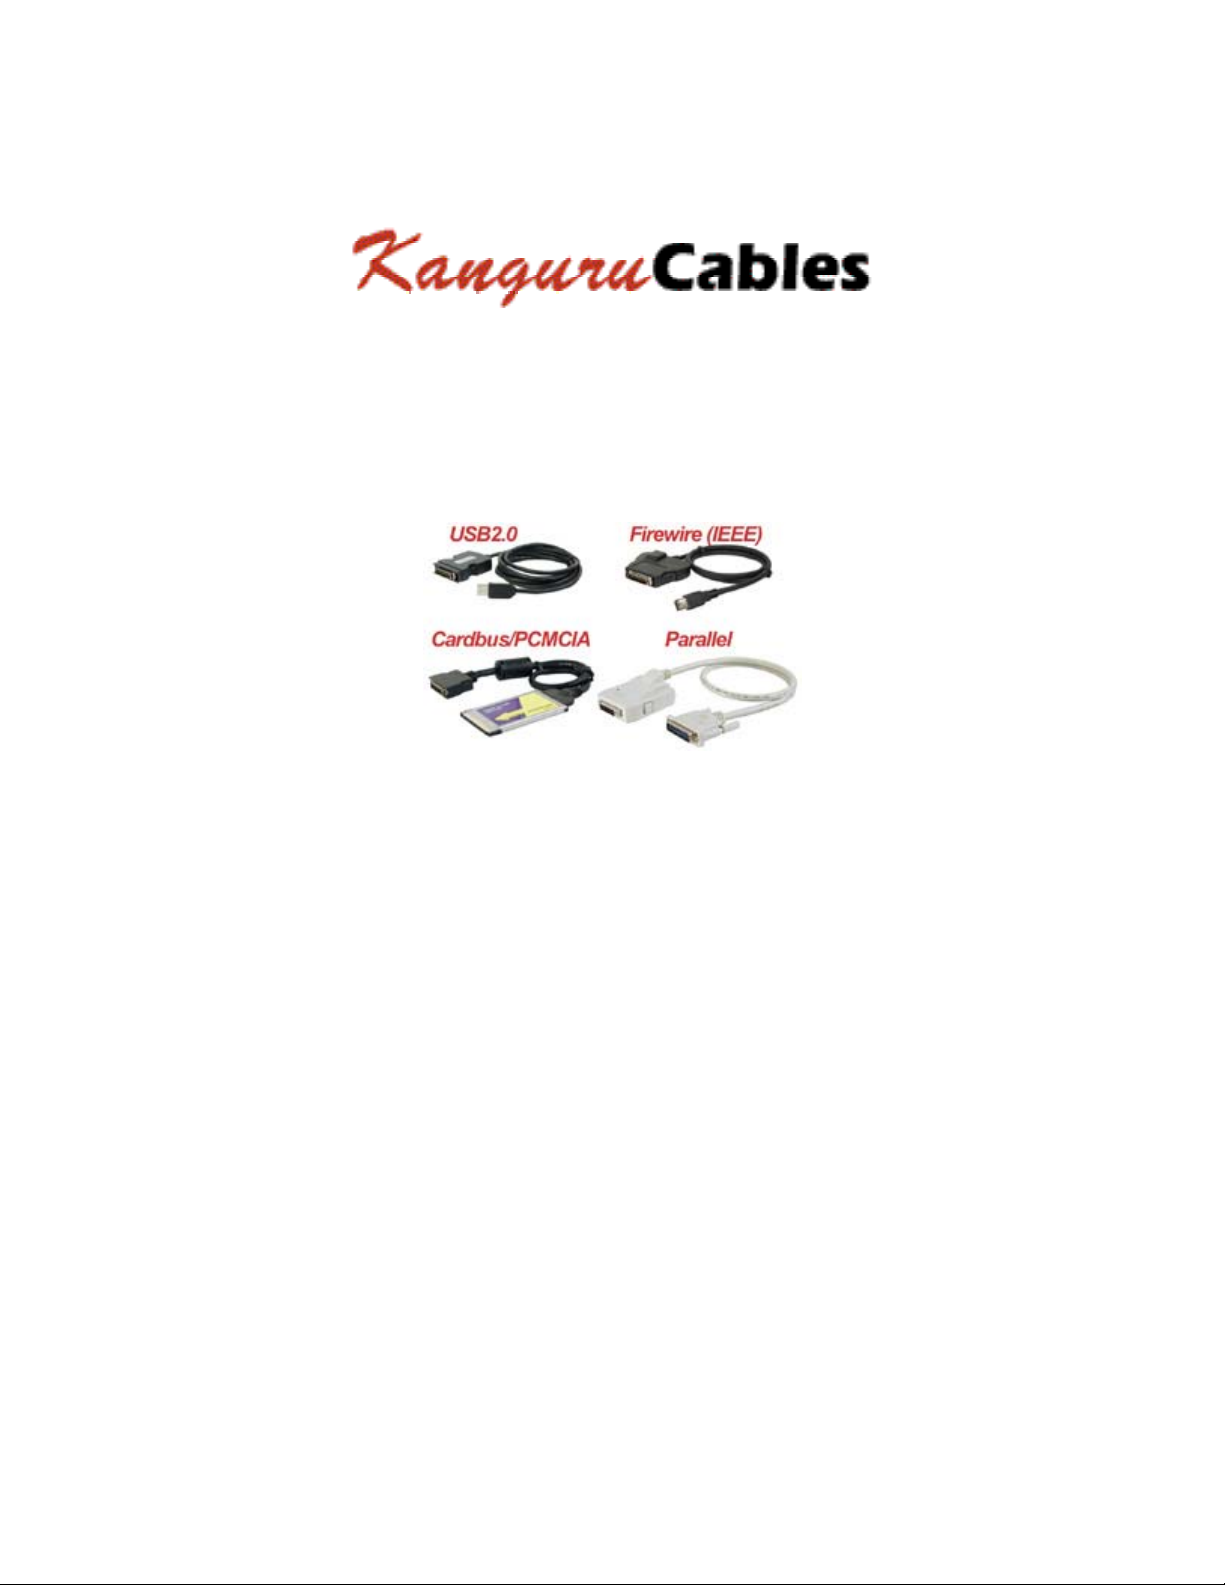
Choose from one of our four cables to suit your needs:
USB2.0 - Also referred to as USB2, this interface is an upgrade from standard USB1.1. It
provides external throughput comparable to Firewire and is backwards compatible with
USB1.1 ports. Very fast and hot swappable!
Firewire* - Also referred to as IEEE & 1394, Firewire is a longstanding favorite of
people requiring fast throughput. Very fast and hot swappable!
*Note: Our Firewire connection is a standard six pin female connection.
Cardbus/PCMCIA - Great for Notebook users, this dual cable will work in either
Cardbus (32 bit) or PCMCIA (16 bit) mode. Just flick the micro switch to whichever
setting you prefer. Quick and hot swappable!
Parallel* - Works with DOS and Win 95! (As well as others.) Great for older model
computers and imaging hard drives! Comes with printer pass through port.
*Note: Parallel is not supported by our multi-interface 24x, 32x, or 40x CDRW
NOTE: In order to reach USB 2.0 speed, you must have a computer or host adapter
card that has USB 2.0 support. This device will automatically sense the speed of
your USB port and adjust between USB 1.0 and USB 2.0 speed. If you do not have
USB 2.0 support, the device will work at USB 1.1 speeds. Kanguru Solutions carries
a wide variety of USB 2.0 PCI cards, adapters, and hubs should the need arise.
Page 3

2. System Requirements
Hardware:
USB1.1
USB2.0
Firewire
Cardbus/PCMCIA Computer with a Cardbus/PCMCIA slot
Parallel Computer with a Parallel cable connection
Computer with a USB or USB2.0 port
Computer with a USB or USB2.0 port
Computer with a FireWire port
Operation system:
USB1.1
USB2.0
Firewire
Cardbus/PCMCIA
Parallel Win95, 98SE, NT, ME, 2000, XP, Mac OS 8.6 or above.
Win98/98SE, ME, 2000, XP, Mac OS 8.6 or above.
Win98/98SE, ME, 2000, XP, Mac OS 8.6 or above.
Win98SE, ME, 2000, XP, Mac OS 8.6 or above.
Win95B, 98SE, NT, ME, 2000, XP, Mac OS 8.6 or above.
3. Installation Procedure:
The Kanguru Cables can connect to any of the Kanguru Multi interface products:
Kanguru Portable 2.5” and 3.5”, Kanguru CDRW, KanguruSlim CDRW, and the
Kanguru Disk with and Kanguru Adapter. Each cable requires drivers to operate on your
computer. Please refer to the section below for installing the required drivers.
USB Cables:
Note: The USB cables have three different versions:105,305,and 307. The USB1.1 cables
are version 105, and the USB2.0 cables are either 305 or 307. You can identify what
version of USB cable you have by examining the back of the universal connector. You
will either find a 105, 305 or 307 label. The drivers for the 105 and 305 cables are in the
Kanguru USB Cables folder and the 307 drivers are in the Kanguru USB 307 Cables
folder.
• Windows 98 & 98 SE/2000/ME/XP
Page 4

1.) Insert Kanguru Drivers CD into you computer.
2.) Connect the USB cable to the Kanguru Product and turn on the device.
3.) Connect the other end of the cable into you computer.
4.) A Found New Hardware wizard will appear. Click Next to install the drivers.
5.) Select “Search for the best driver for your device” and click Next
6.) Select “Specify a Location” and click Browse.
7.) Browse to the drivers cd and select the “Kanguru USB Cables” or “Kanguru
USB 307 Cables” folder, and then select the Drivers folder. Click OK
8.) Click Next to install these drivers, then Finish to complete the installation.
3.) You may have to restart your computer to complete the installation.
4.) After the installation has finished you will find the attached device in “My
Computer”.
• Macintosh 8.6 and above
Mac extensions for Kanguru USB cables can be found the drivers folder of the according
cable. Most systems have USB Storage Class driver installed that will support these
cables. However if your system doesn’t have these drivers, please install our drivers
before connecting the device.
Note: The Kanguru Hard Drive icons may take up to 10 minutes to initially appear on
your desktop. If you are solely using your drive with Macs, please format your drive as a
Mac Hard Drive to avoid this delay.
Note: The CD icon will only appear on your desktop when the CD is inserted into the
drive. You will not see a CDRW drive icon on your desktop if there isn’t a CD present.
FIREWIRE Cables:
• Windows 98 SE/2000/ME/XP/Mac 8.6 and above
Kanguru FireWire cables can connect to any of the Kanguru Multi interface products:
Kanguru Portable 2.5” and 3.5”, Kanguru CDRW, KanguruSlim CDRW, and the
Kanguru Disk with and Kanguru Adapter.
Kanguru FireWire cables do not require any drivers in the supported operating systems.
To use the FireWire cables, simply connect the cable to the device, turn it on, and
connect the cable to you computer. Your operating system will automatically detect the
new hardware and install the device. After the installation has finished you will find the
attached device in “My Computer”.
Page 5

Note: The Kanguru Hard Drive icons may take up to 10 minutes to initially appear on
your desktop. If you are solely using your drive with Macs, please format your drive as a
Mac Hard Drive to avoid this delay.
Note: The CD icon will only appear on your desktop when the CD is inserted into the
drive. You will not see a CDRW drive icon on your desktop if there isn’t a CD present.
Cardbus/PCMCIA Cables:
There are two modes for this cable: Cardbus and PCMCIA. Near the rear of the card, just
before the cable, you will find a micro switch. When the switch is pushed to the rear
position (towards the cable) it is in PCMCIA mode (16 bit). When the switch is pushed to
the front, it is in Cardbus mode (32 bit). If you are using Win XP you must have the cable
in CardBus mode. Win 95 and DOS must be in PCMCIA mode.
• Windows 98 & 98 SE/2000/ME/XP
1. Insert Kanguru Drivers CD into you computer.
2. Connect the USB cable to the Kanguru Product and turn on the device.
3. Connect the other end of the cable into you computer.
4. A Found New Hardware wizard will appear. Click Next to install the drivers.
5. Select “Search for the best driver for your device” and click Next
6. Select “Specify a Location” and click Browse.
7. Browse to the drivers cd and select the “Kanguru Cardbus-PCMCIA Cables”
folder, and then select the Drivers folder.
8. Select the folder according to the operating system, and click OK.
9. Click Next to install these drivers, then Finish to complete the installation.
10. You may have to restart your computer to complete the installation.
11. After the installation has finished you will find the attached device in “My
Computer”.
• Macintosh 8.6 and above
The Mac drivers for the Cardbus/PCMCIA cables are located in the Drivers folder found
in the Kanguru Cardbus-PCMCIA Cables folder. Please install these extensions before
connecting the device.
Note: The Kanguru Hard Drive icons may take up to 10 minutes to initially appear on
your desktop. If you are solely using your drive with Macs, please format your drive as a
Mac Hard Drive to avoid this delay.
Page 6

Note: The CD icon will only appear on your desktop when the CD is inserted into the
drive. You will not see a CDRW drive icon on your desktop if there isn’t a CD present.
Parallel Cables:
Make sure your printer port works.
The Kanguru Parallel Cable needs to be connected to your computer’s parallel port. The
parallel port is in the back of your PC where you normally connect your printer. The
connector is a 25 pin D-shaped female connector. Make sure that the printer port is
working correctly before connecting the Kanguru Cable to the parallel port. Test this by
printing a sample document.
Note: For optimal performance your printer port should be set to EPP (best) or bi-
directional mode. Check your system manual(s) for help.
Before connecting the parallel cable to you computer make sure everything is turned off.
Connect the cable to the device and the to the parallel port on your computer. You can
now power on the device, and the turn on your computer.
• Windows 3.x and DOS
Win95/98/NT Users should not use this procedure - see section 3.1.
After completing the hardware installation, insert the drivers cd and run the
dosinst.bat file to install the DOS drivers.
This procedure creates a directory on your C: drive. It copies the driver
installation program to this directory and modifies your CONFIG.SYS file to load the
driver. You can view your CONFIG.SYS file afterward to see where the driver was
added. Follow the instructions given onscreen to install the drivers and choose to install
them to the default directory. Reboot your PC after the installation is complete.
The installation is complete! You are now ready to begin using your Kanguru products.
Important information for users who purchased a new KanguruDisk or Portable to
use with their Kanguru Parallel cable:
• You have to format your KanguruDisk before you can use it for storage. Please
see chapter 5 for instructions.
• If your KanguruDisk is 8.4GB or greater it has been partitioned using FAT32 for
improved efficiency. As a result, systems using Windows 95A, Windows 3.X,
DOS and Windows NT will not recognize your KanguruDisk. In order to gain
access to your KanguruDisk you will need to repartition it by using FAT16.
Page 7

• Windows 98 & 98 SE/2000/ME/XP
1. Insert Kanguru Drivers CD into you computer.
2. A Found New Hardware wizard will appear. Click Next to install the drivers.
3. Select “Search for the best driver for your device” and click Next
4. Select “Specify a Location” and click Browse.
5. Browse to the drivers cd and select the “Kanguru Parallel Cables” folder, and
then select the Drivers folder.
6. Select the folder according to the operating system, and click OK.
7. Click Next to install these drivers, then Finish to complete the installation.
8. You may have to restart your computer to complete the installation.
9. After the installation has finished you will find the attached device in “My
Computer”.
Warranty
This product carries a 1-year warranty from the date of purchase. Any claims for loss or
damage must be made to carrier directly. Claims for shipping errors should be reported
to Kanguru Solutions within three (3) business days of receipt of merchandise.
Tech Support
If you experience any problems installing your Kanguru Cables or have any technical
questions regarding any of our products, please call our tech support department. Our tech
support is free and available Monday through Friday, 9am to 5pm EST.
Call 1-508-376-4245 or
Visit our website at www.KanguruSolutions.com
 Loading...