

Page 1
Copyright 2010, All Rights Reserved.
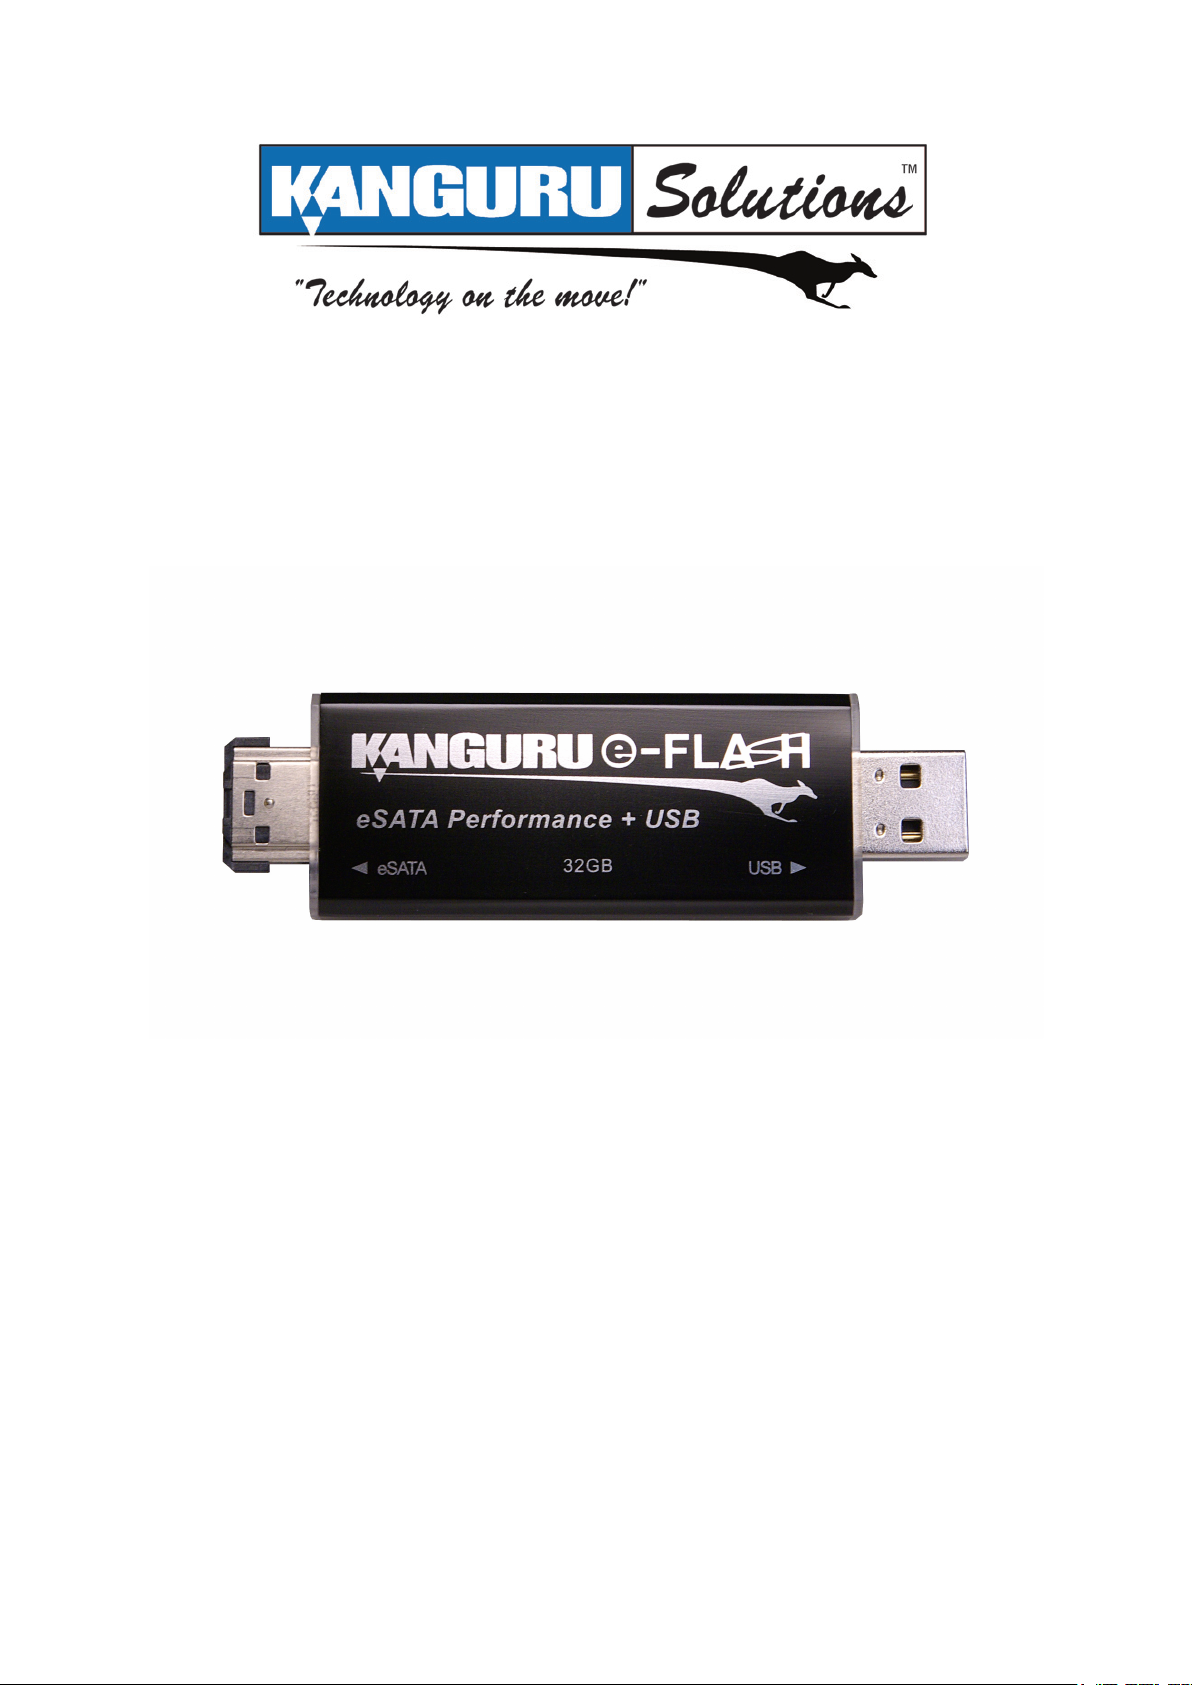
Kanguru eFlash
User Guide
Page 2

Notices and Information
NOTICES AND INFORMATION
Please be aware of the following points before using your Kanguru eFlash
Copyright © 2010 Kanguru Solutions. All rights reserved.
Windows 2000®, Windows ME®, Windows XP®, and Windows Vista® are registered trademarks
of Microsoft Inc. All other brands or product names are trademarks of their respective companies or
organizations.
Kanguru Solutions will not be held responsible for any illegal use of this product nor any losses
incurred while using this product. The user himself is responsible for the copyright laws, and is fully
responsible for any illegal actions taken.
Customer Service
To obtain service or technical support for your system, please contact Kanguru Solutions Technical
Support Department at 508-376-4245, or visit www.Kanguru.com for web support.
Legal notice
In no event shall Kanguru Solutions’ liability exceed the price paid for the product from direct,
indirect, special, incidental, or consequential software, or its documentation. Kanguru Solutions
offers no refunds for its products. Kanguru Solutions makes no warranty or representation, expressed,
implied, or statutory, with respect to its products or the contents or use of this documentation and
all accompanying software, and specifically disclaims its quality, performance, merchantability, or
fitness for any particular purpose. Kanguru Solutions reserves the right to revise or update its products,
software, or documentation without obligation to notify any individual or entity.
Export Law Compliance
Regardless of any disclosure made to Kanguru Solutions pertaining to the ultimate destination of the
specific Kanguru product, you warrant that you will not export, directly or indirectly, any Kanguru
product without first obtaining the approval of Kanguru Solutions and the appropriate export license
from the Department of Commerce or other agency of the United States Government. Kanguru
Solutions has a wide range of products and each product family has different license requirements
relative to exports.
Defragmenting Flash Memory Warning
Do not attempt to defragment your Kanguru Flash Drive. Flash memory does not need to be
defragmented and does not gain any performance by doing so. Defragmenting your flash drive can
actually degrade the flash memory which may reduce the drive’s total capacity and lifespan.
2
Page 3

Table of Contents
Table of Contents
Notices and Information ......................................................................... 2
1. Introduction ...................................................................................... 4
1.1 Package Contents ....................................................................................... 4
1.2 Specifications .............................................................................................. 5
2. Connecting and Using Your Kanguru eFlash ................................ 6
2.1 Connection Options ................................................................................... 6
2.1.1 Power Over eSATA ............................................................................. 7
2.1.1.1 Installing the Power Over eSATA bracket ........................................ 7
2.1.1.2 Connecting your eFlash through Power Over eSATA .................... 11
2.1.2 eSATA + USB ..................................................................................... 12
2.1.3 USB Only ........................................................................................... 13
2.2 Using Your eFlash .................................................................................... 14
2.2.1 Using the eFlash as an eSATA device ............................................. 14
2.2.1.1 Using HotSwap! ............................................................................ 16
2.2.2 Using the eFlash as a USB device .................................................... 18
3. Maintenance and Care .................................................................. 18
4. Troubleshooting .............................................................................. 19
5. Warranty ........................................................................................ 20
6. Tech Support................................................................................... 20
APPENDIX A: eSATA Hot Swap ........................................................ 21
3
Page 4
1. Introduction
Congratulations on purchasing the Kanguru eFlash. We appreciate the confidence you have in our
products. Please read through these operating instructions and store them safely for future reference.
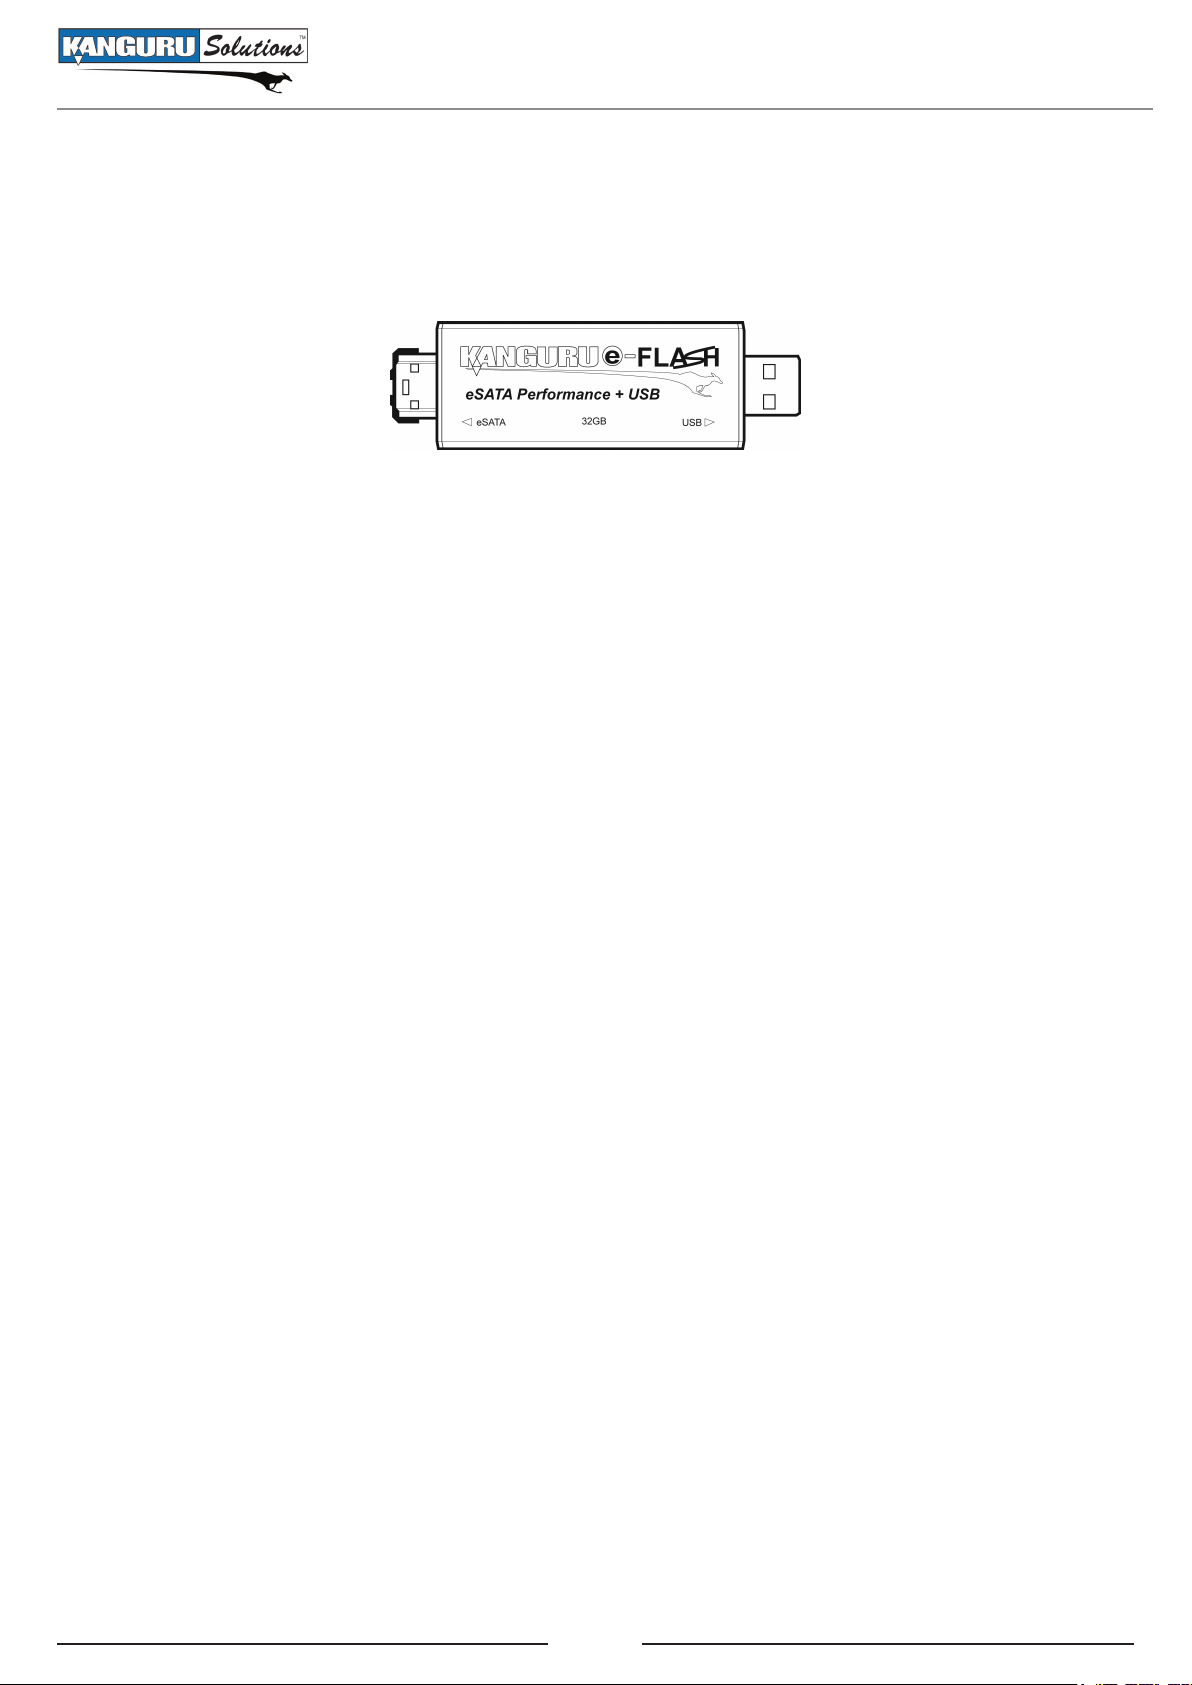
The Kanguru eFlash combines the convenience of USB connectivity with the blazing-fast speed
of eSATA connectivity into one sleek, portable device. The USB 2.0 interface allows the eFlash to
connect to most desktop computers or laptops. The high-speed eSATA 3Gb/s interface allows the
eFlash to transfers data up to six times faster than USB 2.0.
The Kanguru eFlash’s fast transfer speed, large capacity and small size makes it a great alternative to
an external Hard Drive.
The Kanguru eFlash is compatible with the following operating systems:
√ Windows 2000 SP4
√ Windows XP SP2 or SP3
√ Windows Vista
√ Windows 7
√ MAC OS 9.x or above
√ Linux Kernel 2.4 or above
Introduction
1.1 Package Contents
Please check the contents of the package you received. If any of the parts listed below are missing,
please contact Kanguru Solutions (508-376-4245) and you will be shipped replacement parts
immediately.
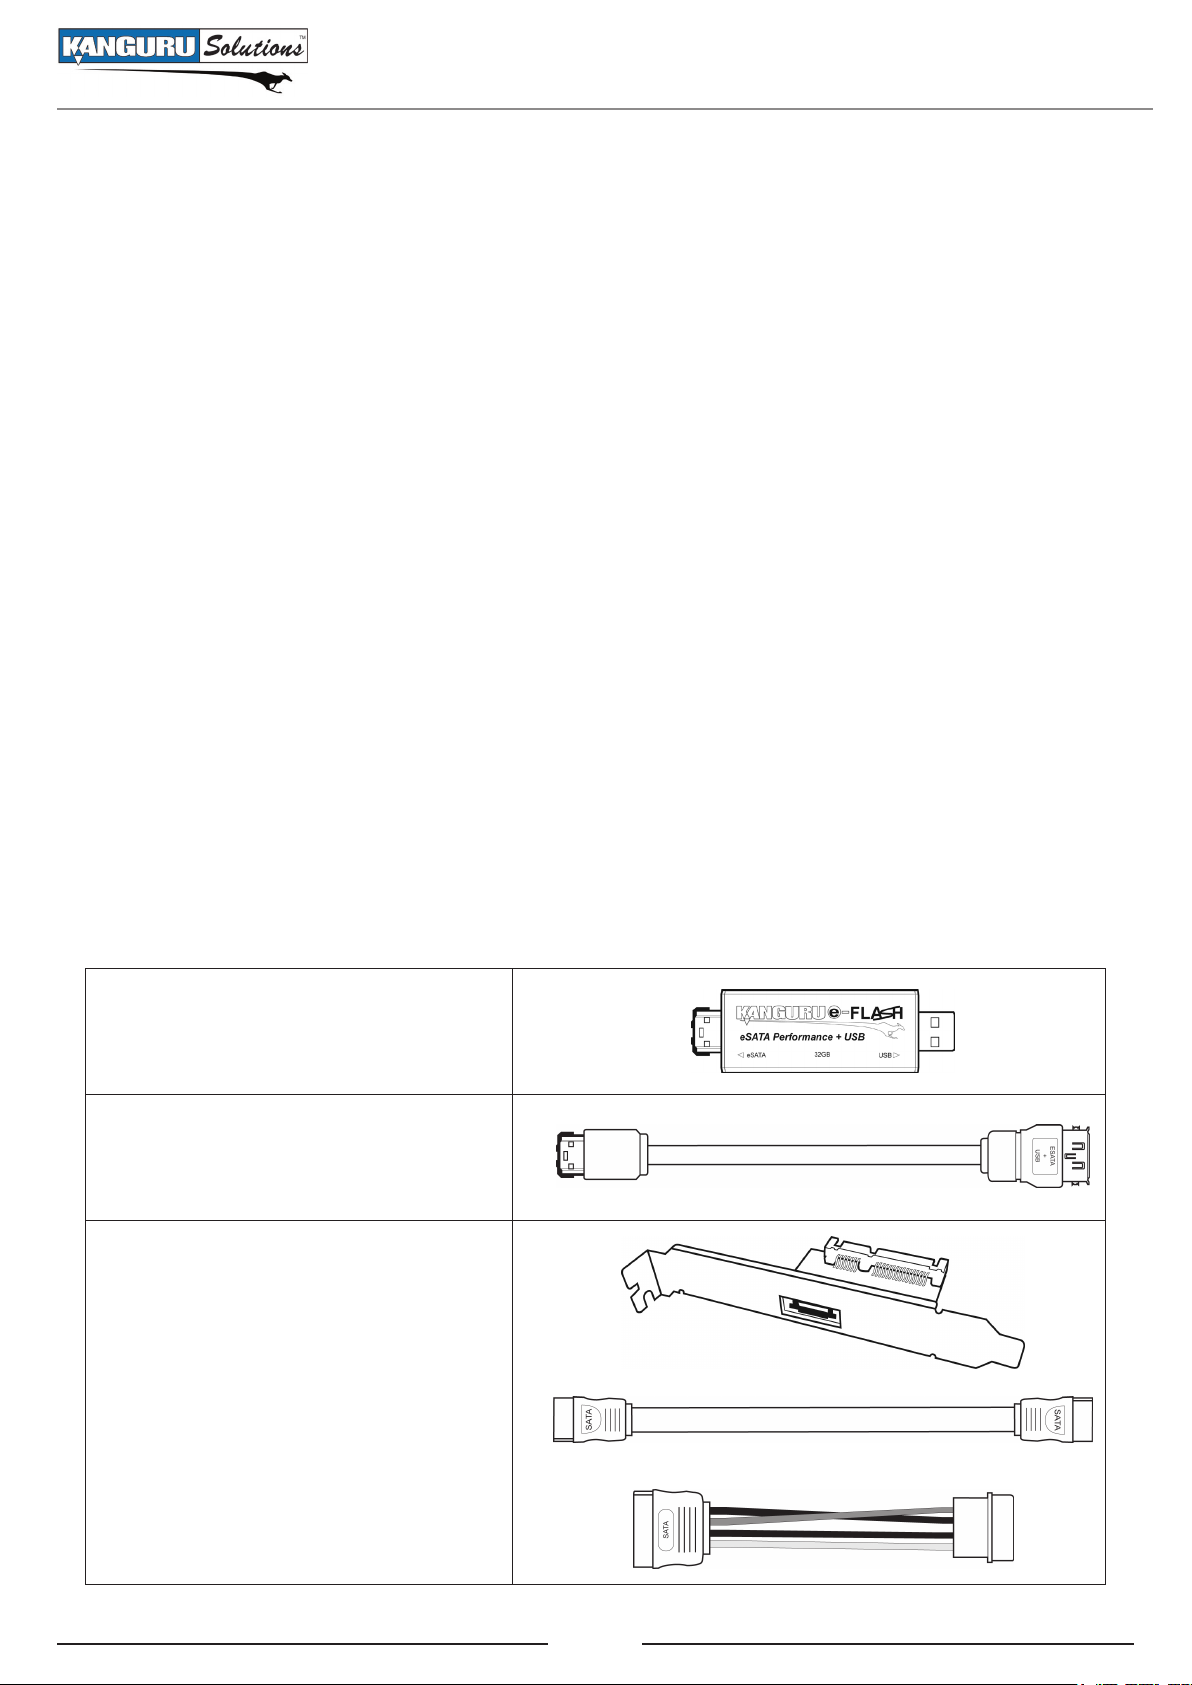
• Kanguru eFlash
• Power Over eSATA cable
• Power Over eSATA bracket
○ Includes SATA data cable
○ Includes SATA power adapter cable
4
Page 5
1.2 Specifications
Introduction
Interfaces
Housing High-strength Anodized Aluminum
Memory Solid State NAND Flash memory
Read Speed
Write Speed
Write Cycles 1,000,000
Data Retention Up to 10 years
OS Compatibility
USB 2.0
eSATA
eSATA: up to 85 MB/s
USB 2.0: up to 33 MB/s
eSATA: up to 50 MB/s
USB 2.0: up to 30 MB/s
Windows 2000 SP4
Windows XP SP2 or SP3
Windows Vista
Windows 7
MAC OS 9.x or above
Linux Kernel 2.4 or above
Weight 22g
Dimensions 89mm x 24mm x 7mm
5
Page 6
Connecting and Using Your Kanguru eFlash
2. Connecting and Using Your Kanguru eFlash
The Kanguru eFlash supports both USB and eSATA connectivity. Both connections will read and
write to the same data partition.
eSATA
USB 2.0
2.1 Connection Options
You have three options for connecting your eFlash to a computer:
1. Connect through Power Over eSATA
When connected through Power Over eSATA, the eFlash transfers data at SATA speeds without
the need for an external power source. This is the best connection option, however the majority
of computers do not have a Power Over eSATA port. The eFlash comes with a Power Over
eSATA bracket that once installed will provide your computer with a Power Over eSATA port.
For more information on connecting the eFlash through Power Over eSATA, please see section
2.1.1 Power Over eSATA, p.7.
2. Connect through eSATA + USB
Since Power Over eSATA is a new technology, many computers will not have a Power Over
eSATA port. However, many of today’s newer computers will have a standard eSATA port. The
eFlash’s unique dual-connection design allows the eFlash to be connected to standard eSATA
ports. When connected to a standard eSATA port, the eFlash must also be connected to a USB
port. The eSATA connection transfers data while the USB connection powers the device. For
more information on connecting the eFlash through eSATA + USB, please see section 2.1.2
eSATA + USB, p.12.
3. Connect through USB only
Connecting through USB allows the eFlash to operate as a normal USB Flash Drive, making
the eFlash compatible with almost any computer. When the eFlash is connected through USB
it transfers data at USB 2.0 speed, which is slower than eSATA. For more information on
connecting the eFlash through USB only, please see section 2.1.3 USB Only, p.13.
6
Page 7
Connecting and Using Your Kanguru eFlash
2.1.1 Power Over eSATA
The eFlash’s main feature is Power Over eSATA compatibility.
Unlike a standard eSATA connection which only transfers data, the Power Over eSATA connection
transfers both data and power. In order to take advantage of the eFlash’s Power Over eSATA connection,
you must have a Power Over eSATA port. The eFlash comes with a Power Over eSATA bracket that
once installed on your computer, provides you with a Power Over eSATA port.
You can connect the eFlash directly to the Power Over eSATA port or to the Power Over eSATA port
using the provided Power Over eSATA cable.
Note: Standard eSATA cables only transfer data and will not transfer power, even when connected to
a Power Over eSATA port.
2.1.1.1 Installing the Power Over eSATA bracket
The eFlash comes with a Power Over eSATA bracket that once installed on your desktop computer,
will provide a Power Over eSATA port. The bracket will occupy one PCI bay, so you will need to have
an available PCI bay in your computer in order to install the Power Over eSATA bracket.
You may want to print out these instructions for your reference during installation.
1. Make sure your computer is powered down and then unplug the computer’s power cable.
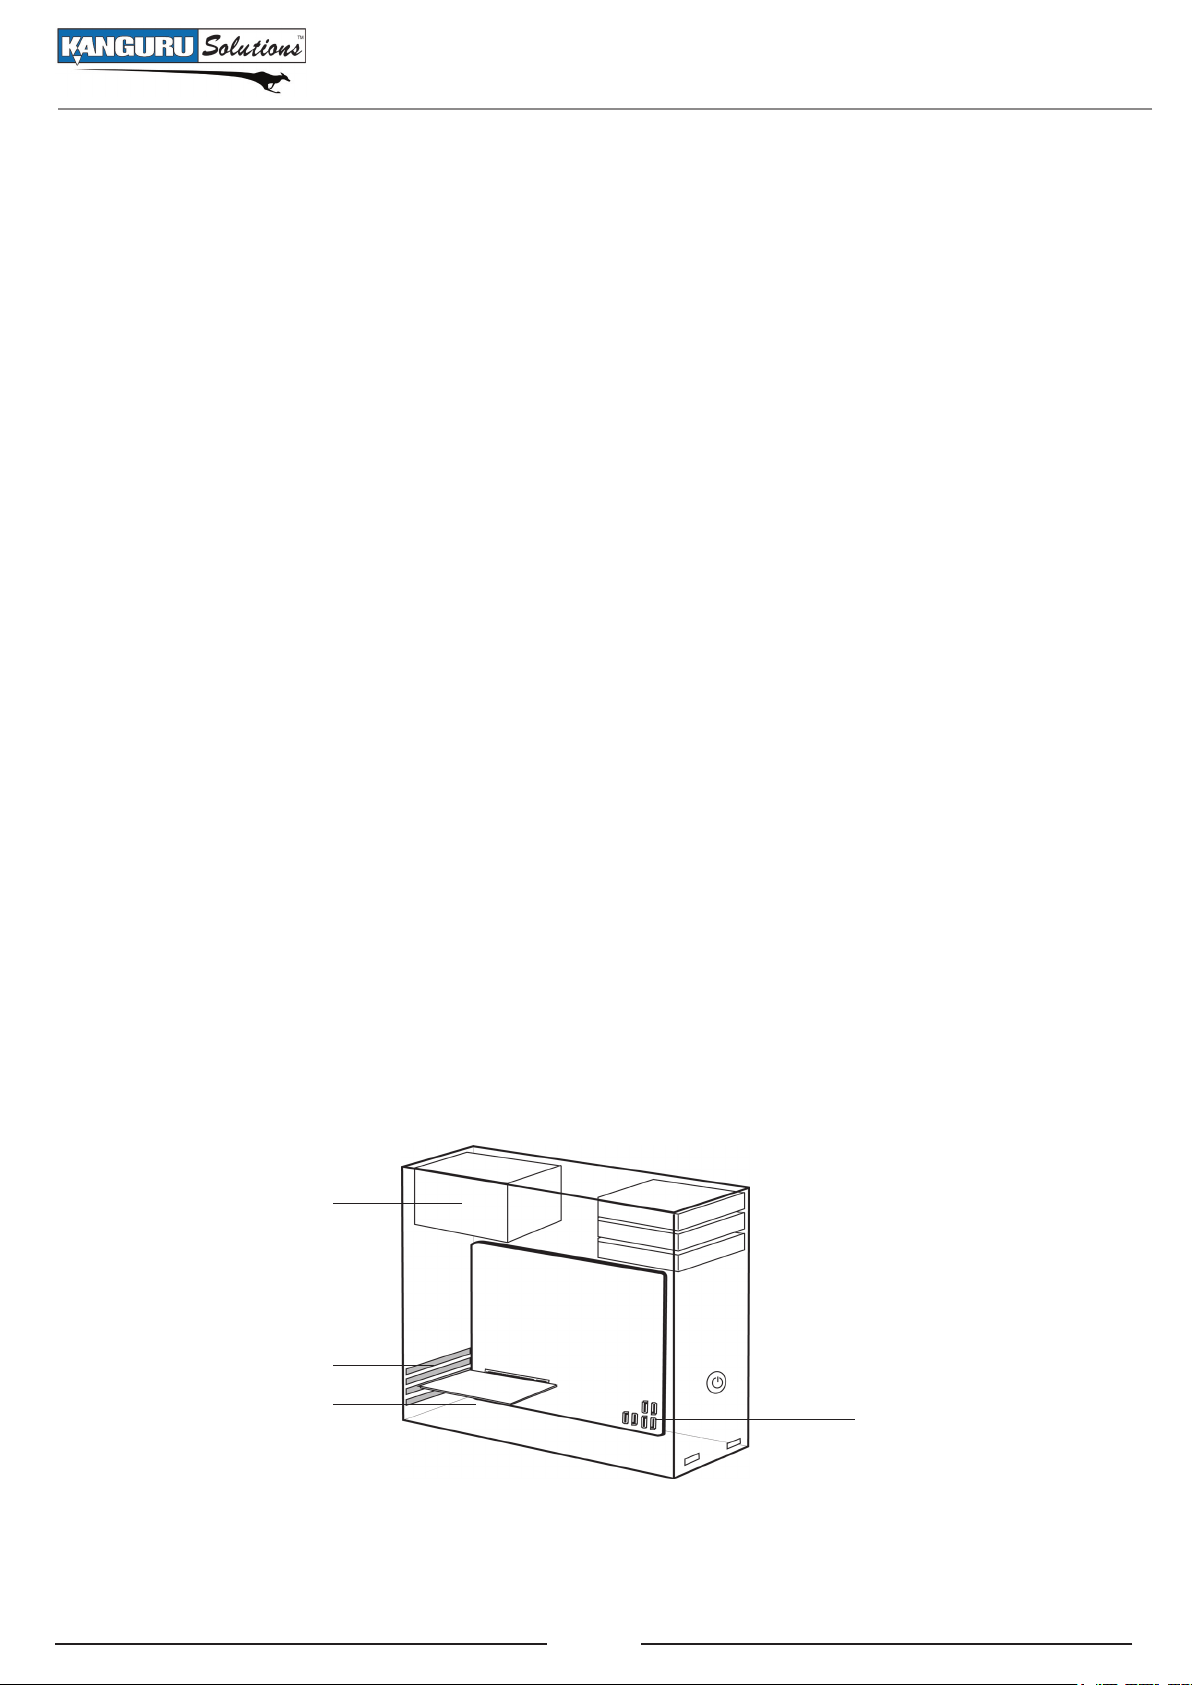
2. Open the computer’s casing, which is usually held on by screws in the back. Locate the following
components:
(A) Power Supply
(B) PCI Slot
(C) SATA Port
1) on host adapter (only necessary if your motherboard does not have SATA ports)
2) on the mother board
A
PC Internal Diagram
B
C1
Note: The layout of your computer may differ from the images presented in these instructions. They
should be used for reference only. Please refer to your computer’s instruction manual to locate the
components detailed above on your specific system.
7
C2
Page 8

Connecting and Using Your Kanguru eFlash
Caution! Do not touch any of the boards or other components inside the computer without first
grounding yourself by touching the computer’s metal frame or power supply. This discharges any
static electricity that could damage your system. To minimize the risk of static electricity damage,
refrain from handling parts of your computer not used in this installation process.
3. Locate an available SATA port on your computer motherboard. If your computer has an internal
SATA hard drive installed, you can trace the data cable from the hard drive to the SATA ports
on the mother board.
If your motherboard does not have SATA ports, you will have to purchase and install a separate
SATA host controller card in order to connect the Power Over eSATA bracket. If you purchase a
PCI or PCIe SATA host controller card, make sure that it has an internal SATA port.
4. Connect one end of the provided SATA data cable to an available SATA port, and then connect the
other end to the Power Over eSATA bracket. Both ends of the SATA data cable are identical.
Connecting to the motherboard Connecting to the SATA host controller card
8
Page 9

Connecting and Using Your Kanguru eFlash
5. Locate the power connectors coming from your computer’s power supply. If you can locate a
15-pin SATA power connector, please skip directly to step 8. If not, continue to step 6.
4-pin Molex power connector
15-pin SATA power connector
6. Locate an available four-pin Molex power connector in your computer.
7. Connect the white end of the provided SATA power adapter cable to the computer’s four-pin
Molex power connector.
8. Connect the 15-pin SATA power connector to the Power Over eSATA bracket.
9
Page 10

9. Remove one PCI SLOT cover from a PCI bay.
Connecting and Using Your Kanguru eFlash
10. Insert the Power Over eSATA bracket into the open PCI bay and fasten it in place using the
screw provided.
11. Make sure all cables are securely connected, and then replace the computer’s casing.
Your power over eSATA bracket is now ready for use.
Note: If you regularly use more than one desktop computer, you can purchase more Power Over
eSATA brackets and cables for installation on all your systems. You can also purchase a Power Over
eSATA ExpressCard, which will provide you with a Power Over eSATA port on your laptop computer.
For more information, please contact Kanguru Solutions Sales at 1-888-KANGURU.
10
Page 11

Connecting and Using Your Kanguru eFlash
2.1.1.2 Connecting your eFlash through Power Over eSATA
If your computer has a Power Over eSATA port, simply remove the cap from the eFlash’s eSATA
connection and then connect the device to the Power Over eSATA port either directly or by using the
provided Power Over eSATA cable.
Note: Some newer laptops come with an eSATA/USB combo port. If you have an eSATA/USB
combo port on your laptop, you can use it with the eFlash as a Power Over eSATA port.
Note: The provided Power Over eSATA cable was designed specifically for transferring data and
power through the Power Over eSATA connection. Standard eSATA cables will transfer data but not
power, even if connected to a Power Over eSATA port.
For information on using the eFlash as an eSATA device see section 2.2.1 eSATA, p.14.
11
Page 12

Connecting and Using Your Kanguru eFlash
2.1.2 eSATA + USB
Standard eSATA connections only transfer data and require a separate power supply.
The eFlash’s unique dual connection design allows you to use the USB connection to power the
device while it sends data through the eSATA connection. You can connect the eFlash through a
standard eSATA connection, but you must also have it connected to an available USB port to power
the device as stated above.
To connect the eFlash using the eSATA + USB method:
1. Remove the caps from both sides of the eFlash.
2. First connect the device via eSATA, either directly to an eSATA port or using an eSATA extension
cable. You can use the provided Power Over eSATA cable as an eSATA extension cable (it will
only transfer data if it is connected to a standard eSATA port).
3. After the eFlash has been connected via eSATA, connect it to a USB port. You can use a USB
extension cable (not included) to connect via USB, or if you used an eSATA extension cable you
can connect the eFlash directly to a USB port.
(USB extension cable not included)
If you followed these steps and connected the device in the proper order, the eSATA connection will
transfer data while the USB connection provides power.
Note: Please be sure that you connect the eFlash to the eSATA port first. If you connect through USB
before connecting to eSATA, the eFlash will operate as a USB device.
For more information on using the eFlash as an eSATA device see section 2.2.1 eSATA p.14.
12
Page 13

Connecting and Using Your Kanguru eFlash
2.1.3 USB Only
The Kanguru eFlash has a high speed USB2.0 connection that allows you to connect it to almost
any computer. When the eFlash is connected through a USB port it behaves like a regular USB flash
drive.
To use the eFlash as a USB flash drive:
1. Remove the cap from the eFlash’s USB connection.
2. Connect the eFlash to an available USB 2.0 port on your computer (you can plug it into a USB
1.1 port, but it will not operate at USB 2.0 speeds).
(USB extension cable not included)
3. Your computer should automatically detect the device.
For information on using your eFlash as a USB device see section 2.2.2 USB p.18.
13
Page 14

Connecting and Using Your Kanguru eFlash
2.2 Using Your eFlash
There are 2 ways to use your eFlash depending on the way it is connected. If you are connecting the
eFlash through Power over eSATA or eSATA + USB, the eFlash will operate as an eSATA device. If
you are connecting the eFlash through USB only, the eFlash will operate as a USB device.
2.2.1 Using the eFlash as an eSATA device
When you connect the eFlash through Power Over eSATA or eSATA + USB, the eFlash will appear
in the Hard Disk Drives section under My Computer if you are using Windows or as a drive icon on
your desktop if you are using Mac OS.
Your system may not automatically recognize that the device has been connected. Although SATA
was designed to be hot-swappable, not all systems support this feature. For more information, please
refer to Appendix A: eSATA Hot Swap, p.21.
If you do not see the device right away:
1. Right click on the My Computer icon on your desktop and then select Manage from the popup
menu. The Computer Management window appears.
2. Under System Tools in the left window, select Device Manager.
3. In the right window, right click on Disk drives.
4. Select Scan for hardware changes.
You should now be able to see your device in My Computer. If you still are not seeing the device,
please see section 4. Troubleshooting, p.19 for possible solutions.
Note: The eFlash comes preloaded with a third party application, HotSwap!. HotSwap! allows you
to easily add and remove eSATA devices with a few clicks of your mouse. We recommend using the
preinstalled HotSwap! application to scan for hardware changes. If you are using HotSwap! you can
right click on the HotSwap! icon in the taskbar and then select Scan for hardware changes from the
popup menu. For more information on using HotSwap!, see section 2.2.1.1 Using HotSwap!, p.16.
14
Page 15

Connecting and Using Your Kanguru eFlash
Removing the eSATA device
Windows Users
Before attempting to remove the eFlash, make sure that no data is being transferred to or from the
device. The easiest way to determine that no data is being transferred to or from the device is to check
that the blue LED indicator near the eFlash’s eSATA connection is not blinking. Be sure to follow safe
removal procedures to avoid loss of data.
To remove the eFlash:
1. Right click on the My Computer icon on your desktop and then select Manage from the popup
menu. The Computer Management window appears.
2. Under System Tools in the left window, select Device Manager.
3. In the right window, select Disk drives to view all connected disk drives.
4. Right click on the eFlash and then click on Uninstall from the popup menu to remove the
device.
If you are using HotSwap! you can click on the HotSwap! icon and then select Safely hotswap
Kanguru eFlash SCSI Device from the popup menu. For more information on using HotSwap!, see
section 2.2.1.1 Using HotSwap!, p.16.
If you receive an error message stating that the device cannot be removed yet, make sure that any
programs that may still be accessing the device are closed and then try to remove it again.
Once the device has been successfully removed, you can safely disconnect the eFlash.
Mac Users
To safely remove the device, drag the eFlash drive icon on the desktop into the trash can.
Once the device has been successfully removed, you can safely disconnect the eFlash.
15
Page 16

Connecting and Using Your Kanguru eFlash
2.2.1.1 Using HotSwap!
The eFlash comes preloaded with a third party application HotSwap!. HotSwap! allows you to easily
add and remove eSATA devices with a few clicks of your mouse. HotSwap! is extremely useful when
using eSATA devices like the eFlash. We recommend that you install HotSwap! on any computer that
you will be using with the eFlash. HotSwap! is only compatible with Windows XP / 2003 / Vista /
7. A Windows 2000 compatible version of HotSwap! is available for download from the HotSwap!
website.
Note: HotSwap! is a 3rd party application and is NOT supported by Kanguru Solutions. You are
not required to use HotSwap!, but we do feel that you will find it very convenient when connecting
or disconnecting eSATA devices. For more information regarding HotSwap! or to find HotSwap!
support, please visit their website: http://mysite.verizon.net/kaakoon/hotswap/index_enu.htm
To install HotSwap!:
1. Connect the eFlash.
2. Open the eFlash device and then open the HotSwap! folder.
3. Copy the HotSwap!.exe application onto your desktop.
4. Double click on the HotSwap!.exe file to run HotSwap!.
You will see the HotSwap! icon appear in the taskbar. The icon will look similar to the Safely
Remove Hardware icon, except that the icon’s arrow is red instead of green.
Note: This will install and autostart HotSwap!. To uninstall or to turn off autostart, right click on the
HotSwap! icon in the taskbar. A pop up menu will appear. Click on Autostart to turn Autostart On/
Off. Click on Uninstall to uninstall HotSwap!.
→
→
16
Page 17

Connecting and Using Your Kanguru eFlash
Connecting the eFlash using HotSwap!
To connect the eFlash using HotSwap!:
1. Connect the drive via eSATA as described in sections 2.1.1 Power Over eSATA, p.6 & 2.1.2
eSATA p.14.
2. Right click on the HotSwap! icon in the taskbar.
3. Select Scan for hardware changes.
This performs the same action as going into the Device Manager and running a Scan for hardware
changes action. You should now be able to see your device in My Computer.
Disconnecting the eFlash using HotSwap!
To disconnect the eFlash using HotSwap!:
1. Make sure that no data is being transferred to or from the device. The easiest way to determine
that no data is being transferred to or from the device is to check that the blue LED indicator near
the eFlash’s eSATA connection is not blinking.
2. Left click on the HotSwap! icon in the taskbar. A popup menu appears, listing any connected
eSATA devices.
3. Select eFlash from the popup menu. You will receive a message notifying you that it is safe to
hot swap the hardware.
You can configure the way HotSwap! functions by right clicking on the taskbar icon. We recommend
that you leave these configurations in the default settings or that you read the HotSwap! documentation
at the link below before doing so. For more information regarding HotSwap! or to find HotSwap!
support, please visit their website: http://mysite.verizon.net/kaakoon/hotswap/index_enu.htm
Note: HotSwap! is a free application. If you enjoy HotSwap!, you can make a donation at their
website through PayPal.
17
Page 18

Connecting and Using Your Kanguru eFlash
2.2.2 Using the eFlash as a USB device
Windows Users
The eFlash will appear in the Hard Disk Drives section under My Computer.
Mac Users
The eFlash will appear on your desktop as a drive icon.
You can now access the eFlash as you would a standard USB device.
Removing the eFlash
Before attempting to remove the eFlash, make sure that no data is being transferred to or from the
device. The easiest way to determine that no data is being transferred to or from the device is to check
that the red LED indicator near the eFlash’s USB connection is not blinking. Be sure to follow safe
removal procedures. Failure to do so may result in data corruption.
Windows Users
1. Left click on the Safely Remove Hardware icon
2. Select the eFlash from the popup menu.
3. A message will appear informing you that it is safe to remove the device.
If you receive a message that the device cannot be removed, close any programs that may be accessing
the device and then try to safely remove it again.
Mac Users
To safely remove the device, drag the eFlash drive icon on the desktop into the trash can.
in the taskbar.
3. Maintenance and Care
• This is an electronic device. It requires careful handling and use.
• Keep the device free from dust and contaminants by always replacing the safety caps when the
device is not in use.
• Keep liquid and moisture away from the drive.
• Clean the exterior of the device by wiping with a soft, dry cloth. Do not use any harsh or abrasive
cleaning agents as it could damage the surface of the device.
• Do not attempt to open or repair the device yourself. There are no serviceable parts inside.
Opening the device or attempting unauthorized repairs will void your warranty. If you need to
have the device serviced, contact Kanguru Solutions Tech Support at 508-376-4245.
18
Page 19

4. Troubleshooting
Q: Can I use this device with Windows 95 / 98 / NT / ME?
A: No, these versions of Windows do not provide adequate support for eSATA. Please upgrade
your version of Windows.
Q: Can I use both the USB and eSATA connections at the same time to transfer data?
A: No, you cannot use both connections to transfer data simultaneously. Your device will
automatically transfer data through whichever side was connected first.
Q: The device cannot be detected or is disabled (has a yellow exclamation point next to the device
name in the Device Manager).
A: Make sure that you are logged in as the Administrator or a user with Administrator privileges
when you are installing new hardware. If the device is appearing in the Device Manager with
a yellow exclamation mark next to it, right click on the device and then select uninstall. Then
right click on the Disk Drives and then select Scan for hardware changes.
Maintenance and Care | Troubleshooting
Q: The device cannot be detected even after I have scanned for hardware changes under the Device
Manager.
A: Your computer does not support hot swap. You will have to restart your computer with the
eFlash connected during boot up.
Q: I’m receiving the following warning when trying to safely unmount the device, “The device
cannot be stopped because a program is still accessing it”.
A: The device is still in use. Close all folders, files and programs that may be accessing the device
and then try again.
Q: I’m receiving the following warning when trying to safely unmount the device, “The device
cannot be uninstalled right now because the device requested a system restart”.
A: Even if no programs are accessing the drive, if something is referencing the memory on the drive
Windows fails to remove the drive and requests a system restart. Unfortunately, it is almost
impossible to prevent this situation before actually attempting to remove the drive. Please try
again later or restart Windows.
Q: How can the eFlash perform faster through eSATA than through USB2.0? Doesn’t the flash
memory limit the data rate?
A: Earlier generation NAND Flash memory and USB controllers did in fact throttle the transfer
speed of data over USB2.0. Modern NAND Flash and USB Controllers though have overcome
these limitations. Although there are many factors that contribute to the measured speed of
USB2.0 on a PC, the practical limit is typically ~35MB/s for bulk data transfer. This means that
by using the eSATA interface, the eFlash is able to overcome this transfer limit for enhanced
speed.
Q: Why can’t I copy some of my files to the eFlash?
A: There may be a single file size limit if your eFlash was formatted with a FAT32 file system.
FAT32 has a limit of 4GB per file. We recommend formatting the eFlash in NTFS if you will
be copying files of 4GB or bigger. Please note that formatting the drive will cause all the data
stored on the eFlash to be permanently erased. Also note that the NTFS file structure is not
compatible with all operating systems.
19
Page 20

Warranty | Tech Support
5. Warranty
This product carries a 3-year limited* warranty from the date of purchase. Kanguru Solutions is not
responsible for any damages incurred in the shipping process. Any claims for loss or damage must
be made to the carrier directly. Claims for shipping errors should be reported to Kanguru Solutions
within three (3) working days or receipt of merchandise.
*90-day warranty on labor.
6. Tech Support
If you experience any problems installing your Kanguru product or have any technical questions
regarding any of our products, please call our tech support department. Our tech support is free and
available Monday thru Friday, 9am to 5pm EST.
Call 1-508-376-4245
Or visit our website at www.Kanguru.com
20
Page 21

APPENDIX A: eSATA Hot Swap
Hot Swapping allows you to add and remove hardware to your computer while the computer is
powered on and running. The eFlash is designed to be eSATA hot swap compatible, but not all
computers support hot swap.
There are three components that factor in to whether a device can be hot swapped:
1. The device - The device in this case is the Kanguru eFlash. The Kanguru eFlash was designed
to support hot swapping.
2. The SATA controller - The SATA controller is either integrated into your computer’s motherboard
or an add on SATA controller card, depending on where the eSATA port is connected to. If the
eSATA port is connected to the motherboard then the motherboard’s south bridge must support
hot swap. If the eSATA port is connected to a host controller (i.e. PCI SATA host controller) then
the host controller’s chip needs to support hot swap.
3. The driver - The driver is the software that controls how your hardware operates. If the eSATA
port is connected to the motherboard, then your computer will most likely be using the native
Windows driver. SATA controller cards come with their own driver software typically.
Depending on these three components, your eFlash will behave in one of 3 ways when attached via
eSATA:
• It will automatically appear under My Computer when you plug it in. In order to have the eFlash
appear automatically, your controller must support hot swap and the driver must allow you to
hot swap on the fly. Whether you remove the device using the Safely Remove Hardware tool or
through the Device Manager depends on your setup.
• It will not appear when you plug it in until you run the “Scan for new hardware changes”
from the Device Manager or HotSwap! application. If your controller supports hot swapping,
but the driver does not allow you to hot swap on the fly, you will have to run the Scan for
hardware changes from the Device Manager before your computer can recognize that the eFlash
is connected. You will have to uninstall the device from the Device Manager in order to safely
unmount it.
• It will have to be connected while your system boots up. If your controller does not support hot
swap you will need to have the eFlash connected while the computer while the system boots up
in order for it to be seen. This is referred to as cold swapping. You can remove the device once
the computer has been shut down or you can uninstall it from the Device Manager.
For more information on what type of hot swap support your computer has, please refer to your
computer’s instruction manual.
21
Page 22

Kanguru Solutions
1360 Main Street
Millis, MA 02054
www.kanguru.com
10.19.10 V1.2© 2010 Kanguru Solutions
Legal terms and conditions available at www.kanguru.com. Please review and agree before use. Thank you.
 Loading...