

Page 1
Kanguru DVD Autoloader 200
USER’S MANUAL
FCC COMPLIANCE STATEMENTS
This equipment has been tested and found to comply with the limits for a Class B digital device, pursuant to Part 15 of the
FCC Rules. These limits are designed to provide reasonable protection against harmful interference in a residential installation.
This equipment generates, uses and can radiate radio frequency energy and, if not installed and used in accordance with the
instructions, there is no guarantee that interference will not occur in a particular installation. If this equipment does cause
harmful interference to equipment off and on, the user is encouraged to try to correct the interference by one or more of the
following measures:
Reorient or relocate the receiving antenna.
Increase the Distance between the equipment and receiver.
Connect the equipment into an outlet on a circuit different from that to which the receiver is connected.
Consult the dealer or an experienced radio/TV technician for help.
Page 2

Please complete and return the included registration form within the first 30 days
of purchase to validate your warranty.
Please be aware of the following points before using the Kanguru DVD-Duplicator
Copyright© 2005, Kanguru Solutions. All rights reserved.
®
DOS
, Windows 95
®
XP
are registered trademarks of Microsoft Inc. Apple® and Macintosh® are registered trademarks
of Apple Computer Inc. IBM and OS/2 are registered trademarks of the International Business
Machines Corporation. All other brand or product names are trademarks of their respective
companies or organizations.
Kanguru Solutions will not be held responsible for any illegal use of this product nor any losses
incurred while using this product. The user himself is responsible for the copyright laws, and is
fully responsible for any illegal actions taken.
CUSTOMER SERVICE
To obtain service or technical support for your system, please contact Kanguru Solutions
Technical Support Department at 508-376-4245, or visit www.Kanguru.com for web support.
®,
Windows 98®, Windows NT
®,
Windows 2000
®,
Windows ME®, and Windows
LIMITED WARRANTY
Kanguru Solutions guarantees that every Kanguru DVD-Duplicator will be free from defects in
workmanship and materials for 1 year from the date of purchase. Labor is covered for 90 days
from the purchase date. This warranty does not apply if, in the judgment of Kanguru Solutions,
the product fails due to damage from handling, accident, abuse, misuse, or if it has been used in
a manner not conforming to the product’s instructions, has been modified in anyway, or the
warranty labels have been removed. If the product proves defective during this warranty period,
call Kanguru Solutions Technical Support in order to obtain a RMA required for service. Please
refer to the RMA Procedure section of this manual if your duplicator needs servicing. When
returning a product, mark the RMA number clearly on the outside of the package, and include a
copy of your original proof of purchase.
In no event shall Kanguru Solutions’ liability exceed the price paid for the product from direct,
indirect, special, incidental, or consequential software, or its documentation. Kanguru Solutions
offers no refunds for its products. Kanguru Solutions makes no warranty or representation,
expressed, implied, or statutory, with respect to its products or the contents or use of this
documentation and all accompanying software, and specifically disclaims its quality, performance,
merchantability, or fitness for any particular purpose. Kanguru Solutions reserves the right to
revise or update its products, software, or documentation without obligation to notify any
individual or entity.
Kanguru Solutions
1360 Main St., Millis, MA 02054
508.376.4245 • Fax 508.376.4462
www.kanguru.com
Page 3

Introduction
Thank you for purchasing the Kanguru DVD-Duplicator from Kanguru Solutions. We are proud of
the quality and reliability of our DVD-Duplication products and hope that this product meets or
exceeds your expectations. Your Kanguru DVD-Duplicator is designed for ease of use! It is ready
to begin burning DVDs and CDs straight out of the box! Simply plug it in and follow these
instructions and you will be duplicating DVDs within a matter of minutes. Enjoy!
Note1: The Kanguru DVD Duplicator CANNOT duplicate commercial DVD movies using
encryption methods, such as CSS. DVDs that have been decrypted can be duplicated.
Package Contents
• 1 – Kanguru DVD Autoloader 200.
• 1 – AC power supply.
• This manual w/ user registration
Please keep the original packaging. All Duplicators being serviced must be packed in the
ORIGINAL PACKAGING.
If any of the above items are missing, please call Kanguru Solutions’ Tech Support department
at: (508) 376-4245 and replacement parts will be shipped to you ASAP.
Compatible Media
The DVD-R/RW drives read and write several CD and DVD Recordable formats including CD-R,
CD-RW, DVD-RW, and DVD-R which offers up to 4.7GB of storage capacity on a single sided
DVD disc. The drives write to DVD-R/RW and DVD+/R/RW GENERAL PURPOSE media. It will
not write to DVD-R Authoring media.
Kanguru Solutions recommends the following brands of DVD media:
• DVD+R Verbatim/Mitsubishi Chemical, Taiyo Yuden, Ricoh
• DVD+RW Verbatim/Mitsubishi Chemical, Ricoh
• DVD-R Verbatim/Mitsubishi Chemical, Taiyo Yuden, Maxell, TDK
• DVD-RW Verbatim/Mitsubishi Chemical, TDK
• CD-R (74 min or 80 min) 40X Verbatim/Mitsubishi Chemical, Taiyo Yuden, Maxell
• CD-R 4-32X Verbatim/Mitsubishi Chemical, Taiyo Yuden, Mitsui Chemicals, Ricoh,
Maxell
• CD-RW (74 min) 24X Verbatim/Mitsubishi Chemical
• CD-RW 4X-10X Verbatim/Mitsubishi Chemical, Ricoh
Kanguru Solutions also carries a house brand of DVD media that is supported by these
duplicators. Visit www.kanguru.com
for additional info on this media.
Page 4

Features
• 200 piece media hopper Can hold as many as 200 DVDs for mass production
• Standalone unit No computer knowledge required for DVD duplication.
• 8X DVD+/-RW Duplicate 18 DVDs per hour
• 48X CD-RW Duplicate 45 CDs per hour
• One touch recording Simple, fast, and easy to use.
• Automatic detection No need to specify the DVD format to be copied.
Just insert the master DVD and press the button.
• 80GB Internal hard drive. Store up to 16 full size DVDs on the internal HDD.
• 8MB Buffer Enhances burning stability.
• Auto detect Automatically adjusts to the max burn speeds of the
media.
Specifications
Simultaneous Duplication Duplicate 3 DVDs at the same time; 200 discs total capacity.
Write Speeds 8X DVD+/-R; 4X DVD+/-RW; 48X CD-R
Media Types DVD+/-R, DVD+/-RW, CD-R/RW
Operation Mode Copy, Copy and Compare, Compare, Verify, Load, Test, Erase
Support Formats CD-DA (Red Book), Compressed Audio/Video (CD-ROM/XA), CD-
ROM mode 1&2 (Yellow Book), Video CD, Mixed mode CD,
Enhanced CD, CD Plus, CD Extra, CD-I (Green Book), Photo CD
Single/Multisession, ISO 9660 Level 3, ISO 9660 Extension, HF,
HFS, HFS+, Games CD, Joliet
Power 300W with fan
Input Power Source Universal 115-230V AC, 50-60Hz
Certification CE/FCC
Weight 48lbs
Dimension (in) 20” x 16.5” x 14”
Page 5

Getting Started
Front View:
Top View:
Page 6
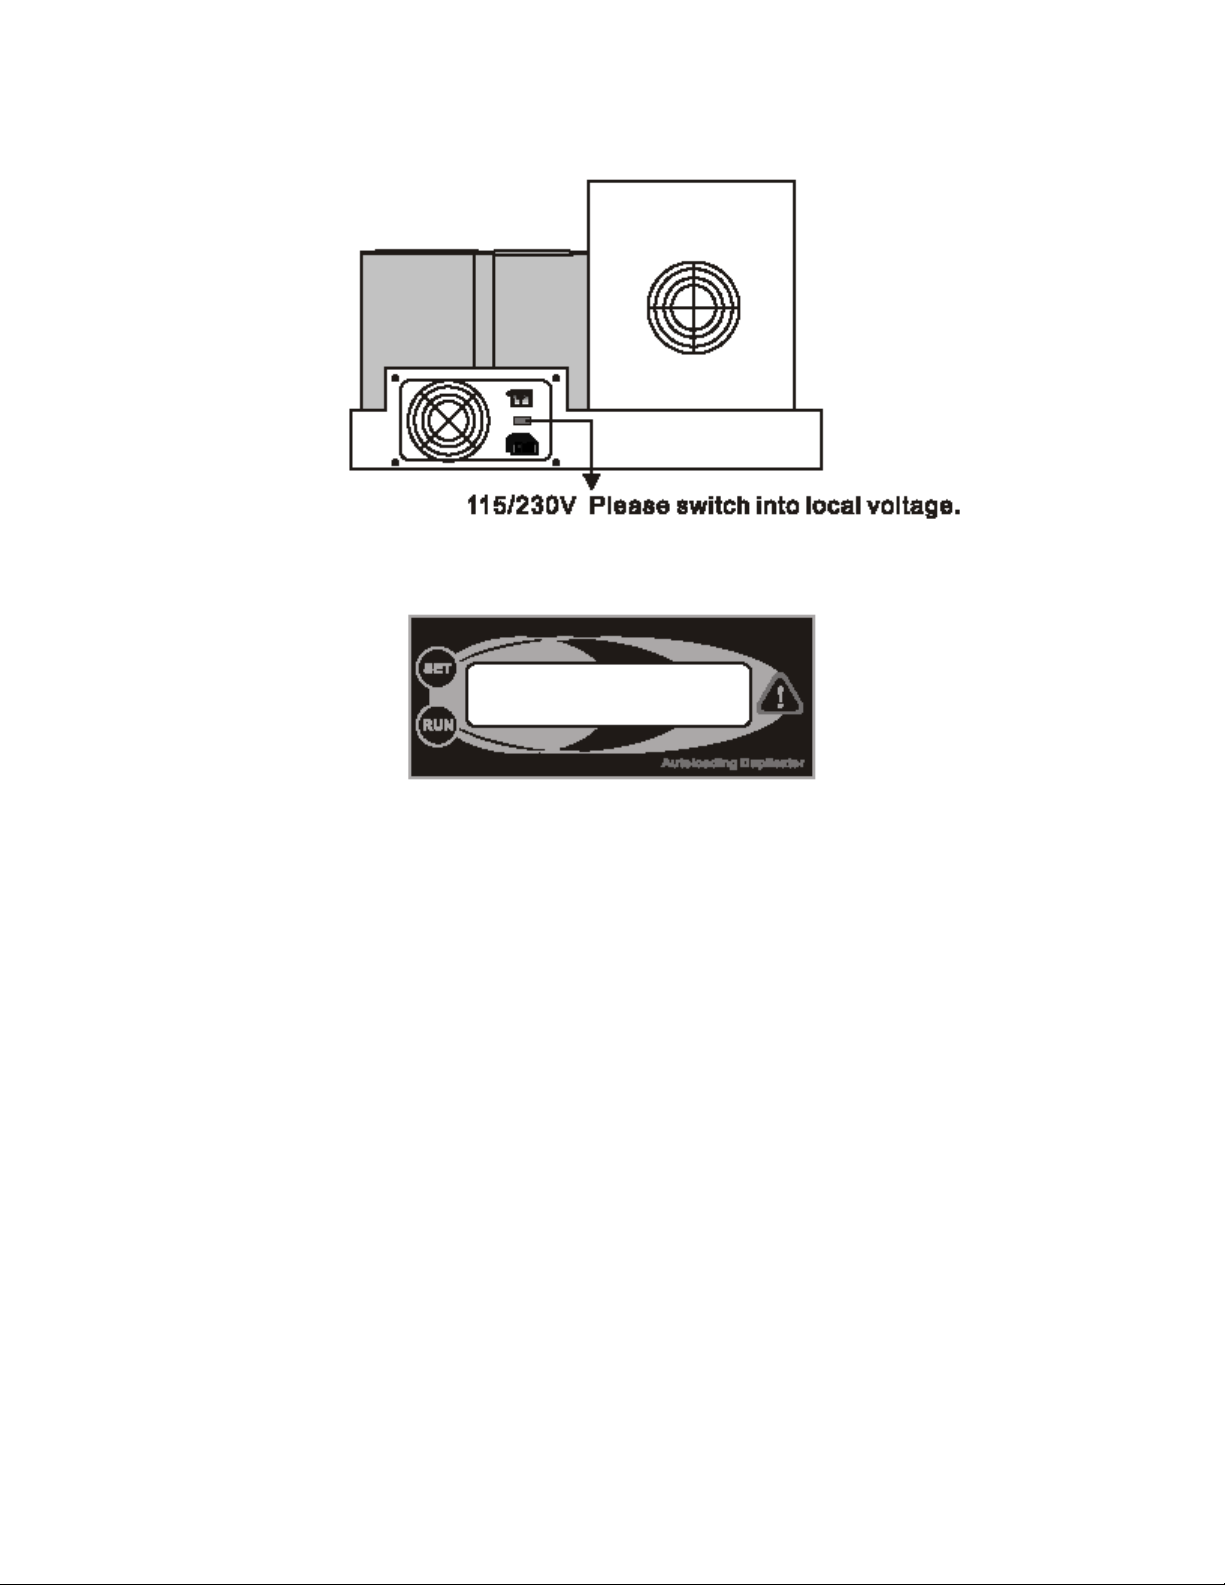
Rear View:
Control Panel:
Overview:
When you turn on your KanguruDVD-Autoloader 200, it will go through an initialization process to
setup the robotic arm, detect the DVD/RW drives, and read the internal hard drive. The detection
process will be displayed on the LCD screen.
After successful start-up, you will enter Operation Mode. In Operation Mode, you can use the
SET button to switch between modes, or you can press down the SET button continuously for 3
seconds to enter Setup Mode. Pressing the RUN button will perform a specified operation. When
you are ready to return from Setup Mode to Operation Mode, press the SET button continuously
for 3 seconds to return back to Operation Mode.
There are two buttons on the KanguruDVD-Duplicator console, the SET and RUN button. The
SET button is normally used when you need to switch between different modes and functions;
where the RUN button is used to change, select, or start a specific task. For further information,
please see Individual Settings.
Page 7
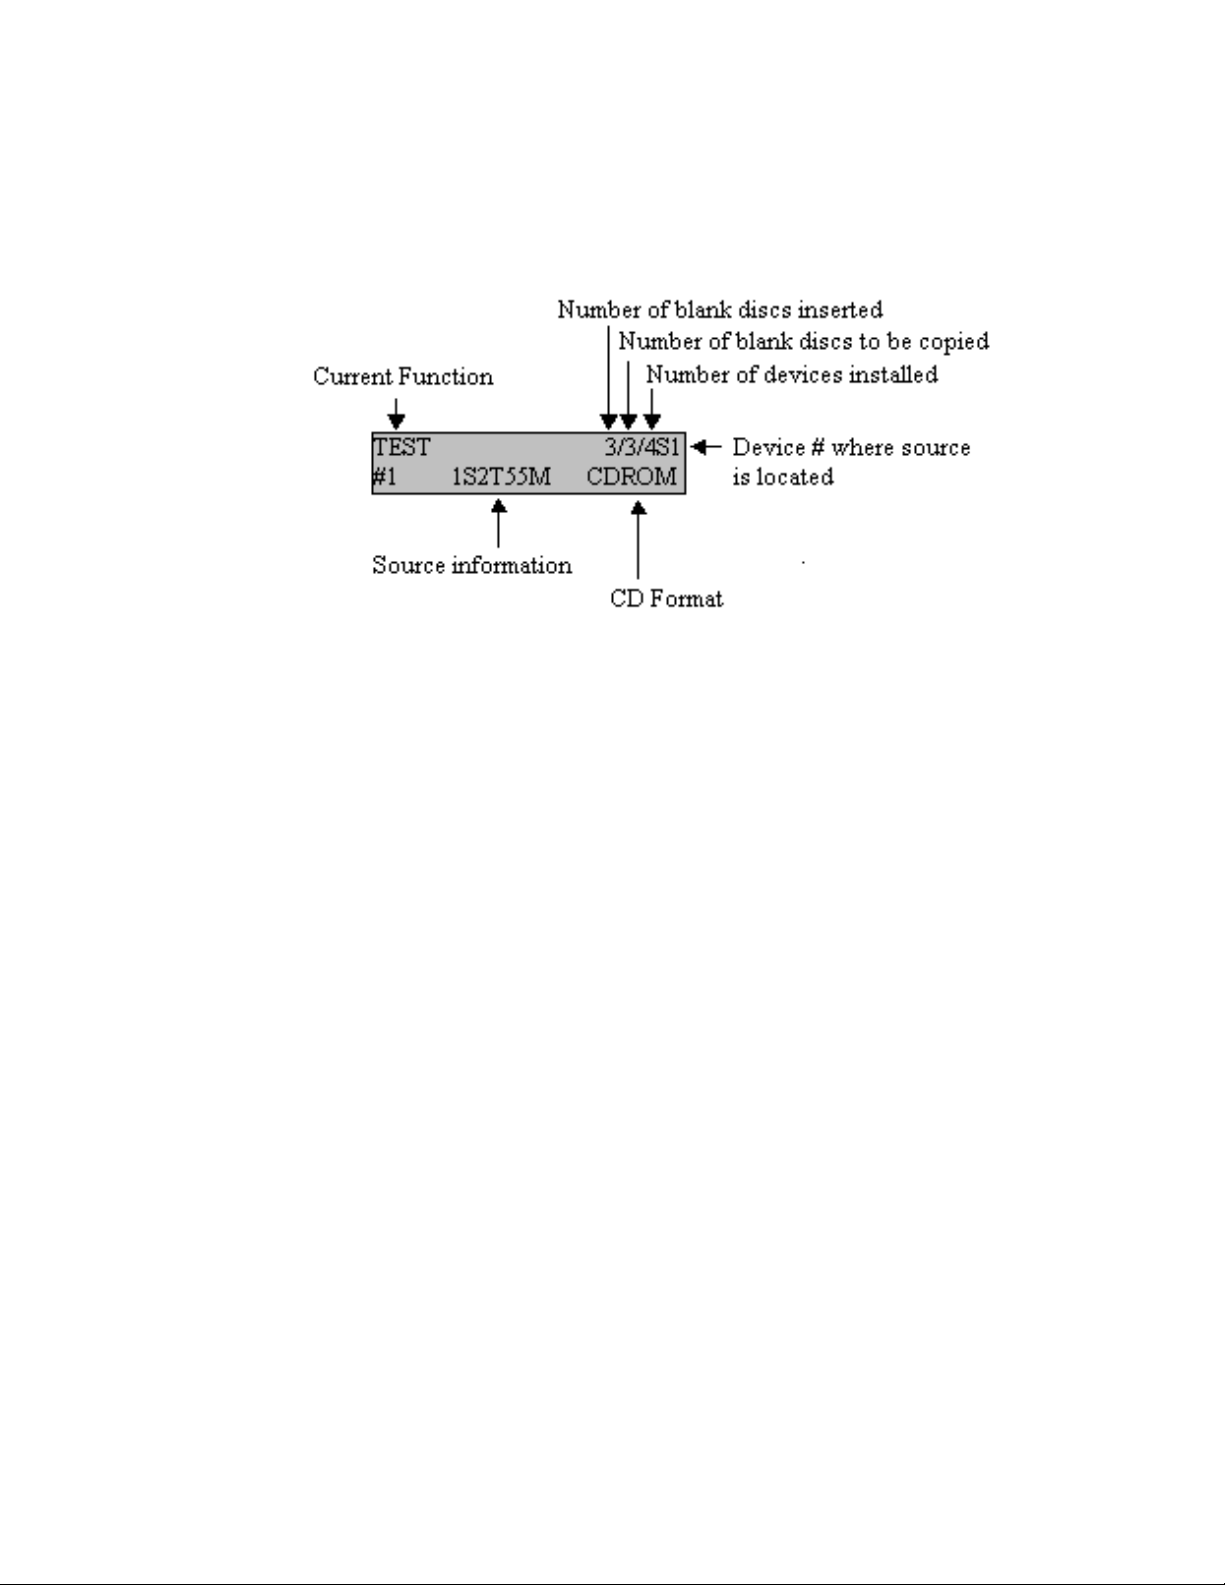
Understanding the LCD Display Panel:
NOTE: The LCD displays menu options, operating instructions, and also information on what the
duplicator is doing. Use it to walk you through simple DVD duplicating.
You can select the following modes by pushing the SET button on the controller. Then push the
RUN button to perform that function.
Loading the Source DVD or CD
The Kanguru DVD Autoloader 200 uses an internal 80GB hard drive to store images of your
source or master discs. When the duplication process begins the system will read from the data
from this hard drive and burn it onto the target discs. To get your source material onto the
internal hard drive it must be loaded from one of the DVD/RW drives. To do so, simply insert your
master disc into any of the 3 drives and go to the LOAD function. Press the RUN button and the
data will be loaded onto the hard drive. This will be discussed in greater detail later on in this
manual in the Internal Hard Drive Management section.
Loading blank DVDs or CDs
There are three Disc Tubs included with your Autoloader 200 (see the Top View diagram above).
Each can hold up to 100 discs for duplication. By default the Autoloader will begin picking blank
discs from Disc Tub #2. If there aren’t any discs in Disc Tub #2, the Autoloader will move to pick
from Disc Tub #1. Never load blank discs in Disc Tub#3, as that is only used as a finished tub. If
you plan to run a full 200 disc duplication then load 100 discs into Tub #2 and 100 disc into Tub
#1.
Page 8

Operation Instructions
Please Note: Your Kanguru DVD Autoloader 200 has been pre-configured to work right out of
the box. However, you may have to adjust the robotic arm if you are finding that it will not properly
load/unload your discs. If you find that you robotic arm needs to be adjusted please refer to the
Adjusting the Robotic Arm section of this manual. If you need to STOP the robotic arm at any
time, press the Emergency Stop button! Refer to the Adjusting the Robotic Arm section to
reset the arm.
Turn on the Kanguru DVD Autoloader
1. Make sure the voltage switch on the rear of the unit is on the correct voltage setting.
2. Connect the power cables and hit the power switch on the back of the unit.
3. The system will run through a quick initialization process, detecting all of the components.
Load your Blank DVDs or CDs
1. Begin loading your blank discs into Disc Tub #2. If you are copying more than 100 discs,
loading the remaining blank discs into Disc Tub #2. Never place blank discs into Disc Tub
#3 as that is only used to unload copied discs.
2. If you only plan to copy a certain number of discs, then only put that number of discs in
Disc Bin #2 as the duplicator will continue to copy the discs until there are no blank discs
left in Bin #2 or #1.
Load your Master DVD or CD
1. Press the SET button until you reach the LOAD function.
2. Insert the DVD or CD that you wish to duplicate into any of the 3 DVD/RW drives. The
LCD should display information about this disc on the bottom line. For example, the LCD
screen pictured below informs us that we are using the LOAD function. That there is 1
disc present in one of the 3 drives and the source disc is being read from the #6 drive.
The #6 drive contains a music CD with 70 minutes of audio over 18 tracks.
3. Press the RUN button to begin loading the data onto the internal hard drive. The LCD will
display the progress as pictured below.
Page 9

4. Once the Autoloader 200 has finished reading the source disc it will eject the disc and the
LCD will instruct you to press any key (Set or Run) to exit.
5. Press the set button until you return to the COPY function and the LCD will show that you
have loaded a source disc onto the hard drive.
Begin the Duplication Process
If you have loaded your blank discs and source data as instructed above you are now ready to
being duplicating your DVDs or CDs.
1. Make sure you are on the COPY function and press the RUN button to begin.
2. The robotic will rotate to Disc Tub #2 and lower down to pick a blank disc load it into the
first DVD/RW drive. This process will continue until all 3 DVD/RW drives are loaded or
the blank discs are gone.
3. Once the DVD/RW drives are loaded the duplication process will automatically begin.
You should see the following screen:
4. The Autoloader will finish the duplication end the robotic arm will pick the disc from tray 1
and drop it in Disc Din #3.
5. The robotic arm will then pick a new blank disc from Disc Bin #2 to load into the first
drive. Then it will pick the finished disc from tray 2, drop it in Disc Bin #3, and pick a new
blank disc from Disc Bin #2. The same process will be repeated for the 3
6. This process will continue until there are no blank discs left in either Disc Bin #2 or Disc
Bin #1. Once there are no blank discs left the LCD will display the following:
rd
tray.
7. Press any key (SET or RUN) to return to the main menu.
Please note: The instructions above are only intended to provide a basic setup instructions for
duplicating your CDs or DVDs. Please refer to the additional sections in this manual for a more in
depth explanation of each function.
Page 10

Important Notes
1. If you ever need to stop the robotic arm for any reason, press the Emergency Stop
button and the arm will shut down. Refer to the Adjusting the Robotic Arm section to reset
the arm.
2. Never load blank discs into Disc Bin #3, as that is only used as an output bin.
3. Only load the number of blank discs that you wish to duplicate. If you load 200 discs, the
Autoloader will continue duplicating until all 200 discs are copied.
4. Do not attempt to load more than 100 blank discs in any of the bins.
5. You can use the duplicate as a standalone unit, meaning that you can manual load blank
discs and copy from the hard drive. This is useful if you need to make a quick copy of a
small amount of discs, or if they robotic arm ever malfunctions. Refer to the Standalone
Mode of this manual for further instructions.
6. You can load multiple images of your source DVDs or CDs onto the internal 80GB hard
drive. This allows you to load up to 80GB worth of data to be copied at anytime. You
must create and name a different partition on the hard drive for each disc. Please refer to
the Partition Name section of this manual for further instructions.
7. The duplicator will automatically detect if there is a bad burn and drop the bad disc on
Spindle #5.
8. This DVD duplicator will not copy commercial DVDs that contain any type of copy write
encryption.
Page 11

Individual Functions
Your KanguruDVD-Duplicator has the following functions:
• TEST
This function will simulate the duplication process but the writers won’t burn the CD-R/DVD-R
media, so at the end, CD-R/DVD-R will still be blank discs.
• COPY
The Disc copying function allows for the duplication of original master disc, without media test or
verify features. Upon completion, the destination discs will contain identical data as the master
disk.
• COMPARE
Disc comparison allows for comparison of original master disc with the destination disc. Note that
audio and other media files such as VCD discs have the tendency to be slightly dissimilar during
copying. The disc comparison feature may signal the difference constantly. Therefore, it is
advisable for you to compare files that are not media in nature.
• COPY&COMP
This function combines COPY and COMPARE into one task; copy first and then compare. If you
restart your Duplicator in this mode, it will be in COPY mode when restated.
• ERASE
In order to use this function, you will need to have DVD/RW or CD/RW media inserted. Pushing
the “RUN” button, it will start a quick erase. If you want to completely erase the RW media, hold
the “RUN” button for three seconds. *It will not show but the erasing time will be enlarged
Page 12

SETUP MODE
Setup Mode lets you change the way that your KanguruDVD-Duplicator works. Press the SET
button continuously for 3 seconds to enter this mode. Once entered, use the SET button to
jump between individual settings, and use the RUN button to change on/off status of each setting.
There are square blocks after settings; these blocks will show the default status for each setting.
Press the SET button continuously for 3 seconds to return from Setup Mode to Operation
Mode.
Individual settings
There are different settings as follows:
• CHOOSE SOURCE
This will change the default source device. Use the RUN button to switch between default source
device #ID. A number indicates the source device number; while “A” indicates your KanguruDVDDuplicator will automatically select the source device. This is the best setting for this option.
If you select “A” (automatic source device selection) as the status,
*The default status is: “M”
• DISC COUNTER
Set necessary quantity of blank discs when you are in Standalone Mode.
1. “M” indicates manual operation – press the RUN button to start each function,
2. “A” indicates the KanguruDVD-Duplicator will start to copy when all of the drives are loaded
with blank media.
3. “1~8” indicates KanguruDVD-Duplicator will start to copy when the # (1~8) of blank DVDs or
CDs have been inserted and detected. For example: If you set this setting to 3, once you have
placed 3 blank CD in the drives, the duplication process will automatically start.
*The default status is: “M
SKIP READ ERROR
•
If you enable this function, the controller will skip the bad sectors on the source disc and finish
reading the disc. Below are the settings:
1. “NO” when a bad sector is detected in the disc, then the reader will display fail and the
duplication process will also fail.
2. “SHORT” when a bad sector is detected in the disc, then the reader will skip several KB of the
bad sector and continue reading.
3. “LONG” when a bad sector is detected in the disc, then the reader will skip several MB of the
bad sector and continue reading.
4. “SKIPPA” when bad sector is detected in the disc, then the reader will assume that the source
disc already finished and the duplication process will close the disc.
•
CD WRITING METHOD
Your KanguruDVD-Duplicator provides 3 different types of reading and writing modes for CDs:
1. “DAO” Disc at Once, most Frequent writing.
2. “TAO” Track at Once, the duplication process uses track by track to copy the disc.
”
Page 13

3. “RAW” Raw writing method, when the “DAO” and “TAO” can not succeed in backing up your
disc, you may try this writing method.
*Default Setting is “DAO”
• DVD WRITING METHOD
Your KanguruDVD-Duplicator provides 2 different types of reading and writing modes for DVDs:
1. “DAO” Disc at Once, most Frequent writing.
2. “INC” Can be used to improve the compatibility of the final discs.
*Default Setting is “DAO”
• CD READING SPEED
Set the reading speed of the source drive.
Usable speed can be: “MX”, “01”, “02”, “03”, “04”, “06”, “08”, “10”,
“12”, “16”, “20”, “24”, “32”, “40” “46”, “48”, and “52”.
“MX” indicates the maximum speed. If you set this value to a value higher than the maximum
speed of your writer, your writer will operate at its maximum speed.
“MD” the reader uses the source disc media speed (default speed of disc), to read the source
disc.
The default value is: “MX”.
• DVD READING SPEED
Set the reading speed of the source drive.
Usable speed can be: “MX”, “01”, “02”, “2.4”, “04”, “06”, “08, 16”.
“MX” indicates the maximum speed. If you set this value to a value higher than the maximum
speed of your writer, your writer will operate at its maximum speed.
“MD” the reader uses the source disc media speed (default speed of disc), to read the source
disc.
The default value is: “MX”.
• CD WRITING SPEED
Set the writing speed of your writers.
Usable speed can be: “MX”, “MD, “01”, “02”, “03”, “04”, “06”, “08”, “10”,
“12”, “16”, “20”, “24”, “32”, “40” “46”, “48”, and “52”.
“MX” indicates the maximum speed. If you set this value to a value higher than the maximum
speed of your writer, your writer will operate at its maximum speed.
“MD” the writers use the source disc media speed (default speed of disc), to read the source
disc.
The default value is: “MX”.
• DVD WRITING SPEED
Set the writing speed of your writers.
Usable speed can be: “MX”, “MD, “01”, “02”, “2.4”, “04”, “06”, “08”
“MX” indicates the maximum speed. If you set this value to a value higher than the maximum
speed of your writer, your writer will operate at its maximum speed.
“MD” the writers use the source disc media speed (default speed of disc), to read the source
disc.
The default value is: “MX”.
• SET AS DEFAULT
The Kanguru DVD controller will save all changes of the settings made. If you want to restore the
factory setting (default setting) push the “SET” button to select this setting and then push the
“RUN” button to restore the default settings.
Page 14

• UPDATE FIRMWARE—N/A
DO NOT USE THIS FUNCTION UNLESS INSTRUCTED TO DO SO BY A
KANGURU SOLUTIONS TECHNICIAN.
• TOTAL DISC COUNT
Displays a master record of the total discs duplicated.
• CHECK TRK LEN
This function is for the controller to read and detect the bad sector location.
1. “NO” doesn’t use GAP to read.
2. “AUTO” uses a standard GAP to read.
3. “SHORT” uses a short GAP to read.
4. “LONG” uses a long GAP to read.
• PARTITION NA. [00000]
This is setting allows you to name each partition on your hard drive to load multiple DVD or CD
images. By default the Autoloader is set to read and load from Partition 00000. This means that
any data loaded onto the hard drive will be loaded into the first partition on the hard drive [00000].
Also, the system will read from this partition to get the source data. If you want to load more than
one DVD or CD onto the hard drive you must create a new partition for each DVD or CD.
Please follow these instructions to load multiple DVDs or CDs onto the hard drive.
Image #1
1. Begin by entering the Setup Mode and checking the partition name. It should be 00000
by default.
2. Exit the Setup Mode and scroll to the Load function.
3. Insert your source DVD or CD and wait for the system to recognize it.
4. Press RUN to load the data onto partition 00000.
Image #2
1. Enter the Setup Mode and scroll to the Partition NA. Function.
2. Change the Partition NA. to 00001.
3. Exit the Setup Mode and scroll to the Load function.
4. Insert your source DVD or CD and wait for the system to recognize it.
5. Press RUN to load the data onto partition 00001.
Please note: If you want to load a second image onto the internal hard drive you MUST
first create a new partition name or the new image will be loaded over the first. If you wish
to duplicate from a particular partition, you must also define that partition before
beginning the duplication.
It’s a good practice to keep a sheet handy with your partition names and what they contain.
• SHOW DISC INFO
This function shows all of the information on the discs in the drives.
Page 15

• SHOW EXE TIME [ ]
This function displays the time it takes to duplicate a DVD or CD.
• AUTO EXE TIME [ ]
This function sets a time period (in seconds) in which the duplication process will automatically
begin if there is a blank disc and a source detected. This is used in Standalone Mode only.
• DISABLE SEND OPC [ ]
DO NOT enable this function unless instructed by a Kanguru Solutions tech support rep.
• AUTOMATIC
This function is used to adjust the robotic arm in the event that it’s no longer aligned
correctly. This function is explained in depth in it’s own section called Adjusting the Robotic Arm.
Page 16

ADJUSTING THE ROBOTIC ARM
This section will provide you with detailed instructions on how to calibrate the robotic arm in the
event that it’s no long aligned correctly with the DVD/RW drive or Disc Bins. Please follow the
instruction carefully.
1. Enter the Setup Mode and scroll to the Automatic function.
2. Press the Run button to enter the Adjustment mode.
The Adjustment Mode allows you to adjust the arm in the following ways:
• RESET
This function will reset the robotic arm to the factory defaults.
• ADJ HEIGHT OF H. DRIVE
This allows you to adjust pickup position up or down for the first DVD/RW drive. You only
need to calibrate one drive for this function. Press SET to move the arm up or RUN to
move the arm down. Press and HOLD SET to exit.
• ADJ ANGLE OF H. DRIVE
This allows you to move the pickup position to the left or the right for the first DVD/RW
drive. Again, you only need to calibrate the first drive. Press SET to move the arm to the
left or RUN to move the arm to the right. Press and HOLD SET to exit.
Page 17

Adjust the arm so that the disc hole is located directly below the sucker on the arm.
• ADJ ANGLE OF 1 SPDL
This allows you to move the pickup position to the left or the right for the first spindle
drive. Press SET to move the arm to the left or RUN to move the arm to the right. Press
and HOLD SET to exit.
Use the included peg to align the arm with the center of the spindle.
• ADJ ANGLE OF 2 SPDL
Same as ADJ ANGLE OF 1 SPDL.
• ADJ ANGLE OF 3 SPDL
Same as ADJ ANGLE OF 1 SPDL.
• ADJ ANGLE OF 5 SPDL
Same as ADJ ANGLE OF 1 SPDL.
• ADJ DOWN LMT OF SPDL
This allows you to adjust pickup position up or down for the Disc Bins. You only need to
calibrate one bin for this function. Press SET to move the arm up or RUN to move the
arm down. Press and HOLD SET to exit.
The best way to calibrate this setting is to place one disc at the bottom of the bin and
move the arm down until it rests snug against the disc.
• DLY AFTER FINISH:
You can adjust the period the duplicator will wait between duplication sets.
• DLY BETWEEN DRVS:
You can adjust the period the duplicator will wait to move between drives.
• SHORT TRAY [ yes ]
DO NOT change this setting unless instructed by a Kanguru technician.
Page 18

DVD FAQ
Q1: Can I directly copy an entertainment title on DVD?
A1: NO. Copyrighted material with copy protection cannot be duplicated. Most DVDs have CSS
encryption, which scrambles the data when copied. Also entertainment DVDs are pressed and
can hold up around 20 GB of data, while DVD-R/RWs only hold up to 4.7GB. DVDs that have
been decrypted on a PC can be duplicated.
Q2: What’s the difference between Authoring and General Purpose media?
A2: Authoring recorders use a more expensive 635 nm laser, while general-purpose recorders
use a 650nm laser, which is similar to a CD recorder. You can’t mix and match the two media
types. Authoring media will not work in a general-purpose drive, and vise versa.
Q3: What kinds of DVD formats are there?
A3: The most widely known format currently is DVD-Video, which we know of as DVD movies
that we can purchase at the local store. Other formats include DVD-A, DVD-ROM, DVD-R, DVDRW, DVD +R, DVD+RW, and DVD-RAM. Each has its own use and special purpose.
• DVD-A: This stands for DVD-Audio, which is a new audio format just starting to hit the
market. It allows for better-than-CD quality and multiple channel surround sound.
• DVD-ROM: ROM stands for Read Only Memory. This is typically used for data storage
and software titles. Video games are starting to come out on this format with more to
follow.
• DVD-R: This stands for DVD-Recordable. This is a “once-recording” format, which means
you cannot erase the information that has been previously written and write new
information.
• DVD-RW: The RW stands for Re-Writeable. Unlike DVD-R, this format allows you to
erase info on the disc and write new info in its place.
• DVD+RW: The only difference between this format and DVD-RW is the “+RW” format is
accepted in most DVD video players and DVD-ROM drives.
• DVD-RAM: RAM stands for Random Access Memory. These discs work similarly to 3.5
floppy disks. You are able to transfer files on and off the disc at will. Though great for
data, these disc are not great for video because they do not play on standard video
decks.
Q4: Why can’t I directly copy a DVD-Video Disc?
A4: Most DVDs that you purchase today are encrypted. Almost every DVD title that you can
purchase in a store has some kind of copy protection (encryption). There are several types of
encryption used on DVDs. The most widely used type is called CSS Encryption, which prevents
the ability to copy or duplicate the disc by using a burner. In this case, if you own a DVD
duplicator for distribution purposes, you will not be able to make copies of a DVD title that you
bought at a store.
Q5: Will MP3 files on a DVD play on a stand-alone DVD player?
A5: This depends on the design of your DVD Video player. You can contact the manufacturer of
your DVD-player to see if it supports playback of MP3s. However, your PC should be able to
playback MP3s from its DVD-ROM drive.
Page 19

Q6: Can I put adhesive paper label on my DVD-R/RW media?
A6: NO, it’s not recommended to put any type of paper label on a DVD-R/RW. Skipping and
shuttering may result from applying a paper label on a DVD disc. DVD drives tend to reach
higher temperatures than CD drives, which may result in weakening the adhesive.
Q7: Can I play back DVD-R/RW or DVD+R/RW discs in my DVD player?
A7: Yes, as long as your DVD player recognizes DVD-/+ media and the disc was correctly
authored according to DVD video specifications. Check with the DVD player manufacturer to
assure DVD playback compatibility.
Q8: How long will it take to burn a DVD?
Q9: At “1X” recording speed, a complete 3.95 Gbyte side is written in approximately 50 minutes,
regardless of the data that will be contained. A 4.7 Gbyte disc can be recorded in approximately
one hour. At “2X” recording speed, a complete 4.7 Gbyte disc is written in approximately 30
minutes. At “4X” recording speed, a complete 4.7 Gbyte disc is written in approximately 15
minutes. At “8X” recording speed, a complete 4.7 Gbyte disc is written in approximately 8
minutes.
Error Messages definitions
SET_SPEED_ERROR ‘S’ Speed setting error
READ_ERROR ‘r’ Reading error
WRITE_ERROR ‘w’ Writing error
READ_DMA_ERROR ‘W’ Writing error
WRITE_DMA_ERROR ‘R’ Reading error
CUE_SHEET_ERROR ‘U’ Transferring command error
ERASE_ERROR ‘E’ Erasing disc error
FORMAT_ERROR ‘F’ Format error
COMPARE_ERROR ‘C’ Compare error
SYNCHRONIZE_ERRO ‘Z’ Buffer memory error
CLOSE_ERROR ‘O’ Closing disc error
TERMINATE_ERROR ‘T’ Writers error
BLANKMED_ERROR ‘B’ CD-R/DVD-R media error
UNKNOW_ERROR ‘K’ Unknown error
Supported Formats
Red Book: CD-DA
Yellow Book: CD-ROM(Mode 1) CD-ROM XA: Mode 2 Form 1 or Mode 2 Form 2
Green Book: Single Track CD-1
CD-Bridge: Photo CD
White Book: VCD 1.0 or 2.0
Orange Book: Fixed Packet Writing, Multi-Session, TAO/DAO/SAO
Mixed Mode: Mixed CD-DA, Mode 1/2, Form 1/2
CD Plus: CD Extra
Page 20

Helpful Hints
1.) If you experience an error in duplication, (after checking the media type), it is advisable to run
the Speed Test. If this does not help, there is a good chance that the error is either in the media
type or the information being copied.
2.) Not all types of DVD formats are supported by this DVD-Duplicator due to a variety of factors.
If you experience problems with a specific disc or DVD format, try duplicating a simple audio CD
or data CD. If this works, there is a good chance that there is an incompatibility issue between the
duplicator and media you are attempting to copy.
3.) There may be inconsistencies in duplication according to the way a master is created (for
example a hybrid DVD with different burning methods or types of formats (not simple file
extensions). If this is the case please attempt to recreate the master as source/disc at once and
retry the duplication.
Warranty
This product carries a *1 year limited warranty on the case, controller and all internal
components. Kanguru Solutions is not responsible for any damages incurred in the shipping
process. Any claims for loss or damage must be made to carrier directly. Claims for shipping
errors should be reported to Kanguru Solutions within three (3) working days of receipt of
merchandise. Please refer to the RMA Procedure section of this manual if your duplicator needs
servicing.
*90-day warranty on labor. After 90 days, a $20.00 service charge will be applied to all RMAs.
Shipping back to the customer is covered during the first 90 days of purchase. After 90 days the
customer is responsible for shipping both ways.
RMA Procedure
All Duplicators being serviced must be packed in the ORIGINAL PACKAGING. If you do
not have your original packaging, you can purchase replacement packaging for $45.00
from Kanguru’s Tech Support Department. Kanguru Solution’s warranty will not be
honored in the event that a duplicator is received
physically damaged.
• STEP ONE: Call for a RMA Number: 508-376-4245
Duplicators will not be accepted for repair without a valid RMA number. RMA numbers
are valid for 30 days upon assignment. Any return without a valid RMA number will be
returned to the customer at their expense.
• STEP TWO: Ship and Insure your Duplicator
Kanguru Solutions strongly recommends you fully insure the duplicator for shipping.
Kanguru Solutions is not responsible for if the package is lost or damaged in transit. We
suggest using a shipping company that utilizes a “tracking” feature to verify “proof of
delivery.” The customer is responsible for shipping charges when returning a product.
Shipping back to the customer is covered by Kanguru Solutions during the first 90 days of
purchase. After 90 days of purchase the customer is responsible for shipping both
ways.
improperly packaged, altered, or
Page 21

Tech Support
If you experience any problems using your Kanguru CD or DVD Duplicator or
have any technical questions regarding any of our products, please call our tech
support department. Our tech support is free and available Monday thru Friday,
9am to 5pm EST.
Call 1-508-376-4245 or
Visit our website at www.KanguruSolutions.com
 Loading...