

Page 1
Kanguru Defender Elite30
User Manual
Copyright 2014, All Rights Reserved
Model no: KDFE30
Page 2

Notices and Information
NOTICES AND INFORMATION
Please be aware of the following points before using your Kanguru Defender
Copyright © 2014 Kanguru Solutions. All rights reserved.
Windows XP®, Windows Vista®, Windows 7® and Windows 8® are registered trademarks of Microsoft
Inc. All other brands or product names are trademarks of their respective companies or organizations.
Kanguru Solutions will not be held responsible for any illegal use of this product nor any losses incurred
while using this product. The user is solely responsible for the copyright laws, and is fully responsible
for any illegal actions taken.
Customer Service
To obtain service or technical support for your system, please contact Kanguru Solutions Technical
Support Department at 508-376-4245, or visit www.Kanguru.com for web support.
Legal notice
In no event shall Kanguru Solutions’ liability exceed the price paid for the product from direct, indirect,
special, incidental, or consequential software, or its documentation. Kanguru Solutions offers no refunds
for its products. Kanguru Solutions makes no warranty or representation, expressed, implied, or statutory,
with respect to its products or the contents or use of this documentation and all accompanying software,
and specifically disclaims its quality, performance, merchantability, or fitness for any particular purpose.
Kanguru Solutions reserves the right to revise or update its products, software, or documentation without
obligation to notify any individual or entity.
Export Law Compliance
Regardless of any disclosure made to Kanguru Solutions pertaining to the ultimate destination of the
specific Kanguru product, you warrant that you will not export, directly or indirectly, any Kanguru
product without first obtaining the approval of Kanguru Solutions and the appropriate export license from
the Department of Commerce or other agency of the United States Government. Kanguru Solutions has
a wide range of products and each product family has different license requirements relative to exports.
Defragmenting Flash Memory Warning
Do not attempt to defragment your Kanguru Defender Flash Drive. Flash memory does not need to
be defragmented and does not gain any performance by doing so. Defragmenting your flash drive can
actually degrade the flash memory which may reduce the drive’s total capacity and lifespan.
2
Page 3

Table of Contents
1. Introduction .................................................................................................... 4
1.1 Package Contents .......................................................................................4
1.2 System Requirements ................................................................................4
1.3 Features ......................................................................................................5
1.4 Technical Specifications ............................................................................6
2. Kanguru Defender Manager Elite30 ............................................................7
2.1 Running KDMElite30 ..............................................................................7
2.1.1 Running KDMElite30 on Windows ....................................................... 7
2.1.2 Running KDMElite30 on Mac OS X .....................................................9
2.2 The Setup Wizard ......................................................................................10
2.2.1 Selecting a Setup Language ............................................................10
2.2.2 Activating On-board Antivirus Protection (Windows only) ............11
2.2.3 Setting a Password ...........................................................................12
2.2.4 KRMC Cloud ..................................................................................13
2.2.5 Contact Info ..................................................................................... 14
2.2.6 Resetting the Device through the Setup Wizard .............................. 15
2.3 Unlocking the Security Partition ...............................................................16
2.3.1 Resetting from the Login Screen ............................................................ 17
2.4 Using the Virtual Keyboard to Enter Your Password ................................ 18
2.5 Encrypting Files and Folders ..................................................................... 19
2.6 On-board Antivirus (Windows only) ......................................................... 20
2.6.1 Device Scan ......................................................................................21
2.6.2 Path Scan ........................................................................................... 22
2.6.3 File Scan ............................................................................................23
2.6.4 Antivirus License .............................................................................. 24
2.7 Security Settings ........................................................................................ 25
2.7.1 Changing Your Password .................................................................. 26
2.7.2 KRMC Cloud Settings ..................................................................... 27
2.8 Changing Languages .................................................................................28
2.9 Online Documentation ...............................................................................29
2.10 About KDMElite30 ................................................................................. 29
2.11 Unmounting Your Defender Elite30 ........................................................ 30
Table of Contents
3. Updating Your Defender Elite30 ................................................................... 31
3.1 Updating standard edition drives ............................................................... 31
3.2 Updating KRMC enterprise edition drives ................................................ 32
3.3 Verifying the download checksum ............................................................32
4. Safely Removing Your Kanguru Defender Elite30 ..................................... 33
4.1 Safely Removing from Windows .............................................................. 33
4.2 Safely Removing from Mac OS X ............................................................33
5. Warranty Information ...................................................................................34
6. Tech Support ..................................................................................................34
7. Appendix A - Proxy Support ......................................................................... 35
3
Page 4

1. Introduction
The Kanguru Defender Elite30 is a hardware encrypted, tamper proof USB3.0 flash drive. The Defender
Elite30 contains two partitions: a CD-ROM partition and a secure, encrypted partition. The CD-ROM
partition contains the login application that will allow you to access the secured partition.
The Kanguru Defender Elite30 flash drive secures your sensitive data using:
• 256-bit AES hardware encryption
• Secure password protection
1.1 Package Contents
Please check the contents of the package you received. If any of the parts listed below are missing, please
contact Kanguru Solutions (508-376-4245) and you will be shipped replacement parts immediately.
• Kanguru Defender Elite30 USB Flash Drive
• Quick Start Guide
• Registration Form
Introduction
1.2 System Requirements
• 1 Available USB port (USB 2.0 or USB 3.0 Recommended)
• 256MB of internal DDR RAM or more
• 500MHz internal CPU or faster
• Operating Systems (32 and 64 bit compatible)
○ Windows Server 2003, Windows Server 2008, Windows 2000 SP 4, Windows XP SP2*, Win
Vista, Win 7, Win 8
○ Max OS X 10.5 and above (compatible with Intel-based Macs only)
* In line with Microsoft’s End-of-Support announcement for Windows XP, Kanguru Solutions is ending
support for the Windows XP platform. While our products have been quality tested internally on Windows
XP, we cannot guarantee normal product operation on an unsupported OS.
4
Page 5

Features
1.3 Features
√ 256-bit AES hardware encryption
√ Password protected data partition for your secure files
√ USB3.0 interface
√ Does NOT require Admin privileges
√ Driverless installation (Plug & Play)
√ High-strength aluminum housing
√ Tamper-proof design
√ Write protect switch
√ On-board antivirus protection
Remote Management Capability
The Kanguru Defender Elite30 flash drive can be remotely managed using the Kanguru Remote
Management Console (KRMC). KRMC is a web-based application that gives administrators a complete
USB management system.
With KRMC you will be able to:
√ Create and manage a master password for your Defenders
√ Remotely delete all data on a target drive
√ Schedule actions for present or future times
√ Audit at administrator and super administrator level
√ Locate devices via IP address (IP Address / network location)
√ Locate devices via hostname
√ Create remote policy modifications like:
○ Password Strength and Length (e.g. 10 characters: 2 upper, 2 numbers, etc)
○ Limit Invalid Login Attempts (e.g. 3 retries before drive is wiped)
○ Rate at which password should be changed (e.g. every 30, 60, or 90 days)
○ Change user password
○ Change master password
√ Create user groups
You Kanguru Defender Elite30 does not come with KRMC enabled by default.
For more information about KRMC, visit: https://www.kanguru.com/index.php/flash-management
5
Page 6

1.4 Technical Specifications
General Specifications
Model KDFE30 series
Interface USB 3.0 (USB 2.0 and 1.1 compatible)
Technical Specifications
Max Data Transfer Rates
Read: 140 MB/s
Write: 40 MB/s
Memory Type Solid State NAND flash
Encryption Features Hardware based 256-bit AES encryption (XTS mode)
Additional Features
Physical write-protect switch
Remote management ready
Write Cycles 10,000 write cycles / block
Data Retention 10 years or more
Operating Temperature 0°C to 70°C
Storage Temperature -25C to 85°C
Humidity Range 20% - 90%
Shock Resistance 1000G Max
Vibration 15G Peak to Peak Max
Weight 10g
Dimensions 64mm x 18.5mm x 9mm
Power
Max Read: 5 VDC @ 122mA
Max Write: 5 VDC @ 182mA
6
Page 7
Kanguru Defender Manager Elite30 / Running KDMElite30 on Windows
2. Kanguru Defender Manager Elite30
Kanguru Defender Manager Elite30 (KDMElite30) is the client program pre-loaded on the Defender
Elite30’s CD-ROM partition. The user needs to login to KDMElite30 in order to access the secure,
encrypted partition. KDMElite30 comes pre-installed on your Defender Elite30. No installation on your
PC is necessary.
2.1 Running KDMElite30
The Kanguru Defender Elite30 is compatible with multiple operating systems. Running the KDMElite30
application can be different depending on the OS your computer is running.
2.1.1 Running KDMElite30 on Windows
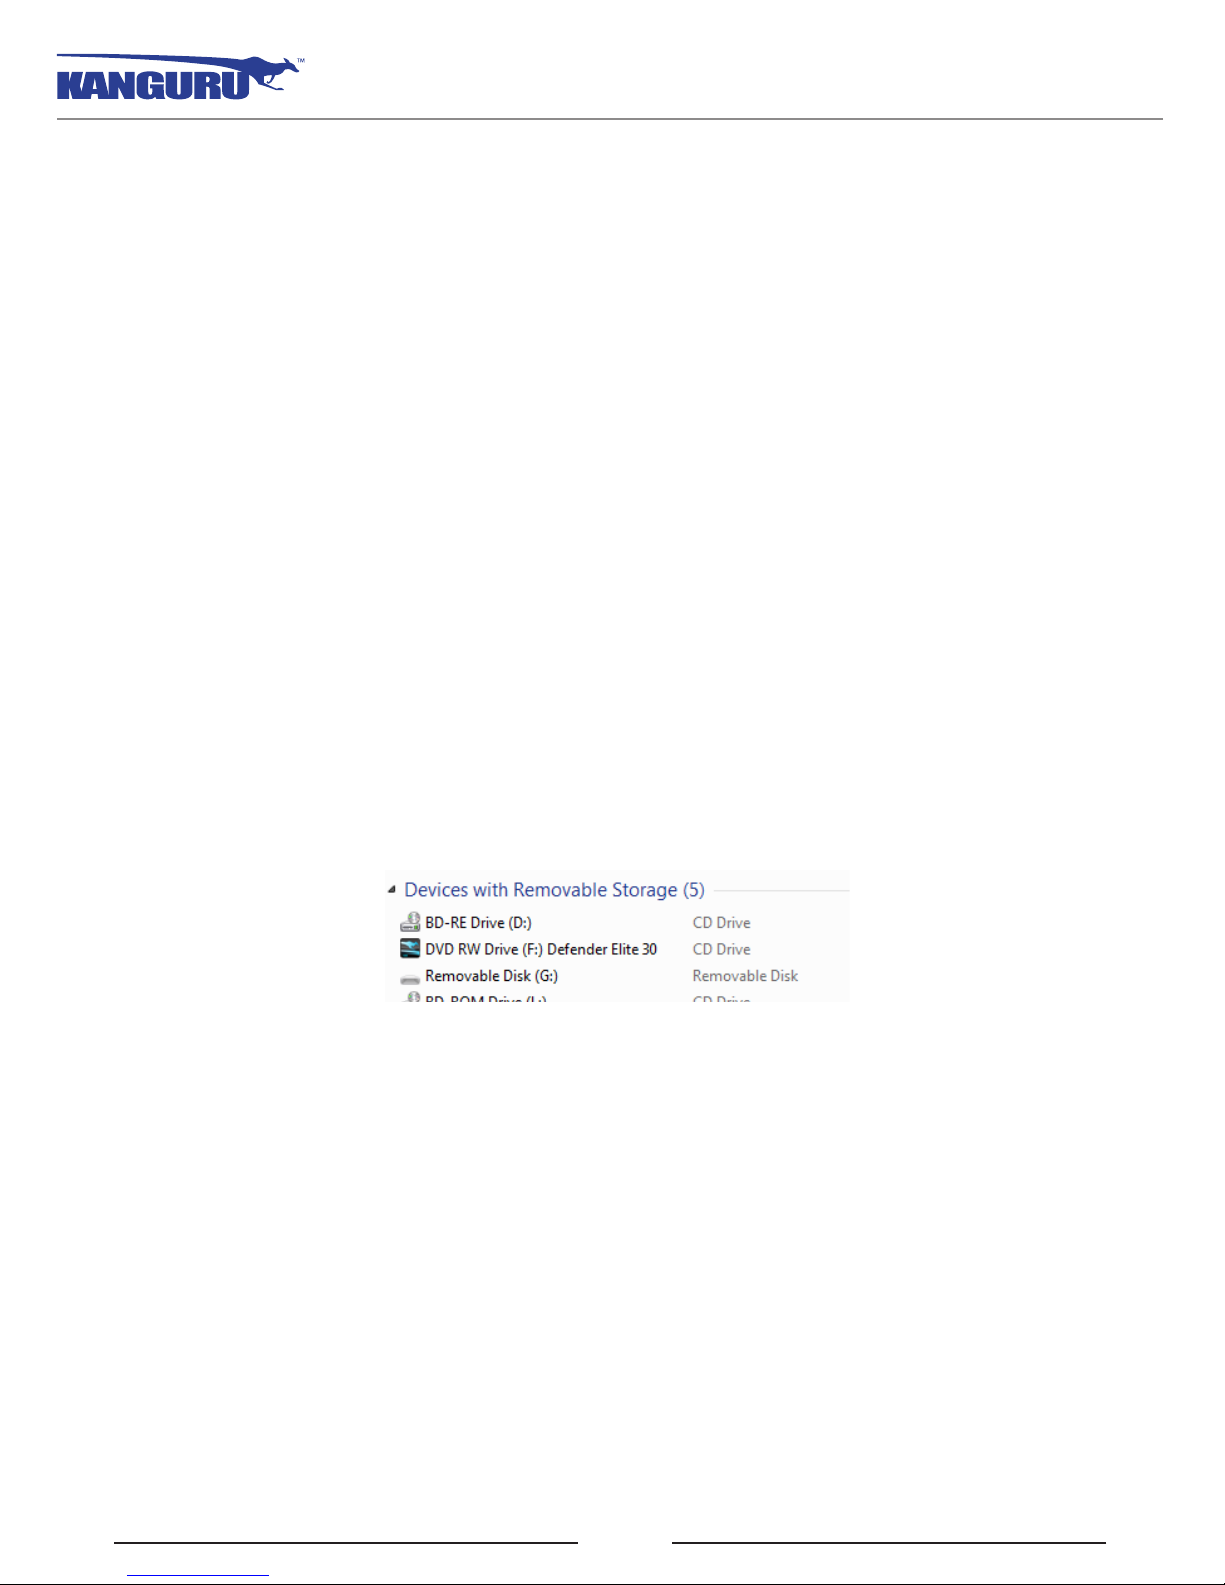
To run KDMElite30 from a Windows operating system, simply connect your Defender Elite30 to your
computer through a USB port. The KDMElite30 application should start automatically if Autorun is
enabled.
If KDMElite30 does not start automatically:
1. Open My Computer and open the Defender Elite30’s CD-ROM partition named KDMElite30.
The drive letter (e.g. D:, E:, F:) will depend on your computer.
2. Double-click on the KDMElite30.exe file to launch the KDMElite30 application.
If it is your first time running KDMElite30 you will need to complete the setup wizard in order to set
your security password (see section 2.2 The Setup Wizard on page 10). If you have already setup your
security password, you will be prompted to login (see section 2.3 Unlocking the Security Partition on
page 16)
Caution! The KDMElite30.exe file needs to remain on your Defender Elite30’s CD-ROM partition at
all times. Always run the application from the Defender Elite30’s CD-ROM partition. Do not try to copy
KDMElite30.exe or run KDMElite30.exe from your computer’s hard drive.
Note: Windows 7 users may not see the removable disk partition until you have logged into KDMElite30.
If you are running Windows 7 and for any reason need to see the removable disk before you log into
KDMElite30 please refer to the instructions on p.9.
7
Page 8
Attention Windows 7 Users
Attention Windows 7 Users
Windows 7 users may not see the removable disk partition until you have logged into KDMElite30 (see
section 2.3 Unlocking the Security Partition on page 16 for more information). This is normal.
If you are running Windows 7 and for any reason need to see the removable disk before you log into
KDMElite30, you will need to configure Windows in the following manner:
Note: This is user preference only. There is no need to configure Windows in order to use your Defender.
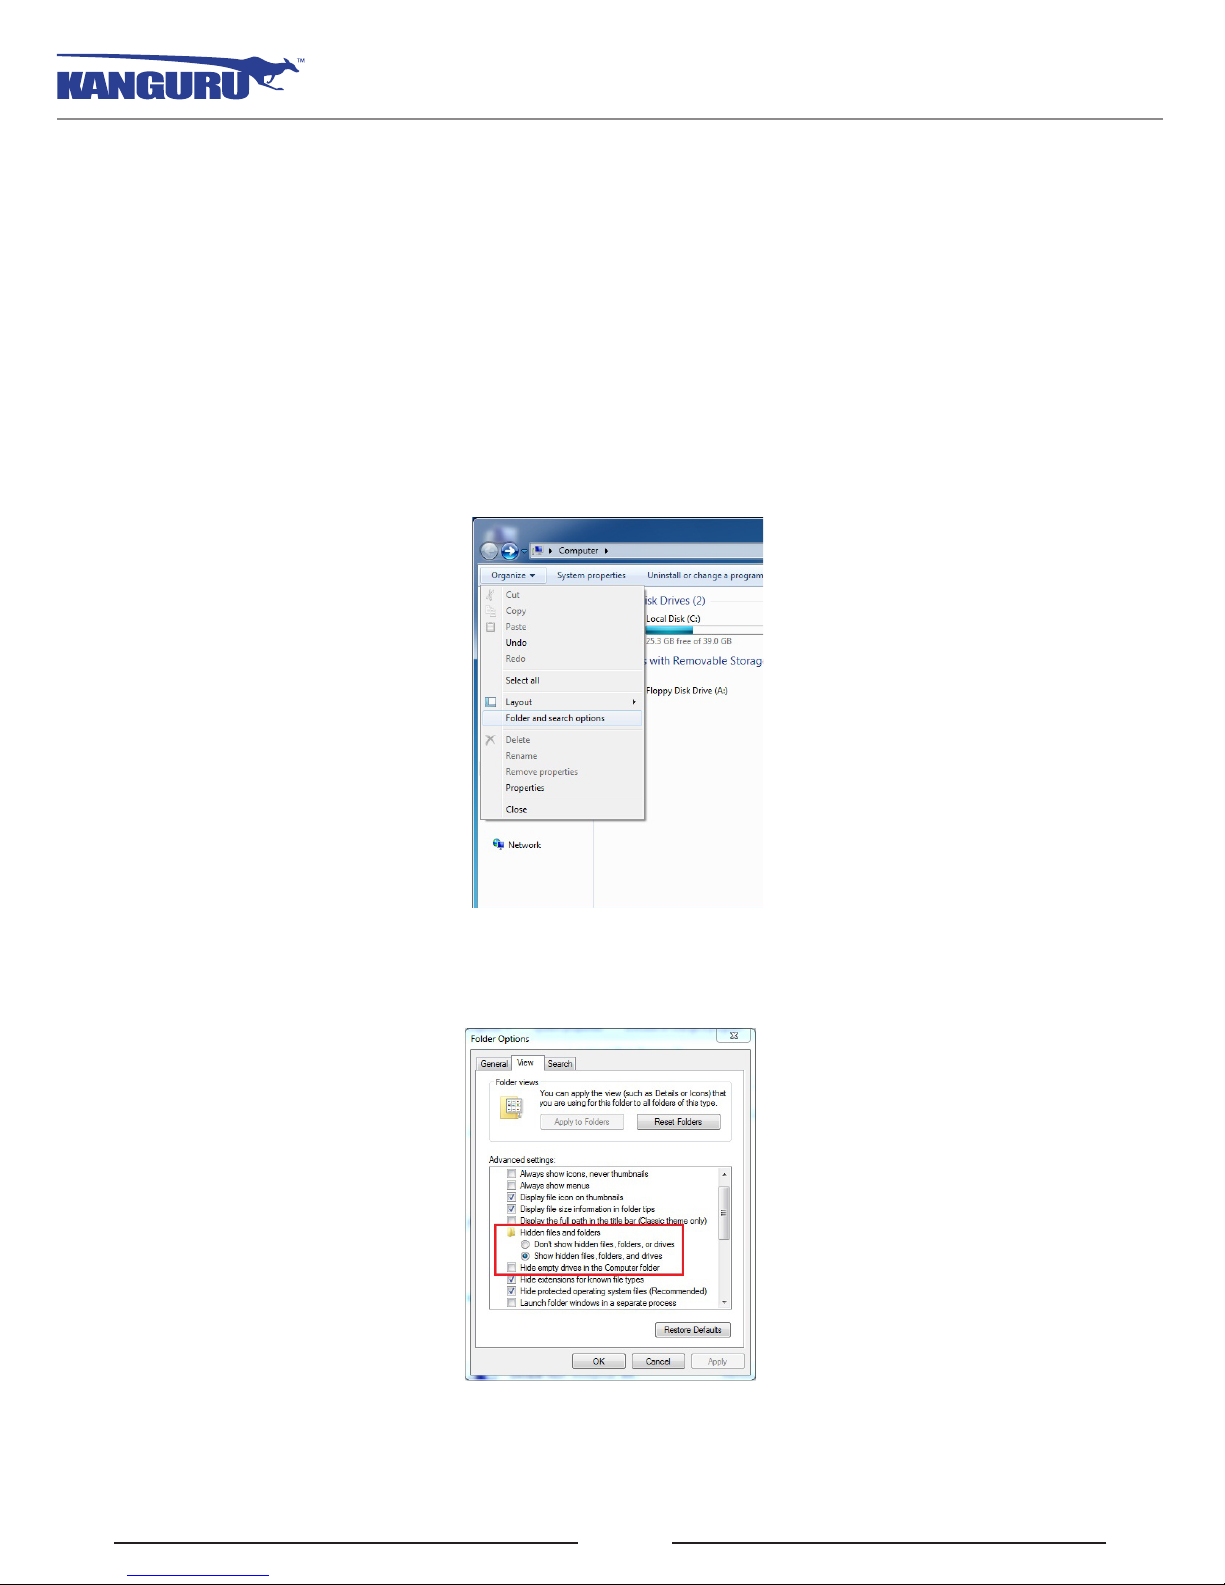
1. From My Computer, click on the Organize tab and then select Folder and search options.
2. The Folder Options window appears. Scroll down to the option for Hidden Files and Folders and
select Show hidden files, folders, and drives.
3. Click on the OK button to finish configuring Windows. The removable disk is now visible before
you log into KDMElite30.
8
Page 9
Running KDMElite30 on Mac OS X
2.1.2 Running KDMElite30 on Mac OS X
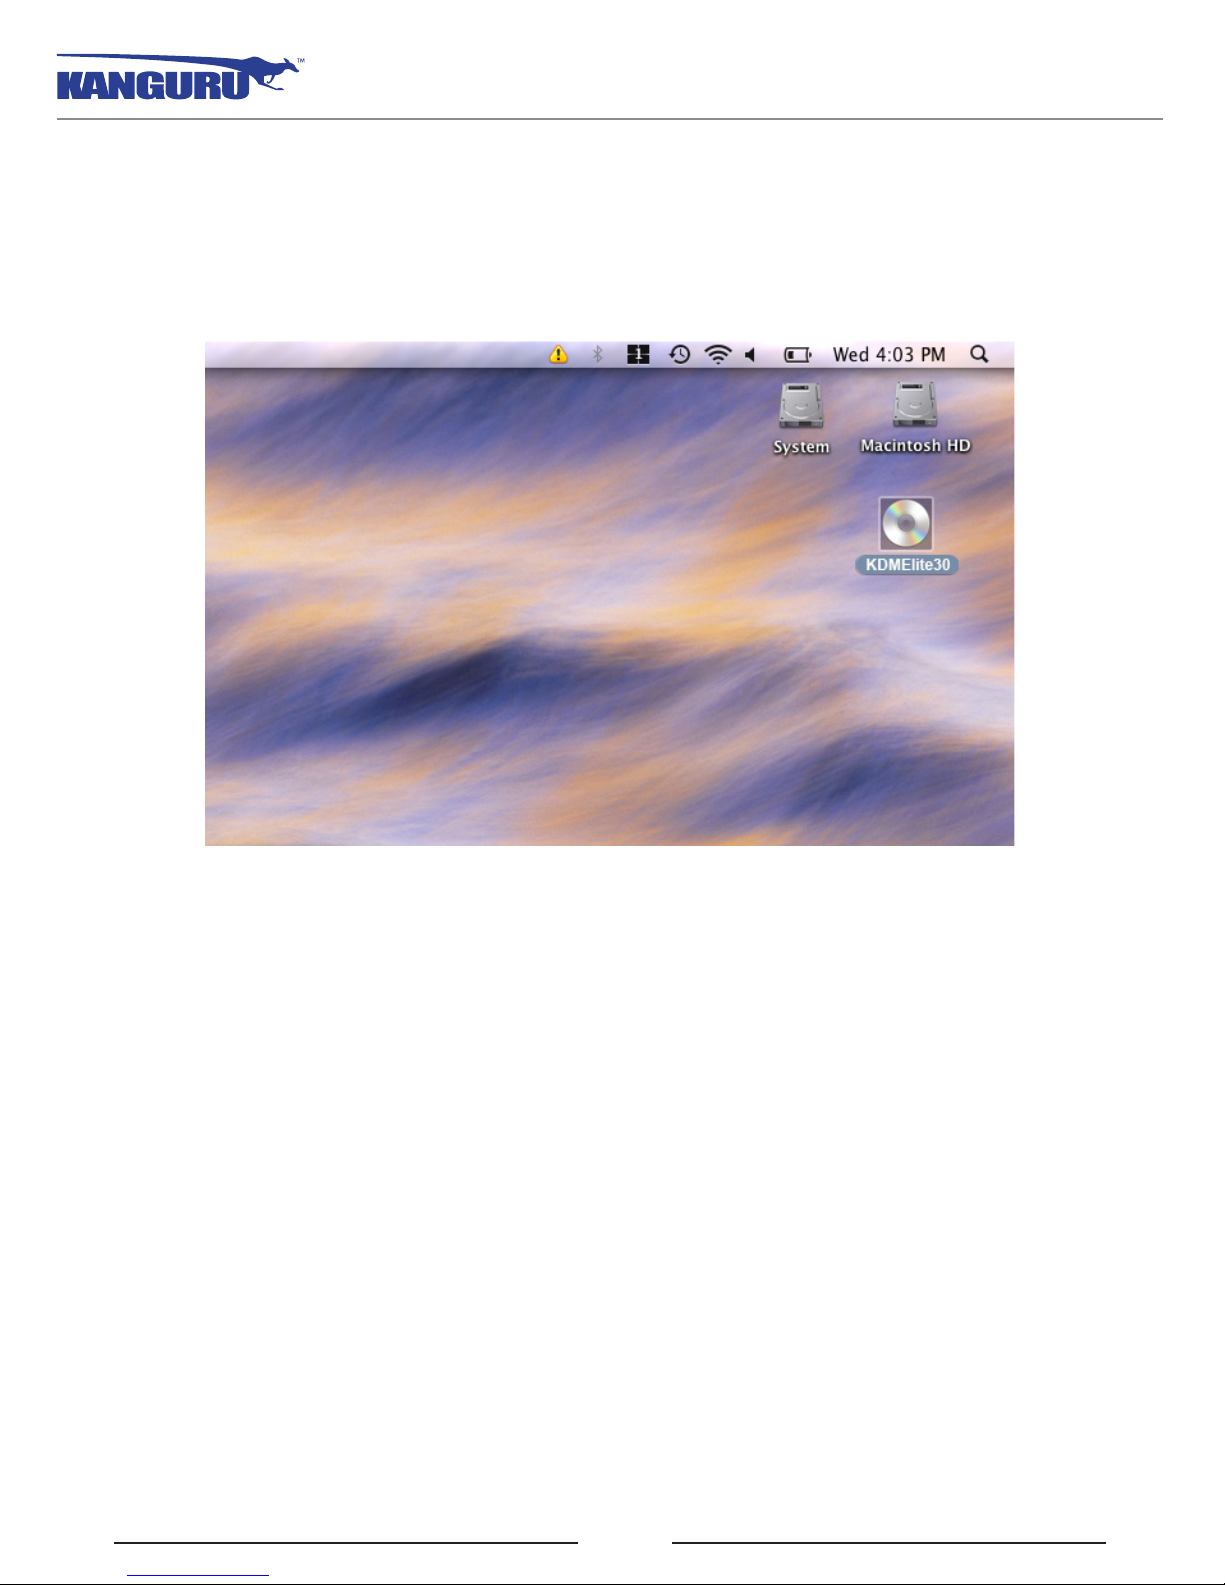
To run KDMElite30 from Mac OS X, connect your Defender Elite30 to your computer through a USB
port. A CD icon named ‘KDMElite30’ will appear on the desktop. Double click on the KDMElite30
icon to open it.
In the window that opens, double-click on the KDMElite30.app file to launch the KDMElite30
application.
If it is your first time running KDMElite30 you will need to complete the setup wizard in order to set
your security password (see section 2.2 The Setup Wizard on page 10). If you have already setup your
security password, you will be prompted to login (see section 2.3 Unlocking the Security Partition on
page 16).
Caution! The KDMElite30.app file needs to remain on your Defender Elite30’s CD-ROM partition at
all times. Always run the application from the Defender Elite30’s CD-ROM partition. Do not try to copy
KDMElite30 or run KDMElite30 from your computer’s hard drive.
Note: The KDElite30 icon is not always displayed on the desktop. If you do not see the KDMElite30
icon on your desktop, you can locate the KDMElite30.app file on the CD-Rom partition through the
Finder window.
9
Page 10
The Setup Wizard / Selecting a Setup Language
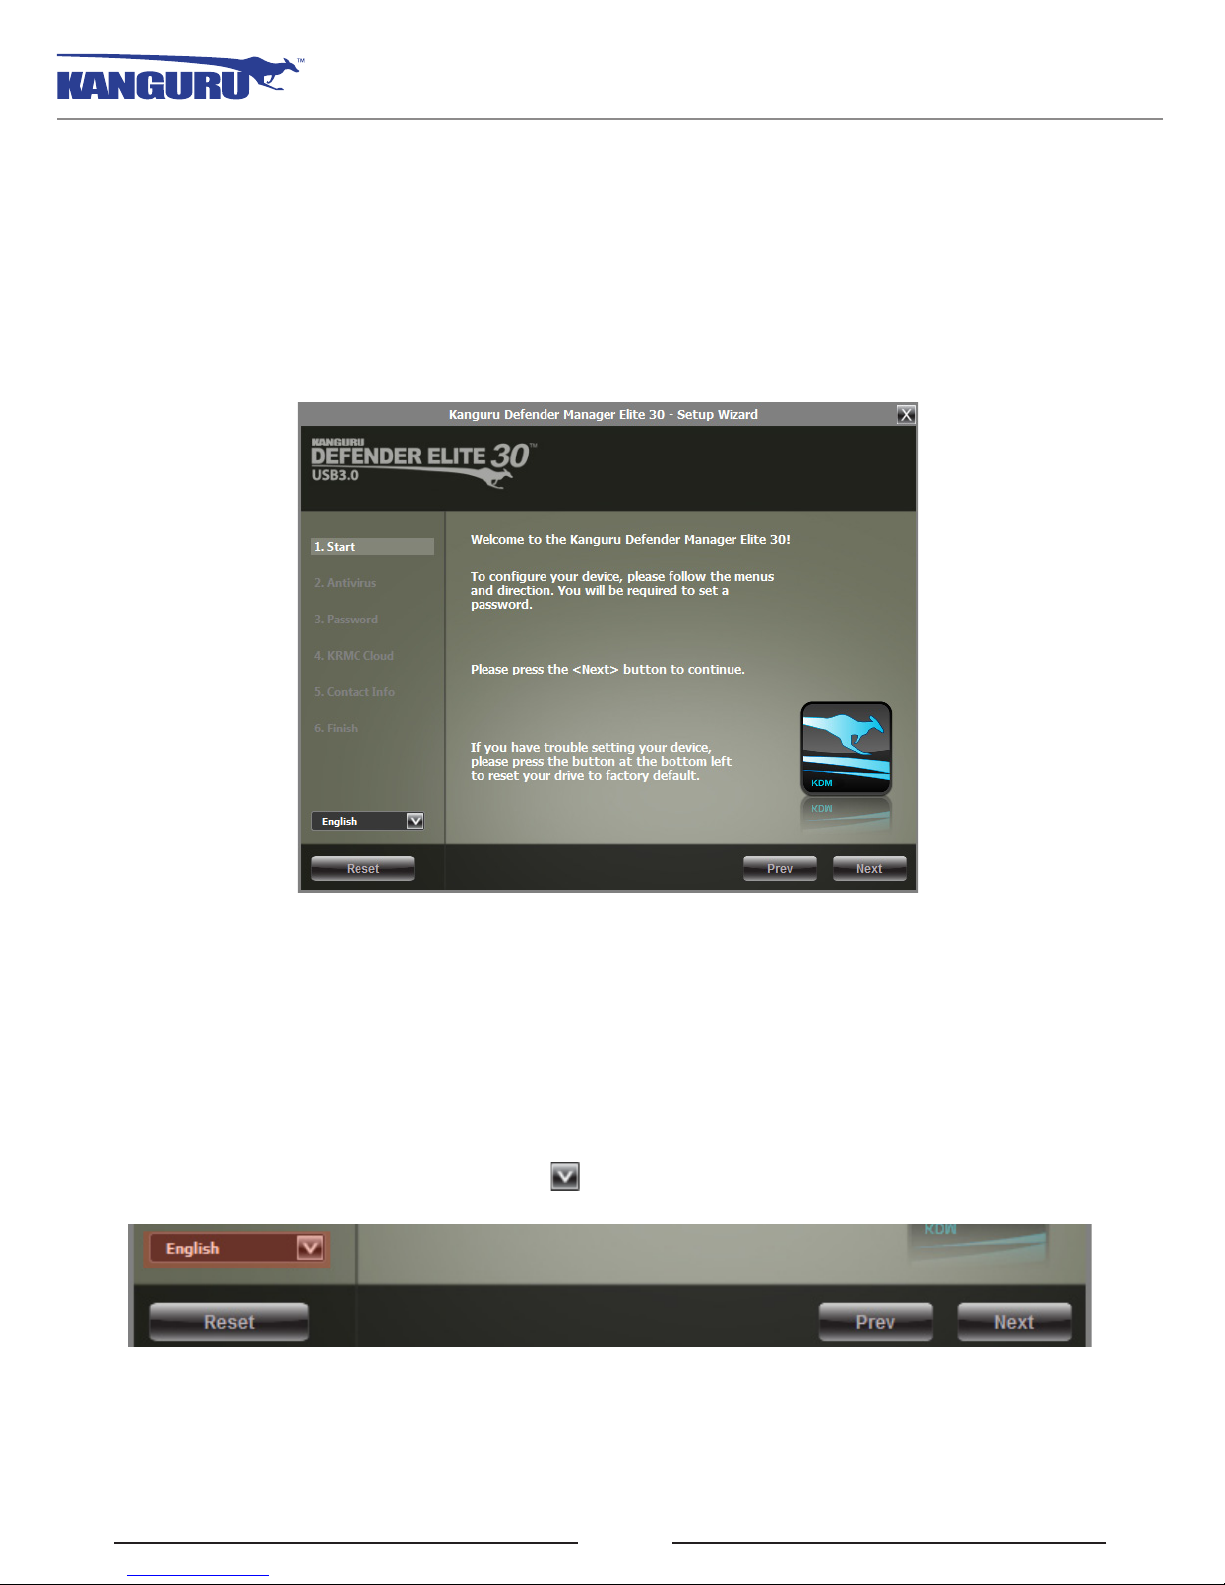
2.2 The Setup Wizard
When you start KDMElite30 for the first time you will be greeted by the Setup Wizard. Follow the Setup
Wizard instructions to create a security password for your Defender Elite30’s encrypted partition.
Note: Before you can setup your Defender Elite30’s password, the manual write protect switch must be
set to the unlock position.
Caution! Once the Setup Wizard has started, you should not disconnect your Defender Elite30 without
either first completing the Setup Wizard or closing the Setup Wizard by clicking on the X button.
2.2.1 Selecting a Setup Language
The default language for the Setup Wizard is set to English. To run the Setup Wizard in a different
language:
1. From the Welcome screen, click on the icon next to the Language Menu.
2. A list of available languages will appear in a drop down menu. Select your desired language from
the drop down menu. The Setup Wizard will switch to the new language.
3. Click on the Next button to continue to the next step.
10
Page 11
Activating On-board Antivirus Protection
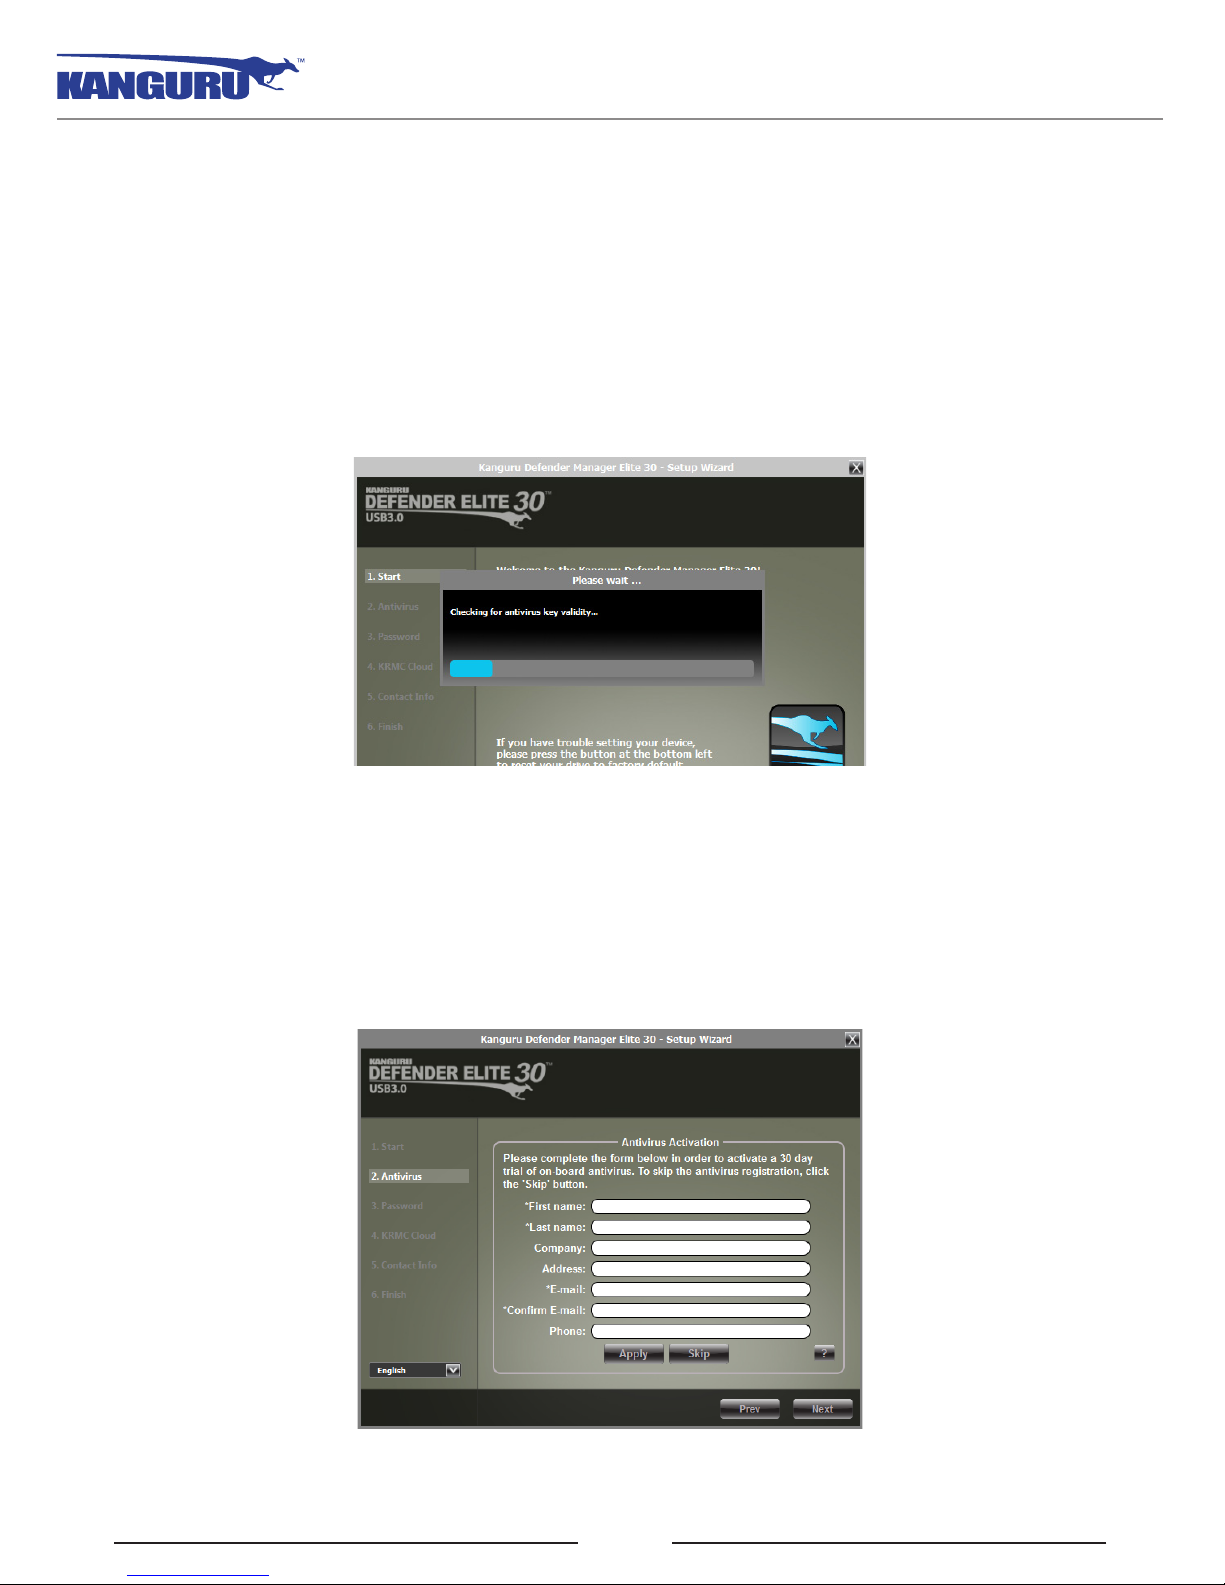
2.2.2 Activating On-board Antivirus Protection (Windows only)
Note: This section does not apply if you are running the Setup Wizard in Linux or Mac OS X. This section
does not apply to Enterprise Edition users. Antivirus for Enterprise Edition is activated through Kanguru
Remote Management Console (KRMC). Enterprise Edition users, please contact your administrator.
KDMElite30 will automatically check if your device has a valid antivirus license key.
Note: Your Defender Elite30 will need to be connected to a computer with internet access in order to
register for on-board antivirus protection.
If your Defender Elite30 does not already have a valid antivirus license key, then you must fill out the
following registration form with the required information and then click on the Apply button in order to
activate your one (1) year of free antivirus protection.
Click on the Skip button if you do not wish to activate antivirus protection. If you decide to skip activating
your antivirus now, you will not be able to activate it in the future without first resetting your drive to
the factory default setting.
Click on the Next button to continue with setting up your Defender Elite30’s security password.
11
Page 12

2.2.3 Setting a Password
From the Set Password screen:
Setting a Password
1. Enter your password in the Password data field. You can enter your password using KDMElite30’s
Virtual Keyboard by clicking the VK button. For more information on using the Virtual Keyboard
see section 2.4 Using the Virtual Keyboard to Enter Your Password on page 18.
Note: For security reasons, it is recommended that you incorporate letters, numbers and symbols
to achieve maximum security.
2. Enter the same password in the Confirm Password field for verification. If your passwords do not
match or there is any other issue with the password which you have entered in the Set Password
section, an explanation will be visible in the Password Info window.
Note: The Password Info window will inform you if there are any password requirements. It
updates in real time. Disregard the messages in the Password Info box until you have finished
entering your password into both the Password and Confirm Password fields.
3. Click on the Apply button to set your password. Once the password has been set you will see the
following message in the Password Info box:
4. Click the Next button and KDMElite30 will automatically configure the security parameters.
Note: If you are managing your Defender Elite30 with an administrative program like KLA or KRMC,
you can set a Master Password which can be used to reset the user password if it is lost or forgotten.
12
Page 13

KRMC Cloud
2.2.4 KRMC Cloud
Note: This section does not apply to Enterprise Edition users.
Kanguru Defender drives can be remotely managed using the Kanguru Remote Management Console
(KRMC). KRMC Cloud is hosted on Kanguru’s server and can be enabled on any non-Enterprise
Defender drive.
To Enable KRMC Cloud functionality:
1. Select the Enable KRMC Cloud option and then click on the Apply button.
2. A dialog box will appear asking if you want to register your device with KRMC Cloud. Click on
the Yes button.
3. Your web browser will open and direct you to the KRMC Cloud login page.
4. Purchase a license for your drive in order to use it with KRMC Cloud.
If you choose not to remotely manage your Defender using KRMC Cloud, select the Disable KRMC
Cloud option and then click on the Apply button. You will not be able to enable KRMC Cloud
functionality again, unless you first reset your drive to the factory default.
Click on the Next button to continue setting up your drive.
13
Page 14

2.2.5 Contact Info
Note: This section does not apply to Enterprise Edition users.
Contact Info
Your contact info will be saved to the drive. If you are managing your drive using KRMC Cloud, the
information entered here will be automatically be imported to the KRMC Cloud server when you register
your drive.
Fill in your information in the appropriate fields and then click on the Apply button. A window will
appear confirming that your data has been saved. Click on the OK button to close the window and then
click on the Next button to finish setting up your drive.
Congratulations! Your Defender Elite30 is now ready to use.
14
Page 15

Resetting from the Setup Wizard
2.2.6 Resetting the Device through the Setup Wizard
If you experience any problems during the Setup Wizard, you may have to perform a device reset before
you can complete the setup process.
To perform a device reset while in the Setup Wizard:
1. From anywhere in the Setup Wizard, click on the Prev button until you return to the Welcome
Screen.
2. On the Welcome Screen you will see a Reset button in the lower-left side of the application window.
Click on the Reset button.
3. A dialog box appears asking you to confirm the reset. Click on Ye s to reset your device to the
factory default settings.
After the device has been reset to the factory default setting you will be required to restart the Setup
Wizard.
15
Page 16

Unlocking the Security Partition
2.3 Unlocking the Security Partition
Anytime you run KDMElite30, you will be asked to login using your security password. You need to
provide the correct security password in order to access the Defender Elite30’s secure partition.
When the login screen appears:
1. Enter your password in the Password field.
2. Click on the Login button.
Caution! If you enter your password incorrectly six times in a row (six is the default setting, this may
be different depending on your setup), for security purposes, any data stored on the secure partition will
automatically be erased. You will be issued an on-screen warning when you have one attempt remaining,
to prevent accidental erasure. To cancel the login process, click on the Cancel button. Unplugging
and then reinserting your Defender Elite30 or manually running KDMElite30.exe will bring the login
window back.
Once you have successfully logged in to KDMElite30, the Defender Elite30’s secure partition will be
accessible through My Computer or Windows Explorer. For more information on accessing the secure
partition, see section 2.5 Encrypting Files and Folders on page 19.
Caution! Once KDMElite30 has started, you should never disconnect your device without first closing
KDMElite30 properly by clicking the KDMElite30 task bar icon and selecting Unmount Kanguru
Defender as described in section 2.11 Unmounting Your Defender Elite30 on page 30.
Note: If your Defender drive is being managed by KRMC, you may see an Autorun checkbox. This
means that your administrator has configured your drive to auto-execute a file saved on your drive’s secure
partition every time you successfully login. You can disable the Autorun functionality by unchecking
this box.
16
Page 17

Resetting from the Login Screen
2.3.1 Resetting from the Login Screen
In the event you have forgotten your password, you can use the Reset to Factory Default function to reset
your password. This function will restore the device to the factory settings, erasing all saved passwords
and data residing on the device’s secure partition.
Caution! Using the Reset to Factory Default function will format and wipe all data off the device! All
data on the device will be lost!
To reset your Defender Elite30 to the factory default:
1. Start KDMElite30.
2. When the login screen appears, click on the Reset button.
3. When you are prompted to confirm the reset, click on the Yes button.
4. When your password and data stored on the secure partition have been erased, the following
message will appear. Click on the OK button to complete the reset.
The next time you run KDMElite30, you will have to complete the Setup Wizard again before you are
able to access the secure partition. Please see section 2.2 The Setup Wizard on page 10 for instructions
on completing the Setup Wizard.
17
Page 18

Using the Virtual Keyboard to Enter Your Password
2.4 Using the Virtual Keyboard to Enter Your Password
The virtual keyboard feature can be accessed anytime you are required to enter your password in order to
prevent key logging applications from recording your key strokes and potentially stealing your password.
To use the virtual keyboard to enter your password:
1. Click on VK button which is located near the password entry field.
2. The virtual keyboard will appear below the Setup Wizard window. Click on the keys on the virtual
keyboard to enter your password.
3. Click on the VK button again to close the virtual keyboard.
Note: You can click on the Shuffle key on the bottom right corner of the virtual keyboard to randomize
the virtual keyboard layout. Randomizing the keyboard layout protects your password from mouse
tracking programs designed to thwart virtual keyboards.
18
Page 19

Encrypting Files and Folders
2.5 Encrypting Files and Folders
A key feature of the Defender Elite30 is drag & drop encryption; allowing you to simply drag files that
you want encrypt directly onto the drive. The Defender Elite30 automatically encrypts these files as they
are transferred to the secure partition, ensuring that your data stays safe and private.
To open the secure partition:
1. Start KDMElite30.
2. Login to KDMElite30 to gain access to the secure partition.
3. Click on the KDMElite30 icon located in the task bar and then select Explore Security Drive
from the popup menu.
Note: Linux users must right-click on the KDMElite30 icon in the task bar.
We recommend using either the drag & drop action, right-click copy/paste action, or the shortcut keys
(Ctrl+C and Ctrl+V) to copy and paste files and folders directly to and from the secure partition.
Note: Data saved on the Defender Elite30’s secure partition are only accessible after you have successfully
logged into KDMElite30.
19
Page 20

On-board Antivirus
2.6 On-board Antivirus (Windows only)
You must register your device with Kanguru Solutions in order to take advantage of the Defender Elite30’s
on-board antivirus functions (see section 2.2.2 Activating On-board Antivirus Protection (Windows only)
on page 11).
Once your on-board antivirus has been activated, real-time virus scanning is automatically enabled
whenever you log into your device. All files copied to the Defender are scanned for viruses and
malware.
Note: Updates for the latest the virus definitions are downloaded automatically when the device is
connected to a computer with internet access. If you disconnect your Defender before the latest update
has finished downloading, the Defender will save your place and continue the download the next time
it is connected to a computer with internet access.
Virus definitions are stored in the ‘System’ folder on the secure partition. If these files are deleted, they
will be automatically re-downloaded. If the device is reset to the factory default, these files will be
deleted and will need to be re-downloaded.
Caution! Do not store any data in the ‘System’ folder. Any data saved here that does not pertain to virus
definitions will be automatically deleted.
The Onboard Antivirus menu
You can access the on-board antivirus menu to scan your device, a path or a file. To open the antivirus
menu:
1. Right-click on the KDMElite30 icon located in the task bar.
2. Select Antivirus from the popup menu and then click on Configuration from the submenu.
The antivirus menu appears.
20
Page 21

2.6.1 Device Scan
The antivirus menu allows you to scan your Defender Elite30 for known viruses and malware.
Device Scan
To scan your Defender Elite30:
1. Click on the Scan Device tab at the top of the antivirus menu.
2. Click on the Start Scan button to begin scanning your Defender Elite30.
3. Once the scan has started:
○ Click on the Pause Scan button to pause the scan process. Click on the Resume Scan button to
resume the scan.
○ Click on the Stop Scan button to cancel the scan process.
4. The scan results will appear in the Scan Results window.
5. Click on the View Scan Log button to view a log of the previous scan.
6. Click on the OK button to close the antivirus menu.
21
Page 22

Path Scan
2.6.2 Path Scan
The antivirus menu allows you to scan any path on your computer for known viruses and malware.
Note: The Scan Path feature can be disabled on Enterprise Edition drives, please contact your
administrator for more information.
To scan a path on your computer:
1. Click on the Scan Path tab at the top of the antivirus menu.
2. Click on the Start Scan button and then select a path on your computer to begin scanning.
3. Once the scan has started:
○ Click on the Pause Scan button to pause the scan process. Click on the Resume Scan button to
resume the scan.
○ Click on the Stop Scan button to cancel the scan process.
4. The scan results will appear in the Scan Results window.
5. Click on the View Scan Log button to view a log of the previous scan.
6. Click on the OK button to close the antivirus menu.
22
Page 23

File Scan
2.6.3 File Scan
The antivirus menu allows you to scan any file on your computer for known viruses and malware.
Note: The Scan File feature can be disabled on Enterprise Edition drives, please contact your administrator
for more information.
To scan a file:
1. Click on the Scan File tab at the top of the antivirus menu.
2. Click on the Start Scan button and then select a file to begin scanning.
3. Once the scan has started:
○ Click on the Pause Scan button to pause the scan process. Click on the Resume Scan button to
resume the scan.
○ Click on the Stop Scan button to cancel the scan process.
4. The scan results will appear in the Scan Results window.
5. Click on the Advanced Info button to view a log of the previous scan.
6. Click on the OK button to close the antivirus menu.
23
Page 24

Antivirus License
2.6.4 Antivirus License
The antivirus menu allows you to view your antivirus license information and also renew your
subscription. You can view the number of remaining days that your current antivirus license is valid for.
• Click on the Licenses button to see your current antivirus license number.
• Click on the Renew License Online button to purchase a one-year antivirus license subscription
from Kanguru’s online store.
Once you have purchased or renewed your antivirus license, you will receive a new antivirus license key
as well as a customer ID. Enter your new license key and customer in the appropriate fields and then
click on the Verify ID button.
Your antivirus license will be activated once your customer ID and antivirus license key have been
verified.
24
Page 25

Security Settings
2.7 Security Settings
The Security Settings menu allows you to:
• Change your login password
• Enable or disable KRMC Cloud functionality
• Add or edit your contact information
The Security Settings menu
To access the security settings menu, right-click on the KDMElite30 icon located in the task bar
and select Security Settings... from the popup menu.
The Security Settings menu appears.
25
Page 26

Changing Your Password
2.7.1 Changing Your Password
You can change your security password through the Security Settings menu.
To change your password:
1. Click on the KDMElite30 icon located in the task bar and then select Security Settings…
from the popup menu. Note: Linux users must right-click on the KDMElite30 icon in the task bar.
2. The Password Settings window opens. Enter your current password in the Old Password field.
Enter your new password in the New Password field and then enter it again in the Confirm New
Password field.
3. When you are ready to proceed, click on the Apply button to set your new password.
4. Once your new password has been set, a confirmation window appears informing you that your
password has been successfully changed. Click on the OK button to complete setting your new
password.
26
Page 27

KRMC Cloud Settings
2.7.2 KRMC Cloud Settings
Note: This section does not apply to Enterprise Edition users.
You can enable or disable KRMC Cloud functionality through the Security Settings menu, as well as
register the device with an existing KRMC Cloud account using a KRMC Cloud Account ID.
Enable/Disable KRMC Cloud functionality
To change your device’s KRMC functionality, click on the KRMC Cloud Settings tab at the top of the
Security Settings menu to enter the KRMC Cloud Settings window. You can enable or disable KRMC
Cloud functionality by selecting the appropriate radio button and then clicking on the Apply button.
Register the device with an existing KRMC Cloud Account
If you have registered for a KRMC Cloud Account and have valid device licenses, you can manually
register your device with your KRMC Cloud Account using your KRMC Cloud Account ID. Simply
enter your KRMC Cloud Account ID into the field and then click on the Register button.
You can view your KRMC Cloud Account ID on the System Overview page when you login to KRMC
Cloud.
27
Page 28

Changing Languages
2.8 Changing Languages
KDMElite30 supports several languages. The KDMElite30 language is set to English by default.
To change the language:
1. Right -click on the KDMElite30 icon located in the task bar and then hover your cursor over
the Language option in the popup menu. A list of available languages appears.
2. Click on the desired language from the submenu that you want KDMElite30 to be displayed in.
28
Page 29

Online Documentation / About KDMElite30
2.9 Online Documentation
You can download digital copies of the Kanguru Defender Elite30’s documentation from the internet.
To download your Defender Elite30’s documentation, right-click on the KDMElite30 icon located
in the task bar
• Click on Quick Start Guide to download a digital copy of the Defender Elite30’s Quick Start
Guide.
• Click on Defender User Manual to download a digital copy of the Defender Elite30’s User Manual
2.10 About KDMElite30
To view information regarding the version of KDMElite30 currently installed on your device, right-click
on the KDMElite30 icon located in the task bar and then select About.
29
Page 30

Unmounting Your Defender Elite30
2.11 Unmounting Your Defender Elite30
When you unmount your Defender Elite30, the KDMElite30 application will close and the secure
partition containing your encrypted data will be inaccessible until you log into KDMElite30 again.
To unmount your Defender Elite30, right-click on the KDMElite30 icon located in the task bar and
then select Unmount Kanguru Defender.
The KDMElite30 icon in the task bar will disappear and the Defender Elite30’s secure partition will no
longer be accessible.
Caution! Do not disconnect the Kanguru Defender Elite30 without first properly unmounting your
device as detailed in this section and then safely removing the device from your computer as described
in chapter 4. Safely Removing Your Kanguru Defender Elite30 on page 33. Doing so may result in file
damage or data corruption.
30
Page 31

Updating Your Defender Elite30
3. Updating Your Defender Elite30
Updates for your Defender Elite30 flash drive’s client application may be released from time to time. To
view the version of the KDMElite30 client application currently running on your drive, see section 2.10
About KDMElite30 on page 29.
Please check whether your Defender Elite30 is being managed by Kanguru Remote Management Console
(KRMC), as the update process is different for enterprise edition and standard edition drives.
3.1 Updating standard edition drives
Standard edition Defender Elite30 drives will automatically check the Kanguru Central Server (KCS)
for client updates. Once you have successfully logged into your Defender Elite30’s secure partition,
KDME30 will check KCS for any available client updates. If an update is available, you will receive a
pop-up notification with instructions for downloading the updater file. If you refuse the update, you will
not be prompted to update again until the next version updater is released.
Note: The drive will only check KCS if it is connected to a computer with internet access.
To manually check if there is an update for Kanguru Defender Manager available for your device, right
-click on the KDM icon located in the task bar and then click on Check for Client Updates. If
a newer client version is available for your device, follow the on-screen instructions to download and
apply the update.
Standard edition Defender Elite30 users can also manually search and download available client updaters
from the Kanguru Support site. Defender Elite30 client updaters can be found under the ‘USB Client
Software Updates’ forum in the ‘Software Downloads and Updaters’ section (support.kanguru.com).
31
Page 32

Updating Your Defender Elite30
3.2 Updating KRMC enterprise edition drives
Enterprise edition Defender Elite30 drives are managed by the Kanguru Remote Management Console
(KRMC). Updaters for enterprise edition Defender Elite30 drives are available for download from
the Kanguru Support site. The KRMC system administrator is granted access to the enterprise edition
downloads when their KRMC order is processed. Enterprise edition updaters can be found under the
‘KRMC Enterprise’ forum in the ‘Software Downloads and Updaters’ section (support.kanguru.com).
Once you have downloaded your enterprise edition updater, you can create an ‘Upgrade Client
Application’ action in KRMC to deploy the update to all of your managed drives remotely.
Note: Only KRMC administrators are given access to download the enterprise edition updaters.
3.3 Verifying the download checksum
To verify the integrity of the KDMElite30 updater that you downloaded, please use the SHA256
Checksum tool. The SHA256 Checksum tool will generate a 64-character checksum which can be
verified against the checksum list published by Kanguru Solutions. This ensures that the updater file
was downloaded correctly and wasn’t altered.
The SHA256 Checksum tool and a list of valid checksum values can be found on Kanguru’s Support
site: https://kanguru.zendesk.com/entries/21747773-sha256-checksum-utility
To view and verify your download’s checksum:
1. Download the SHA256 Checksum tool from the Kanguru Solutions’ support site.
2. Save the SHA256 Checksum tool to the same directory that KDMElite30 updater file is saved in.
3. Open a command prompt window by clicking on Start → All Programs → Accessories →
Command Prompt.
4. Within the command prompt window, navigate to the directory containing your KDMElite30
updater file and the SHA256 Checksum tool.
5. Type “sha256.exe <filename.exe>”, where <filename.exe> is the name of the updater file that you
are checking.
6. Press the Enter key. A 64-character string appears. This is the SHA256 checksum of the updater.
7. Verify that the checksum generated by the SHA256 Checksum tool matches the checksum published
by Kanguru Solutions for your updater version.
If the checksum generated by the SHA256 Checksum tool matches the checksum published, then your
updater downloaded correctly. If the checksum generated does not match the checksum published by
Kanguru Solutions, please delete the updater from your computer and download it again.
32
Page 33

Safely Removing Your Kanguru Defender Elite30
4. Safely Removing Your Kanguru Defender Elite30
Before unplugging the Defender Elite30 from the USB port, you should always make sure that you have
unmounted the secured partition (see section 2.11 Unmounting Your Defender Elite30 on page 30).
After the Defender has been unmounted, you should use you operating system’s method for safely
removing a USB device.
4.1 Safely Removing from Windows
Caution! Be sure that the secure partition has been unmounted before attempting to remove the Defender
drive. See section 2.11 Unmounting Your Defender Elite30 on page 30.
Please use the Windows ‘Safely Remove Hardware’ function before disconnecting your Defender drive.
To safely remove your Defender Elite30:
1. Click on the Safely Remove Hardware icon located in the task bar.
2. A popup menu appears listing all USB devices connected to your computer. Select the Defender
Elite30 from the menu (it will appear with two drive letters).
A message will appear indicating that the portable storage device can be safely removed. You can now
disconnect your Defender Elite30.
If a message saying “The device cannot be stopped right now” appears, please make sure that any
windows or applications accessing the Defender Elite30 are closed and then try again.
4.2 Safely Removing from Mac OS X
Caution! Be sure that the secure partition has been unmounted before attempting to remove the Defender
drive. See section 2.11 Unmounting Your Defender Elite30 on page 30.
To remove the Defender drive, click and drag the KDMElite30 icon from the desktop into the trash can
icon. When you start dragging the KDMElite30 icon, the trash can icon will turn into an eject icon.
Alternatively, you can right-click on the KDMElite30 icon from the desktop and then select ‘Eject’ from
the pop-up menu.
Once the KDMElite30 icon no longer appears on your desktop then it is safe to disconnect your Defender
Elite30.
33
Page 34

Warranty Information / Tech Support
5. Warranty Information
This product carries a 3-year warranty from the date of purchase. Kanguru Solutions is not responsible
for any damages incurred in the shipping process. Any claims for loss or damage must be made to the
carrier directly. Claims for shipping errors should be reported to Kanguru Solutions within three (3)
working days or receipt of merchandise.
6. Tech Support
If you experience any problems using your Kanguru Defender Elite30 or have any technical questions
regarding any of our products, please call our technical support department. Our tech support is free and
available Monday thru Friday, 9am to 5pm EST.
Call 1-508-376-4245 or
Visit our website at www.Kanguru.com
34
Page 35

Appendix A - Proxy Support
If your computer uses a proxy server to access the internet, the correct proxy information will need to
be configured in KDMElite30.
If the KDMElite30 client application cannot connect to the internet you will see the following error
message:
If the computer that the Defender Elite30 is connected to uses a proxy server to access the internet,
click on the Yes button. KDMElite30 will try to read the proxy server information from the computer’s
configuration.
Proxy Support
• If KDMElite30 is able to determine your proxy server’s address and no authentication is required
then KDMElite30 will read this information and connect to the internet as normal.
• If KDMElite30 is able to determine your proxy server’s address but the proxy requires authentication
then you will need to enter your credentials in the window that appears.
• If KDMElite30 is unable to determine your proxy server’s address then you will need to enter the
proxy server address, proxy type and credentials:
Enter the proxy address and the port to connect to in the address field (e.g. 192.168.0.193:8080 or
proxycomp:8080). Select your proxy type and then enter your credentials. If KDMElite30 is able
to connect to the proxy server using those credentials then the authentication information is saved
in an encrypted proxy settings file.
Note: Proxy information must be configured once for each computer the Defender Elite30 is connected
to that connects to the internet through a proxy server.
35
Page 36

Kanguru Solutions
1360 Main Street
Millis, MA 02054
www.kanguru.com
05.15.14 V 1.1 © 2014 Kanguru Solutions
Legal terms and conditions available at www.kanguru.com. Please review and agree before use. Thank you.
 Loading...