

Page 1
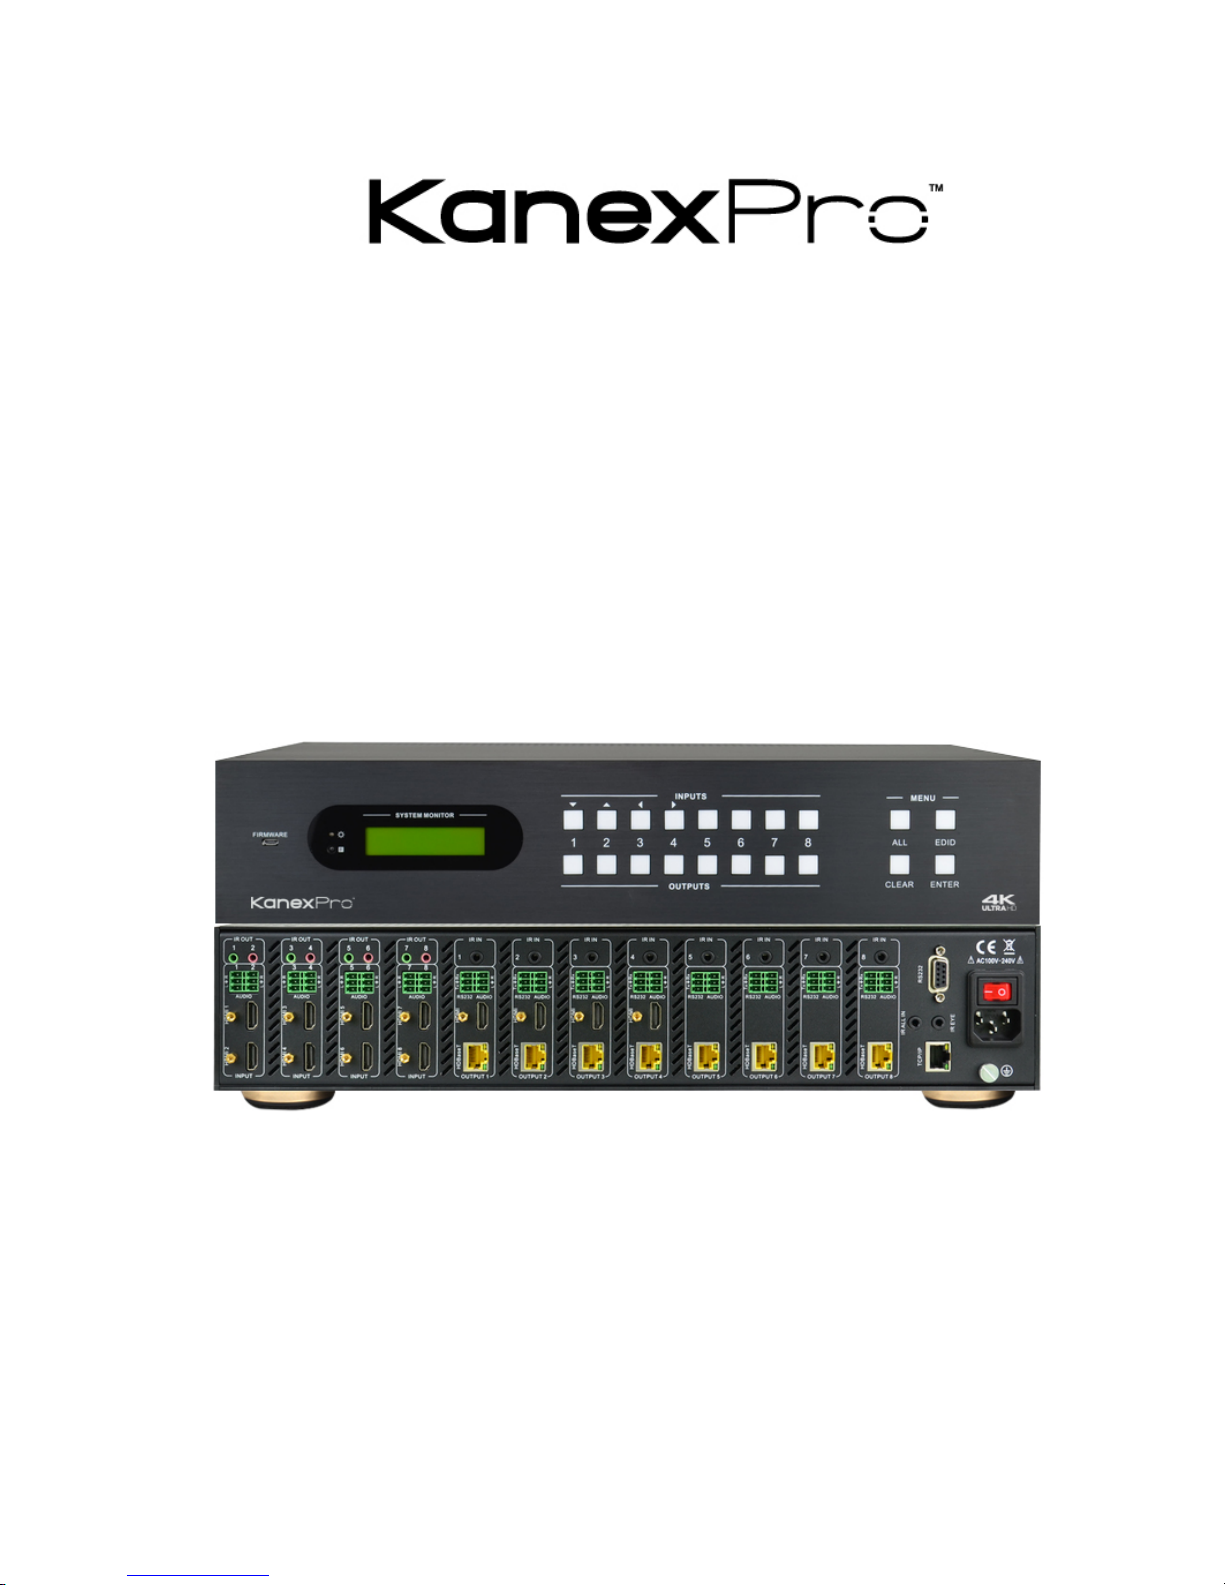
MX-HDBASE8X8-4K
4K HDBaseT™ 8x8 Matrix Switcher
All Rights Reserved
Version: MX-HDBASE8X8-4K_2015V1.1
Page 2

4K HDBaseT™ 8x8 Matrix Switcher
MX-HDBASE8X8-4K
www.kanexpro.com
Preface
Read this user manual carefully before using this product. Pictures shown in this manual
is for reference only, different model and specifications are subject to real product.
This manual is only for operation instruction only, not for any maintenance usage. The
functions described in this version are updated till April 2015. Any changes of functions
and parameters since then will be informed separately. Please refer to the dealers for
the latest details.
All product function is valid till 2015-4-13.
Trademarks
Mentioned product model, logo are trademarks. Any other trademarks mentioned in this
manual are acknowledged as the properties of the trademark owner. No part of this
publication may be copied or reproduced without the prior written consent.
FCC Statement
This equipment generates, uses and can radiate radio frequency energy and, if not
installed and used in accordance with the instructions, may cause harmful interference
to radio communications. It has been tested and found to comply with the limits for a
Class B digital device, pursuant to part 15 of the FCC Rules. These limits are designed
to provide reasonable protection against harmful interference in a commercial
installation.
Operation of this equipment in a residential area is likely to cause interference, in which
case the user at their own expense will be required to take whatever measures may be
necessary to correct the interference
Any changes or modifications not expressly approved by the manufacture would void
the user’s authority to operate the equipment.
Page 3

4K HDBaseT™ 8x8 Matrix Switcher
MX-HDBASE8X8-4K
www.kanexpro.com
SAFETY PRECAUTIONS
To insure the best from the product, please read all instructions carefully before using
the device. Save this manual for further reference.
! Unpack the equipment carefully and save the original box and packing material for
possible future shipment
! Follow basic safety precautions to reduce the risk of fire, electrical shock and injury
to persons.
! Do not dismantle the housing or modify the module. It may result in electrical shock
or burn.
! Using supplies or parts not meeting the products’ specifications may cause damage,
deterioration or malfunction.
! Refer all servicing to qualified service personnel.
! To prevent fire or shock hazard, do not expose the unit to rain, moisture or install this
product near water.
! Do not put any heavy items on the extension cable in case of extrusion.
! Do not remove the housing of the device as opening or removing housing may
expose you to dangerous voltage or other hazards.
! Install the device in a place with fine ventilation to avoid damage caused by
overheat.
! Keep the module away from liquids.
! Spillage into the housing may result in fire, electrical shock, or equipment damage. If
an object or liquid falls or spills on to the housing, unplug the module immediately.
! Do not twist or pull by force ends of the optical cable. It can cause malfunction.
! Do not use liquid or aerosol cleaners to clean this unit. Always unplug the power to
the device before cleaning.
! Unplug the power cord when left unused for a long period of time.
! Information on disposal for scrapped devices: do not burn or mix with general
household waste, please treat them as normal electrical wastes.
Page 4

4K HDBaseT™ 8x8 Matrix Switcher
MX-HDBASE8X8-4K
www.kanexpro.com
Contents
1. Introduction .................................................................................................................. 1!
1.1 Introduction to the 4K HDBaseT 8x8 Matrix Switcher ........................................ 1!
1.2 Features ............................................................................................................. 1!
1.3 Package List ....................................................................................................... 1!
2. Product Appearance of the 4K HDBaseT 8x8 Matrix Switcher ................................... 2!
2.1 Front Panel ......................................................................................................... 2!
2.2 Rear Panel ......................................................................................................... 4!
3. System Connection ..................................................................................................... 5!
3.1 System Applications ........................................................................................... 5!
3.2 Usage Precautions ............................................................................................. 5!
3.3 Connection Diagram .......................................................................................... 6!
3.4 Connection Procedure ....................................................................................... 6!
3.5 Connection with HDMI Twisted Pair PoC Receiver ........................................... 7!
4. System Operations ...................................................................................................... 7!
4.1 Front Panel Button Control ................................................................................. 7!
4.1.1 Switching I/O connection .......................................................................... 7!
4.1.2 EDID Management ................................................................................... 8!
4.1.3 Inquiry ...................................................................................................... 9!
4.1.4 Clear operation ....................................................................................... 10!
4.2 IR Control ......................................................................................................... 10!
4.2.1 Usage of IR Remote ............................................................................... 12!
4.2.2 IR Operations ......................................................................................... 13!
4.3 RS232 Control .................................................................................................. 16!
4.3.1 Connection with RS232 Communication Port ........................................ 16!
4.3.2 Installation/uninstallation of RS232 Control Software ............................ 16!
4.3.3 Basic Settings ........................................................................................ 16!
4.3.4 RS232 Communication Commands ....................................................... 18!
4.3.5 RS232 Control Modes ............................................................................ 26!
4.3.6 Control 3rd-Party Device from Local ...................................................... 27!
4.3.7 Bi-directional RS232 Control .................................................................. 28!
Page 5

4K HDBaseT™ 8x8 Matrix Switcher
MX-HDBASE8X8-4K
www.kanexpro.com
4.4 TCP/IP Control ................................................................................................. 29!
4.4.1 Control Modes ........................................................................................ 29!
4.4.2 GUI for TCP/IP control ........................................................................... 30!
4.4.3 GUI Update ............................................................................................ 34!
4.5 Firmware Update via USB ................................................................................ 34!
5. Specification .............................................................................................................. 36!
6. Troubleshooting & Maintenance ................................................................................ 38!
7. After-sales Service .................................................................................................... 40!
Page 6

4K HDBaseT™ 8x8 Matrix Switcher
MX-HDBASE8X8-4K 1
KanexPro.com
1. Introduction
1.1 The MX-HDBASE8X8-4K
The KanexPro MX-HDBASE8X8-4K matrix switcher is a professional 8 HDMI input to 8
HDBaseT output switch with 4 HDMI mirrored outputs designed for routing 4K/UHD
applications. For proficient audio capabilities it includes 8 auxiliary audio inputs for
stereo and 8 stereo outputs for HDMI audio de-embedding and 8 IR inputs. The HDMI
inputs from the matrix can be controlled via front panel buttons, bi-directional IR &
RS232, or in GUI mode using Ethernet. The selected source is delivered to HDMI
Output 1~4(for HDMI input 1~4) & HDBaseT outputs 1~8 (easy extension to 70m at
1080p and 40m at 4Kx2K on a single CAT5e/6 connection with optional PoE based
HDBaseT receivers) simultaneously. The unit provides built-in EDID and HDCP
management.
1.2 Features
! Ultra-fast 8x8 switching with instant display
! Distribute eight HDBaseT outputs up to 70m at 1080p & 40m at 4Kx2K on a single
CAT5e/6 cable.
! Supports power over Ethernet (PoE) to all eight receivers
! Four HDMI mirrored outputs for local monitor support
! Deep color support up to 16 bit
! RGB/YCbCr 4:4:4, YCbCr: 4:2:2, 4K/30Hz
! Illuminated buttons w/ Front panel LCD
! Dedicated audio zones for digital and stereo audio
! Audio De-embedding
! Advanced EDID & HDCP management
! Bi-directional IR & RS-232 control
! Built-in GUI using Ethernet connectivity
! Controllable via front panel, RS232, IR & IP
! IR remote control included
! Easy firmware upgrade thru Micro-USB port
! Locking HDMI connectors
! 2 RU rack-mountable steel enclosure
Page 7
4K HDBaseT™ 8x8 Matrix Switcher
MX-HDBASE8X8-4K 2
KanexPro.com
! External International power supply (100V-240V AC, 50/60Hz)
1.3 Package List
" 1 x 4K HDBaseT 8x8 Matrix Switcher
" 2 x Mounting ears (6 x Screws)
" 1 x RS232 cable
" 1 x IR Receiver
" 4 x Plastic cushions (4 x Black Screws)
" 1 x IR remote
" 1 x Power cord
" 24 x Pluggable Terminal Blocks
" 1 x User manual
Notes:
1) Confirm if the product and the accessories are all included, if not, please contact with
the dealers.
2) This matrix switcher does not include any receivers, please order the receivers
separately by contacting your AV dealer or KanexPro directly.
2. Product Appearance of the KanexPro 8x8 Matrix Switcher
2.1 Front Panel
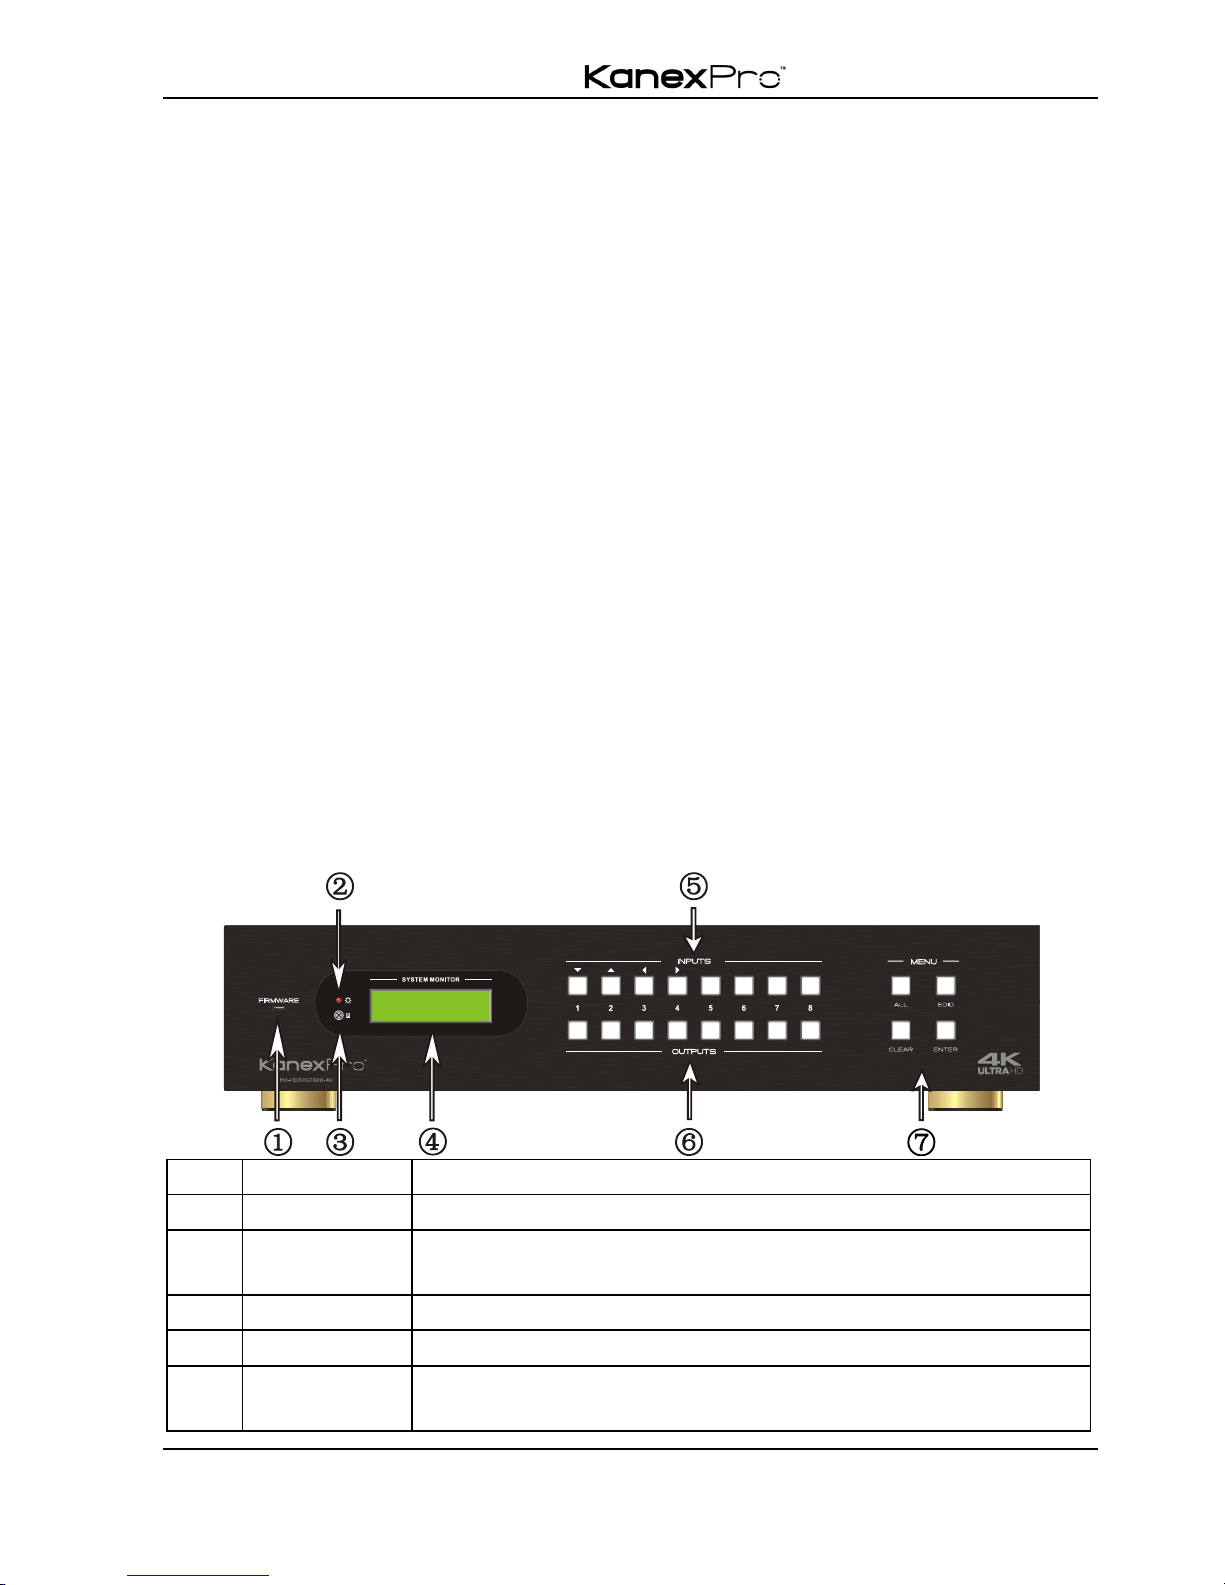
No.
Name
Description
Firmware
Micro USB port for updating firmware
Power
Indicator
" Illuminate red when power on
" Illuminate yellow in standby mode
IR
In-built IR sensor, receive IR signals sent from IR remote.
LCD Screen
Display real-time operation status.
INPUTS/Me
nu buttons
" Normal mode: Back-lit buttons, ranging from "1" to "8".
" Inquiry mode (buttons 1~4): Press, “ENTER” for more than
Page 8

4K HDBaseT™ 8x8 Matrix Switcher
MX-HDBASE8X8-4K 3
KanexPro.com
3 seconds to enter this mode. Dial to select
different menus, to select different options.
OUTPUTS
buttons/
EDID
Manageme
nt buttons
" Normal mode: Backlit buttons, ranging from "1" to
"8".Output 1~4 support synchronous local HDMI output.
" EDID Invoking mode: press and hold EDID button for 3
seconds or more to enter this mode, buttons 1~6
correspond to the 6 embedded EDID data separately.
Press any of the 6 buttons to invoke embedded EDID data.
Function
buttons
" ALL: Select all inputs/ outputs
Example: To transfer both AV and IR signals from input
channel No.1 to all output channels.
Operation: Press buttons in this order: “1”, “ALL”, “ENTER”
" EDID management button: Enable input port to manually
capture and learn the EDID data of output devices.
Example: Input channel No.2captures and learns the EDID
data of output channel No.4
Operation: Press buttons in this order: “EDID”, “2”, “4”,
“ENTER”
" CLEAR: Withdraw an operation like switching output
channel; learning EDID data before it comes into effect.
Meanwhile, the matrix will return to the previous status.
" ENTER: Confirm operation. Press and hold it for 3 seconds
to enter in Inquiry mode.
Notes: Pictures shown in this manual are for reference only; different model and
specifications are subject to real product.
Important:
This matrix switcher does not include any receivers, please order the receivers
separately by contacting your AV dealer or KanexPro directly. Referring part #
HDBASE70POER for optional HDBaseT receivers which are powered over Ethernet
from the Matrix switcher.
Page 9
4K HDBaseT™ 8x8 Matrix Switcher
MX-HDBASE8X8-4K 4
KanexPro.com
2.2 Rear Panel
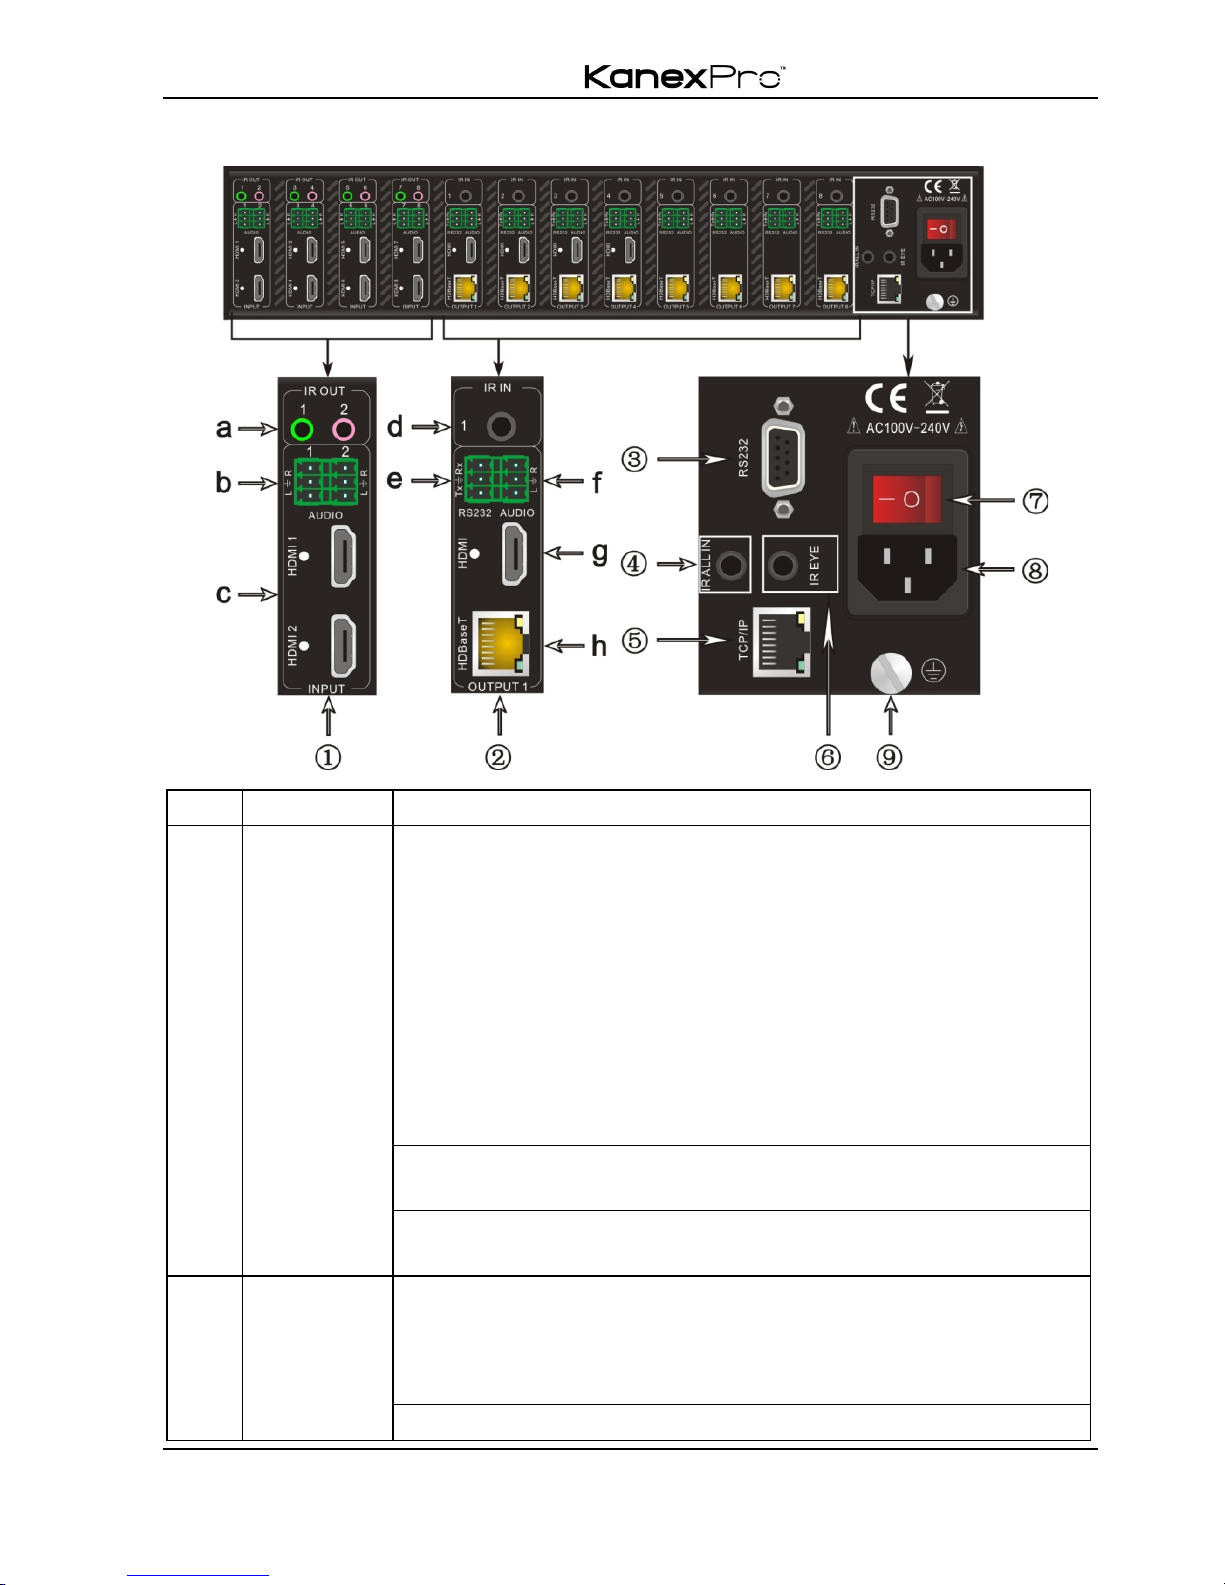
No.
Name
Description
INPUTS
a. IR OUT:8 in total connect with IR emitters to deliver the
IR signal sent from the far-end receivers connected to the
HDBaseT ports.
These IR OUT sockets make up an IR matrix with the IR
IN sockets on the far-end receivers, and all can be
switched synchronously with the AV signal, or separately
switching.
In default setting, the 8 IR OUT corresponds with the 8 IR
IN, i.e. IR OUT1→IR IN1, IR OUT2→IR IN2, …IR OUT8
→IR IN8.
b. AUDIO: Auxiliary audio input ports, 8 in total, connect
with analog audio sources
c. HDMI: HDMI input ports, 8 in total, type A female HDMI
connector, connect with HDMI input source devices.
OUTPUTS
d. IR IN: Connect with IR receiver (with carrier), 8 in total,
correspond to the 8 IR OUT, cannot be switched
separately. It makes up an IR bi-directional transmission
with the IR OUT on the corresponding far-end receiver.
e. RS232: 3-pinpluggable terminal blocks, 8 in total,
Page 10

4K HDBaseT™ 8x8 Matrix Switcher
MX-HDBASE8X8-4K 5
KanexPro.com
correspond to 8 output sources separately, communicate
with the RS232 port on corresponding HDBaseT receiver,
and cannot be switched separately. When controlled by
HDBaseT receiver, the communication protocol must be
the same with the matrix switcher’s.
f. AUDIO: stereo audio output ports, 8 in total
g. HDMI: Local HDMI output ports for HDMI Inputs 1~4,
synchronously switched with HDBaseT Output 1~4
h. HDBaseT: output extension ports, works with HDBaseT
receivers to extend signals and power far-end HDBaseT
receiver on a single CAT5e/6 cable.
RS232
Serial port for unit control, 9-pin female connector, connects
with control device such as a PC.
④
IR ALL IN
Input port for IR control signal; connect with IR receiver (with
carrier), delivers the received IR signal to all the 8 far-end
receivers.
TCP/IP
TCP/IP port for unit control
⑥
IR EYE
Connect with extended IR receiver; use the IR remote to
control the matrix switcher.
⑦
Power
Trigger
Press the button to turn on/off the matrix. The indicator turns
red when power on.
⑧
Power port
Connect to an AC 100V~240V power adapter via the included
power cord
⑨
GROUND
Connect to grounding; make sure the unit is grounded well.
Note: Pictures shown in this manual are for reference only; different model and
specifications are subject to real product.
3. System Connection
3.1 System Applications
As its good performance in control and transmission, the matrix switcher can be widely
used in computer realm, monitoring, large screen displaying, conference system,
television education and bank securities institutions etc.
3.2 Usage Precautions
1) System should be installed in a clean environment and has a prop temperature and
humidity.
2) All of the power switches, plugs, sockets and power cords should be insulated and
safe.
3) All devices should be connected before power on.
Page 11
4K HDBaseT™ 8x8 Matrix Switcher
MX-HDBASE8X8-4K 6
KanexPro.com
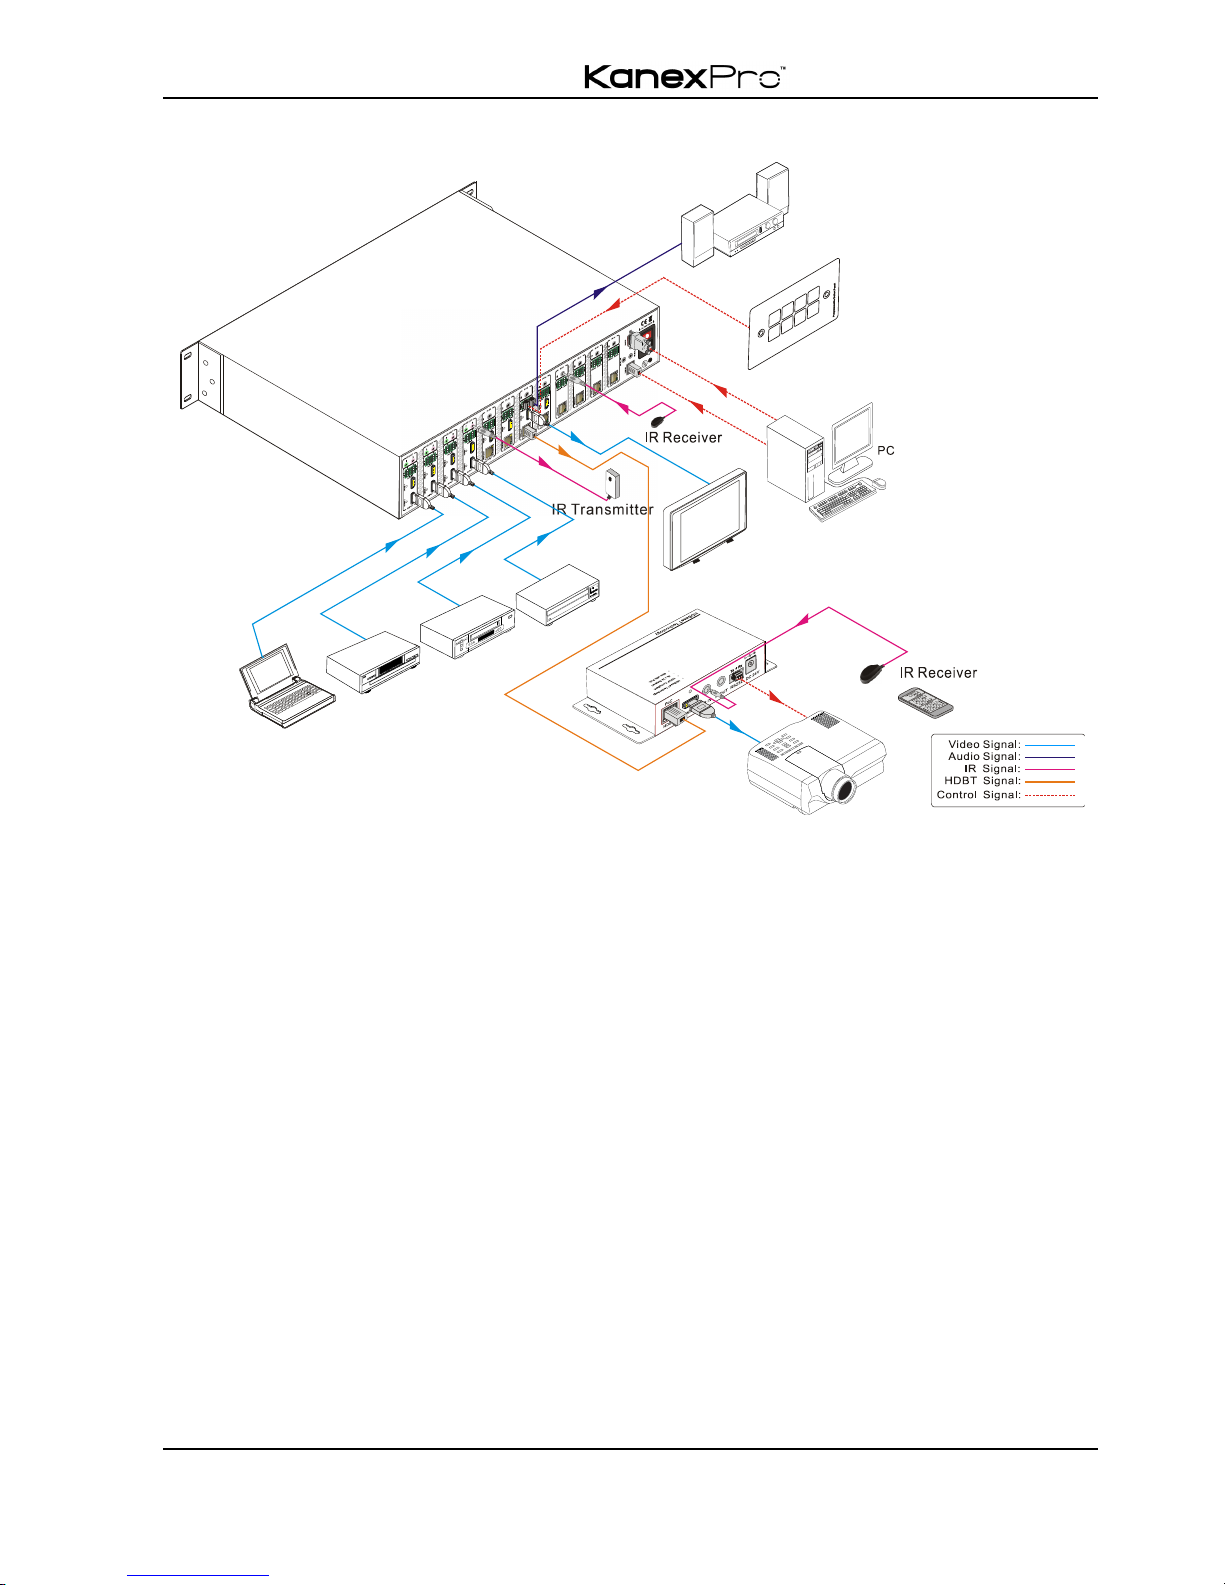
3.3 Connection Diagram
3.4 Connection Procedure
1) Connect HDMI sources (e.g. DVD) to HDMI inputs of the matrix switcher with HDMI
cables.
2) Connect auxiliary audio sources to the AUDIO IN ports with audio cables.
3) Connect HDBaseT receivers (e.g. HDMI Twisted Pair PoC Receiver) to the
HDBaseT Output ports with twisted pair.
4) Connect HDMI displays (e.g. HDTV) to HDMI outputs of the matrix switcher or the
receivers with HDMI cables
5) Connect speakers/earphones to AUDIO output ports
6) Connect the RS232 port of control device (e.g. a PC) to the RS232 port of either
switcher or far-end receivers. RS232 signal can be transmitted bi-directionally
between the switcher and far-end receivers.
7) The switcher can collect IR signal sent by the included IR remote via its built-in IR
sensor or through external IR receiver connected to the IR IN/ IR EYE/ IR ALL IN
port. The IR signal can be transmitted bi-directionally between the switcher and
far-end receivers.
IR Tran sm itt er
VCR
STB
DVD
Speaker
Laptop
RS232
cont ro l pan el
HDTV
PoC
Page 12
4K HDBaseT™ 8x8 Matrix Switcher
MX-HDBASE8X8-4K 7
KanexPro.com
8) Connect an AC 100V~240V power outlet and the switcher with the AC power cord.
Note:
1. Connect HDBT ports of switcher and far-end receiver with straight-through cable.
2. Output audio is selectable via RS232 command Audio/[X]:[Y]. It’s free to select
whether analog audio or HDMI audio to output. Default is HDMI audio.
3. IR receivers connected to IR IN& IR ALL IN should be with carrier. If not, send
command %0900.or %0901.to activate native carrier mode or force carrier mode in
the IR matrix launched between the switcher and far-end receivers.
3.5 Connection with HDMI Twisted Pair PoC Receiver
4K HDBaseT 8x8 Matrix Switcher boasts 8 HDBaseT output ports, which support PoC
solution. Connect the HDBT output ports of 4K HDBaseT 8x8 Matrix Switcher to
HDBaseT Receivers supporting PoC(like HDMI Twisted Pair PoC Receiver) via twisted
pair. Plug a power supply to the power port of the switcher; the HDBaseT Receivers will
be energized synchronously with PoC solution.
4. System Operations
4.1 Front Panel Button Control
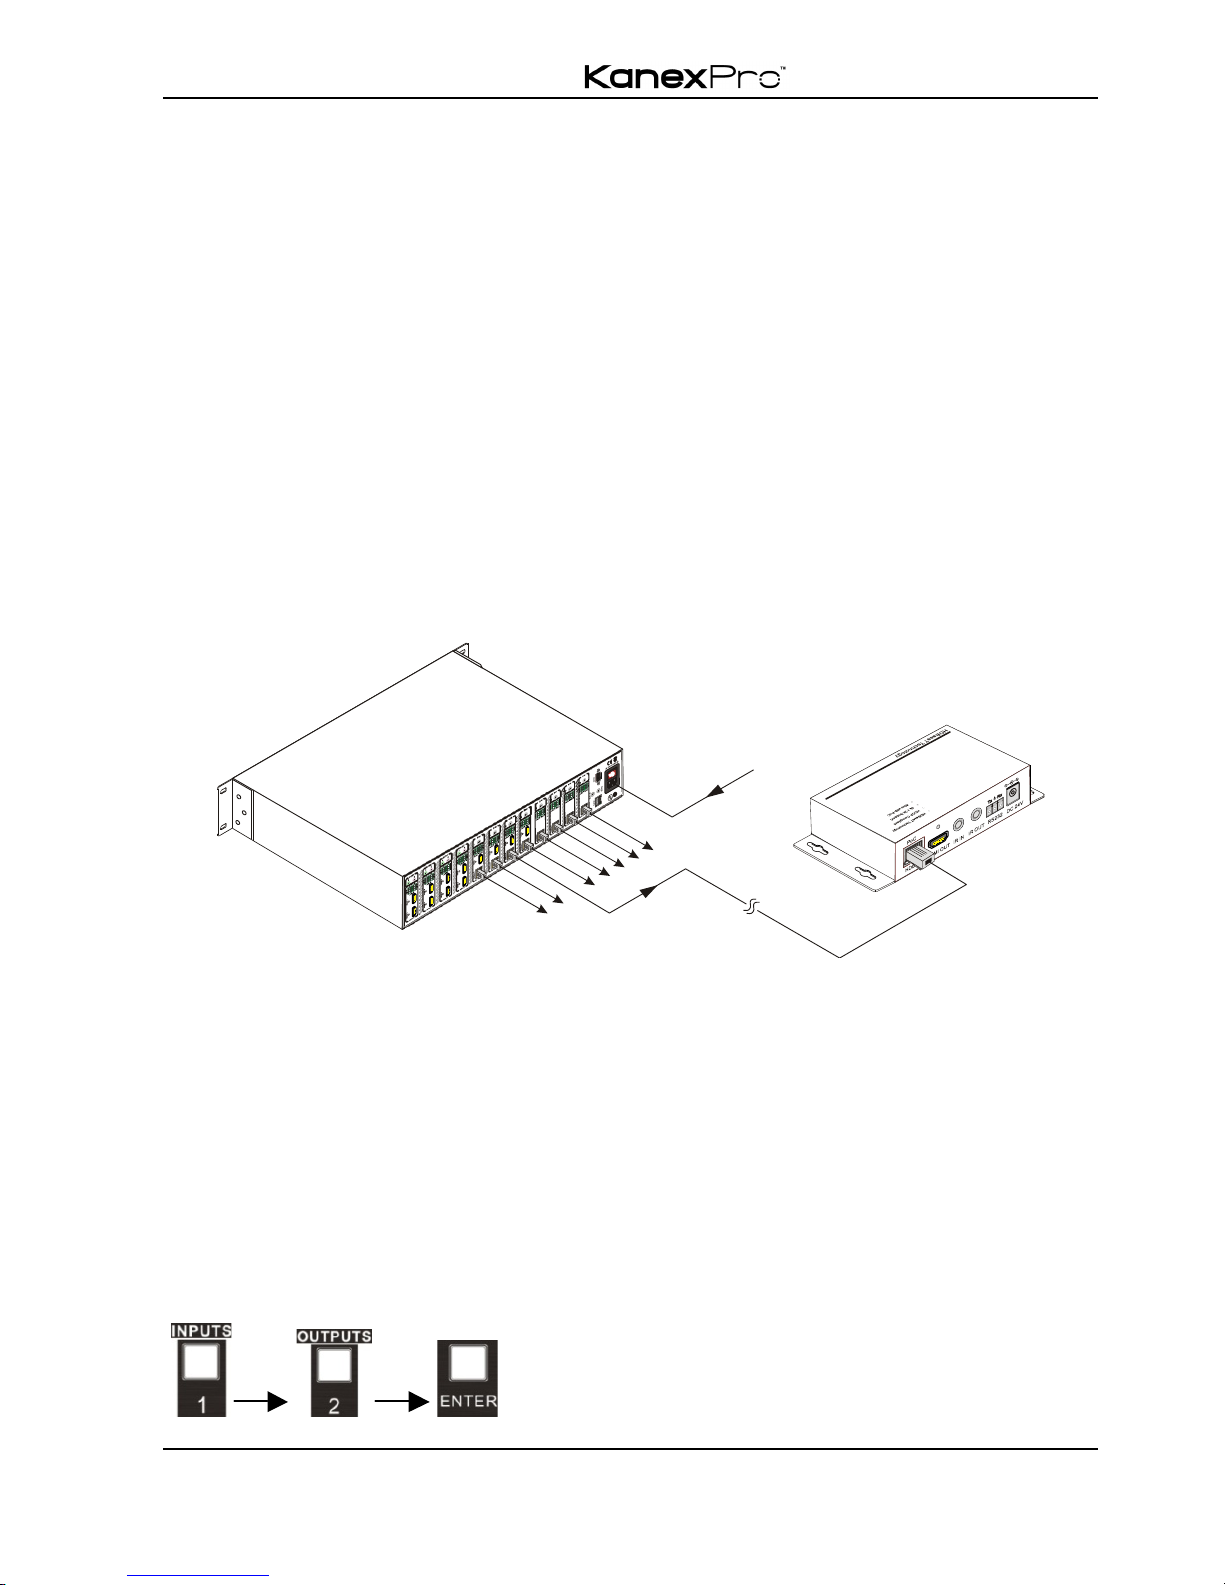
The operation examples are showed in 2.1 Front Panel. Here we make a brief
introduction to the system operations.
4.1.1 Switching I/O connection
1) To convert one input to an output:
Operation: “input”+“output”+“ENTER”
Example: input 1 to output 2
P
o
C
AC 1 00V ~ 240 V
Page 13
4K HDBaseT™ 8x8 Matrix Switcher
MX-HDBASE8X8-4K 8
KanexPro.com
Note: In default status, 8 IR OUT sockets correspond with 8 HDMI INPUTS. When you
convert an HDMI input to an output, the corresponding IR OUT will be switched
synchronously.
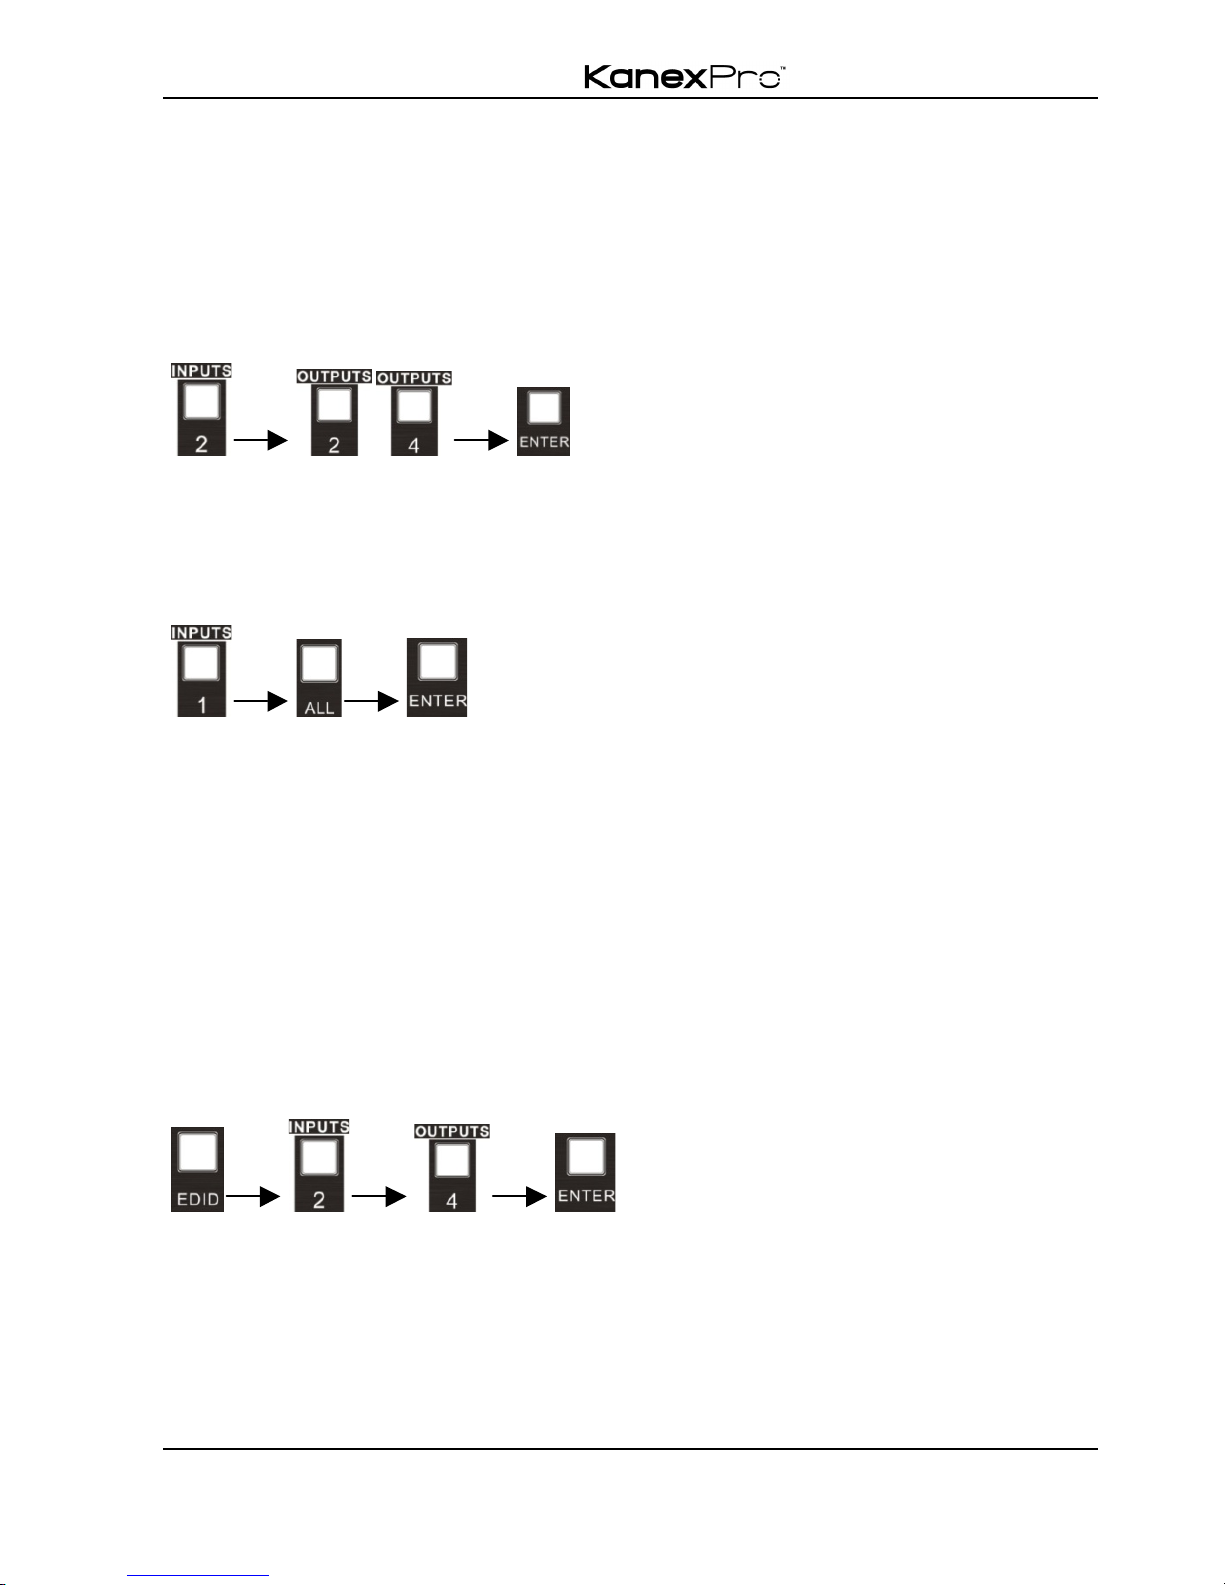
2) To convert an input to several outputs:
Operation: “input” + “output” + “output” +… +“ENTER”
Example: Switch input 2 to output 2, 4
3) To convert an input to all outputs:
Operation: “input” + “ALL” +“ENTER”
Example: Convert input 1 to all outputs
Note: Indicators of the pressed buttons will blink green for three times if the conversion
is done, then it will be off. If the conversion failed, they will be off immediately.
4.1.2 EDID Management
The matrix switcher features EDID management to maintain compatibility between all
devices. It can be controlled via EDID learning and EDID invoking.
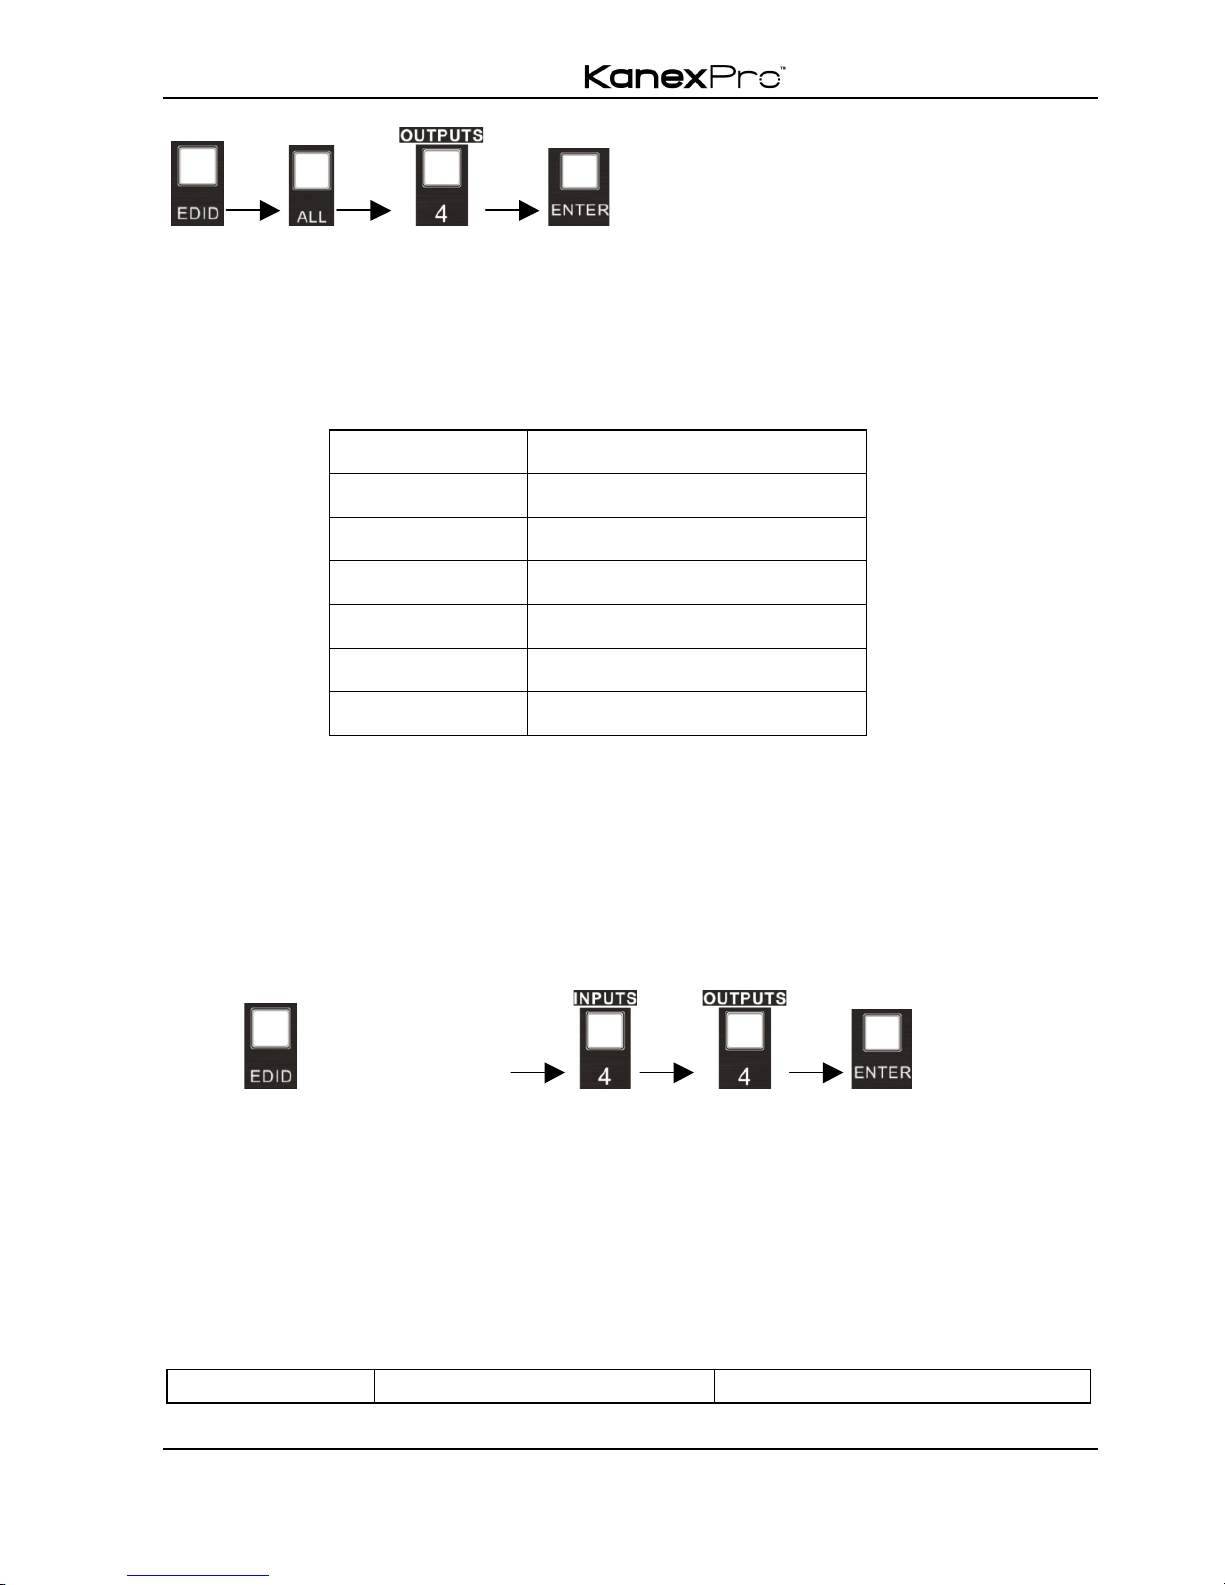
EDID Learning (from output):
" One input port learns the EDID data of one output port
Operation: Press “EDID”, “INPUTS”+“OUTPUTS”+“ENTER”.
Example: Input 2learns EDID data from output 4
" All input ports learn EDID data from one output port
Operation: Press “EDID”, “ALL”+“OUTPUTS”+“ENTER”
Example: All input ports learn EDID data from output 4
Page 14
4K HDBaseT™ 8x8 Matrix Switcher
MX-HDBASE8X8-4K 9
KanexPro.com
Note: Indicators of the pressed buttons will blink green for three times if the conversion
is done, then it will be off. If the conversion failed, they will be off immediately.
EDID invoking:
There are six types of embedded EDID data. The chart below illustrates the detailed
information of the embedded EDID data:
Output Button
EDID Data
1
1080P 3D 2CH
2
1080P 3D Multichannel
3
1080P 2D 2CH
4
1080P 2D Multichannel
5
3840x2160 2D(30Hz)
6
4096x2160 2D(30Hz)
Format: Press and hold “EDID” for 3 seconds, “INPUTS”+“OUTPUTS”+“ENTER”.
Operations:
" Set EDID data for one input
Operation: Press “EDID”(hold for 3 seconds to enter in EDID setting status),
“INPUTS”+“OUTPUTS”+“ENTER”.
Example: Set the EDID data of INPUT 4 to the forth type of embedded EDID data:
Press (hold for 3 seconds) .
Note: If the conversion is successful, indicators of the pressed buttons will blink green
for three times at normal speed; if the conversion failed, they will blink for three times
quickly.
4.1.3 Inquiry
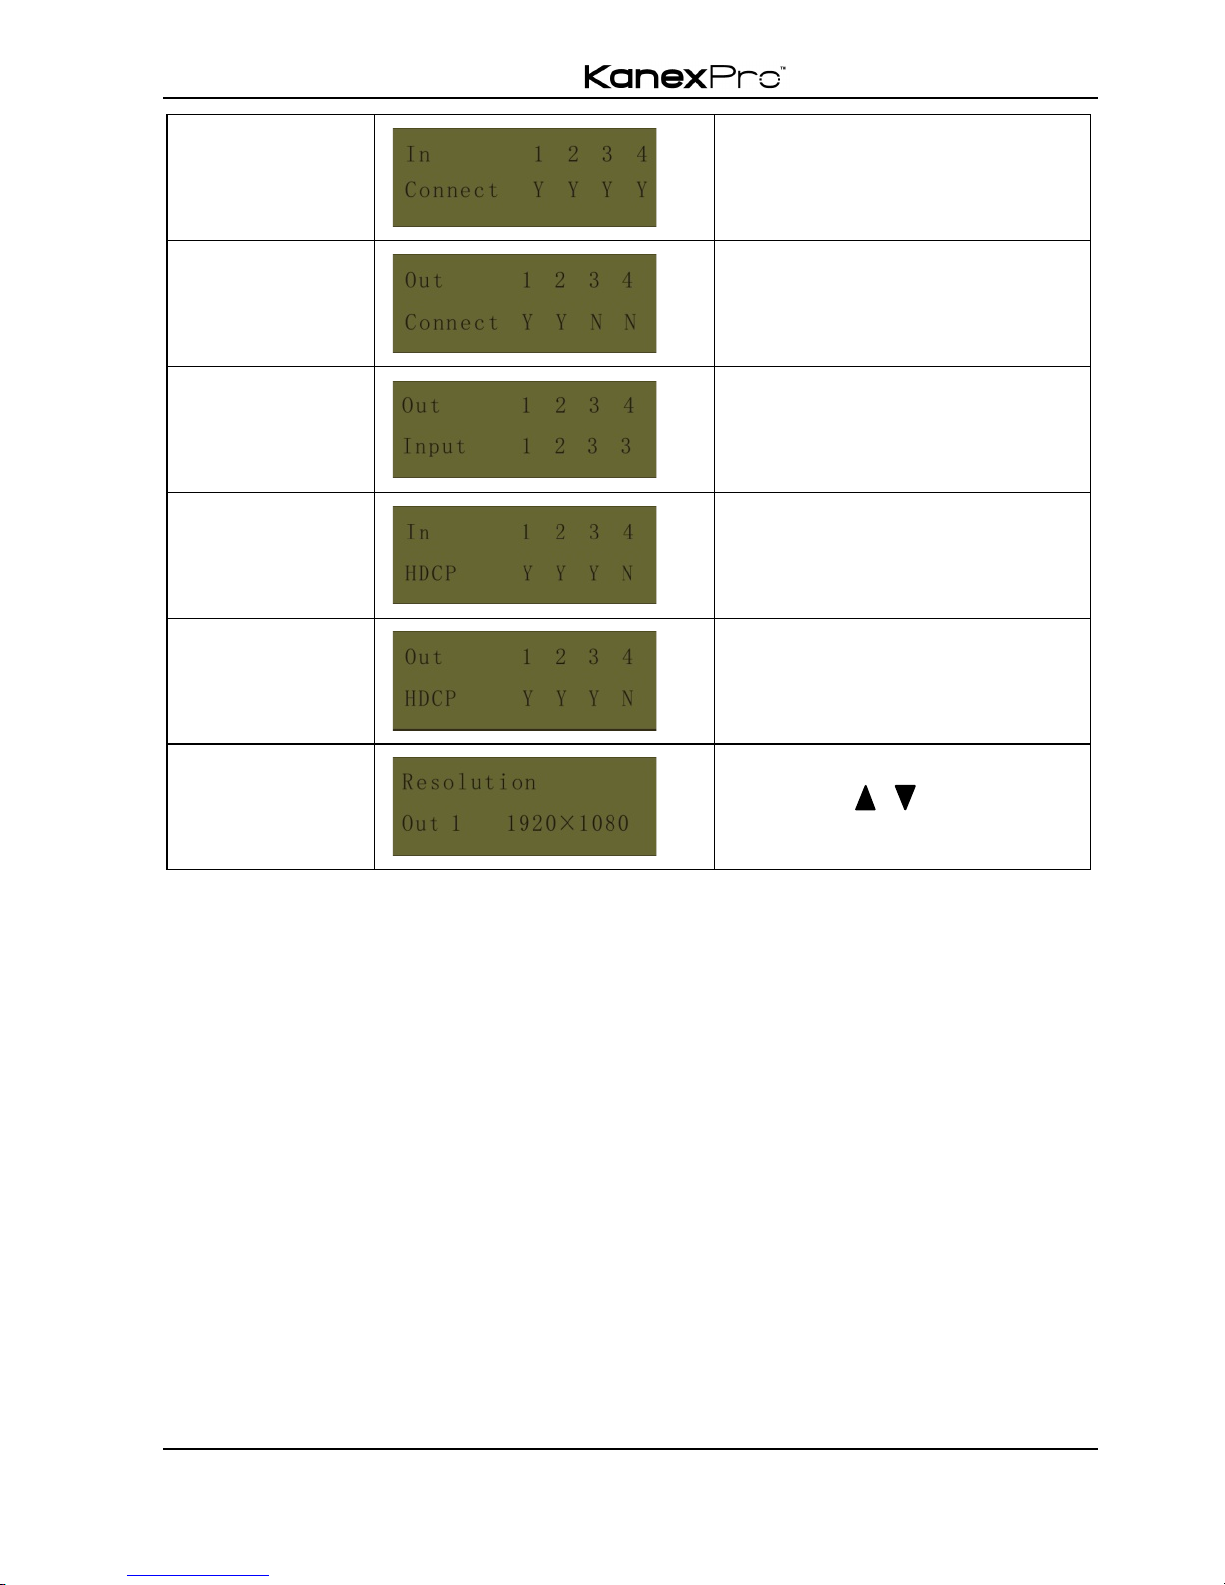
" Check status
Press and hold the button “ENTER” for 3 seconds, it will enter into system inquiry menu.
Use Left and Right direction button to navigate checking the previous/next items.
Function Items
Example
Description
Page 15
4K HDBaseT™ 8x8 Matrix Switcher
MX-HDBASE8X8-4K 10
KanexPro.com
Check the
connection
status of inputs
Y means the corresponding port
is connected with input device, N
means not.
Check the
connection
status of outputs
Y means the corresponding port
is connected with output device,
N means not.
Correspondence
between inputs
and outputs
Shows the correspondence
between the 8 inputs and 8
outputs.
Check if the
input is with
HDCP
Y means the input signal is with
HDCP, N means not.
Check if the
output is with
HDCP
Y means the output signal is with
HDCP, N means not.
Check the
output resolution
Use button to check the
8 output resolutions separately.
" Output check
Press any output button to check its corresponding input.
Example: Check which one is the corresponding input for output 2. (Presume Output 2
corresponds to Input 1.)
Operation: Press Output 2 button, LCD screen display “AV: 1->2 IR: 1->2”, and
indicators of input 1 and output 2 turn on and last for 3 seconds. Then output 2
corresponds to input 1.
4.1.4 Clear operation
When you switch output channel, learn EDID data, or set EDID data, press Clear button
to withdraw the operation before you press “ENTER” to carry it on. When you press it,
the matrix will return to the previous status.
4.2 IR Control
By using IR & HDBaseT transmission technology, the switcher has some functions as
follows:
Page 16

4K HDBaseT™ 8x8 Matrix Switcher
MX-HDBASE8X8-4K 11
KanexPro.com
1) Control far-end output device from local.
2) Control local input/output device remotely.
3) Control the 4K HDBaseT 8x8 Matrix Switcher locally/remotely.
Page 17
4K HDBaseT™ 8x8 Matrix Switcher
MX-HDBASE8X8-4K 12
KanexPro.com
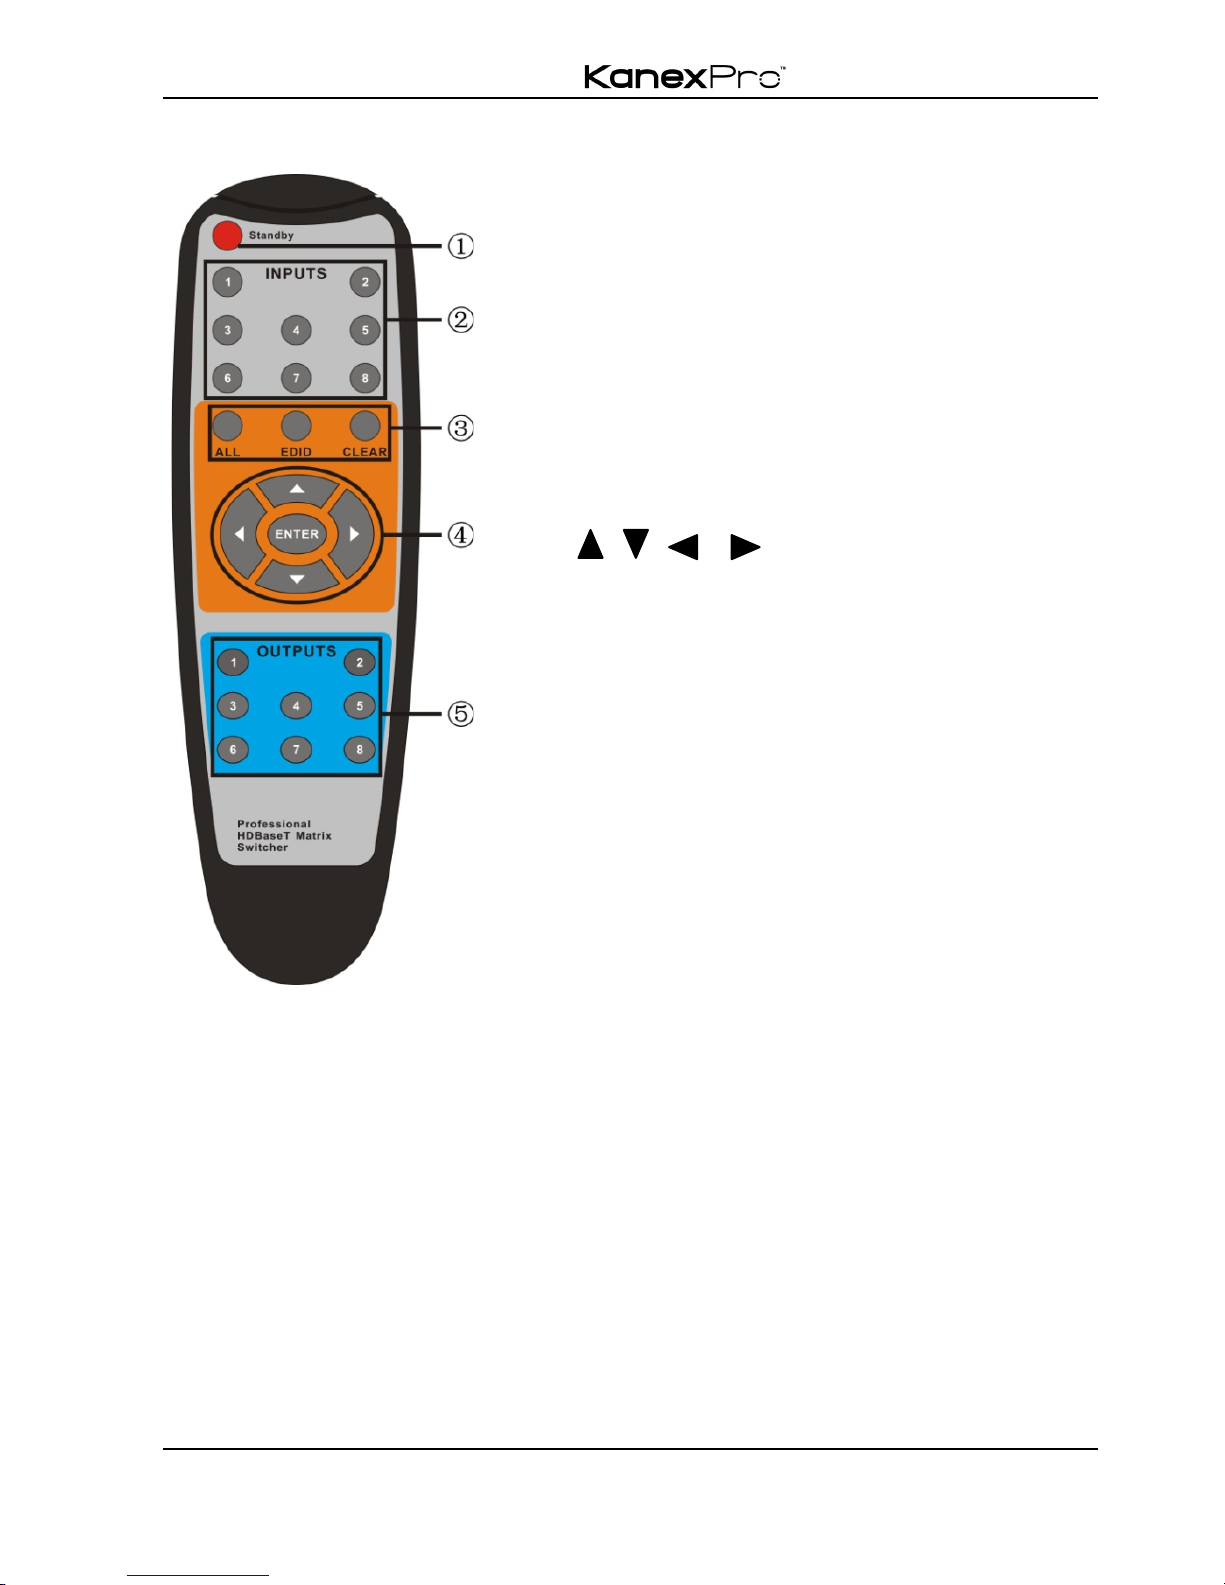
4.2.1 Usage of IR Remote
Standby button, press it to enter/ exit standby
mode
Input channels, range from 1~8,
corresponding IR signal switched
synchronously when switching input
channels.
Menu buttons, ALL, EDID and CLEAR, same
with the corresponding front panel buttons.
Please refer to 4.1 Front Panel Button Control
for details.
: Navigation buttons.
ENTER: Confirm button.
Output channels, range from1~8.
Each channel has 1 IR IN, 1 HDBaseT, 1
RS232, and 1 AUDIO outputs, and
channel1~4have HDMI outputs.
Note: With this IR remote, the matrix switcher can be controlled with the built-in IR, the
extended IR receiver connected to the “IR EYE”/”IR ALL IN” and the IR receiver on the
far-end receiver.
Page 18
4K HDBaseT™ 8x8 Matrix Switcher
MX-HDBASE8X8-4K 13
KanexPro.com
4.2.2 IR Operations
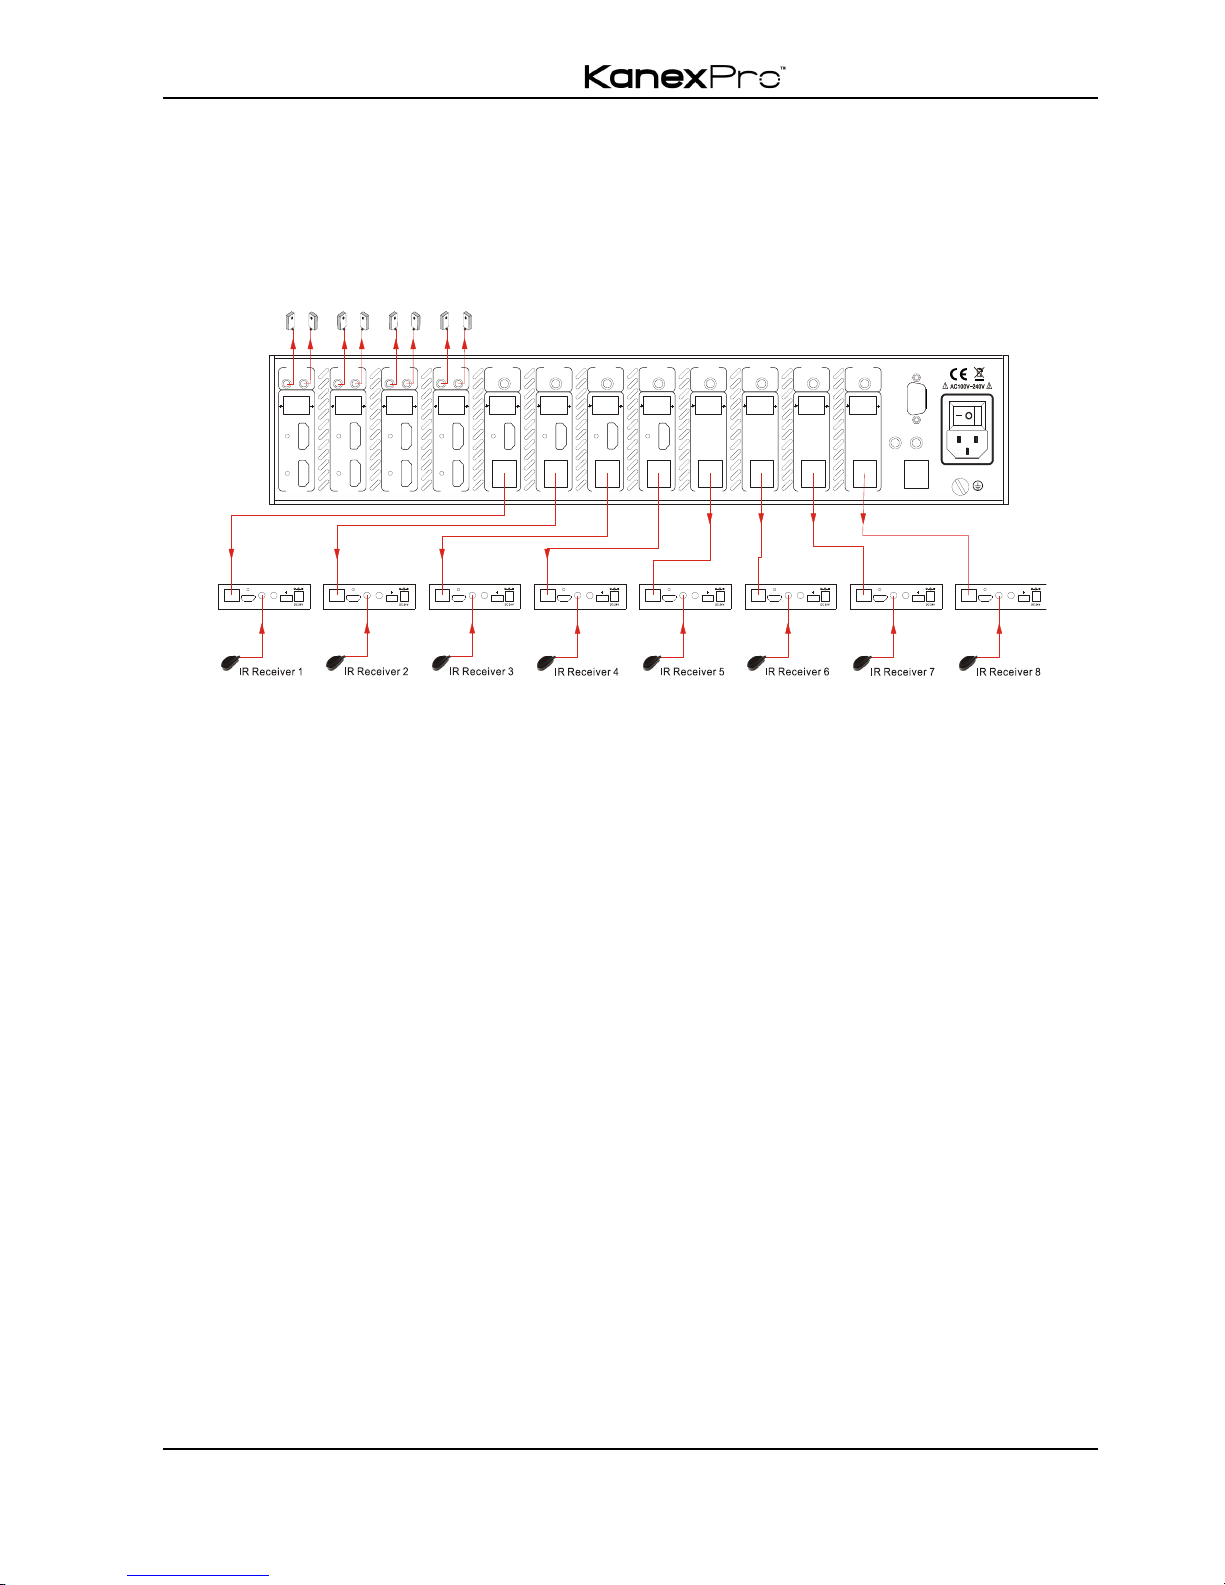
1) IR Matrix Switching
The 8“IR OUT” ports and the 8 “IR IN” ports on the far-end receivers makeup an8x8IR
matrix. See as below:
IR Matrix
Corresponding IR sends the IR signal remote, then it is transferred to HDBaseT receiver,
then to corresponding zone of the matrix through the twisted pair, finally it is transferred
to IR OUT port and received by controlled device.
Switching Operation: (8 IR IN ports correspond with 8 HDMI input ports separately in
default mode.)
a) Sending command (reference to 4.3 RS232 Control): [x1] R [x2].
x1: Corresponding to the 8 IR OUT ports of the matrix, the IR transmitter connected
to this port can be placed at IR receiving area of output device or the
8x8switcheritself.
x2: Corresponding to the zone (receive IR signal from HDBaseT receiver with IR IN
port connects with IR receiver) number of the switcher.
Example: Send command “3R2.” to transfer IR signal received from zone 2 to IR
OUT port 3.
2) Force Carrier
a) Only if the IR receiver connected to HDBaseT receiver is with IR carrier, can the
received IR signal be transferred to IR OUT port of the matrix.
b) Only if the IR receiver connected to IRALL IN port of the matrix is with IR carrier, can
the received IR signal be transferred to IR OUT port of the matrix.
If the IR receiver connected with HDBaseT receiver or IR ALL IN port of the matrix is
RS232TCP/IP
IR ALL IN
IR EYE
HDMI 8 HDMI 7
7
IR OUT
INPUT
L R
HDBase T
RS232 AUDIO
OUTPUT 1
Tx Rx
HDMI
1
L R
HDBase T
RS232 AUDIO
OUTPUT 2
Tx Rx
HDMI
2
L R
HDBase T
RS232 AUDIO
OUTPUT 3
Tx Rx
HDMI
3
L R
HDBase T
RS232 AUDIO
OUTPUT 4
Tx Rx
HDMI
4
L R
HDBase T
RS232 AUDIO
OUTPUT 5
Tx Rx
5
L R
HDBase T
RS232 AUDIO
OUTPUT 6
Tx Rx
6
L R
HDBase T
RS232 AUDIO
OUTPUT 7
Tx Rx
7
L R
HDBase T
RS232 AUDIO
IR INIR INIR INIR INIR INIR INIR INIR IN
OUTPUT 8
Tx Rx
8
AUDIO
7
L R
L R
8
8
HDMI 6 HDMI 5
5
IR OUT
INPUT
AUDIO
5
L R
L R
6
6
HDMI 4 HDMI 3
3
IR OUT
INPUT
AUDIO
3
L R
L R
4
4
HDMI 2 HDMI 1
1
IR OUT
INPUT
AUDIO
1
L R
L R
2
2
HDMI OUTHDBT IN
Tx Rx
RS232IR IN IR OU T
PoC
IR Tra ns mi tt er
HDMI OUTHDBT IN
Tx Rx
RS232IR IN IR OU T
PoC
HDMI OUT
HDBT IN
Tx Rx
RS232IR IN IR OU T
PoC
HDMI OUTHDBT IN
Tx Rx
RS232IR IN IR OU T
PoC
HDMI OUT
HDBT IN
Tx Rx
RS232IR IN IR OU T
PoC
HDMI OUT
HDBT IN
Tx Rx
RS232IR IN IR OU T
PoC
HDMI OUT
HDBT IN
Tx Rx
RS232IR IN IR OU T
PoC
HDMI OUT
HDBT IN
Tx Rx
RS232IR IN IR OU T
PoC
1
2
Rec eiver 1 Rec eiver 2 Rec eiver 3 R ece iver 4 Rece ive r 5 R ece iver 6 R eceiv er 7 Re cei ver 8
3
4
5
6
7
8
Page 19
4K HDBaseT™ 8x8 Matrix Switcher
MX-HDBASE8X8-4K 14
KanexPro.com
not with IR carrier, send the command “%0901.”to enter infrared carrier enforcing
mode, and then IR signal can be transferred to IR OUT port.
3) IR control setting
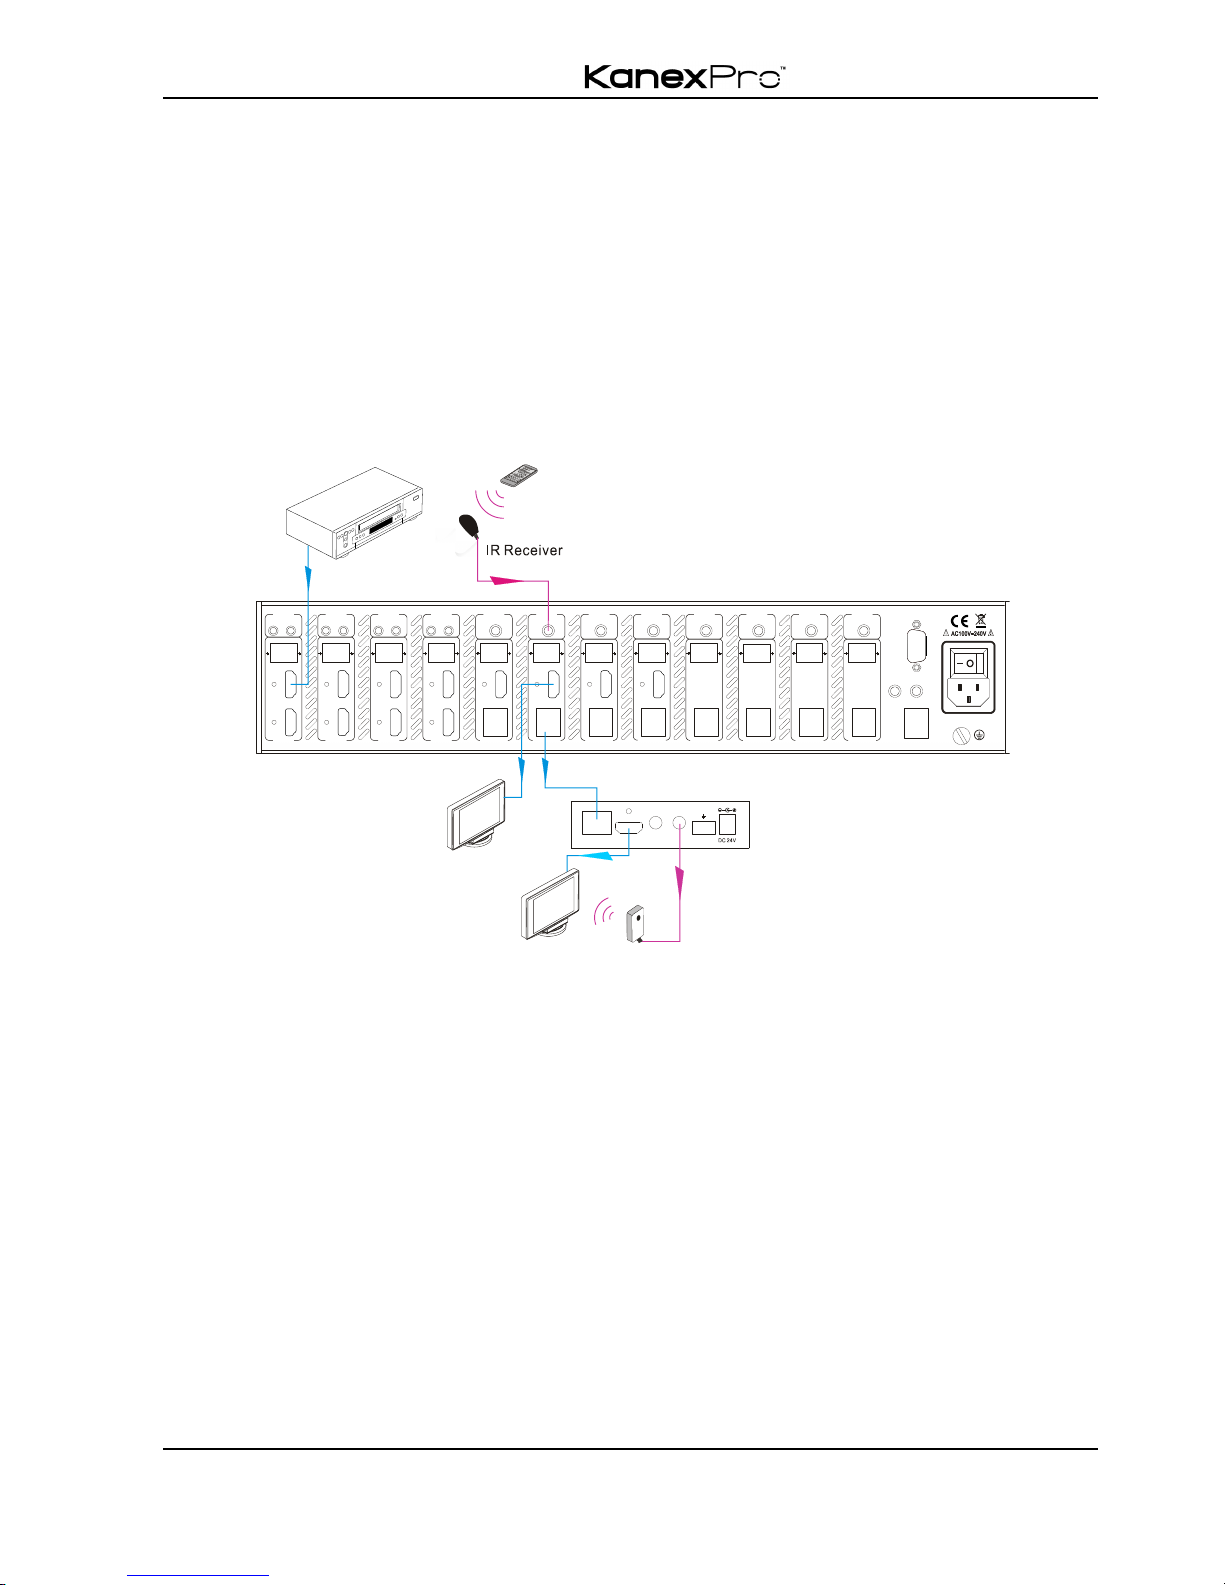
! Control far-end output device from local
Connect an IR receiver with IR carrier to the IR IN port of the switcher; users can control
far-end output displayer via its IR remote from local.
In that case, the IR signal is transferred via twisted pair. Only the corresponding IR OUT
port can emit control signals to the remote display.
See the figure below:
Control far-end device from Local
Note: The IR receiver connected to IR IN must be with IR carrier
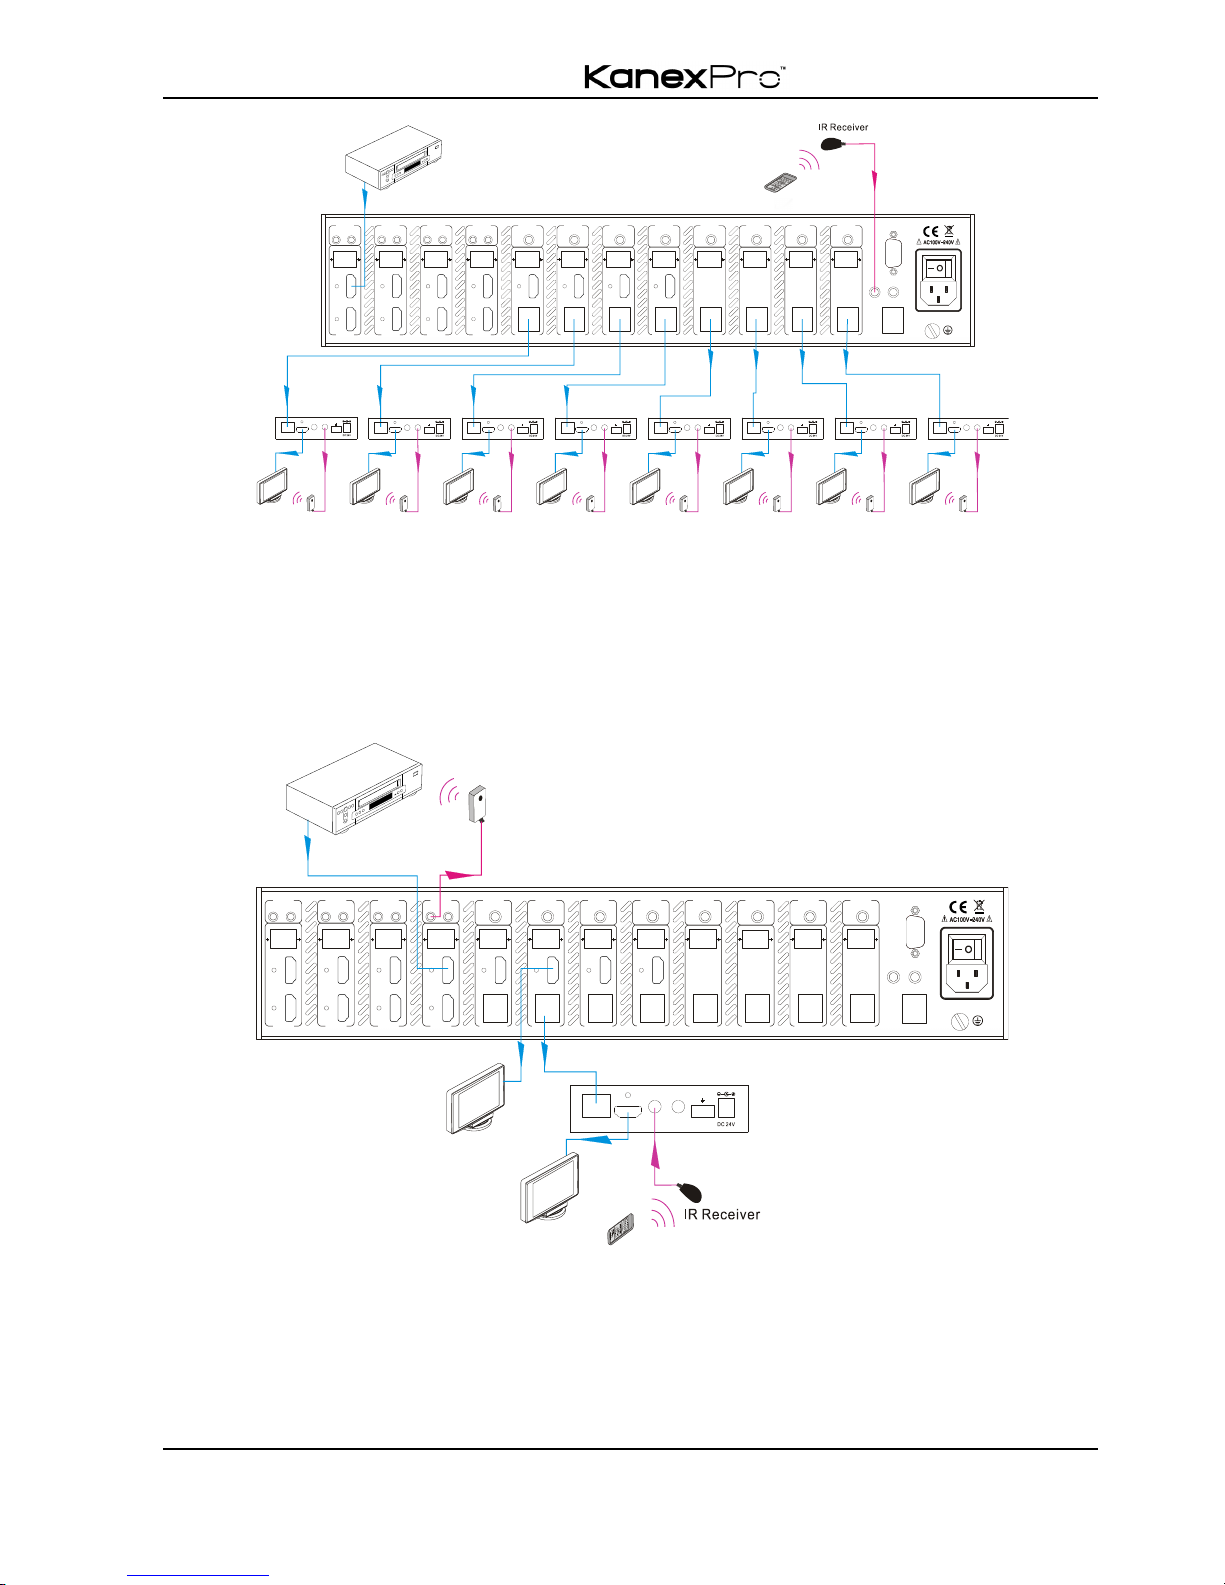
The IR signal received from IR ALL IN port will be transmitted to all the eight far-end
HDBaseT receivers connected to HDBaseT ports of the matrix switcher. See below:
RS232TCP/I P
IR ALL IN
IR EYE
HDMI 8 HDMI 7
7
IR OUT
INPUT
L R
HDBas eT
RS232 AUDIO
OUTPUT 1
Tx Rx
HDMI
1
L R
HDBas eT
RS232 AUDIO
OUTPUT 2
Tx Rx
HDMI
2
L R
HDBas eT
RS232 AUDIO
OUTPUT 3
Tx Rx
HDMI
3
L R
HDBas eT
RS232 AUDIO
OUTPUT 4
Tx Rx
HDMI
4
L R
HDBas eT
RS232 AUDIO
OUTPUT 5
Tx Rx
5
L R
HDBas eT
RS232 AUDIO
OUTPUT 6
Tx Rx
6
L R
HDBas eT
RS232 AUDIO
OUTPUT 7
Tx Rx
7
L R
HDBas eT
RS232 AUDIO
IR INIR INIR INIR INIR INIR INIR INIR IN
OUTPUT 8
Tx Rx
8
AUDIO
7
L R
L R
8
8
HDMI 6 HDMI 5
5
IR OUT
INPUT
AUDIO
5
L R
L R
6
6
HDMI 4 HDMI 3
3
IR OUT
INPUT
AUDIO
3
L R
L R
4
4
HDMI 2 HDMI 1
1
IR OUT
INPUT
AUDIO
1
L R
L R
2
2
HDMI OUT
HDBT IN
Tx Rx
RS232IR IN IR OUT
PoC
Receiver
DVD
HDTV
IR R em ot e
HDTV
Page 20
4K HDBaseT™ 8x8 Matrix Switcher
MX-HDBASE8X8-4K 15
KanexPro.com
Control far-end device through IR ALL IN port
! Control local device from remote
User can control local source devices with their IR remote from remote too. When using,
the IR signal received by the HDBaseT receiver will be transmitted to the corresponding
IR OUT port of the switcher. See below:
Control local device from remote
RS232TCP/IP
IR ALL IN
IR EYE
HDMI 8 HDMI 7
7
IR OUT
INPUT
L R
HDBase T
RS232 AUDIO
OUTPUT 1
Tx Rx
HDMI
1
L R
HDBase T
RS232 AUDIO
OUTPUT 2
Tx Rx
HDMI
2
L R
HDBase T
RS232 AUDIO
OUTPUT 3
Tx Rx
HDMI
3
L R
HDBase T
RS232 AUDIO
OUTPUT 4
Tx Rx
HDMI
4
L R
HDBase T
RS232 AUDIO
OUTPUT 5
Tx Rx
5
L R
HDBase T
RS232 AUDIO
OUTPUT 6
Tx Rx
6
L R
HDBase T
RS232 AUDIO
OUTPUT 7
Tx Rx
7
L R
HDBase T
RS232 AUDIO
IR INIR INIR INIR INIR INIR INIR INIR IN
OUTPUT 8
Tx Rx
8
AUDIO
7
L R
L R
8
8
HDMI 6 HDMI 5
5
IR OUT
INPUT
AUDIO
5
L R
L R
6
6
HDMI 4 HDMI 3
3
IR OUT
INPUT
AUDIO
3
L R
L R
4
4
HDMI 2 HDMI 1
1
IR OUT
INPUT
AUDIO
1
L R
L R
2
2
HDMI OUT
HDBT IN
Tx Rx
RS232
IR IN IR OUT
PoC
Rec eiver 1 Rec eicer 2 Rec eiver 3
Rec eiver 4 Rec eiver 5
Rec eiver 6
Rec eiver 7
Rec eiver 8
HDTV
IR Transmitter
HDMI OUT
HDBT IN
Tx Rx
RS232IR IN IR OUT
PoC
HDTV
HDMI OUT
HDBT IN
Tx Rx
RS232IR IN IR OUT
PoC
HDTV
HDMI OUT
HDBT IN
Tx Rx
RS232IR IN IR OUT
PoC
HDTV
HDMI OUT
HDBT IN
Tx Rx
RS232IR IN IR OUT
PoC
HDTV
HDMI OUT
HDBT IN
Tx Rx
RS232IR IN IR OUT
PoC
HDTV
HDMI OUT
HDBT IN
Tx Rx
RS232IR IN IR OUT
PoC
HDTV
HDMI OUT
HDBT IN
Tx Rx
RS232IR IN IR OUT
PoC
HDTV
DVD
IR Re mote
RS232TCP/I P
IR ALL IN
IR EYE
HDMI 8 HDMI 7
7
IR OUT
INPUT
L R
HDBas eT
RS232 AUDIO
OUTPUT 1
Tx Rx
HDMI
1
L R
HDBas eT
RS232 AUDIO
OUTPUT 2
Tx Rx
HDMI
2
L R
HDBas eT
RS232 AUDIO
OUTPUT 3
Tx Rx
HDMI
3
L R
HDBas eT
RS232 AUDIO
OUTPUT 4
Tx Rx
HDMI
4
L R
HDBas eT
RS232 AUDIO
OUTPUT 5
Tx Rx
5
L R
HDBas eT
RS232 AUDIO
OUTPUT 6
Tx Rx
6
L R
HDBas eT
RS232 AUDIO
OUTPUT 7
Tx Rx
7
L R
HDBas eT
RS232 AUDIO
IR INIR INIR INIR INIR INIR INIR INIR IN
OUTPUT 8
Tx Rx
8
AUDIO
7
L R
L R
8
8
HDMI 6 HDMI 5
5
IR OUT
INPUT
AUDIO
5
L R
L R
6
6
HDMI 4 HDMI 3
3
IR OUT
INPUT
AUDIO
3
L R
L R
4
4
HDMI 2 HDMI 1
1
IR OUT
INPUT
AUDIO
1
L R
L R
2
2
HDMI OUT
HDBT IN
Tx Rx
RS232IR IN IR OUT
PoC
Revceiver
DVD
HDTV
HDTV
IR Tr an sm it t er
Page 21
4K HDBaseT™ 8x8 Matrix Switcher
MX-HDBASE8X8-4K 16
KanexPro.com
4.3 RS232 Control
4.3.1 Connection with RS232 Communication Port
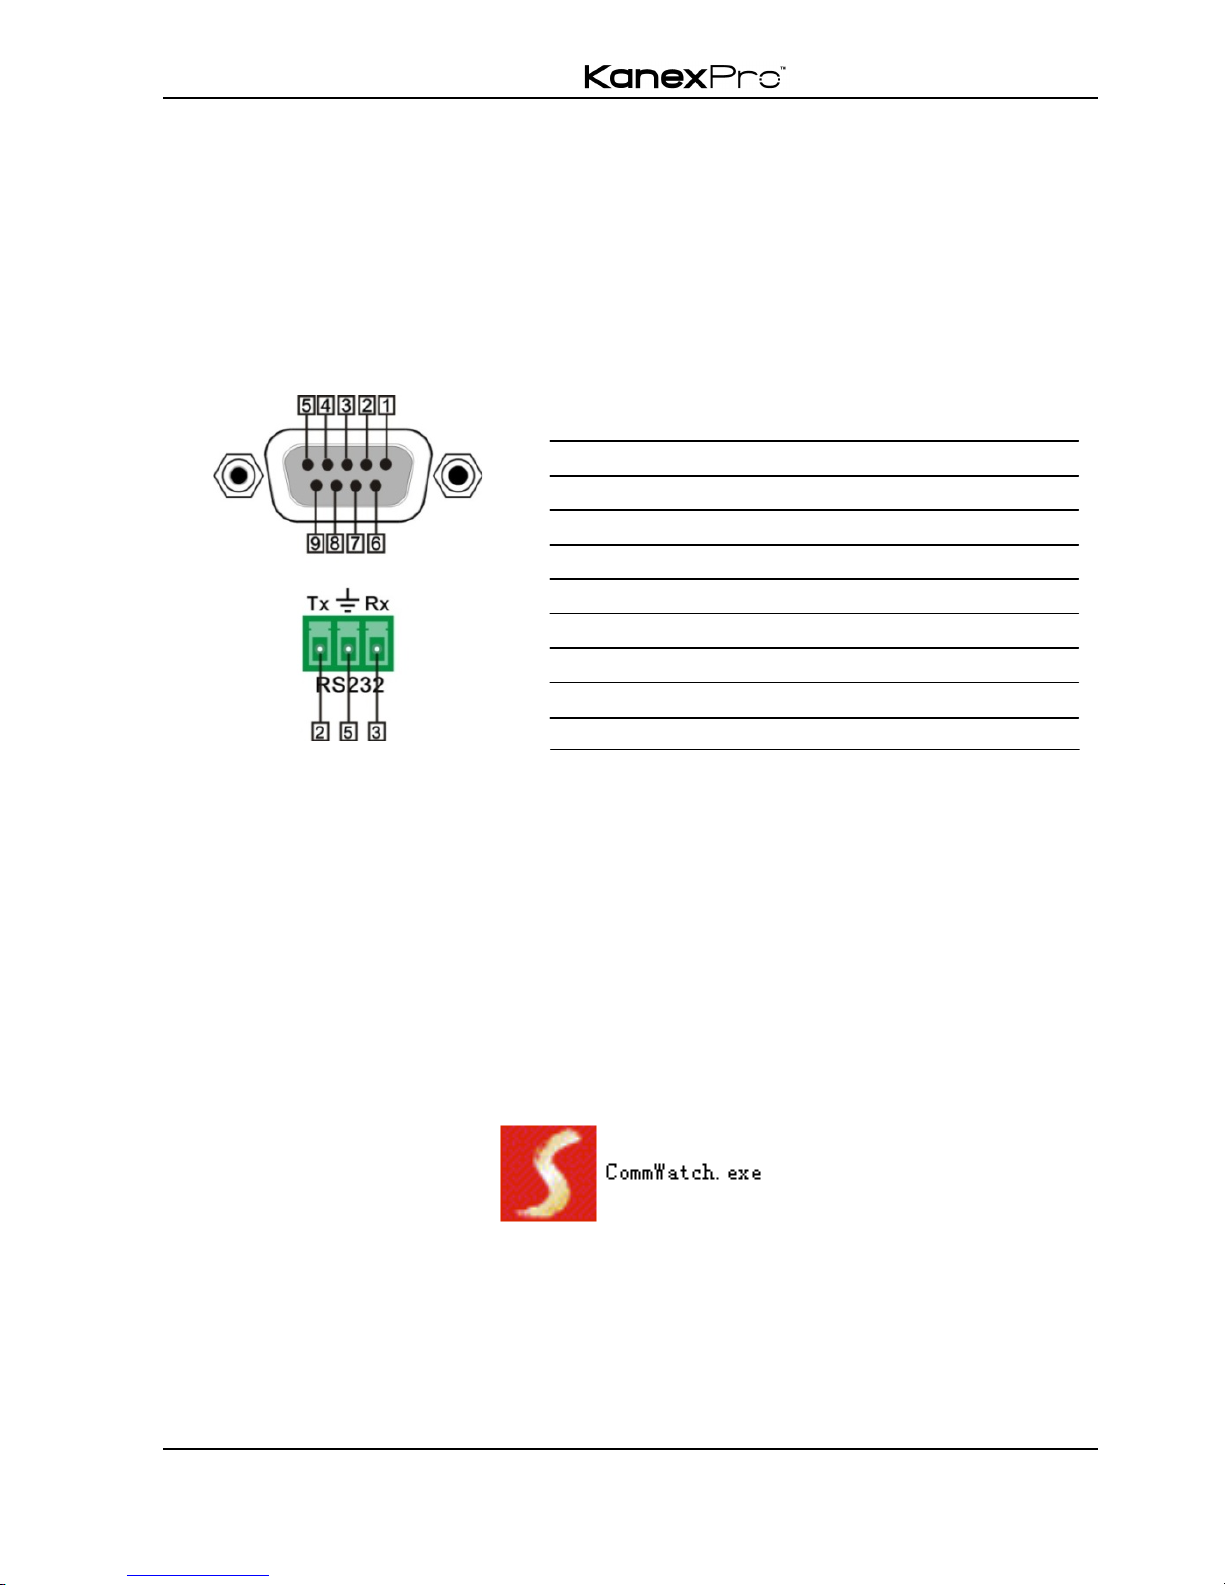
Except the front control panel, the matrix switcher can be controlled by far-end control
system through the RS232 communication port. This RS232 communication port is a
female 9-pin D connector. The definition of its pins is listed in the table below.
No. Pin Function
1 N/u Unused
2 Tx Transmit
3 Rx Receive
4 N/u Unused
5 Gnd Ground
6 N/u Unused
7 N/u Unused
8 N/u Unused
9 N/u Unused
4.3.2 Installation/uninstallation of RS232 Control Software
! Installation Copy the control software file to the computer connected with the
switcher.
! Uninstallation Delete all the control software files in corresponding file path.
4.3.3 Basic Settings
Firstly, connect the switcher with an input device and an output device. Then, connect it
with a computer, which is installed with RS232 control software. Double-click the
software icon to run this software.
Here we take the software CommWatch.exeas example. The icon is showed as below:
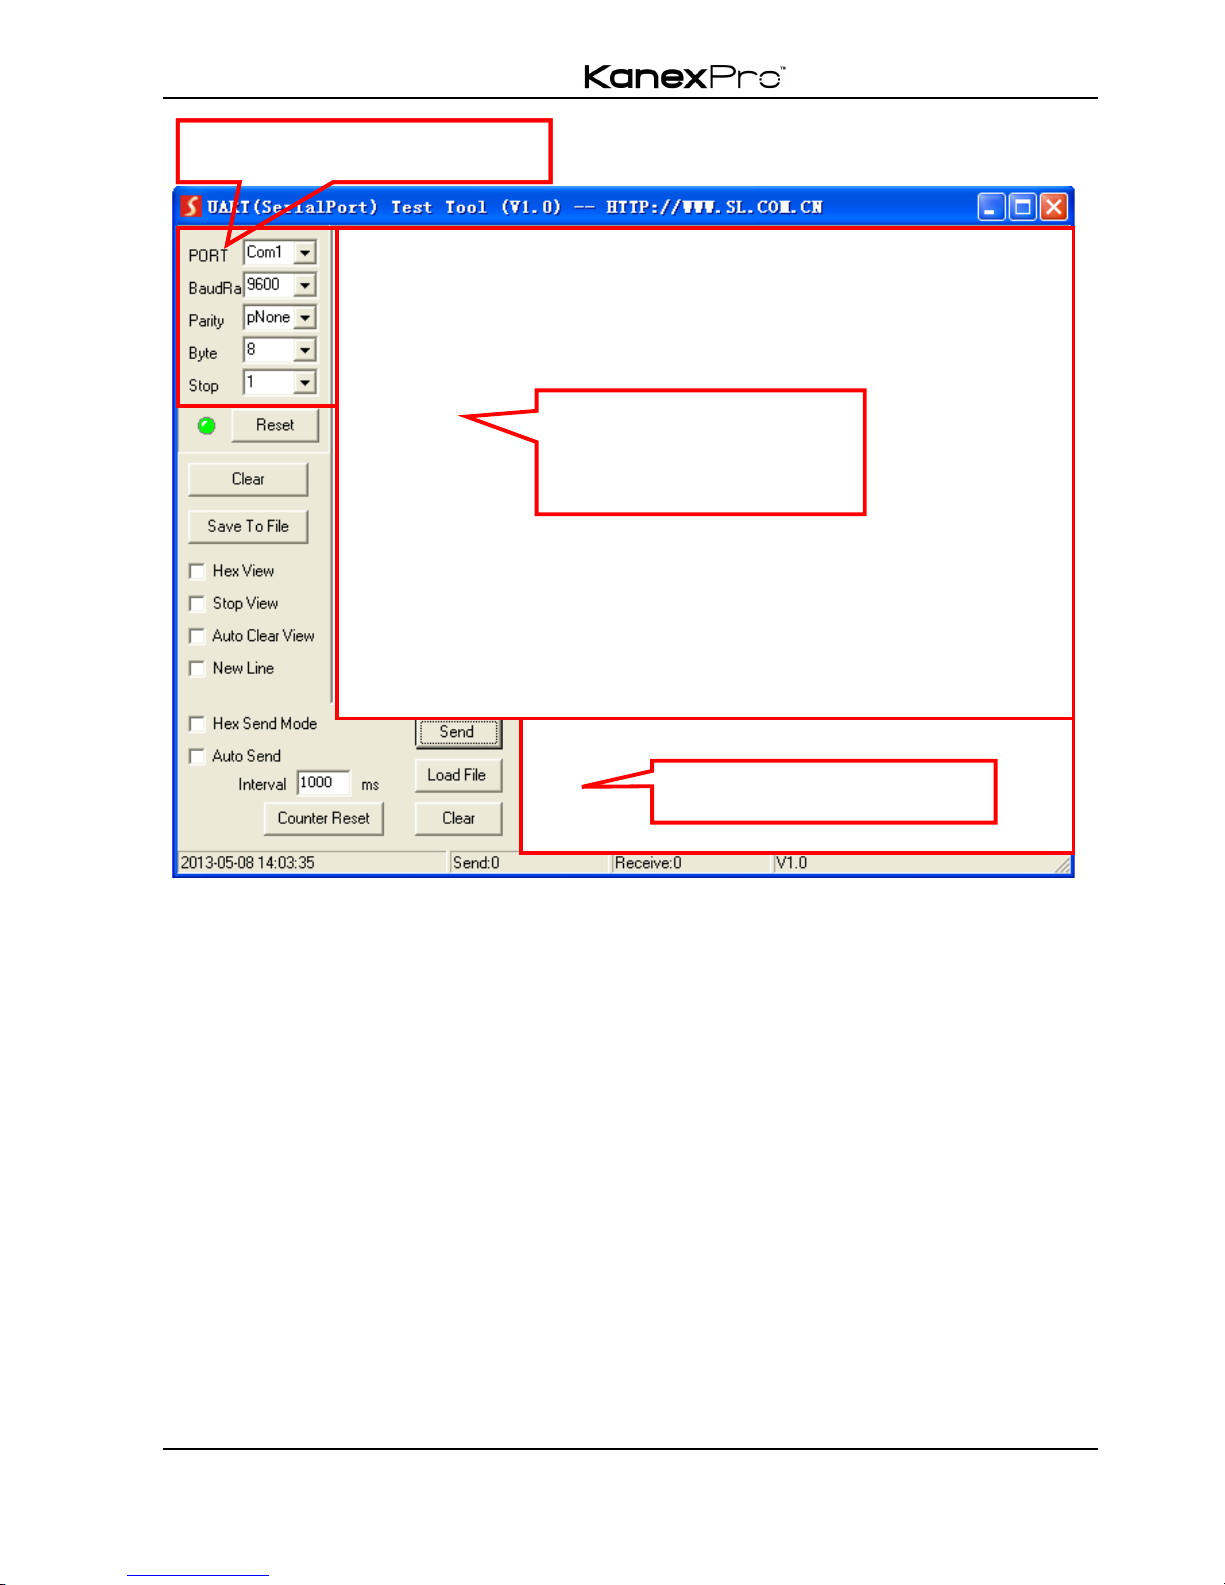
The interface of the control software is showed as below:
Page 22
4K HDBaseT™ 8x8 Matrix Switcher
MX-HDBASE8X8-4K 17
KanexPro.com
Please set the parameters of COM number, bound rate, data bit, stop bit and the parity
bit correctly, only then will you be able to send command in Command Sending Area.
Parameter Configuration area
Monitoring area, indicates
whether the command
sent works.
Command Sending area
Parameter Configuration area
Monitoring area, indicates
whether the command
sent works.
Command Sending area
Page 23

4K HDBaseT™ 8x8 Matrix Switcher
MX-HDBASE8X8-4K 18
KanexPro.com
4.3.4 RS232 Communication Commands
Baud rate: 9600 Data bit: 8 Stop bit: 1 Parity bit: none
Command
Function
Feedback Example
System Commands
/*Type;
Inquire the models information.
MX-HDBASE8X8-4K
/%Lock;
Lock the front panel buttons on the Matrix.
System Locked!
/%Unlock;
Unlock the front panel buttons on the
Matrix.
System Unlock!
/^Version;
Inquire the version of firmware
VX.X.X
/:MessageOff;
Turn off the feedback command from the
com port. It will only show simple words
like “SWITCH OK!”.
/:MessageOff;
/:MessageOn;
Turn on the feedback command from the
com port.
/:MessageOn;
Demo.
Switch to the “demo” mode, convert input
and output in turn like1B1, 1B2, … 8B7,
8B8, 1B1… and so on.
The switching interval is 2 seconds.
Demo Mode
AV: 1-> 1
AV: 1-> 2
AV: 1-> 3
AV: 1-> 4
AV: 1-> 5
AV: 1-> 6
AV: 1->7
AV: 1->8
AV: 2-> 1
…
Undo.
To cancel the previous operation.
Undo Ok!
Out 1 2 3 4
In 1 1 1 1
Out 5 6 7 8
In 1 1 1 1
Operation Commands
[x]All.
Transfer signals from the input channel [x]
to all output channels
X To All.(X=1~8)
All#.
Transfer all input signals to the
corresponding output channels
respectively like 1->1, 2->2…
All Through.
All$.
Switch off all the output channels.
All Closed.
[x]#.
Transfer signals from the input channel [x]
to the output channel [x].
X Through.(X=1~8)
Page 24

4K HDBaseT™ 8x8 Matrix Switcher
MX-HDBASE8X8-4K 19
KanexPro.com
Command
Function
Feedback Example
[x]$.
Switch off the output channel [x].
X Closed.(X=1~8)
[x]@.
Switch on the output channel [x].
X Open.(X=1~8)
All@.
Switch on all output channels.
All Open.
[x1]V[x2].
Transfer the AV signal from the input
channel [x1] to one or several output
channels ([x2], separate output channels
with comma).
AV:X1->X2
(X1/X2=1~8)
[x1]B[x2].
Transfer the AV and IR signal from input
channel [x1] to one or several output
channels ([x2], separate output channels
with comma).
AV:X1->X2
(X1/X2=1~8)
Status[x].
Check the I/O connection status of output
[x]
AV: Y->X
(X=1~8, Y=1~8)
Status.
Inquire the input channel to the output
channels one by one.
AV: 1->1
AV: 2->2
AV: 3->3
AV: 4->4
AV: 5->5
AV: 6->6
AV: 7->7
AV: 8->8
Save[Y].
Save the present operation to the preset
command [Y], ranges from 0 to 9.
Save To FY
(Y=0-9)
Recall[Y].
Recall the preset command [Y].
Recall From FY
(Y=0-9)
Clear[Y].
Clear the preset command [Y].
Clear FY
(Y=0-9)
PWON.
Work in normal mode.
PWON
PWOFF.
Enter into standby mode and cut off the
power supply to HDBaseT receivers.
PWOFF
STANDBY.
Enter into standby mode. (Do not cut off
the power supply to HDBaseT receivers
press other buttons or send other
commands to start.)
STANDBY
Audio/[X]:[Y].
Select HDMI audio or analog audio as
audio source for output 1~8.
Audio/[X]:[Y].
X=1~8, Y=0 (HDMI
audio) or 1 (Analog
audio).
Page 25

4K HDBaseT™ 8x8 Matrix Switcher
MX-HDBASE8X8-4K 20
KanexPro.com
Command
Function
Feedback Example
/%[Y]/[X]:[Z].
HDCP management command.
[Y] is for input(value: I) or output (value:
O); [X] is the number of the port, if the
value of X is ALL, it means all ports; [Z] is
for HDCP compliant status, the value may
be 1 (HDCP compliant) or 0 (not HDCP
compliant).
/%[Y]/[X]:[Z].
[x1]R[x2].
Transfer the IR signal from output
channel [x1] to input channel [x2].
IR:X1->X2
(X1/X2=1~8)
DigitAudioON[
x].
Enable HDMI audio output of port x.
! X=1, 2, 3, 4, 5, 6, 7, 8, enable this
port.
! X=9, enable all the 8 ports.
DigitAudio ON with [x]
x=1~8 or ALL
DigitAudioOF
F[x].
Disable HDMI audio output of port x.
! X=1, 2, 3, 4, 5, 6, 7, 8, disable this
port.
! X=9, disable all the 8 ports.
DigitAudio OFF with
[x]
x=1~8 or ALL
Page 26

4K HDBaseT™ 8x8 Matrix Switcher
MX-HDBASE8X8-4K 21
KanexPro.com
Command
Function
Feedback Example
/+[Y]/[X]:******.
Set communication between PC and
HDBaseT receiver.
Y is for RS232 port (connect with
RS232 port of HDBaseT receiver)
Y= 1~9 or A~P, The value of Y is
defined into the following meanings
(in a given baud rate depended by the
value of X):
a. Y = 1~8, send this command to the
corresponding HDBaseT receiver to
control far-end device.
b. Y = 9, send this command to all
HDBaseT receivers to control all
far-end devices.
c. Y = A, B, C, D, E, F, G or H
d. Y = I, J, K, L, M, N, O or P
For items c or d, send this command,
it will be saved to the matrix switcher
but taken without action to
corresponding HDBaseT receiver.
And its command function will be
effective almost at the same time
when you send the command PWON
(for item c) or PWOFF (for item d).
Note:
A & I are for port 1. B & J are for port
2.
C & K are for port 3. D & L are for
port 4.
E & L are for port 5. F & N are for
port 6.
G & O are for port 7. H & P are for
port 8.
X is for bound rate, its value ranges
from 1 to 7 (1--2400, 2--4800,
3--9600, 4--19200,5--38400,
6—57600, 7--115200)
***** is for data (max 48 Byte)
******
Page 27

4K HDBaseT™ 8x8 Matrix Switcher
MX-HDBASE8X8-4K 22
KanexPro.com
Command
Function
Feedback Example
EDIDH[x]B[y].
Input port [y] learns the EDID from output
port [x].
If the EDID data is available and the audio
part supports not only PCM mode, then
force-set it to support PCM mode only. If
the EDID data is not available, then set it
as initialized EDID data.
EDIDH[x]B[y]
EDIDPCM[x].
Set the audio part of input port [x] to PCM
format in EDID database.
EDIDPCM[x]
EDIDG[x].
Get EDID data from output [x]and display
the output port number.
Hexadecimal EDID
data and carriage
return character
EDIDMInit.
Restore the factory default EDID data of
every input.
EDIDMInit.
EDIDM[X]B[Y].
Manually EDID switching. Enable input[Y]
to learn the EDID data of output[X]. If the
EDID data is not available, then set it as
initialized EDID data.
EDIDM[X]B[Y]
EDIDUpgrade
[x].
Upgrade EDID data via the RS232 port.
[x] is the input port, when the value of X is
9, it means to upgrade all input ports.
When the switcher receives the
command, it will show a message to
prompt you to send EDID file (.bin file).
Operations will be canceled after 10
seconds. Please cut off all connections of
HDBaseT ports.
Please send the
EDID file
EDID/[x]/[y].
Set the EDID data of input port [x] to
built-in EDID No.[y].
[y]=1~6, correspond to the 6 embedded
EDID data
EDID/[x]/[y]
Page 28

4K HDBaseT™ 8x8 Matrix Switcher
MX-HDBASE8X8-4K 23
KanexPro.com
Command
Function
Feedback Example
UpgradeIntED
ID[x].
Upgrade one of the 6 embedded EDID
data, x is the serial number for EDID data
1. 1080P 3D 2CH
2. 1080P 3D Multichannel
3. 1080P 2D 2CH
4. 1080P 2D Multichannel
5. 3840x2160 2D (30Hz)
6. 4096x2160 2D (30Hz)
When the switcher gets the command, it
will show a message to send EDID file
(.bin file). Operations will be invalid after
10 seconds.
Please send the
EDID file
GetIntEDID[x].
Return the embedded EDID data ranked
x, [x]=1~6
GetInPortEDI
D[X].
Return the EDID data of input [x], [x]=1~8
%0801.
Auto HDCP management, activate carrier
native mode
%0801
%0900.
Switch to carrier native mode.
Carrier native
%0901.
Switch to force carrier mode.
Force carrier
%0911.
Reset to factory default.
Factory Default
%9951.
Check the command sent by port 1 when
PWON.
Port 1:data when
PWON
%9952.
Check the command sent by port 2 when
PWON.
Port 2:data when
PWON
%9953.
Check the command sent by port 3 when
PWON.
Port 3:data when
PWON
%9954.
Check the command sent by port 4 when
PWON.
Port 4:data when
PWON
%9955.
Check the command sent by port 5 when
PWON.
Port 5:data when
PWON
%9956.
Check the command sent by port 6 when
PWON.
Port 6:data when
PWON
%9957.
Check the command sent by port 7 when
PWON.
Port 7:data when
PWON
Page 29

4K HDBaseT™ 8x8 Matrix Switcher
MX-HDBASE8X8-4K 24
KanexPro.com
Command
Function
Feedback Example
%9958.
Check the command sent by port 8 when
PWON.
Port 8:data when
PWON
%9941.
Check the command sent by port 1 when
PWOFF.
Port 1:data when
PWOFF
%9942.
Check the command sent by port 2 when
PWOFF.
Port 2:data when
PWOFF
%9943.
Check the command sent by port 3 when
PWOFF.
Port 3:data when
PWOFF
%9944.
Check the command sent by port 4 when
PWOFF.
Port 4:data when
PWOFF
%9945.
Check the command sent by port 5 when
PWOFF.
Port 5:data when
PWOFF
%9946.
Check the command sent by port 6 when
PWOFF.
Port 6:data when
PWOFF
%9947.
Check the command sent by port 7 when
PWOFF.
Port 7:data when
PWOFF
%9948.
Check the command sent by port 8 when
PWOFF.
Port 8:data when
PWOFF
%9961.
Check the system locking status.
System Locked/
Unlock!
%9962.
Check the status while in standby mode.
STANDBY/PWON/
PWOFF
%9963.
Check the working mode of infrared
carrier.
Carrier native/ Force
carrier
%9964.
Check the IP address.
IP:192.168.0.178
(default)
Page 30

4K HDBaseT™ 8x8 Matrix Switcher
MX-HDBASE8X8-4K 25
KanexPro.com
Command
Function
Feedback Example
%9966.
Check the audio sources of all outputs
Channel 1 is HDMI
Audio
Channel 2 is HDMI
Audio
Channel 3 is HDMI
Audio
Channel 4 is HDMI
Audio
Channel 5 is HDMI
Audio
Channel 6 is HDMI
Audio
Channel 7 is Analog
Audio
Channel 8 is HDMI
Audio
%9971.
Check the connection status of the inputs.
In 1 2 3 4
Connect N Y Y Y
In 5 6 7 8
Connect N Y Y Y
%9972.
Check the connection status of the
outputs.
Out 1 2 3 4
Connect N Y Y Y
Out 5 6 7 8
Connect N Y Y Y
%9973.
Check the HDCP status of the inputs.
In 1 2 3 4
HDCP N N Y Y
In 5 6 7 8
HDCP N N Y Y
%9974.
Check the HDCP status of the outputs.
Out 1 2 3 4
HDCP N N Y Y
Out 5 6 7 8
HDCP N N Y Y
%9975.
Check the I/O connection status.
Out 1 2 3 4
In 1 2 3 4
Out 5 6 7 8
In 5 6 7 8
Page 31

4K HDBaseT™ 8x8 Matrix Switcher
MX-HDBASE8X8-4K 26
KanexPro.com
Command
Function
Feedback Example
%9976.
Check the output resolution.
Resolution
Out 1 0000x0000
Out 2 1920x1080
Out 3 1920x1080
Out 4 1920x1080
Out 5 0000x0000
Out 6 1920x1080
Out 7 1920x1080
Out 8 1920x1080
%9977.
Check the status of digital audio of output
channels.
Out 1 2 3 4
Audio Y Y Y Y
Out 5 6 7 8
Audio Y Y Y Y
%9978.
Check the HDCP compliant status of the
inputs.
In 1 2 3 4
HDCPEN Y Y Y Y
In 5 6 7 8
HDCPEN Y Y Y Y
Note:
1) Please disconnect all the twisted pairs before sending command EDIDUpgrade[X].
2) In above commands, “[”and “]” are symbols for easy reading and do not need to be
typed in actual operation.
3) Please remember to end the commands with the ending symbols “.” and “;”.
4) Type the command carefully, it is case-sensitive.
4.3.5 RS232 Control Modes
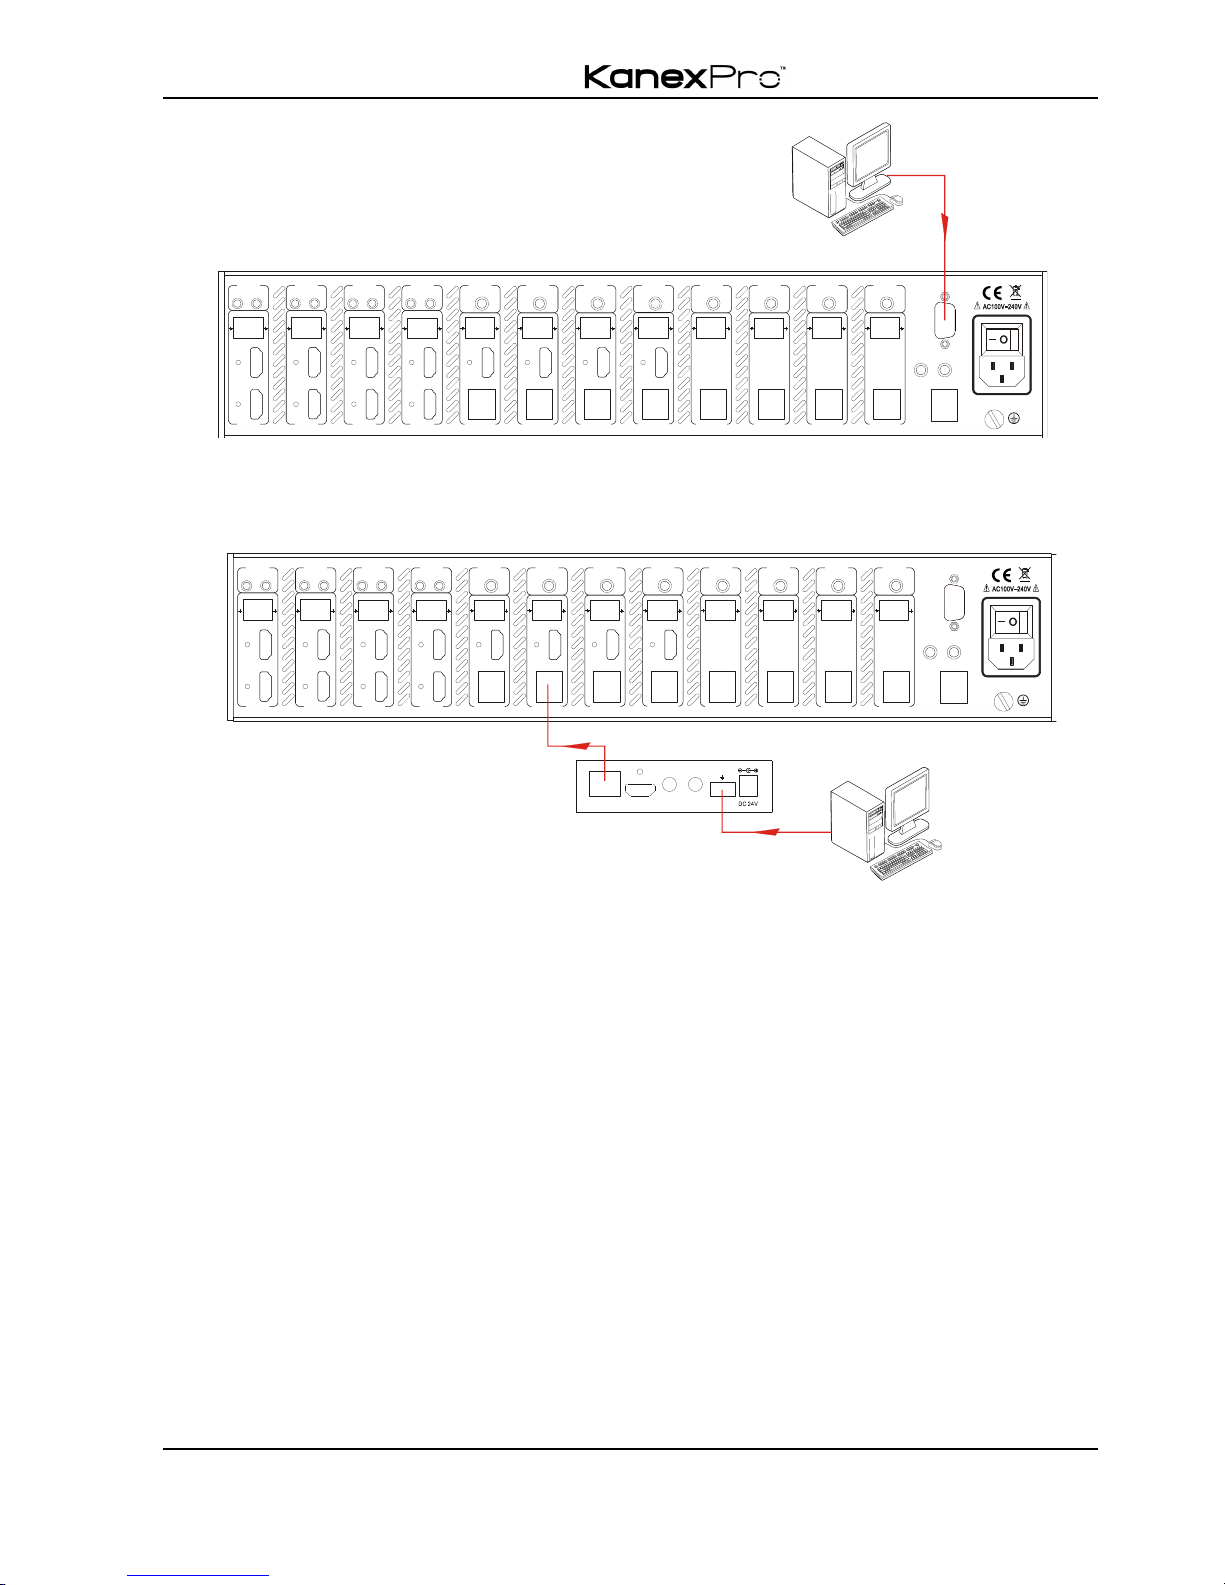
To control the matrix switcher, you need to connect its9 pin female RS232 port to a PC’s
RS232 port, or you can just connect any one of the HDBaseT receiver’s RS232 port with
PC (RS232 command can be transmitted to the switcher via the twisted pair). By using
RS232 control software and with right specification settings, you are able to control the
switcher.
! Control the KanexPro 8x8 Matrix Switcher from local
Page 32
4K HDBaseT™ 8x8 Matrix Switcher
MX-HDBASE8X8-4K 27
KanexPro.com
Control the 4K HDBaseT 8x8 Matrix Switcher from local
! Control the 4K HDBaseT 8x8 Matrix Switcher from remote
Control the KanexPro 8x8 Matrix Switcher from remote
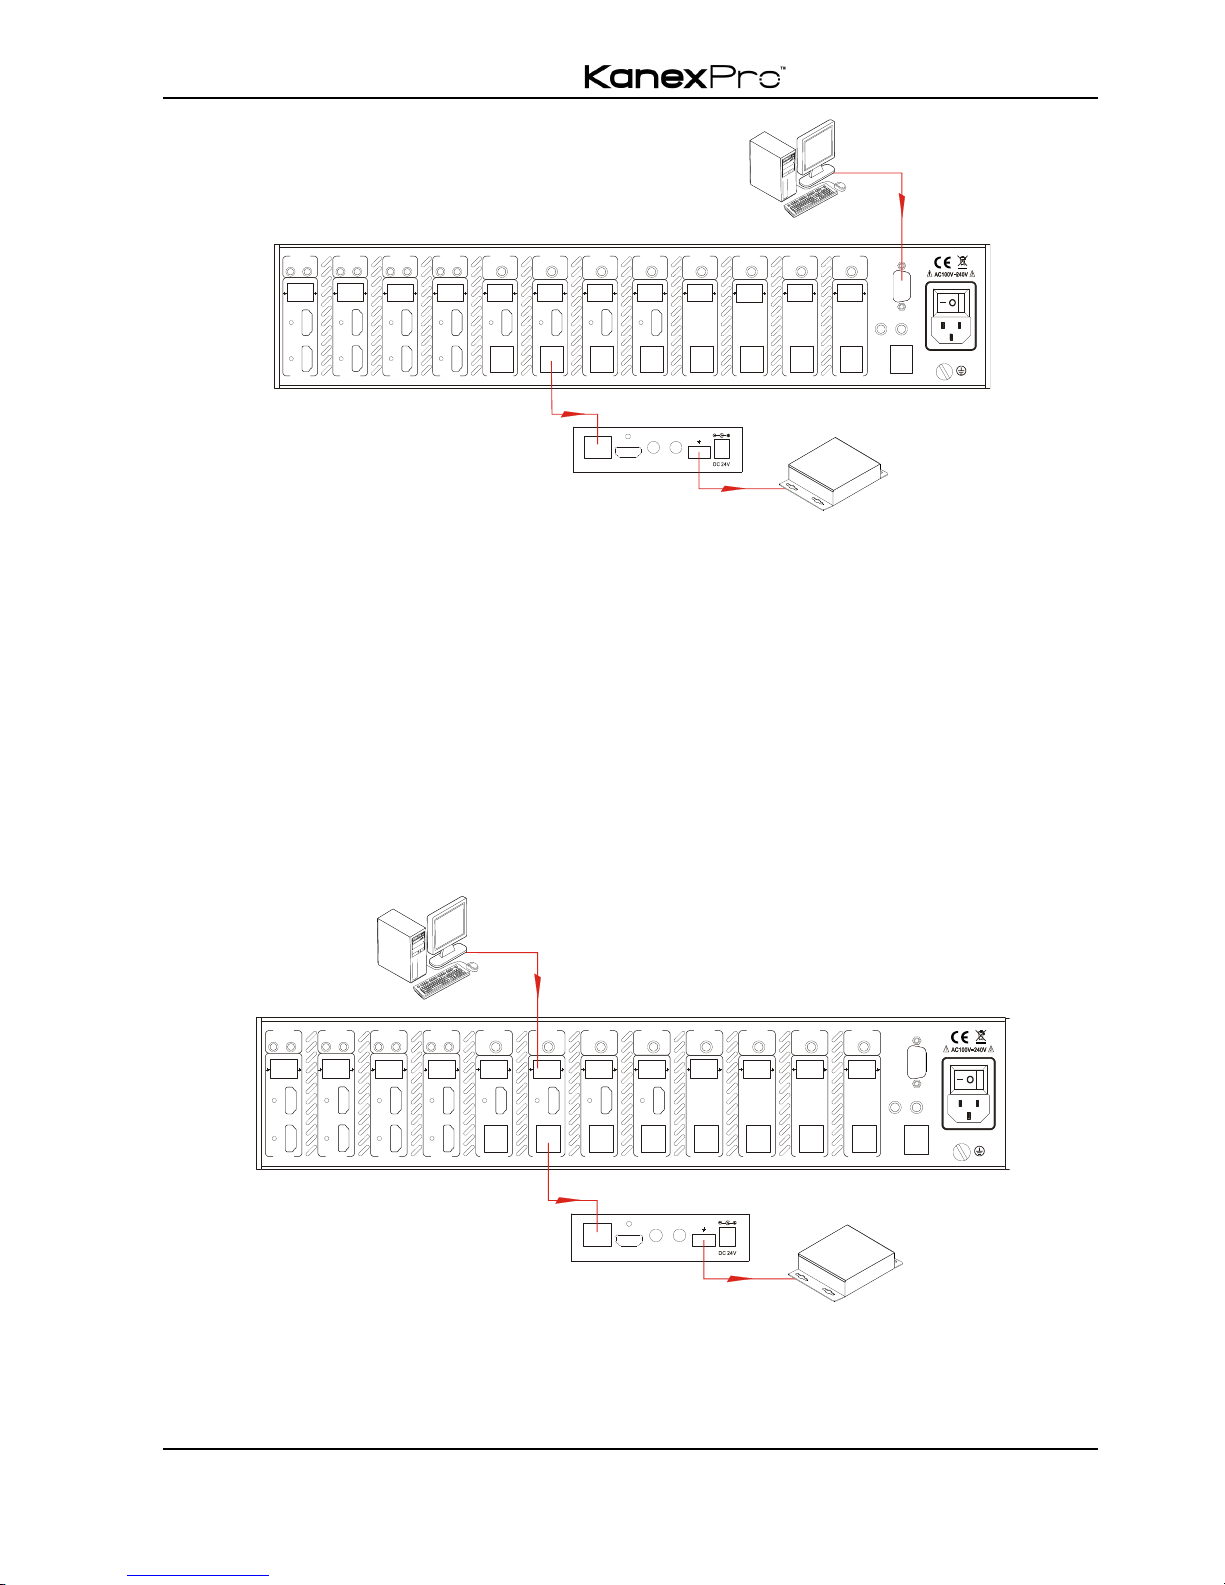
4.3.6 Control 3rd-Party Device from Local
Connect the 9 pin female RS232 port of the switcher with PC, by using the RS232
command “/+[Y]/[X]:******.”, you are able to control the 3rd-party device connected with
the HDBaseT receiver.
Please refer to the detailed command descriptionin4.3.4 RS232 Communication
Commands.
RS232TCP/I P
IR ALL IN
IR EYE
HDMI 8 HD MI 7
7
IR OUT
INPUT
L R
HDBas eT
RS232 AUDIO
OUTPUT 1
Tx Rx
HDMI
1
L R
HDBas eT
RS232 AUDIO
OUTPUT 2
Tx Rx
HDMI
2
L R
HDBas eT
RS232 AUDIO
OUTPUT 3
Tx Rx
HDMI
3
L R
HDBas eT
RS232 AUDIO
OUTPUT 4
Tx Rx
HDMI
4
L R
HDBas eT
RS232 AUDIO
OUTPUT 5
Tx Rx
5
L R
HDBas eT
RS232 AUDIO
OUTPUT 6
Tx Rx
6
L R
HDBas eT
RS232 AUDIO
OUTPUT 7
Tx Rx
7
L R
HDBas eT
RS232 AUDIO
IR INIR INIR INIR INIR INIR INIR INIR IN
OUTPUT 8
Tx Rx
8
AUDIO
7
L R
L R
8
8
HDMI 6 HD MI 5
5
IR OUT
INPUT
AUDIO
5
L R
L R
6
6
HDMI 4 HD MI 3
3
IR OUT
INPUT
AUDIO
3
L R
L R
4
4
HDMI 2 HD MI 1
1
IR OUT
INPUT
AUDIO
1
L R
L R
2
2
PC
RS232TCP/ IP
IR ALL IN
IR EYE
HDMI 8 HDM I 7
7
IR OUT
INPUT
L R
HDBas eT
RS232 AUDIO
OUTPUT 1
Tx Rx
HDMI
1
L R
HDBas eT
RS232 AUDIO
OUTPUT 2
Tx Rx
HDMI
2
L R
HDBas eT
RS232 AUDIO
OUTPUT 3
Tx Rx
HDMI
3
L R
HDBas eT
RS232 AUDIO
OUTPUT 4
Tx Rx
HDMI
4
L R
HDBas eT
RS232 AUDIO
OUTPUT 5
Tx Rx
5
L R
HDBas eT
RS232 AUDIO
OUTPUT 6
Tx Rx
6
L R
HDBas eT
RS232 AUDIO
OUTPUT 7
Tx Rx
7
L R
HDBas eT
RS232 AUDIO
IR INIR INIR INIR INIR INIR INIR INIR IN
OUTPUT 8
Tx Rx
8
AUDIO
7
L R
L R
8
8
HDMI 6 HDM I 5
5
IR OUT
INPUT
AUDIO
5
L R
L R
6
6
HDMI 4 HDM I 3
3
IR OUT
INPUT
AUDIO
3
L R
L R
4
4
HDMI 2 HDM I 1
1
IR OUT
INPUT
AUDIO
1
L R
L R
2
2
HDMI OUT
HDBT IN
Tx Rx
RS232IR IN IR OUT
PoC
Receiver
PC
Page 33
4K HDBaseT™ 8x8 Matrix Switcher
MX-HDBASE8X8-4K 28
KanexPro.com
Control 3rd-party Device through 9 pin female RS232 port
4.3.7 Bi-directional RS232 Control
By connecting oneRS232 port with PC (or controlled device), and connecting the RS232
port of corresponding HDBaseT receiver with controlled device (or PC), the RS232
signal can be transmitted bi-directionally.
! Control far-end device from local
Connect the RS232 (3-pinpluggable terminal block) port in any zone to PC, and connect
the controlled RS232 device (3rd party device) to the corresponding (same zone as PC)
receiver, see below:
Control far-end device from local
! Control the KanexPro 8x8 Matrix Switcher from remote
RS232TCP/IP
IR ALL IN
IR EYE
HDMI 8 HDMI 7
7
IR OUT
INPUT
L R
HDBase T
RS232 AUDIO
OUTPUT 1
Tx Rx
HDMI
1
L R
HDBase T
RS232 AUDIO
OUTPUT 2
Tx Rx
HDMI
2
L R
HDBase T
RS232 AUDIO
OUTPUT 3
Tx Rx
HDMI
3
L R
HDBase T
RS232 AUDIO
OUTPUT 4
Tx Rx
HDMI
4
L R
HDBase T
RS232 AUDIO
OUTPUT 5
Tx Rx
5
L R
HDBase T
RS232 AUDIO
OUTPUT 6
Tx Rx
6
L R
HDBase T
RS232 AUDIO
OUTPUT 7
Tx Rx
7
L R
HDBase T
RS232 AUDIO
IR INIR INIR INIR INIR INIR INIR INIR IN
OUTPUT 8
Tx Rx
8
AUDIO
7
L R
L R
8
8
HDMI 6 HDMI 5
5
IR OUT
INPUT
AUDIO
5
L R
L R
6
6
HDMI 4 HDMI 3
3
IR OUT
INPUT
AUDIO
3
L R
L R
4
4
HDMI 2 HDMI 1
1
IR OUT
INPUT
AUDIO
1
L R
L R
2
2
HDMI OUT
HDBT IN
Tx Rx
RS232IR IN IR OUT
PoC
Receiver
3rd part y
PC
RS232TCP/I P
IR ALL IN
IR EYE
HDMI 8 HDMI 7
7
IR OUT
INPUT
L R
HDBas eT
RS232 AUDIO
OUTPUT 1
Tx Rx
HDMI
1
L R
HDBas eT
RS232 AUDIO
OUTPUT 2
Tx Rx
HDMI
2
L R
HDBas eT
RS232 AUDIO
OUTPUT 3
Tx Rx
HDMI
3
L R
HDBas eT
RS232 AUDIO
OUTPUT 4
Tx Rx
HDMI
4
L R
HDBas eT
RS232 AUDIO
OUTPUT 5
Tx Rx
5
L R
HDBas eT
RS232 AUDIO
OUTPUT 6
Tx Rx
6
L R
HDBas eT
RS232 AUDIO
OUTPUT 7
Tx Rx
7
L R
HDBas eT
RS232 AUDIO
IR INIR INIR INIR INIR INIR INIR INIR IN
OUTPUT 8
Tx Rx
8
AUDIO
7
L R
L R
8
8
HDMI 6 HDMI 5
5
IR OUT
INPUT
AUDIO
5
L R
L R
6
6
HDMI 4 HDMI 3
3
IR OUT
INPUT
AUDIO
3
L R
L R
4
4
HDMI 2 HDMI 1
1
IR OUT
INPUT
AUDIO
1
L R
L R
2
2
HDMI OUT
HDBT IN
Tx Rx
RS232IR IN IR OUT
PoC
Receiver
3rd pa rt y
PC
Page 34
4K HDBaseT™ 8x8 Matrix Switcher
MX-HDBASE8X8-4K 29
KanexPro.com
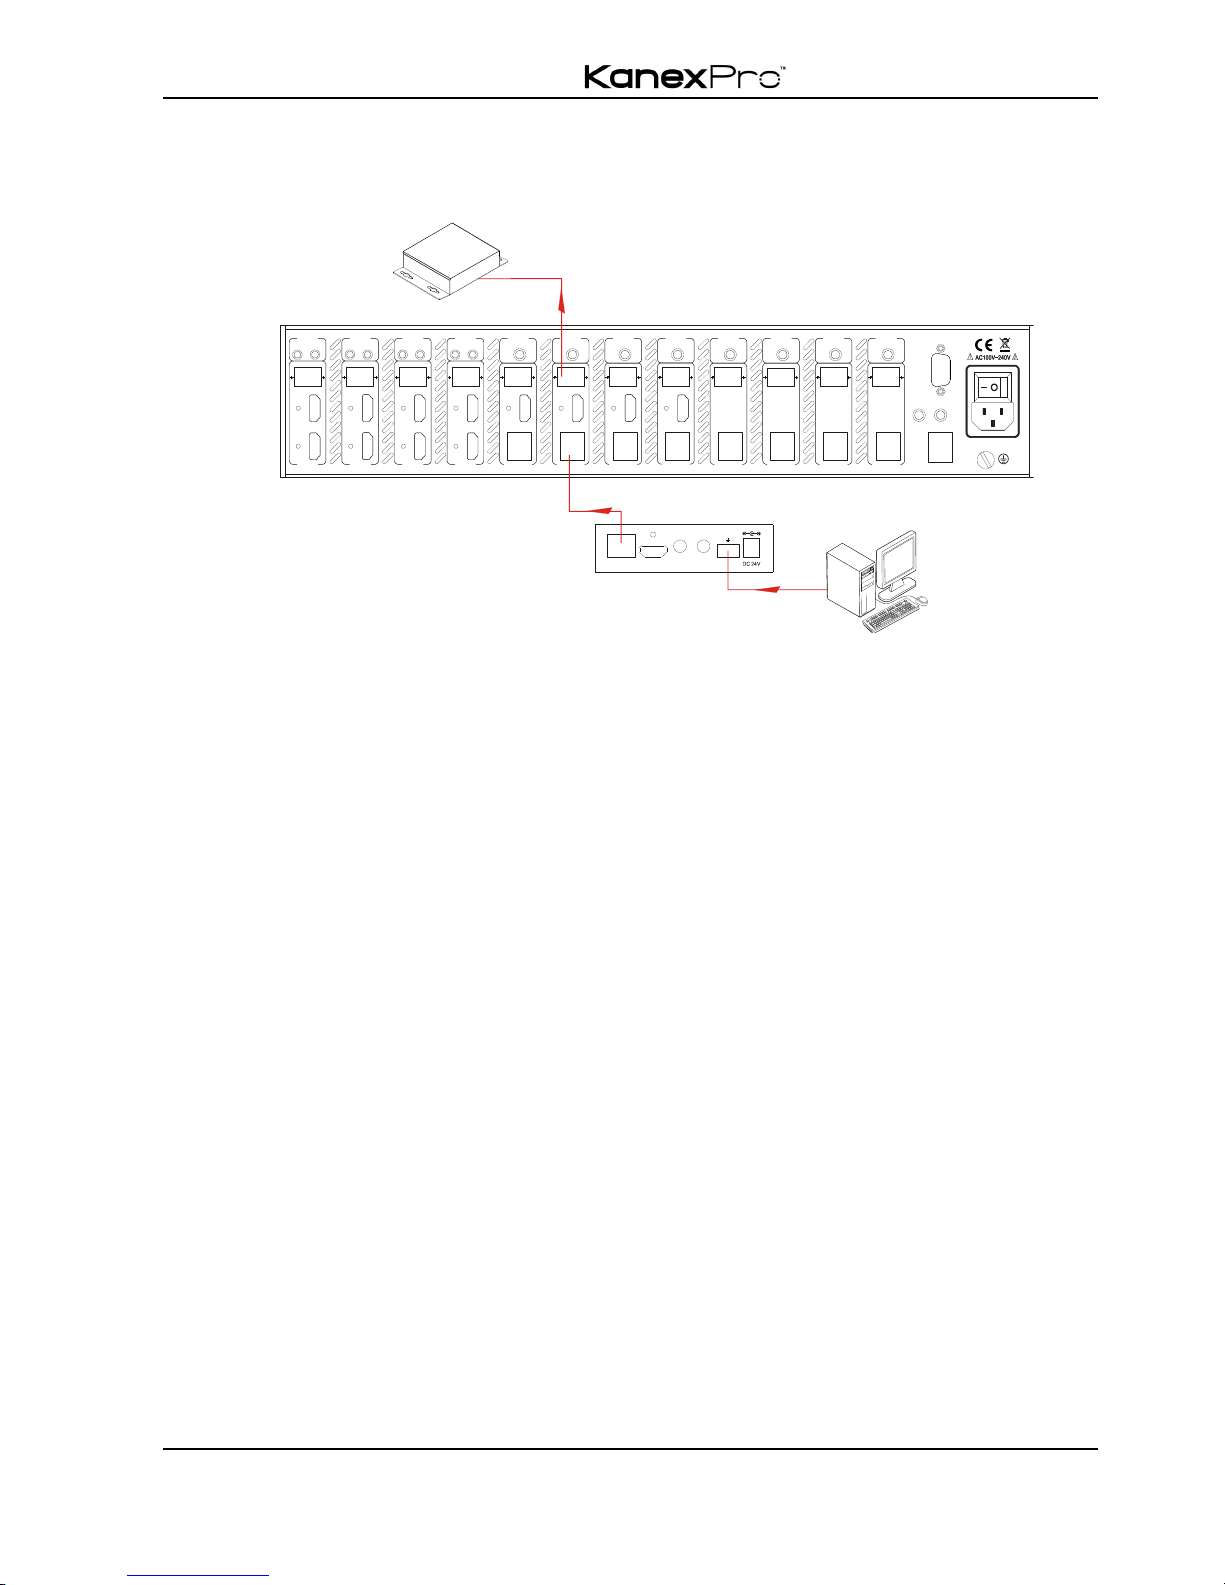
Connect the RS232 (3-pinpluggable terminal block) port in any zone to controlled device
(3rd party device), and connect PC to the corresponding (same zone as controlled
device) receiver, see below:
Control the KanexPro 8x8 Matrix Switcher from remote
4.4 TCP/IP Control
4.4.1 Control Modes
TCP/IP default settings: IP is 192.168.0.178, Gateway is 192.168.0.1, and Serial Port is
8080. IP & Gateway can be changed as you need, Serial Port cannot be changed.
! Controlled by Single PC
Connect a computer to the TCP/IP port of the matrix switcher, and set its network
segment to the same as the matrix switcher’s.
RS232TCP/IP
IR ALL IN
IR EYE
HDMI 8 HDMI 7
7
IR OUT
INPUT
L R
HDBas eT
RS232 AUDIO
OUTPUT 1
Tx Rx
HDMI
1
L R
HDBas eT
RS232 AUDIO
OUTPUT 2
Tx Rx
HDMI
2
L R
HDBas eT
RS232 AUDIO
OUTPUT 3
Tx Rx
HDMI
3
L R
HDBas eT
RS232 AUDIO
OUTPUT 4
Tx Rx
HDMI
4
L R
HDBas eT
RS232 AUDIO
OUTPUT 5
Tx Rx
5
L R
HDBas eT
RS232 AUDIO
OUTPUT 6
Tx Rx
6
L R
HDBas eT
RS232 AUDIO
OUTPUT 7
Tx Rx
7
L R
HDBas eT
RS232 AUDIO
IR INIR INIR INIR INIR INIR INIR INIR IN
OUTPUT 8
Tx Rx
8
AUDIO
7
L R
L R
8
8
HDMI 6 HDMI 5
5
IR OUT
INPUT
AUDIO
5
L R
L R
6
6
HDMI 4 HDMI 3
3
IR OUT
INPUT
AUDIO
3
L R
L R
4
4
HDMI 2 HDMI 1
1
IR OUT
INPUT
AUDIO
1
L R
L R
2
2
HDMI OUT
HDBT IN
Tx Rx
RS232IR IN IR OUT
PoC
Receiver
PC
3rd part y
Page 35
4K HDBaseT™ 8x8 Matrix Switcher
MX-HDBASE8X8-4K 30
KanexPro.com
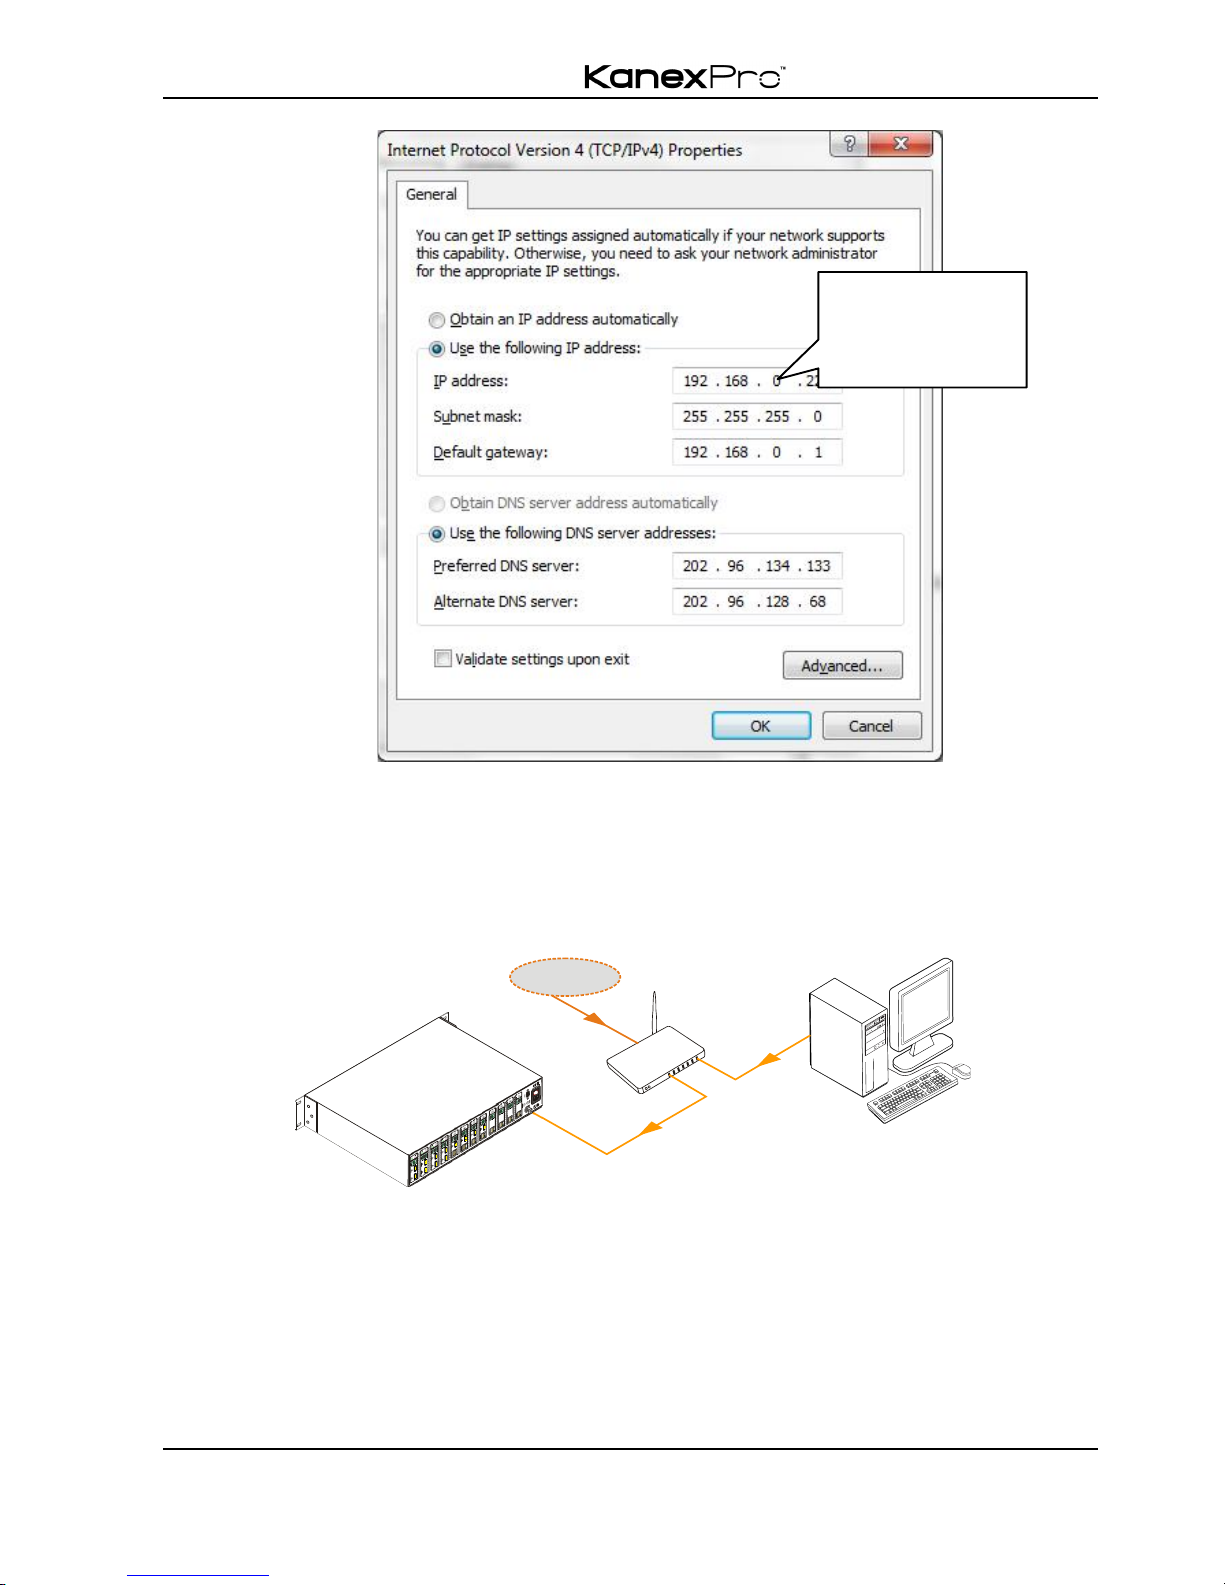
! Controlled by PC(s) in LAN
Connect the switcher, a LAN based router and several PCs to setup a LAN (as shown in
the following figure). Set the network segment of the matrix switcher to the same as the
router’s, then PCs within the LAN are able to control the switcher.
Follow these steps to connect the devices:
Step1. Connect the TCP/IP port of the switcher to Ethernet port of PC with twisted
pair.
Step2. Set the PC’s network segment to the same as the switcher’s. Please remember
the PC’s original network segment.
Step3. Set the switcher’s network segment to the same as the router.
Router
Internet
PC
CAT5e
Same network
segment as the
switcher
Page 36
4K HDBaseT™ 8x8 Matrix Switcher
MX-HDBASE8X8-4K 31
KanexPro.com
Step4. Set the PC’s network segment to the original ones.
Step5. Connect the switcher and PC(s) to the router. PC(s) within the LAN is able to
control the switcher asynchronously.
Then it’s able to control the device via GUI.
4.4.2 GUI for TCP/IP control
The switcher provides with built-in GUI for convenient TCP/IP control. GUI allows users
to interact with switcher through graphical icons and visual indicators.
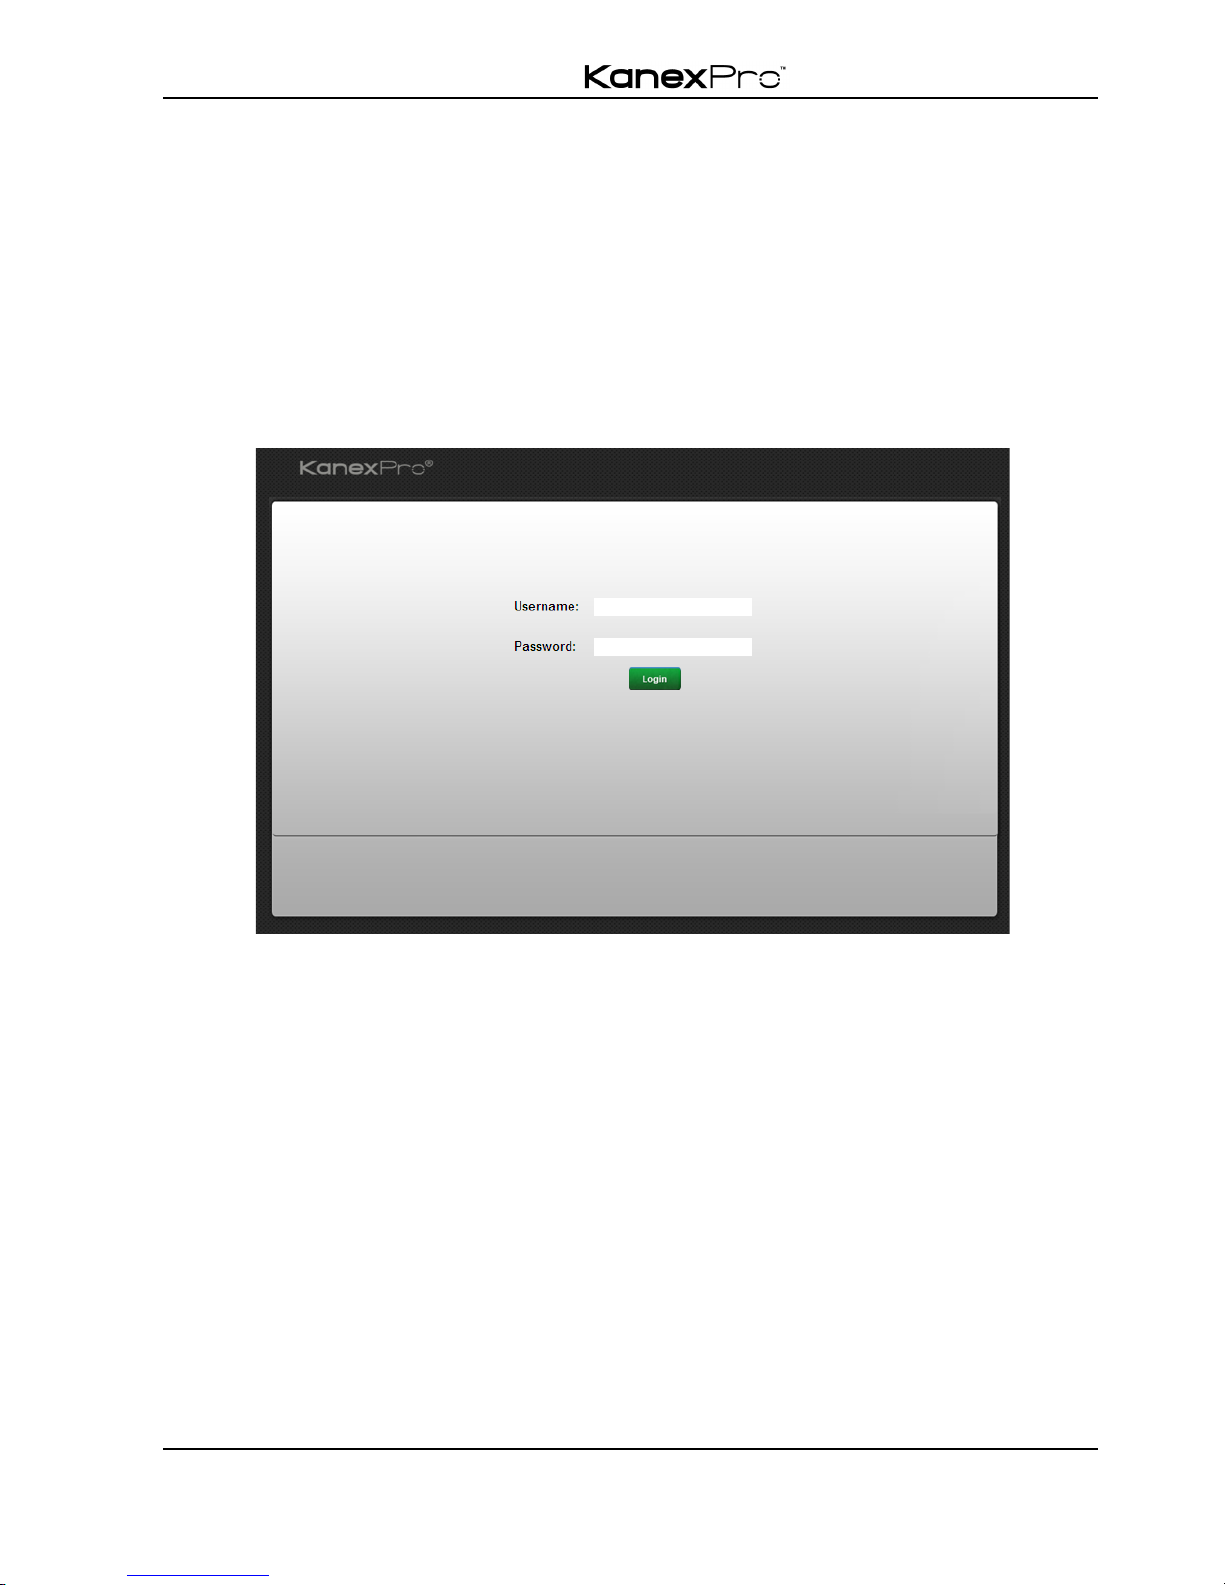
Type 192.168.0.178 in your browser, it will enter the login interface shown as below:
There are 2 selectable usernames – admin (default password: admin) and user (default
password: user). Log in as admin can access more configuration interfaces than user.
Enter username and the right password. Here is a brief introduction to the interfaces.
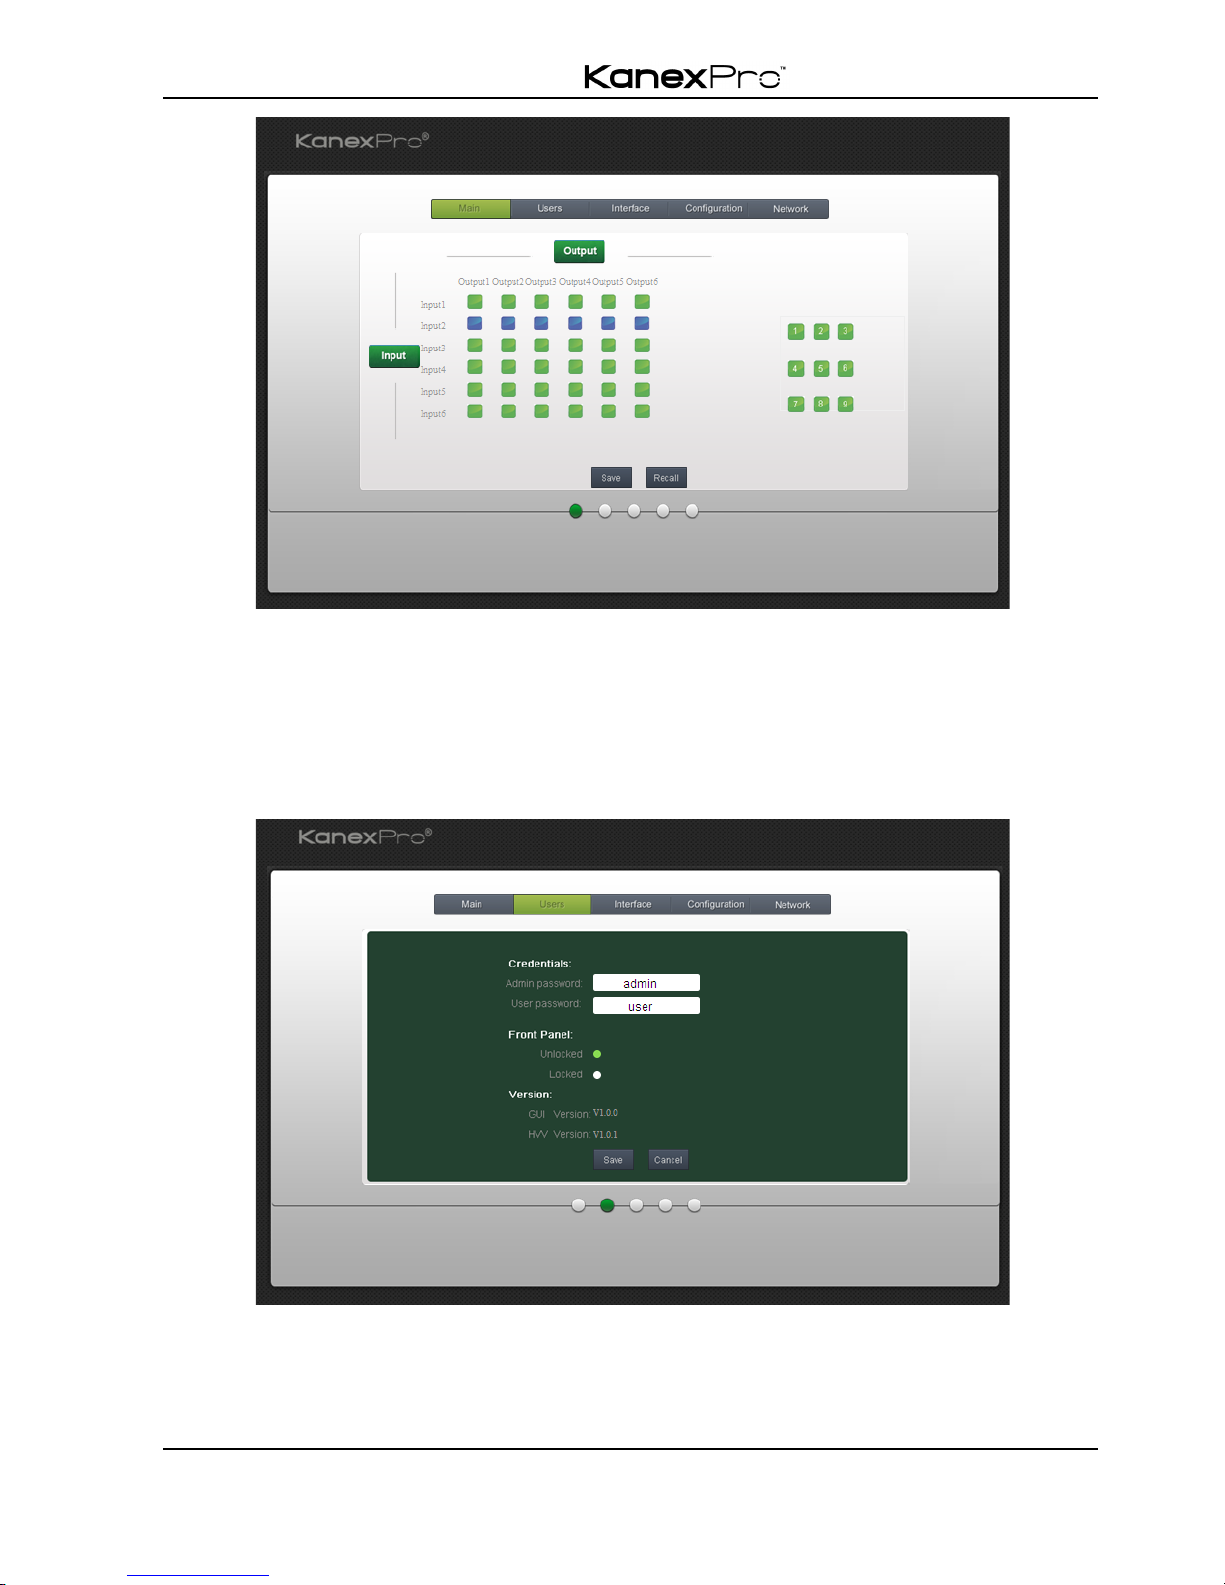
Main: Interface shown after logging in, provide intuitive I/O connection switching. See
the screenshot below:
Page 37
4K HDBaseT™ 8x8 Matrix Switcher
MX-HDBASE8X8-4K 32
KanexPro.com
The button matrix displays every possible connection between every input and output;
users can carry on the connections by clicking corresponding button.
Buttons 1~9 at the right-bottom corner provides quick saving and recall for overall
connection status.
Users: Display or modify credential settings, front panel lock, and GUI version.
If there is any modification, press Save to restore the settings, or press Cancel to
withdraw.
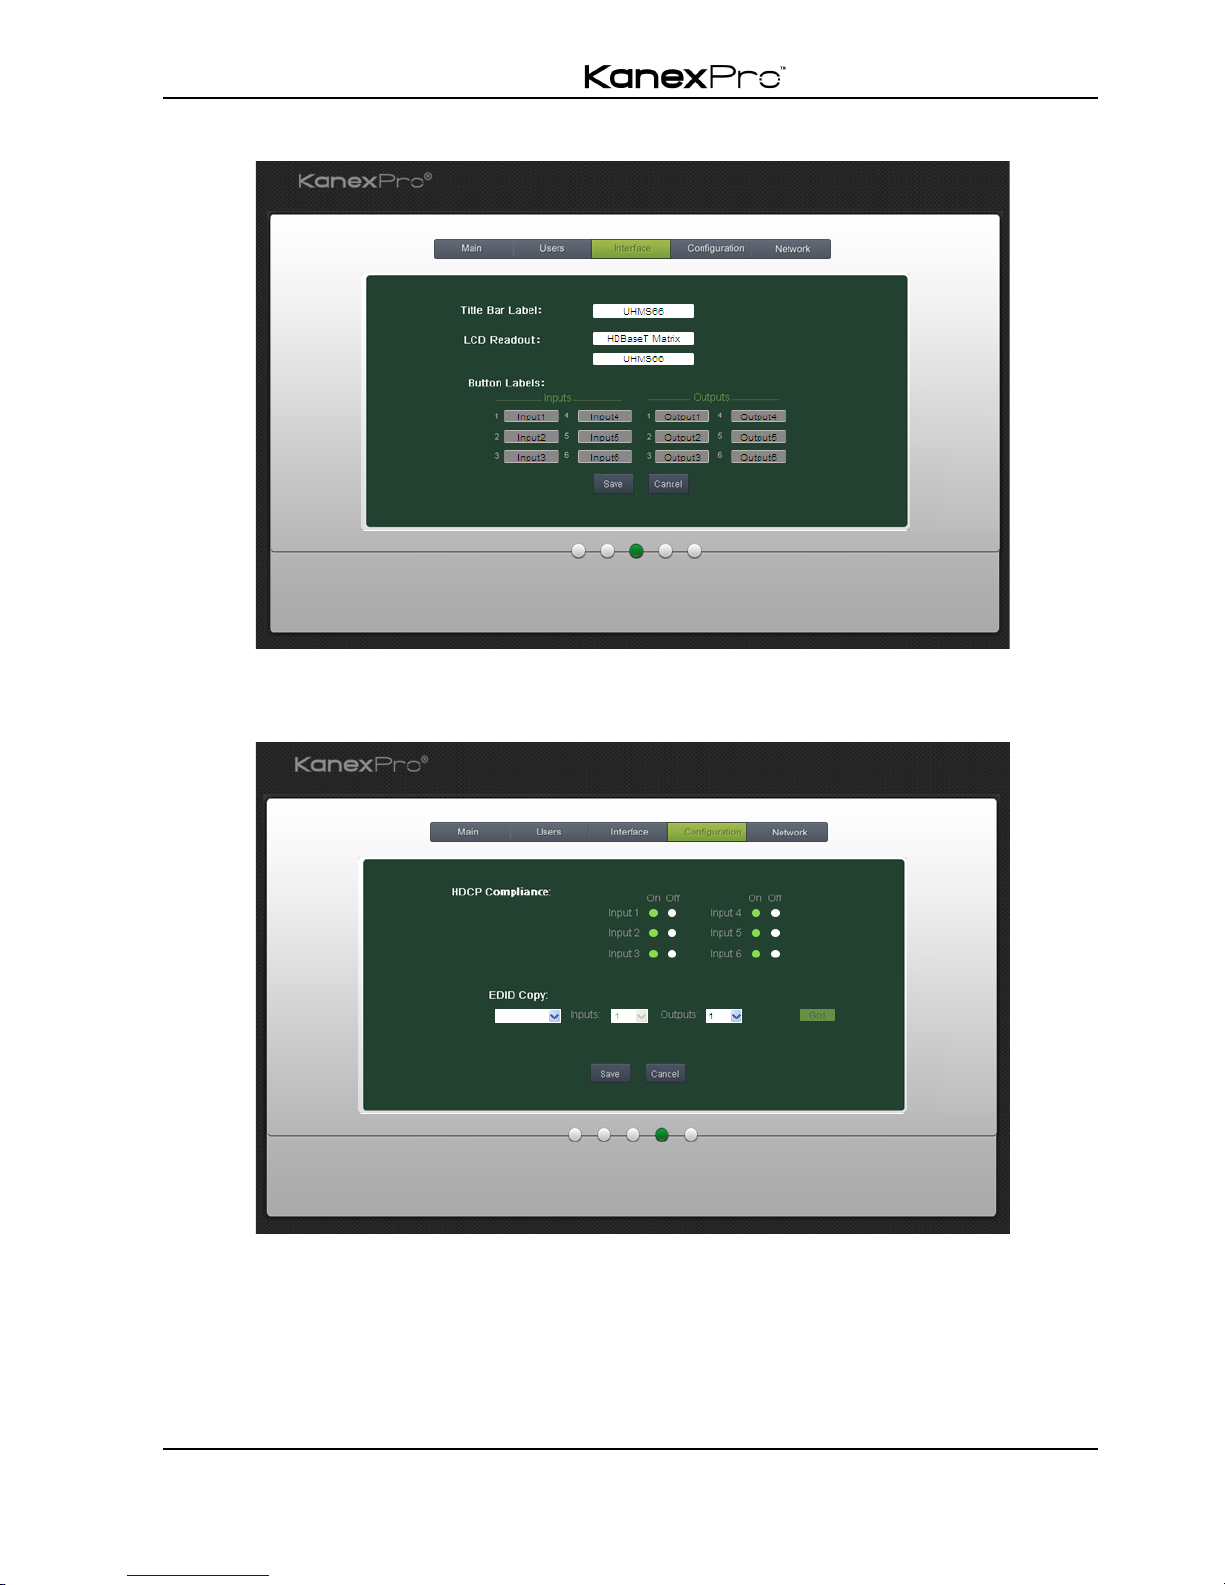
Interface: Set title bar label, LCD readout, and button labels, press Save to save the
Page 38
4K HDBaseT™ 8x8 Matrix Switcher
MX-HDBASE8X8-4K 33
KanexPro.com
settings
Configuration: Set HDCP Cmpliance status for every input, and manage EDID. See
the screenshot below:
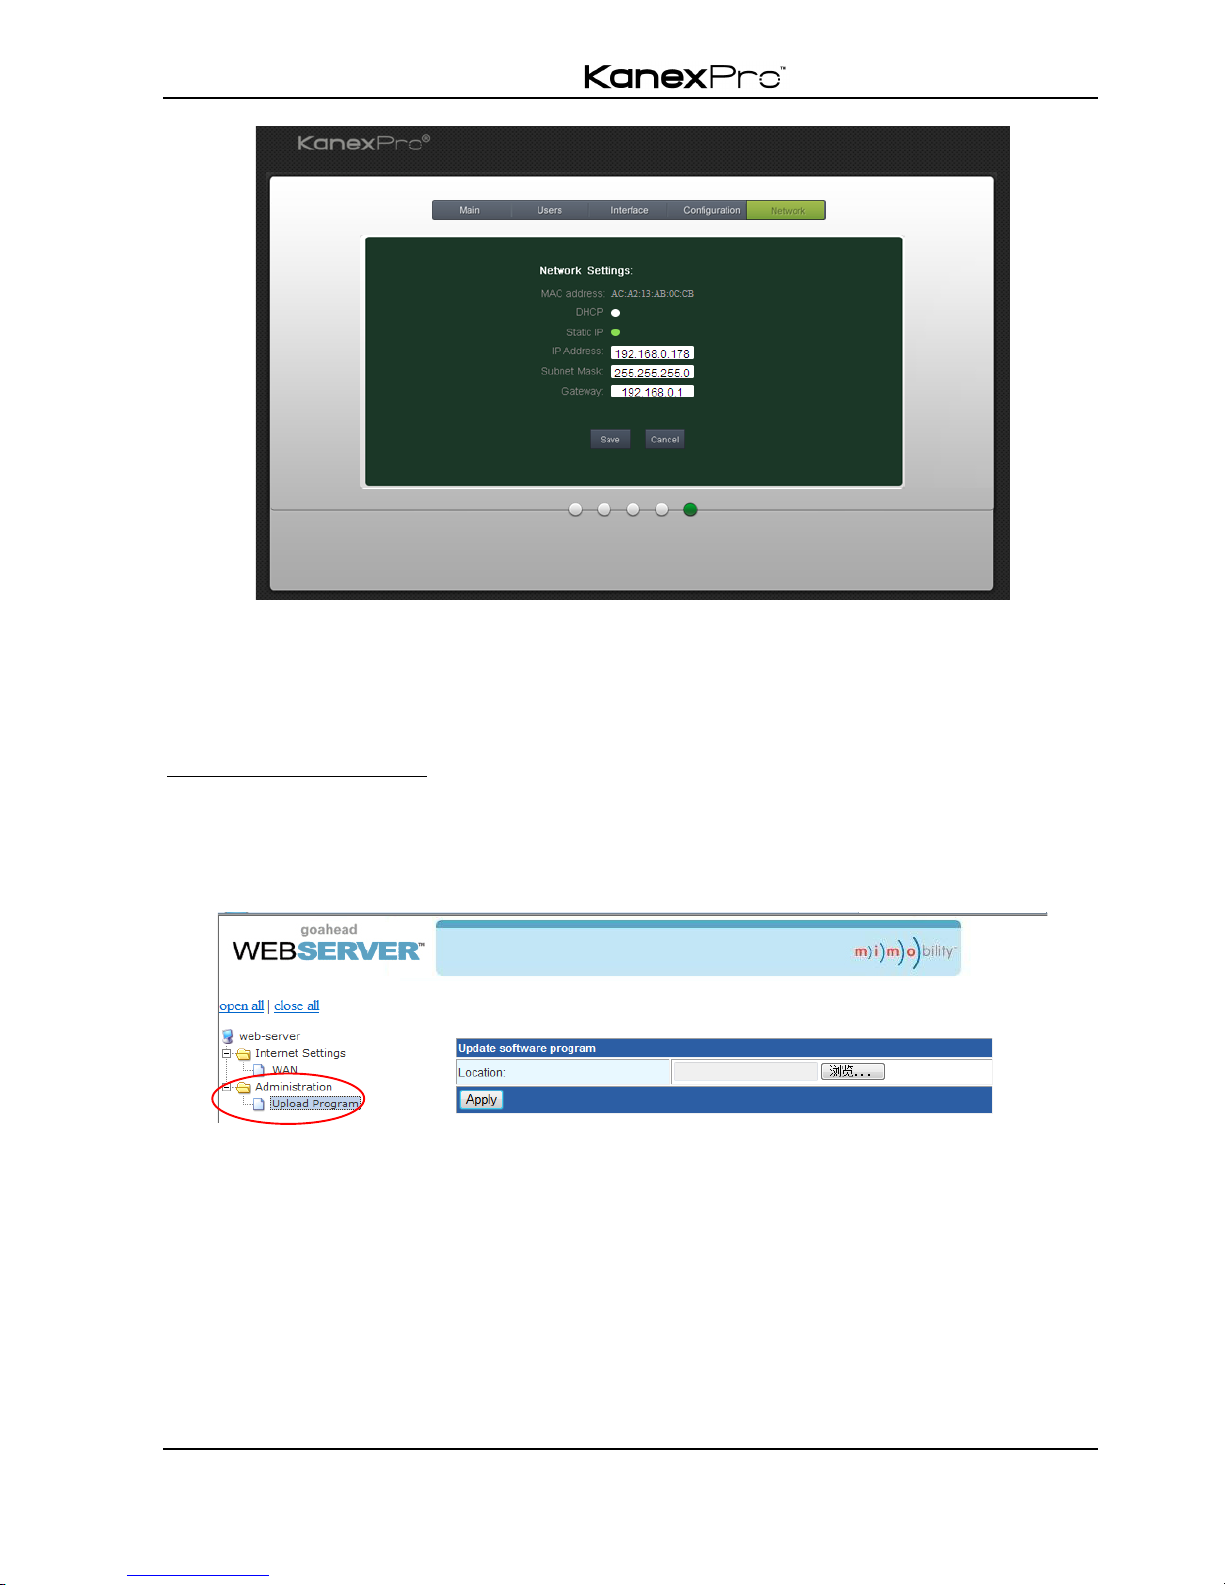
Network: Inquire and configure network settings including MAC address, IP address,
subnet mask, and Gateway
Page 39
4K HDBaseT™ 8x8 Matrix Switcher
MX-HDBASE8X8-4K 34
KanexPro.com
Note: Log in as user access main interface only.
4.4.3 GUI Update
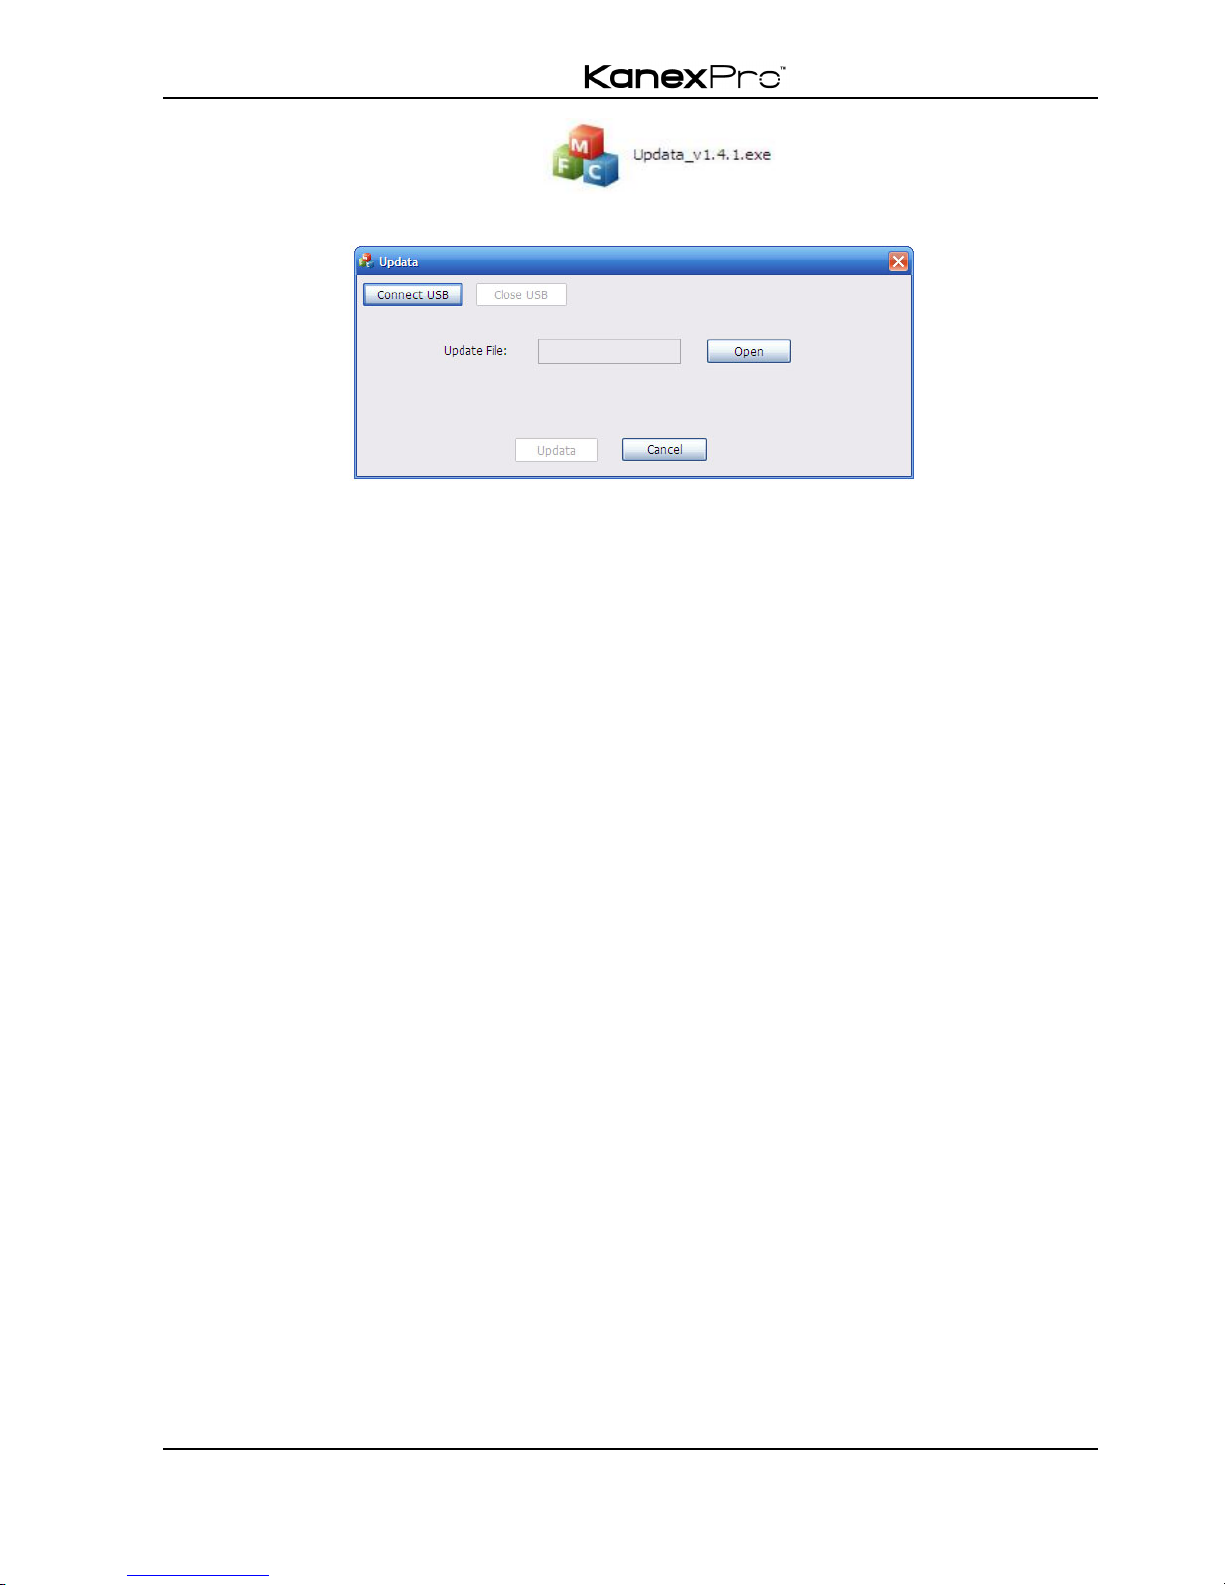
GUI for 4K HDBaseT 8x8 Matrix Switcher supports online update in
http://192.168.0.178:100. Type the username and password (the same as the GUI log-in
settings, modified password will be available only after rebooting) to log in the
configuration interface. After that, click Administration at the source menu to get to
Upload Program as shown below:
Select the desired update file and press Apply, it will start upgrading then.
4.5 Firmware Update via USB
The switcher boasts a USB port for online firmware upgrade on the front panel. Follow
these steps to upgrade firmware:
Step1. Copy the upgrade software and the latest upgrade file (.bin) to PC.
Step2. Connect the USB ports of the switcher and the PC via USB cable.
Step3. Double-click the update software icon (see as below).
Page 40
4K HDBaseT™ 8x8 Matrix Switcher
MX-HDBASE8X8-4K 35
KanexPro.com
It will enter the upgrade interface shown as below:
Step4. Click Connect USB.
Step5. Click Open to load the upgrade file, and then click Updata to start firmware
upgrading.
Note: To ensure available control, the COM number of the PC should be 1~9.
Page 41

4K HDBaseT™ 8x8 Matrix Switcher
MX-HDBASE8X8-4K 36
KanexPro.com
5. Specification
Video Input
Video Output
Input
8HDMI
Output
4HDMI
8 HDBaseT
Input
Connector
Female HDMI
Output
Connector
Female HDMI
Female RJ45 (with LED
indicators)
Input Level
T.M.D.S. 2.9V~3.3V
Output Level
T.M.D.S. 2.9V~3.3V
Input
Impedance
100Ω (Differential)
Output
Impedance
100Ω (Differential)
HDBaseT
Output
1080P@60Hz ≤70m
4Kx2K@30Hz ≤40m
Video General
Gain
0 dB
Bandwidth
10.2 Gbps
Video Signal
HDMI (or DVI-D)
Maximum
Pixel Clock
225MHz
Resolution
Range
Up to 4Kx2K, 1080P 3D
Switching
Speed
200ns (Max.)
Max Pixel
Clock
225MHz
EDID
Management
In-built EDID data
and manual EDID
management
HDCP
Supports HDCP 1.4, auto detecting for HDCP status& selectable
HDCP status
Audio General
Output Signal
Analog audio
Output
Connector
3-pin pluggable
terminal block
PCM Format
Distortion: 0.1%
32Ω/70mW@1KHz,
0.1% 16Ω/105mW
@1KHz
Frequency
Response
20Hz~20KHz
CMRR
>90dB @20Hz ~ 20KHz
Control Parts
Control Ports
8 IR OUT (green and
red)
8 IR IN (black)
1 IR EYE (black)
1 IR ALL IN (black)
1 TCP/IP (female RJ45)
1 RS232 (9 pin female)
8 RS232s (3-pin
Panel Control
Front panel buttons
Page 42

4K HDBaseT™ 8x8 Matrix Switcher
MX-HDBASE8X8-4K 37
KanexPro.com
pluggable terminal
blocks)
IR Control
In-built IR sensor,
Extended IR receiver
RS232
Control
9 pin female
TCP/IP
Control
Works with In-built web GUI
General
Power
Supply
100V~240V AC
Power
Consumption
103W (full load)
Temperature
-10 ~ +40℃
Reference
Humidity
10% ~ 90%
Dimension
(W*H*D)
437 x 87.8 x 380 mm
Weight
5.4Kg
Page 43

4K HDBaseT™ 8x8 Matrix Switcher
MX-HDBASE8X8-4K 38
KanexPro.com
6. Troubleshooting & Maintenance
Problems
Causes
Solutions
Color losing or no video
signal output
The connecting cables
may not be connected
correctly or it may be
broken.
Check whether the cables
are connected correctly and
in working condition.
Fail or loose connection
Make sure the connection is
good
No output image when
switching
No signal at the input /
output end
Check with oscilloscope or
multimeter if there is any
signal at the input/ output
end.
Fail or loose connection
Make sure the connection is
good
Input source is with HDCP
while the HDCP
compliance is switched off.
Send command
/%[Y]/[X]:1.or change HDCP
compliance status in GUI.
The display doesn’t
support the input
resolution.
Switch for another input
source or enable the display
to learn the EDID data of the
input.
Cannot control the device
via front panel buttons
Front panel buttons are
locked.
Send command /%Unlock;
or select unlock in GUI
interface to unlock
Cannot control the device
via IR remote
The battery has run off.
Change for new battery.
The IR remote is broken.
Send it to authorized dealer
for repairing.
Beyond the effective range
of the IR signal or not
pointing at the IR receiver
Adjust the distance and
angle and point right at the
IR receiver.
The IR receiver connected
to IR IN/ IR ALL IN port is
not with carrier
Change for an IR receiver
with carrier.
Page 44

4K HDBaseT™ 8x8 Matrix Switcher
MX-HDBASE8X8-4K 39
KanexPro.com
Power Indicator remains
off when powered on
Fail or loose power
connection
Check whether the cables
are connected correctly
EDID management does
not work normally
The HDMI cable is broken
at the output end.
Change for another HDMI
cable, which is in good
working condition.
There is a blank screen
on the display when
switching
The display does not
support the resolution of
the video source.
Switch again.
Manage the EDID data
manually to make the
resolution of the video
source automatically
compliant with the output
resolution.
Cannot control the device
by control device (e.g. a
PC)through RS232 port
Wrong connection
Check to ensure the
connection between the
control device and the unit
Wrong
RS232communication
parameters
Type in
correctRS232communication
parameters: Baud rate:9600;
Data bit: 8; Stop bit: 1; Parity
bit: none
Broken RS232 port
Send it to authorized dealer
for checking.
Static becomes stronger
when connecting the
video connectors
Bad grounding
Check the grounding and
make sure it is connected
well.
Cannot control the device
by RS232 / IR remote /
front panel buttons
The device has already
been broken.
Send it to authorized dealer
for repairing.
If your problem persists after following the above troubleshooting steps, seek
further help from authorized dealer or our technical support at 888-975-13668 or
visit: kanexpro.com for more details on that product.
Page 45

4K HDBaseT™ 8x8 Matrix Switcher
MX-HDBASE8X8-4K 40
KanexPro.com
7. After-sales Service
If there appear some problems when running the device, please check and deal with the
problems reference to this user manual.
1) Product Limited Warranty: We warrant that our products will be free from defects
in materials and workmanship for three years, which starts from the first day the
product leaves warehouse (check the SN mark on the product).
Proof of purchase in the form of a bill of sale or receipted invoice must be presented
to obtain warranty service.
2) What the warranty does not cover:
! Warranty expiration.
! Factory applied serial number has been altered or removed from the product.
! Damage, deterioration or malfunction caused by:
! Normal wear and tear
! Use of supplies or parts not meeting our specifications
! No certificate or invoice as the proof of warranty.
! The product model showed on the warranty card does not match with the
model of the product for repairing or had been altered.
! Damage caused by force majeure.
! Servicing not authorized
! Other causes which does not relate to a product defect
! Delivery, installation or labor charges for installation or setup of the product.
3) Technical Support: Email to our after-sales department or make a call, please
inform us the following information about your cases.
! Product version and name.
! Detailed failure situations.
! The formation of the cases.
Remarks: For any questions or problems, please try to get help from your local
distributor or AV dealer.
Page 46

Page 47

Brea, California
KanexPro.com
MPN: MX-HDBASE6X6-4K
HDMI® and HDBaseT™ are trademarks or registered trademarks of HDMI Licensing LLC &
HDBaseT Alliance respectively in the United States and other countries. KanexPro is a trademark
of Apogee Inc., registered trademarks in the US.
 Loading...