

Page 1

Due to continual improvement in design or otherwise, the product you
purchase may differ slightly from the illustration in this book. Issue B13
Kambrook - New Zealand
Private Bag 94411
Botany, Manukau
Auckland 2163
New Zealand
Customer Service Line/
Spare Parts 0800 273 845
Customer Service Fax 0800 288 513
www.kambrook.co.nz
Kambrook - Australia
Building 2, Port Air Industrial Estate
1A Hale Street
Botany NSW 2019
Australia
Customer Service Line 1300 139 798
Customer Service Fax 1800 621 337
www.kambrook.com.au
Page 2
X Blade Pro
Food Prep
System
KSB400
Instruction Booklet
Page 3

Important
Please retain your instruction
book for future use.
In the event that you need some assistance with your
Kambrook appliance, please contact our Customer Service
Department on 1300 139 798 (Australia) or 0800 273 845
(New Zealand). Alternatively, visit us on our website at
www.kambrook.com.au or www.kambrook.co.nz
Page 4

Contents
Kambrook Recommends
Safety First
p4
Your Kambrook X Blade Pro
Food Prep System
p7
Operating Your Kambrook
Stick Mixer
p9
Food Preparation Guide p24
Care, Cleaning and Storage p28
Recipes p33
Page 5

4
Kambrook Recommends Safety First
IMPORTANT: Please retain your
instruction book for future use.
At Kambrook, we believe that safe performance is the first priority in any
consumer product, so that you, our valued customer can confidently
use and trust our products. We ask that any electrical appliance that
you use be operated in a sensible fashion with due care and attention
placed on the following important operating instructions.
Important Safeguards For Your Kambrook
X Blade Pro Food Prep System
• Carefully read all instructions before
operating the Kambrook X Blade Pro Food
Prep System for the first time and save for
future reference.
• Remove and safely discard any packaging
material and promotional labels before
using the Stick Mixer for the first time.
• To eliminate a choking hazard for young
children, remove and safely discard the
protective cover fitted to the power plug of
this Stick Mixer.
• Do not place the Stick Mixer near the edge
of a bench or table during operation. Ensure
the surface is level, clean and free of water,
flour, etc.
• Do not place the Stick Mixer on or near a
hot gas or electric burner, or where it could
touch a heated oven.
• If using the Stick Mixer as a hand blender to
blend hot food in a saucepan, firstly remove
the saucepan from the heat source and
ensure the power cord and body of Stick
Mixer are also kept away from any heat
source.
• Take care when handling the Stick Mixer,
attachments and sharp cutting blades,
when emptying the bowl and during
cleaning. Remember the blade and
attachments are very sharp and should be
kept out of reach of children.
• Always make sure the Stick Mixer is
completely and properly assembled
before operating.
• Ensure the Stick Mixer is turned OFF by
releasing the ‘ON’ or ‘TURBO’ button on the
Stick Mixer motor. Turn the power off at the
power outlet and remove the power plug
from the power outlet before attempting
to attach or disassemble any of the
accessories.
• Always ensure the Stick Mixer motor is
securely fitted onto the food processing bowl
lid, blending shaft or masher attachment
before operating.
• Always ensure the food processing bowl lid
is securely locked in place before operating
the food processing bowl.
• Do not use attachments other than those
provided with the Stick Mixer.
• Do not attempt to operate the Stick Mixer by
any method other than those described in
this booklet.
• Do not process hot or boiling liquids in the
processing bowl – allow liquids to cool before
placing into the processing bowl.
• Do not operate the Stick Mixer continuously
for more than 1 minute. Allow the motor to
rest for 1 minute between each use.
• Never mix dry, thick or heavy mixtures for
more than 20 seconds. Stop the operation
and stir the ingredients before continuing.
Allow the motor to rest for 1 minute between
each use.
Page 6

5
• Ensure the Stick Mixer is turned OFF by
releasing the ‘ON’ or ‘TURBO’ button on
the motor head. Turn the power off at the
power outlet and remove the power plug
from the power outlet before attempting
to move the Stick Mixer, when not in use, if
left unattended and before disassembling,
cleaning or storing.
• When blending or mashing, if food becomes
lodged around the processing blade or in
the blade guard, release the ‘ON’ or ‘TURBO’
speed button, switch the power off at the
power outlet and remove the power plug
from the outlet. Use a spatula to dislodge
the food. Do not use fingers as the blades
are sharp.
• Ensure the Stick Mixer is switched off and
unplugged at the power outlet before
changing accessories or approaching parts
that move when they are in use.
• Do not use the Stick Mixer with wet hands.
• Do not push the food into the feed chute
with your fingers or other utensils. Always use
the food pusher provided.
• Keep fingers, hands, knives and other utensils
away from moving blades and discs.
• Do not place hands or fingers in the
food processing bowl unless the motor,
processing blade or disc has come to a
complete stop. Ensure the Stick Mixer is
switched off and unplugged at the power
outlet before removing the lid from the food
processing bowl.
• Use the blade protector when storing the
processing blade.
• Do not process thin fluids such as water, milk,
stock, juice etc in the food processing bowl
as this could result in overflow. To reduce the
risk of overflow, always add drier or thicker
ingredients to the food processing bowl prior
to adding fluids.
• Do not place anything on top of the
appliance when the lid is on, when in use
and when stored.
• To protect against electric shock, do not
immerse the Stick Mixer motor, cord or power
plug in water or any other liquid.
• Do not remove the Stick Mixer from
ingredients during operation. Ensure the
Stick Mixer is switched OFF and has stopped
turning before removing, to avoid contact
with moving blade.
• Do not leave the Stick Mixer unattended
when in use.
• Do not allow children to use the Stick Mixer
without supervision.
• Do not place any parts of the Stick Mixer in a
microwave oven.
• Do not wash the mashing attachment
connector, processing bowl lid or the motor
of the Stick Mixer in the dishwasher. The
detachable blending shaft, processing bowl,
cube cutter blade, cube cutter disc, cube
cutter blade holder, cube cutter cleaning
accessory, processing blade, shredding/
slicing disc, chipping disc and masher
attachment are dishwasher safe.
• Keep the Stick Mixer clean. Follow the Care,
Cleaning and Storage instructions provided
in this book.
Page 7

6
Important Safeguards For All Electrical
Appliances
• Fully unwind the power cord before use.
• Connect only to 230V or 240V power outlet.
• Do not let the power cord hang over the
edge of a bench or table, touch hot surfaces
or become knotted.
• To protect against electric shock, do not
immerse the power cord, power plug or
appliance in water or any other liquid,
unless it is recommended in the cleaning
instructions.
• The appliance is not intended for use by
persons (including children) with reduced
physical, sensory or mental capabilities,
or lack of experience and knowledge,
unless they have been given supervision or
instruction concerning use of the appliance,
by a person responsible for their safety.
• Children should be supervised to ensure that
they do not play with the appliance.
• It is recommended to inspect the appliance
regularly. Do not use the appliance if the
power supply cord, plug, connector or
appliance becomes damaged in any way.
Return the entire appliance to the nearest
authorised Kambrook Service Centre for
examination and/or repair.
• Any maintenance other than cleaning
should be performed at an authorised
Kambrook Service Centre.
• This appliance is for household use only.
Do not use this appliance for other than its
intended use. Do not use in moving vehicles
or boats. Do not use outdoors. Misuse may
cause injury.
• The installation of a residual current device
(safety switch) is recommended to provide
additional safety protection when using
electrical appliances. It is advisable
that a safety switch with a rated residual
operating current not exceeding 30mA be
installed in the electrical circuit supplying
the appliance. See your electrician for
professional advice.
• Always turn the appliance to the OFF
position, switch off at the power outlet
and unplug at the power outlet when the
appliance is not in use.
• Before cleaning, always turn the appliance
to the OFF position, switch off at the power
outlet, unplug at the power outlet and
remove the power cord, if detachable, from
the appliance and allow all parts to cool.
• Do not place this appliance on or near
a heat source, such as hot plate, oven or
heaters.
• Position the appliance at a minimum
distance of 20cm away from walls, curtains
and other heat or steam sensitive materials
and provide adequate space above and on
all sides for air circulation.
Page 8
7
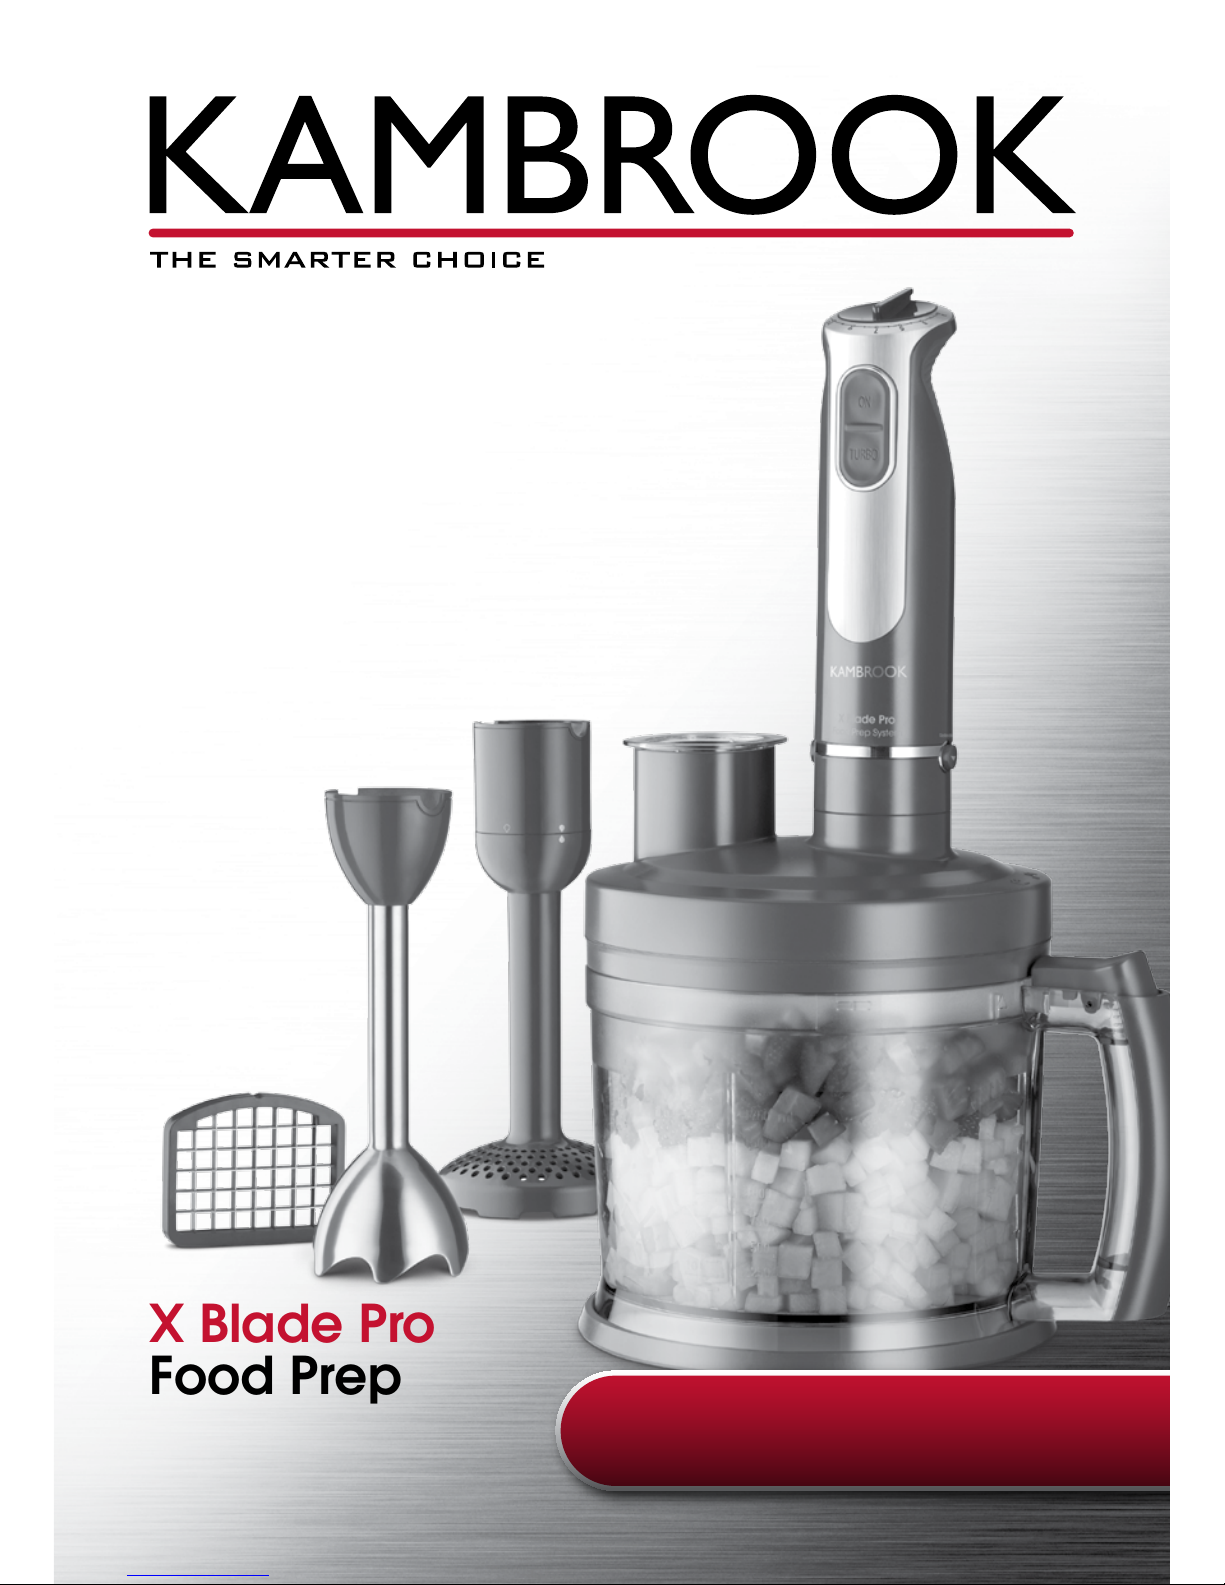
Your Kambrook X Blade Pro Food Prep System
1. 'ON' speed button
2. 'TURBO' speed button
3. 600 watt powerful Stick Mixer
motor controls stick mixer and
attaches to food processing
bowl for operating cubic and
food processing attachments
a) Variable speed control dial to
adjust motor speed from low to
high as required depending on
the processing task
4. Stick Mixer attachments for
blending or mashing
a) Stainless steel four tip
blending shaft
b) Masher attachment
c) Masher attachment
connector
NOTE: The rubber non-slip ring on
the base of the food processing
bowl is removable for cleaning but
should always be in place when
using the food processing bowl.
5. 2 litre processing bowl used
with cubic and food processing
attachments
6. Lid release button on processing
bowl handle. Press down on
button to release the locking
mechanism on the lid.
7. Processing bowl lid with feed
chute and food pusher used
with cubic and food processing
attachments
8. Non-slip rubber ring (removable)
4a
4b
4c
3a
Page 9
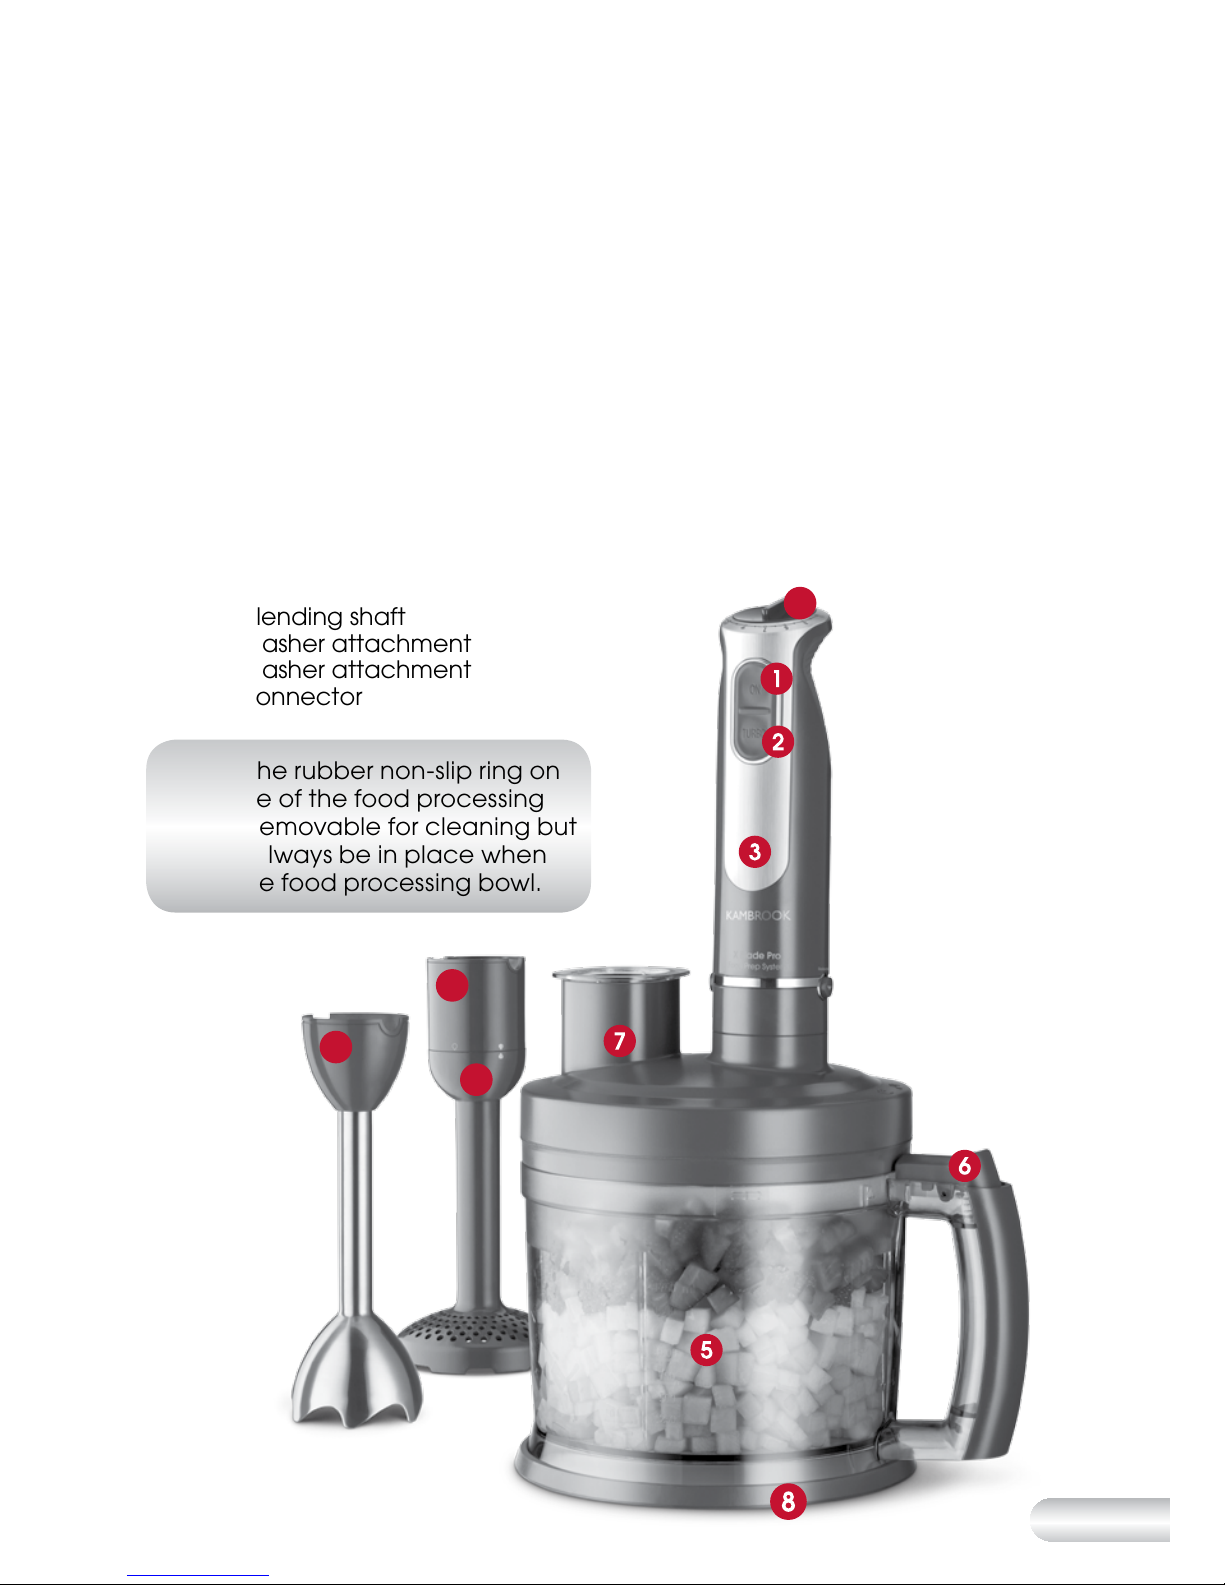
8
Your Kambrook X Blade Pro
Food Prep System Continued...
9. Cubic attachment for dicing
a) Cube cutter blade
b) Blade holder with locking clips
c) Disc with stainless steel blade
d) Cube cutter shaft- inserted
into the assembled cubic
attachment and placed
inside the processing bowl
e) Cube cutter cleaning
accessory to help remove
foodstuffs that may get
caught in cube cutter blade
after dicing
10. Food Processing attachment
for processing, slicing, shredding
or chipping
a) Spindle - sits inside the
processing bowl to be used
with processing blade,
slicing/shredding disc and
chipping disc
b) Reversible stainless steel
slicing/ shredding disc
c) Stainless steel chipping disc
d) Stainless steel processing
blade
Page 10

9
Operating Your Kambrook Stick Mixer
Before First Use
Remove any packaging material
and promotional labels.
When unpacking the Stick Mixer,
check to see you have received all
the required parts and accessories
as outlined in the parts list before
discarding the packaging.
Disassemble and wash blending shaft,
cube cutter blade, cube cutter disc,
processing blade, processing bowl,
slicing/shredding disc, chipping disc
and mashing attachment with warm
soapy water, rinse and dry thoroughly.
Ensure no water remains inside the
blending shaft to avoid water running
into the Stick Mixer motor when
re-attached.
NOTE: Carefully remove the
protective safety storage cover
from the processing blade. The
processing blade is extremely
sharp, it should only ever be held
by its central plastic.
WARNING: All blades are
extremely sharp. Handle
with care.
NOTE: DO NOT place the masher
connector, processing bowl lid
and Stick Mixer motor into a
dishwasher or submerge in water
for cleaning. Wipe the masher
connector, processing bowl lid
and Stick Mixer motor with a
damp cloth. The detachable
blending shaft, processing bowl,
blade holder, cube cutter blade,
cube cutter disc, cube cutter
shaft, cube cutter cleaning
tool, processing blade, slicing/
shredding disc, chipping disc
and masher attachment are
dishwasher safe.
NOTE: Before placing the
blending shaft back onto the
Stick Mixer motor after washing,
make sure that the blending shaft
has been dried thoroughly.
Stick Mixer Motor
The Stick Mixer motor with button
controls is versatile and can
be attached to:
•The stainless steel four blade
blending shaft for use as a hand
blender
•The masher attachment to
conveniently make lump-free mash
•The processing bowl lid for use
with the cubic attachment to dice
vegetables and fruit in a short
amount of time
•The processing bowl lid using the
slicing/shredding disc, chipping
disc or processing blade for use as
a food processor
Page 11

10
WARNING: Do not
immerse the Stick Mixer
motor, power cord, or
plug in water or any other
liquid.
Stick Mixer Attachments
WARNING: All processing
blades are extremely
sharp. Handle with care
and only lift from the
shaft.
To Attach the Stainless Steel
Blending Shaft to the Stick
Mixer Motor
Align the lock buttons on the drive
end of the Stick Mixer motor with
the grooves found at the top of the
four blade blending shaft. Push down
to lock into place until an audible
“click” sound is heard to indicate
that it is secure.
Using the Hand Blender
Ensure the blender is correctly and
securely assembled as detailed prior.
1. Place food to be processed into
a sufficiently large mixing bowl or
saucepan (not provided).
2. Insert the power plug into a 230V
or 240V power outlet and turn
the power on.
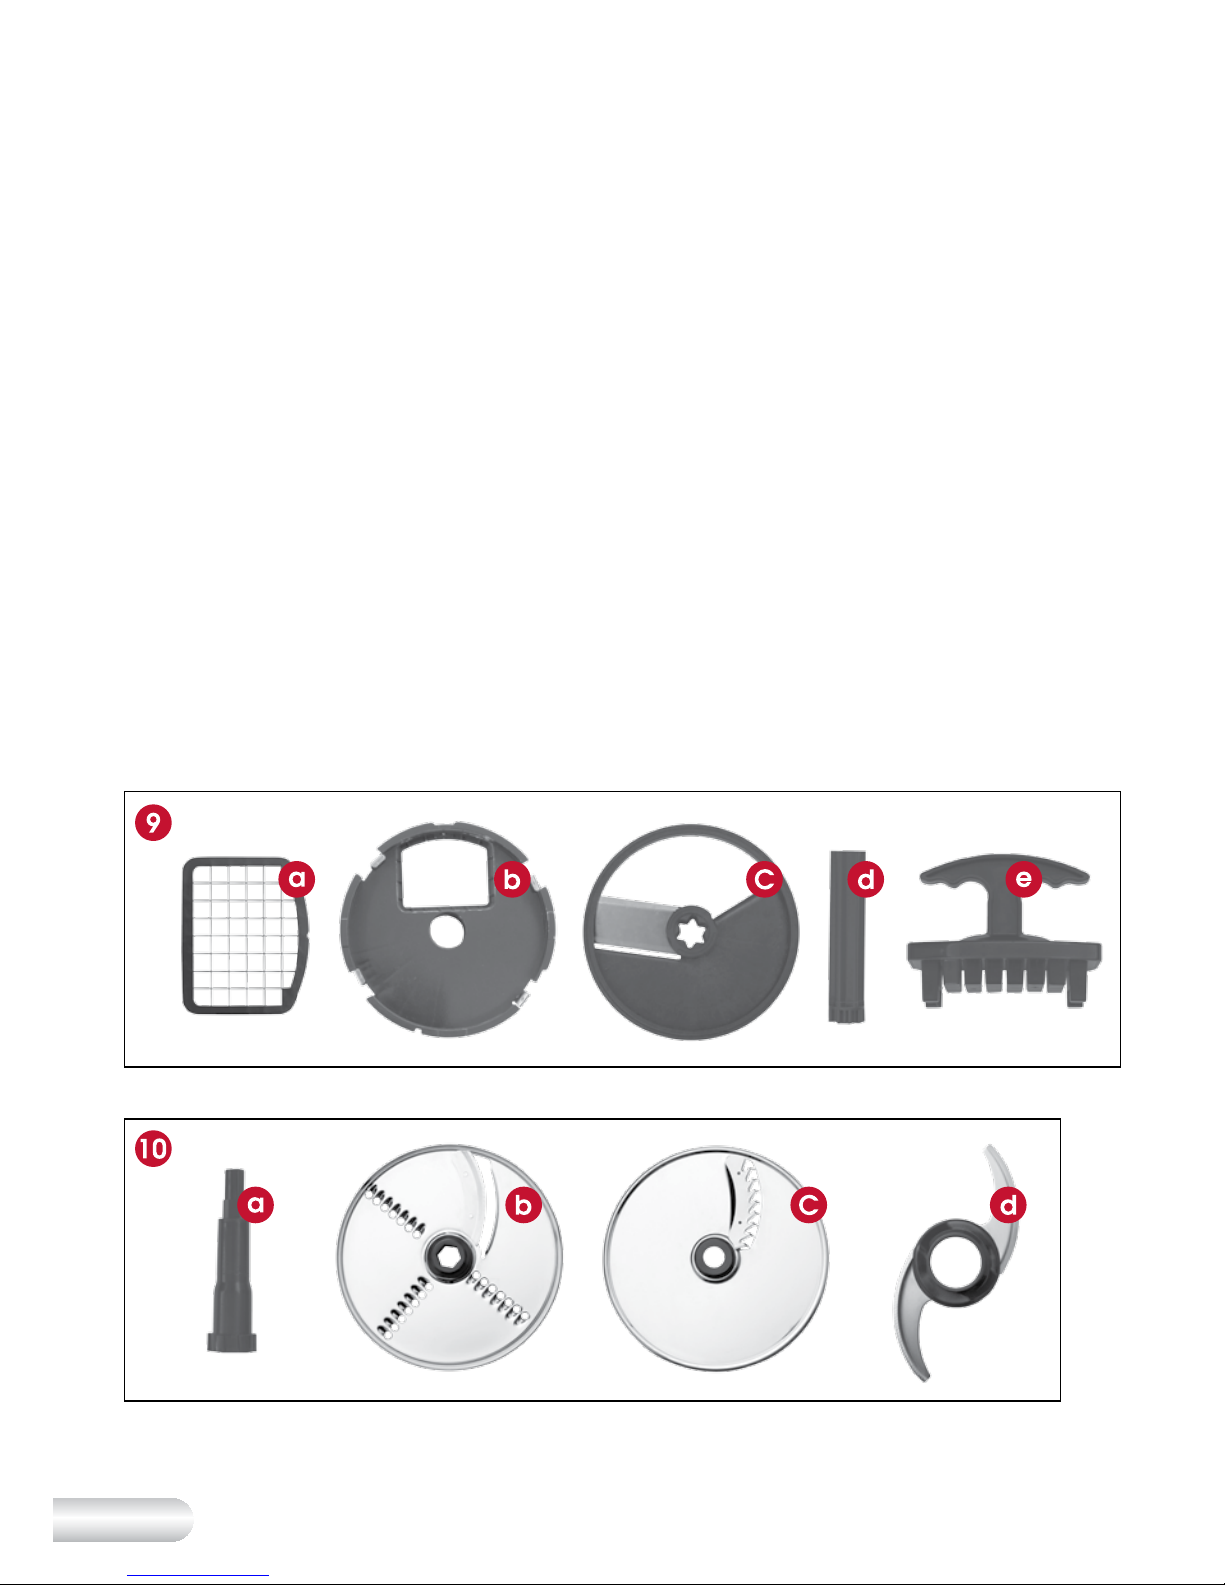
3. Using the Variable Speed
Control Dial located on top of the
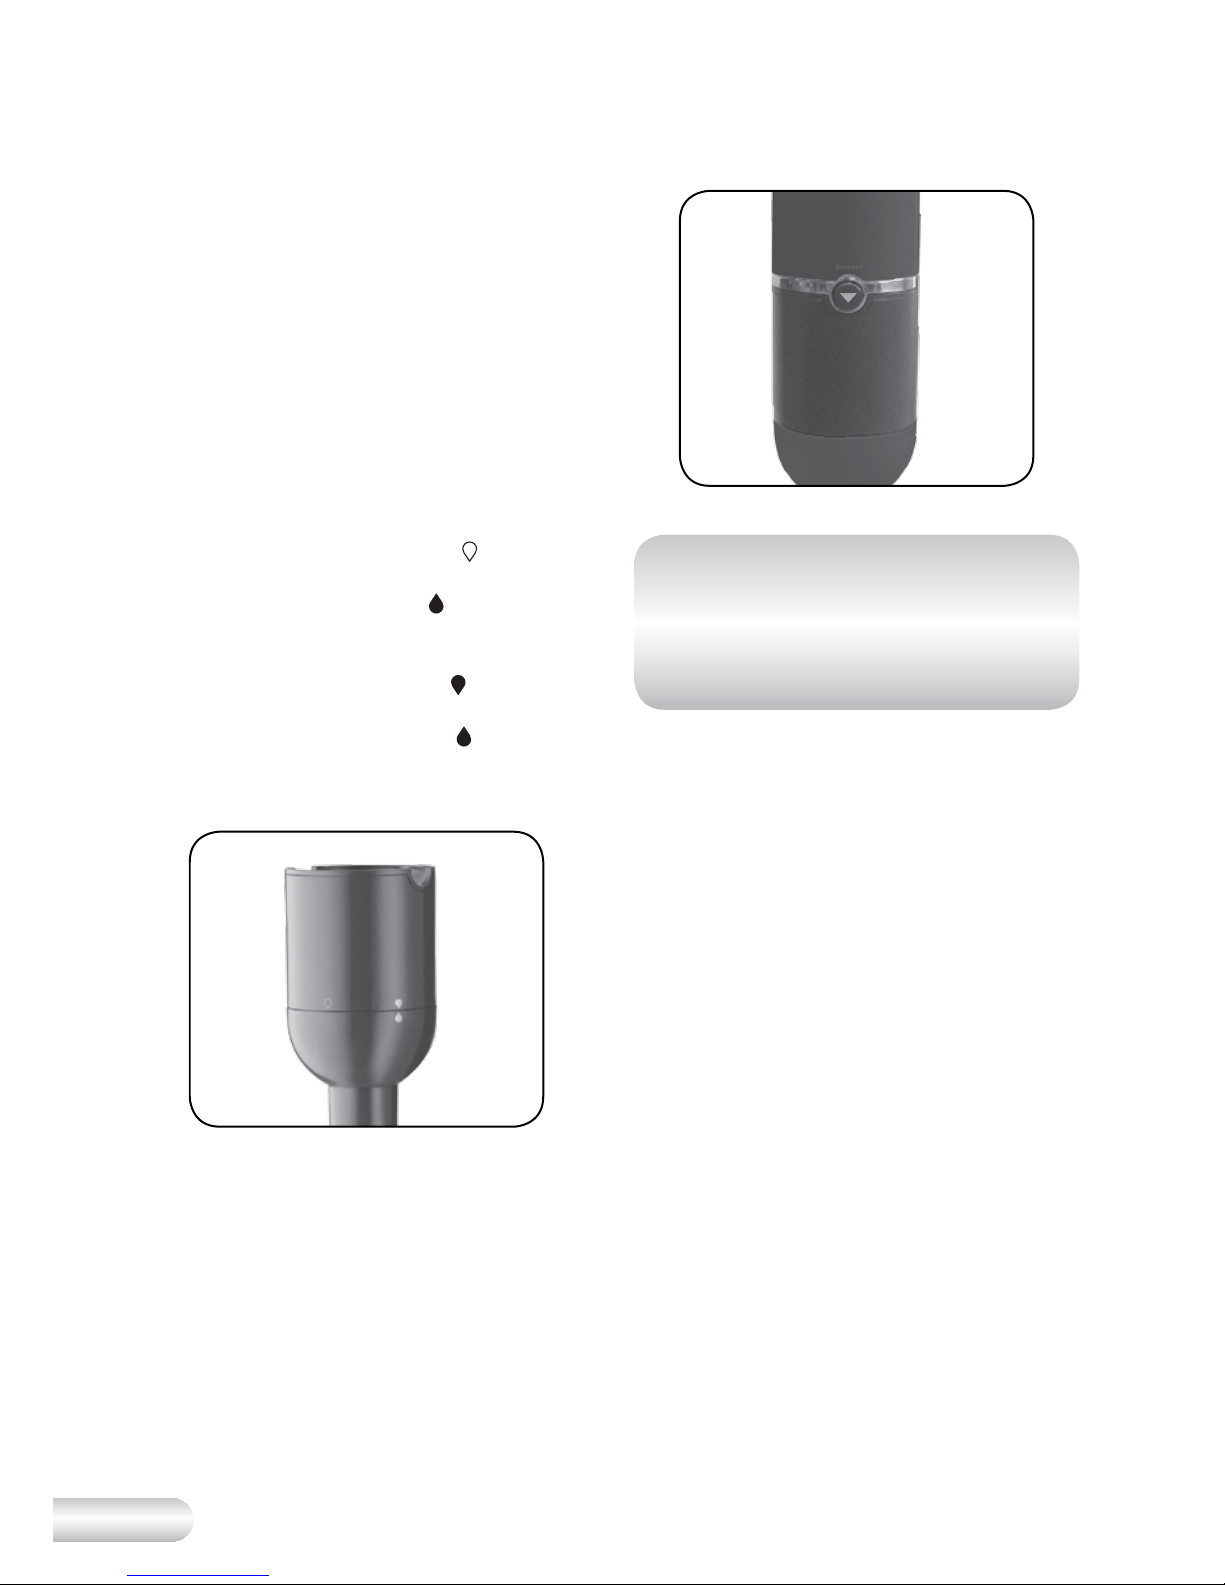
Stick Mixer motor (See Fig. 1), turn
the dial to a low speed setting
and then, if required, adjust to a
higher speed setting depending
on what the recipe specifies.
4. Place the blending shaft as
deeply as possible into the
saucepan and press and hold
the ‘ON’ button. The button must
be kept pressed for the duration
of operation. If an extra burst of
power is required when blending,
press the ‘TURBO’ speed button
instead of the 'ON' button.
5. With one hand work through the
ingredients in the saucepan with
a gentle raising and lowering
motion of the Stick Mixer, whilst
with the other hand hold onto
the saucepan handle for
increased control.
6. Once processing is complete,
switch OFF the motor by releasing
the ‘ON’ or ‘TURBO’ speed
button, switch off at the power
outlet and remove the power
plug from the outlet.
7. To avoid splashing when lifting the
Stick Mixer out of the saucepan,
ensure the motor has completely
stopped and the blades have
stopped rotating.
NOTE: The Stick Mixer has a
Variable Speed Control Dial that
adjusts speed from low to high
depending on the processing
task. Turn dial from a low speed of
1 up to a higher speed if required
(See Fig. 1). Pressing the ‘TURBO’
button however will override the
Variable Speed and operate at
maximum speed.
Operating Your Kambrook Stick Mixer Continued...
Page 12
11
Fig. 1
WARNING: DO NOT
process hard foodstuffs
such as ice, coffee
beans, cereals or
chocolate in lumps
as these may result in
damage to the blades.
NOTE: The Stick Mixer motor will
only operate while the ‘ON’ or
‘TURBO’ speed button remains
pressed - this is a safety feature.
To Detach the Stainless Steel
Blending Shaft
1. Once blending is complete,
switch OFF the motor by releasing
the ‘ON’ or ‘TURBO’ speed
button, switch off at the power
outlet and remove the power
plug from the outlet.
2. Holding the Stick Mixer motor with
one hand and the upper plastic
part of the blending shaft with
the other hand, press the two
‘Release’ buttons found at the
drive end of the Stick Mixer motor
and pull the blending shaft away
from the motor.
Recommendations when Using
the Stick Mixer as a Hand Blender
•The Stick Mixer blends foods
and liquids rapidly, therefore it is
easy to over-process. Remember
when using the blending shaft,
to stop the Stick Mixer and
check foodstuffs throughout the
operation.
•The stainless steel blending shaft
on the Stick Mixer allows for hot
food to be processed directly in
the saucepan. This makes blending
soups and sauces very easy. For
safety reasons, move the saucepan
away from the heat before
processing.
•Ensure the body of the Stick Mixer
and power cord are kept away
from any heat source.
•When pureeing and blending,
cut food into uniform sizes. This
will ensure smooth and consistent
results.
•Warm all liquids to be added to
soups and purees, this will ensure
even blending.
•DO NOT process hard foodstuffs
such as ice, coffee beans, cereals
or chocolate in lumps as these may
result in damage to the blades.
Dislodge Food from the Blending
Blade
If foodstuffs become lodged around
the four tip blade or in the blade
guard surrounding the blade, follow
the safety instructions outlined below:
1. Release the ‘ON’ or ‘TURBO’
speed button, switch the power
off at the power outlet and
unplug the power plug from
the outlet.
Page 13
12
2. Use a spatula to carefully dislodge
the food. DO NOT use fingers as
the blades are sharp.
3. After the food has been removed
and blades are clear, plug the
Stick Mixer back into the power
supply, switch the power on and
continue blending.
To Attach the Masher Attachment
to the Stick Mixer Motor
1. To assemble the masher
attachment, align the (
) symbol
on the masher attachment
connector with the (
) symbol
found on the masher attachment.
Turn the masher attachment anticlockwise so that the (
) symbol
on the masher attachment
connector aligns with (
) symbol
on the masher attachment
(See Fig. 2).
Fig. 2
2. Align the lock buttons on the drive
end of the Stick Mixer motor with
the grooves at the top of the
masher attachment connector
after the connector has been
connected to the masher
attachment. Push down to lock
into place until an audible “click”
sound is heard to indicate that it is
secure (See Fig. 3).
Fig. 3
NOTE: Ensure the masher
attachment is dry and that
there is no water inside before
attaching to avoid any water
getting in the Stick Mixer motor.
Using the Stick Mixer as
a Masher
1. Place cooked foodstuffs to be
mashed into a saucepan.
2. Insert the plug into a 230V or 240V
power outlet and then turn the
power on at the power outlet.
3. Insert the mashing attachment
deeply into a saucepan and
press and hold the ‘ON’ or
'TURBO' button to turn the masher
on. Choose a Variable Speed
as per the recipe guideline or
alternatively, press and hold the
'TURBO' speed button to select
the maximum speed.
4. To efficiently mash the foodstuffs,
use a gentle raising and
lowering motion.
5. Switch OFF the motor by releasing
the ‘ON’ button and then lift
the Stick Mixer out of the
saucepan. To avoid splattering,
allow the blades to stop rotating
before lifting the masher out of
the saucepan.
Operating Your Kambrook Stick Mixer Continued...
Page 14

13
6. The Stick Mixer will only
operate while either the ‘ON’ or
‘TURBO’ speed control button
is continuously pressed - this is a
safety feature.
To Remove the Masher
Attachment
1. Once mashing is complete,
release the ‘ON’ or ‘TURBO’
speed button, switch the power
off at the power outlet and
unplug the power plug from
the outlet.
2. To remove the masher from the
Stick Mixer motor, press the two
‘Release’ buttons found at the
drive end of the Stick Mixer motor
and pull the masher away from
the motor.
3. To separate the masher
attachment connector from
the masher attachment, turn
the masher attachment in a
clockwise direction and
pull apart.
Recommendations when using
the Stick Mixer with the Masher
Attachment
•The Stick Mixer is powerful
and processes quickly. It is
recommended that in order to
avoid ‘over mashing’ potatoes,
stop the Stick Mixer and
check the consistency of the
foodstuffs regularly.
•The masher attachment allows for
foodstuffs to be mashed directly in
the saucepan. For safety reasons,
always remove the saucepan from
the heat and allow to cool to room
temperature before mashing.
•When mashing, ensure the
potatoes are cut into uniform
sizes and fully cooked to ensure
even and consistent results.
•Ensure the body of the Stick Mixer
and power cord are kept away
from any heat source.
NOTE: The masher attachment
should only be used for mashing
tasks; do not use it to blend.
Cubic Attachment
To assemble the Cubic Attachment
into the Food Processor Bowl
WARNING: The cube
cutter blade and disc
are extremely sharp and
should only be handled
by the plastic parts.
The cubic attachment is used to dice
fruits and raw or cooked vegetables,
such as carrots, pumpkin and onions.
1. To use the cubic attachment, the
cube cutter blade and blade
disc must first be assembled into
the blade holder. To do this, sit
the blade holder on a bench so
that the protruding cylinder is
facing downwards and pull the
four locking clips away from the
edges of the blade holder. Next,
holding the cube cutter blade by
the outside plastic edges, align
the tab on the cube cutter blade
with the matching groove on the
blade holder and drop into the
blade holder cavity (See Fig. 4).
Make sure the cube cutter blade
sits securely and flush inside the
cavity of the blade holder.
Page 15

14
HI NT: Pinch the top and bottom
of each clip between thumb and
index finger and pull outwards to
release locking clips.
NOTE: The cube cutter blade
will only sit inside the blade
holder when fitted in the correct
position.
Fig. 4
2. Hold the blade disc only by the
plastic part to avoid the sharp
blade. Turn the disc so the sharp
side of the blade is facing up and
drop the protruding cylinder on
the blade disc into the hole of the
blade holder (See Fig. 5). Make
sure the disc fits securely inside
the blade holder and then push
the four locking clips towards the
blade holder edges to lock the
disc in place for dicing.
Fig. 5
3. Place the food processing
bowl on a flat benchtop and
remove the lid. To do this, press
downwards on the lid release
button found on the handle of
the processing bowl to release
and twist the lid clockwise to
unlock. Remove the lid from
the bowl.
4. Locate the small vertical tab
found on the inside of the
processing bowl just to the left of
the handle near the top edge.
Align the small groove on the
blade holder with the vertical
tab. Once aligned, drop the
assembled cubic attachment
inside the processing bowl. Make
sure the cubic attachment is level
and sits securely under the three
horizontal tabs found inside the
processing bowl close to the top
edge (See Fig. 6).
Fig. 6
5. Align the star shaped end of
the cube cutter shaft with the
matching star shaped hole in
the disc and drop inside the
assembled cubic attachment.
Make sure the shaft drops all the
way down and fits onto the metal
pivot inside the processing bowl
(See Fig. 7).
Operating Your Kambrook Stick Mixer Continued...
Page 16

15
Fig. 7
6. Place the lid on the processing
bowl so that the small tab on
the lid sits just left of the handle
on the processing bowl. Press
downwards on the lid release
button found on the handle of
the processing bowl to release
and twist the lid anti-clockwise so
the ‘
’ symbol on the lid is directly
above the ‘
’ symbol on the lid
release button. Make sure the tab
on the lid sits inside the lid release
button and the lid is secure
before using.
NOTE: The lid will only sit properly
on the bowl when the tab is in the
correct starting position.
7. To attach the Stick Mixer motor,
align the lock buttons on the drive
end of the Stick Mixer motor with
the grooves at the top of the
processing bowl lid. Push down to
lock into place until an audible
"click" can be heard to indicate it
is secure (See Fig. 8).
Fig. 8
8. Put the Food Pusher inside the
feed chute on the processing
bowl lid.
Using the Cubic Attachment
HI NT: Before dicing, organise
ingredients in terms of soft or
hard foods. It is recommended
to dice soft foods such as,
strawberries, kiwi fruit, boiled
eggs, or zucchini first. Then dice
hard foods, which includes
uncooked root vegetables such
as pumpkin, carrots, potatoes,
beetroot or parsnip.
Ensure the cubic attachment is
completely and correctly assembled
as detailed prior.
1. Insert the power plug into a 230V
or 240V power outlet and turn the
power on.
2. Make sure food to be diced
are of a suitable size to be fed
through the feed chute.
3. Using the Variable Speed Control
Dial located at the top of the
Stick Mixer motor, start by setting
the dial to a low speed setting
and then, if required adjust to a
higher speed setting depending
on what the recipe suggests.
Page 17

16
4. Remove the Food Pusher from the
feed chute. Place food inside the
feed chute and simultaneously
push food into the bowl with the
food pusher while pressing the
'ON' or 'TURBO' button.
NOTE: After dicing each hard
food or root vegetable, before
moving to the next dicing task,
remove the processing bowl lid
and check for any foodstuffs
caught in the cube cutter blade.
If food is caught in the blade,
see 'Using the Cube Cutter
Cleaning Accessory' section
on page 29 to clean the blade
before dicing again.
WARNING: Never push
food into the feed chute
with your fingers or other
utensils. Always use the
food pusher provided.
5. When processing has finished,
switch OFF the motor by releasing
the ‘ON’ or ‘TURBO’ speed
button, switch off at the power
outlet and remove the power
plug from the outlet.
6. Release the Stick Mixer motor
from the processing bowl lid
and remove the lid from the
processing bowl following the
instructions on page 22 under
section 'To Detach the Stick
Mixer Motor and Processing Bowl
Lid'. Carefully remove the cubic
attachment as described below
and use a spatula to scrape off
any attached foodstuffs back
into the processing bowl.
7. Remove the foodstuffs from inside
the processing bowl using a
spatula.
8. Clean the food processor bowl
and cubic attachments as per
the Care, Cleaning and Storage
Instructions on page 28.
To Detach the Cubic Attachment
WARNING: Ensure the
‘ON’ or ‘TURBO’ speed
button is released, power
is turned off at the power
outlet and the power
plug is removed from the
outlet before detaching
the Stick Mixer motor from
the processing bowl lid.
1. With the Stick Mixer motor
unplugged from the outlet, press
the two ‘Release’ buttons found
at the drive end of the Stick Mixer
motor to eject the motor from the
processing bowl lid. Pull the motor
away from the processing bowl lid
to detach.
2. To remove the processing bowl lid
from the processing bowl, press
downwards on the lid release
button found on the handle of
the processing bowl and twist the
lid clockwise to unlock. Pull the lid
away from the processing bowl.
3. Pull the cube cutter shaft out of
the assembled cubic attachment
(See Fig. 9).
Operating Your Kambrook Stick Mixer Continued...
Page 18

17
Fig. 9
4. Carefully holding onto the plastic
part in the middle of the disc to
avoid contact with the sharp
stainless steel blade (See Fig.10),
pull the disc assembled to the
blade holder out and away from
the processing bowl.
Fig. 10
5. Pull the four locking clips away
from the blade holder edges to
unlock the disc from the blade
holder (See Fig. 11).
Fig. 11
6. Carefully holding only the plastic
part in the middle of the disc,
avoiding contact with the sharp
stainless steel blade, pull the disc
away from the blade holder
(See Fig. 12).
Fig. 12
7. Carefully remove the cube cutter
blade from the blade holder.
To do this, flip the blade holder
upside down over a benchtop
so that the protruding shaft faces
upwards and lightly tap on the
bench. The cube cutter blade
should fall onto the bench. If it
does not fall out, press lightly
on the two plastic corners to
disengage (See Fig. 13).
The cube cutter blade is now
removed for cleaning. Follow
the Care, Cleaning and Storage
instructions on page 29 for
instructions to use the cube cutter
cleaning accessory.
Fig. 13
Page 19

18
Recommendations when Using
the Stick Mixer with Cubic
Attachment
•When dicing, cut food into uniform
sizes that will easily fit down the
feed chute to ensure quicker, even
and more consistent results.
•DO NOT dice hard ingredients such
as fruits with stones, meat with
bones or frozen ingredients as they
could block and cause damage to
the blades.
•When dicing is finished, use the
cube cutter cleaning accessory
provided to remove any foodstuffs
left on the cube cutter blades.
Food Processing
Attachments
Assembly of Food Processor Bowl
with Processing Blade, Reversible
Slicing/Shredding Disc or
Chipping Disc
Assemble the Processing Blade
WARNING: The
processing blade is
extremely sharp and
should only be handled
by its central plastic.
1. Place the food processing bowl
on a benchtop. Press downwards
on the lid release button on the
handle and twist the lid clockwise
to unlock the lid and remove from
the bowl.
2. When using the processing blade,
place the Spindle onto the metal
pivot pin located on the base of
the processing bowl (See Fig. 14).
Fig. 14
NOTE: Do not use the processing
blade when using the Slicing/
Shredding or Chipping Disc.
3. Carefully remove the protective
safety storage cover from the
processing blade. The cutting
edge of the processing blade is
extremely sharp, it should only
ever be held by its central plastic
body.
4. With the wider opening
facing downwards, place the
processing blade over the
centre of the Spindle.
Ensure the processing blade is
pushed all the way down to the
base of the Spindle (See Fig. 15).
Fig. 15
Operating Your Kambrook Stick Mixer Continued...
Page 20

19
Assemble the Stainless Steel
Reversible Slicing/Shredding and
Chipping Disc
1. Place the Spindle onto the metal
pivot pin located on the base of
the processing bowl (See Fig. 14).
2. Carefully select the desired
stainless steel disc to be used
(slicing/shredding or chipping
disc).
3. Hold the selected disc only by
the edge keeping fingers away
from the sharp blades. Place the
required disc onto the Spindle
and push down so that it sits
securely on top of the Spindle
(See Fig. 16).
NOTE: The reversible slicing/
shredding disc is labelled. To
select the slicing side, ensure the
blade is sharp side up and the
"SLICER" label is facing upwards.
Or, to select the shredding side,
ensure the "SHREDDER" label is
facing upwards.
Fig. 16
Assemble the Food Processor Lid
and Stick Mixer Motor
Once the processing bowl is
assembled with the Spindle and
the chosen processing accessory,
it is time to place the lid on the
processing bowl.
1. Place the lid on the processing
bowl so that the small tab on
the lid sits just left of the handle
on the processing bowl. Press
downwards on the lid release
button found on the handle of
the processing bowl to release
and twist the lid anti-clockwise so
the ‘
’ symbol on the lid is directly
above the ‘
’ symbol on the
locking clip. Make sure the tab
on the lid sits inside the lid release
button and the lid is secure
before using.
NOTE: Always ensure the food
processing lid is securely locked in
place before operating the food
processing bowl.
2. Put the food pusher inside the
processing bowl lid.
3. To attach the Stick Mixer motor,
align the lock buttons on the
drive end of the motor body with
the grooves at the top of the
processing bowl lid. Push down to
lock into place until an audible
"click" can be heard to indicate it
is secure.
Page 21

20
Using the Assembled
Attachments
Using the Stick Mixer Motor with
Food Processing Bowl and
Processing Blade
Ensure the processing blade is
completely and correctly assembled
as detailed prior.
1. Insert the power plug into a 230V
or 240V power outlet and turn the
power on.
2. Place the processing blade into
the processing bowl as previously
directed.
3. Place ingredients to be processed
into the processing bowl.
NOTE: Kambrook recommends a
maximum of 1 litre of liquid be put
inside the processing bowl.
4. Lock the lid securely into place
and attach Stick Mixer motor.
NOTE: Always ensure the food
processing lid is securely locked in
place before operating the food
processing bowl.
5. Using the Variable Speed Control
Dial located at the top of the
Stick Mixer motor, start by setting
the dial to a low speed setting
and then, if required adjust to a
higher speed setting depending
on what the recipe suggests.
6. Press and hold down the ‘ON’
button to turn the Stick Mixer
motor on and start processing.
7. Press and hold down the ‘TURBO’
speed button when an extra burst
of power is required.
8. When processing has finished,
switch off the motor by releasing
the ‘ON’ or ‘TURBO’ speed
button, switch off at the power
outlet and remove the power
plug from the outlet.
9. Release the Stick Mixer motor
from the processing bowl lid
and remove the lid from the
processing bowl following the
instructions on page 22 under
section 'To Detach the Stick Mixer
Motor and Processing Bowl Lid'.
Carefully remove the processing
blade from the bowl, refer to
page 22 under section 'Remove
the Processing Blade from the
Processing Bowl'.
10. Remove the foodstuffs from
inside the processing bowl using
a spatula.
11. Clean the food processor bowl
and processing blade as per
the Care, Cleaning and Storage
Instructions on page 30.
Recommendations when Using
the Stick Mixer with Processing
Blade and Bowl
•Do not operate your Stick Mixer
when the processing bowl is empty.
Ensure the processing blade is in
place before adding foodstuffs into
the processing bowl.
•When processing, cut food into
uniform sizes to ensure quicker,
even and more consistent results.
•For effective processing, press the
‘ON’ or ‘TURBO’ speed button a
few times in succession; this will
create a rapid pulse action.
Operating Your Kambrook Stick Mixer Continued...
Page 22

21
•DO NOT process hard food such
as ice, coffee beans, cereals or
chocolate in lumps as these may
result in damage to the blade.
•DO NOT process boiling or hot
foods in the processing bowl.
•NEVER remove the blade from
the bowl before processing
is complete.
•The processing blade blends food
and liquids rapidly, therefore it is
easy to over process. Remember
to check food throughout the
operation to ensure perfect
results are achieved.
Using the Food Processor with
the Reversible Slicing/Shredding
or Chipping Disc
Ensure the selected disc is completely
and correctly assembled as detailed
prior.
1. Insert the power plug into a 230V
or 240V power outlet and turn the
power on.
2. Place the chosen stainless steel
disc securely on the Spindle inside
the processing bowl.
3. Lock the lid securely into place
and attach Stick Mixer motor.
4. Using the Variable Speed Control
Dial located at the top of the
Stick Mixer motor, start by setting
the dial to a low speed setting
and then, if required adjust to a
higher speed setting depending
on what the recipe suggests.
5. Remove the Food Pusher from the
feed chute. Place food inside the
feed chute and simultaneously
push food into the bowl with the
food pusher while pressing the
'ON' or 'TURBO' button.
6. Ensure that the ingredients to be
sliced, shredded or chipped are
of suitable size to be fed through
the feed chute and then push the
food down the feed chute using
the food pusher.
7. When processing has finished,
switch off the motor by releasing
the ‘ON’ or ‘TURBO’ speed
button, switch off at the power
outlet and remove the power
plug from the outlet.
8. Release the Stick Mixer motor
from the processing bowl lid
and remove the lid from the
processing bowl following the
instructions on page 22 under
section 'To Detach the Stick Mixer
Motor and Processing Bowl Lid'.
Carefully remove the stainless
steel disc from the bowl, refer to
page 22 under section 'Remove
the Slicing/Shredding or Chipping
Disc from the Processing Bowl'.
9. Remove the foodstuffs from inside
the processing bowl.
10. Clean the processing bowl and
stainless steel discs as per the
Care, Cleaning and Storage
Instructions on page 30.
Recommendations when
Using the Shredding/Slicing or
Chipping Discs
•For all foods, pack the feed chute
firmly to ensure even results.
Although firm pressure on the food
pusher is recommended for some
foods, do not press hard as the disc
may jam.
•The slicing disc processes
vegetables and hard cheeses
into thin pieces with a large
surface area.
Page 23

22
•The shredding disc processes
vegetables and hard cheeses into
a large grate.
•The chipping disc makes chips
from potatoes and also pumpkin,
zucchini and sweet potato.
•Always use the food pusher when
using the shredding/slicing or
chipping disc.
•When processing, cut food into
uniform sizes to ensure quicker,
even and more consistent results.
Removing Attachments
To Detach the Stick Mixer motor
and Processing Bowl Lid
1. Once processing is complete,
release the ‘ON’ or ‘TURBO’
speed button, switch the power
off at the power outlet and
unplug the power plug from
the outlet.
2. Holding the Stick Mixer motor
with one hand and the processing
bowl with the other, press the
two ‘Release’ buttons found at
the drive end of the Stick Mixer
motor. Pull the Stick Mixer motor
away from the processing bowl lid
to detach.
3. To remove the processing bowl
lid from the processing bowl,
press the lid release button on the
processing bowl handle to unlock
and turn the lid in a clockwise
direction. Pull the lid away from
the processing bowl to detach.
Remove the Processing Blade
from the Processing Bowl
1. Pull upwards on the Spindle to
remove from the metal pivot
inside the processing bowl.
2. Holding the Spindle with one
hand and the plastic part of the
processing blade with the other,
carefully slide the processing
blade up and away from the
shaft to remove for cleaning
(See Fig. 17).
Fig. 17
Remove the Slicing/Shredding
or Chipping Disc from the
Processing Bowl
1. Pull upwards on the Spindle to
remove from the metal pivot
inside the processing bowl.
2. Holding the Spindle with one
hand and the disc with the
other, lift the disc away from the
Spindle to remove for cleaning
(See Fig. 18).
Fig. 18
Operating Your Kambrook Stick Mixer Continued...
Page 24

23
WARNING: Never mix dry,
thick or heavy mixtures
for more than 20 seconds.
Stop the operation and
stir the ingredients before
continuing. Allow the
motor to rest for 1 minute
between each use.
Page 25

24
Food Preparation Guide
Food Accessory Method/Approx. Time
Milkshakes, smoothies, cocktails,
fruit frappes
Blend until desired consistency
is achieved. Use speed setting
‘6’ to speed ‘8’ for 20 seconds.
Soups, dips, baby food Blend until smooth. Use speed
setting ‘6’ to speed setting ‘8’
for 60 seconds.
Onions Peel and cut in half, or to fit.
Place into the feed chute and
push down using the food
pusher. Use speed setting ‘10’.
Root Vegetables (Potatoes,
Pumpkin, Carrots, Sweet
Potatoes, Swede, Parsnip)
Peel or scrub clean and cut to
fit the feed chute. Place into
the feed chute and push down
using the food pusher. Use
speed setting ‘10’.
Zucchini, Eggplant, Cucumbers,
Celery
Wash and cut to fit the feed
chute. Place into the feed
chute and push down using the
food pusher. Use speed setting
‘8’.
Mushrooms Cut to fit the feed chute. Place
into the feed chute and push
down using the food pusher.
Use speed setting ‘6’.
Page 26

25
Apples, Peaches (seed
removed), Pears
Peel or scrub clean and cut to
fit the feed chute. Place into
the feed chute and push down
using the food pusher. Use
speed setting ‘10’.
Strawberries, Tomatoes Hull and place into the feed
chute and push down gently
using the food pusher. Use
speed setting ‘6’.
Avocadoes, Mangoes, Bananas Peel and then cut to fit the
feed chute. Place into the feed
chute and push down using the
food pusher. Use speed setting
‘6’.
Melons Peel and scoop out the seeds
and then cut to fit the feed
chute. Place into the feed
chute and push down using the
food pusher. Use speed setting
‘8’.
Medium Cheeses (Cheddar,
Gouda, Swiss)
Cut to fit the feed chute. Place
into the feed chute and push
down using the food pusher.
Use speed setting ‘8’.
Hard Boiled Eggs Remove the shells under cold
water. Place into the feed
chute and push down using the
food pusher. Use speed setting
‘6’.
Page 27

26
Cooked Potato, Sweet Potato Blend until smooth and lump
free. Use speed setting ‘8’ for
30-60 seconds.
Cheddar, parmesan, mozzarella
cheese (maximum weight
250g, pre-cut into 2cm cubes),
cabbage, carrot
Cut to fit the feed chute and
push down using the food
pusher. Use speed setting ‘8’.
Onions, carrots, potatoes,
pumpkin, zucchini, eggplant,
cucumbers, capsicum,
cabbage, cheese, lettuce,
cooked meats; cabanossi and
salami
Cut to fit the feed chute and
push down using the food
pusher. Use speed setting ‘8’ to
speed setting ‘10’.
Potatoes, sweet potatoes,
zucchini, pumpkin
Peel or scrub clean and cut to
fit the feed chute. Place into
the feed chute and push down
using the food pusher. Use
speed setting ‘10’.
Onions, herbs Use speed setting ‘4’ for 20
seconds.
Nuts (grind) Use setting speed ‘8’ for 30 - 40
seconds
Food Preparation Guide Continued...
Page 28

27
Yeast dough- Bread flour (260g
maximum)- Water (160ml water,
adjust the water quantity if
necessary)- ½ teaspoon dry
yeast
Use speed setting ‘2’ for
approximately 1 second
increments until the dough ball
is formed.
Mixing dough with nuts- Already
prepared dough (260g
flour with 160ml water)- 30g
chopped nuts
Use speed ‘2’ for approximately
1 second increments until
desired consistency is reached.
Red meat, chicken fillets, fish
fillets (maximum weight 250g,
pre-cut into 2cm cubes)
Use speed setting ‘6’ to speed
setting ‘8’ for 20-30 seconds.
NOTE: Do not allow foodstuffs to
exceed the 1.75ml marking on the
food processing bowl.
Page 29

28
Care, Cleaning and Storage
Stick Mixer Motor
To remove any food residue, wipe
the Stick Mixer motor and cord with a
damp cloth only. Do not use abrasive
cleaners or steel wool. Never immerse
the motor in water or any other liquid.
HI NT: See the Table on page 31
for a quick guide to washing each
part of the X Blade Pro Food Prep
System.
NOTE: DO NOT place the masher
connector, processing bowl
lid and Stick Mixer motor into
a dishwasher. Wipe the Stick
Mixer motor with a damp cloth.
Wash the masher connector
and processing bowl lid in warm,
soapy water and dry thoroughly.
The detachable blending shaft,
processing bowl, blade holder,
cube cutter blade, cube cutter
disc, cube cutter shaft, cube
cutter cleaning tool, processing
blade, slicing/shredding disc,
chipping disc and masher
attachment are dishwasher safe.
WARNING: All blades are
extremely sharp. Handle
with care.
Stick Mixer Attachments
Four Blade Blending Shaft
Before cleaning, turn the power off
at the power outlet and then remove
the power plug from the outlet.
Remove the Stick Mixer motor from
the stainless steel blending shaft.
The stainless steel blending shaft
can be placed in the dishwasher.
Alternatively, hand wash in warm
soapy water, rinse and dry
thoroughly after each use.
Do not use abrasive cleaners or
steel wool.
QUICK WASH: Between each
processing task, with the Stick Mixer
motor attached and turned on at the
power outlet, place the stainless steel
blending shaft and blade assembly
into a jug of water and press the ‘ON’
button for 5 seconds.
This will remove any foodstuffs on
the blade and shaft and allows you
to quickly continue onto the next
processing task.
Masher Attachment
Before cleaning the mashing
attachment, turn the power off at the
power outlet and remove the power
plug from the outlet.
Remove the Stick Mixer motor from
the mashing attachment by pressing
the ‘Release’ buttons.
The mashing attachment and
mashing attachment connector can
be hand washed in warm soapy
water, rinsed and dried thoroughly
after each use. Only the masher
attachment is dishwasher safe. Do
not put the masher attachment
connector in the dishwasher.
The mashing blade can be removed
for cleaning by holding the shaft
firmly and unscrewing the cap in a
clockwise direction. After cleaning,
dry thoroughly and replace the
blade and cap. Tighten the cap in
an anti-clockwise direction (See Fig.
19). Make sure the cap and blade are
reassembled before storing.
Page 30

29
Wipe the processing bowl lid with
a cloth to clean. Do not put the
processing bowl lid in dishwasher.
Do not use abrasive cleaners or
steel wool.
Using the Cube Cutter
Cleaning Accessory
After emptying the processed food
from inside the processing bowl, use
the cleaning accessory to assist in
removing food residue left on the
cube cutter blade after processing.
1. Assemble the cubic attachment
as described prior, except without
attaching the blade holder.
2. Put the assembled cubic
attachment without the blade
holder inside the processing bowl
by aligning the small groove
on the blade holder with the
vertical tab inside the processing
bowl near the handle (See Fig.
20). Make sure the blade holder
is level and sits securely in the
processing bowl.
Fig. 20
Fig. 19
NOTE: In order to ensure the cap
does not loosen while processing,
firmly tighten by turning anticlockwise.
WARNING: The masher
blade is sharp. Handle
with care.
Cubic Attachment
Before cleaning the cubic
attachment, turn the power off at the
power outlet and then remove the
power plug from the outlet. Remove
the Stick Mixer motor from the
processing bowl lid and cube cutter
shaft, disc, blade holder, and cube
cutter blade from the processing
bowl, following instructions on page
16 'To detach the Cubic Attachment'.
The cube cutter blade, disc, blade
holder, cube cutter shaft, and cube
cutter cleaning accessory can be
washed in warm soapy water, rinsed
and dried thoroughly or put in the
dishwasher for cleaning.
UNLOCK
LOCK
Page 31

30
3. Align the cubic cutter cleaning
accessory with the cube cutter
blade. Apply some pressure and
push the cleaning accessory
down onto the cube cutter blade
to push the excess foodstuffs into
the processing bowl (See Fig. 21).
HI NT: If hard foodstuffs are
difficult to push through the
blade, apply pressure to one side
of the cube cutter cleaning tool
and then the other, instead of
both sides at once.
Fig. 21
4. When foodstuffs are removed,
put one finger inside the hole in
the blade holder and remove
the blade holder from the
processing bowl.
5. Carefully remove the cube cutter
blade from the blade holder.
To do this, flip the blade holder
upside down over a benchtop
so that the protruding shaft faces
upwards and lightly tap on the
bench. The cube cutter blade
should fall onto the bench. If it
does not fall out, press lightly
on the two plastic corners to
disengage (See Fig. 22).
Fig. 22
6. The blade holder and cube
cutter blade are now removed
for cleaning.
7. Use a spatula to remove excess
foodstuffs found inside the
processing bowl.
8. The cube cutter blade, cube
disc with stainless steel blade,
cube cutter shaft, and cube
cutter cleaning accessory are
all dishwasher safe. Alternatively,
wash in warm, soapy water
and dry thoroughly. Do not use
abrasive cleaners or steel wool.
Processing Bowl/ Processing
Blade/ Slicing/Shredding
Disc/ Chipping Disc
Before cleaning the processing bowl,
turn the power off at the power outlet
and then remove the power plug
from the outlet. Remove the Stick
Mixer motor from the processing bowl
lid and processing blade or stainless
disc used disc from the processing
bowl.
The processing bowl, processing
blade, slicing/shredding disc and
chipping disc should be hand washed
in hot soapy water, rinsed and dried
thoroughly after each use.
Care, Cleaning and Storage Continued...
Page 32

31
Part
Warm soapy
water
Dishwasher Wipe with cloth
Motor Body No No Yes
Blending shaft Yes Yes Yes
Masher
attachment
Yes Yes Yes
Masher
attachment
connector
No No Yes
Processing bowl
lid
No No Yes
Processing bowl Yes Yes
Cubic
attachment;
cube cutter,
disc, blade
holder, cubic
shaft, cleaning
accessory
Yes Yes Yes
Processing blade,
slicing/shredding
disc, chipping
disc, the Spindle
Yes Yes Yes
Quick Cleaning Guide
The processing bowl, processing
blade, slicing/shredding disc and
chipping disc are also dishwasher
safe.
Wipe the processing bowl lid with a
cloth. Do not put the processing bowl
lid in the dishwasher.
Do not use abrasive cleaners or
steel wool.
Page 33

32
Storage
Before storing, turn the power off at
the power outlet and then remove
the power plug from the outlet. Ensure
the Stick Mixer and all accessories are
clean and completely dry.
Carefully put the processing blade
inside the protective safety storage
cover. The cutting edge of the
processing blade is extremely sharp,
it should only ever be held by the
plastic shaft.
Place the slicing/shredding and
chipping disc inside the processing
bowl so they sit flat. Place the Spindle,
cube cutter shaft, cube cutter blade
cleaning accessory and processing
blade on top of the discs. Assemble
the cubic attachment as described
prior, without the cube cutter shaft.
Fit the cubic attachment inside
the processing bowl. Attach the
processing bowl lid. Attach the Stick
Mixer motor to the processing bowl lid.
Put the food pusher inside the feed
chute. Store the masher attachment
and blending shaft separately (See
Fig. 23).
Fig. 23
WARNING: All the blades
are extremely sharp.
Handle with care.
Care, Cleaning and Storage Continued...
Page 34

33
Recipes
Page 35

34
Recipes
Fruit Salad
Makes 6 serves
½ rockmelon, peeled
½ honeydew melon, peeled
300g strawberries, hulled
2 red apples, cored, quartered
1. With the assembled cubic
attachment, secure the processing
bowl lid. Turn the speed setting dial to
setting 10 and attach the motor to the
processing bowl lid.
2. Cut the fruit to fit through the feed
chute and then feed the fruit through
the feed chute and push down using
the pusher while pressing the ‘ON’
button. Continue until all fruit has
been processed.
3. Toss together in a bowl and serve
immediately.
Guacamole
Makes 1 cup
2 avocadoes, halved, seed removed
1 vine ripened tomato, halved
1 red onion, halved
Juice 1 lemon
2 tsp sweet chilli sauce
2 tsp flaked salt
1. With the assembled cubic
attachment, secure the processing
bowl lid. Turn the speed setting dial to
setting 10 and attach the motor to the
processing bowl lid.
2. Scoop the avocado flesh out using a
dessert spoon and feed the through
the feed chute and push down using
the pusher while pressing the ‘ON’
button. Continue until all avocado
has been processed.
3. Feed the tomato and onion through
the feed chute and push down using
the pusher while pressing the ‘ON’
button. Continue until all has been
processed.
4. Toss together the avocado, tomato,
onion, lemon juice, chilli sauce and
salt in a bowl and serve immediately.
NOTE: Kambrook recommends
a maximum of 1 litre of liquid be
put inside the processing bowl.
NOTE: Do not allow foodstuffs to
exceed the 1.75ml marking on
the food processing bowl.
Page 36

35
Pumpkin and Feta Salad
Makes 4 serves
400g pumpkin, peeled
2 tbsp olive oil
2 tsp flaked salt
300g Australian feta cheese
2 Lebanese cucumbers
1 red onion, halved
1 tbsp seeded mustard
1 tbsp apple cider vinegar
1 tbsp grapeseed oil
2 tsp brown sugar
1 clove garlic, minced
250g salad leaves, washed
1. Preheat a fan forced oven to 180˚C
and set aside a baking tray.
2. With the assembled cubic
attachment, secure the processing
bowl lid. Turn the speed setting dial to
setting 10 and attach the motor to the
processing bowl lid.
3. Cut the pumpkin to fit the feed chute
and then feed through the feed chute
and push down using the pusher while
pressing the ‘ON’ button. Continue
until all pumpkin has been processed.
4. In a bowl, toss together the pumpkin,
olive oil and salt until combined. Pour
onto the prepared oven tray and
place into the oven to bake for 20
minutes, scraping at 10 minutes.
5. With the assembled cubic
attachment, secure the processing
bowl lid. Turn the speed setting dial to
setting 10 and attach the motor to the
processing bowl lid.
6. Feed the feta cheese and then the
cucumber and onion through the
feed chute and push down using the
pusher while pressing the ‘ON’ button.
7. In a bowl, whisk together the mustard,
vinegar, grapeseed oil, brown
sugar and garlic until the sugar has
dissolved.
8. In a bowl, toss together the pumpkin,
feta cheese, cucumber, onion,
salad leaves and dressing and serve
immediately.
Page 37

36
Cheesy Potato Bake
Serves 4
800g potatoes, peeled
1 brown onion, halved
½ cup parmesan cheese, grated
3 sprigs thyme, shredded
300ml pure cream
200ml milk
59g free range egg
2 tsp flaked salt
½ cup cheddar cheese, grated
200g baby spinach, to serve
1. Preheat a fan forced oven to 180˚C.
2. With the assembled slicing disc
attachment, secure the processing
bowl lid. Turn the speed setting dial to
setting 10 and attach the motor to the
processing bowl lid.
3. Cut the potatoes to fit through
the feed chute and then feed the
potatoes and onion through the
feed chute and push down using the
pusher while pressing the ‘ON’ button.
Continue until all potatoes and onion
has been processed.
4. Pour half of the onion and potato into
a 20cm x 30cm crockery dish and
then top with the parmesan cheese.
Layer the remaining potato and
onion.
5. In a 1 litre jug, whisk together the
thyme, cream, milk, egg and salt and
pour over the potato and onions.
6. Top with cheddar cheese and
cover with aluminium foil. Bake for
45 minutes and then removed the
aluminium foil and cook for a further
15 minutes.
7. Serve over baby spinach or as an
accompaniment to another meal.
Bolognaise Sauce
Serves 4
1 brown onion, halved
2 tbsp olive oil
2 cloves garlic, minced
700g lean beef mince
300g carrots, peeled
500ml tomato passata
1 cup beef stock
2 bay leaves
½ tsp dried Italian herbs
2 tsp flaked salt
4 cups spaghetti, cooked, to serve
½ cup parmesan cheese, to serve
1. With the assembled cubic
attachment, secure the processing
bowl lid. Turn the speed setting dial to
setting 10 and attach the motor to the
processing bowl lid.
2. Feed the onion through the feed
chute and push down using the
pusher while pressing the ‘ON’ button.
3. Using a large pot, heat the oil over a
medium heat and sauté the onion
and garlic until golden brown. Add
the mince and cook until crumbly and
browned.
4. With the assembled shredding disc
attachment, secure the processing
bowl lid. Turn the speed setting dial to
setting 10 and attach the motor to the
processing bowl lid.
5. Feed the carrots through the feed
chute and push down using the
pusher while pressing the ‘ON’ button.
Continue until all carrots have been
processed.
6. Place the carrots, passata, stock, bay
leaves, herbs and salt to the pot and
stir to combine. Allow to simmer for 60
minutes.
7. Remove the bay leaves and serve
over spaghetti with grated parmesan
cheese.
Page 38

37
Strawberry and Lime Daiquiri
Makes 2 serves
½ cup strawberries, frozen
Juice and zest of 1 lime
1 cup apple juice
100ml vodka
Strawberry, to serve
1. With the four blade blending shaft
attached, place the strawberries,
lime, apple juice and vodka into a
glass jug and hold the ‘PULSE’ speed
setting for 3 second increments at one
time for approximately 30 seconds or
until desired consistency is reached.
2. Serve in a cocktail glass with a
strawberry on the side of the glass.
Low Fat Mango Smoothie
Makes 2 serves
2 mango cheeks, flesh only, frozen
1 ½ cup light milk
½ cup low fat vanilla yoghurt
½ cup pineapple juice
1 tbsp maple syrup
Lime wedge, to serve
1. With the four blade blending shaft
attached, place the mango, milk,
yoghurt, pineapple juice and
maple syrup into a glass jug and
hold the ‘PULSE’ speed setting for 3
second increments at one time for
approximately 30 seconds or until
desired consistency is reached.
2. Serve with a lime wedge.
Page 39

38
Pumpkin Soup
Makes 1 litre
1 brown onion, halved
400g pumpkin, peeled
2 tbsp olive oil
2 cloves garlic, minced
1 teaspoon salt
500ml vegetable stock
100ml water
100ml cream
Bread toasted, to serve
½ cup sour cream, to serve
1. With the assembled cubic
attachment, secure the processing
bowl lid. Turn the speed setting dial to
setting 10 and attach the motor to the
processing bowl lid.
2. Feed the onion and pumpkin through
the feed chute and push down using
the pusher while pressing the ‘ON’
button. Continue until all has been
processed.
3. Using a 2 litre pot, heat the oil over a
medium heat and sauté the onion,
garlic and pumpkin until softened,
approximately 5 minutes, stirring
regularly.
4. Add the salt, stock and water and
allow to simmer over a medium to low
heat for 20 minutes. Remove from the
heat, stir through the cream and allow
to cool for 10 minutes.
5. With the four blade blending shaft
attached , turn the speed setting dial
to setting 10 and blend by pressing
the ‘ON’ button for 30 seconds or until
completely blended.
6. Serve with toasted bread and a
dollop of sour cream.
Basil and Cashew Dip
Makes 1 cup
2 cups basil leaves
1 cup olive oil
1 cup dry roasted cashew nuts
1 tbsp rock salt
2 tbsp lemon juice
4 cloves garlic, peeled
½ cup parmesan cheese, grated
Biscuits, vegetable batons, bread, to serve
1. Place the basil, olive oil, nuts, salt,
lemon juice, garlic and parmesan
cheese into the processing bowl and
the processing blade attached and
hold the ‘PULSE’ speed setting for 3
second increments at one time for
approximately 30 seconds or until
desired consistency is reached.
2. Blend on speed setting 10 by pressing
the ‘ON’ button for 15 seconds and
serve with biscuits, vegetable batons
or bread.
Page 40

39
Thai Chicken Patties
Makes 30 patties
600g chicken breast (2 approximately)
1 small bunch coriander, roughly
chopped
4 shallots, root removed, thinly sliced
1 tbsp fish sauce
1 tbsp soy sauce or kecap manis
1 tbsp sweet chilli sauce
½ cup panko bread crumbs
15 green beans, finely sliced
¼ cup vegetable oil
1 tbsp sesame oil
½ cup satay sauce, to serve
1. Place the chicken, coriander, shallots,
fish sauce, soy sauce, sweet chilli
sauce and bread crumbs into the
processing bowl and the processing
blade attached and hold the 'TURBO'
speed setting for 3 second increments
at one time for approximately 20
seconds or until it forms a smooth
mixture.
2. Stir through the green beans and
shape into 1 tbsp sized patties.
3. Place the oils into a large frypan and
heat over a medium heat for 1 minute.
Add half of the patties and cook for 3
minutes on each side or until golden
brown. Repeat and set all patties
aside on absorbent paper towel.
4. Serve with satay sauce.
Carrot Cupcakes
Makes 18
300g carrots, peeled, tops removed
1 cup self-raising flour
½ cup plain flour
1 tsp baking soda
1 tsp ground cinnamon
1 tsp ground nutmeg
½ cup brown sugar
¾ cup vegetable oil
½ cup golden syrup
3 x 59g free range eggs, lightly whisked
1 tsp vanilla bean paste
200g cream cheese, cubed and softened
2 cups pure icing sugar
2 tbsp honey
2 tsp boiling water
1. Preheat a fan forced oven to 160˚C.
Line 3 x 6 hole cupcake tins with patty
pans.
2. With the assembled shredding
attachment, secure the processing
bowl lid. Turn the speed setting dial to
setting 10 and attach the motor to the
processing bowl lid.
3. Feed the carrots through the feed
chute and push down using the
pusher while pressing the ‘ON’ button.
Continue until all carrots have been
processed.
4. Combine the carrots, flours, baking
soda, cinnamon, nutmeg, brown
sugar, oil, golden syrup and eggs
in a bowl until they have all come
together consistently and evenly.
5. Distribute into patty pans and bake for
16 minutes or until a skewer is inserted
and comes out clean. Allow to cool.
6. To make the icing, combine the
vanilla bean paste, cream cheese,
icing sugar, honey and boiling water
using an electric mixer, until light and
fluffy, approximately 3 minutes.
7. Pour into a piping bag with a tip
of your choice. Pipe in a circular
motion and refrigerate if not
eating immediately.
Page 41

40
Apple Coleslaw
Makes 4 serves
400g white cabbage
½ medium red onion, peeled
4 sticks celery, washed
500g red apples, cored, peeled, halved
¼ cup Greek yoghurt
2 tsp lemon juice
1 tsp paprika
Grilled chicken breast, to serve
1. With the assembled slicing
attachment, secure the processing
bowl lid. Turn the speed setting dial to
setting 10 and attach the motor to the
processing bowl lid.
2. Cut the ingredients to fit through
the feed chute and then feed the
cabbage, onion and celery through
the feed chute and push down using
the pusher while pressing the ‘ON’
button. Continue until all have been
processed.
3. With the assembled cubic
attachment, secure the processing
bowl lid. Turn the speed setting dial to
setting 10 and attach the motor to the
processing bowl lid.
4. Cut the apple to fit through the feed
chute and then feed the apple
through the feed chute and push
down using the pusher while pressing
the ‘ON’ button. Continue until all
apple has been processed.
5. In a bowl, combine the yoghurt,
lemon and paprika and toss through
the coleslaw.
6. Serve with grilled chicken.
Sweet Potato Fries
Makes 500g
3 litres vegetable oil, for deep frying
500g sweet potato, peeled
¼ cup plain flour
1 tsp sweet paprika
1 tbsp sesame seeds
2 tsp flaked salt
1. Fill with oil and preheat a 3 litre deep
fryer to 190˚C.
2. With the assembled chipping disc
attachment, secure the processing
bowl lid. Turn the speed setting dial to
setting 10 and attach the motor to the
processing bowl lid.
3. Cut the sweet potato to fit through the
feed chute and then feed the sweet
potato through the feed chute and
push down using the pusher while
pressing the ‘ON’ button. Continue
until all have been processed.
4. In a bowl, toss together the sweet
potato batons, flour, paprika and
sesame seeds until completely
coated.
5. Shake away the excess flour and
place into the deep frying basket.
Cook for 6 minutes or until golden
brown. Raise the deep frying basket
and allow to drain for 2 minutes.
6. Place the chips into a large bowl and
toss with salt and serve immediately.
NOTE: To make potato chips, follow
the same instructions but cook for 8
minutes or until golden brown.
Page 42

41
Pumpkin, Horseradish and Sage
Mash
Makes 6 serves
1kg butternut pumpkin, peeled, 3cm diced
2 tbsp milk
3 tsp horseradish cream
2 tsp flaked salt
40g butter
10 sage leaves
1. In a large saucepan, place the
pumpkin over with water until the level
is 2cm above the pumpkin and place
onto the stove top over a medium
heat. Allow to cook for 20 minutes or
until a skewer can be inserted easily.
2. Once cooked, drain the pumpkin
through a sieve and place back
into the pot along with the milk,
horseradish cream, salt and mash
using the mashing attachment on
speed setting 10 by pressing the ‘ON’
for approximately 60 seconds.
3. In a small frypan, heat the butter
and sage over a low heat and allow
to cook until golden brown and
bubbling. Reserve two leaves and
pour the remaining butter and sage
into the saucepan over the pumpkin
and blend using the four blade
blending shaft on speed setting
10 by pressing the ‘ON’ button for
approximately 60 seconds.
4. Top with reserved sage leaves and
serve immediately.
Thai Style Sweet Potato Mash
Makes 6 serves
1.2kg sweet potato, peeled, 3cm diced
1 kaffir lime leaf
1 tbsp vegetable oil
2cm piece ginger, peeled, minced
2 cloves garlic, minced
270ml can coconut milk
2 tsp salt
3 shallots, thinly sliced
¼ cup coriander leaves, roughly chopped
1. In a large saucepan, place the sweet
potato and kaffir lime leaf. Cover with
water until the level is 2cm above the
sweet potatoes and place onto the
stove top over a medium heat. Allow
to cook for 20 minutes or until a skewer
can be inserted easily.
2. Once cooked, drain the sweet potato
through a sieve and place back into
the pot.
3. In a small frypan, heat the oil over a
low heat and sauté the ginger and
garlic until golden brown. Add to
the large saucepan along with the
coconut milk and salt.
4. Mash using the mashing attachment
on speed setting 10 by pressing the
‘ON’ for approximately 60 seconds.
5. Stir through the shallots and coriander
and serve immediately.
Page 43

42
Creamy Mashed Potato with
Chives
Makes 6 serves
1kg potatoes, peeled, quartered
40g butter, cubed
½ cup pure cream
2 tsp flaked salt
3 tbsp chives, finely sliced
1. In a large saucepan, place the potato
and cover with water until the level is
2cm above the potatoes and place
onto the stove top over a medium
heat. Allow to cook for 30 minutes or
until a skewer can be inserted easily.
2. Once cooked, drain the potato
through a sieve and place back into
the pot. Add the butter, cream and
salt and mash using the mashing
attachment on speed setting 10 by
pressing the ‘ON’ for approximately 60
seconds.
3. Stir through ¾ of the chives and
sprinkle the remaining over the top.
Veggie Baby Food
Makes 4 serves
50g sweet potato, peeled, steamed
50g carrot, peeled, steamed
1 broccoli floret, steamed
1
⁄3 cup water
1. Place the sweet potato, carrot,
broccoli and water into a flat
bottomed bowl and mash using
the mashing attachment on speed
setting 10 by pressing the ‘ON’ for
approximately 60 seconds.
2. Pour into containers to be refrigerated
or frozen.
NOTE: You can add 1 tablespoon
of grated cheddar cheese if the
child is old enough to consume dairy
products.
Page 44

43
Notes
 Loading...