

Page 1

Kambrook - Australia
Ground Floor, Suite 2, 170-180 Bourke Rd
Alexandria NSW 2015, Australia
Locked Bag 2000
Botany NSW 1455
Customer Service Line 1300 139 798
Customer Service Fax 1800 621 337
www.kambrook.com.au
Due to continual improvement in design or otherwise, the product you
purchase may differ slightly from the illustration in this book. Issue H15
Kambrook - New Zealand
Private Bag 94411
Botany, Manukau
Auckland 2163
New Zealand
Customer Service Line/
Spare Parts 0800 273 845
Customer Service Fax 0800 288 513
www.kambrook.co.nz
Page 2
Suits all KRC410 ModelsINSTRUCTION BOOKLET
Page 3

Important
Please retain your instruction
book for future use.
In the event that you need some assistance with your
Kambrook appliance, please contact our Customer Service
Department on 1300 139 798 (Australia) or 0800 273 845
(New Zealand). Alternatively, visit us on our website at
www.kambrook.com.au or www.kambrook.co.nz
Page 4

Contents
Kambrook Recommends
Safety First
Your Kambrook Rice Master
10 Cup Rice Cooker & Steamer
Using Your Kambrook
Rice Cooker & Steamer
Rice Cooking Tables p13
Care, Cleaning and Storage p15
Recipes p16
p4
p7
p9
Page 5

Kambrook Recommends Safety First
IMPORTANT: Please retain your
instruction book for future use.
At Kambrook, we believe that safe performance is the first priority in any
consumer product, so that you, our valued customer can confidently
use and trust our products. We ask that any electrical appliance that
you use be operated in a sensible fashion with due care and attention
placed on the following important operating instructions.
Important Safeguards For Your Kambrook
Rice Master 10 Cup Rice Cooker & Steamer
• Carefully read all instructions before
operating the rice cooker for the first time
and save for future reference.
• Remove and safely di scard any packaging
material and promotional labels before using
the rice cooker for the first time.
• To eliminate a choking hazard for young
children, remove and safely discard the
protective cover fitted to the power plug of
this rice cooker.
• Do not place the rice cooker near the edge
of a bench or table during operation. Ensure
that the surface is level, clean and free of
water and other substances.
• Do not operate the rice cooker on a sink
drain board.
• Always ensure rice cooker is properly
assembled before use. Follow the instructions
provided in this book.
• Always operate the rice cooker on a stable
and heat resistant surface.
• Do not place the rice cooker directly on a
heat sensitive bench top, such as a stone
bench top, when cooking. Thi s type of bench
top is heat sensitive to uneven heat and
may crack if heated locally. To cook on a
heat sensitive bench top, place a chopping
board or heat proof mat underneath the rice
cooke r.
• Never plug in or switch on the rice cooker
without having the removable cooking bowl
placed inside the rice cooker housing.
• Always insert the connector end of the
power cord into the rice cooker inlet before
inserting power plug into the power outlet
and switching on the rice cooker. Ensure
the appliance inlet is completely dry before
inserting the connector end of the power
cord.
• Use the removable cooking bowl supplied
with the rice cooker. Do not use any other
bowl inside the rice cooker housing.
• Do not use a damaged, cracked or dented
removable cooking bowl. If damaged,
cracked or dented, replace bowl before
using.
• Before placing removable cooking bowl into
rice cooker base ensure the base of cooking
bowl and base of rice cooker is dry by wiping
with a dry soft cloth.
• Do not place food or liquid in the rice cooker
housing. Only the removable cooking bowl is
designed to contain food or liquid.
• Do not place the removable cooking bowl
when hot on any surface that may be
affected by heat.
• Never operate the rice cooker without food
and liquid in the removable cooking bowl.
• Ensure the removable cooking bowl is
correctly positioned in the rice cooker base
before you commence cooking.
• When using this rice cooker, ensure the lid is
properly locked into position before use.
4
Page 6

• When using the rice cooker, avoid s pillage of
water on the cooker and connector as thi s
may cause damage to the rice cooker.
• Do not operate the rice cooker on an
inclined plane. Do not move the rice cooker
while it is switched on and during cooking.
• Care should be taken when handling the rice
cooker after cooking, ensuring that the rice
cooker body and parts are not touched as
these may still be hot due to residual heat.
• The temperature of accessible sur faces will
be high when the rice cooker is operating
and for some time after use.
• Do not touch hot surfaces. Use the rice
cooker handle for lif ting and carrying the
rice cooker once the unit is switched off.
• Do not touch hot surfaces. To move the
rice cooker, ensure the cooker is turned off
and unplugged. With lid locked into place,
lift with one hand on the lid handle and a
second hand supporting the base.
• Do not touch hot surfaces, u se oven mitts to
remove the lid and or removable cooking
bowl. Lift and remove the lid carefully and
away from yourself to avoid scalding from
escaping steam.
• Extreme caution must be used when the
rice cooker contains hot food and liquids.
Improper use may result in injur y. Do not
move the rice cooker during cooking.
• Do not allow water from the lid to drip
into the rice cooker housing, only into the
removable cooking bowl.
• Position the rice cooker so that the stea m
vent is directed away from you. Lift and
remove the lid carefully to avoid scalding
from escaping steam.
• To prevent scratching the non- stick surface
of the removable cooking bowl, always use
wooden or plastic utensils.
• Do not leave the rice cooker unattended
when in use.
• Do not place your face or any other body
part over the rice cooker whil st in use as the
steam can cause serious burns.
• The appliance connector must be removed
before the rice cooker is cleaned and that
the appliance inlet must be dried before the
rice cooker is used again.
• Do not place a nything on top of the lid when
assembled, when in use and when stored.
• Do not place a nything, other than lid, on top
of rice cooker when assembled, when in use
and when stored.
• Do not use chemicals, steel wool, metal
scouring pad or abrasive cleaners to clean
the outside of the Rice cooker hous ing or
cooking bowl as these can damaged the
housing or the coating of the cooking bowl.
• Do not immerse rice cooker housing/ba se,
power cord or plug in water or any other
liquid.
• The rice cooker is not intended to be
operated by means of an external timer or
separate remote control system.
• Always ensure that the power is off at the
power outlet and remove power plug from
the power outlet before attempting to move
the appliance before cleaning and storing.
• Keep the rice cooker clean. Follow the
cleaning instructions provided in the book.
5
Page 7

Important safeguards for all electrical
appliances
• Fully unwind the power cord before use.
• Connect only to a 230V or 240V power outlet.
• Do not let the power cord hang over the
edge of a bench or table, touch hot surfaces
or become knotted.
• To protect against electric shock, do not
immerse the power cord, power plug or
appliance in water or any other liquid or
allow moisture to come in contact with
the part, unless it is recommended in the
cleaning instructions.
• The appliance is not intended for use by
persons (including children) with reduced
physical, sensory or mental capabilities,
or lack of experience a nd knowledge,
unless they have been given super vision or
instruction concerning use of the appliance
by a person responsible for their safety.
• Children should be supervised to ensure that
they do not play with the appliance.
• It is recommended to regularly inspect the
appliance. To avoid a hazard, do not use
the appliance if power cord, power plug or
appliance becomes damaged in any way.
Return the entire appliance to the nearest
authorized Kambrook service centre for
examination and / or repair.
• Any maintenance other than cleaning
should be performed at an authorised
Kambrook Service Centre.
• This appliance is for household use only. Do
not use this appliance for anything other
than its intended use. Do not use in moving
vehicles or boats. Do not use outdoors.
Misuse may cause injury.
• The installation of a residual current device
(safety switch) is recommended to provide
additional safety protection when using
electrical appliances. It is advisable
that a safety switch with a rated res idual
operating current not exceeding 30mA be
installed in the electrical circuit supplying
the appliance. See your electrician for
professional advice.
• Always turn the appliance to the OFF
position, switch off at the power outlet
and unplug at the power outlet when the
appliance is not in u se.
• Before cleaning, always turn the appliance
to the OFF position, switch of f at the power
outlet, unplug at the power outlet and
remove the power cord, if detachable, from
the appliance and allow a ll parts to cool.
• Do not place this appliance on or near
a heat source, such as hot plate, oven or
heaters.
• Position the appliance at a minimum
distance of 20cm away from walls, curtains
and other heat or steam sensitive materials
and provide adequate space above and on
all sides for air circulation.
6
Page 8
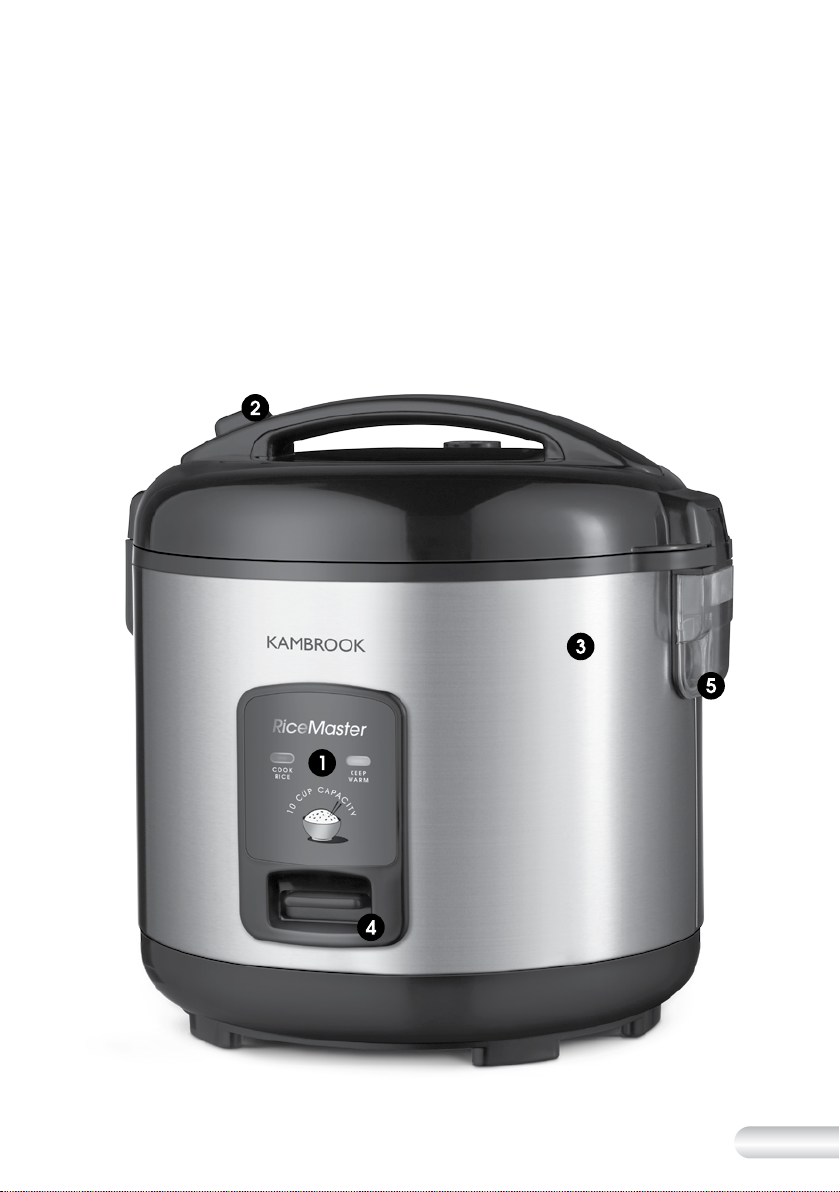
Your Kambrook Rice Master 10 Cup Rice Cooker
& Steamer
1. ‘COOK RICE’ and ‘KEEP WARM’
indicator lights
2. Jar-style lid with easy one press
release button
3. Cool touch housing
4. Selector control lever
5. Condensation collector
7
Page 9

Your Kambrook Rice Master 10 Cup Rice Cooker
& Steamer Continued...
6. Steam release assembly
7. Non-stick removable
cooking bowl
8. Removable steaming tray
Not Shown
• Rice measuring scoop
• Serving spoon
• Removable cord
8
Page 10

Using Your Kambrook Rice Cooker & Steamer
Before First Use
Remove and safely discard any
packaging material and promotional
labels before using the rice cooker for
the first time.
Ensure you have all the parts and
accessories as specified before
throwing away the packaging.
NOTE: The condensation
collector may be found packed
inside the rice cooker for
transport purposes. Always clip
into place on the side of the
cooker before use.
Wash the removable cooking bowl,
steaming tray, rice measuring scoop
and serving spoon in warm soapy
water, rinse and dry thoroughly.
Ensure the interior of the housing is
clean and clear of any debris, the
condensation collector is empty and
clipped in place, and the steam
release assembly is correctly inserted.
Operating Your Rice Cooker
1. Remove the removable
cooking bowl. Use the rice
measuring scoop provided to
measure the required amount
of rice (See Fig. 1) and place
into the removable cooking
bowl. Ensure the rice is spread
evenly across the bottom of the
removable cooking bowl and
not heaped to one side.
CAUTION: Never operate
the rice cooker without
food and liquid in the
removable cooking bowl.
Fig. 1
NOTE: If desired, prior to
placing into the removable
cooking bowl, place the rice
into a large sieve then run
under cold water to remove
excess starch. Continue this
process until the water appears
clear. Drain the rice well then
place into the removable
cooking bowl.
NOTE: When measuring rice,
use the rice measuring scoop
provided and level off (See Fig. 1).
NOTE: Please refer to rice cooking
tables (page 13) for quantities.
2. Add the required amount of cold
tap water.
CAUTION: When using
the rice cooker, avoid
spillage of water on the
cooker as this may cause
damage to the rice
cooker.
9
Page 11

Using Your Kambrook Rice Cooker & Steamer
Continued...
3. Ensure the exterior of the
removable cooking bowl is clean
then place into the housing. This
will ensure proper contact with
the inner cooking surface of the
housing.
4. Close the lid ensuring that it is
5. Insert the power plug into a 230V
6. To commence cooking, push the
7. When cooking is finished, the rice
8. Allow to stand on the ‘KEEP WARM’
CAUTION: Always
operate the rice cooker
on a stable and heat
resistant surface.
CAUTION: Position the
rice cooker so that the
steam vent is directed
away from you. Unlock
and open the lid carefully
to avoid scalding from
escaping steam.
properly locked into position.
or 240V power outlet and switch
on at the power point. The orange
‘KEEP WARM’ light will illuminate.
selector control lever down to
the ‘COOK RICE’ position. The red
‘COOK RICE’ light will illuminate.
cooker will automatically switch
to the ‘KEEP WARM’ setting and
the orange ‘KEEP WARM ’ light will
illuminate.
setting for 10 minutes with the lid
closed before serving in order to
get fluffy, soft rice and to absorb
any excess moisture.
NOTE: Rice can be kept on the
automatic ‘KEEP WARM’ setting
for up to 5 hours. However,
smaller quantities of cooked rice
may become dry if left on the
‘KEEP WARM’ setting for too long.
9. Switch off at the power outlet and
remove the power plug. Use oven
mitts to open the lid and remove
the removable cooking bowl to
serve. Allow the rice cooker to
cool before cleaning.
NOTE: To stop the automatic
‘KEEP WARM’ setting, switch off
at the power outlet and then
unplug.
CAUTION: Do not touch
hot surfaces; use oven
mitts to unlock and open
the lid and to remove
the removable cooking
bowl. Unlock and open
the lid carefully and
away from yourself to
avoid scalding from
escaping steam.
CAUTION: Do not place
your face or any other
body part over the rice
cooker whilst in use as
the steam can cause
serious burns.
10
Page 12

Steaming
Steamed food retains most of its
nutritional value. Food may be
steamed by placing it on the
steaming tray over stock or water
and ensuring the lid is properly locked
into position. Keep the lid closed
and locked while steaming unless
the recipe specifically calls for the
lid to be opened. By unlocking and
opening the lid unnecessarily, you lose
steam and valuable time.
1. Place 3 rice measuring cups or
more of water or stock into the
removable cooking bowl
2. Place food to be steamed
directly onto the steaming tray
and insert into the removable
cooking bowl.
3. Place the removable cooking
bowl with steaming tray into the
cooking body and close the lid,
ensuring that the lid is properly
locked into position.
4. Plug into a 230V or 240V power
outlet and then switch on. The
orange 'KEEP WARM' light will
illuminate.
5. Push the selector lever down
to begin cooking. The red
'COOK RICE' light will illuminate.
NOTE: There will only be one
light on at a time i.e. orange
for 'KEEP WARM' or red for
'COOK RICE' If further cooking is
required, ensure sufficient water
or stock is in the removable
cooking bowl.
6. When finished cooking, turn the
rice cooker off at the power
outlet and then unplug. Using an
oven mitt carefully remove the
steaming tray and serve. Allow
the rice cooker to cool before
cleaning.
WARNING: Always
unlock and open the lid
away from you to avoid
the spurt of the steam
escaping from under
the lid.
Hints and Tips for Steaming
Vegetables
• Smaller pieces will steam faster
than larger ones.
• The size and shape of vegetables
may call for adjustments. For softer
vegetables, allow extra cooking
time.
• Try to keep vegetables to a
standard size to ensure even
cooking.
• Ensure that not all the steamer
holes are covered by food to
prevent overflow during steaming.
• Fresh or frozen vegetables may be
steamed.
• If steaming frozen vegetables, do
not thaw first.
• Do not allow water or stock to
touch the tray or food.
• Check liquid level occasionally.
Add more hot water if further
steaming is required. Do not allow
to boil dry.
• Always unlock and open the lid
away from you to avoid the spurt of
steam escaping from under the lid.
Hints and Tips for Steaming
Fish and Seafood
• Season fish with fresh herbs, onions,
lemon etc.
• Ensure fish fillets are in a single layer
and not overlapped.
• Fish is cooked when it flakes easily
with a fork and is opaque in colour.
11
Page 13

Using Your Kambrook Rice Cooker & Steamer
Continued...
Hints and Tips for Steaming
Poultry
• Select pieces of poultry of a similar
size for even cooking.
• Arrange a single layer if possible, to
facilitate even cooking.
• Remove visible fat and skin.
• Check poultry is cooked by
piercing the thickest part of the
poultry. If the juices run clear it is
cooked.
WARNING: Do not allow
the removable cooking
bowl to boil dry.
Important
• Do not interfere with the automatic
selector control lever during
operation.
• Never try to force the selector
control lever to stay on the
‘COOK RICE’ setting after it has
automatically switched to the
‘KEEP WARM’ setting.
• To avoid damage to your rice
cooker, always ensure that the
removable cooking bowl is
correctly positioned in the housing.
This will ensure proper contact with
the heating surface in the housing
for optimal performance.
• Do not use a damaged or dented
cooking bowl as this may cause
the cooking bowl to sit incorrectly
in the housing.
• Never use metal utensils inside the
removable cooking bowl as they
will damage the non-stick surface.
Always use wooden or plastic
utensils.
12
Page 14

Rice Cooking Tables
The rice measuring scoop provided
with your rice cooker is used in the
following tables.
1 level rice
measuring scoop
1 level rice
measuring scoop
140g
=
uncooked rice
180ml water
=
White Rice Cooking Table
UNCOOKED RICE
(using scoop provided)
2 2 4 cups 17min
3 3 7cups 19 min
4 4 9 cups 22 min
5 5 11cups 24min
6 6 13cups 28min
7 7 15cups 30min
8 8 17cups 32min
9 9 19cups 34min
10 10 21cups 36min
Fill with water to
cooking bowl
marking
Brown Rice Cooking Table
NOTE: For best results when simply
cooking rice (white or brown), use
the rice measuring scoop provided
to measure the uncooked rice
as it most accurately relates to
the water level markings inside
the removable cooking bowl
(see tables provided). If the rice
measuring scoop is misplaced,
however, another cup or metric
measuring cup can be used, but
ensure the 5 cup maximum water
level mark is not exceeded.
COOKED RICE
(metric measure)
Note: Approximate timings are based on Jasmine rice
Approximate
cooking time
UNCOOKED RICE
(using scoop provided)
3 3 6 cups 37min
4 4 8 cups 43min
5 5 10 cups 44min
6 6 12 cups 45min
7 7 14 cups 47min
8 8 16 cups 49min
9 9 18 cups 51min
10 10 20 cups 53min
Fill with water to
cooking bowl
marking
Note: Approximate timings are based on medium grain brown rice
COOKED RICE
(metric measure)
Approximate
cooking time
13
Page 15

Rice Cooking Tables Continued...
Hints
• The quantity of water required will
depend on the type of rice as well
as personal preference for the
texture of the cooked rice. Add a
little extra water for fluffier rice and
a little less water for firmer rice.
• Some white rice varieties, such
as Basmati, Arborio and short
grain, may require more water for
cooking.
• Allow sufficient time when cooking
brown rice and stir halfway through
cooking if desired. When cooking
brown rice, starchy water bubbles
will form under the lid during
cooking and will dissipate when
left to stand on the ‘KEEP WARM’
setting for 10-20 minutes after
cooking has finished.
• To cook wild rice (the seed of an
aquatic grass), combine as a blend
with white or brown rice.
• Should you happen to add too
much water, the excess water may
overflow during cooking. Start by
cooking with the recommended
quantity of water; if the rice is still
a bit hard, add some extra water
and push the ‘COOK RICE’ selector
control lever down again.
NOTE: The minimum
recommended amount of
rice cooked is 2 measuring
cups. Cooking small amounts
of rice may result in a crusty
or browned result on the base
of the cooked rice closest to
the bowl.
• To avoid matting at the base of the
rice, cut a circle shape in baking
paper and place at the bottom
of the removable cooking bowl
before adding rice and water.
14
Page 16

Care, Cleaning and Storage
Cleaning
Switch off the rice cooker at the
power outlet and unplug. Allow all
parts to cool before cleaning. Unclip the condensation collector by
pressing on both sides and pulling
away from unit. Empty any water that
might have accumulated, and clip it
back into place.
Remove the steam release assembly
by turning it anti-clockwise and pulling
away from unit. Wash in warm soapy
water, rinse, dry and place back into
place.
Wash the removable cooking bowl,
serving spoon and measuring scoop
in warm soapy water, rinse and dry all
parts thoroughly.
Do not wash the removable cooking
bowl, steaming tray, measuring
scoop, serving spoon or housing in
a dishwasher. Do not use abrasive
cleaners, steel wool or scouring pads
as these can damage the non-stick
surface of the removable cooking
bowl and the housing. Never use
metal utensils inside the non-stick
removable cooking bowl.
To prevent damage to the rice
cooker, do not use alkaline cleaning
agents when cleaning. Use a soft
cloth and a mild detergent.
CAUTION: Do not use
chemicals, steel wool,
metal scouring pad or
abrasive cleaners to
clean the outside of the
rice cooker housing or
cooking bowl as these
can damage the housing
or the coating of the
removable cooking bowl.
CAUTION: To prevent
damage to the rice
cooker, do not use
alkaline cleaning agents
when cleaning. Use a soft
cloth and mild detergent.
NOTE: If rice has cooked onto
the inside of the removable
cooking bowl, fill the bowl with
warm soapy water and leave
to stand for approximately
10 minutes before cleaning
with a soft cloth; rinse and dry
thoroughly. Ensure rice residue
does not adhere to the outside
surface of the removable
cooking bowl. The housing can
be wiped with a soft, damp
cloth then dried thoroughly.
15
Page 17

Recipes
NOTE: The rice and liquid content
in the following recipes (if
applicable) are measured using
a metric cup (250ml), not the rice
measuring scoop included.
Mushroom Risotto
Serves 4
1 tbsp olive oil
1 brown onion, diced
2 cloves garlic, crushed
200g Swiss brown mushrooms, sliced
2 cups medium grain rice
¼ bunch thyme
½ cup white wine
4 cups chicken stock
50g butter
50g parmesan cheese
Salt and pepper to taste
1. Heat a fry pan up to medium-high
heat, add the olive oil. Once oil is hot,
add onion and sauté for 3 minutes.
Once it becomes translucent, add
garlic and thyme. Cook for 1 minute.
2. Add mushrooms and sauté for 3
minutes. Add rice and cook out for 3
minutes.
3. Stir in wine and reduce by ¾. Add
the stock and bring to a boil before
pouring into the removable cooking
bowl.
4. Place into the rice cooker, close
and securely lock the lid into place.
Press the selector control lever down
to ‘COOK RICE’ setting. Cook until
the unit automatically switches to
the ‘KEEP WARM’ function. Stir once
during cooking.
5. Once the rice is cooked and all the
liquid has been absorbed, add the
butter and parmesan cheese, fold
through and season with salt and
pepper.
Seafood Paella
Serves 4
3 tbsp olive oil
1 red capsicum, diced
2 cloves garlic, crushed
1 Spanish onion, diced
2 chorizo sausages, chopped
400g diced chicken thigh fillets
2 cups Arborio rice (medium grain)
1 tsp chilli flakes
1 tsp turmeric powder
1 tbsp paprika
4 cups chicken stock
1 tomato, diced
375g mixed seafood (prawns, calamari,
octopus, mussel meat, white fish fillet)
1 tbsp chopped fresh parsley
2 tsp fresh lemon juice
Salt and pepper to taste
1. Place olive oil in a large frypan and
heat on high for 3 minutes. Add
capsicum and cook for 2 minutes.
Add garlic, onion, chorizo, chicken,
and sauté for 5 minutes until the
chicken is browned.
2. Add rice and fry for 4 minutes, stir
in the spices and cook for a further
2 minutes. Add stock and bring to
the boil before pouring into the
removable cooking bowl.
3. Add diced tomato and seafood mix.
4. Place the removable cooking bowl
into the rice cooker, close and
securely lock the lid into place.
Press the selector control lever down
to ‘COOK RICE’ setting. Cook until
the unit automatically switches to
the ‘KEEP WARM’ function. Stir once
during cooking. Allow to stand for
10 minutes.
5. Add chopped parsley and season
with lemon, salt and pepper. Serve
immediately.
16
Page 18

Steamed Pork Buns
Makes 12 buns
2 tbsp vegetable oil
1 green shallot, finely sliced
1 garlic clove, finely chopped
300g barbecue pork
2 tbsp light soy sauce
2 tbsp oyster sauce
1 tbsp white sugar
1 tbsp corn starch
Dough
1 sachet dried yeast (7g or 2tsp)
1 cup warm water
4 ½ cups flour
¼ cup white sugar
2 tbsp vegetable oil
½ cup boiling water
2 tbsp sesame oil
1. Heat a fry pan with the vegetable
oil. Fry shallots and garlic for about a
minute.
2. Add pork and sauces with sugar and
corn starch. Cook for a minute until
sauce thickens. Allow to cool before
making pork buns.
3. Dissolve yeast in warm water. Add 1
cup of flour and allow to rest, covered
for one hour.
4. Mix sugar, oil and boiling water
together, allow to cool and mix in with
the yeast mixture and the remaining
flour. Cover with a damp cloth and
allow to rest for a fur ther hour.
5. Separate dough into two parts and
knead. Roll each into a log and cut
into 12 equal pieces.
6. Roll each piece of dough into flat,
circular disks. Place a tablespoon of
the filling mixture in the centre of each
and pinch and twist together.
7. Place into a patt y case and leave
to rest for another 30 minutes before
cooking.
8. Pour 1 cup of hot water into the rice
cooker removable cooking bowl, and
place steaming tray on top. Arrange
pork buns in the steaming tray, close
and securely lock the lid into place.
9. Press the selector control lever down
to ‘COOK RICE’ setting. Cook until
the unit automatically switches to
the 'KEEP WARM' function. The dough
should have puffed up and be nice
and fluffy.
10. Manually switch the rice cooker to the
‘KEEP WARM’ setting after 20 minutes
and leave the lid closed and securely
locked until ready to eat.
17
Page 19

Quinoa and Roast Pumpkin
Salad
Serves 4
20ml olive oil
1 brown onion, diced
1 clove garlic
1 tbsp cumin
Pinch salt
2 cups quinoa
200g pumpkin, peeled and diced
3 ½ cups water or chicken stock
1 punnet cherry tomatoes
2 handfuls baby spinach
1 handful toasted walnuts
100g ricotta cheese
1. In a large frypan, heat oil and fry
onion for 3 minutes. Add garlic and
cook for 3 minutes. Once there is a
little bit of colour to the onions, add
cumin and salt.
2. Add quinoa, pumpkin, and water or
stock. Bring to the boil before pouring
into the removable cooking bowl.
3. Place into the rice cooker, close
and securely lock the lid into place.
Press the selector control lever down
to ‘COOK RICE’ setting. Cook until
the unit automatically switches to
the ‘KEEP WARM’ function. Stir once
during cooking. Allow to stand for 10
minutes.
4. Once the quinoa has cooled slightly,
pour out into a large bowl. Mix in
tomatoes, baby spinach and place
on serving board.
5. Garnish with toasted walnuts and
ricotta cheese.
Steamed Chicken and Asian
Greens with Peanut Sauce
Serves 2
250g chicken breast cut into strips
20ml sweet soy sauce
1 bunch Chinese broccoli
1 bunch broccolini
½ bunch snake beans (found in the fresh
beans section of the supermarket)
Peanut sauce
1 tbsp Satay paste
1 x 270ml coconut cream
1 tbsp peanut butter
1 tsp fish sauce
1 tbsp crushed peanuts
1. Marinate the chicken in the sweet soy
sauce for 10-15 minutes.
2. Arrange the chicken in the steaming
tray.
3. Lay the Asian greens on top of the
chicken.
4. Pour ½ cup of hot water into the rice
cooker removable cooking bowl, and
place steaming tray on top. Close
and securely lock the lid into place.
5. Press the selector control lever down
to ‘COOK RICE’ setting. Cook until
the unit automatically switches to the
'KEEP WARM' function. The vegetables
will be cooked, and make sure the
chicken is cooked as well.
6. To make the sauce, heat a little bit of
oil in a small pot and fry the paste for
2 minutes. Add remaining ingredients
to the pot and simmer for 3-4 minutes
until the sauce becomes thicker.
Adjust seasoning if not to taste.
7. Once the chicken is cooked, lie on a
plate next to the vegetables and pour
the peanut sauce over.
18
Page 20

Steamed Snapper with Ginger
and Shallots
Serves 1
200g snapper fillets
180ml chicken stock
1 tbsp palm sugar (found in the Asian
section of the supermarket)
4 coriander roots
10 white peppercorns, crushed
100ml Chinese cooking wine
Splash of white vinegar
Garnishes
1 knob ginger, finely chopped
2 stems green shallot
1 red chilli, finely chopped
1 tbsp sesame oil
1. To make broth, combine the
stock, palm sugar, coriander roots,
peppercorns, cooking wine, and
vinegar in a pot. Bring to the boil, and
simmer for 3 minutes. Strain, saving the
broth.
2. Place the fish pieces in a small shallow
bowl or saucer and pour over the
broth.
3. In a separate bowl, mix together
ginger, chilli and shallots. Using only
half of the garnish mixture, cover the
fish.
4. Place the bowl or saucer in the
steaming tray.
5. Pour ½ cup of hot water into the rice
cooker removable cooking bowl, and
place steaming tray on top. Close
and securely lock the lid into place.
6. Press the selector control lever down
to ‘COOK RICE’ setting. Cook until
the unit automatically switches to the
'KEEP WARM' function.
7. Once cooked, place the remaining
garnish mixture on top of the fish. In
a separate pot, heat the sesame oil
until smoking and pour over hot fish,
garnish with a few sprigs of coriander.
Serve with rice.
Sushi Rice
Serves 6
2 cups sushi rice, washed
2¼ cups water
1½ tbsp rice vinegar
1½ tbsp caster sugar
½ tsp salt
1. Thoroughly wash rice and drain. Place
rice and water into the removable
cooking bowl.
2. Place into the rice cooker, close
and securely lock the lid into place.
Press the selector control lever down
to ‘COOK RICE’ setting. Cook until
the unit automatically switches to
the ‘KEEP WARM’ function. Stir once
during cooking.
3. Stir through vinegar, sugar and salt
with the serving spoon.
4. Allow to cool before preparing sushi.
19
Page 21

Seaweed Rolls
Serves 6
6 sheets of Nori seaweed
Sushi rice, cooked
Wasabi paste to taste
150g fresh salmon, thinly sliced
Japanese pickled ginger
Cucumber and spring onion, finely sliced
1. Place a sheet of seaweed, shiny side
down, on a bamboo sushi mat.
2. Spread ¾ cup of the rice over ¾ of
the Nori sheet, leaving a border at the
top.
3. Spread a very thin layer of wasabi
paste in a narrow line down the
centre of the rice. Top with a thin strip
of salmon and some pickled ginger,
cucumber and spring onion.
4. Using the sushi mat as a guide, roll up
the seaweed to enclose the filling.
Press to seal the edges.
5. Using a very sharp knife, cut the roll
neatly into 2.5cm pieces.
6. Repeat with remaining seaweed and
filling. Chill until ready to serve.
TIP: To make the slicing easier,
dip the knife into a mixture of
vinegar and cold water.
Middle Eastern Pilaf
Serves 4–6
2 tbsp olive oil
1 red onion, finely chopped
2 garlic cloves, finely chopped
1 tsp cardamom pods, finely crushed
1 tsp ground cumin
¼ tsp ground black pepper
1 tsp ground turmeric
1 bay leaf
Pinch salt
2 cups Basmati rice, washed and well
drained
4 cups chicken or vegetable stock
1 cup dried apricots, chopped
¼ cup currants
¼ cup shelled pistachio nuts, chopped
½ cup chopped coriander leaves
1. Heat a large frypan, add olive oil and
fry onion for 3 minutes. Add garlic and
cook for 2 more minutes until there is a
small amount of colour on the garlic.
2. Add spices and cook for 3 minutes to
release the flavours.
3. Add rice, stock, and bring to the boil
before pouring into the removable
cooking bowl.
4. Place into the rice cooker, close
and securely lock the lid into place.
Press the selector control lever down
to ‘COOK RICE’ setting. Cook until
the unit automatically switches to
the ‘KEEP WARM’ function. Stir once
during cooking.
5. Add apricots, and currants. Close
lid and allow to rest for a further 10
minutes.
6. Spoon rice onto a serving platter and
garnish with pistachio nuts and fresh
coriander.
20
Page 22

Vanilla Risotto
Serves 4
300g Arborio rice
2 cups water
¾ cup caster sugar
1 tsp vanilla bean paste
2 cups milk
1 cup cream
½ cup Mascarpone cheese
Poached fruit to serve (peaches,
nectarines, apricot, raspberries etc.)
1. Place rice, water, sugar and vanilla
paste in the removable cooking bowl.
2. Place into the rice cooker, close
and securely lock the lid into place.
Press the selector control lever down
to ‘COOK RICE’ setting. Cook until
the unit automatically switches to
the ‘KEEP WARM’ function. Stir once
during cooking.
3. Stir in milk and cream.
Repeat step 2 again.
4. Allow to rest for 10 minutes after
cooking is finished. Stir in mascarpone
cheese.
5. Serve immediately with fresh poached
fruit or berries.
21
Page 23

Notes
22
Page 24

Notes
23
 Loading...