

Page 1
Multi Function
25L Mini Oven
KOT710
Instruction Booklet
Page 2

Important
Please retain your instruction
book for future use.
In the event that you need some assistance with your
Kambrook appliance, please contact our Customer Service
Department on 1300 139 798 (Australia) or 09 271 3980 (New
Zealand). Alternatively, visit us on our website at
www.kambrook.com.au
Page 3

Contents
Kambrook Recommends p4
Safety First
Your Kambrook Multi Function p6
Mini Oven
Using Your Kambrook p7
Multi Function Mini Oven
Multi Function Mini Oven p9
Cooking Guide
Maintaining Your Kambrook p10
Multi Function Mini Oven
Recipes p11
Warranty p20
Page 4

Kambrook Recommends Safety First
IMPORTANT: Please retain your
instruction book for future use.
At Kambrook, we believe that safe performance is the first priority in any
consumer product, so that you, our valued customer can confidently
use and trust our products. We ask that any electrical appliance that
you use be operated in a sensible fashion with due care and attention
placed on the following important operating instructions.
Important Safeguards For Your Kambrook
Multi Function Mini Oven
• Carefully read all instructions before
operating the Kambrook Multi Function
Mini Oven for the first time and save for
future reference.
• Remove and safely discard any
packaging material and promotional
labels before using the Multi Function Mini
Oven for the first time.
• To eliminate a choking hazard for young
children, remove and safely discard the
protective cover fitted to the power plug
of this appliance.
• Do not place the Multi Function Mini Oven
near the edge of a bench or table during
operation. Ensure the surface is level, clean
and free of water and other substances.
• Do not use the Multi Function Mini Oven
on a sink drain board.
• Do not place this Multi Function Mini Oven
on or near a hot gas or electric burner, or
where it could touch a heated oven.
• Position the Multi Function Mini Oven at
a minimum distance of 20cm away from
walls, curtains, cloths and other heat
sensitive materials when in use.
• Always operate the Multi Function Mini
Oven on a stable and heat resistant surface.
Do not use on a cloth-covered surface, near
curtains or other flammable materials.
• Do not place cardboard, plastic, paper or
other flammable materials into the Multi
Function Mini Oven.
• Do not cover the crumb tray or any other
part of the Multi Function Mini Oven with
metal foil. This will cause overheating of
the oven.
• Always ensure the crumb tray is
thoroughly dried after cleaning and is
reinserted into position before operating
the Multi Function Mini Oven.
• The door or the outer surface may get hot
when the appliance is operating.
• The temperature of accessible surfaces
will be high when the appliance is
operating and for some time after use.
• Do not touch hot surfaces, use handles or
insulated oven mitts.
• Always wear protective, insulated oven
mitts when inserting, removing or handling
items from the Multi Function Mini Oven
when hot.
• Always use extreme caution when
removing the tray or disposing of hot
grease or other hot liquids.
• Allow the Multi Function Mini Oven to cool
before handling.
• Do not place hands inside the Multi
Function Mini Oven during operation.
• Do not leave the door standing open for
extended periods of time.
• The glass of the Multi Function Mini
Oven door has been specially treated
to make it stronger, more durable and
safer than ordinary glass, however it is not
unbreakable. If struck extremely hard, it
may break or weaken, and could at a
later time shatter into many small pieces
without apparent cause.
• Do not insert over-sized foods or metal
utensils into the Multi Function Mini Oven
as they create risk of fire or electric shock.
4
Page 5

• For snack ovens: The snack oven is
designed for reheating, toasting/cooking
or grilling small portions of suitable foods
as described in this book. Frozen foods
such as frozen pies and frozen pizzas
should not be placed into the appliance.
• The use of accessory attachments is not
recommended by the manufacturer
as it may cause hazard or injury. It
is recommended to use only the
accessories supplied with the Multi
Function Mini Oven.
• Do not store any materials other than the
supplied accessories in the Multi Function
Mini Oven when not in use.
• Do not clean the interior of the Multi
Function Mini Oven with metal scouring
pads as pieces can break off the pad
and touch electrical parts, creating risk of
electric shock.
• Do not attempt to operate the Multi
Function Mini Oven by any method other
than those described in this book.
• Always ensure the Multi Function Mini Oven
is properly assembled before use. Follow the
instructions provided in this book.
• The Multi Function Mini Oven is not intended
to be operated by means of an external
timer or separate remote control system.
• Do not place anything on top of the Multi
Function Mini Oven when in use and
when stored.
• The Multi Function Mini Oven should not be
left unattended at any time when in use.
• Always ensure the Multi Function Mini
Oven has cooled, the Element Selection
Dial and the timer dial are in the off
position, the power cord is switched off
at the power outlet and is unplugged
when the appliance is not in use, before
cleaning, before attempting to move the
appliance, disassembling, assembling or
storing the appliance.
• Keep the Multi Function Mini Oven clean.
Follow the cleaning instructions provided
in this book.
Important Safeguards For All
Electrical Appliances
• Fully unwind the power cord before use.
• Do not let the power cord hang over
the edge of a bench or table, touch hot
surfaces or become knotted.
• To protect against electric shock do not
immerse the power cord, power plug or
appliance in water or any other liquid.
• The appliance is not intended for use by
persons (including children) with reduced
physical, sensory or mental capabilities,
or lack of experience and knowledge,
unless they have been given supervision
or instruction concerning use of the
appliance by a person responsible for
their safety.
• Children should be supervised to ensure
that they do not play with the appliance.
• This appliance is for household use only.
Do not use this appliance for anything
other than its intended use. Do not use
in moving vehicles or boats. Do not use
outdoors. Misuse may cause injury.
• It is recommended to regularly inspect
the appliance. To avoid a hazard do not
use the appliance if power cord, power
plug or appliance becomes damaged in
any way. Return the entire appliance to
the nearest authorised Kambrook Service
Centre for examination and/or repair.
• Any maintenance other than cleaning
should be performed at an authorised
Kambrook Service Centre.
• The installation of a residual current
device (safety switch) is recommended to
provide additional safety protection when
using electrical appliances. It is advisable
that a safety switch with a rated residual
operating current not exceeding 30mA be
installed in the electrical circuit supplying
the appliance. See your electrician for
professional advice.
CAUTION: Hot surfaces
during and after use.
5
Page 6
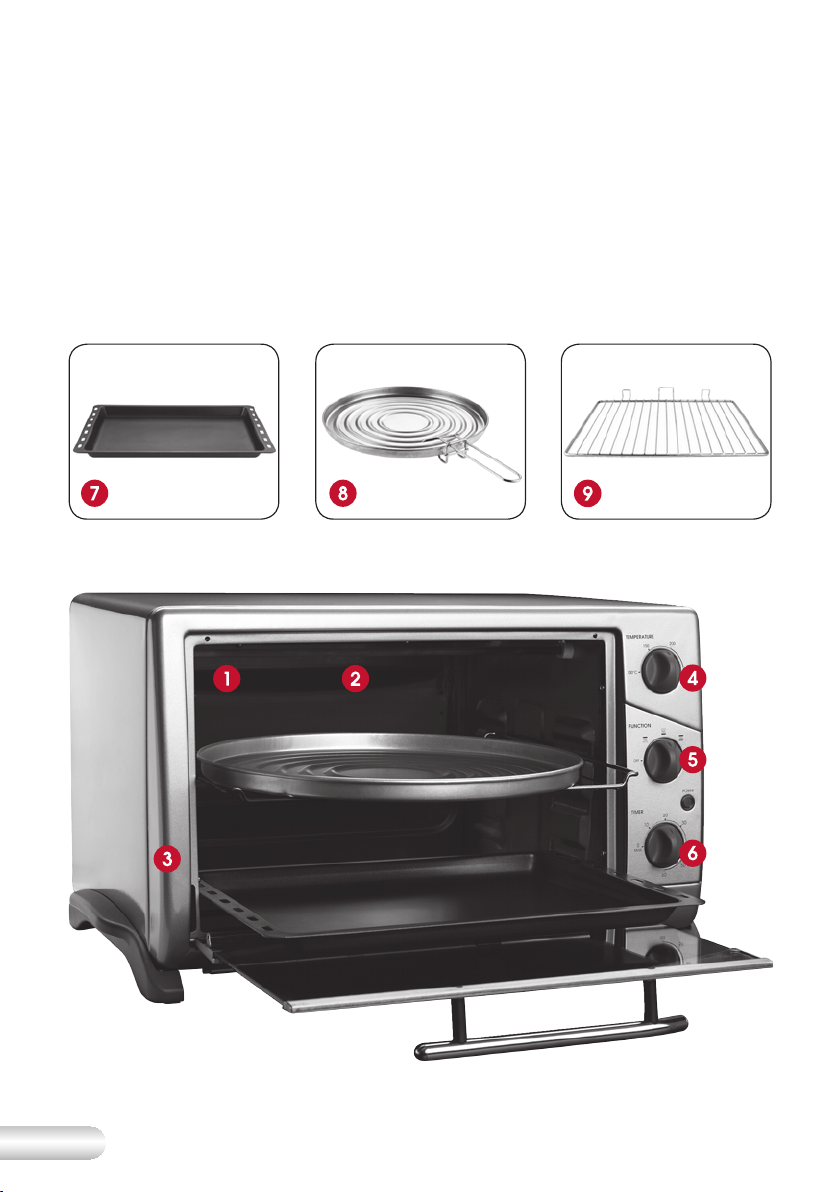
Your Kambrook Multi Function Mini Oven
1. 25L multi function mini oven
2. Capacity for 12” pizza
3. 1400W
4. Adjustable temperature dial
5. Element selection dial
6. 60 minute timer
7. Baking Tray
8. Pizza Tray
9. Oven Rack
6
Page 7

Using Your Kambrook Multi Function Mini Oven
Before First Use
Remove and safely discard any
packaging material and promotional
stickers before using the Multi Function
Mini Oven for the first time.
To eliminate a choking hazard for
young children, remove and safely
discard the protective cover fitted to
the power plug of this appliance.
Place the Kambrook oven on a level,
flat surface.
Plug the appliance into a 230V or
240V power outlet. Turn the power on.
Set the Temperature Control to 250°C
and the Time Control to 15 minutes.
This will eliminate any oil residue that
may have been used for packing
and shipping.
When turned on for the first time, the
Kambrook oven may give off vapours
for up to 15 minutes. This is due to the
protective substances on the heating
elements. It is safe, not detrimental to
the performance of the Kambrook
oven and will dissipate with use.
NOTE: Allow the oven to cool.
Insert the accessories. The
Kambrook Multi Function Mini
Oven is now ready to use.
IMPORTANT: The oven will not
heat until ALL of the following are
activated:
•The ‘Element Selection Dial’
selected
•Timer is activated
•Temperature is selected
The Element Selection Dial
The Element Selection Dial is able to
select ‘top and bottom’ element on,
‘bottom only’ element on, or ‘top only’
element on.
= ‘Top element only’ for grilling.
= ‘Bottom element only’ for
grilling.
= ‘Top & bottom elements’
together for roasting, toasting,
baking.
NOTE: For even cooking (top
and bottom) only one element
at the top will illuminate, as well
as the bottom element.
For setting cooking times less than
30 minutes - turn the timer dial past
the 45 minute mark, then turn back
to the desired time. For example 10
minutes of cooking, turn the dial to 45
minutes then immediately turn back
to 10 minutes.
Heating Light
The light will illuminate as the oven
is heating and will turn off when
the oven has reached the selected
temperature. It will cycle on and off
throughout the cooking process.
Preheating
For best results allow the Multi
Function Mini Oven to pre-heat
before using the oven. Select the
desired temperature and select
the desired element setting. Set the
timer dial to 60 minutes, heat until
the heating light switches off. Place
food into the oven and reset timer to
desired cooking time.
7
Page 8

Using Your Kambrook Multi Function
Mini Oven continued
Chrome Plated Wire Rack
Always place the wire oven rack into
top, middle or bottom Rack Support
Guide inside oven in an upward rack
return position. This provides three rack
height positions.
Roasting, Baking
and Reheating
Position the wire rack to the required
shelf height.
Select the required temperature on
the ‘Adjustable Temperature Dial’.
Select ‘top and bottom’
on the Element Selection Dial.
Preheat the oven.
Place the food inside the oven and
select the desired time. The oven will
switch off when the timer switches off.
elements
Multi Function Mini
Oven Guide
Multi oven Roasting Guide – Place
no more than 1.5kg of meat at any
one time.
Grilling
Position the wire rack in the top rung
inside the oven.
For grilling, use the baking tray with
the grill tray insert.
Select ‘top only’
Element Selection Dial. Select 250ºC
setting on the Temperature Control
Dial. Place the food inside and select
the desired time.
Leave the door slightly ajar, leaving
about 50mm gap at the top. This will
ensure adequate airflow during grilling.
element on the
Toasting
Position the wire rack on the middle
rung. Select ‘top’
Selection Dial.
Select the 250ºC on the Temperature
Control Dial.
NOTE: For best results allow the
Multi Oven to preheat before
using the oven for roasting,
grilling or toasting.
on the Element
NOTE: Times will vary
depending on the thickness of
food and individual preference.
Thermostat Oven Temperature Function/Food setting ºC
Description Using ‘Top and Bottom’ Elements
Low 50ºC Warm
150ºC Moderately warm
180ºC Moderate
200-220ºC Hot Roasts
8
Warming plates/ dishes
Pavlova and rich fruit cakes
Shortbreads, cakes, casseroles, stews,
cheesecakes, biscuits and slices
Bread, flans, muffins, pastry, scones
and pizza
Page 9

Multi Function Mini Oven Cooking Guide
Meat Time per 500g - Cooked at 200ºC
Beef - Rare
Beef - Medium
Beef - Well Done
Lamb - Medium
Lamb - Well Done
Veal - Well Done
Pork - Well Done
Chicken
20 minutes
28 minutes
35 minutes
35 minutes
40 minutes
28 minutes
40 minutes
30 minutes
Thermostat Food Type Approximate Cooking Times.
Setting ºC Using ‘Top Only’
250ºC
250ºC
250ºC
GRILL
GRILL
GRILL
Thin sausages
Thick sausages
Lamb chops
10 minutes
12 minutes
10 - 12 minutes
250ºC
250ºC
GRILL
GRILL
Steaks each side
Kebabs
6 minutes for
medium rare,
8-10 minutes
for well
done, both
depending on
thickness
of meat
10 minutes
9
Page 10

Maintaining Your Kambrook Multi Function
Mini Oven
It is recommended that you clean the
Multi Function Mini Oven after each
use to prevent a build up of grease
and to avoid unpleasant odours.
Always turn the unit “OFF”, then turn
the power off at the power outlet and
unplug from the power outlet before
cleaning the Multi Oven and allow the
appliance to cool first.
The removable rack, baking tray, pizza
tray and tray handle can be washed
in warm soapy water.
To clean the outside and the interior
of the Multi Oven, wipe with a mild
detergent and a damp cloth.
NOTE: Do not use abrasive
cleaners, commercial oven
cleaners or sharp utensils to clean
the Multi Function Mini Oven.
Do not immerse the Multi Function
Mini Oven unit or power cord in
water or any other liquid.
NOTE: Do not place any part
of the Multi Function Mini Oven
in the dishwasher.
10
Page 11

Recipes
11
Page 12

Recipes
Thai Green Chicken Curry
Serves 4
2 tablespoons olive oil
1 brown onion, peeled and diced
1 kg chicken thigh fillets trimmed and diced
1
⁄ 3 cup green curry paste
3 cups coconut cream
2 Kaffir lime leaves
2 tablespoons lime juice
1 tablespoon brown sugar
2 teaspoons fish sauce
1 x 250g pkt dried rice noodles
1. Remove all trays from the Multi
Function Mini Oven.
2. Place the wire rack in the top
rack position.
3. Set Element Control Dial to top
element only.
4. Preheat the Multi Function Mini Oven
to 210ºC.
5. Place the oil, onion, diced chicken
and curry paste into a casserole dish
and place into the Multi Function
Mini Oven; cook for 10 minutes. Stir
occasionally then remove.
6. Meanwhile, place the coconut cream
into a medium saucepan; add the
lime leaves, lime juice, brown sugar
and fish sauce.
7. Bring the mixture to the boil, then
simmer for 5 minutes. Add the coconut
cream mixture to the chicken.
8. Change the Element Control Dial to
top and bottom elements and the
temperature to 180ºC.
9. Cover and place the chicken curry
into the Multi Function Mini Oven.
Cook for 40-50 minutes or until the
chicken is tender.
10. Place the noodles into a heatproof
bowl and cover with boiling water;
allow to stand for 5 minutes then drain.
11. Spoon curry over noodles to serve.
Potato and Onion Bake
Serves 4
1 tablespoon butter
1 teaspoon finely chopped garlic
1 cup milk
½ cup/125ml cream
6 medium potatoes, peeled and
thinly sliced
1 brown onion, peeled and finely sliced
Salt and pepper
1 cup grated cheese
2
⁄3 cup breadcrumbs
1. Remove all trays from the Multi
Function Mini Oven.
2. Set the Element Control Dial to top
and bottom elements, place the wire
rack in the bottom rack position.
3. Preheat the Multi Function Mini Oven
to 210ºC.
4. Grease a 5-cup capacity baking dish
with the butter and garlic.
5. Place the milk and cream in a small
saucepan and bring to the boil.
6. Layer the potato and onion into the
dish and sprinkle with salt and pepper.
7. Pour the milk and cream over the
potatoes. Sprinkle the cheese and
breadcrumbs evenly over the top.
8. Place the potato bake in the Multi
Function Mini Oven. Lower oven
temperature to 180ºC, cook for 40-50
minutes until
the top is golden and the potatoes
are cooked.
9. Serve as an accompaniment to roast
meat or chicken.
12
Page 13

Country Style Apricot Chicken
Serves 6
Quiche Florentine
Serves 4
1 pkt French onion soup mix
2 x 425ml tins apricot nectar
½ cup of mango chutney
8 chicken thigh fillets trimmed and diced
1. Remove all trays from the Multi
Function Mini Oven.
2. Set Element Control Dial to top and
bottom elements , place the wire rack
in the bottom rack position.
3. Preheat the Multi Function Mini Oven
to 180ºC.
4. Add all the ingredients into a
heatproof casserole dish and mix well.
5. Cover the dish with a heatproof lid or
foil and place into the Multi Function
Mini Oven; cook for 50 minutes or until
the chicken is cooked.
6. Serve with steamed rice and
Greek yoghurt.
2 sheets frozen ready rolled shortcrust
pastry
1 tablespoon light olive oil
1 brown onion, finely diced
200g pkt frozen spinach, defrosted and
well drained
½ cup grated tasty cheese
½ cup ricotta cheese
¼ teaspoon ground nutmeg
3 eggs, lightly beaten
Salt and ground pepper
1. Remove all trays from the Multi
Function Mini Oven.
2. Set the Element Control Dial selecting
bottom element only. Place the wire
rack in the top rack position.
3. Preheat the Multi Function Mini Oven
to 210ºC.
4. Lightly grease an 18cm quiche tin.
Line the tin with the pastry, ensuring to
push the pastry into the corners of the
dish, refrigerate for 20 minutes.
5. Cover the pastry with baking paper
and fill with 1½ cups of dry rice to
‘blind bake’ the pastry. Place the
quiche tin into the Multi Function Mini
Oven and cook for 10 minutes, then
remove the rice and paper. Cook for
a further 5 minutes.
6. In a large bowl combine the
remaining ingredients mixing well;
add these ingredients to the pastry
shell, being careful not to over fill the
quiche tin.
7. Return the quiche to the Multi
Function Mini Oven. Lower the oven
temperature to 180ºC and bake the
quiche for 35-45 minutes or until the
filling is firm.
8. Serve hot or cold with a garden salad.
13
Page 14

Shepherds Pie
Serves 6
1 tablespoon butter
2 brown onions diced
¼ cup plain flour
2 cups/500ml chicken stock
2 teaspoons hot English mustard
1
⁄3 cup/80ml tomato sauce
¼ cup/60ml Worcestershire sauce
600g cooked roast lamb, finely diced
or minced
Salt and ground pepper
Potato Topping:
500g potatoes (Pontiac or Desiree) cooked
2 tablespoons butter
½ cup/125ml sour cream
1 cup grated cheese
1. Remove all trays from the Multi
Function Mini Oven.
2. Set the Element Control Dial selecting
both elements. Place the wire rack in
the top rack position.
3. Preheat the Multi Function Mini Oven
to 180ºC.
4. Melt the butter in a large saucepan
over a medium heat, add onion, cook
for 3-5 minutes.
5. Add flour and cook for a further
2 minutes.
6. Add chicken stock and bring mixture
to the boil stirring constantly.
7. Add the mustard, tomato and
Worcestershire sauce, reduce heat to
low, simmer for 5 minutes.
8. Add the lamb, and re-boil the mixture,
reduce the heat and simmer for
30 minutes.
9. Make the potato topping by mashing
all ingredients in a bowl.
10. Place the lamb into a 2-litre casserole
dish place the potato mixture on top
of the lamb mixture.
11. Place the shepherds pie into the
Multi Function Mini Oven; cook for 40
minutes or until the potato is golden
and the lamb mixture is hot.
12. Serve with steamed vegetables
or salad.
Roast Minted Rack of Lamb
Serves 4
4 bone racks of lamb, trimmed
1 cup mint jelly
¼ cup/60ml port
Salt and ground pepper
1. Remove all trays from the Multi
Function Mini Oven.
2. Set Element Control Dial to top and
bottom elements , place the wire rack
in the bottom rack position.
3. Preheat the Multi Function Mini Oven
to 210ºC.
4. Place the mint jelly and port in a small
saucepan, place over a low heat, to
melt and combine.
5. Allow to cool, then pour over the lamb.
6. Place racks of lamb onto the baking
tray with the grilling insert in place.
7. Place the baking tray into the Multi
Function Mini Oven. Lower oven
temperature to 180ºC. Cook for 30-35
minutes for pink meat or 45-55 minutes
for well done.
8. Serve with mashed potatoes and
steamed vegetables.
14
Page 15

Chicken Satay
Serves 4
500g chicken thigh fillets
2 tablespoons honey
½ cup/125ml teriyaki sauce
½ cup/125ml sweet chilli sauce
2 tablespoons lemon juice
Satay Sauce:
¾ cup crunchy peanut butter
2 teaspoons Penang curry paste
1 cup/250ml coconut cream
2 tablespoons sweet chilli sauce
1 tablespoon soy sauce
2 tablespoons lime juice
1 cup/250ml chicken stock
1. 15 bamboo skewers, soaked in cold
water for 15 minutes
2. Cut the chicken into strips 5cm long
and 2cm wide, thread the chicken
onto the skewers.
3. Place the skewers into a ceramic dish
in a single layer.
4. Combine the honey, teriyaki sauce,
sweet chilli sauce and lemon juice
in a bowl and pour over the chicken
skewers, cover with plastic wrap and
refrigerate for 1 hour or over night.
5. Remove all trays from the Multi
Function Mini Oven.
6. Set the Element Control Dial selecting
top element only. Place the wire rack
in the top rack position.
7. Preheat the Multi Function Mini Oven
to Max ºC.
8. Combine the satay sauce ingredients
in a medium saucepan and cook over
a low heat, stirring constantly until the
sauce has thickened slightly, remove
from the heat and keep warm.
9. Place the chicken satays onto the
baking tray with the grill insert in place,
then into the Multi Function Mini Oven
and cook for approx 7 minutes on
each side or until cooked through.
10. Serve with steamed rice.
15
Page 16

Bourbon Pork Ribs
Serves 4
Roast Beef
Serves 4
1kg American style pork ribs cut into
small pieces
4 cloves
1 cup/250ml white vinegar
Marinade:
1 cup/250ml tomato sauce
2 tablespoons English mustard
2 cups plum sauce
¼ cup/60ml soy sauce
½ cup/125ml honey
¼ cup/60ml sweet chilli sauce
1 cup/250ml bourbon whisky
1. Place the ribs into a large sauce pan
and cover with water, add the cloves
and vinegar, bring to the boil, lower
heat and simmer for 1 hour.
2. Remove all trays from the Multi
Function Mini Oven.
3. Preheat the Multi Function Mini Oven
to 210ºC.
4. Set the Element Control Dial selecting
top and bottom elements. Place the
wire rack in the top rack position.
5. Remove the ribs and place them
in a single layer in a heatproof
ceramic dish.
6. Mix all the ingredients for the marinade
in a large bowl until well combined.
7. Pour the marinade over the ribs
and ensure all the ribs are coated in
the marinade.
8. Place the ribs into the Multi Function
Mini Oven. Lower oven temperature to
180ºC. Cook for 45 minutes turning the
ribs every 15 minutes.
9. The ribs may take longer to cook
depending on the thickness.
10. Serve with steamed rice, a salad or
grilled vegetables.
1kg beef (scotch fillet or boned rib)
2 cloves garlic
Freshly ground pepper
2 tablespoons peanut oil
2 tablespoons red wine
2 tablespoons plain flour
2 cups/500ml beef stock
1. Remove all trays from the Multi
Function Mini Oven.
2. Preheat the Multi Function Mini Oven
to 210ºC.
3. Set the Element Control Dial selecting
top and bottom elements. Place the
wire rack in the bottom rack position.
4. Slice the garlic into thin slices, make
small incisions into the beef and
place the garlic into them, grind some
pepper onto the beef and rub with
the oil, place into the baking tray.
5. Place the beef into the Multi Function
Mini Oven. Lower oven temperature
to 180ºC. Cook 45 to 50 minutes for
medium or 1 to 1¼ hours for well done.
6. When beef is cooked remove from the
Multi Function Mini Oven and let it rest
for 15 minutes, covered in foil.
7. Mix red wine and flour together in a
small saucepan, place over a low
heat, add the beef stock and the juices
from the resting meat. Cook stirring
constantly until the gravy thickens,
season to taste with salt and pepper.
8. Slice the meat and serve with the gravy.
9. Serve with baked vegetables.
NOTE: The timer will need to be
reset after 60 minutes.
Roast leg of lamb
16
Page 17

Serves 4
1.25 kg leg of lamb
2 garlic cloves
3 sprigs of rosemary
2 tablespoons of olive oil
Salt and ground pepper
¾ cup of water
Fresh mint sauce:
¼ cup caster sugar
¾ cup fresh mint leaves chopped
1 cup/250ml malt vinegar
1. Remove all trays from the Multi
Function Mini Oven.
2. Preheat the Multi Function Mini Oven
to 210ºC.
3. Set the Element Control Dial selecting
top and bottom elements. Place the
wire rack in the bottom rack position.
4. Using a small knife cut small slits in
the surface of the lamb and push the
garlic and rosemary into slits.
5. Brush the lamb with the olive oil and
season the leg with salt and pepper
and place into the baking tray.
6. Pour water into the base of baking
tray with lamb.
7. Place into the Multi Function Mini
Oven. Lower oven temperature to
180ºC. Cook for 1 to 1¼ hours for
medium or 1¼ to 1½ hours for well
done, basting with the pan juices
every 20 minutes.
8. While roast is cooking combine all the
ingredients for the mint sauce, place
them in a screw top jar and shake
to combine.
9. When roast is cooked let it rest for 20
minutes, covered in foil.
10. Serve with baked vegetables and
boiled new potatoes.
NOTE: The timer will need to be
reset after 60 minutes.
17
Page 18

Chocolate muffins
Makes 12 medium muffins
2 cups self-raising flour
½ teaspoon baking powder
¼ cup cocoa powder
2 tablespoons caster sugar
1 cup milk chocolate bits
1 egg, lightly beaten
¾ cup/180ml sour cream
½ cup/125ml milk
100g butter melted
1. Lightly grease 2 x 6 cup muffin pans
with butter or cooking spray.
2. Remove all trays from the Multi
Function Mini Oven.
3. Preheat the Multi Function Mini Oven
to 180ºC.
4. Set the Element Control Dial selecting
top and bottom elements. Place the
wire rack in the bottom rack position.
5. Sift the flour, baking powder and
cocoa into a bowl, stir in the caster
sugar and choc bits.
6. Combine the egg, sour cream, milk,
and butter, whisk until well combined.
7. Pour the liquid into the dry ingredients
and mix until just combined.
8. Spoon half the mixture into one of the
muffin pans until two-thirds full.
9. Place into the Multi Function Mini
Oven and bake for 15-20 minutes or
until muffins are cooked. Turn muffins
out onto a wire rack to cool slightly.
Repeat with remaining muffin mixture.
10. Serve warm.
11. Top with chocolate icing or slice in
half and place a small scoop of ice
cream inside.
NOTE: Ensure muffin tray will fit
into oven before commencing.
Recipe is done in two batches
of 6.
18
Page 19

Notes
19
Page 20

Kambrook 12 Month Replacement Warranty
In Australia, this Kambrook Replacement Warranty
does not affect the mandatory statutory rights
implied under the Trade Practices Act 1974 and
other similar State and Territory legislation relating
to the appliance. It applies in addition to the
conditions and warranties implied by
that legislation.
In New Zealand, this Kambrook Replacement
Warranty does not affect your mandatory statutory
rights implied under the Consumer Guarantees
Act 1993 in relation to the appliance. It applies in
addition to the conditions and guarantees implied
by that legislation.
This Kambrook Replacement Warranty is valid only
in the country of purchase, but other statutory
warranties may still apply.
This Warranty card and the purchase receipt for this
product are to be retained as proof of purchase
and must be presented if making a claim under
the Kambrook Replacement Warranty. Please note
that under any applicable statutory warranty you
are not required to produce these documents, but
may be required to provide a proof of purchase.
Kambrook warrants the purchaser against defects
in workmanship and material for a period of 12
months domestic use from the date of purchase
(or 3 months commercial use).
The Kambrook Replacement Warranty does not
apply to any defect, deterioration, loss, injury or
damage occasioned by, or as a result of, misuse
or abuse, negligent handling or if the product has
been used other than in accordance with the
instructions. The Kambrook Replacement Warranty
excludes breakables such as glass and ceramic
items, consumable items and normal wear
and tear.
This Kambrook Replacement Warranty is void if
there is evidence of the product being tampered
with by unauthorised persons.
If the product includes one or a number of
accessories only the defective accessory or
product will be replaced. Subject to your statutory
rights, in the event of Kambrook choosing
to replace the appliance, the Kambrook
Replacement Warranty will expire at the original
date, i.e. 12 months from the original date
of purchase.
In the event that you need some assistance
with your Kambrook appliance, please contact
our Customer Service Department on 1300 139
798 (Australia) or 09 271 3980 (New Zealand).
Alternatively, visit us on the website at
www.kambrook.com.au
Kambrook 12 Month Replacement Warranty
Your Purchase Record (Please Complete)
Date Of Purchase ________________________________
Attach a copy of the purchase receipt
here.
Model Number ___________________________________
Serial Number ____________________________________
Purchased From __________________________________
(Please don’t return purchase record
until you are making a claim)
Register your warranty at www.kambrook.com.au/service.asp
Kambrook - Australia
Building 2, Port Air Industrial Estate
1A Hale Street
Botany NSW 2019
Australia
Customer Service Line 1300 139 798
Customer Service Fax 1800 621 337
Due to continual improvement in design or otherwise, the product you
purchase may differ slightly from the illustration in this book. Issue 1/10
Kambrook - New Zealand
Private Bag 94411
Botany, Manukau
Auckland 2141
New Zealand
Customer Service Line/Spare Parts
0800 273 845 or 09 271 3980
Customer Service Fax 0800 288 513
 Loading...