

Page 1

Omelette Maker
GG
OO
OO
DD
NN
AA
MM
EE
GG
OO
OO
DD
VV
AA
LL
UU
EE
KOM2 Issue 2/04
Page 2

KAMBROOK SAFETY
Welcome to Kambrook and your new
Omelette Maker.At Kambrook we believe
that the safe performance of our product
is the first priority in any consumer
product so that you, our valued customer,
can confidently use and trust our
products.We ask that any electrical
appliance that you use be operated in a
sensible fashion with due care and
attention placed on the following
important operating instructions:
READ ALL INSTRUCTIONS
THOROUGHLY BEFORE
ACTIVATING THE APPLIANCE
AND RETAIN THEM FOR FUTURE
REFERENCE.
Ensure that the power source to be used
is the same as the voltage requirements of
the product.
Switch off at the power outlet and then
unplug the appliance when not in use and
before cleaning.
Never immerse the power cord, plug or
appliance in water or any other liquid.
Place the appliance on a dry, level surface.
Do not touch hot surfaces, use the handle
only.
This appliance is not intended for use by
young children or infirm persons without
supervision.
Do not let the cord hang over the edge of
a table or counter, touch hot surfaces or
become knotted.
Do not place this appliance on or near a
hot gas or electric burner, or where it
could touch a heated oven.
This appliance is suitable for domestic use
only. Do not use this appliance for
anything other than its intended use. Do
not use outdoors.
The installation of a residual current
devise (Safety switch) is recommended to
provide additional safety protection when
using electrical appliances. It is advisable
that a safety switch with a rated residual
operating current not exceeding 30mA be
installed in the electrical circuit supplying
the appliance. See your electrician for
professional advise.
Regularly inspect the supply cord,
plug and actual appliance for any
damage. If found damaged in any
way, immediately cease use of the
appliance and return the entire
appliance to the nearest authorised
Kambrook Service Centre for
examination, replacement or repair.
Please call 1800 800 634 for service
centre details.
Young children should be supervised to
ensure that they do not play with the
appliance.
Do not leave the appliance unattended
when in use.
2
Page 3
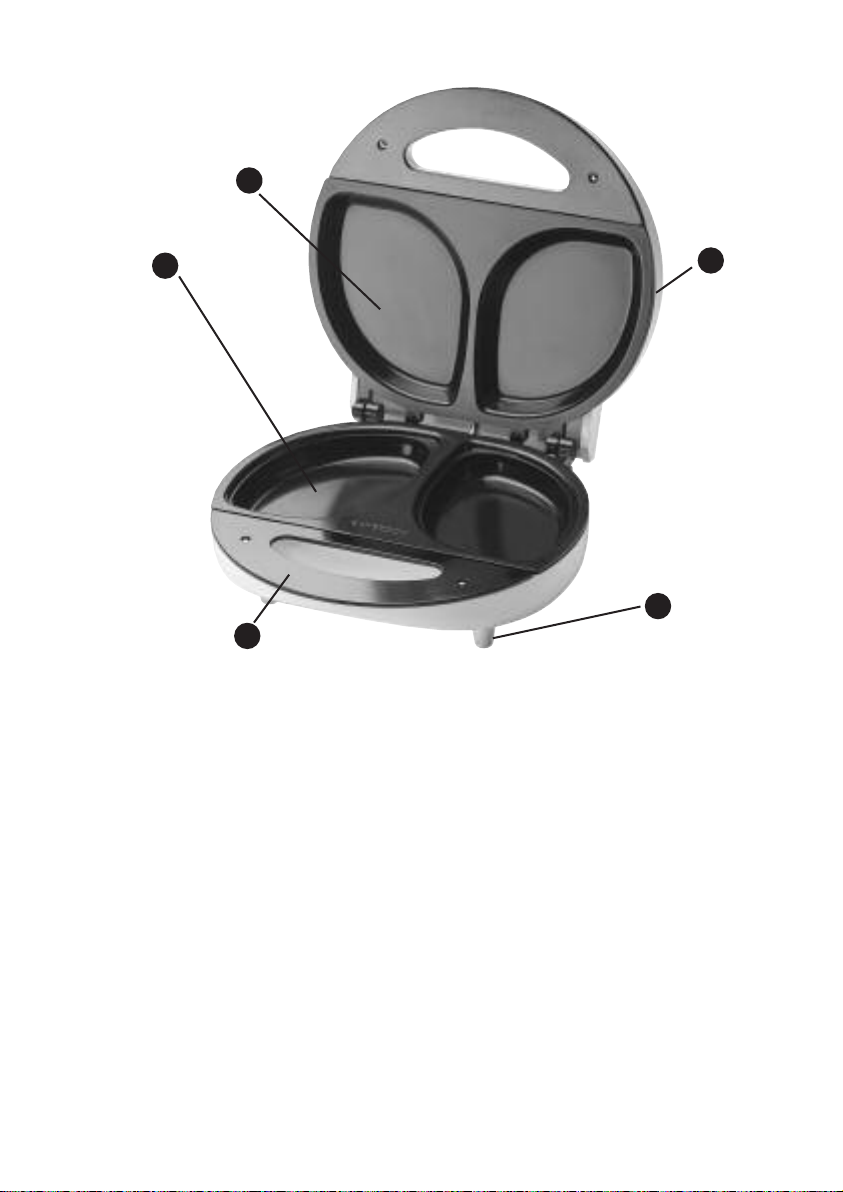
FEATURES OF YOUR KAMBROOK OMELETTE MAKER
2
1
6
1. Extra deep cooking plates – holds
up to 3 eggs in 1 omelette
2. Easy-clean non-stick coating –
for easy removal of omelettes
4
5
4. Indicator light – red light will switch
off when the Omelette Maker has
reached the correct temperature
5. Non skid feet for stability
3. Plastic Spatula ideal for serving the
omelettes and protecting the non-stick
coating. (Not pictured).
6. Large cool touch handle
3
Page 4

USING YOUR KAMBROOK
OMELETTE MAKER
Before first use remove any promotional
labels and wipe the plates down with a
damp cloth, then wipe dry.
Brush the wells in the Cooking plates
with oil.
Pour the freshly whisked egg mixture over
the filling (if applicable), into the two
cooking wells.When filling ensure the
mixture does not fill above the maximum
level as indicated in Figure 1.
Figure 1
Close the Omelette Maker. Plug the
Omelette Maker into a 230/240 volt
power outlet and switch the power on,
the Indicator light will illuminate.
Lightly whisk eggs in a large bowl with a
hand whisk, until an erated mixture is
produced. If filling is required in the
omelettes, cut the filling of your choice
into suitable sized pieces.
As the Omelette Maker pre heats, add the
filling pieces in to the wells in the cooking
plates, to cook these pieces as appropriate,
or if the ingredients do not require cooking,
mix and pour in with the egg mixture.
Stir the filling pieces with the Plastic
Spatula provided which will not scratch
the non-stick coating.
The Indicator Light will switch off when
the Omelette Maker is at the correct
temperature.
Note:The Indicator light will continue to cycle
on and off to indicate the Omelette Maker is
maintaining the correct temperature.
Note: Less eggs will be required when using filling
in an omelette.
MAX
Close the lid and allow the omelettes to
cook for eight to nine minutes.
Note: If the Omelette Maker has been
filled as indicated, the upper lid will lift
slightly, as the omelettes approach the end
of the cooking cycle.When the lid lifts
slightly, continue cooking for around 30
seconds to achieve the best results.
Open the Omelette Maker lid and remove
the omelettes with the Plastic Spatula
provided. Do not use metal utensils as
they will damage the non-stick coating.
Before Cooking
Before cooking an omelette, fried eggs or
poached eggs first brush the wells with
cooking oil.
Plug the Omelette Maker into 230/240
volt power outlet and switch the power
on, close the lid and allow the appliance
eheat and wait until the Indicator
to pr
witches off.
light s
Simple Omelette
Up to 3 eggs (60g each)
11⁄2 tablespoon milk
4
Page 5

Freshly ground black pepper
Combine the omelette ingredients and
whisk until aerated, pour into the cooking
wells, not exceeding the maximum level.
Cook for approximately 9-10 minutes or
until the omelette has risen and cooked
through, remove with a plastic spatula.
Filled Omelette
Up to 2 eggs (60g)
1 tablespoon milk
1
⁄2 cup of fillings
Freshly ground black pepper
Combine the omelette ingredients and
whisk until aerated, pour into the cooking
wells not exceeding the maximum level.
Some Filling Suggestions:
• Mushroom, chives and cottage cheese
• Smoked salmon, dill and cream cheese
• Tomato, bacon and cheddar cheese
• Sweet corn and asparagus
• Herb
• Spinach and fetta
• Mince beef and tomato sauce
• Spanish omelette (potato, onion,
capsicum and parsley)
Egg White Omelette
4 egg whites lightly whisked
1
⁄2 cup of filling (optional)
Freshly ground black pepper
Pour the whisked egg whites into the
cooking wells not exceeding the maximum
level.
Filling ingredients can be pre-cooked in
the wells of the cooking plates or added
into the omelette mixture. During
cooking the omelette maker lid may lift,
this is normal.The omelette will be
cooked after 8-9 minutes. Remove the
omelette with a plastic spatula. Do not
use metal utensils, as they will damage the
non-stick coating.
Fried Eggs
Open the Omelette Maker lid, crack one
egg in each well.
Close lid and allow the Omelette Maker
to fry eggs for 3 to 4 minutes.
Note:Times may vary depending on egg size,
quantity and hardness desired.
Open the Omelette Maker lid and remove
the fried eggs with the Plastic Spatula
provided. Do not use metal utensils, as
they may damage the non-stick coating.
Poached Eggs
First brush the wells with cooking oil and
apply 2 tablespoon (40ml) of water to
each well.
Plug the Omelette Maker into 230/240
volt power outlet and switch the power
on, close the lid and allow the appliance
to preheat and wait until the Indicator
light switches off.
After approximately 2 minutes water will
start to boil, open the lid and break one
egg into each of the wells.
Close the lid and allow the eggs to poach.
After a short time, the water will resume
boiling.Allow to boil for about 1 minute.
Open the lid, the eggs should be lightly
poached. If firmer poached eggs are
desired close the lid and again bring the
water to the boil for about 30 seconds to
a minute, always ensuring there is enough
water. Open the lid and remove the
poached eggs using the Plastic Spatula
provided.
Do not use metal utensils, as they may
damage the non-stick coating.
If subsequent poaching cycles are
required, top up cooking wells, so that
ell contains 40mls of water
each w
e steps till y
Repeat the abo
v
.
ou have
completed poaching all of your eggs.
5
Page 6

Caution: When reusing your Omelette Maker for
repeated poaching ensure you turn off the
Omelette Maker to cool slightly before adding
additional water to the hot cooking surface.
When a poaching session has been
completed, switch off from the power
outlet and then unplug the appliance,
allow water in the plates to cool before
carefully emptying by turning the
Omelette Maker on its side, over a sink.
Wipe off any excess water from the
cooking plates and lid with a damp cloth,
so that the Omelette Maker is clean and
dry for its next cooking operation.
Eggs Benedict
2 poached eggs
1 muffin toasted
50 g shaved ham
1
⁄2 cup hollandaise sauce
Hollandaise sauce
Makes 1 cup
2 egg yolks
1 tablespoon white wine vinegar
1
⁄2 cup melted butter (lukewarm)
freshly ground black pepper
Half fill a small saucepan with water and
bring it to the boil.Turn off the heat. Place
egg yolks and vinegar into a stainless
mixing bowl and place on top of the
saucepan, whisk until the mixture is thick,
slowly add the melted butter whilst
whisking.
If the sauce is too thick ad
d a
small amount of hot water to thin the
sauce.
Lightly toast the muffin, place the shaved
ham then the poached egg on the muffin.
Cover the egg with hollandaise sauce,
finish with freshly ground black pepper.
Hints:
Wipe out each well with a damp cloth
before using again.
Always pre heat Omelette Maker with
the lid closed as directed in instructions.
Eggs should be at room temperature
(not from the refrigerator) for best
results when making omelettes.
Whisk the eggs with a hand whisk in
a large bowl to achieve a well aerated
egg mixture.
Whisk the egg mixture immediately
prior to filling Omelette Maker wells,
do not allow the egg mixture to sit for
long periods as this will effect the
omelette rising.
Maintaining Your Kambrook
Omelette Maker
Switch off at the power outlet and then
unplug.Allow appliance to cool down
slightly before cleaning.The appliance is
easier to clean when slightly warm.
Always clean the omelette maker after
each use to prevent a build up of bakedon foods.
Wipe cooking plates with a damp cloth. If
cooked on food is not removed by this
method, brush with a little oil or melted
butter.Allow to stand for five minutes and
then wipe with a damp cloth.
Caution: Do not immerse the appliance, power
cord or plug in water or any other liquid.
If a lot of residue build up occurs, spray
with a little lemon juice and wipe with a
damp cloth.The acid will assist with the
emoval of residue.
r
The cooking plates ar
Note:
stick surface, do not use abrasives as this may
damage to Cooking Plates.
e coated with a non-
6
Page 7

KAMBROOK
12 MONTH
REPLACEMENT WARRANTY
KAMBROOK warrants the purchaser
against defects in workmanship and
material, for a period of 12 months from
the date of purchase (3 months
commercial use).
Guarantee and purchase receipt for this
product are to be retained as proof of
purchase and must be presented if making
a claim under the terms of the
KAMBROOK guarantee.
KAMBROOK reserves the right to
replace or repair the appliance within
the warranty period.
Warranty does not apply to any defect,
deterioration, loss or injury or damage
occasioned by, or as a result of the misuse
or abuse, negligent handling or if the product
has not been used in accordance with the
instructions.The guarantee excludes
breakages and consumable items such as
kneading blades.
This warranty is void if there is evidence
of the product being tampered with by
unauthorised persons.
If the product includes one or a number of
accessories only the defective accessory
or product will be replaced.
In the event of KAMBROOK choosing to
replace the appliance, the guarantee will
expire at the original date, ie. 12 months
from the original purchase date.
In Australia, this KAMBROOK Guarantee
is additional to the conditions and
guarantees which are mandatory as
implied by the Trade Practises Act 1974
and State Territory legislation.
For service, spare parts or product
information in Australia, please call
KAMBROOK on the customer Service
Line (free call) 1800 800 634.
For service, spare parts or product
information in New Zealand,
please call KAMBROOK New Zealand,
Greenmount, Auckland
Phone 09 271 3980 Fax 0800 288 513.
If claiming under this guarantee the product
must be returned to freight prepaid.
YOUR PURCHASE RECORD (Please complete)
DATE OF PURCHASE______________________________________________________
MODEL NUMBER ________________________________________________________
SERIAL NUMBER (If applicable) ______________________________________________
PURCHASED FROM ______________________________________________________
7
Attach purchase receipt here.
Please don’t return purchase record
unless you are making a claim
Page 8

Kambrook 4 Kingston Town Close Oakleigh,Victoria 3166, Australia
GG
OO
OO
DD
NN
AA
MM
EE
GG
OO
OO
DD
VV
AA
LL
UU
EE
Customer Service Line (free call) 1800 800 634 Customer Service Fax 1800 621 337
Kambrook New Zealand, Private Bag 94411, Greenmount, Auckland, New Zealand
Customer Service Line/Spare Parts 09 2713980 Customer Service Fax 0800 288 513
Due to continual improvement in design or otherwise
the product you purchase may differ slightly from the one illustrated in this book. Issue 2/04
,
 Loading...