

Page 1
Quatro
Multi-Function Cooker
KMC200
KMC200_IB_D11_FA.indd 1 18/08/11 3:06 PM
Instruction Booklet
Page 2

Important
Please retain your instruction
book for future use.
In the event that you need some assistance with your
Kambrook appliance, please contact our Customer Service
Department on 1300 139 798 (Australia) or 0800 273845 (New
Zealand). Alternatively, visit us on our website at
www.kambrook.com.au or www.kambrook.co.nz
KMC200_IB_D11_FA.indd 2 18/08/11 3:06 PM
Page 3

Contents
Kambrook Recommends p4
Safety First
Your Quatro Multi-Cooker p6
Using Your Quatro Multi-Cooker p7
Using the Slow Cooking Function p8
Using the Rice Cooking Function p11
Using the Sauté Function p13
Using the Steaming Function p14
Hints & Tips p16
Care, Cleaning & Storage p17
Recipes p18
KMC200_IB_D11_FA.indd 3 18/08/11 3:06 PM
Page 4

Kambrook Recommends Safety First
IMPORTANT: Please retain your
instruction book for future use.
At Kambrook, we believe that safe performance is the first priority in any
consumer product, so that you, our valued customer can confidently
use and trust our products. We ask that any electrical appliance that
you use be operated in a sensible fashion with due care and attention
placed on the following important operating instructions.
Important Safeguards For Your Kambrook
Quatro Multi-Cooker
• To eliminate a choking hazard for young
children, remove and safely discard the
protective cover that is fitted to the power
plug on the appliance.
• Carefully read all instructions before operating
the Multi-Cooker and save for future reference.
• Remove any packaging material and
promotional stickers before using the
Multi-Cooker for the first time.
• Do not place the Multi-Cooker on the edge of
a bench or table during operation. Ensure the
surface is level, clean and free of water and
other substances.
• Do not use on a sink drain board.
• Do not place the Multi-Cooker on or near a
hot gas or electric burner, or where it could
touch a heated oven.
• Position the Multi-Cooker well away from walls,
curtains and other heat or steam sensitive
materials. Minimum of 20cm distance.
• If using plastic utensils, do not leave inside the
appliance when hot or on sauté setting.
• When using the Multi-Cooker, provide adequate
space above and on all sides for air circulation.
• Always ensure the Multi-Cooker is properly
assembled before use.
• Never plug in or switch on the Multi-Cooker
without having the removable cooking bowl
placed inside the stainless steel housing.
• Use only the removable cooking bowl
supplied. Do not use any other bowl inside the
stainless steel housing.
• Do not place food or liquid directly into the
stainless steel housing. Only the removable
cooking bowl is designed to contain food
or liquid.
• Never operate the Multi-Cooker without food
and liquid in the removable cooking bowl.
• Ensure that the food or liquid to be cooked fills
half or more of the removable cooking bowl
before switching on the appliance.
• The glass lid has been specially treated to
make it stronger, more durable and safer than
ordinary glass, however it is not unbreakable. If
struck extremely hard it may break or weaken,
and could at a later time, shatter into many
small pieces without any apparent cause.
• Extreme caution must be used when the
appliance contains hot food, hot oils and liquids.
• Do not move the appliance during cooking.
• Always have the glass lid placed correctly
into position on the removable cooking bowl
throughout operation of the appliance unless
stated in the recipe to have it removed.
• Do not touch hot surfaces. Use handles to
move the Multi-Cooker and dry pot holders or
oven mitts to remove the removable cooking
bowl and lid when hot.
• Do not place the removable cooking bowl
when hot on any hot surface that may be
affected by heat.
• Avoid sudden temperature changes. Do
not place frozen or very cold foods into the
removable cooking bowl when it is hot. Do not
place removable cooking bowl when hot into
cold water.
4
KMC200_IB_D11_FA.indd 4 18/08/11 3:06 PM
Page 5

• Do not use the removable cooking bowl
in a conventional oven. Do not place the
removable cooking bowl onto a heat gas or
electric burner.
• Do not use a damaged or cracked removable
cooking bowl. Replace before using.
• Avoid scalding from escaping steam when
removing the glass lid from the removable
cooking bowl when hot by carefully lifting the
lid angled away from yourself.
• Do not allow water from the lid to drip into the
stainless steel housing, only into the removable
cooking bowl.
• Do not place anything, other than the lid, on
top of the Multi-Cooker when assembled,
when in use and when stored.
• Always switch the Multi-Cooker to the ‘Off’
position, then switch off at the power outlet,
then unplug and allow to cool, if appliance is
not in use, before cleaning, before attempting
to move the appliance, dissembling,
assembling and when storing the appliance.
• Keep the stainless steel housing, removable
cooking bowl and glass lid clean. Follow the
cleaning instructions provided in this book.
• The Multi-Cooker is not intended to be
operated by means of an external timer or
separate remote control system.
Important Safeguards For All
Electrical Appliances
• Carefully read all instructions before operating
the appliance and save for future reference.
• Remove and safely discard all packaging
material and promotional labels before using
the appliance for the first time.
• Fully unwind the power cord before use.
• Do not let the power cord hang over the edge
of a bench or table, touch hot surfaces or
become knotted.
• To protect against electric shock, do not
immerse the power cord, power plug or
appliance in water or any other liquid, unless it
is recommended in the cleaning instructions.
• The appliance is not intended for use by
persons (including children) with reduced
physical, sensory or mental capabilities, or lack
of experience and knowledge, unless they
have been given supervision or instruction
concerning use of the appliance, by a person
responsible for their safety.
• Children should be supervised to ensure that
they do not play with the appliance.
• It is recommended to inspect the appliance
regularly. Do not use the appliance if the
power supply cord, plug, connector or
appliance becomes damaged in anyway.
Return the entire appliance to the nearest
authorised Kambrook Service Centre for
examination and/or repair.
• Any maintenance other than cleaning should
be performed at an authorised Kambrook
Service Centre.
• This appliance is for household use only. Do not
use this appliance for other than its intended
use. Do not use in moving vehicles or boats.
Do not use outdoors. Misuse may cause injury.
• The installation of a residual current device
(safety switch) is recommended to provide
additional safety protection when using
electrical appliances. It is advisable that a
safety switch with a rated residual operating
current not exceeding 30mA be installed in
the electrical circuit supplying the appliance.
See your electrician for professional advice
• Always turn the appliance to the OFF
position, switch off at the power outlet
and unplug at the power outlet when the
appliance is not in use.
• Before cleaning, always turn the appliance to
the OFF position, switch off at the power outlet,
unplug at the power outlet and remove the
power cord, if detachable, from the appliance
and allow all parts to cool.
• Do not place this appliance on or near a heat
source, such as hot plate, oven or heaters.
• Position the appliance at a minimum
distance of 20cm away from walls, curtains
and other heat or steam sensitive materials
and provide adequate space above and on
all sides for air circulation.
WARNING: Do not
operate the appliance
on an inclined surface.
Do not move the
appliance while it is
switched on.
IMPORTANT: Fully unwind
the cord before use.
Ensure appliance is fully
cooled before storage.
5
KMC200_IB_D11_FA.indd 5 18/08/11 3:06 PM
Page 6
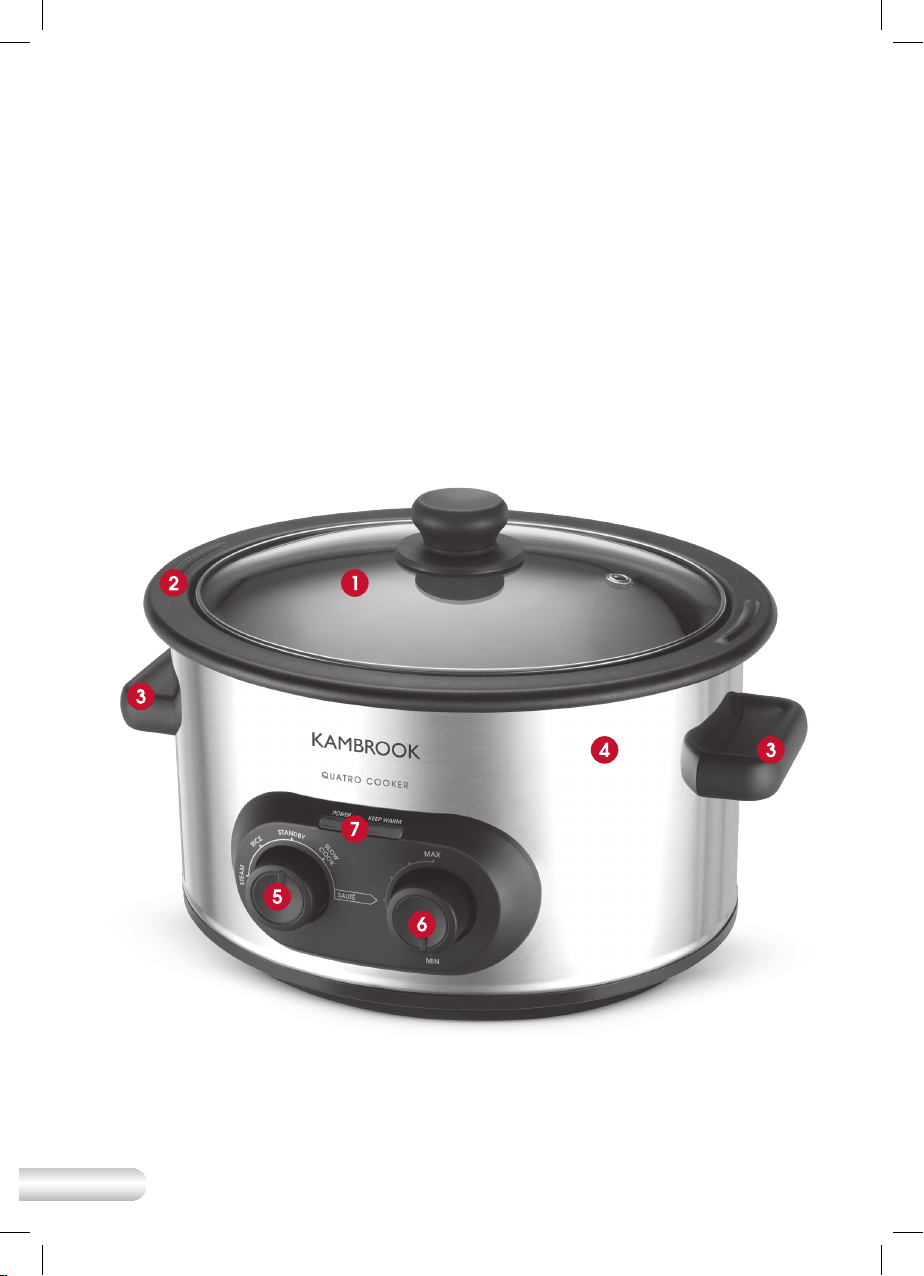
Your Quatro Multi-Cooker
1. Glass lid with steam vent,
allows you to monitor food
during cooking
2. Non-stick removable cooking
bowl with 3.5L capacity
3. Cool touch handles
4. Stainless steel housing
5. Mode selection dial for
Steam, Rice, Slow Cook and
Sauté functions
6. Sauté variable temperature dial
7. ‘POWER’ and ‘KEEP WARM’
indicator light
Not Shown
• Serving spoon and rice
measuring cup
• Steaming tray
6
KMC200_IB_D11_FA.indd 6 18/08/11 3:06 PM
Page 7

Using Your Quatro Multi-Cooker
Before First Use
Before first use remove all promotional
stickers and packaging material.
Wash the removable cooking bowl
and glass lid in hot soapy water, rinse
and dry thoroughly.
Ensure the interior of the stainless
steel housing is clean and clear of
any debris.
Operating Instructions
Before placing the removable
cooking bowl in the stainless steel
housing, ensure the exterior is clean
and dry.
This will ensure proper contact with
the inner cooking surface.
Using the Slow
Cooking Function
1. Make sure that the power outlet is
switched off and that the multicooker is unplugged from the
power outlet.
2. Place the prepared food into
the removable cooking bowl,
ensuring denser foods are spread
evenly across the bottom of the
bowl and not heaped to one side.
Ensure that the food and/or liquids
fill at least ½ of the removable
cooking bowl.
3. Ensure that the food is fully
submerged in liquid.
4. Place the glass lid into position.
5. Insert the removable cooking bowl
into the stainless steel housing.
6. Select the STANDBY mode using
the mode selection dial.
7. Plug the multi-cooker into a 230V
or 240V power outlet and switch
the power on at the power outlet.
8. Select the ‘SLOW COOKER’ mode
setting using the mode selection
dial. After a few seconds, the
POWER light will stop flashing and
remain on as the multi-cooker
heats up.
9. When cooking is complete, turn
the mode selection dial to the
STANDBY position, switch off at
the power outlet and then unplug
from the power outlet.
NOTE: The maximum time for
slow cooking is 12 hours. Make
sure that there is sufficient water
in the removable cooking bowl
to ensure the desired result.
Important
Always use the multi-cooker on a dry,
level surface.
Never operate without food and
liquid in the removable cooking bowl.
Never operate without the removable
cooking bowl positioned in the
stainless steel housing.
Always have the glass lid firmly in
position on the removable cooking
bowl throughout the operation of the
appliance unless where stated in a
recipe to have it removed.
Always use oven mitts when
removing the removable cooking
bowl when hot.
Do not place the removable cooking
bowl when hot on any surface that
may be affected by heat.
CAUTION: Always lift
and remove the glass
lid carefully and angled
away from yourself to
avoid scalding from
escaping steam.
7
KMC200_IB_D11_FA.indd 7 18/08/11 3:06 PM
Page 8
Using the Slow Cooking Function
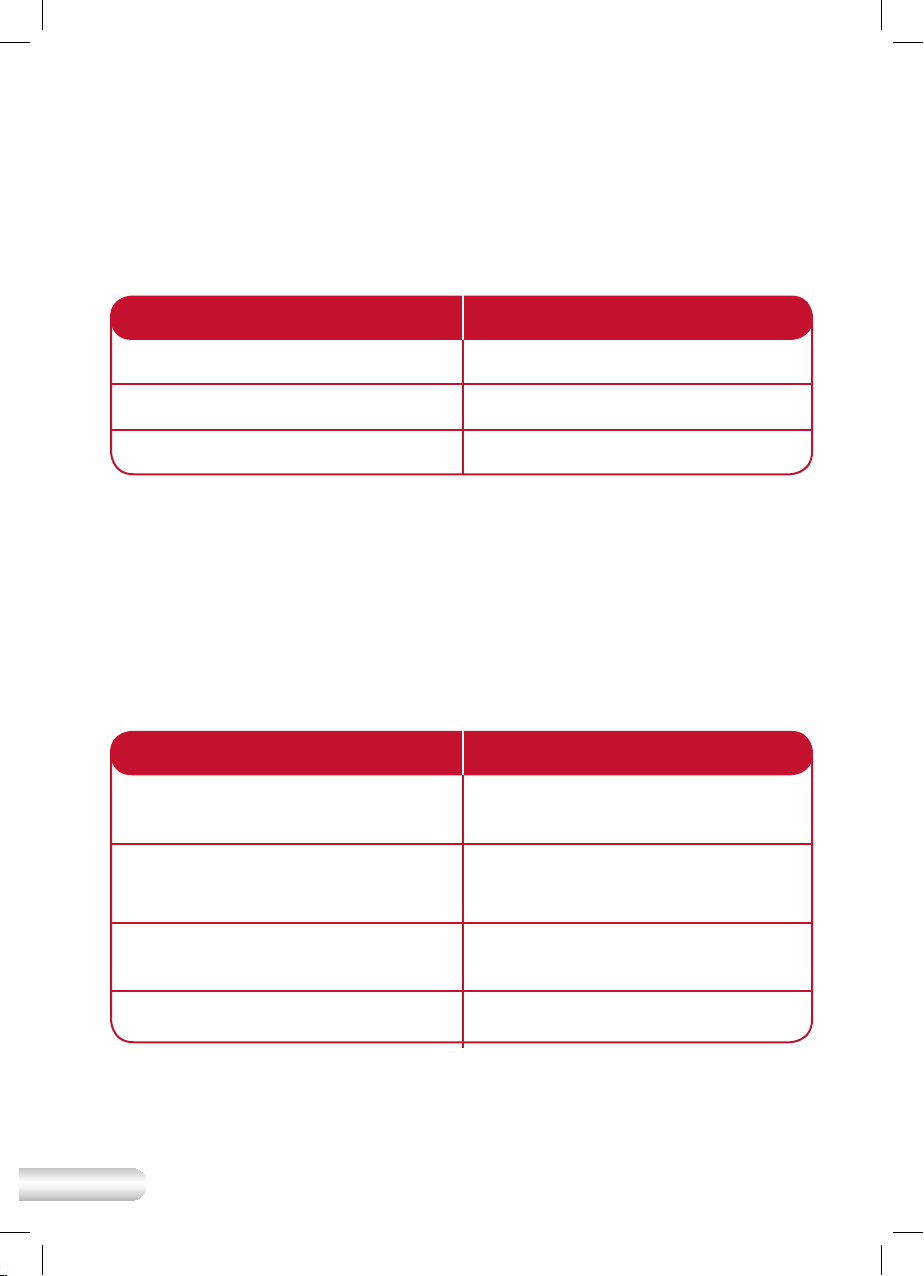
Cooking Time Guide
Use the following table for suggested cooking times and settings when
adjusting your favourite recipes. Always check that the food is thoroughly
cooked before serving.
Traditional Recipe Time Slow Cooker Recipe Time
15–30 minutes 4–6 hours
35–45 minutes 6–10 hours
50 minutes – 3 hours 8–12 hours
Preparing Meat and Poultry
Select the leanest cuts when purchasing meat. Trim the meat or poultry of any
visible fat. If possible, purchase chicken portions without the skin. Otherwise,
the slow cooking process will result in extra liquid being formed from the fat as
it melts.
For casserole-type recipes, cut the meat into cubes, approximately 2.5cm to
3cm. Slow cooking allows less tender cuts of meat to be used.
Suitable Meat Cuts for Slow Cooking
Meat Type of Cut
Beef
Lamb
Veal
Pork
8
KMC200_IB_D11_FA.indd 8 18/08/11 3:06 PM
Beef Chuck, Skirt, Round Steak,
Boneless Shin [Gravy] Beef, Bone-In
Shin [Osso Bucco].
Lamb Shanks, Drumsticks
[Frenched Shanks] Neck Chops, Best
Neck Chops, Boned Out Forequarter
or Shoulder.
Diced Leg, Shoulder/ Forequarter
Chops and Steaks, Neck Chops,
Knuckle [Osso Bucco].
Leg Steaks, Diced Belly, Diced
Shoulder, Boneless Loin Chops.
Page 9

Sauté and Browning Before Slow Cooking
Pre-browning meat and poultry prior to slow cooking, seals in the moisture,
intensifies the flavour and provides more tender results, whilst producing richer
flavours in other food, such as onions, capsicums and leeks. Pre-browning may
take a little extra time, and whilst not strictly necessary, the rewards are evident
in the end results. The meat can be sautéed in the multi-cooker or browned
in a non-stick pan to reduce the amount of oil required. Refer to page 13 for
instructions on how to use the sauté function.
Pot Roasting
The addition of liquid is required for pot roasting. Place sufficient liquid into the
removable cooking bowl to cover up to a third of the meat. Meat will not brown
during the pot roasting process. For browner results, sauté in the multi-cooker or
seal in a frypan before pot roasting.
Suitable Cuts for Pot Roasting
Meat Type of Cut
Beef
Beef Topside, Blade, Silverside Roasts,
Rolled Brisket
Lamb
Veal
Pork
Preparing Vegetables
Vegetables should be cut into
even-sized pieces to ensure more
even cooking. Frozen vegetables
must be thawed before adding to
the multi-cooker.
Preparing Dried Beans
and Pulses
If time permits, overnight soaking of
dried beans and pulses is preferable.
After soaking, drain and place in the
multi-cooker and cover with sufficient
water to reach double their volume.
Cook beans on the ‘SLOW COOK’
setting for 2–4 hours or until tender.
Pre-soaked beans and pulses will
cook a little faster.
Forequarter, Shank, Shoulder
Shoulder/Forequarter
Loin, Neck
Herbs and Spices
Leaf or whole herbs and spices are
preferred. If using ground or dried
herbs and spices, add during the last
hour of cooking.
NOTE: Always taste and season
before serving.
Milk and Cream
Milk, cream and sour cream tend
to break down during extended
cooking. When possible, add during
the last hour of cooking.
9
KMC200_IB_D11_FA.indd 9 18/08/11 3:06 PM
Page 10

Using the Slow Cooking Function continued
Hints and Tips for
Slow Cooking
Always thaw frozen meat and poultry
before cooking.
Trim all visible fat from meat or poultry.
Meat and poultry require at least 6–7
hours of cooking.
Ensure that the food or liquid to
be cooked fills half or more of the
removable cooking bowl.
10
KMC200_IB_D11_FA.indd 10 18/08/11 3:06 PM
Page 11

Using the Rice Cooking Function
1. Make sure that the power outlet is
switched off and that the multicooker is unplugged from the
power outlet.
2. Remove the removable cooking
bowl from the unit.
3. Use the measuring cup provided
to measure the required amount
of rice and place into the
cooking bowl.
4. Add the required amount of cold
tap water.
5. Place the glass lid into position
on top of the removable
cooking bowl.
6. Ensure water and rice are
combined to avoid dry patches.
7. Ensure the rice is spread evenly
across the bottom of the
removable cooking bowl and not
heaped to one side.
NOTE: If desired, prior to placing
into the removable cooking
bowl, place the rice into a
large sieve then run under cold
water to remove excess starch.
Continue this process until the
water appears clear. Drain the
rice well then place into the
removable cooking bowl.
NOTE: When measuring rice use
the measuring cup provided
and level off.
Fig. 1
1 level
measuring cup
1 level
measuring cup
170g
uncooked rice.
170ml water
NOTE: Please refer to Rice Cooking
Guide (Page 12) for quantities.
8. Ensure the exterior of the cooking
bowl is clean then place into
the stainless steel housing. This
will ensure proper contact with
the inner cooking surface of the
housing.
9. Select the ‘STANDBY’ setting using
the mode selection dial
10. Insert the power plug into a 230V
or 240V power outlet and switch
on at the power point.
11. To commence cooking, select
the ‘RICE’ setting using the mode
selection dial.
12. After a few seconds, the POWER
light will stop flashing and remain
on as the rice in the multi-cooker
starts the cooking process.
13. When the cooking is finished, the
multi-cooker will automatically
switch to the ‘KEEP WARM’ setting
and the orange ‘KEEP WARM’
indicator light will illuminate.
NOTE: Rice can be kept on the
automatic ‘KEEP WARM’ setting for
up to 5 hours. However, smaller
quantities of cooked rice may
become dry if left on the ‘KEEP
WARM’ setting for too long.
14. Carefully lift the glass lid and use
the serving spoon to lightly fluff
the rice.
15. After use, set the mode selection
dial to ‘STANDBY’.
16. Switch off at the power outlet and
remove the power plug. Use oven
mitts to remove the removable
cooking bowl to serve. Allow the
multi-cooker unit and cooking
bowl to cool before cleaning.
11
KMC200_IB_D11_FA.indd 11 18/08/11 3:06 PM
Page 12

Using the Rice Cooking Function continued
NOTE: To stop the automatic
‘KEEP WARM setting, switch
off at the power point and
then unplug.
Rice Cooking Guide
Rice quantities
The quantites and cooking times in these tables are for use only with the
supplied measure.
White Rice
Uncooked
Rice Measures
2 2 4 10-15
4 4 8 10-15
6 6 12 10-15
8 8 16 10-15
Water
Measures
Cooked Rice
Measures
Brown Rice
Uncooked
Rice Measures
2 3 5 10-15
4 6 10 10-15
6 9 15 10-15
8 12 20 10-15
Tips
Add a little extra water for fluffier rice
and a little less water for firmer rice.
Some rice varieties may require more
water for cooking, such as wild rice.
Follow the directions on the packet or
use the brown rice cooking table.
Water
Measures
Cooked Rice
Measures
Due to the additional water needed to
cook brown rice, some starchy water
bubbles may be visible during cooking.
For best results, thoroughly wash the
rice before cooking and keep warm
for 10-15 minutes after cooking to
absorb the remaining moisture.
Keep Warm
Time (mins)
Keep Warm
Time (mins)
12
KMC200_IB_D11_FA.indd 12 18/08/11 3:06 PM
Page 13

Using the Sauté Function
1. Make sure that the power outlet is
switched off and that the multicooker is unplugged from the
power outlet.
2. Set the mode selector dial
to ‘STANDBY’.
3. Place the removable cooking
bowl inside the stainless steel
housing.
4. Ensure the bowl is positioned
correctly before continuing.
5. Plug your multi-cooker into a
230V or 240V power outlet. The
‘POWER’ indicator light will flash.
6. Move the mode selector switch
dial to the ‘SAUTÉ’ position. After
a few seconds, the ‘POWER’
indicator light will stop flashing and
remain on as your multi-cooker
heats up. Use the temperature
control as required to set the
temperature for sautéing.
7. Cover the multi-cooker with
the glass lid and allow to preheat for approximately 2-3
minutes (do not preheat for
longer than 5 minutes).
8. Add oil or butter and allow to
heat/melt for approximately
1 minute.
9. If using chicken or seafood in
the recipe, sauté in small
batches, cover the multi-cooker
with the glass lid if necessary and
stir occasionally until the food
is cooked.
10. Add extra oil/butter to cooking
bowl if necessary or if recipe
states. Allow to heat for
approximately 1 minute.
11. Add ingredients such as onions,
garlic and sauté, cover with lid if
necessary and stir occasionally
for about 4 to 5 minutes or until
cooked to desired brownness.
12. When the sauté process is
complete, turn the mode selector
dial to the ‘STANDBY’ position,
switch off at the power outlet
and then unplug from the power
outlet. To use the slow cooker
function after sautéing, please
refer to page 7 for instructions.
After use
After use, set the mode selector to
‘STANDBY’ and unplug your multicooker from the supply socket.
NOTE: Your multi-cooker does
not switch off automatically.
NOTE: When cooking is
completed, switch the mode
selection dial to ‘STANDBY’. Ensure
that the power outlet is switched
off and that the multi-cooker is
unplugged from the power outlet.
13
KMC200_IB_D11_FA.indd 13 18/08/11 3:06 PM
Page 14

Using the Steaming Function
1. Make sure that the power outlet is
switched off and that the multicooker is unplugged from the
power outlet.
2. Set the mode selector dial
to ‘STANDBY’.
3. Place the removable cooking
bowl inside the stainless steel
housing.
4. Ensure the bowl is positioned
correctly before continuing.
5. Add 1 litre of cold water.
6. Plug your multi-cooker into a
230V or 240V power outlet. The
‘POWER’ indicator light will flash.
7. Set the control dial to the ‘STEAM’
position. After a few seconds, the
‘POWER’ indicator light will stop
flashing and remain on as the
multi-cooker heats up.
8. When the water has heated
sufficiently to produce steam,
add the foodstuff to the steamer
tray. Make sure that some of the
steam holes in the steamer tray
remain uncovered to allow the
steam to penetrate the foodstuff.
9. Don’t overfill the steamer tray
otherwise the vegetables may be
unevenly cooked.
10. Using oven mitts, carefully
place the steamer tray into the
removable cooking bowl.
11. Place the glass lid onto your
multi-cooker.
12. Steam the foodstuff for the
appropriate time. For cooking
times see the steam cooking
guide on page 15. If further
steaming is required ensure there
is sufficient water in the bowl.
Add more water as required
and replace the steaming tray
and glass lid. Take care when
removing the lid. Angle the lid
away from you in order to allow
the excess steam to escape.
NOTE: Always check that your
food is thoroughly cooked
before serving.
NOTE: Beware of hot steam
escaping from the vent hole in
the glass lid.
NOTE: Your multi-cooker does
not switch off automatically.
After Use
After use, set the mode selector to
‘STANDBY’ and unplug your multicooker from the supply socket.
NOTE: Unless your recipe states
otherwise, avoid removing the
lid during steaming. Removing
the lid unnecessarily will result in
a loss of steam and the cooking
time will need to be extended.
14
KMC200_IB_D11_FA.indd 14 18/08/11 3:06 PM
Page 15

Steaming Guide
Vegetable Preperation Quantity
Asparagus
Broccoli
Brussel sprouts
Cabbage
Carrots
Cauliflower
Celery
Fresh peas
Frozen peas
New potatoes
Turnips
Trim, leave as
spears
Cut into small/
medium florets
Slice in half
Large pieces
Cut into slices
Cut into florets
Sliced
Shell removed
Washed and
diced
Peel, slice into
50g pieces
250g 8
250g 8
300g
500g
250g
250g
3 medium stalks
250g
250g
500g
350g
Cooking
Time (mins)
10-12
14-16
20-22
20-22
7-9
12-14
6-8
30-35
20-25
Fish Preperation Quantity
Boneless, skinned
fillets
Prawns In shell 250g
Cut into medium
sized fillets
2 large or 4 small
Cooking
Time (mins)
20-30mins
Steam until the
flesh is opaque
and flaky all the
way through
10-12mins
Steam until they
are pink
15
KMC200_IB_D11_FA.indd 15 18/08/11 3:06 PM
Page 16

Hints & Tips
Slow Cooking
Always thaw frozen meat and poultry
before cooking.
Trim all visible fat from meat or poultry.
Meat and poultry require at least 6–7
hours of cooking.
Ensure that the food or liquid to
be cooked fills half or more of the
removable cooking bowl.
Do’s
Do ensure the removable
cooking bowl is at room temperature
when placing into the housing prior
to cooking.
Do avoid extreme temperature
changes to the removable cooking
bowl and glass lid. Handle the
removable cooking bowl and glass
lid with care.
Do use oven mitts when lifting the
removable cooking bowl containing
hot liquids.
Do place the removable cooking bowl
onto a heat proof placemat when
serving from the bowl at the table.
Never
Place water or other liquids into
the base of the housing of the
multi-cooker.
Immerse the stainless steel housing,
cord or plug of the multi-cooker
in water.
Touch hot surfaces with bare hands.
CAUTION: Ensure the
removable cooking bowl
is correctly positioned
in the stainless steel
housing before you
commence cooking.
Don’ts
Do not place removable cooking
bowl or glass lid into or under cold
water while still hot.
Do not use the removable cooking
bowl or glass lid if chipped or cracked.
Do not operate the multi-cooker
without the removable bowl
in position.
Do not place a hot removable
cooking bowl onto a wet surface.
Do not cook with frozen meats
or poultry.
16
KMC200_IB_D11_FA.indd 16 18/08/11 3:06 PM
Page 17

Care, Cleaning & Storage
Before cleaning, switch the mode
selection dial to ‘STANDBY’, ensure
that the power outlet switched off and
the power plug is unplugged from the
power outlet.
Always allow the appliance to cool
before cleaning.
To remove stubborn, cooked-on
foods in the removable cooking bowl,
soften by filling with warm, soapy
water and allow to soak for 20–30
minutes. Remove by lightly scrubbing
with a soft nylon kitchen brush.
The removable cooking bowl and
glass lid can be washed in hot,
soapy water using a mild household
detergent. Rinse and dry thoroughly.
Do not use abrasive cleaners, steel
wool, or metal scouring pads as these
can damage the surfaces.
The glass lid is dishwasher safe,
however care should be taken not to
chip or crack the glass lid.
To prevent damage to the removable
cooking bowl, do not use alkaline
detergents when cleaning, use a soft
cloth and a mild detergent.
The stainless steel housing can be
wiped over with a soft, damp cloth
and then dried thoroughly.
CAUTION: Do not
immerse the stainless
steel housing or power
cord in water or any
other liquid as this may
cause electrocution.
Store the multi-cooker upright and
ensure that nothing is placed on top
of the product as this may cause the
glass lid to break.
17
KMC200_IB_D11_FA.indd 17 18/08/11 3:06 PM
Page 18

Recipes
Red Wine, Beef, Mushroom and
Thyme Stew
Serves 8
3 tablespoons olive oil
6 large eschallots, peeled, sliced
3 cloves garlic, minced
40g butter
8 rindless bacon slices
1kg chuck steak, diced
2 teaspoons brown sugar
2 tablespoons tomato paste
400g button mushrooms, washed
350ml dry red wine
1000ml beef stock
1 sprig of thyme
1 bay leaf
1. Preheat oil on the high sauté setting
and then sauté onion and garlic until
golden brown, about 6 minutes.
2. Add the butter, bacon and beef
and cook until meat is sealed, about
8 minutes.
3. Stir through the sugar and tomato
paste and stir for 1 minute. Add the
mushrooms, wine, stock, thyme and
bay leaf, stir until combined and
place onto ‘SLOW COOK’ for 8 hours.
4. Serve over mashed potato.
Leek and Three Cheese
Potato Bake
Serves 8
1 tablespoon olive oil
40g butter
2 medium leeks, sliced thinly, washed
1500g potatoes, peeled, thinly sliced
3 sprigs lemon thyme, shredded
1 cup pure cream
½ cup milk
½ cup low fat ricotta cheese
50g packet French onion soup mix
½ cup parmesan cheese, grated
½ cup vintage cheddar cheese. Grated
1. Preheat oil and butter on the high
sauté setting and then sauté the leek
until golden brown, about 6 minutes.
Remove from the bowl.
2. Layer a
base of the multi-cooker pot and then
add
layers have formed.
3. In a 1 litre jug, whisk together the
thyme, cream, milk, ricotta and soup
mix. Pour over the potato and leek.
4. Top with parmesan and cheddar
cheeses and place onto ‘SLOW
COOK’ for 8 hours.
5. Serve over baby spinach or as an
accompaniment to another meal.
1
⁄3 of the potato slices on the
1
⁄3 of the leek, repeat until three
18
KMC200_IB_D11_FA.indd 18 18/08/11 3:06 PM
Page 19

Smoked Ham and
Split Pea Soup
Serves 8
1 tablespoon olive oil
1 large brown onion, diced
3 cloves garlic, minced
1 ham hock (800g)
500g green split peas, washed
1 bay leaf
4 sprigs thyme
2 carrots, peeled, diced
3 stalks celery, diced
2 teaspoons black peppercorns
1 cup white wine
1 litre vegetable stock
1. Preheat oil on the high sauté setting
and then sauté onion and garlic until
golden brown, about 6 minutes.
2. Add the ham hock and place the lid
on for 5 minutes.
3. Stir through the peas, herbs,
carrot, celery, wine and stock.
Stir until combined and place onto
‘SLOW COOK’ for 8 hours.
4. Remove hock and separate meat,
add meat back to soup and stir
to combine.
5. Serve with crusty Italian bread.
Dahl
Serves 8
60g butter
2 brown onions, peeled, diced
4 cloves garlic, minced
2 teaspoons ginger, minced
1 teaspoon coriander seeds
1 teaspoon cumin seeds
1 teaspoon black mustard seeds
1 teaspoon fennel seeds
1 teaspoon ground nutmeg
3 cups dried yellow lentils, washed
2 teaspoons salt
1500ml vegetable stock
300ml light coconut milk
1. Preheat oil on the high sauté setting
and then sauté onion, garlic and
ginger until golden brown, about
6 minutes.
2. Add the spices and stir for 2 minutes.
3. Stir through the lentils and stir for 1
minute. Add the stock and stir until
combined and place onto ‘SLOW
COOK’ for 6 hours.
4. Stir through the coconut milk and
serve with mango chutney, greek
yoghurt and coriander.
19
KMC200_IB_D11_FA.indd 19 18/08/11 3:06 PM
Page 20

Recipes continued
Homemade Baked Beans
60g butter
40ml olive oil
2 brown onions, peeled, diced
3 cloves garlic, minced
1 tablespoon brown sugar
1 tablespoon balsamic vinegar
4 roma tomatoes, diced
4 x 420g 4 bean mix, rinsed
1000ml tomato passata
500ml vegetable stock
1 bunch basil, washed, shredded
1 teaspoon white pepper, cracked
1. Preheat butter and oil on the high
sauté setting and then sauté onion
and garlic until golden brown, about
6 minutes.
2. Add the sugar, vinegar and tomatoes,
simmer for about 5 minutes.
3. Stir through the beans, passata, stock,
basil and pepper until combined and
place onto ‘SLOW COOK’ for 6 hours.
4. Serve with a fried egg, parmesan
cheese and crusty bread.
Vanilla Rice Pudding
1 cup medium grain white rice, washed
1250ml full cream milk
½ cup brown sugar
2 vanilla beans, split
1 tablespoon dark rum
1. Combine all ingredients in multi-
cooker bowl and place onto
‘SLOW COOK’ for 5 hours.
2. Fold through rum and serve with
stewed fruit of your choice.
20
KMC200_IB_D11_FA.indd 20 18/08/11 3:06 PM
Page 21

Notes
21
KMC200_IB_D11_FA.indd 21 18/08/11 3:06 PM
Page 22

Notes
22
KMC200_IB_D11_FA.indd 22 18/08/11 3:06 PM
Page 23

Notes
23
KMC200_IB_D11_FA.indd 23 18/08/11 3:06 PM
Page 24

Kambrook - Australia
Building 2, Port Air Industrial Estate
1A Hale Street
Botany NSW 2019
Australia
Customer Service Line 1300 139 798
Customer Service Fax 1800 621 337
www.kambrook.com.au
Kambrook - New Zealand
Private Bag 94411
Botany, Manukau
Auckland 2163
New Zealand
Customer Service Line/
Spare Parts 0800 273 845
Customer Service Fax 0800 288 513
www.kambrook.co.nz
Due to continual improvement in design or otherwise, the product you
purchase may differ slightly from the illustration in this book. Issue D11
KMC200_IB_D11_FA.indd 1 18/08/11 3:06 PM
 Loading...