

Page 1

Kambrook - Australia
Building 2, Port Air Industrial Estate
1A Hale Street
Botany NSW 2019
Australia
Customer Service Line 1300 139 798
Customer Service Fax 1800 621 337
www.kambrook.com.au
Due to continual improvement in design or otherwise, the product you
purchase may differ slightly from the illustration in this book. Issue B14
Kambrook - New Zealand
Private Bag 94411
Botany, Manukau
Auckland 2163
New Zealand
Customer Service Line/
Spare Parts 0800 273 845
Customer Service Fax 0800 288 513
www.kambrook.co.nz
Page 2

Suits all KFP800 modelsINSTRUCTION BOOKLET
Page 3

Important
Please retain your instruction
book for future use.
In the event that you need some assistance with your
Kambrook appliance, please contact our Customer Service
Department on 1300 139 798 (Australia) or 0800 273 845
(New Zealand). Alternatively, visit us on our website at
www.kambrook.com.au or www.kambrook.co.nz
Page 4

Contents
Kambrook Recommends
Safety First
Your Kambrook Power Drive Direct
Food Processor
Assembly and Operating Your
Kambrook Food Processor
Blade Operating Guide p18
Care, Cleaning and Storage p24
Recipes p26
p4
p7
p10
Page 5

Kambrook Recommends Safety First
IMPORTANT: Please retain your
instruction book for future use.
At Kambrook, we believe that safe performance is the first priority in any
consumer product, so that you, our valued customer can confidently
use and trust our products. We ask that any electrical appliance that
you use be operated in a sensible fashion with due care and attention
placed on the following important operating instructions.
Important Safeguards For Your Kambrook Power
Drive Direct Food Processor
• Carefully read all instructions before
operating the Kambrook Power Drive Direct
Food Processor for the first time and save for
future reference.
• Remove and safely discard any packaging
material and promotional labels before using
the Food Processor for the first time.
• To eliminate a choking hazard for young
children, remove and safely discard the
protective cover fitted to the power plug of
this Food Processor.
• Do not place the Food Processor near the
edge of a bench or table during operation.
Ensure the surface is level, clean and free of
water and other substances.
• Do not use the Food Processor on a sink
drain board.
• Do not place the Food Processor on or near
a hot gas or electric burner, or where it could
touch a heated oven.
• Handle the Food Processor and attachments
with care – remember the blades are razor
sharp and should be kept out of the reach of
children.
• Use the blade protector when storing the
processing blade.
• Always ensure the Food Processor is
completely assembled before operating.
• The Food Processor will not operate unless
properly assembled.
• Ensure the control dial is in the ‘OFF’ position
and the Food Processor is switched of f at
the power outlet and the power cord is
unplugged before attaching the processing
blade, disc, or lid.
• Always secure the process ing bowl onto the
motor base before attaching the processing
blade or disc.
• Ensure the Food Processor lid is securely
locked in place before operating.
• Do not remove the processing bowl from the
motor base whilst in operation.
• Do not push food into the feed chute with
your fingers or other utensils. Always use the
food pusher provided.
• Keep fingers, hands, knives and other utensils
away from moving blades.
• Do not place hands or fingers into the
proces sing bowl unless the motor, processing
blades and discs have come to a complete
stop. Ens ure the Speed Control Dial is in the
‘OFF’ position and the appliance is switched
off at the power outlet and the power cord is
unplugged before removing the lid from the
proces sing bowl.
4
Page 6

• Ensure the motor and processing blade
or disc have completely stopped before
disa ssembling. Ensure the Speed Control Dial
is in the ‘OFF’ position and the appliance
is switched of f at the power outlet and
the power cord is unplugged from the
power outlet before attempting to move
the appliance, when not in use, if left
unattended and before disassembling,
cleaning or storing.
• Do not use attachments other than those
provided with the Food Processor.
• Do not attempt to operate the Food
Processor by any method other than those
described in this booklet.
• Care should be taken when removing the
food from the processing bowl by ensuring
the motor and the processing blade or
disc have completely stopped before
disa ssembling. Ensure the Speed Control Dial
is turned to the ‘OFF’ position, the appliance
is switched of f at the power outlet and
unplugged before removing the lid from the
proces sing bowl. The processing bowl should
then be unlocked from the motor body and
the processing blade or blade holding disc
carefully removed before attempting to
remove the processed food.
• Do not operate the Food Processor
continuously for periods longer than 3
minutes on any setting or if processing a
heavy load. None of the recipes in this book
should require processing for longer than 3
minutes and none are considered a heavy
load. If the Food Proces sor is operated
continuously for too long, it should be
allowed to rest for about 30 minutes before
recommencing.
• In this unlikely event of an excessive load, do
not operate the Food Processor continuously
with excessive load for more than 1 minute.
• Some stif f mix tures, such as dough, may
cause the dough blade to rotate more slowly
than normal.
• Do not process hot or boiling liquids. Allow
liquids to cool before placing into the
proces sing bowl.
• Always switch off the Food Processor and
disconnect from the power outlet before
changing accessories or approaching parts
that move in use.
• Do not move the Food Processor whilst in
operation.
• Do not leave the Food Processor unat tended
when in use.
• Do not place any part of the Food Proces sor
in the dishwasher or microwave oven.
• Do not over-fill the processing bowl past
the ‘MA X FOOD LEVEL’ for solids. Do not
over-fill the processing bowl past the ‘MAX
LIQUID LEVEL’ for fluids. Do not process thin
liquids such as water, milk, stock, juice, etc.
in the processing bowl as this could result
in overflow. To reduce the risk of overflow,
always add drier or thicker ingredients to the
proces sing bowl prior to adding fluids.
• Do not place anything on top of the Food
Processor when the lid is on, when in use and
when stored.
• Keep the Food Processor clean. Follow the
Care, Cleaning and Storage instructions
provided in this book.
WARNING: In order to
avoid a hazard due to
inadvertent resetting
of the thermal cut-out,
this appliance must not
be supplied through
an external switching
device, such as a timer,
or connected to a circuit
that is regularly switched
on and off by the utility.
5
Page 7

Important safeguards for all electrical
appliances
• Fully unwind the power cord before use.
• Connect only to a 230V or 240V power outlet.
• Do not let the power cord hang over the
edge of a bench or table, touch hot surfaces
or become knotted.
• To protect against electric shock , do not
immerse the power cord, power plug or
appliance in water or any other liquid or
allow moisture to come in contact with
the part, unless it is recommended in the
cleaning instructions.
• The appliance is not intended for use by
persons (including children) with reduced
physical, sensory or mental capabilities,
or lack of experience a nd knowledge,
unless they have been given super vision or
instruction concerning use of the appliance
by a person responsible for their safety.
• Children s hould be supervised to ensure that
they do not play with the appliance.
• It is recommended to regularly inspect the
appliance. To avoid a hazard, do not use
the appliance if power cord, power plug or
appliance becomes damaged in any way.
Return the entire appliance to the nearest
authorized Kambrook Service Centre for
examination and/or repair.
• Any maintenance other than cleaning
should be performed at an authorised
Kambrook Service Centre.
• This appliance is for household use only.
Do not use this appliance for anything other
than its intended use. Do not use in moving
vehicles or boats. Do not use outdoors.
Misuse may cause injury.
• The installation of a res idual current device
(safety switch) is recommended to provide
additional safety protection when using
electrical appliances. It is advisable
that a safety switch with a rated res idual
operating current not exceeding 30mA be
installed in the electrical circuit supplying
the appliance. See your electrician for
professional advice.
• Always turn the appliance to the ‘OFF’
position, switch off at the power outlet
and unplug at the power outlet when the
appliance is not in u se.
• Before cleaning, always turn the appliance
to the ‘OFF’ position, switch off at the power
outlet, unplug at the power outlet and
remove the power cord, if detachable, from
the appliance and allow a ll parts to cool.
• Do not place this appliance on or near
a heat source, such as hot plate, oven or
heaters.
• Position the appliance at a minimum
distance of 20cm away from walls, curtains
and other heat or steam sensitive materials
and provide adequate space above and on
all sides for air circulation.
WARNING: The processing
blades are extremely
sharp, handle with care
at all times. Do not place
hands, knives, or other
utensils into the feed
chute. Always use the
food pusher to push the
food down the feed chute.
6
Page 8

Your Kambrook Power Drive Direct
Food Processor
1. 2 speed control dial with
‘PULSE’ function
2. Powerful 800 watt motor
3. 2L processing bowl
4. Processing bowl lid
5. Wide feed chute – fixed to the
processing lid and best for large
sized food
7
Page 9

Your Kambrook Power Drive Direct
Food Processor Continued...
6. Removable feed chute – sits
inside the wide feed chute and
best for small sized food or, when
combined with the food pusher,
acts as the food pusher for the
wide feed chute
7. Food pusher – used to push small
sized food down removable
feed chute or, when combined
with the removable feed chute,
push larger sized food down
wide feed chute
8. Storage compartment to easily
store the stainless steel blades
9. Blade holding disc storage is
located at the rear of the motor
base
10. Non-skid suction feet for
added stability
8
Page 10
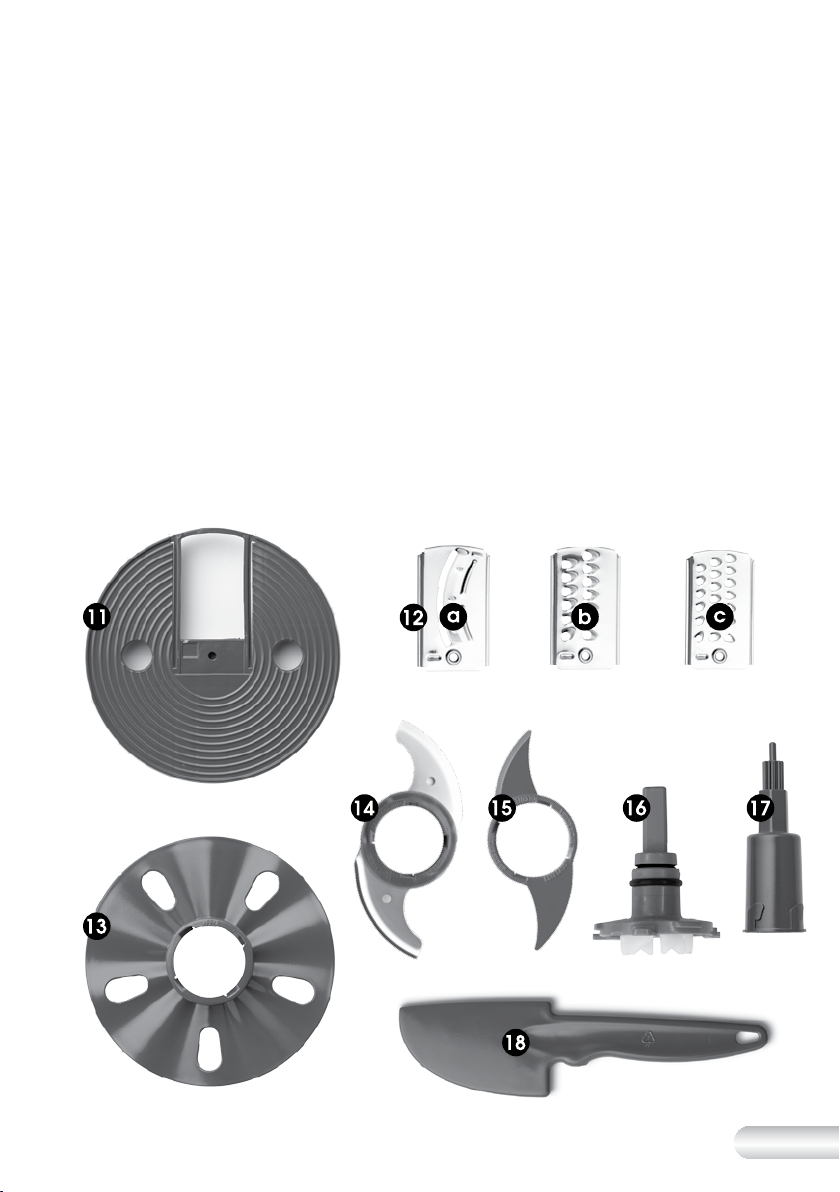
11. Blade holding disc for using the
stainless steel blades
12. Stainless steel blades including:
a) Slicing blade
b) Shredding blade
c) Grating blade
13. Whisking blade
14. Stainless steel processing blade
15. Dough blade
16. Removable Spindle 1- comes
already attached to the bottom
of the processing bowl and
connects the processing bowl to
the motor base. Spindle 1 can
be removed for cleaning.
17. Spindle 2- sits on top of Spindle
1 to be used with the blade
holding disc, stainless steel
blades, dough blade, whisking
disc and processing blade
18. Spatula
Not Shown
• Processing blade protective
cover- for storing processing
blade when blade is not in use
• Cord Storage
9
Page 11

Assembly and Operation of Your Kambrook
Food Processor
Before First Use
Before first use, remove and safely
discard any promotional labels.
Disassemble Spindle 1 from the
processing bowl by following the
steps in the ‘Disassembling the Food
Processor Bowl’ on page 17.
Wash the processing bowl, processing
bowl lid, removable feed chute, food
pusher, processing blade, stainless
steel blades, dough blade, whisk
attachment, spatula and spindles in
warm, soapy water. Dry thoroughly.
Wipe the motor base with a damp
cloth and dry thoroughly.
WARNING: All blades
are sharp and must be
handled carefully.
WARNING: Place the
motor base on a level,
flat surface.
Assembling the Food
Processor Bowl
1. Place the motor base on a flat,
dry surface such as a bench
top. Make sure the motor base
is turned off at the power outlet
and the power cord is unplugged.
2. With the lid off, place the
processing bowl upside down
on a flat, dry surface such as a
bench top.
3. Put Spindle 1 inside the hole on
the base of the processing bowl.
4. Use one hand to hold the
processing bowl handle and
with the other hand turn the
tabs on the base of Spindle 1
in a clockwise direction to ‘
symbol on Spindle 1.
5. With Spindle 1 assembled, turn the
processing bowl over and place
on the motor base. To do this,
align the handle with the ‘ALIGN’
symbol on the motor base and
turn the bowl anti-clockwise until
a “click” sound is heard and
the handle is directly above the
‘LOCK’ symbol on the motor
base. The processing bowl is now
locked securely onto the motor
base.
NOTE: The processing bowl
handle will be situated directly on
the top of the Speed Control Dial
of the motor base when correctly
locked in place.
6. Once the processing bowl
is locked onto the motor
base, place Spindle 2 into the
processing bowl so that it sits over
the top of Spindle 1 (See Fig. 1).
Fi g.1
’
10
Page 12

NOTE: Spindle 1 comes already
attached to the bottom of the
processing bowl and connects
the processing bowl to the
motor base.
With the processing bowl locked into
place and Spindle 2 in position, the
Food Processor can now be used for
various processing tasks including
using the processing blade, the
stainless steel blades, the dough
blade and whisking disc.
Assembling the Processing
Blade
Fig.2
NOTE: ALWAYS store the
processing blade with the
protective cover provided.
WARNING: All blades
are sharp and must be
handled carefully.
1. Carefully remove the protective
cover from the processing
blade. The cutting edge of the
processing blade is extremely
sharp and should only ever be
held by its central plastic part.
2. Following the graphics
indicating 'THIS SIDE UP', place
the processing blade over the
centre of Spindle 2. Ensure the
processing blade is pushed all
the way down to the base of
Spindle 2 (See Fig. 2).
Assembling the Stainless
Steel Slicing/ Shredding/
Grating Blades
1. Carefully select the desired
stainless steel blade to be used
(slicing, shredding or grating).
2. Holding the blade holding disc,
slide the selected blade (sharp
edged facing upwards) into the
blade holding disc slot. Push the
stainless steel blade into place
until the circle hole at the end of
blade is directly above the circle
hole found on the blade holding
disc (See Fig. 3).
Fig.3
11
Page 13

Assembly and Operation of Your Kambrook
Food Processor Continued...
3. Place the assembled blade
holding disc with stainless steel
blade onto Spindle 2 and push
down so that it falls fully into place
(See Fig. 4).
Fig.4
Assembling the Whisking Disc
1. Following the graphics indicating
'THIS SIDE UP', place the whisking
disc over the centre of Spindle 2.
Ensure the whisking disc is pushed
all the way down to the base of
Spindle 2 (See Fig. 6).
Assembling the Dough Blade
1. Following the graphics indicating
'THIS SIDE UP', place the dough
blade over the centre of Spindle
2. Ensure the dough blade is
pushed all the way down to the
base of Spindle 2 (See Fig. 5).
Fig.5
Fig.6
NOTE: The processing blade,
dough blade, whisking disc
and stainless steel blades can
not be used at the same time.
Assembling the Food
Processor Lid
Once the processing bowl is secure
on the motor base and the chosen
accessory is assembled, it is time to
place the lid on the processing bowl.
1. Place the lid on the processing
bowl, ensuring the ‘ALIGN’ symbol
on the processing bowl is aligned
with the lid handle (See Fig. 7).
Turn the lid handle anti-clockwise
so that the lid handle is directly
above the processing bowl
handle (See Fig. 8).
12
Page 14

ALIGN
Fig.7
LOCKED
Fig.8
2. Align the tab on the removable
feed chute with the groove on
the processing bowl handle.
Push the removable feed chute
down the groove so that it sits
inside the feed chute on the
processing bowl lid (See Fig. 9).
The removable feed chute
is now assembled to the
processing bowl lid.
3. Put the food pusher inside the
removable feed chute.
NOTE: The Food Processor
will not operate unless the
removable feed chute,
processing bowl and lid are
correctly positioned and
locked in place.
Using the Food Processor
with the Processing
Blade/ Dough Blade
or Whisking Disc
1. Ensure the Speed Control Dial is in
the ‘OFF’ position.
2. Insert the power plug into a 230V
or 240V power outlet. Switch the
power on at the power outlet.
3. Place the processing blade,
dough blade or whisking disc into
the processing bowl as previously
directed on pages 11 and 12.
4. Place the ingredients to be
processed into the processing
bowl.
5. Align and lock the lid securely into
place.
6. Attach the removable feed chute
inside the processing bowl lid.
Fig.9
NOTE: When not using the feed
chute to process, ensure that
the food pusher is inside the
feed chute to avoid splashing.
13
Page 15

Assembly and Operation of Your Kambrook
Food Processor Continued...
7. Turn the Speed Control Dial to the
‘LOW’ speed setting to begin the
processing task and then if the
recipe requires increase to the
‘HIGH’ speed.
NOTE: For short bursts of power,
turn the Speed Control Dial to
the ‘PULSE’ speed setting.
NOTE: Ingredients can be also
added through the feed chute
using the food pusher while
processing.
NOTE: If the ingredients stick
to the sides of the processing
bowl during processing, turn
the Speed Control Dial to the
‘OFF’ position, switch off at the
power outlet, ensure the blade
has fully stopped rotating
before removing the lid and
then push the food back onto
the blades using the spatula to
scrape down the sides of the
bowl. Replace the lid, turn the
power on at the power outlet
and recommence processing.
8. When processing is complete,
turn the Speed Control Dial to the
‘OFF’ position, switch off at the
power outlet and unplug from the
power outlet. Wait until the blades
have fully stopped rotating before
removing the lid.
9. Take out Spindle 2 along with the
processing blade/ dough blade/
whisking disc from the bowl.
10. Remove foodstuffs from the
processing bowl using the spatula
provided. Unlock the bowl
from the motor base to remove
foodstuffs if required.
11. Clean the processing bowl,
lid, removable feed chute,
processing blade/ dough
blade/ whisking disc, food
pusher and spatula as per the
Care, Cleaning and Storage
instructions on page 24.
NOTE: Do not over-fill the
processing bowl past the
‘MAX FOOD LEVEL’ for solids.
Do not over-fill the processing
bowl past the ‘MAX LIQUID
LEVEL’ for fluids. Do not process
thin liquids such as water,
milk, stock, juice etc. in the
processing bowl as this could
result in overflow. To reduce
the risk of overflow, always add
drier or thicker ingredients to
the processing bowl prior to
adding fluids.
14
Page 16

Using the Food Processor
with the Slicing/ Shredding/
Grating Blades
1. Ensure the Speed Control Dial is in
the ‘OFF’ position.
2. Insert the power plug into a 230V
or 240V power outlet. Switch the
power on at the power outlet.
3. With the chosen stainless steel
blade secure in the blade holding
disc, place the blade holding disc
into the processing bowl.
4. Align and lock the lid securely
into place.
5. Attach the removable feed chute
inside the processing bowl lid.
6. Turn the Speed Control Dial to the
‘LOW’ speed setting to begin the
processing task and then if the
recipe requires increase to the
‘HIGH’ speed.
7. Ensure that the ingredients to be
sliced/shredded/grated are of
suitable size to be fed through the
feed chute using the food pusher.
8. For processing large food, use
the wide feed chute on the
processing bowl lid (See Fig. 10).
NOTE: Do not put large food more
than 2/3 of the feed chute height
down the processing bowl lid.
9. When processing is complete,
turn the Speed Control Dial to the
‘OFF’ position, switch off at the
power outlet and unplug from the
outlet. Wait until the disc has fully
stopped rotating before removing
the lid.
10. Insert fingers in the two holes on
the assembled blade holding
disc and lift it up from Spindle 2 to
remove (See Fig. 11).
Fi g .11
11. Blades are sharp! Carefully
remove the stainless steel blade
by pushing the blade out from the
blade holding disc (See Fig. 12).
Fi g.10
Fi g.12
15
Page 17

Assembly and Operation of Your Kambrook
Food Processor Continued...
12. Remove the foodstuffs from the
processing bowl using the spatula
provided. Unlock the bowl
from the motor base to remove
foodstuffs if required.
13. Clean the processing bowl,
lid, removable feed chute,
stainless steel blades, food pusher
and spatula as per the Care,
Cleaning and Storage instructions
on page 24.
NOTE: If the ingredients stick
to the sides of the processing
bowl during processing, turn
the Speed Control Dial to the
‘OFF’ position, switch off at the
power outlet, ensure the blade
has fully stopped rotating
before removing the lid and
then push the food back onto
the blades using the spatula to
scrape down the sides of the
bowl. Replace the lid, turn the
power on at the power outlet
and recommence processing.
Disassembling the Food
Processor Lid
1. Remove food pusher from inside
the removable feed chute.
2. Pull the removable feed chute
out of the lid so that is disengages
from the groove on the lid handle.
The removable feed chute is now
ready for cleaning.
3. With one hand holding the
processing bowl handle and the
other on the lid handle, turn the
lid handle clockwise (See Fig.
13). Pull the lid away from the
processing bowl to remove.
Fi g.13
NOTE: The Power Drive Direct
Food Processor is designed so
that the motor will not operate
without the processing bowl
and lid correctly locked into
position. In the event that the
appliance starts without the lid
correctly locked into position,
immediately disconnect at the
power outlet and return to your
local Kambrook Service Centre
for examination.
16
Page 18

Disassembling the Food
Processor Bowl
1. Remove Spindle 2 from inside the
processing bowl.
2. With one hand on the motor
base and the other holding the
processing bowl handle, turn the
processing bowl handle clockwise
(See Fig. 14). Pull the processing
bowl away from the motor base
to remove.
ALIGN LOCKED
Fi g.14
3. Spindle 1 can be removed from
the processing bowl. To do this,
place the processing bowl upside
down on a flat, dry surface such
as a bench top.
4. Use one hand to hold the
processing bowl handle and
the other hand to turn the tabs
on the base of Spindle 1 in an
anti-clockwise direction to ‘
on Spindle 1.
5. Once loose, lift up Spindle 1 from
the bottom of the processing
bowl to remove.
’
Overload Protection System
The motor is protected from burning
out by a manual reset cut-out switch.
If the Food Processor is overloaded or
operated continuously for too long,
the motor may overheat and stop.
To operate the Food Processor again,
switch off, unplug and allow to cool
for approximately 30 minutes.
Once the motor has fully cooled, it is
ready for use again.
If overheating is caused by the
processing bowl being overloaded,
remove some of the food and process
in smaller batches.
To avoid overheating, do not operate
the Food Processor continuously
with an excessive load for more than
1 minute.
Some stiff mixtures, such as dough,
may cause the dough blade to rotate
more slowly than normal.
17
Page 19

Blade Operating Guide
The Stainless Steel
Processing Blade
NOTE: The cutting edge of this
blade is extremely sharp, it
should only ever be held by the
plastic part.
ALWAYS store the blade with the
protective cover provided.
Ingredients Procedure
Onions,
Vegetables,
Fruits and
Cooked Meats
Raw Meats
(boneless)
Herbs Make sure the herbs are as dry as possible. Place in the
Breadcrumbs or
Biscuit
Nuts (shells
removed)
Hard Boiled Eggs Remove the shell and halve the eggs before placing in the
Cut ingredients into approximately 2.5cm cubes. Place in
processing bowl, up to 750g at a time. Process, using the
‘LOW’ or ‘PULSE’ speed settings until all the ingredients
are chopped as desired. Remove lid and scrape the sides
down with the spatula between pulses to ensure more
even chopping.
Trim the meat, fat and gristle, remove any bones. Cut into
2.5cm cubes. Process up to 750g at a time using the ‘LOW’
speed setting, scraping down the sides of the bowl, until
the meat is coarse or fine as desired.
processing bowl and use the ‘LOW’ speed setting, until
finely chopped. Scrape down the sides of the bowl at least
once during processing. Up to 4 cups of firmly packed
herbs can be processed at a time.
Quarter the slices of bread and break up the biscuits. Place
into the processing bowl, using the ‘LOW’ speed setting.
Processing up to ½ loaves of bread, crusts removed at any
one time. Use stale bread for dry breadcrumbs.
Place up to 2 cups of nuts in the processing bowl at
one time and process using the ‘HIGH’ or ‘PULSE’ speed
settings. If chopped too finely the nuts will become oily and
eventually form into butter. Processing smaller quantities at
one time will ensure even chopping.
processing bowl. Process using the ‘PULSE’ speed setting.
18
Page 20

NOTE: When mixing liquids
using the processing blade, do
not fill above the ‘MAX LIQUID
LEVEL’ on the processing bowl.
The Dough Blade
Ingredients Procedure
Packet Cakes Place all the ingredients in the processing bowl. Process
Batter, Pikelets,
Crepes and
Pancakes
Short Crust Pastry
and Scones
Biscuits and
Champagne
Pastry
Yeast Dough Add ingredients in the order listed in the recipe. Add liquids
for 5 seconds using ‘HIGH’ speed, remove lid and scrape
down the sides of the bowl. Process for another 5-10
seconds.
Place all ingredients in the processing bowl and process on
‘LOW’ or ‘HIGH’ speed until combined, scrape sides of the
bowl down during processing. Do not fill above the ‘MAX
LIQUID LEVEL’.
Place flour and butter in the processing bowl and process
using ‘LOW’ speed until the butter is rubbed in. With the
motor running, pour the liquid down the feed chute
and process until mixture forms a ball, approximately 30
seconds. Do not mix more than 2 cups of flour at a time.
Place butter, sugar and egg yolks in the processing bowl
and process on ‘LOW’ or ‘HIGH’ speed until just combined.
Remove lid, add the flour and mix until just combined using
the ‘PULSE’ speed setting. Do not mix more than 2 cups of
flour at a time.
through the feed chute with the motor running.
19
Page 21

Blade Operating Guide Continued...
The Whisking Disc
Ingredients Procedure
Cream Pour the cream into the processing bowl and process using
Eggs Place the eggs into the processing bowl and process using
NOTE: Do not process thin
liquids such as water, milk,
stock, juice, etc. in the
processing bowl with the
whisking disc as this could
result in overflow. To reduce
the risk of overflow, only use
the whisking disc for whipping
thicker ingredients such as
cream and eggs.
the ‘LOW’ speed setting, until soft peaks form.
the ‘LOW’ speed setting until the desired consistency is
reached.
The Stainless Steel
Slicing Blade
The slicing blade processes cooked
meats and vegetables into thin pieces
with a large surface area.
Although firm pressure on the food
pusher is recommended for some
foods, do not press hard as the blade
may jam.
ALWAYS use the food pusher when
using the slicing blade.
20
Page 22

Ingredients Procedure
Onions Peel the onions and halve if too large to fit into the feed
chute. Place the onions in the feed chute, sharp edge
down. Process, exerting firm pressure on the food pusher.
Carrots, Zucchini,
Eggplant,
Cucumbers
Prepare the foods in the usual way. For rings arrange foods
vertically in the feed chute, cutting them so they are even
in height. For slices arrange foods horizontally in the feed
chute. Process by exerting firm pressure on the food pusher.
Capsicums Remove the core and seeds. Halve the capsicums if
necessary and arrange them vertically in the feed chute.
Process using firm pressure on the food pusher.
Mushrooms Wipe any dirt from the mushrooms and pack into the feed
chute on their sides. Process using firm pressure on the feed
pusher.
Apples and
Peaches
Peel if desired, remove the core/stone and quarter the fruit.
Lie the quarters on their sides in the feed chute and process
using firm pressure on the food pusher.
Cheese
(cheddar, crumble
feta, mozzarella,
gouda)
Cut the cheese into pieces large enough to just fit in the
feed chute. Process using light pressure on the food pusher
to prevent cheese crumbling.
Cabbage Cut cabbage into wedges to fit inside the feed chute and
process using firm pressure on the food pusher.
Lettuce Separate the leaves of the lettuce and wash and dry. Roll
the leaves firmly and pack into the feed chute. Process
using firm pressure on the food pusher.
Cooked Meats,
Cabanossi and
Salami
Place meat vertically into the feed chute. Process using
firm pressure on the food pusher. For more even slicing
remove sausage skins first.
Potatoes Peel the potatoes and cut into pieces if necessary to fit the
feed chute. Process using firm pressure on the food pusher.
21
Page 23

Blade Operating Guide Continued...
The Stainless Steel
Shredding Blade
Although firm pressure on the food
pusher is recommended for some
foods, do not press hard as the blade
may jam.
ALWAYS use the food pusher when
using the shredding blade.
Ingredients Procedure
Potatoes and Root
Vegetables
Carrots, Zucchini,
Cucumber, Onions
Cheese (Cheddar,
crumble Fetta,
Mozzarella,
Gouda)
Chocolate Break chocolate into pieces to fit in the feed chute and
Pack into the feed chute and process using firm pressure.
Peel and cut into pieces if necessary to fit in the feed
chute.
Prepare the vegetables and pack into the feed chute.
Packing vertically will give shorter shreds than packing
horizontally. Process using firm pressure on the food
pusher.
Cut the cheese to fit in the feed chute snugly. Process
using light pressure on the food pusher to prevent the
cheese crumbling.
process using firm pressure on the food pusher.
22
Page 24

The Stainless Steel
Grating Blade
Although firm pressure on the food
pusher is recommended for some
foods, do not press hard as the blade
may jam.
ALWAYS use the food pusher when
using the grating blade.
Ingredients Procedure
Potatoes and
Root Vegetables
Carrots, Zucchini,
Cucumber,
Onions
Parmesan
Cheese
Chocolate Break chocolate into pieces to fit in the feed chute and
Pack into the feed chute and process using firm pressure.
Peel and cut into pieces if necessary to fit in the feed
chute.
Prepare the vegetables and pack into the feed chute.
Packing vertically will give shorter shreds than packing
horizontally. Process using firm pressure on the food pusher.
Cut the cheese to fit in the feed chute snugly. Process using
light pressure on the food pusher to prevent the cheese
crumbling.
process using firm pressure on the food pusher.
23
Page 25

Care, Cleaning and Storage
• Before disassembling any parts
or storing, always switch the Food
Processor off at the power outlet
and then remove the power plug
from the outlet.
• Wash the processing bowl, lid,
removable feed chute, spindles,
stainless steel blades, dough blade,
whisking disc, processing blade,
food pusher and spatula in warm
soapy water after each use. Rinse
thoroughly and dry.
• Never use any abrasive cleaners.
• Do not place any parts in the
dishwasher.
• Do not allow the processing blade
and the stainless steel blades to
soak in water for an extended
period of time as this may damage
the metal finish.
• The processing blade and stainless
steel blades are extremely sharp!
Use caution when handling and
storing these parts. Always store
the processing blade with the
protective cover provided.
• The cutting edges of the
processing blade are extremely
sharp; it should only be held by its
central plastic part. Wash in warm
soapy water and carefully dry.
• Wipe the motor housing with
a soft, damp cloth (do not use
abrasive agents or cloths which
can damage the surface). Dry and
polish with a soft, lint-free cloth.
• DO NOT immerse the motor base,
power plug or cord in water or any
other liquid.
To Store:
• Store the stainless steel blades in
the storage compartment located
on the side of the motor base
(See Fig. 15).
Fi g.15
•Insert Spindle 2 onto Spindle
1 inside the processing bowl.
Place the whisking disc, dough
blade, the processing blade with
the protective cover and then
the blade holding disc on top
of Spindle 2. Attach the lid to
the processing bowl. Insert the
removable feed chute inside the
lid. Put the food pusher inside the
removable feed chute.
24
Page 26

• The blade holding disc can also be
stored on the rear side of the motor
base. Insert the tab found behind
the blade holding disc inside the
hole on the rear side of the motor
base. Push the blade holding
disc down (See Fig. 16). The blade
holding disc is now securely locked
onto the motor base.
Fi g.16
• Store the spatula separately.
NOTE: Do not put any parts
of the Food Processor in the
dishwasher.
•Remove the power cord from
under the tabs of the cord channel
found on the bottom side of the
motor base (See Fig. 17).
Fig.17
•Push the power cord into the cord
storage until the cord is inside the
motor base, except for the plug
(See Fig. 18).
Fi g.18
25
Page 27

Recipes
Basil and Cashew Dip
Makes 1 cup
1 cup basil leaves
½ cup olive oil
½ cup cashew nuts
2 tsp rock salt
1 tbsp lemon juice
2 cloves garlic, peeled
¼ cup parmesan cheese, grated
Biscuits, vegetable batons, bread to serve
1. Using the processing blade, place the
basil, olive oil, nuts, salt, lemon juice,
garlic and parmesan cheese into the
processing bowl, lock the lid in place
and hold the ‘PULSE’ speed setting
for 3 second increments at one time
for approximately 30 seconds or until
desired consistency is reached.
2. Process on ‘LOW’ speed setting for
15 seconds and ser ve with biscuits,
vegetable batons or bread.
Olive Tapenade
Makes 1 cup
1 cup Kalamata olives, pitted
2 tbsp olive oil
2 cloves garlic
1 tsp rock salt
1 tbsp lemon juice
1 tbsp basil leaves
Bread to serve
1. Using the processing blade, place
the olives, olive oil, garlic, salt, lemon
juice and basil into the processing
bowl, lock the lid into place and
hold the ‘PULSE’ speed setting for 3
second increments at one time for
approximately 30 seconds or until
desired consistency is reached.
2. Process on ‘LOW’ speed setting for
15 seconds and ser ve with serve with
crusty bread.
26
Page 28

Sausage Rolls
Makes 4 serves
500g sausage mince
1 small onion, roughly chopped
2 cloves garlic
2 slices of bread, ripped
1 tbsp tomato paste
1 tbsp Worcestershire sauce
59g free-range egg
¼ tsp dried mixed herbs
3 sheets puff pastry
1 tbsp milk
1 tbsp sesame seeds
1. Preheat a fan forced oven to 180°C
and line 2 baking trays with canola oil
spray and baking paper.
2. Using the processing blade, place the
mince, onion, garlic, bread, tomato
paste, sauce, egg and dried herbs
into the processing bowl, lock the lid
into place, hold the ‘PULSE’ speed
setting for 3 second increments at one
time for approximately 30 seconds or
until desired consistency is reached.
3. Slice the puff pastry sheets in half and
place a thick line of mince mixture
onto each piece, lengthways. Fold
pastry over and seal by gently pushing
the pastry together where it overlaps.
4. With a pastry brush, brush the tops
with milk and top with seasame seeds.
5. Place into the oven for 25 minutes or
until golden brown.
Cheese and Bacon BBQ rolls
Makes 6 Serves
375ml warm water
60ml olive oil
1 tsp sugar
1 tsp salt
600g bread flour
2 tsp yeast
3 tbsp barbecue sauce
1 cup bacon, diced
1 cup tasty cheese, grated
1. Using the dough blade, place the
water, olive oil, sugar, salt, flour and
yeast into processing bowl, lock the lid
into place, select ‘LOW’ speed setting
and process for 1 minute. Shape into a
ball and place in a large clean glass
bowl.
2. Brush with a little water and cover with
a damp tea towel. Place in a warm,
draught-free place to prove for 1½
hours or until doubled in size.
3. Preheat a fan forced oven to 180°C
and place dough ball back into the
processing bowl, lock the lid into
place, select the ‘LOW’ speed setting
and knead for a further minute.
4. Roll dough ball out onto a floured
surface and cut into 6 balls. Place the
6 dough balls onto a baking tray lined
with baking paper. Top each evenly
with barbecue sauce, bacon and
cheese. Place into the oven and cook
for 20 minutes.
27
Page 29

Leek and Three Cheese
Potato Bake
Makes 8-10 serves
2 medium leeks, sliced thinly, washed
1500g potatoes, peeled, thinly sliced
1 tbsp olive oil
40g butter
3 sprigs lemon thyme, shredded
1 cup pure cream
½ cup milk
½ cup low fat ricotta cheese
50g packet French onion soup mix
½ cup parmesan cheese, grated
½ cup vintage cheddar cheese, grated
1. Preheat a fan forced oven to 180°C
and set aside a 3 litre oven safe
crockery dish.
2. Using the slicing blade on the food
processor, lock the lid into place,
select ‘LOW’ speed setting and place
the leeks down the feed chute until
the whole leek has been thinly sliced,
wash thoroughly.
3. Using the slicing blade on the food
processor again, lock the lid into
place, select ‘LOW’ speed setting and
place the potatoes down the feed
chute until all potatoes have been
thinly sliced.
4. Using a fry pan, over a medium heat,
heat the oil and butter and then sauté
the leek until golden brown, about 6
minutes.
5. Layer the potato slices on the base
of a crockery dish and then add a
of the leek, repeat until three layers
have formed.
6. In a litre jug, whisk together the thyme,
cream, milk, ricotta and soup mix.
Pour over the potato and leek.
7. Top with parmesan and cheddar
cheese and bake for 45 minutes.
1
⁄3
Bolognaise Pies
Makes 12 serves
2 tbsp olive oil
1 brown onion, halved
1 cloves garlic, minced
400g lean beef mince
1 carrot, peeled
300ml tomato passata
½ tsp dried oregano
3 sheets frozen puff pastry, thawed
Canola oil spray
2 tbsp parmesan cheese, grated
1. Preheat a fan forced oven to 180°C.
Line 12 hole muffin tin with canola oil
spr ay.
2. Using the slicing blade on the food
processor, lock the lid into place,
select ‘LOW’ speed setting and push
the onions down the feed chute, with
the pusher until all onions have been
thinly sliced.
3. Using a fry pan, heat the oil over a
medium heat and sauté the onions
and garlic until golden brown. Add
the mince and cook until browned.
Separate using a wooden spoon.
4. Using the grating blade on the food
processor, lock the lid into place,
select ‘LOW’ speed setting and push
the carrot down the feed chute, with
the food pusher until all carrots have
been grated.
5. Fold the carrot, passata and oregano
through the meat mixture and simmer
for 15 minutes.
6. Cut the pastry sheets into 4 squares
and gently push each one into
each muffin well. Fill with a heaped
tablespoon of bolognaise mixture and
pull all of the edges of the puff pastry
in to form a sealed pie.
7. Place into the oven for 30 minutes
and allow to cook. Top with grated
parmesan cheese.
28
Page 30

Apple Coleslaw
Makes 6 serves
500g red apples, cored, peeled, halved
400g white cabbage
½ medium red onion, peeled
4 sticks celery, washed
¼ cup Greek yoghurt
2 tsp lemon juice
1 tsp paprika
1. Using the grating blade on the food
processor, lock the lid into place,
select ‘LOW’ speed setting and push
the apples down the feed chute, with
the food pusher until all apples have
been thinly sliced.
2. Using the slicing blade on the food
processor, lock the lid into place,
select ‘LOW’ speed setting and push
the cabbage, onion and celery down
the feed chute, with the food pusher
until all have been thinly sliced.
3. In a bowl, combine the yoghurt,
lemon and paprika and toss through
the coleslaw.
Carrot Cupcakes
Makes 18 serves
300g carrots, peeled
1 cup self-raising flour
½ cup plain flour
1 tsp baking soda
1 tsp ground cinnamon
1 tsp ground nutmeg
½ cup brown sugar
¾ cup vegetable oil
½ cup golden syrup
3 x 59g free range eggs, lightly whisked
1 tsp vanilla bean paste
200g cream cheese, cubed and softened
2 cups pure icing sugar
2 tbsp Manuka honey
2 tsp boiling water
1. Preheat a fan forced oven to 160°C.
Line 3 x 6 hole cupcake tins with patty
pans.
2. Using the grating blade on the food
processor, lock the lid into place,
select ‘LOW’ speed setting and push
the carrots down the feed chute, with
the food pusher until all carrots have
been grated.
3. In a bowl, place the carrots, flours,
baking soda, cinnamon, nutmeg,
brown sugar, vegetable oil, golden
syrup, eggs and vanilla and stir until
combined.
4. Distribute into patty pans and bake for
16 minutes or until a skewer is inserted
and comes out clean. Allow to cool.
5. To make the icing, combine the
cream cheese, icing sugar, honey and
boiling water using an electric mixer,
until light and fluffy, approximately 3
minutes.
6. Pour into a piping bag with a tip
of your choice. Pipe in a circular
motion and refrigerate if not eating
immediately.
29
Page 31

Cheese Cake
Makes 22cm cake
100g butter, melted
250g plain sweet biscuits
300ml pure cream
½ cup caster sugar
2 x 59g free range eggs
2 x 250g cream cheese, softened
1 tbsp lemon juice
1. Preheat a fan forced oven to 160°C
and line an 18cm spring form cake
tin with canola oil spray and baking
pa per.
2. Using the processing blade on the
food processor, lock the lid into
place and process the butter and
biscuits until they form a smooth and
consistent grind. Push the mixture into
the base and around the edges of the
cake tin and press firmly to secure.
3. Using the processing blade on the
food processor, lock the lid into place
and process the cream, sugar, eggs
and ½ the cream cheese until it forms
a smooth paste.
4. Add the remaining cream cheese and
lemon juice and blend until it forms a
creamy and lump free mixture.
5. Pour into the biscuit base and place
into the oven for 60 minutes. Turn off
the oven and rest the door open
slightly using a wooden spoon. Allow
to cool completely in the oven and
then transfer to the fridge for 24 hours
to set.
Parmesan and Parsley
Chicken Schnitzels
Makes 4 serves
60g parmesan cheese
2 slices bread
1 tbsp parsley leaves
400g (2) chicken breast, halved
lengthways
59g free range egg, lightly whisked
1 tsp chilled water
½ cup vegetable oil
4 serves mashed potatoes, to serve
1. Using the processing blade, lock
the lid into place, and place the
parmesan, bread and parsley into
the processing bowl and process for 1
minute on ‘LOW’ speed setting.
2. Using two bowls separate the egg
and water into one bowl and the
breadcrumbs into the second one.
3. Dip each chicken fillet into the egg
and then into the bread crumbs and
transfer to a lined tray. Continue
process until all chicken fillets are
battered.
4. Preheat the oil in a fry pan over a
medium heat and cook the schnitzels
for 3 minutes on each side.
5. Serve with mashed potatoes.
30
Page 32

Protein Pancakes
Makes 10 pancakes
2 tbsp vanilla whey powder
1 cup plain flour
250ml milk
59g free range egg
1 tsp vanilla essence
1 tbsp butter, melted
Canola oil spray
1. Using the processing blade, lock the
lid into place, and place the whey
powder, flour, milk, egg, vanilla and
butter into the processing bowl and
process for 1 minute on ‘LOW’ speed
setting.
2. Preheat a fry pan over a medium heat
and lightly spray with canola oil spray.
Pour ¼ cup measure into the fry pan
and allow to cook for 3 minutes on the
first side and 1 minute on the second.
3. Repeat until all pancakes have been
cooked.
Chocolate Mousse
Makes 12 serves
300g dark chocolate melts
3 x 59g free range eggs
½ cup caster sugar
300ml pure cream
200ml whipped cream, to serve
1 tbsp cocoa powder, to serve
1. Place the chocolate melts into a heat
proof glass bowl and microwave for
1 minute on high. Remove from the
microwave and stir. If not completely
melted, melt for a further 30 seconds.
2. Using the whisking disc, lock the lid
into place, and place the eggs and
sugar into the processing bowl and
whisk for 1 minute on ‘LOW’ speed
setting.
3. Pour the chocolate through the
feed chute and hold the ‘PULSE’
speed setting until it forms a smooth
chocolate paste.
4. Pour the chocolate mixture into a
large mixing bowl and wash the
processing bowl.
5. Reassemble the food processor and
pour the cream into the processing
bowl. Lock the lid into place and
process on ‘LOW’ speed setting for 10
seconds or until it forms stiff peaks.
6. Using a large metal spoon, fold the
cream through the chocolate mixture
until just combined. Evenly divide the
mousse into 12 glasses and chill in
the refrigerator for 2 hours and serve
with whipped cream and a dusting of
cocoa powder.
31
Page 33

Pizza Dough
Makes 1 pizza
170mls warm water
30ml olive oil
½ tsp caster sugar
½ tsp salt
300g bread flour
1 tsp dried yeast
1. Using the dough blade, lock the lid
into place, and place the water, olive
oil, sugar, salt, flour and yeast into the
processing bowl and process for 1
minute on ‘LOW’ speed setting.
2. Place into a bowl and cover with cling
wrap. Place into a warm spot and
allow to rise for 60 minutes.
3. Roll out in a circular motion and top
with pizza toppings.
NOTE: Top with your favourite
toppings and then grated
mozzarella cheese. Choices
might include: sliced meats,
seafood, char grilled vegetables,
sliced fruits, cheeses and herbs.
For a sweet pizza, try using a
chocolate hazelnut spread for
the base and topping with fruit,
nuts and a drizzle of honey.
Green Pea and Roasted
Garlic Soup
Makes 4 serves
1 tbsp olive oil
2 eschallots, roughly chopped
2 cloves garlic, roasted, minced
3 cups frozen peas, thawed
½ tsp flaked salt
Pinch dried rosemary
500ml chicken stock
100ml pure cream
2 tsp lemon juice
1. Using a medium pot, heat the oil
over a medium heat and sauté
the eschallots and garlic until
golden brown.
2. Add the peas, salt, rosemary and
chicken stock and allow to simmer
over a low speed for 10 minutes. Set
aside for 10 minutes to cool.
3. Using the processing blade, lock the
lid into place, and place the soup into
the processing bowl and puree for 1
minute on ‘HIGH’ speed setting.
4. Stir through the cream and lemon
juice before serving.
32
Page 34

Thai Sweet Potato Soup
Makes 4 serves
2 tbsp peanut oil
1 brown onion, thinly sliced
1 clove garlic, thinly sliced
2cm piece ginger, thinly sliced
1 tsp flaked salt
200ml can coconut cream
1 tbsp mild red curry paste
500ml chicken stock
750g sweet potato, 2cm pieces
1. In a medium pot, heat the olive oil
over a low heat and sauté the onion,
garlic and ginger until golden brown.
2. Add the salt, coconut cream, curry
paste and sweet potato and allow to
simmer for 20 minutes or until sweet
potato has cooked through. Allow to
cool for 20 minutes.
3. Using the processing blade on the
food processor, lock the lid into place
and blend the soup until it forms a
smooth blend, approximately 60
seconds.
33
Page 35

Notes
34
Page 36

Notes
35
 Loading...