

Page 1
_
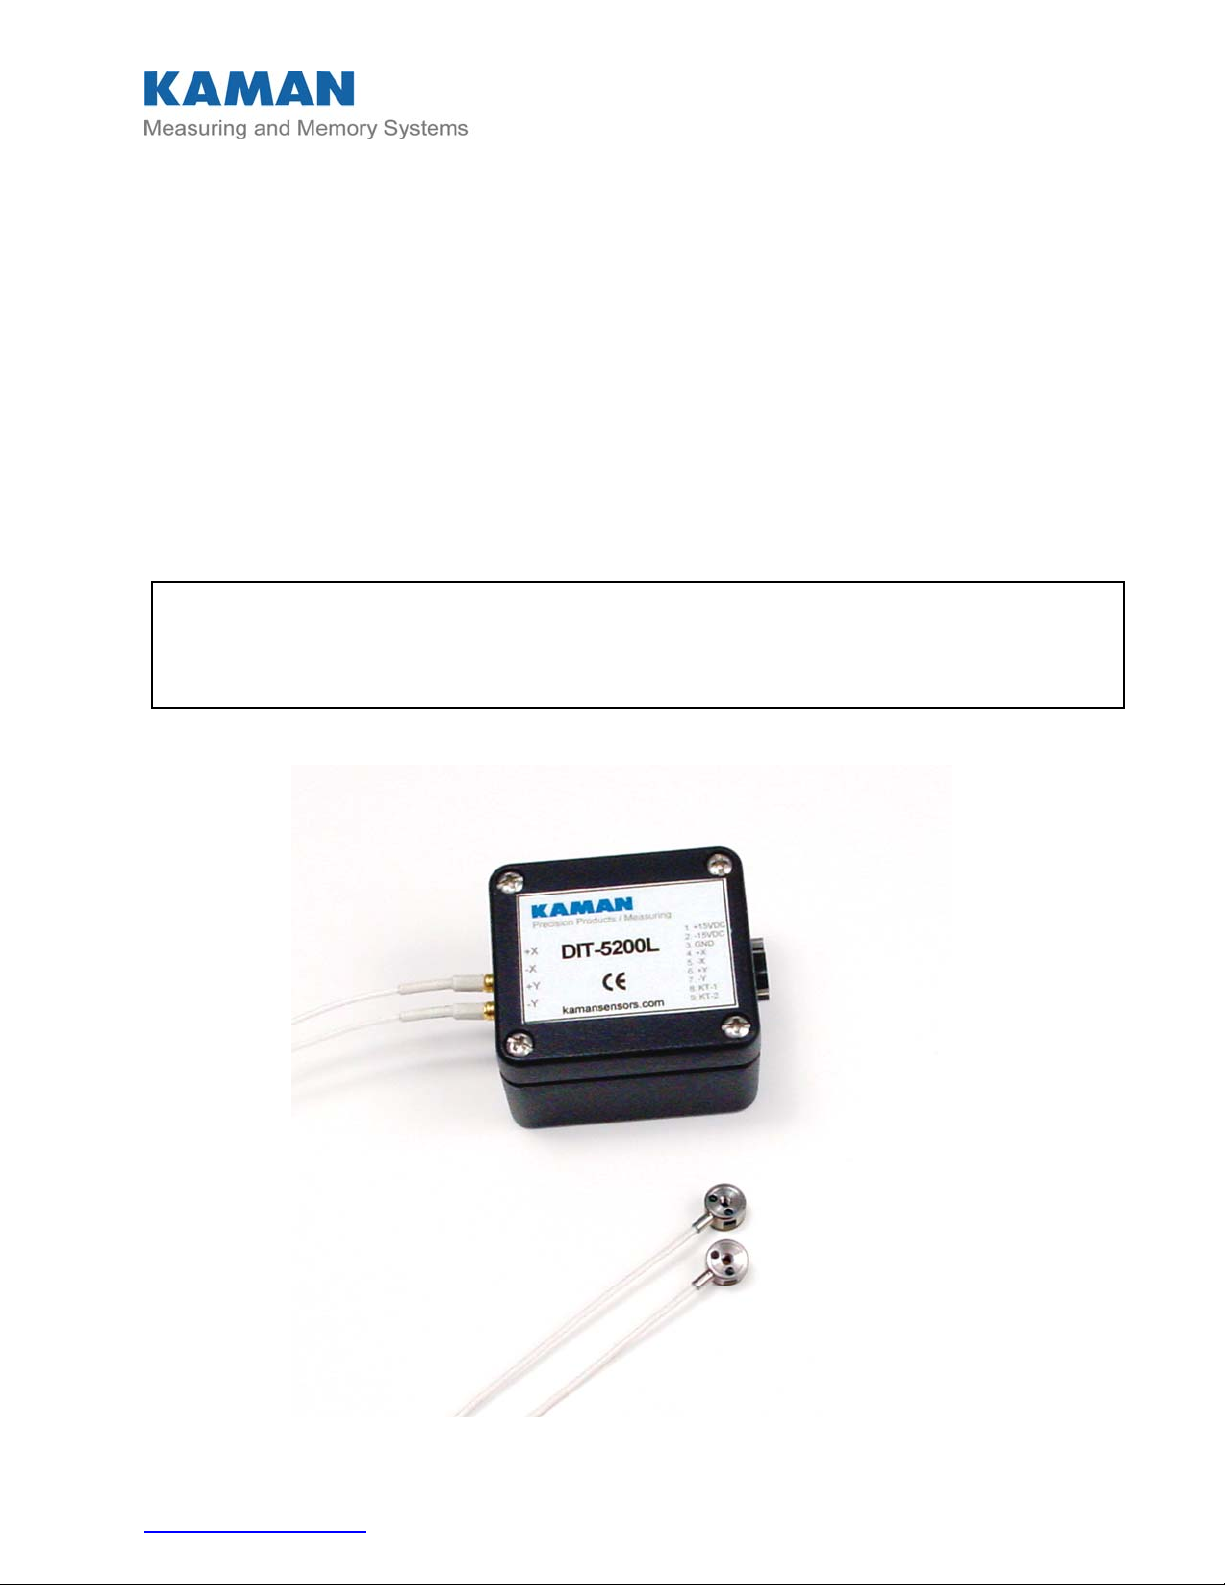
DIT-5200L
Non-Contact Displacement
Differential Measuring System
User’s Manual
This apparatus, when installed and operated per the manufacturer’s recommendations,
.
conforms with the protection requirements of EC Council Directive 89/336/EEC on the
approximation of the laws of the member states relating to Electromagnetic Compatibility.
Refer to the DIT-5200L Declaration of Conformity or contact Kaman Measuring Systems for
_____________________________________________________________________________
Kaman Precision Products PART NO: 860522-001
www.kamansensors.com
- 1 -
Last Revised 11/16/2012
Page 2

_
Table of Contents
PART 1 - INTRODUCTION..........................................................................................................3
PART 2 – CONNECTING THE DIT-5200L...................................................................................4
2.1 What’s Included ................................................................................................................. 4
2.2 Cautions and Safeguards................................................................................................. 4
2.3 Pin out and Connector Assignments.............................................................................. 4
PART 3 – APPLICATION INFORMATION ...................................................................................6
3.1 Fixturing............................................................................................................................... 6
3.2 Sensor Mounting and Installation.................................................................................... 7
3.3 Electrical Nulling Procedure............................................................................................. 7
3.4 Optimizing Performance................................................................................................... 8
3.5 Factors That May Degrade Performance...................................................................... 8
3.6 Target Characteristics....................................................................................................... 9
PART 4 – CALIBRATION ...........................................................................................................11
PART 5 – GENERAL SPECIFICATIONS & TYPICAL PERFORMANCE...................................13
PART 6 - TROUBLESHOOTING................................................................................................15
APPENDIX A DIT-5200L SENSOR DIMENSIONS ..................................................................16
APPENDIX B DIT-5200L ENCLOSURE DIMENSIONS ...........................................................17
APPENDIX C TERMINOLOGY..................................................................................................18
_____________________________________________________________________________
Kaman Precision Products PART NO: 860522-001
www.kamansensors.com
- 2 -
Last Revised 11/16/2012
Page 3
_
PART 1 - INTRODUCTION
The DIT-5200L Non-Contact Displacement Measuring System is an advance in precision
measurement technology. It provides exceptional resolution, repeatability, and nulling accuracy
for detecting the aligned / centered position of a conductive target relative to a pair of noncontacting sensors.
The DIT-5200L is identical in form to Kaman’s previous DIT-5200 product. Enhancements have
resulted in lower noise (better resolution) and CE Marking.
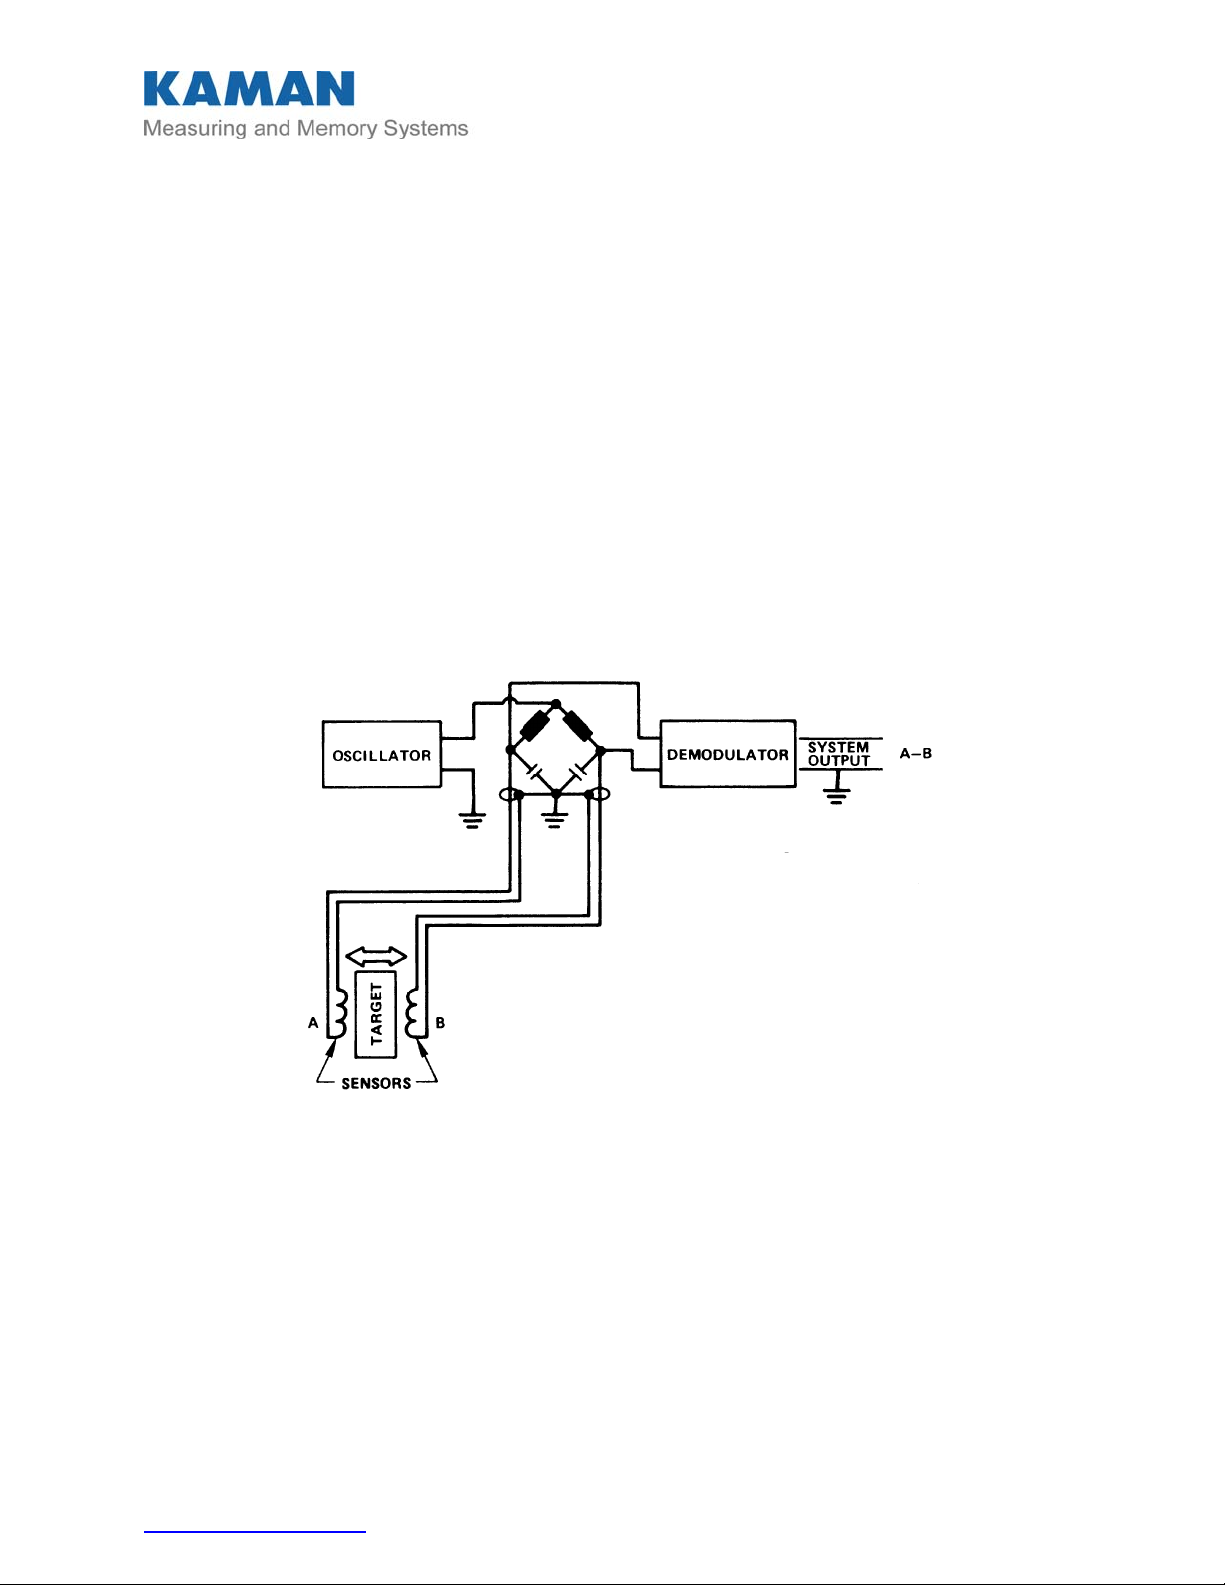
The DIT-5200L uses advanced inductive measurement technology to detect the aligned or
centered position of a conductive target. For differential measurement applications, two precisely
matched sensors per channel are positioned on opposite sides or ends of a target. In this sensorto-target relationship, as the target moves away from one sensor, it moves toward the other
sensor an equal amount. Output is differential and bipolar. Electrically matched sensors on
opposing legs of the same bridge provide exceptional thermal stability
Figure 1 DIT-5200L Circuit
The DIT-5200L signal conditioning electronics is packaged in is a die cast aluminum box with
MCX style sensor connections. The I/O is on a 9 pin mini-D connector. Input power connections
are reverse voltage protected.
The electronics can also be supplied as a bare PCB for installation inside the user’s enclosure.
Custom configurations can also be designed for OEM application requirements
The DIT5200L is CE Marked when purchased in the original enclosure. To maintain the CE
Marking, a ferrite must be installed over the input power wires only on the I/O cable.
_____________________________________________________________________________
Kaman Precision Products PART NO: 860522-001
www.kamansensors.com
- 3 -
Last Revised 11/16/2012
Page 4

_
PART 2 – CONNECTING THE DIT-5200L
2.1 What’s Included
DIT-5200L Signal Conditioning Electronics
2 or 4 sensors (Typically 15N or 20N)
18” Input/Output Cable
2.2 Cautions and Safeguards
The sensor faces may be damaged if allowed to strike the target or other hard surface. Protective
plastic caps should remain in place until the sensors are ready for installation.
The maximum input voltage to the DIT-5200L is +/-15.5V, exceeding this input voltage will cause
damage to the DIT-5200L.
2.3 Pin out and Connector Assignments
The DIT-5200L I/O connections are via an ITT Cannon model MDM-9SL2P connector on the
enclosure. A mating connector with 18 inch leads is provided as part of the system. Connection
information is detailed below.
Sensor connections are the same for both the enclosure style and the OEM DIT-5200L. On the
OEM DIT-5200L orient the box so the I/O connector is on the right and the sensor connections
are on the left.
Pin Color Function
1 Black +15V @ 40 mA
(typical).
2 Brown -15V @ 40 mA
(typical)
3 Red Power Supply
Common
4 Orange +X Output
5 Yellow -X (Gnd)
6 Green +Y Output
7 Blue -Y(Gnd)
8 Violet N/C
9 Gray N/C
Figure 2 I/O Connector
_____________________________________________________________________________
Kaman Precision Products PART NO: 860522-001
www.kamansensors.com
- 4 -
Last Revised 11/16/2012
Page 5

_
Function Sensor Label
Axis 1 Positive
Sensor
Axis 1 Negative
Sensor
Axis 2 Positive
Sensor
Axis 2 Negative
Sensor
+X
-X
+Y
-Y
Figure 3 Sensor Connections
The output on the channel will become more positive with movement toward the positive (+)
sensor. The output on the channel will become more negative with movement toward the
negative (-) sensor.
On single channel systems only the Axis 1 (X channel) is used.
The system is set up with the sensors as marked. Sensors are supplied as matched pairs for
optimum performance. Swapping sensors will result in degraded performance without factory
recalibration.
_____________________________________________________________________________
Kaman Precision Products PART NO: 860522-001
www.kamansensors.com
- 5 -
Last Revised 11/16/2012
Page 6
_
PART 3 – APPLICATION INFORMATION
For differential measurement applications, the two electronically matched sensors are positioned
on opposite sides or ends of the target. The sensor to target relationship is such that as the target
moves away from one sensor, it moves toward the other an equal amount.
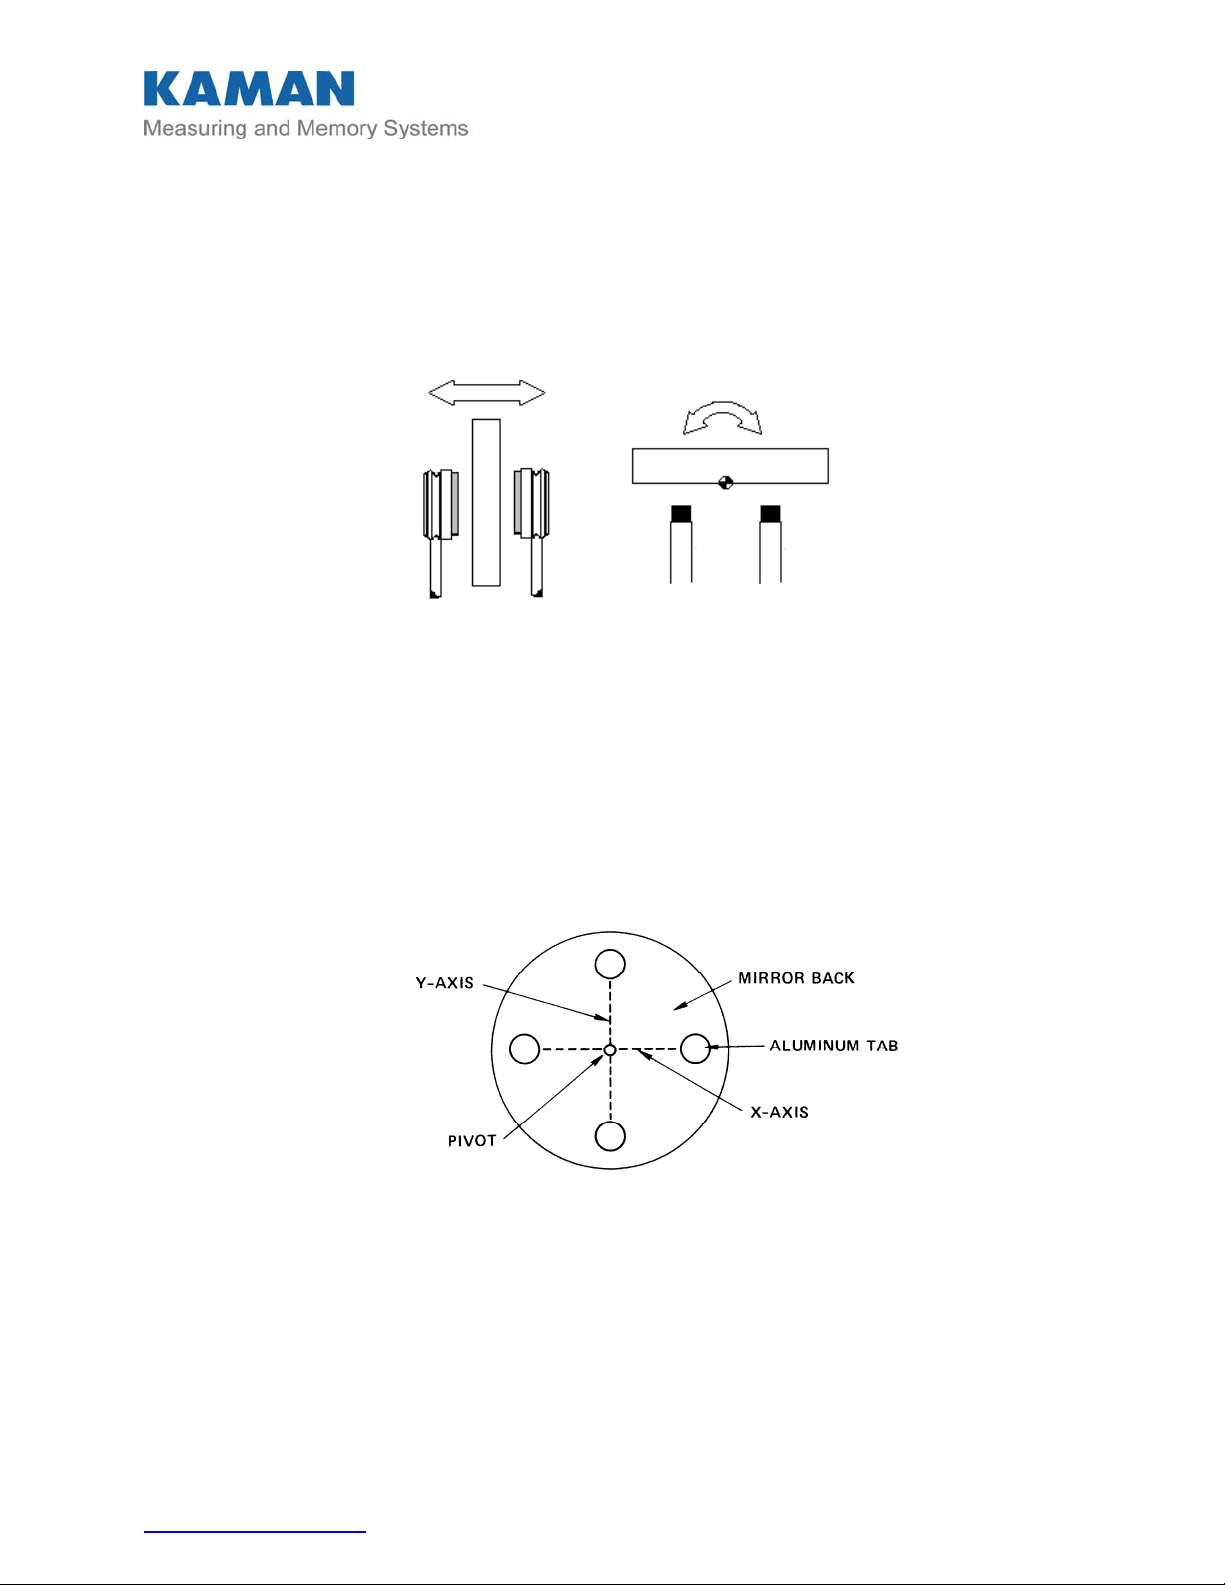
Figure 4 Sensor/Target Relationship
Standard systems come with two measurement axes (four sensors; two per axis) and can
therefore be fixtured a number of ways to provided precise x-y alignment. The figure below
illustrates target configuration for x-y alignment of an image stabilization mirror for an electrooptical application.
Figure 5 Sensor Position on a Stabilization Mirror
3.1 Fixturing
The user provides fixturing for the DIT-5200L electronics and sensors. The following information
establishes fixturing requirements for optimum system performance. Both the sensor and target
fixturing must be structurally sound and repeatable
_____________________________________________________________________________
Kaman Precision Products PART NO: 860522-001
www.kamansensors.com
- 6 -
Last Revised 11/16/2012
Page 7

_
3.2 Sensor Mounting and Installation
The sensors must be securely clamped. A collet type fixture is the best. It is best to clamp the
fixture as close to the sensor face as possible (without causing additional loading on the sensor) –
this is to minimize expansion differences between the two sensor housings. To insure that the
fixturing does not load the sensor and cause performance errors you should have any metal parts
approximately 3 sensor diameters away from the tip.
The target must not strike the sensor face. The sensor should have a null gap and measuring
range specified on the calibration record. As an example a 15N sensor may have a null gap of 15
mils (0.015” / 0.381mm) and a range of +/-10 mils (+/-0.010” / +/-0.254 mm). The difference
between the null gap and measuring range is the offset distance for the sensors. In this example
the offset would be 15-10=5 mils for an offset. The offset is the closest distance the sensor gets
to the target during normal operation. This offset is necessary both to optimize performance and
to keep the target from contacting and possibly damaging the coils in the sensor face.
Install the sensors so that only the target interacts with the sensor’s field. No conductive material
other than the target should be present within the sensor’s field. Because the sensor field
radiates in all directions, excessive back loading can also be a problem.
3.3 Electrical Nulling Procedure
Note: Although both sensors may appear to be positioned mechanically, this can cause a
cumulative error. By electrically positioning the second sensor using the system output, the error
is minimized.
The sensor coil is mounted at the face of both sensors. For purposes of mechanical nulling,
measure distance from the sensor face. (Use care not to damage the sensor coil)
1. Sensor position relative to the target is critical. Make sure the target is in the null position.
Install the first sensor of a pair (start with X-) in the application fixture. Using a dimensional
standard, precisely locate the sensor at the null gap. Secure the sensor and recheck its
position.
2. Now install the second sensor of the pair (X+) in the fixture and position it to within a few mils
(10’s of microns) of the required null gap. Connect the Power/Signal line and apply power to
the system. The system must be energized for a minimum of 30 minutes for best results. Use
the output from the system as a guide in the final positioning of this sensor (electrical nulling).
Slowly move the second sensor toward or away from the target as necessary until the system
output reads 0VDC (typically +/-10mV). Secure the sensor and recheck that the output is
0VDC. This output indicates the sensor is positioned correctly.
3. Repeat steps 1 and 2 for sensor Y- and Y+.
The system is now ready for use.
_____________________________________________________________________________
Kaman Precision Products PART NO: 860522-001
www.kamansensors.com
- 7 -
Last Revised 11/16/2012
Page 8

_
3.4 Optimizing Performance
There are several things to be aware of when using the DIT-5200L in order to optimize the
performance of the system.
Insure that there are no ‘incidental targets’ – i.e. targets that the sensor may see that are
not to be measured.
Insure that the sensor is not tilted with respect to the target as this will cause additional
non-linearity.
Make sure that the system is set up with the proper null gap – electrical nulling of the
second sensor in a pair is best.
Insure you are using the specified calibration material (aluminum is the standard).
Make certain that you are using stable fixturing and mounting of the sensors.
Ensure the target is 3 sensor diameters in size and is thick enough to prevent penetration
of the magnetic field. (reference section 3.6 on Targets)
The system will perform the best if both sensors are in a similar thermal environment –
avoid temperature differentials between the sensor pairs.
3.5 Factors That May Degrade Performance
Unequal Loading
This refers to an unequal amount of conductive material within the field of one sensor as opposed
to the other sensor in the pair (the sensor’s field is approximately three times its diameter).
Unequal loading causes asymmetrical output from the sensors which induces non-linearity in the
system output. Ideally, no conductive material other than the target should be in the sensor’s
field. Some loading may be acceptable if it is equal and the sensors are calibrated in place. Even
then, sensor loading may cause non-linearity. If unable to calibrate, then loading is too great.
Unequal Displacement
For targets using pivot point mount, the system should “see” equal displacement: i.e., the pivot
point of the target is perfectly centered between the sensors. If the pivot point is a fraction of a
centimeter off, it can introduce non-linearity into the system.
The pivot point must be on a common line between the centerline of a pair of sensors.
The axis of tilt must be a perpendicular bisector of a line between the centerlines of a sensor
pair.
The pivot point must be positioned on the target so as not to introduce a translation error.
This error, a function of angle, is caused by slight changes in the effective null gap as the
target moves about the pivot. This results in non-linearity.
The pivot point must not move or change with time.
_____________________________________________________________________________
Kaman Precision Products PART NO: 860522-001
www.kamansensors.com
- 8 -
Last Revised 11/16/2012
Page 9

_
3.6 Target Characteristics
Target Material
Aluminum is the preferred target material for the DIT-5200L. Aluminum targets may be mounted
on materials with more stable temperature characteristics such as Invar or other substrates as
long as the target thickness guidelines are observed. Invar is an excellent target substrate as it
has a very low expansion coefficient with temperature. The figure below shows aluminum tabs
(which give optimal performance from the DIT-5200L) mounted on and Invar fixture.
Iron, nickel, and many of their alloys (ferro-magnetic targets) can be used with the DIT-5200L.
Performance to these materials may not meet standard performance specifications.
Refer to the DIT-5200L data sheet for performance specifications to aluminum
.
Figure 6 Attachment of Aluminum Targets
If the system was purchased for use with a target material other than aluminum, it has been precalibrated (with pre-selected component values) at the factory using that specific material.
Changing the target material may require re-calibration or cause the DIT-5200L to malfunction.
The effect of target material is due to the resistivity and mainly affects the sensitivity of the
system. Expect about twice as much noise and drift on a system set up for a stainless steel target
as compared to one set up for aluminum.
Target Thickness
The RF field produced by the sensor is maximum on the target surface, but it also penetrates
below the surface. The depth of penetration depends on the target material used. For example,
the RF field will penetrate aluminum 0.022”. To avoid variations caused by temperature changes
of the target, use the recommended minimum target thickness in the table below:
_____________________________________________________________________________
Kaman Precision Products PART NO: 860522-001
www.kamansensors.com
- 9 -
Last Revised 11/16/2012
Page 10

_
Material Thickness, mils (mm)
Silver and Copper
22 ( 0.56 )
Gold and Aluminum 22 ( 0.56 )
Beryllium 25 ( 0.64 )
Magnesium, Brass, Bronze,
58 ( 1.5 )
Lead
300 Series Stainless Steel 110 ( 2.8 )
Inconel 110 ( 2.8 )
In applications where the sensors oppose each other with the target between them, the minimum
thickness should be at least double those listed above to prevent sensor interaction
Target Size
The minimum target size must be 1½ to 2 times the sensor diameter. It is preferred that the target
size be 3 times the sensor diameter for optimum performance.
Figure 7 Sensor Field Size
Additional recommendations and guidelines can be found in Kaman’s Inductive Technology
Handbook. The latest copy of this reference guide is located on our website.
_____________________________________________________________________________
Kaman Precision Products PART NO: 860522-001
www.kamansensors.com
- 10 -
Last Revised 11/16/2012
Page 11

_
PART 4 – CALIBRATION
The DIT-5200L systems are shipped from the factory pre-calibrated for a user specified
measuring range, sensitivity, and target material. They do not normally require calibration or recalibration. Potentiometer locations for the OEM and enclosure version are the same relative to
the sensor and I/O connector positions.
The system must be positioned to the null gap by first adjusting one sensor to the null gap and
adjusting the opposing sensor for a zero volt output. Reference section 3.2.
Figure 8 Sensor Positioning for Calibration
_____________________________________________________________________________
Kaman Precision Products PART NO: 860522-001
www.kamansensors.com
- 11 -
Last Revised 11/16/2012
Page 12

_
R117 Offset Ch X
R112 Gain Ch X
R
R212 Gain Ch Y
217 Offset Ch Y
Figure 9 Potentiometer Locations
Note:
included in this calibration sequence.
1. Position the target at Null
2. Adjust the offset control for the measuring channel being calibrated to 0+/-0.001V (unless
3. Position the target at –FS (negative full scale)
4. Adjust the gain control for the measuring channel being calibrated to the full scale voltage +/-
5. Position the target at Null
6. Adjust the offset control for the measuring channel being calibrated to 0+/-0.001V (unless
7. Position the target at –FS (negative full scale)
8. Adjust the gain control for the measuring channel being calibrated to the full scale voltage +/-
9. Repeat steps 1-8 as necessary
Offset (zero) potentiometers R117 and R217 are not normally installed and are not
otherwise specified).
0.005mV (unless otherwise specified)
otherwise specified). (See above note if there is no offset control)
0.005mV (unless otherwise specified).
_____________________________________________________________________________
Kaman Precision Products PART NO: 860522-001
www.kamansensors.com
- 12 -
Last Revised 11/16/2012
Page 13

_
PART 5 – GENERAL SPECIFICATIONS & TYPICAL
PERFORMANCE
Parameter Value Units Comments
Target Material Aluminum is
preferred
Most conductive materials can be
considered
Null Gap See Data
Sheet
Range See Data
Sheet
Output Voltage +/-10 Volts Typical
Non-Linearity <0.5 %FSO Typical
Resolution at Null
(p-p at 1kHz BW)
Resolution at FSO
(p-p @ 1kHz BW)
TempCo at Null <0.005 %FSO/oC Typical
TempCo at FSO <0.02 %FSO/oC Typical
Power Dissipation at 15N
Sensor Head
Power Dissipation at 20N
Sensor Head
Power Dissipation
(Electronics)
<0.004 %FSO Typical
<0.015 %FSO Typical
< 0.5 mW/sensor Typical
< 2 mW/sensor Typical
<1.35 Watts
Range and sensor dependant.
See Data Sheet.
See Data Sheet
Frequency Response 0 - 20 kHz
Input Voltage +/-15 Volts
Output Impedance <1 Ohm
Weight <8 oz Enclosure Version (Typical)
Operating Temperature
Electronics: +32to +140oF (0C to +60oC)
Sensors: -62
Cryogenic 20N Sensor: +4
o
F to +220oF (-52oC to +105oC)
o
K to +220oF (+105oC)
Storage Temperature Range
Electronics: -26oF to +180oF (-32oC to +82oC)
Sensors: -62
Cryogenic 20N Sensor: +4
o
F to +220oF (-52oC to +105oC)
o
K to +220oF (+105oC)
_____________________________________________________________________________
Kaman Precision Products PART NO: 860522-001
www.kamansensors.com
- 13 -
Last Revised 11/16/2012
Page 14

_
Sensor/Range Specific Performance
Range,
+/-mil
10 0.25 15 0.40 x 0.15% 0.30% 0.02% 2E-5% 2E-5%
10 0.25 20 0.50 x 0.10% 0.20% 0.02% 2E-5% 2E-5%
20 0.50 25 0.65 x 0.25% 0.50% 0.03% 2E-5% 2E-5%
20 0.50 40 1.0 x 0.15% 0.30% 0.02% 2E-5% 2E-5%
35 0.90 40 1.0 x 0.50% 1.00% 0.03% 2E-5% 1E-5%
50 1.25 60 1.5 x 0.25% 0.50% 0.03% 2E-5% 1E-5%
75 1.90 85 2.2 x 0.50% 1.00% 0.03% 1.5E-5% 1E-5%
Note: Full Range (FR) is considered as twice the +/- Range
Rang
e
+/-
mm
Null,
mil
Null,
mm
15N 20N Typical
Non-
Linearity,
%FR
Max.
Non-
Linearity,
%FR
Typical
Sensor
TempCO
, %FR/
o
Equivalent
RMS Input
Noise,
C
%FR/Hz @
FR
Equivalent
RMS Input
Noise,
%FR/Hz @
Null
Calculating Effective Resolution
To calculate the effective resolution, take the Equivalent RMS Input Noise and multiply it by the
square root of the measurement bandwidth. Peak-to-peak noise is normally 6.6 times higher than
the RMS noise assuming gaussian (randomly distributed) noise.
For Example, to calculate the worst case noise of a 15N system with a +/-0.5 mm (+/- 500
micron) range at a 20 kHz bandwidth:
Step 1) Calculate the full range of the system:
FR (Full Range) = 2 x 500 microns = 1,000 microns
Step 2) Calculate the Equivalent RMS Input Noise in measurement units by multiplying by the Full
Range (don't forget to divide by 100 to take into account the percent).
Resolution at Full Scale is 2E-5%FR/Hz x 1,000 microns / 100 = 2E-4 microns/Hz
Step 3) Multiply by the square root of the measurement bandwidth to calculate the effective
resolution.
Effective RMS Resolution @ 20kHz = 2E-5%FR/Hz x 1,000 microns x 20 kHz = 0.028
microns
Step 4
Note: Output filtering on the DIT-5200L is set to 20 kHz. External filtering is assumed when
calculating resolutions at lower bandwidths.
) To approximate the peak-to-peak resolution multiply by 6.6
Effective peak-to-peak resolution @ 20 kHz = 0.028 x 6.6 = 0.185 microns
_____________________________________________________________________________
Kaman Precision Products PART NO: 860522-001
www.kamansensors.com
- 14 -
Last Revised 11/16/2012
Page 15

_
PART 6 - TROUBLESHOOTING
5.1 Insufficient Gain
If attempting to recalibrate for a specific sensitivity, measuring range, or for a target different from
factory calibration specifications, there may be insufficient gain control to do this. You may need
to decrease the desired output in order to calibrate the system.
Another cause for insufficient gain could be excessive loading of the sensors by conductive
material (other than the target) within the field of the sensors. The sensor’s field is approximately
three times its diameter.
5.2 Unable to Zero
The DIT-5200L is an exceptionally stable measuring system. Long term drift is less than 2 microinches per month. If the unit does not work, this would most likely be discovered during the
functional test. If you are unable to calibrate your system in no more than two iterations, the
problem is most likely poor mechanical repeatability in the fixturing or actuating mechanisms. To
determine this:
1. Do not make any adjustments to the calibration controls. (Record how much time the next
step takes).
2. Do at least 12 to 15 iterations of moving the target from null to full range and back to null.
Record the output at null each time. If successive readings of the output at null consistently
vary with no clear trend (drift) in one direction or the other, the problem is mechanical
repeatability.
3. Stabilize the target at null and record the output. Leave the target at null for the same length
of time it took to accomplish step two and monitor the output.
4. If the output remains constant, this confirms the problem is mechanical repeatability.
If the output drifts, the problem could be drift in the fixturing, drift in the target positioning servos,
or drift in the DIT-5200L.
If you can positively eliminate all other variables as the source of the problem, consult Kaman
Precision Products.
5.3 Poor Non-Linearity
Poor non-linearity is typically the result of additional loading on the sensor or the sensor head
being slightly tilted.
_____________________________________________________________________________
Kaman Precision Products PART NO: 860522-001
www.kamansensors.com
- 15 -
Last Revised 11/16/2012
Page 16

_
APPENDIX A DIT-5200L SENSOR DIMENSIONS
15N Sensor Versions 20N Sensor
_____________________________________________________________________________
Kaman Precision Products PART NO: 860522-001
www.kamansensors.com
- 16 -
Last Revised 11/16/2012
Page 17

_
APPENDIX B DIT-5200L ENCLOSURE DIMENSIONS
_____________________________________________________________________________
Kaman Precision Products PART NO: 860522-001
www.kamansensors.com
- 17 -
Last Revised 11/16/2012
Page 18

_
APPENDIX C TERMINOLOGY
Null Gap
The point at which a target is equidistant from each sensor of a differential pair. The system
output at null = 0VDC. The actual gap is measured from the sensor face to the corresponding
target face and includes a required offset (null gap = offset plus maximum measuring range).
Offset
The minimum distance between the sensor face and the target. Offset is necessary to both
prevent the target from striking the sensor face and to optimize performance (offset = null gap
minus max range).
Measuring Range
The full range of target motion over which the various specifications such as resolution, linearity,
and sensitivity can be met. The differential sensor arrangement yields a bipolar output and
measuring range is expressed as + and – value either side of the null position (measuring range =
null gap minus the offset).
Sensitivity (scale/gage factor)
Output voltage per unit of displacement. Usually expressed as millivolts per mil (0.001”) or per
millimeter.
Linearity (or non-linearity)
The maximum deviation of any point of a calibrated system’s output from a best fit straight line.
Expressed in actual units, e.g., micro-inches or as a percentage of the full range (the full scale
output times 2).
Equivalent RMS Input Noise
A figure of merit used to quantify the noise contributed by a system component. It incorporates
into a single value, several factors that influence a noise specification such as signal-to-noise
ratio, noise floor, and system bandwidth. Given a measuring systems sensitivity/scale factor and
the level of “white” noise in the system, Equivalent RMS Input Noise can be expressed using
actual measurement units.
Effective Resolution
An application dependent value determined by multiplying the Equivalent RMS Input Noise
specification by the square root of the measurement bandwidth.
Example: an application with a 100 Hz bandwidth using a DIT-5200 with an Equivalent RMS Input
Noise level of 0.2nm/ Hz results in a system with an effective resolution of 0.2nm/ Hz x 100 Hz
or 2nm
.
_____________________________________________________________________________
Kaman Precision Products PART NO: 860522-001
www.kamansensors.com
- 18 -
Last Revised 11/16/2012
 Loading...