


MADE IN CHINA
Due to continuous product development, please ensure that you have downloaded
the latest instruction manual for this product from the Kam website at www.kam.co.uk
MANUAL VERSION 1.0
03/08 /12
For the latest updates and information on the entire Kam range visit:
www.kam.co.uk
Kam products are manufactured by: Lamba plc, Unit 1, Southfields Road, Dunstable, Bedfordshire, United Kingdom LU6 3EJ
Telephone: (+44) (0)1582 690600 • Fax: (+44) (0)1582 690400 • Email: mail@lambaplc.com • Web: www.lambaplc.com
Due to continuous product development, specifications and appearance are subject to change. © Copyright Lamba plc 2012. E&OE.
KAP2020 USB
Rack mountable 4 channel mixer with USB playback

Thank you for purchasing this Kam product, we are sure that it will serve you for many years to come.
To optimise the performance of this product, please read these operating instructions carefully to familiarise
yourself with the basic operations of this unit. Please retain them for future reference.This unit has been tested at
the factory before being shipped to you.
To prevent or reduce the risk of electrical shock or fire, do not expose the unit to rain or moisture. To prevent a fire
hazard, do not expose the unit to any naked flame sources. Unplug this apparatus during lightning storms or if it is
unlikely to be used for long periods of time.
When installing the unit, please ensure you leave enough space around the unit for ventilation. Slots and openings
in the unit are provided for ventilation to ensure reliable operation of the product and to protect it from overheating.
To prevent fire hazard, the openings should never be blocked or covered.
If the unit is powered by the mains, always handle the power cable by the plug. Never pull out the plug by pulling
on the cable. Never touch the power cable when your hands are wet as this could cause an electric shock. Do not
tie a knot in the cable. The power cable should be placed such that it is not likely to be stepped on. A damaged
power cable can cause a fire or give you an electrical shock. Checkthe power cord periodicaly, if you ever find that
it is damaged, replace it before using the unit again. Contact your retailer for a replacement.
The voltage of the available power supply differs according to country or region. Be sure that the power supply
voltage of the area where this unit is to be used meets the required written on the unit.
The lightning flash symbol inside a triangle is to alert the user to the presence high voltage within the
unit’s enclosure that may be of sufficient power to constitute a risk of electrical shock to persons.
Caution: to prevent the risk of electric shock, do not attempt to open the unit. No user-serviceable parts
inside. Refer all servicing to qualified service personnel.
The exclamation mark inside a triangle is intended to alert the user to the presence of important operating
and maintenance instructions in the literature accompanying the appliance.
Select the installation location of your unit carefully. Avoid placing it in direct sunlight or locations subject to
vibration and excessive dust. Do not use the unit where there are extremes in temperature (below 41ºF / 5ºC or
exceeding 95ºF / 35ºC).
Unpacking and safety Please unpack your new product carefully. Your new product should reach you in perfect
condition. Please check that no damage has occurred during transit. If any damage is found, do not operate your
unit. Please contact the retailer you purchased it from immediately. If there is any damage to the mains cable do
not use the device. Always disconnect the unit from the mains supply when carrying out any cleaning of the unit.
Manufacturer declarations
In compliance with the following requirements: RoHS Directive (2002/95/EU) and WEEE Directive (2002/96/EU).
If this product is ever no longer functional please take it to a recycling plant for environmentally friendly disposal.
CE declaration of conformity
R&TTE Directive (1999/5/EU), EMC Directive (2004/108/EU), Low Voltage Directive (2006/95/EU).
The declarations are available on application from certification@lambaplc.com
Before putting the devices into operation, please observe the respective country-specific regulations.
Unpacking
Warning: After unpacking, and before plugging the AC cord in the wall outlet, check whether the AC mains voltage
and frequency is the same as this product (AC220-250V~ 50Hz). If the specified voltage or your AC plug should
not match the local conditions, do NOT plug the AC cord into the wall outlet and contact you dealer immediately.
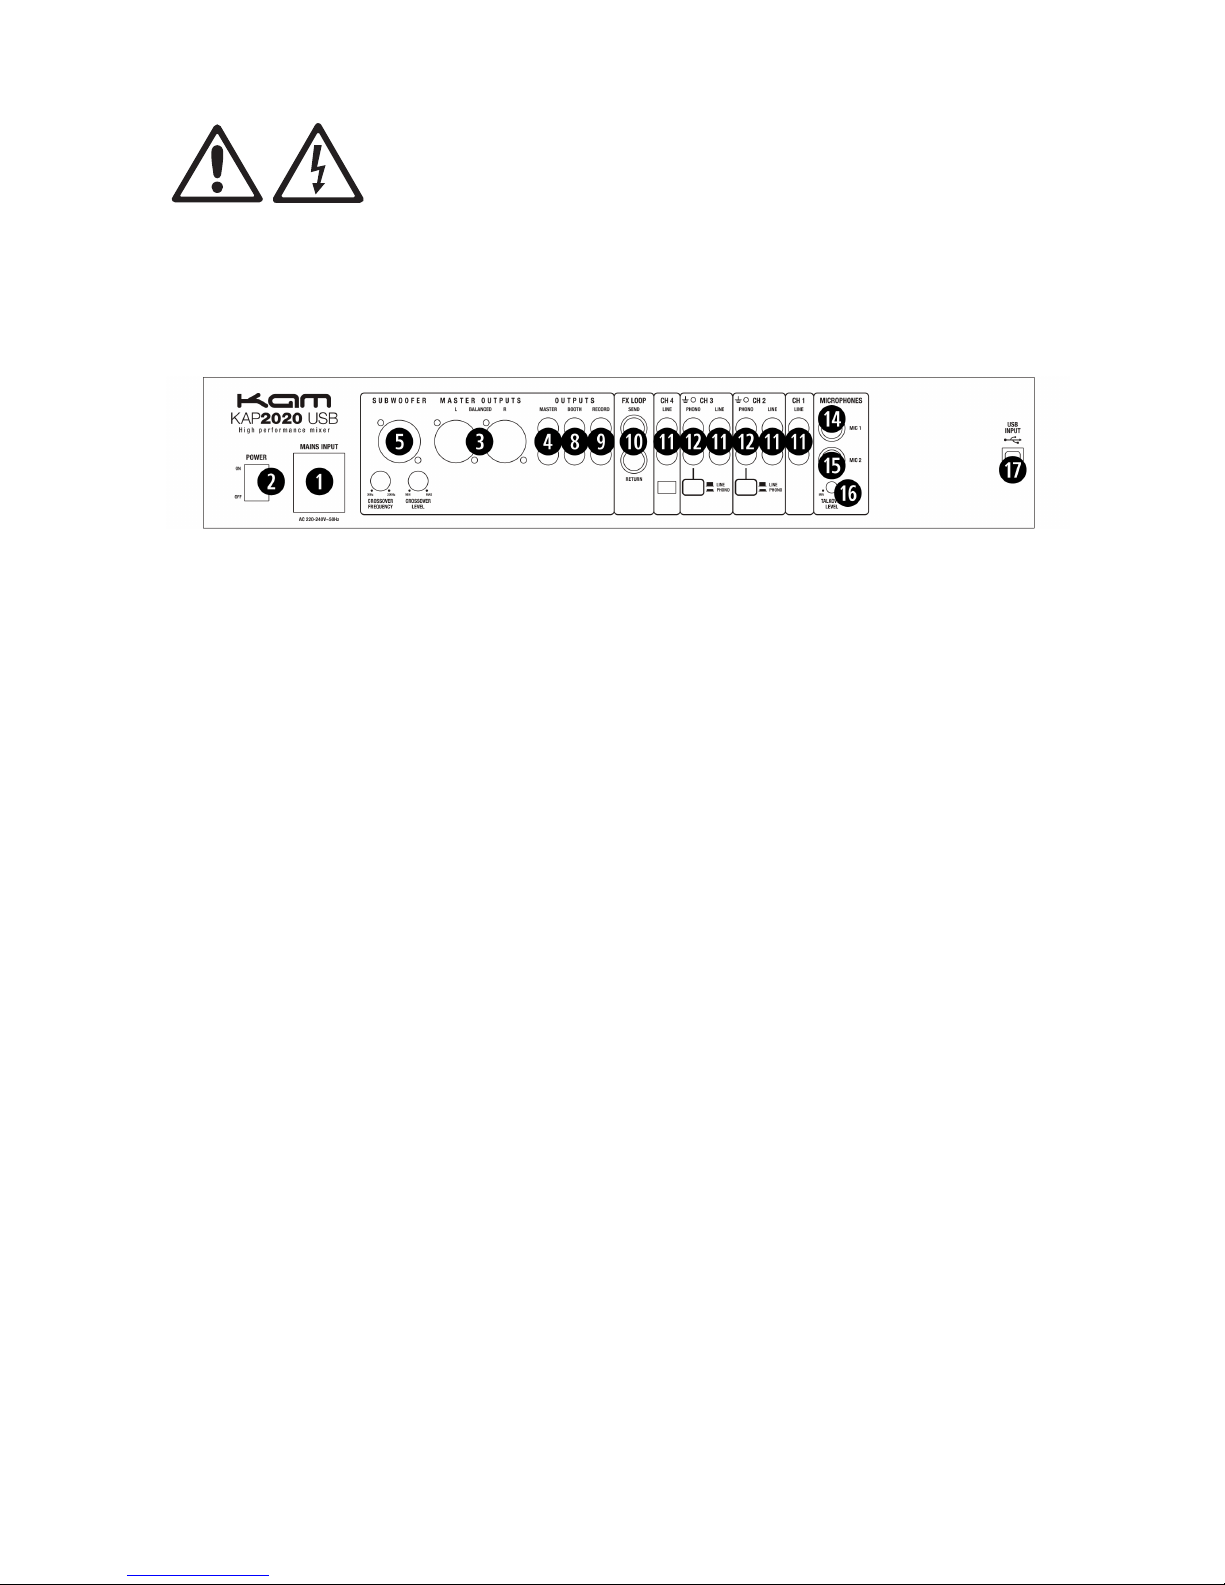
Back Panel
1. Mains input and fuse holder. Use the supplied power lead to connect the unit to AC mains. Make sure
voltage and frequency stated on the unit comply with your local AC supply. The fuse can be accessed by the
small drawer in the AC inlet. To change the fuse, unplug the AC cord first, pull out the fuse drawer and
replace the fuse ONLY with a fuse of SAME voltage and rating. If the fuse blows again after replacement,
please contact your nearest retailer to get the unit checked out.
2. Power switch. Switches the unit on and off. Make sure to switch the unit off when not in use.
3. Balanced output. This is a balanced stereo output carrying the main output signal controlled by (32).
4. Main stereo output. This is an unbalanced output carrying the same signal as output (3).
5. Subwoofer output. This is a balanced mono output for connecting an amplifier driving a subwoofer system.
Please note that the subwoofer output runs in parallel to the main output, hence while the subwoofer upper
frequency limit can be adjusted by means of control (6), no lower frequency limit is introduced to the main
output (3).
6. Crossover frequency adjustment of internal active crossover. Together with the level control (7), this
allows to set the upper frequency limit of the subwoofer output (5). Choosing an appropriate crossover
frequency will avoid unpleasant interference effects with your main program speakers. Check your subwoofer
system specification to determine a suitable frequency.
7. Level control for subwoofer output (5).
8. Booth stereo output. This is an unbalanced output carrying the booth signal controlled by (33). This output
can be used for a 2nd zone which needs independent volume control, such as the DJ booth or the seating
area of a club.
9. Record output. This is an unbalanced stereo output carrying the same signal as the main output (3/4), but
not influenced by the main volume control (32). This is normally used for recording the output to an external
tape, CD or memory device.
10. FX Loop. These two ¼’’ jack (6.35mm) connectors allow you to add a stereo effects processor to the master
signal path. They interact with the top panel controls (41, 42, 43, 44 ). Please note that this effects loop is
NOT an insert path, but a parallel effects path, meaning effects like filters (which are of serial nature) are not
as effectively processed by the effects loop as effect like reverb or delay (which are of parallel nature).
11. Line inputs. These RCA connectors provide inputs for line-level signals to the assigned channels.
12. Phono Inputs. Depending on the position of the selector switches (13), these RCA connectors provide the
following inputs: (A) Position “PHONO”: input for phono-level signals to the assigned channels, featuring the
necessary RIAA equalization. (B) Position “LINE”: input for line-level signals to the assigned channels. Note
please ensure the correct line / phone level is selected before connection as failure to do so may cause
damage to the unit.
13. PHONO/LINE selector switches for PHONO inputs. These switches change the sensitivity of the PHONO
inputs between PHONO (RIAA equalized) and LINE level.
14. Microphone inputs for MIC1. This is a balanced ¼” jack (6.35mm) connector without phantom power
provision, hence only suitable for dynamic microphones. Please note that this connector is in parallel to the
top-panel mounted balanced Combo (XLR + ¼” jack) 6.35mm connector (18).
15. Microphone inputs for MIC2. Same as (14) but for microphone 2.
 Loading...