

Page 1

instruction manual
www.kam.co.uk
Due to continuous product development, specifications
and appearance are subject to change. E&O E.
LASER60 9/10/07 16:15 Page 1
Page 2
INTRODUCTION
Thank you for purchasing the “DMX LASER 60”.
To optimize the performance of this product,
prior to use, please read these operating
instructions carefully to familiarize yourself with
the basic operations of this unit. The DMX LASER
60 has the KAM funky design and is an amazing
Laser effect. Please keep these user instructions
in safe place for future reference. This unit has
been Tested at the factory before being shipped
to you. There is no Assembly required.
WARNING!
To prevent or reduce the risk of electrical shock
or fire, do not expose this unit to high
Temperature / rain or moisture.
Laser Class 3B product. National Regulations
must be adhered to at all steps of installation.
(In Germany apply DIN 56912 and BGVR LASER
note: additional Regulations may apply).
Unintended reflections of the laser beam from
reflective or metallic surfaces can be
dangerous.
This appliance is to used by Qualified personnel
only.
Laser Radiation Warning
This unit uses diode lasers in green. This is CLASS
3B laser product. Avoid exposure to eyes. Never
open the laser diode box, please refer unit to a
qualified engineer for servicing or repairs
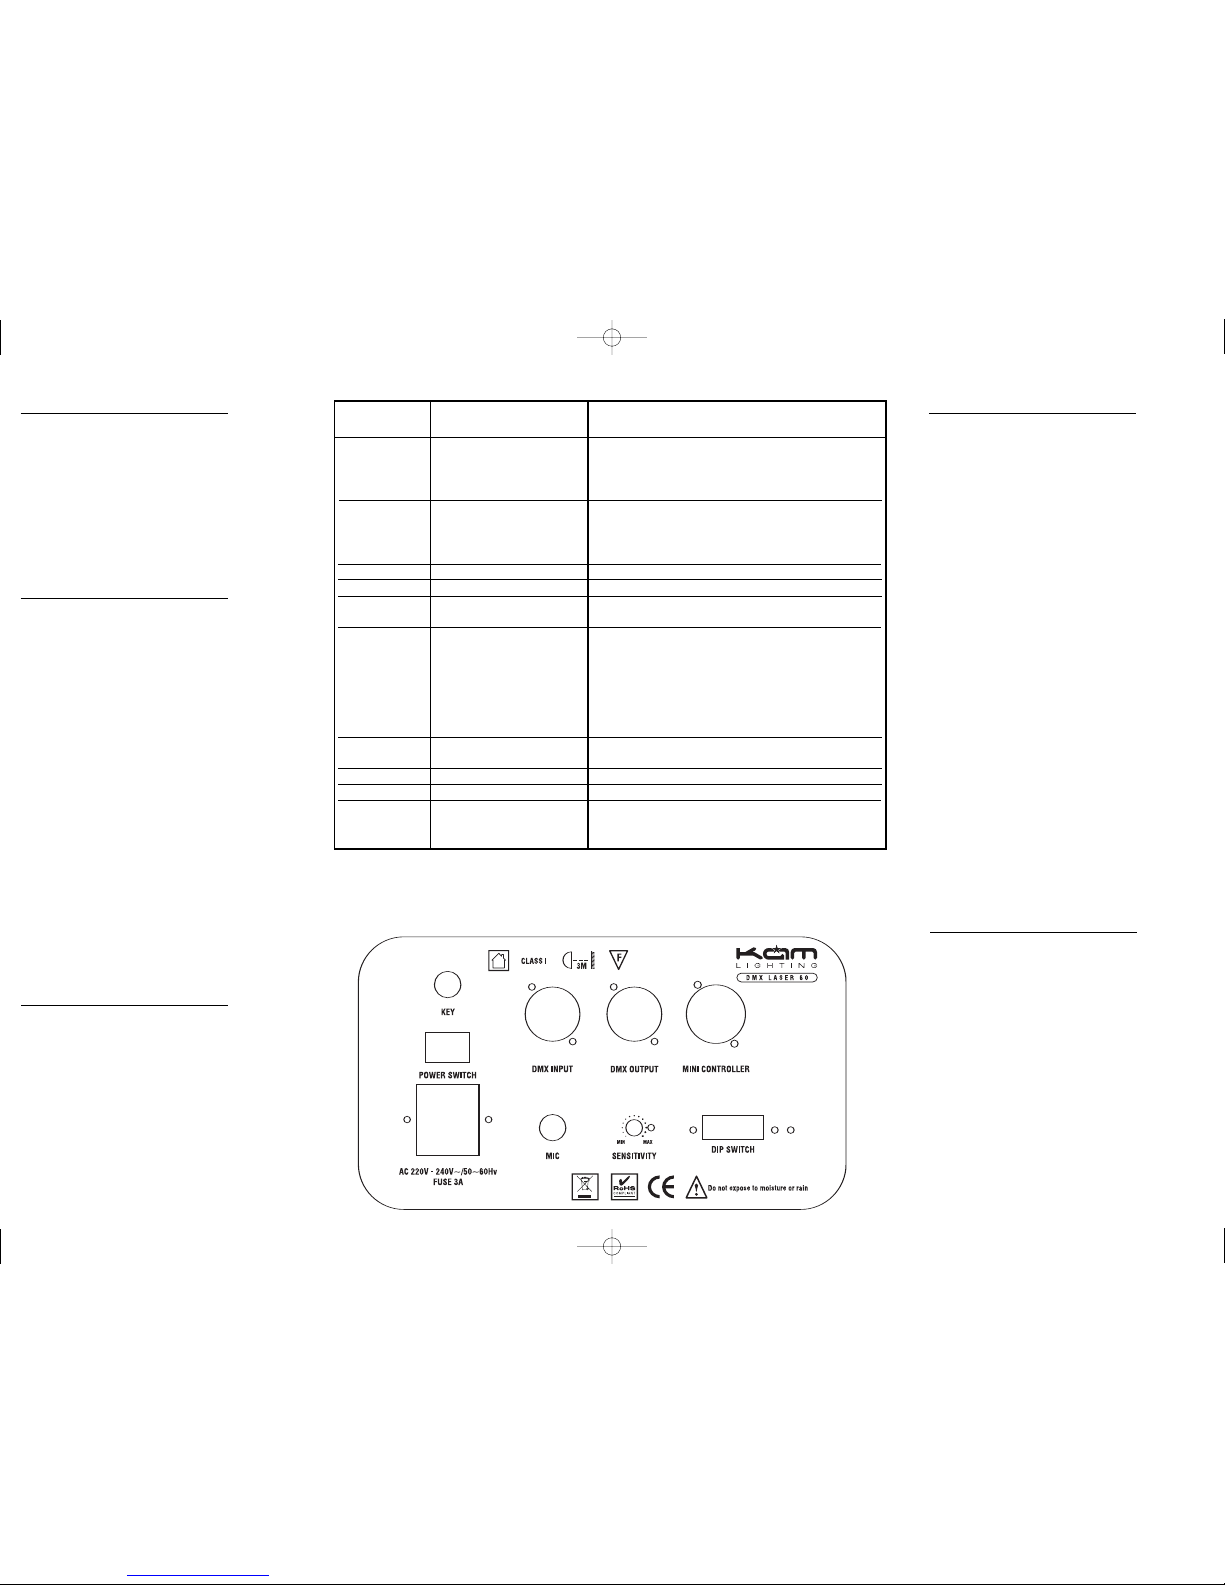
IDENTIFICATION
DMX INPUT: DMX signal input----Male XLR
DMX OUTPUT: DMX signal output----Female XLR
MINI-CONTROLLER: Use 5-XLR Male
DIP SWITCH: DMX address
MIC: Sound active
MIN-MAX: Adjust the sensitivity knob for
sound activivation
POWER SWITCH: ON/OFF power
KEY: LOCK laser
FUSE: 3A F
REMARKS:
l Setting DIP SWITCH NO.1 & NO.10 in “ON”,
the DMX LASER 60 can be controlled by a DMX
controller.
l When using a DMX controller, the minicontroller is not available. When using a
mini-controller, the DMX controller is not
available.
l Setting the laser to master & slave without a
DMX controller, Master & slave DIP SWITCH
setting to No.1 & NO.10 in “ON”, then all the
lasers will show same patterns and work
together in sync.
l Setting the laser to master & slave with a DMX
controller, Master laser DIP SWITCH setting to
No.1 & NO.10 in “ON”, the slave lasers set DIP
SWITCH in binary numbers using the dip switches
to set separate head addresses allowing
separate control via the controller
l When not using a DMX controller to control
laser light, the DIP SWITCH No.10 in “ON”,
position then the laser light will be in sound
active mode
l When not using a DMX controller to control
laser light, the DIP SWITCH No.1 in “ON”, position
then the laser light will be in automatic mode
l When not using a DMX controller to control
laser light, to link lasers set the Master DIP
SWITCH No.1 in “ON”, Slave No.2 in “ON”,
position the laser will be in automatic mode
l DMX LASER 60 was designed with a black out
function. When no sound is present the DMX
LASER 60 will go into black out mode. And when
the sensitivity is set to low the laser will go into
black out mode.
TECHNICAL SPECIFICATION
Operation Voltage: AC 220V~240V/50Hz
Working power: 15W
Laser Wavelength: 532nm
Laser power: 60mW
Laser class: Class 3b
Fuse: 3A F
Channels: 10 channels
Control signal: DMX512 signal
Control mode: DMX/Sound
active/Automatic/Mini-controller
Net weight: 4.00Kg
Dimensions: 225X230X123mm
CHANNEL DMX512 OPTIONS FUNCTION
1 0~63 Sound active programs
64~127 Automation program (3ch-10ch not available)
128~191 Manual and with sound activation
192~255 Automation and automatic activation
2 0~63 Blackout
64~127 On blanking off
128~191 Pulse
192~255 Off blanking on
3 0~255 Select patterns
4 0~255 gobo moving speed
5 0~63 Keep gobo to static
64~255 Gobo change to flat effect
6 0~63 Keep gobo to static
64~127 Follow the gobo form pulse to fast speed
dotting effect
128~191 Follow the gobo form pulse to middle speed
dotting effect
192~255 Follow the gobo form pulse to slow speed
dotting effect
7 0~63 Keep gobo to static
64~255 Gobo to up and down
8 0~255 Laser effect projection speed.
9 0~255 Control the gobo to zoom
10 0~255 Slow-draw speed, There are 12 mode speeds
to control gobo to slow-draw.
From slowly and fast.
l When using a DMX controller set No.1ch to Manual mode or Automatic mode then set
No.2ch to line.
l When using a DMX controller, please set No.4ch to 0, speed function will not work set
No.4ch speed, laser will begin working from small to large.
LASER60 9/10/07 16:15 Page 2
 Loading...