

Page 1

I N S T R U C T I O N M A N U A L
DMX Laser40 FScan
Fast scanning green DMX laser
Fast scanning motor
9 channel DMX 512 operation
XLR DMX in and out
Pre-programmed graphic images
Sound-to-Light, Auto, Master / Slave and DMX 512 modes
Tough metal chassis
Adjustable hanging bracket
Key operated power control
Endless show creation possibilities
For the latest product updates and information on the entire Kam range visit:
www.kam.co.uk
Kam products are manufactured by: Lamba plc, Unit 1, Southfields Road, Dunstable, Bedfordshire, United Kingdom LU6 3EJ
Telephone: (+44) (0)1582 690600 • Fax: (+44) (0)1582 690400 • Email: mail@lambaplc.com • Web: www.lambaplc.com
Page 2
Kam DMX Laser40 FScan
Fast scanning green DMX laser
INTRODUCTION
Thank you for purchasing the Kam DMX Laser40 FScan. To optimise the performance of this product please read
hese operating instructions prior to use to familiarise yourself with the basic operations of this unit. Please keep
t
this user manual in a safe place for future reference. This unit has been tested at our factory before being shipped
to you, there is no assembly required.
WARNING
To prevent or reduce the risk of electric shock or fire, do not expose this unit to high temperature, rain or moisture.
This unit is for indoor use only.
Laser class 3B product. National regulations must be adhered to at all steps of installation. (In Germany apply DIN
56912 and BGVR laser. Note additional regulations may apply).
Unintended reflections of the laser beam on reflective or metallic surfaces can be dangerous. This appliance is to
be used by qualified personnel only.
LASER RADIATION WARNING
This unit uses a green laser diode; this is a class 3B laser product. Avoid exposure to eyes. Never open the laser
diode box, please refer unit to a qualified engineer for any servicing or repairs.
PACKAGING
Every Kam DMX Laser40 FScan has been thoroughly tested and should be in perfect condition when it reaches
you. When you receive your new Kam product, please open the packaging to check that there is no damage to the
outer packaging carton that may have occurred during shipping. If the carton is damaged please check the laser
unit for any signs of damage, if any is found, do not use the laser unit, simply contact the retailer you purchased
the unit from and return it to them if required.
PACKAGE CONTENTS
User instructions / Power cable with plug / Laser unit
GENERAL WARNINGS
Please follow these operations to ensure a long and safe life for your laser. Keep the laser housing clean. Do not
attempt to operate this unit if it becomes damaged in any way. Never operate this unit when its cover is removed.
Disconnect from the mains power before making any type of connection. To prevent or reduce the risk of electrical
shock or fire, do not expose this unit to rain or moisture. Do not attempt to operate this unit if the power cord has
been frayed or broken. Please route your power cord out of the way of foot traffic. Disconnect the appliance before
cleaning and maintenance. This unit has auto-sensing voltage selection dependent on US or European supply.
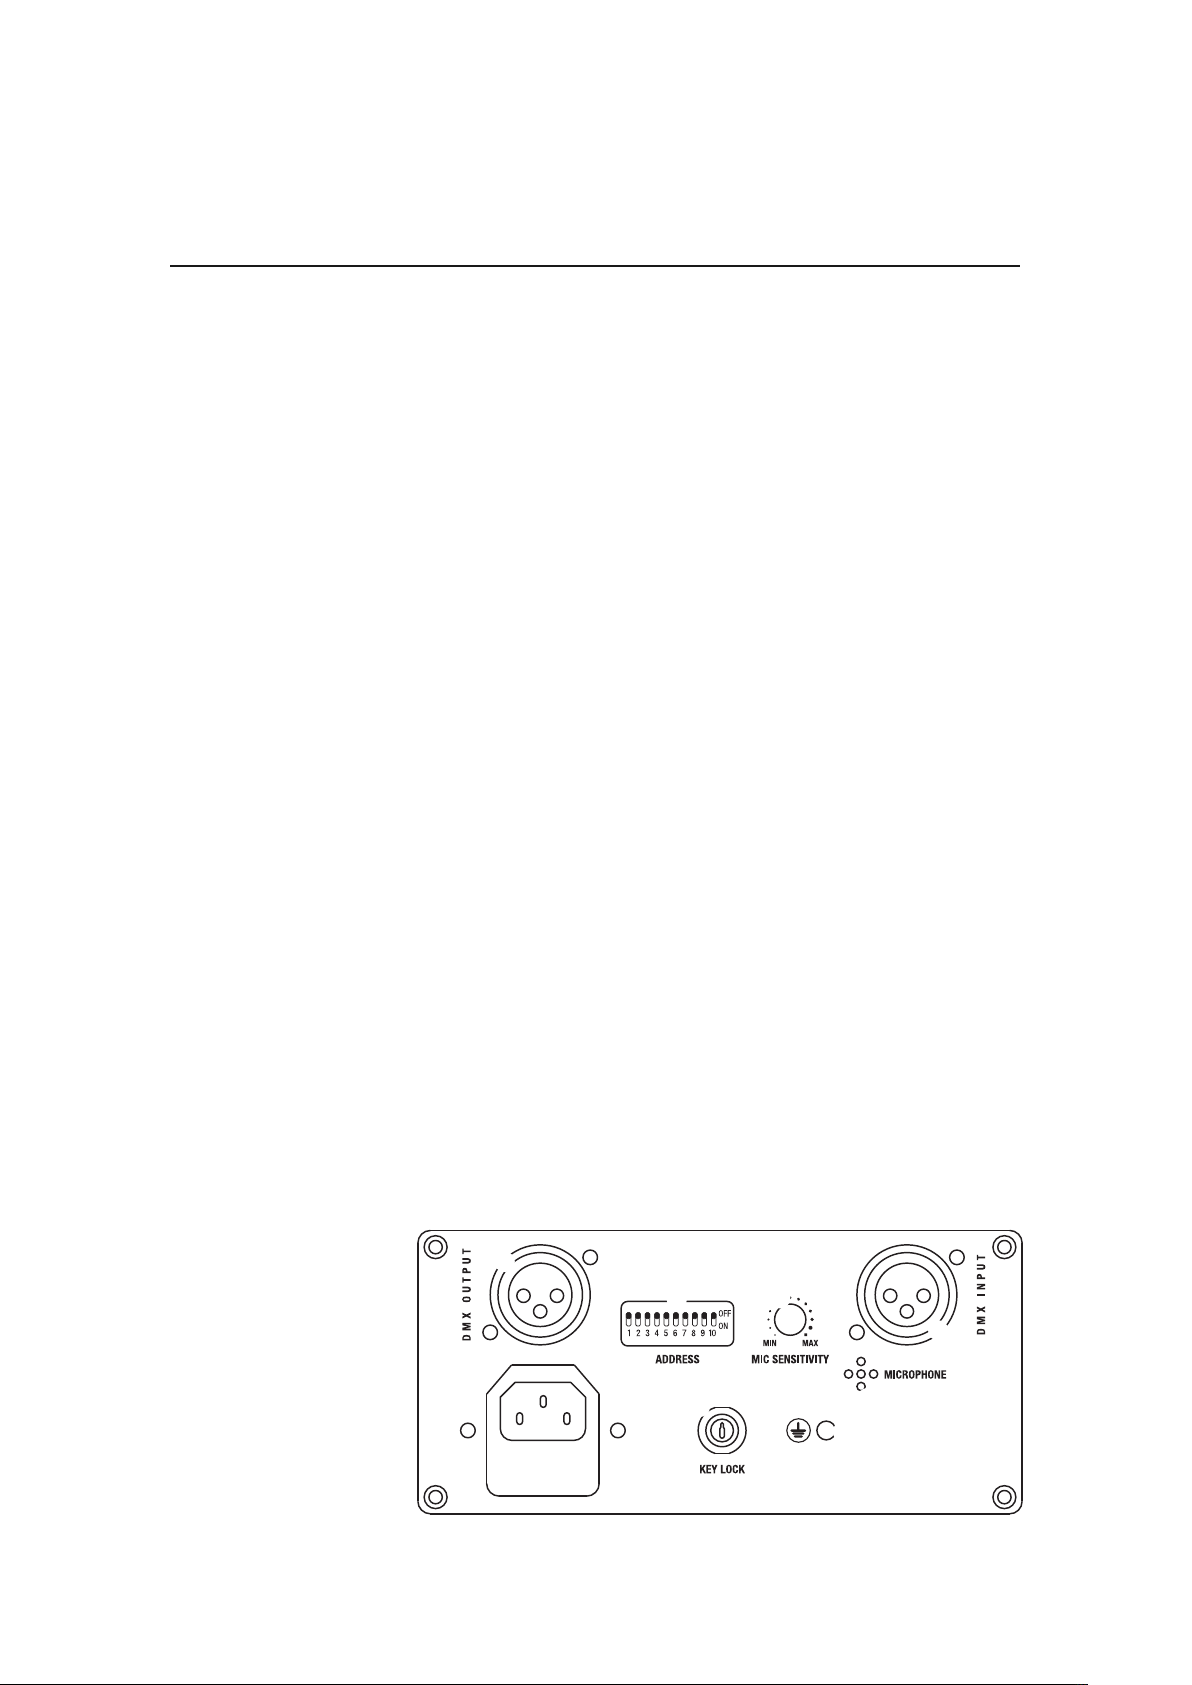
FEATURES
1. Mains fused IEC socket
2. Internal microphone
3. Mic sensitivity adjustment
4. DMX dip switch address
5. DMX output
6. DMX input
7. Security key switch
8. Earth tag
t
r
u
e
y
w
i
q
2
Page 3

INSTALLATION
. Ensure the correct mains supply voltage is used before plugging the unit in
1
2. Installation should be done by a qualified engineer
3. Ensure when mounting this unit that all vents are clear and unit is not placed next to any flammable material
4. This appliance must be earthed
. This laser uses a class 3b laser diode. Certain reflections of the laser beam from reflective surfaces may be
5
dangerous, avoid looking directly into the laser
6. Disconnect from the mains before carrying out any servicing or maintenance
7. When replacing the fuse ensure the correct value fuse is used
. Ensure any rigging or mounting point is suitable for the installation of this product and is strong and secure
8
enough to hold the unit safely
SETTINGS
Stand alone mode
To operate the unit in stand alone mode with no controller, set dip switch 10 only to the ON position. This operates
the auto/sound mode. Turning the sound sensitivity control fully anti-clockwise will set the laser to full automatic
mode and the laser will scroll through its built in programs 42 patterns.
Adjusting the variable sensitivity dial clockwise will enable the sound activation mode and when sound is heard,
the laser will react. When no sound is heard the laser reverts to automatic mode.
Linking lasers in stand alone mode with no controller
Use 3 pin XLR to XLR cables to link lasers with a DMX signal (cables not supplied).
Set the first laser’s dip switch 10 to the ON position, set all other slave unit’s dip switches to the OFF position.
Linking lasers in DMX mode using a DMX controller
Set the correct starting address on each laser and link the units with DMX cables. Each unit has 9 DMX channels.
Set the first laser’s dip switch 1 to the ON position, set all other slave unit’s dip switches to the OFF position.
Set the second laser’s dip switches as follows: 2, 3, 4, 6, 7, 8, 9, 10 to the ON position and 1 and 5 to OFF.
Set the third laser’s dip switches as follows: 2, 3, 4, 5, 7, 8, 9, 10 to the ON position and 1 and 6 to OFF and so on.
3
Page 4

Set all channels using the DMX binary format. See below diagram for a brief explanation.
D
ip switch settingsBinary system
0 0 0 0 0 0 0 0 01
1 7 1 0 0 0 0 0 0 0 0
D
ecimal Dip switch settingsBinary systemDecimal
3 3
4 9
1 1 1 0 0 0 0 0 0
1 0 1 1 0 0 0 0 0
Pattern selection
AutoBeam off
0 255
Sound
Rotate anti-clockwise
manual control
X axis flip
manual control
X axis flip
speed control
Y axis flip
manual control
Y axis flip
speed control
Axis scan manual
left and right Axis scan speed
Axis scan manual
up and down
Beam trace speed
Vector point tracking
Axis scan speed
Rotate anti-clockwise
speed control
1
2
3
4
5
6
7
8
9
See below diagram for a brief explanation of the channel controls.
© C O P Y R I G H T L A M B A p l c 2 0 0 9 . E & O E .
Technical Specifications
Laser power: 40-60Mw
Rated voltage: AC100V-240V/50Hz-60Hz
Power consumption: 80W
Laser wavelength: 532nm
Laser source: solid semiconductor laser generator
Laser colour: emerald green
Scanning: 15kpps scanner system
Scanning angle: ±20 degrees
Laser patterns: 42
Control modes: Sound-activated, Auto, Master/Slave and DMX512
DMX channels: 9 x DMX512
Chassis: Aluminium
Size: 260 x 230 x 185mm (LxWxH)
Net weight: 2Kg
The laser is designed for indoor use only, do not use outdoors.
Due to continuous product development, specifications and appearance are subject to change.
If this product is ever no longer functional please it take to a recycling plant for environmentally friendly disposal.
4
 Loading...