

Page 1
i n s t r u c t i o n m a n u a l
w w w . k a m . c o . u k
Remarks:
DIP SWITCH NO.1 & NO.10 in “ON” control via
dmx controller
DIP SWITCH NO.1 & NO.10 in “ON”.
The mini-controller can be use to control the
laser light.
When using DMX, the mini-controller function
is not available. When using mini-controlle
control, the DMX is not available.
When not using any controller to control laser
, set DIP SWITCH No.1 “ON”, then the laser light
will be in automatic mode
Link laser to master & slave by DMX control,
Master & slave DIP SWITCH setting to No.1 &
NO.10 in “ON”, then all lasers will show same
patterns & work together in sync.
Link laser to master & slave by DMX control,
Master laser DIP SWITCH setting to No.1 & NO.10
in “ON”, slave lasers DIP SWITCH setting will
follow laser function
Use DMX channel binary numbers to set
different head addresses in each unit. Then all
lasers will show different patterns via DMX
controller programming
When no using any controller to control laser,
the laser will be in automatic and sound active
mode. The laser can be linked in master and
slave mode. From master 5-XLR to slave 3-XLR.
THE DIP SWITCH SETTINGS
Master DIP SWITCH address: NO.1
and NO.10 in “OFF”.
All slaves DIP SWITCH address: NO.2 in “ON”.
The DMX LASER 120 PRO is designed with a
blackout function.
A: When no sound is present the laser will go into
blackout mode
B: When the sensitivity is set to low the laser will
go into blackout mode
C: When no DMX signal, the laser will go into
blackout mode
D: When OFF DMX signal, the laser will go into
blackout mode
E: Under DMX signal control to Manual with
sound active mode, blackout function is not
available.
Technical Specification
Operation Voltage: AC 220/240V/50Hz
Working power: 30W
Laser Wavelength: 532nm
Laser power: 120mW
Laser class: Class IIIb
Fuse: 3A F
Insulation Resistance: >2M
Channels: 12 channels
Control signal: DMX512 signal
Control mode: Mini-Controller/Sound
active/Automatic DMX Linkable
Net weight: 4.20Kg
Dimensions: 225x300x280mm
Attention: The laser light is designed indoor use
only Working temperature in 10° ~ 60°C.
Due to continuous product
development, specifications
and appearance are subject to
change. E&O E.
Page 2
INTRODUCTION
Thank you for purchasing the DMX LASER 120
PRO To optimize the performance of this
product, prior to use, please read these
operating instructions carefully to familiarize
yourself with the basic operations of this unit.
DMX LASER 120 PRO light has the KAM funky
design and is an amazing Laser effect. Please
keep these user instructions in safe place for
future reference. This unit has been Tested at the
factory before being shipped to you. There is no
Assembly required.
WARNING!
To prevent or reduce the risk of electrical shock
or fire, do not expose this unit to high
Temperature / rain or moisture.
Laser Class 3B product. National Regulations
must be adhered to at all steps of installation.
(In Germany apply DIN 56912 and BGVR LASER
note: additional Regulations may apply).
Unintended reflections of the laser beam from
reflective or metallic surfaces can be
dangerous.
This appliance is to used by Qualified personnel
only.
Laser Radiation Warning
This unit uses diode lasers in green colour. This is
CLASS 3B laser product.
Avoid exposure to eyes. Never open the laser
diode box , please refer unit to a qualified engineer for servicing or repairs
DMX LASER 120 PRO
FEATURES
Sound activation
High laser output
DMX 512 signal control
Optional mini-controller
High-speed optical scanner.
X+Y scanning module unit can display many
different laser patterns,°¢move°¢rotation °¢split
°¢slow-draw°¢blackout, enlarge and shrink
image and so on
The unit can be used for mobile DJ'S, roller rinks,
disco, clubs and many applications
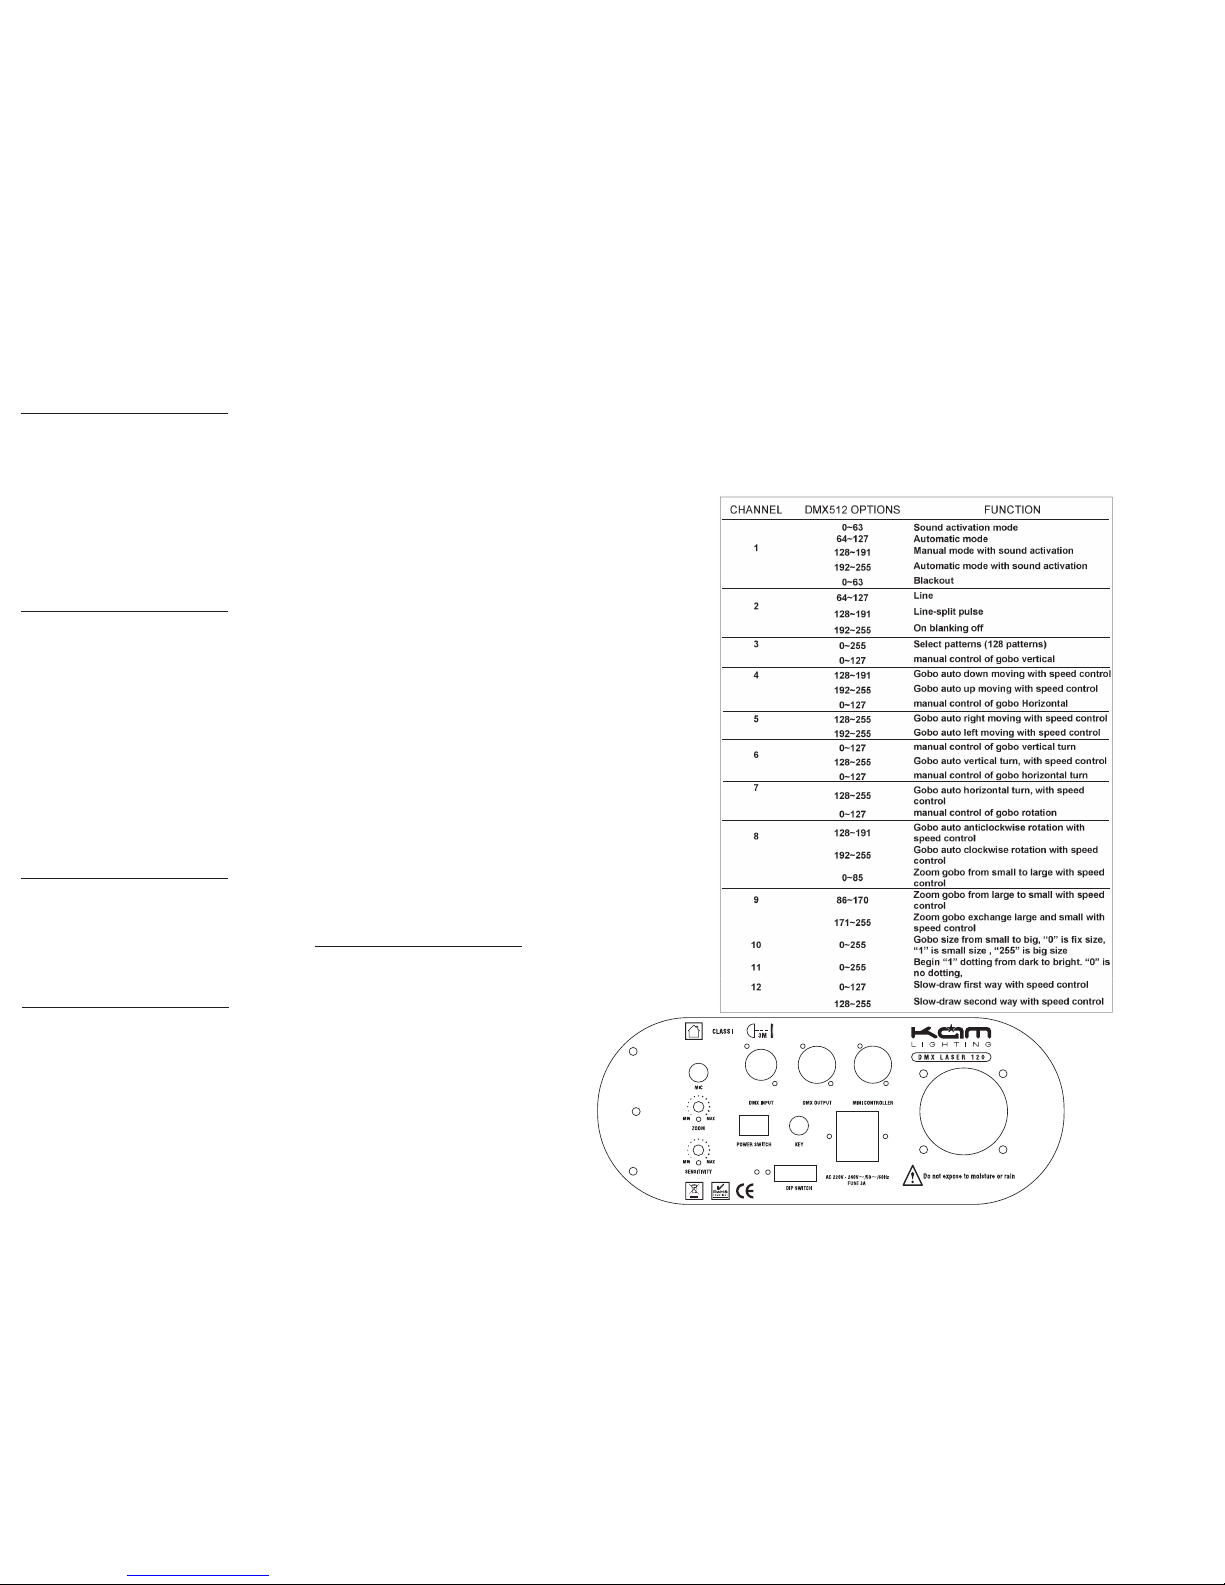
DMX channels functions and options
When using a DMX controller,
DIP SWITCH 1~10 setting as follows:
NO.1 & NO.10 in “ON” unit controlled by DMX.
Packing
Every DMX LASER 120 PRO has been thoroughly
tested, and in perfect working order before
being shipped to you.
When you receive the unit, please open the
packing to check. carefully the carton for
damaged that may have occurred during
shipping. If the carton appears to be damaged,
carefully inspect your laser for any damage.
In the case damage has been found please
contact to the dealer you purchased it from
Installation
Be sure that the mains power outlet matches
the required voltage for the laser 220v-240v
The LASER LIGHT must be installed by a
qualified technician.
Always be sure to mount this unit in area that
will allow proper ventilation.
Allow about 6”(15cm) between this laser
and a wall.
For safety, the laser must be earthed
Instructions
Please follow these instructions, to ensure a long
and safe life for your LASER
Keep the laser clean.
Do not attempt to operate this unit, if it
becomes damaged in any way.
Never operate this unit when it's cover is
removed.
Disconnect from mains power before carrying
out any maintenance
To prevent or reduce the risk of electrical
shock or fire, do not expose this unit to rain or
moisture.
Never block the ventilation holes.
Do not attempt to operate this unit if the
power cable has been damaged
REAR PANEL
POWER SWITCH: ON/OFF
DMX INPUT: DMX signal input----Male XLR
DMX OUTPUT: DMX signal output----Female XLR
MINI-CONTROLLER: Use 5 pix XLR Male
connection.
DIP SWITCH: DMX address
MIC: Sound active
Min-Max: Adjust the sensitivity knob for sound
activation
ZOOM: Adjust the patterns size large and small
KEY: LOCK laser
Using a DMX controller set No.1ch to on
Manual mode or Automation mode and then
set No.2ch to on line.
Using a DMX controller, please note No.4ch to
0ff, speed function doesn't work. set No.4ch
speed CLASS function begin from 1 to large.
 Loading...