

Page 1
Waffle maker
Gofrera
USK WM 17885
USK WM 32619
www.KALORIK.com
120V~60Hz 1000W
Page 2
IMPORTANT SAFEGUARDS
When using electrical appliances, basic safety precautions should
always be followed, including the following :
1. READ ALL INSTRUCTIONS
2. Check that your mains voltage corresponds to that stated on the
rating plate of the appliance before using the appliance.
3. Do not touch hot surfaces. Use the handles.
4. To protect against electrical shock do not immerse cord, plug, or
the appliance in water or other liquid.
5. Close supervision is necessary when the appliance is used by or
near children.
6. Unplug from outlet when not in use and before cleaning. Allow to
cool before cleaning the appliance.
7. Do not operate any appliance with a damaged cord or plug or
after the appliance malfunctions or has been damaged in any
manner. Return appliance to the nearest authorized service
facility for examination, repair, or adjustment.
8. The use of accessory attachments not recommended by the
appliance manufacturer may cause injuries.
9. Do not use outdoors.
10. Do not let cord hang over edge of table or counter or touch hot
surfaces.
11. Do not place on or near a hot gas or electric burner, or in a
heated oven.
12. Extreme caution must be used when moving an appliance
containing hot oil or other hot liquids.
13. Always attach plug to appliance first, then plug cord into the wall
outlet. To disconnect remove the plug from the wall outlet.
14. Do not use appliance for other than intended use.
15. When using this appliance, provide adequate airspace above
and on all sides for air circulation. On surfaces where heat may
cause a problem, an insulated hot pad is recommended.
16. Do not leave unit unattended during use.
2
USK WM 17885 / 32619 - 100922
Page 3

17. Always use the product on a clean, flat, hard, dry surface. There
should be no material such as a tablecloth or plastic between
the unit and surface. A fire may occur if sandwich maker is
covered or touching flammable material, including curtains,
draperies, walls, and the like, when in operation.
18. It is absolutely necessary to keep this appliance clean at all times
as it comes into direct contact with food.
19. Be careful not to scratch the non-stick coating of the cooking
plate, as you might get little pieces of this coating into the food. If
scraping is necessary, unplug the appliance and use a classical
wooden spatula or a heat resistant plastic one.
20. To disconnect the appliance remove the plug from the wall
outlet.
SAVE THESE INSTRUCTIONS
POLARIZED PLUG INSTRUCTIONS
Some appliances are equipped with a polarized plug (one blade is
wider than the other). To reduce the risk of electric shock, this plug
will fit into the polarized outlet only one way. If the plug does not
properly fit into the outlet at first, reverse it. If it still does not fit,
contact a competent qualified electrician. Do not attempt to modify
the plug in any way.
For appliances equipped with a standard plug, simply insert the plug
into the outlet without paying attention to the way you plug it.
SHORT CORD INSTRUCTIONS
A short power supply cord is provided to reduce the hazards resulting
from becoming entangled in, or tripping over a longer cord.
Extension cords may be used if care is exercised in their use.
• The electrical rating of the extension cord should be at least
that of the appliance. If the electrical rating of the extension
cord is too low, it could overheat and burn.
• The resulting extended cord should be arranged so that it will
not drape over the counter top or tabletop where it can be
pulled on by children or tripped over.
3
USK WM 17885 / 32619 - 100922
Page 4

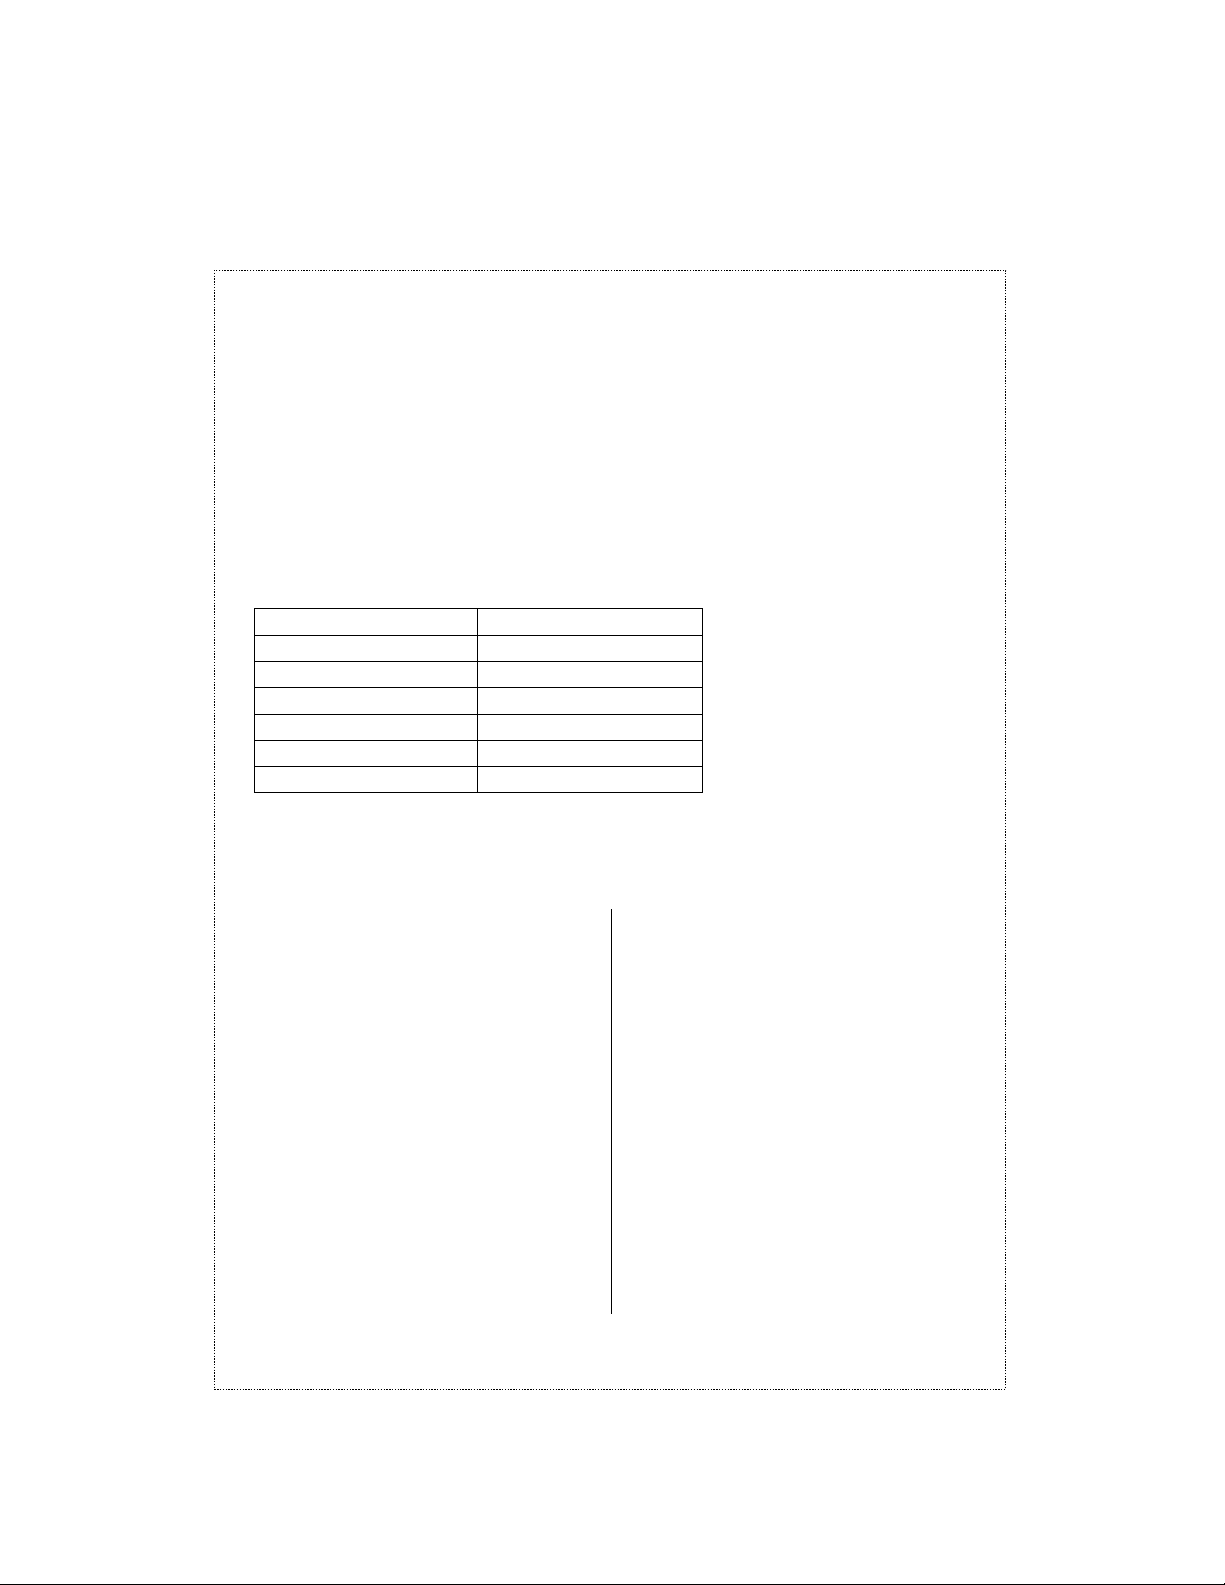
PART DESCRIPTION
C
A
A. Thermostat
B. Power light
C. Temperature pilot light
D. Baking plates
E. Handle
B
OPERATION
E
D
• Protective coating burn off will cause smoking on first use. This is
NOT harmful and will disappear after a short time.
• When using for the first time, wipe the surface of the plates with a
damp cloth, then dry.
• Close the appliance and plug into the electrical outlet. The red
power light will come on to indicate that the appliance is
switched on.
• Set the thermostat to the desired position from 1 to 6 (6 being the
hottest). The green temperature pilot light will come on to indicate
the appliance is warming up. When the green pilot light goes out,
it means that the desired temperature is reached. During use, this
pilot light will come on and off regularly. This simply means that the
thermostat is regulating the appliance's temperature.
• Caution: during operation, the baking plates heat up. Pay
attention not to get burned.
• Open the appliance and lightly brush the grids with butter,
margarine or cooking oil.
• Pour the batter evenly into the heart-shaped sections of the
bottom grid but not all the way to the edges and close the
appliance. Press the lid down for a moment to spread the batter
evenly on the baking plate.
4
USK WM 17885 / 32619 - 100922
Page 5
• Bake until golden brown. If necessary, adjust the temperature by
turning the thermostat according to the desired browning level
needed to bake, and wait until the green pilot light goes out.
• When the waffles are ready, remove them with a plastic or
wooden spatula. Never use any sharp metallic objects, as this
might damage the non-stick coating.
• When baking is finished, unplug the cord from the socket and
leave the appliance open to cool.
The table below shows the thermostat settings and their
corresponding temperature range:
Thermostat settings Temperature range
1
2
239-293°F
275-329°F
3 302-356°F
4
329-383°F
5 356-410°F
6 383-437°F
WAFFLE RECIPES
SHORTBREAD WAFFLES
14 tbsp butter
1 cup sugar
4 eggs
twist of lemon
1 ½ cup of plain flour
YEAST WAFFLES
3 tbsp yeast
1 cup milk
9 tbsp butter
¼ cup sugar
6 eggs
twist of lemon
pinch of salt
3 cups of plain flour
TRADITIONAL WAFFLES
9 tbsp butter
¾ cup sugar
twist of lemon
pinch of salt
3 eggs
1 cup milk
2 cups of plain flour
1 tsp baking powder
5
USK WM 17885 / 32619 - 100922
Page 6

CRISP WAFFLES
14 tbsp butter
¾ cup sugar
4 eggs
3 cups of plain flour
1 tbsp rum
few drops vanilla essence
2/3 to 3/4 cup water (not milk)
APPLE WAFFLES
11 tblsp butter
1 cup sugar
4 eggs
1 tsp baking powder
2 cups of plain flour
pinch of salt
small pinch of ground cloves
1 tsp cinnamon
2 apples peeled and diced
HOW TO PREPARE A BATTER
• Combine the flour with the baking soda, salt, and sugar,
• If using, in a bowl and make a well in the center.
• Add the egg yolk and milk, and gradually, work into the flour
using a whisk.
• Beat gently until smooth.
• Carefully stir in the melted butter.
• In a grease-free bowl, whisk the egg white until stiff and carefully
fold into the batter using a large metal spoon.
• Please find above examples of variations of ingredients to create
different kind of waffles..
CLEANING
• Before cleaning, unplug and wait for the appliance to cool
down.
• Wipe the outside with only a slightly moistened cloth ensuring that
no moisture, oil or grease enters the cooling slots.
• Wipe the inside and the edges of the plate with paper towel or a
soft cloth.
• Do not clean the inside or outside with any abrasive scouring pad
or steel wool as this will damage the finish.
• If there is any batter backed onto the plate, we would advise
using vegetable oil to soften it and waiting 5 minutes before
removing it.
6
USK WM 17885 / 32619 - 100922
Page 7

• DO NOT IMMERSE IN WATER OR ANY OTHER LIQUID.
WARRANTY
We suggest that you complete and return the enclosed Product
Registration Card promptly to facilitate verification of the date of
original purchase. However, return of the Product Registration Card is
not a condition of these warranties. You can also fill this warranty
card online, at the following address: www.KALORIK.com
This KALORIK product is warranted, in the U.S.A., for 1 year from the
date of purchase against defects in material and workmanship. This
warranty is not transferable. Keep the original sales receipt. Proof of
purchase is required to obtain warranty performance.
During this period, the KALORIK product that, upon inspection by
KALORIK, is proved defective, will be repaired or replaced, at
Kalorik’s option, without charge to the customer. If a replacement
product is sent, it will carry the remaining warranty of the original
product.
This warranty does not apply to any defect arising from a buyer's or
user's misuse of the product, negligence, failure to follow KALORIK
instructions noted in the user’s manual, use on current or voltage
other than that stamped on the product, wear and tear, alteration
or repair not authorized by KALORIK, or use for commercial purposes.
There is no warranty for glass parts, glass containers, filter basket,
blades and agitators, and accessories in general. There is also no
warranty for parts lost by the user.
ANY WARRANTY OF MERCHANTABILITY OR FITNESS WITH RESPECT TO
THIS PRODUCT IS ALSO LIMITED TO THE ONE YEAR LIMITED WARRANTY
PERIOD
Some states do not allow limitation on how long an implied warranty
lasts or do not allow the exclusion of incidental or consequential
damages, so the above limitations may not apply to you. This
7
USK WM 17885 / 32619 - 100922
Page 8

warranty gives you specific legal rights, and you may also have other
rights which vary from state to state.
If the appliance should become defective within the warranty
period and more than 30 days after date of purchase, do not return
the appliance to the store: often, our Consumer Service
Representatives can help solve the problem without having the
product serviced. If servicing is needed, a Representative can
confirm whether the product is under warranty and direct you to the
nearest service location.
If this is the case, bring the product (or send it, postage prepaid),
along with proof of purchase and indicating a return authorization
number given by our Consumer Service Representatives, to the
nearest authorized KALORIK Service Centre (please visit our website
at www.KALORIK.com or call our Customer Service Department for
the address of the nearest authorized KALORIK Service Centre).
If you send the product, please include a letter explaining the nature
of the claimed defect.
If you have additional questions, please call our Consumer Service
Department (please see below for complete contact information),
Monday through Friday from 9:00am - 6:00pm (EST). Please note
hours are subject to change.
If you would like to write, please send your letter to:
KALORIK Consumer Service department
Team International Group of America Inc
1400 N.W 159th Street, Suite 102
Miami Gardens, FL 33169 USA
Or call :
Toll Free in the U.S.A. : +1 888-521-TEAM / +1 888-KALORIK
Only letters can be accepted at this address above. Shipments and
packages that do not have a return authorization number will be
refused.
8
USK WM 17885 / 32619 - 100922
Page 9

CONSEJOS DE SEGURIDAD
Cuando use algún aparato eléctrico siempre deben seguirse
precauciones básicas de seguridad incluyendo las siguientes:
1. LEA TODAS LAS INSTRUCCIONES.
2. Antes de utilizar el aparato, compruebe que el voltaje de la red
eléctrica coincide con el indicado en la placa de datos técnicos
del aparato.
3. No toque las superficies calientes. Utilice siempre las pegas.
4. Para protegerse contra una descarga eléctrica, no sumerja el
aparato, el cable de alimentación o el enchufe en agua o en
otros líquidos.
5. Es siempre necesaria la supervisión cercana cuando este
aparato esté utilizado cerca de niños. Este aparato no debe ser
usado por niños.
6. Desconecte el aparato de la toma de corriente cuando la
unidad no se encuentra en uso o antes de limpiarla. Deje enfriar
el aparato antes de limpiarlo.
7. No opere este y ningún aparato si el cable o el enchufe están
quemados o dañados, o después de que el aparato ha
funcionado inadecuadamente o ha sido dañado en cualquier
manera. El aparato debe ser reemplazado por el fabricante o
por un centro de servicio autorizado o por una persona similar
cualificada.
8. El uso de accesorios no recomendados por el fabricante pueden
causar lesiones.
9. No use en exteriores
10. No permita que el cable cuelgue del borde de la mesa o del
mostrador o toque las partes calientes.
11. No coloque este aparato cerca de quemadores de gas o
eléctricos, o dentro de un horno caliente.
12. Tenga mucho cuidado cuando desplace un aparato lleno de
aceite caliente u otros líquidos calientes.
9
USK WM 17885 / 32619 - 100922
Page 10

13. Enchufe siempre primero el cable al aparato y después en el
enchufe de la red eléctrica. Para desconectar el aparato,
desenchúfelo.
14. No use este aparato más que para lo que ha sido diseñado.
15. Asegúrese de que el espacio libre alrededor del aparato esté
suficiente mientras esté en funcionamiento, a fin que el aire
circule bien. En las superficies donde el calor pueda causar
problemas, se recomienda usar un posafuentes aislante.
16. No deje el aparato sin vigilancia mientras esté en uso.
17. Siempre use el producto sobre una superficie limpia, plana, dura
y seca. Nunca coloque materiales como por ejemplo un mantel
o un plástico entre la unidad y la superficie. Puede ocurrir un
incendio si el aparato está en funcionamiento y se encuentra en
contacto o cubierto con materiales inflamables, incluyendo
cortinas, tapicerías, paredes, etc.
18. Es indispensable guardar el aparato limpio, ya que está en
contacto directo con los alimentos.
19. Procure no rallar el revestimiento anti-adherente de la placa de
cocción, ya que en caso contrario podría encontrar partículas
del revestimiento en la comida. Si es necesario raspar las placas,
desenchufe el aparato y utilice sólo una espátula de madera o
de plástico resistente al calor.
20. Para desconectar el aparato, desenchúfelo.
GUARDE ESTAS INSTRUCCIONES
INFORMACIÓN SOBRE EL ENCHUFE POLARIZADO
Algunos aparatos están provistos con un enchufe polarizado (una
pata es más ancha que la otra). Para reducir el riesgo de choque
eléctrico, este enchufe calza en el tomacorriente polarizado de una
sola manera. Si el enchufe no cabe totalmente en el tomacorriente,
gire el enchufe. Si aún así no calza, consulte a un servicio técnico
cualificado. No intente anular esta característica de seguridad.
Para los aparatos provistos con un enchufe clásico, basta con
insertar el enchufe en la toma de corriente.
10
USK WM 17885 / 32619 - 100922
Page 11

INSTRUCCIONES DEL CABLE
El cable de alimentación del aparato es un cable corto a fin de
disminuir el riesgo de accidentes (caídas al tropezar con él, etc.)
Puede utilizar una extensión si es necesaria.
• Asegúrese de que el nivel eléctrico del cable es igual o mayor
que el indicado. Una extensión con un bajo nivel eléctrico
conllevaría el riesgo de sobrecalentarse y de estropearse.
• Para evitar riesgos coloque el cable de forma tal que los niños no
puedan jalarlo o tropezar con él.
PARTES
A. Termostato
B. Testigo luminoso de
funcionamiento
C. Testigo luminoso de
temperatura
D. Placas de cocción
E. Asa
C
A
B
MODO DE EMPLEO
E
D
• La primera vez que se enchufa, hace humo y huele. Esto es
normal, puesto que en su fabricación se pueden haber adherido
grasas que se estén quemando. No está peligroso y
desaparecerá rápidamente.
• Cuando utilice el aparato por primera vez, páselo con un paño
humedecido y séquelo.
• Cierre el aparato y enchufe la clavija a la red eléctrica. El testigo
luminoso rojo se encenderá indicando que el aparato está en
funcionamiento.
11
USK WM 17885 / 32619 - 100922
Page 12

• Regule el termostato en la posición deseada entre 1 y 6 (siendo 6
la más alta). El testigo luminoso verde se encenderá indicando
que el aparato está calentando. Cuando el testigo luminoso
verde se apague, indica que la temperatura deseada está
alcanzada. Durante el funcionamiento ese testigo luminoso irá
enciendo y apagándose regularmente. Ello indica sólo que el
termostato está regulando la temperatura del aparato.
• Atención: Durante la utilización, las placas se calientan. Téngalo
en cuenta para evitar quemaduras.
• Abra el aparato y unte las placas con un poco de mantequilla,
margarina o aceite.
• Vierta la masa uniformemente en los moldes en forma de
corazón de la placa inferior y cierre el aparato. Presione
ligeramente la parte superior del aparato para que la masa se
derrame de modo uniforme en la placa de cocción.
• Deje cocer hasta obtener una gofre dorada. Si necesario, ajuste
la temperatura girando el termostato dependiendo del nivel de
dorado deseado y espere hasta que el testigo verde se apague.
• Cuando las gofres estén cocidas, retírelas de la placa con una
espátula de madera o de plástico. No utilice nunca objetos
metálicos que podrían dañar el revestimiento antiadherente.
• Al final de la cocción, desenchufe la clavija de la toma de
corriente y deje el aparato abierto para que enfríe.
La tabla a continuación indica las posiciones del termostato y las
temperaturas correspondientes aproximadamente:
Posiciones del termostato Temperaturas
1
2
3
4
5
6
239-293°F
275-329°F
302-356°F
329-383°F
356-410°F
383-437°F
12
USK WM 17885 / 32619 - 100922
Page 13

RECETAS DE GOFRES
GOFRES "POLVORON"
½ lb de mantequilla
½ lb de azúcar
4 huevos
Rodaja de limón
½ lb de harina
GOFRES DE LEVADURA
0.8 oz de levadura
8.5 fl. oz. de leche
¼ lb de mantequilla
1.7 lb de azúcar
6 huevos
Rodaja de limón
pizca de sal
0.8 lb de harina
GOFRES TRADICIONALES
¼ lb de mantequilla
1/3 lb de azúcar
Rodaja de limón
pizca de sal
3 huevos
8.5 fl. oz. de leche
½ lb de harina
1 cucharadita de levadura
química
GOFRES CRUJIENTES
½ lb de mantequilla
1/3 lb de azúcar
4 huevos
¾ lb de harina
1 cucharadita de ron
algunas gotas de esencia de
vainilla
5-7 fl. oz. de agua (non leche)
GOFRES DE MANZANA
1/3 lb de mantequilla
0.4 lb de azúcar
4 huevos
1 cucharadita de levadura
química
½ lb de harina
pizca de sal
una pequeña pizca de clavos
1 cucharadita de canela
2 manzanas peladas y
cortadas en dados
13
USK WM 17885 / 32619 - 100922
Page 14

PREPARACIÓN DE LA PASTA PARA GOFRES
• Mezclar la harina con la levadura, la sal y el azúcar.
• En la mezcla, hacer un espacio en el centro y añadir las yemas
de huevo.
• Añadir poco a poco la leche y vaya mezclandola con la harina
con la ayuda de una espátula.
• Mezclar hasta que la pasta sea lisa y suave.
• Añadir lentamente la mantequilla derretida.
• En otro tazón/recipiente no aceitado, batir las claras hasta hacer
clara de nieve, y agreguela a la preparación utilizando una
cuchara grande de metal o un mezclador de cocina.
• Mas arriba le presentamos variantes y otros ingredientes que le
ayudarán a crear diferentes tipos de gofres.
LIMPIEZA
• Desenchufe y deje enfriar el aparato antes de limpiarlo.
• Limpie el exterior del aparato con un paño ligeramente
humedecido, asegurándose de que no haya humedad, aceite o
grasa que se infiltre en las aeraciones que enfrían el aparato.
• Limpie el interior de su aparato con un papel absorbente o un
trapo suave.
• No limpie nunca su aparato (exterior o interior) con productos
abrasivos ya que estropearía el revestimiento.
• Si queda masa cocida en la placa, aconsejamos que utilice
aceite vegetal para ablandarla y espere 5 minutos antes de
quitarla.
• NO SUMERJA EL APARATO EN AGUA NI EN NINGÚN OTRO LIQUIDO.
14
Back cover page (last page)
Assembly page 14/16
USK WM 17885 / 32619 – 100922
Page 15

GARANTÍA
Le sugerimos rellenen y nos envíen rápidamente la Tarjeta de
Registro de Producto adjunta para facilitar la verificación de la
fecha de compra. Por lo tanto, la devolución de esa Tarjeta de
Registro de Producto no es una condición imprescindible para la
aplicación de esa garantía. Puede también rellenar dicha tarjeta de
garantía en línea en la dirección siguiente: www.KALORIK.com
A partir de la fecha de compra, este producto KALORIK está
garantizado un año contra los defectos materiales y de fabricación.
Esta garantía no es transferible. Conserve la prueba de compra
original. Se exige una prueba de compra para obtener la aplicación
de la garantía.
Durante este período, si el producto KALORIK después de una
inspección por parte de KALORIK, se manifiesta defectuoso, será
reparado o reemplazado, según lo que decida KALORIK, sin gastos
para el consumidor. Si se envía un producto de reemplazo, se
aplicará la garantía que queda del producto original.
Esta garantía no se aplica a los defectos causados por una mala
utilización por parte del comprador o del usuario, o una negligencia
al no respeto del manual de instrucciones KALORIK, o una utilización
en un circuito eléctrico cuyo voltaje es diferente al que figura en el
producto, o un desgaste normal, o modificaciones o reparaciones
no autorizadas por KALORIK, o por un uso con fines comerciales. No
existe garantía por las partes de cristal, jarras de cristal, filtros, cestos,
cuchillas y accesorios en general. No existe tampoco garantía por
las piezas perdidas por el usuario.
Toda garantía de valor comercial o de adaptabilidad a este
producto está limitada a un año también.
Algunos estados no ponen límites a la duración de la garantía tácita
o no autorizan la exclusión de daños y perjuicios accesorios o
indirectos, por lo que puede que las restricciones anteriormente
mencionadas no le sean aplicables a Usted. Esta garantía le otorga
derechos legales particulares, pero usted puede tener también otros
15
Back cover page (last page)
Assembly page 15/16
USK WM 17885 / 32619 – 100922
Page 16

derechos que varían de un estado a otro y algunos derechos
pueden variar de un estado a otro.
Si el aparato tuviera un defecto durante el periodo de garantía y / o
más de 30 días después de que se compró, no devuelva el aparato
en la tienda donde le compró: a menudo, nuestro Servicio al
Consumidor puede ayudar a resolver el problema sin que el
producto tenga que ser reparado. Si hace falta una reparación, uno
de nuestros representantes puede confirmar si el producto está bajo
garantía y dirigirle al servicio post-venta más próximo.
Si fuera el caso, traiga el producto (o envíelo, correctamente
franqueado) con la prueba de compra que mencione el número de
autorización de devolución indicado por nuestro Servicio al
Consumidor, al servicio post-venta KALORIK más próximo. (Visite
nuestra web www.KALORIK.com o llame al Servicio al Consumidor
para obtener la dirección del Servicio post-venta KALORIK exclusivo
más próximo).
Si envía el producto, le rogamos añadan una carta explicando la
naturaleza del defecto.
Si tiene preguntas adicionales, por favor llame al Servicio al
Consumidor (véase abajo para los datos completos), de lunes a
viernes, de las 9 a las 18 (EST). Note que las horas pueden ser
modificadas.
Si quiere escribirnos, puede hacerlo a la dirección siguiente:
KALORIK Servicio al Consumidor
Team International Group of America Inc
1400 N.W 159th Street, Suite 102
Miami Gardens, FL 33169 USA
O llame gratuitamente (U.S.A.) al +1 888-521-TEAM / +1 888-KALORIK
Las cartas se aceptan solamente en la dirección anteriormente mencionada.
Los envíos y paquetes que no tengan número de autorización de devolución
serán rechazados
16
Back cover page (last page)
Assembly page 16/16
USK WM 17885 / 32619 – 100922
 Loading...