

Kalorik Chambrer WineBar with Dual Zone, USK WCL 1 Operating Instructions Manual
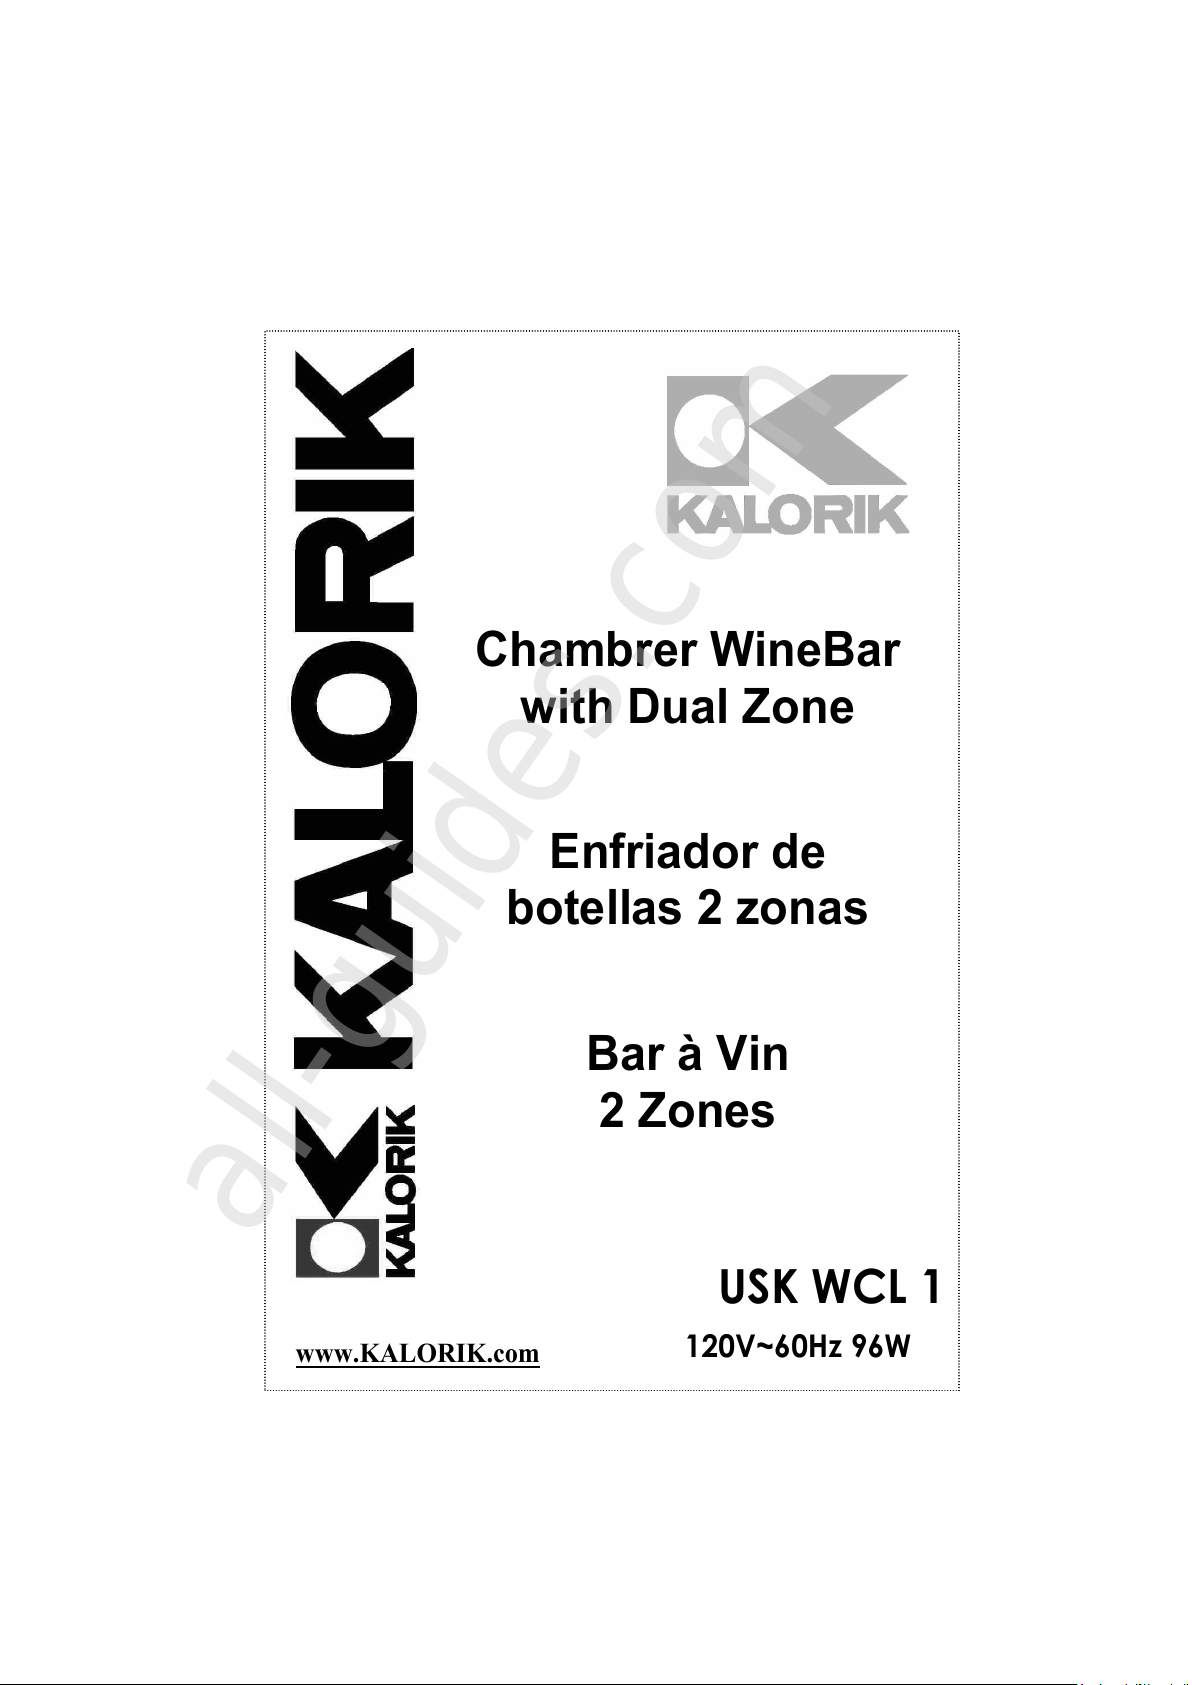
Chambrer WineBar
with Dual Zone
Enfriador de
botellas 2 zonas
Bar à Vin
2 Zones
USK WCL 1
120V~60Hz 96W
www.KALORIK.com
All manuals and user guides at all-guides.com
all-guides.com
IMPORTANT SAFEGUARDS
When using an electrical appliance, basic precautions should always
be followed to reduce the risk of fire, electric shock, and injury to
persons, including the following:
1. Use this appliance only as described in this manual. Other uses
not recommended may cause fire, electric shock or personal
injury.
2. This product is intended for household use ONLY and not for
commercial industrial or outdoor use.
3. To protect against electric shock, do not immerse unit, plug or
cord in water or spray with liquids.
4. Close supervision is necessary when any appliance is used by or
near children.
5. Unplug the appliance from the outlet when not in use, when
moving from one location to another and before cleaning.
6. To disconnect the appliance, grip the plug and pull it from the
wall outlet. Never pull by the cord.
7. Do not operate the appliance in the presence of explosive
and/or flammable fumes.
8. Do not place the appliance or any of its parts near an open
flame, cooking or other heating appliance.
9. Do not operate the appliance with a damaged cord or plug, if
the product malfunctions, or if it is dropped or damaged in any
manner.
10. The use of attachments not recommended by the manufacturer
may be hazardous.
11. Place the unit on a dry level surface.
12. Do not operate if the housing is removed or damaged.
13. A loose fit between the AC outlet (receptacle) and plug may
cause overheating and a distortion of the plug. Contact a
qualified electrician to replace loose or worn outlet.
14. This appliance is designed to be free standing only, and should
not be recessed or built-in (fully recessed).
All manuals and user guides at all-guides.com
15. Locate the unit away from direct sunlight and sources of heat
(stove, heater, radiator, etc.). Direct sunlight will affect / alter the
outside color of the appliance.
WARNING: To reduce the risk of fire, electric shock or personal injury,
unplug or disconnect the appliance from the power
supply before servicing.
SAVE THESE INSTRUCTIONS
Save time and money. Before you call for service, check at the back
of this manual. It lists causes of minor operating can correct yourself.
Warning: Changes or modifications to this unit not expressly
approved by the manufacturer could void the user’s
authority to operate the equipment
POLARIZED PLUG INSTRUCTIONS
Some appliances are equipped with a polarized plug (one blade is
wider than the other). To reduce the risk of electric shock, this plug
will fit into the polarized outlet only one way. If the plug does not
properly fit into the outlet at first, reverse it. If it still does not fit,
contact a competent qualified electrician.
Do not attempt to modify the plug in any way.
For appliances equipped with a standard plug, simply insert the plug
into the outlet without paying attention to the way you plug it.
SHORT CORD INSTRUCTIONS
A short power supply cord is provided to reduce the hazards resulting
from becoming entangled in, or tripping over a longer cord.
Extension cords may be used if care is exercised in their use.
• The electrical rating of the extension cord should be at least that
of the appliance. If the electrical rating of the extension cord is
too low, it could overheat and burn.
• The resulting extended cord should be arranged so that it will not
drape over the counter top or tabletop where it can be pulled on
by children or tripped over.
All manuals and user guides at all-guides.com
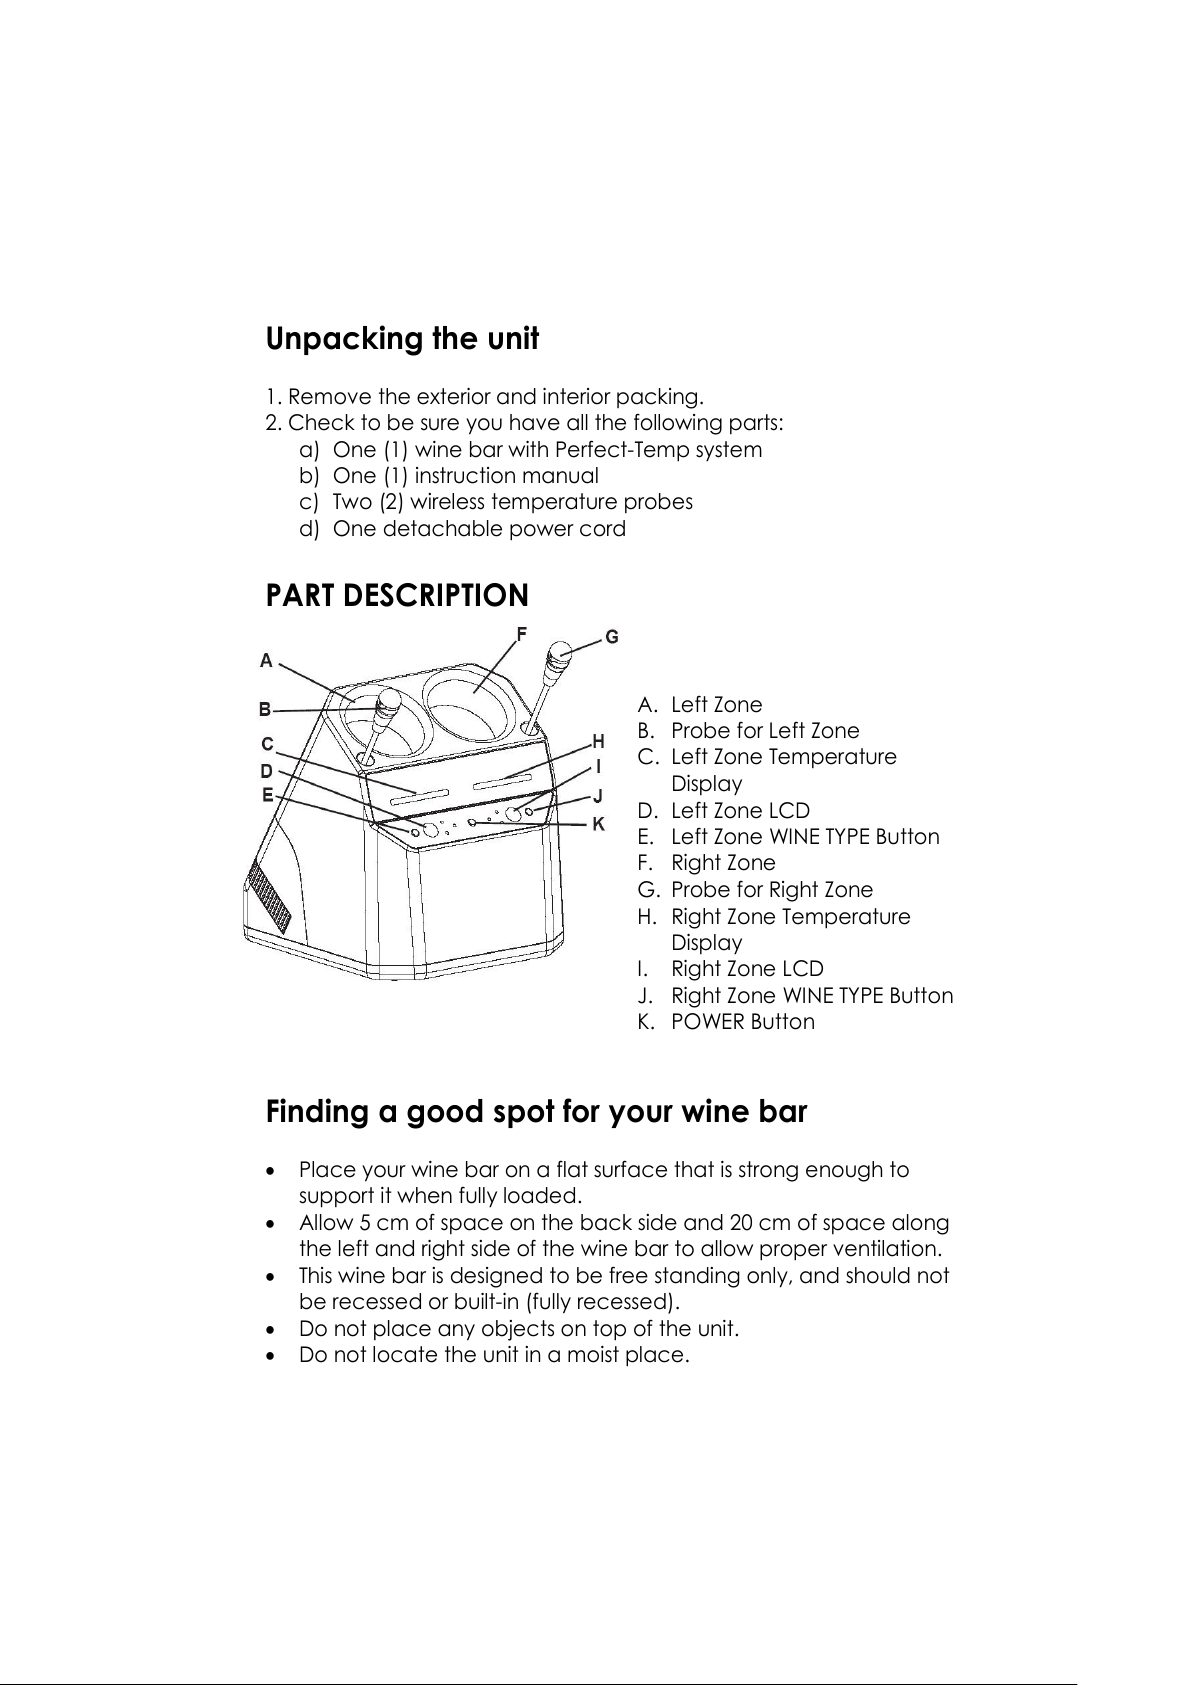
Unpacking the unit
1. Remove the exterior and interior packing.
2. Check to be sure you have all the following parts:
a) One (1) wine bar with Perfect-Temp system
b) One (1) instruction manual
c) Two (2) wireless temperature probes
d) One detachable power cord
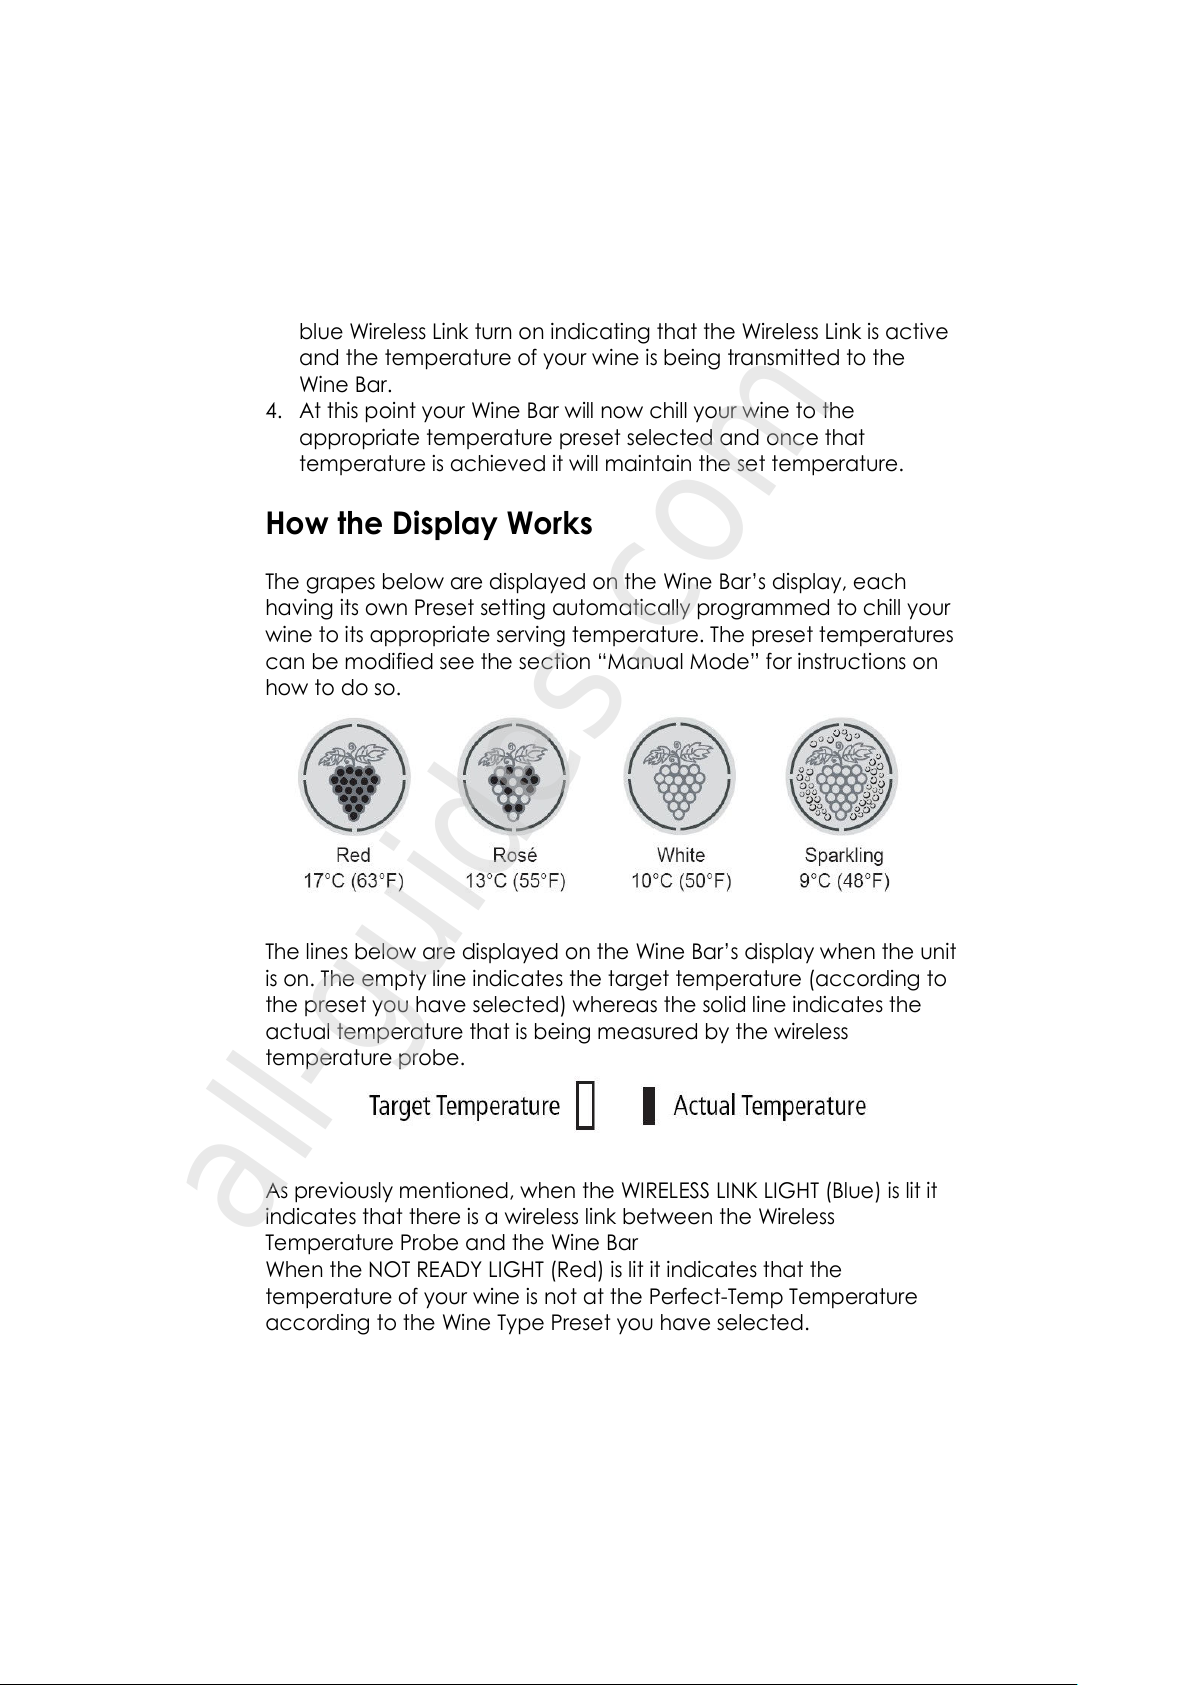
PART DESCRIPTION
A. Left Zone
B. Probe for Left Zone
C. Left Zone Temperature
Display
D. Left Zone LCD
E. Left Zone WINE TYPE Button
F. Right Zone
G. Probe for Right Zone
H. Right Zone Temperature
Display
I. Right Zone LCD
J. Right Zone WINE TYPE Button
K. POWER Button
Finding a good spot for your wine bar
• Place your wine bar on a flat surface that is strong enough to
support it when fully loaded.
• Allow 5 cm of space on the back side and 20 cm of space along
the left and right side of the wine bar to allow proper ventilation.
• This wine bar is designed to be free standing only, and should not
be recessed or built-in (fully recessed).
• Do not place any objects on top of the unit.
• Do not locate the unit in a moist place.
All manuals and user guides at all-guides.com
• The unit’s cooling system operates efficiently with an ambient
temperature of less than 21°C.
• Do not locate the wine bar in direct sunlight. Do not place unit
next to a major appliance that emits large amounts of heat, such
as a dishwasher, microwave, oven, barbecue, etc.
• ALWAYS REMOVE ALL BOTTLES BEFORE MOVING THE WINE BAR
Installing / Replacing Batteries in your Wine Bar’s
Wireless Temperature Probes
The Wine Bar’s Wireless Temperature Sensors already come with
batteries installed at the factory. Should the Sensor Unit batteries ever
need to be replaced:
1. Open the Sensor Unit by removing the battery lid with a small flat
head screwdriver.
2. Remove the exhausted battery and replace it with a lithium
button cell “CR2032”
3. When inserting the new battery make sure that the positive “+”
terminal of the battery is upwards.
4. Replace the battery lid.
BE CAREFUL WHEN INSTALLING BATTERIES IN THE WIRELESS
TEMPERATURE SENSOR OF WINE BAR. INSTALLING THE INCORRECT
BATTERIES OR REVERSING THE POLARITIES COULD CAUSE PERMANENT
DAMAGES TO THE PRODUCT.
Operating instructions
Easy to Use Preset Mode (Using the Wine Bar with the Temperature
Probes)
1. Turn on the Wine Bar by pressing the “POWER” button on the
Main Unit
2. For each zone (left & right) set the wine setting according to the
wine type you wish to chill by pressing the “WINE TYPE” button.
Keep pressing the wine type button until the correct setting
appears on the LCD & screen.
3. Once you have selected the appropriate temperature preset
turn on the correct temperature probe and insert it in your bottle
to activate that particular zone (Left or Right). You will notice the
All manuals and user guides at all-guides.com
blue Wireless Link turn on indicating that the Wireless Link is active
and the temperature of your wine is being transmitted to the
Wine Bar.
4. At this point your Wine Bar will now chill your wine to the
appropriate temperature preset selected and once that
temperature is achieved it will maintain the set temperature.
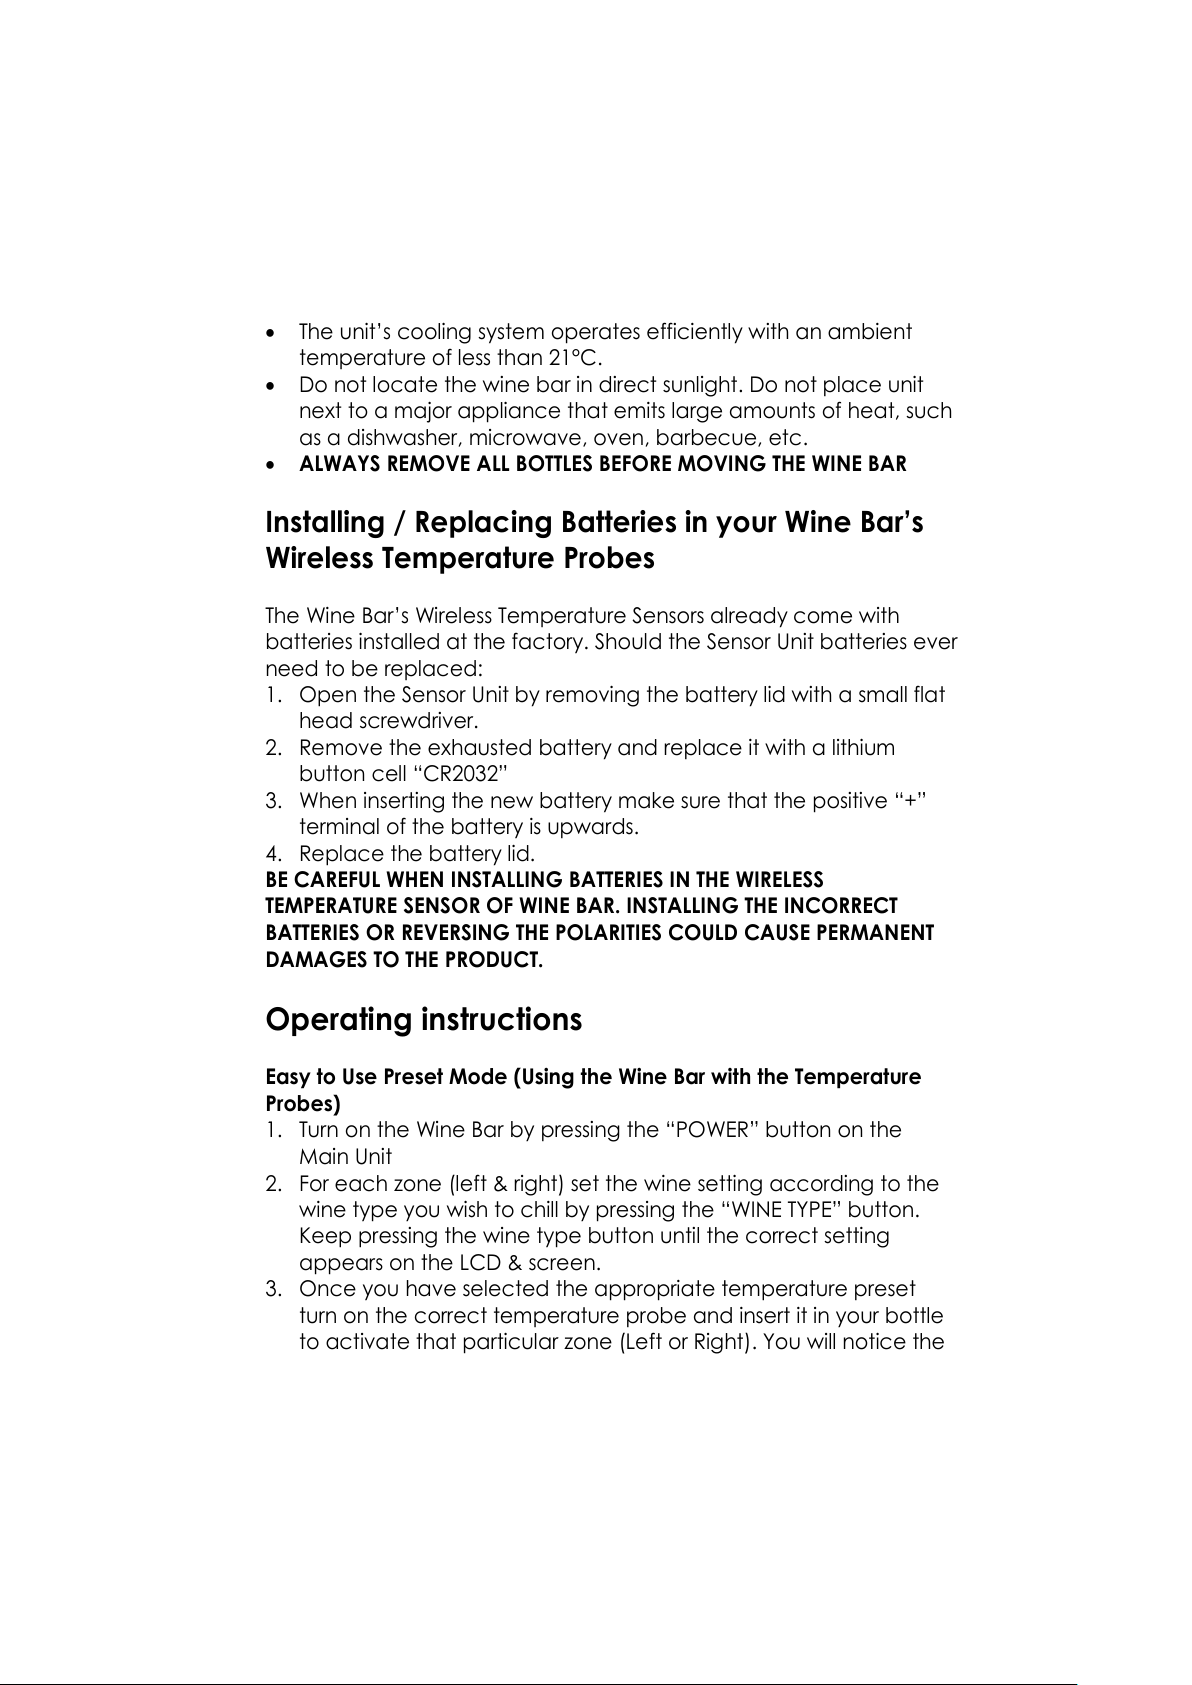
How the Display Works
The grapes below are displayed on the Wine Bar’s display, each
having its own Preset setting automatically programmed to chill your
wine to its appropriate serving temperature. The preset temperatures
can be modified see the section “Manual Mode” for instructions on
how to do so.
The lines below are displayed on the Wine Bar’s display when the unit
is on. The empty line indicates the target temperature (according to
the preset you have selected) whereas the solid line indicates the
actual temperature that is being measured by the wireless
temperature probe.
As previously mentioned, when the WIRELESS LINK LIGHT (Blue) is lit it
indicates that there is a wireless link between the Wireless
Temperature Probe and the Wine Bar
When the NOT READY LIGHT (Red) is lit it indicates that the
temperature of your wine is not at the Perfect-Temp Temperature
according to the Wine Type Preset you have selected.
All manuals and user guides at all-guides.com
all-guides.com
When the READY LIGHT (Green) is lit it indicates that the temperature
of your wine is at the Perfect-Temp temperature according to the
Wine Type Preset you have selected.
Manual Mode (Modifying the Default
Temperature Settings)
Your Wine Bar comes pre-programmed at the factory with
suggested serving temperatures for Reds (17°C / 63°F), Rosés (13°C /
55°F), Whites (10°C / 50°F), and Champagnes (9°C / 48°F). These
settings can be modified to suit your needs. To modify the default
temperature setting:
1. Turn on the Wine Bar by pressing the “POWER” button and select
the preset you wish to modify by pressing the “WINE TYPE” button
on either the Left or Right Zone or Both.
2. Press and hold the “POWER” button until the LCD’s on the Wine
Bar start flashing.
3. Once flashing press the “WINE TYPE” button to lower the Preset
Temperature Setting by 1°C (~1.8°F) decrements. You can cycle
through to a warmer temperature just by continuing to press the
WINE TYPE button. Once you have selected the modified
temperature do not touch any buttons for approximately 5
seconds. The Red LED & Preset Temperature Bar will stop flashing
and the Wine Bar will save the new temperature for the preset
you modified.
*Note: You can change the Default Temperature Setting of the
preset at anytime by following steps 1-3 above. This new setting will
be stored until it is modified or the power to the Wine Bar is
interrupted (power failure, or by unplugging from wall. Should this
occur, the Default Preset Temperature Settings will return to the
factory programmed temperatures).
All manuals and user guides at all-guides.com
Ice Chill Mode
Note: Using the Wine Bar without the Temperature Probes. Please
note that when activated, your Wine Bar will constantly run, it could
result in your beverage getting too cold.
1. Press and hold the “WINE TYPE” button (Left Zone or Right Zone)
for ten (10) seconds until the Red LED stops flashing.
2. Unit will simply turn on and start to cool.
To turn off the “ICE CHILL MODE” simply press the “POWER” button, or
turn “ON” the wireless probe.
CLEANING INSTRUCTIONS
Below is a listing of general cleaning tips that should be taken when
cleaning your wine bar.
When cleaning your wine bar, be cautious when using any type of
cleaning products, some individuals may have allergic reactions to
the chemicals in some of these products.
By using solvents to clean your wine cellar, you may damage its
finish, hence it is recommended to use mild detergents, baking soda
and water. Never spray or squirt any type of liquid onto your wine
bar. If a spray is needed, spray the liquid onto a cloth and then use
the moistened cloth to rub down the wine cellar.
• Always unplug the wine bar before cleaning.
• Wash the inside surface with a warm water and baking soda
solution. The solution should be about 2 tablespoons of baking
soda to a quart (~1 liter) of water.
• The outside of the wine bar should be cleaned with a mild
detergent solution.
• Use a damp cloth or sponge to clean the control panel.
• Always dry all the parts with a clean dry cloth before plugging
the wine bar back into the receptacle.
DO NOT USE ABRASIVE PRODUCTS SUCH AS SCOURING PADS AND
POWDERS.
THEY WILL PERMANENTLY DAMAGE THE FINISH OF YOUR WINE BAR
In addition to the cleaning tips listed above it is recommended to
clean the external grills of your wine bar every 6 months as dirt, dust
All manuals and user guides at all-guides.com

and hair can build up causing the cooling system to not function as
efficiently.
ALWAYS UNPLUG THE UNIT FROM THE WALL PRIOR TO CLEANING THE
GRILLS
There are 2 effective methods to clean the external grills of your wine
bar:
• A vacuum cleaner can be used collect the dirt, dust and hair
that has built up.
• Alternatively compressed air can be used to clean the fan of
your wine bar. Ensure to follow the directions of the compressed
air container to avoid damage or personal injury
NOTE: This device complies with Part 15 of the FCC Rules. Operation
is subject to the following two conditions: (1) this device may not
cause interference, and (2) this device must accept any
interference received, including interference that may cause
undesired operation of the device.
This equipment has been tested and found to comply with the limits
for a Class B digital device, pursuant to Part 15 of the FCC Rules.
These limits are designed to provide reasonable protection against
harmful interference in a residential installation. This equipment
generates, uses and can radiate radio frequency energy and, if not
installed and used in accordance with the instructions, may cause
harmful interference to radio communications.
However, there is no guarantee that interference will not occur in a
particular installation.
If this equipment does cause harmful interference to radio or
television reception, which can be determined by turning the
equipment off and on, the user is encouraged to try to correct the
interference by one or more of the following measures:
- Reorient or relocate the unit.
- Increase the separation between the equipment and receiver.
- Connect the equipment into an outlet on a circuit different from
that to which the receiver is connected.
- Consult a dealer or an experienced radio/TV technician for
help.
All manuals and user guides at all-guides.com
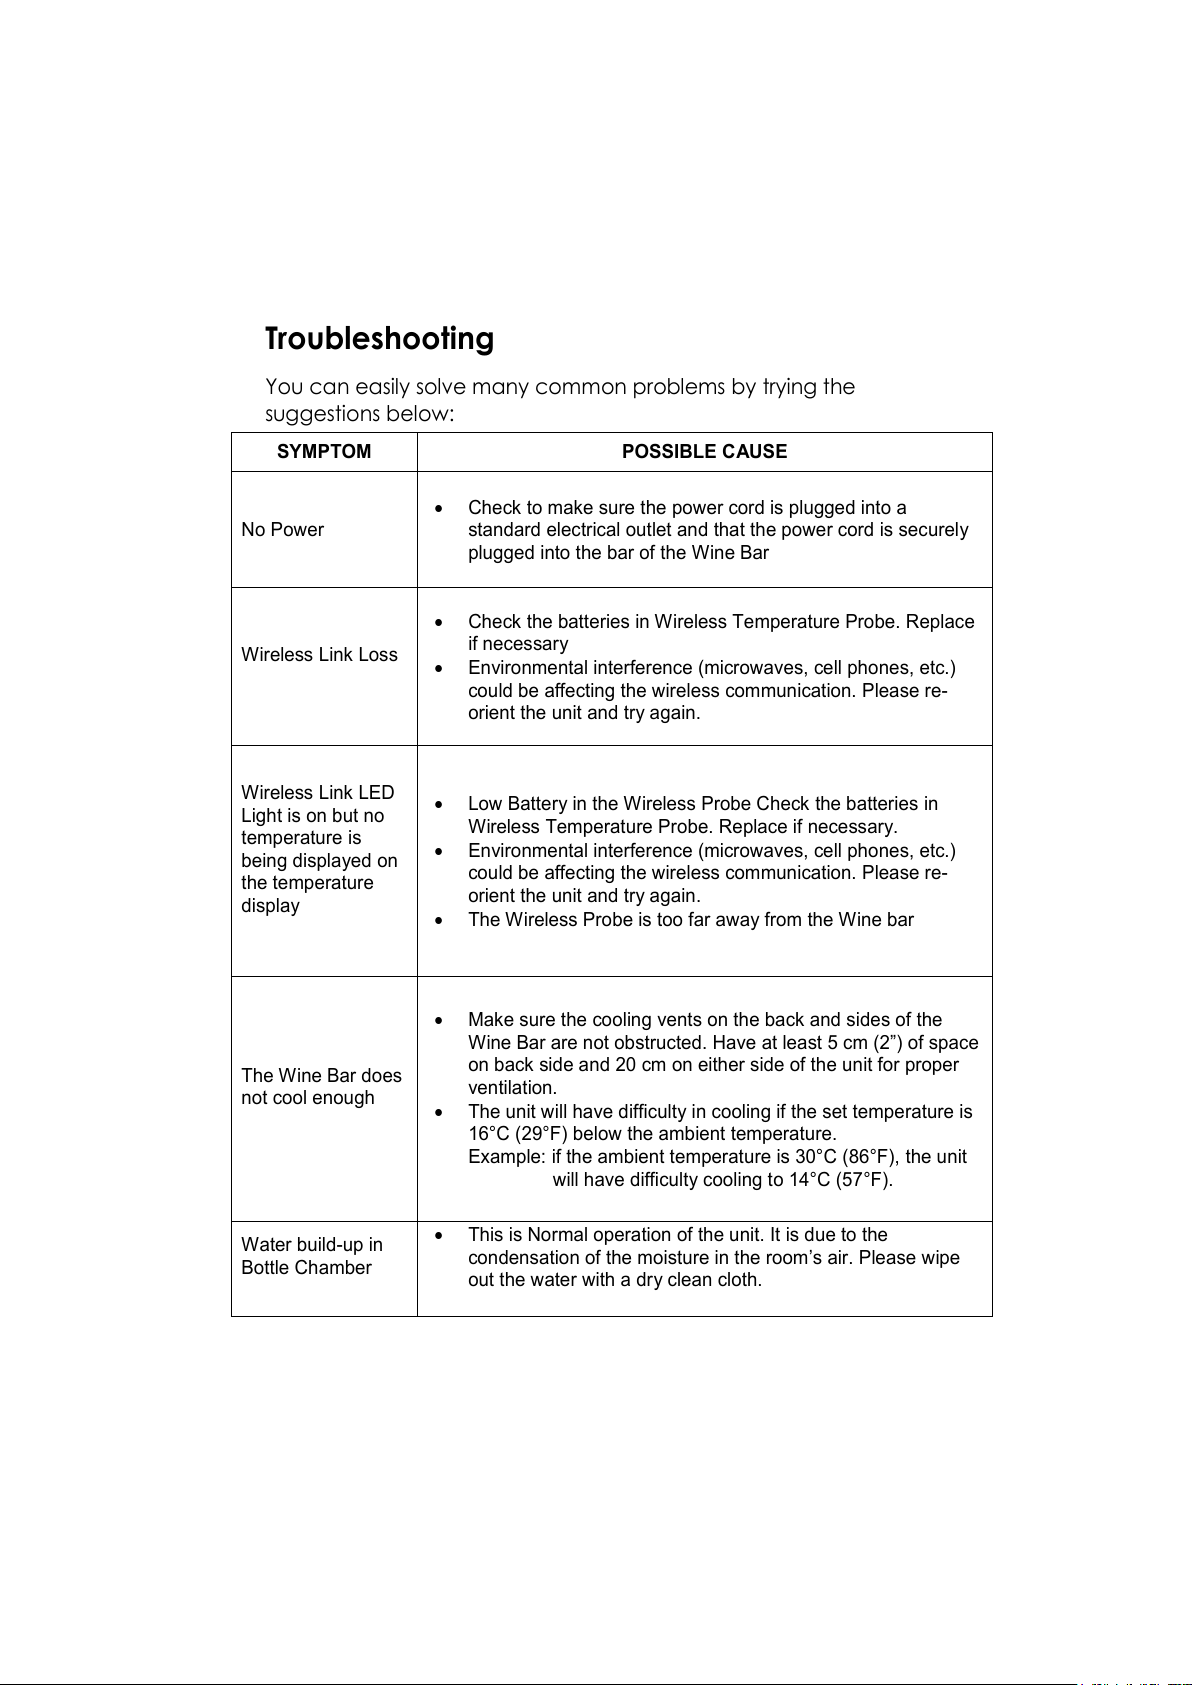
Troubleshooting
You can easily solve many common problems by trying the
suggestions below:
SYMPTOM POSSIBLE CAUSE
No Power
• Check to make sure the power cord is plugged into a
standard electrical outlet and that the power cord is securely
plugged into the bar of the Wine Bar
Wireless Link Loss
• Check the batteries in Wireless Temperature Probe. Replace
if necessary
• Environmental interference (microwaves, cell phones, etc.)
could be affecting the wireless communication. Please re-
orient the unit and try again.
Wireless Link LED
Light is on but no
temperature is
being displayed on
the temperature
display
• Low Battery in the Wireless Probe Check the batteries in
Wireless Temperature Probe. Replace if necessary.
• Environmental interference (microwaves, cell phones, etc.)
could be affecting the wireless communication. Please re-
orient the unit and try again.
• The Wireless Probe is too far away from the Wine bar
The Wine Bar does
not cool enough
• Make sure the cooling vents on the back and sides of the
Wine Bar are not obstructed. Have at least 5 cm (2”) of space
on back side and 20 cm on either side of the unit for proper
ventilation.
• The unit will have difficulty in cooling if the set temperature is
16°C (29°F) below the ambient temperature.
Example: if the ambient temperature is 30°C (86°F), the unit
will have difficulty cooling to 14°C (57°F).
Water build-up in
Bottle Chamber
• This is Normal operation of the unit. It is due to the
condensation of the moisture in the room’s air. Please wipe
out the water with a dry clean cloth.
All manuals and user guides at all-guides.com
 Loading...