

Kalorik USK TKM 2 Operating Instructions Manual
Programmable Coffee maker
Cafetiera programable
Cafetière programmable
Cafeteira programável
USK TKM 2
120V ~ 900 W

IMPORTANT SAFEGUARDS
1. READ ALL INSTRUCTIONS
2. Check that your mains voltage corresponds to that stated on the
appliance.
3. Do not touch hot surfaces. Use handles or knobs.
4. To protect against electrical shock do not immerse cord, plugs, or
the coffee maker in water or other liquid.
5. Close supervision is necessary when any appliance is used by or
near children.
6. Unplug from outlet when not in use and before cleaning. Allow to
cool before putting on or taking off parts.
7. Do not operate any appliance with a damaged cord or plug or
after the appliance malfunctions or has been damaged in any
manner. Return appliance to the nearest authorized service
facility for examination, repair, or adjustment.
8. The use of accessory attachments not recommended by the
appliance manufacturer may cause injuries.
9. Do not use outdoors.
10. Do not let cord hang over edge of table or counter, or touch hot
surfaces.
11. Do not place on or near a hot gas or electric burner, or in a
heated oven.
12. Extreme caution must be used when moving an appliance
containing hot oil or other hot liquids.
13. Always attach plug to appliance first, then plug cord into the wall
outlet. To disconnect, put the switch in off position, then remove
plug from wall outlet.
14. Do not use appliance for other than intended use.
15. Scalding may occur if the lid of the coffee maker is removed
during the brewing cycles.
16. Make sure the appliance never comes into contact with
inflammable materials such as curtains, textiles, ... when it is in use
as they might catch fire.
2
USK TKM 2 - 070508

17. When removing lime scale, only use special products for the
removal of lime scale. Never use ammonia or any other
substance that might damage your health.
18. Only put ground coffee in the filter.
19. Never use your coffee maker without water in it. If you have a
programmable coffee maker, make sure to fill it with water
before programming it.
Important: never put the jug in a microwave oven to warm up the
coffee. We will not take any responsibility if you do so.
SAVE THESE INSTRUCTIONS
POLARIZED PLUG INSTRUCTIONS
This appliance has a polarized plug (one blade is wider than the
other). To reduce the risk of electric shock, this plug will fit into the
polarized outlet only one way. If the plug does not properly fit into
the outlet at first, reverse it. If it still does not fit, contact a competent
qualified electrician. Do not attempt to modify the plug in any way.
SHORT CORD INSTRUCTIONS
A short power supply cord is provided to reduce the hazards resulting
from becoming entangled in, or tripping over a longer cord.
Extension cords may be used if care is exercised in their use.
• The electrical rating of the extension cord should be at least
that of the appliance. If the electrical rating of the extension
cord is too low, it could overheat and burn.
• The resulting extended cord should be arranged so that it will
not drape over the counter top or tabletop where it can be
pulled on by children or tripped over.
3
USK TKM 2 - 070508
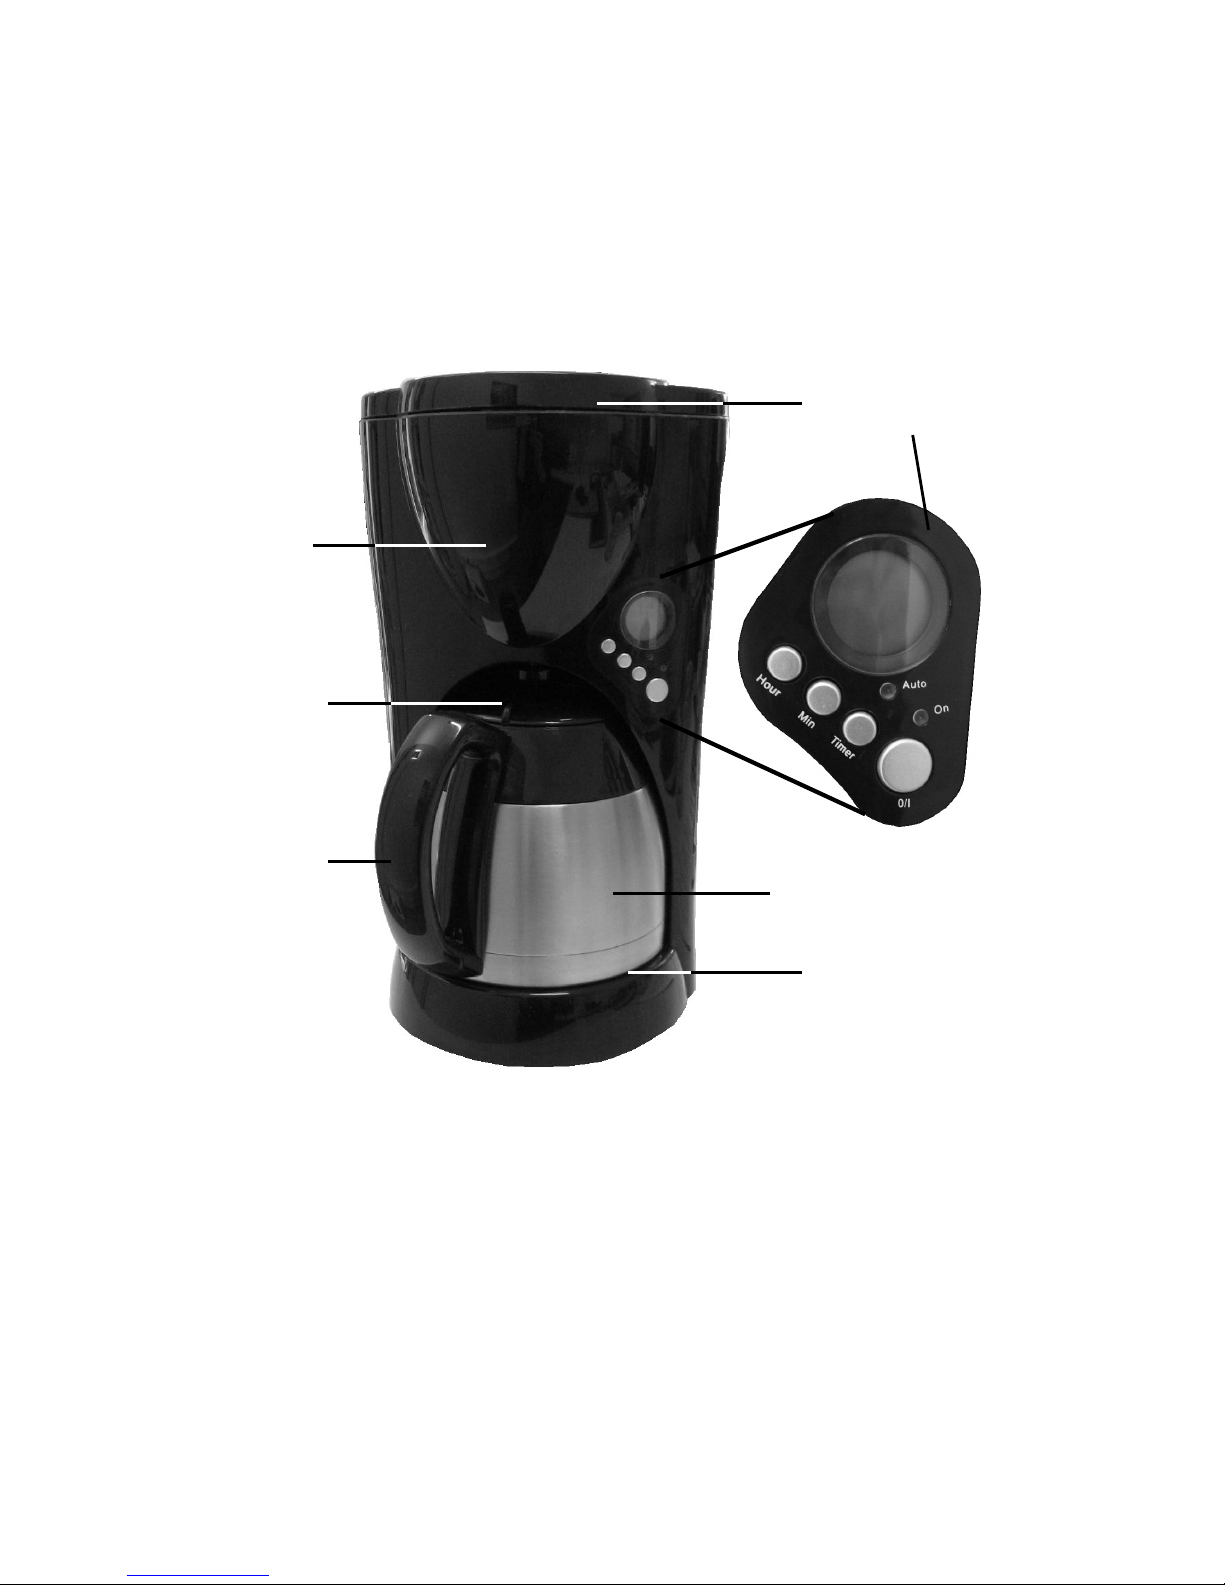
PART DESCRIPTION
2
3
4
1
7
6
1. Lid of the water tank
2. Filter holder housing
3. Lid of the jug
4. Handle of the jug
5. Hot plate
6. Thermos jug
7. Control panel
4
5
USK TKM 2 - 070508

BEFORE FIRST USE
• When you use your appliance for the first time, pour fresh water
into the water tank (without coffee) and switch on the appliance.
This operation of rinsing you appliance must be done before first
use.
• Once all the water has passed through, switch off the appliance
and repeat this operation twice. Let the appliance cool down for
at least 5 minutes before repeating the operation.
SETTING THE CLOCK
• Plug in your coffeemaker. The time "12:00" will be displayed on
the electronic digital clock.
• To set the current time, simply press the Hour button to set the
hours, and the Min button to change the minutes.
• By each impulse on one of those buttons, the hour or minutes will
go with 1 unit but if you keep the pressure, the time will roll
forward more quickly.
NOTE: you can change the set hour anytime you wish by simply
pressing the Hour and Min buttons.
PROGRAMMING THE COFFEE MAKER
Your coffee maker has a 24 hours timing, but the programmed clock
remains in the memory as long as you do not modify it.
• Check the time displayed on the clock.
• Open the lid of the water tank and pour the desired volume of
water in it. The water level can be read off the water level
indicator. Never exceed the maximum level indicated.
• Insert filter paper or permanent filter (depending on the model) in
the filter holder and add the desired quantity of ground coffee.
• Never forget to close the water tank lid before switching on the
coffee maker.
• Press and hold the Timer button. The time "12:00" and ‘TIMER" will
be displayed on the electronic digital clock.
5
USK TKM 2 - 070508

• To set the desired programming time, hold the Timer button and
press simultaneously the Hour and Min buttons.
• Once the setting is finished, release the Timer button. “Timer” and
the programming time will disappear. The clock time will be then
be displayed.
• In order to shut the lid of the thermos jug, make sure the line on
the lid ends up in front of the handle before you start screwing.
• Put the thermos jug with closed lid on the hot plate.
• Then press the 0/I switch once and the green Auto pilot light will
come on. The coffee machine is ready to start at the set time.
• To check or to modify the programming time, press and hold the
Timer button. You can now modify as you like.
• When your appliance will start at the programmed time, the
green pilot light will go out and the red On pilot light will come
on, indicating that the brewing process has started.
• When you remove the jug from the appliance, a non-drip valve
will automatically operate to stop any drops of coffee falling onto
the hotplate. When you put the jug back into place, the non-drip
valve opens automatically and allows remaining coffee to filter
through into the jug.
Practical hints: When the water tank is empty, wait a few more
minutes, as some water might still drip out of the filter before
removing the jug.
• Before pouring the coffee, you should slightly open the lid of the
jug.
• The hot plate allows keeping the coffee hot. After 105 to 120
minutes, your appliance will automatically cut out.
• You can switch off your appliance at any time simply by pressing
the 0/I switch until all pilot lights are off.
MANUAL OPERATION
• Open the lid of the water tank and pour the desired volume of
water in it. The water level can be read off the water level
indicator. Never exceed the maximum level indicated.
• Insert filter paper or permanent filter (depending on the model) in
the filter holder and add the desired quantity of ground coffee.
• Never forget to close the water tank lid before switching on the
coffee maker.
6
USK TKM 2 - 070508

• In order to shut the lid of the thermos jug, make sure the line on
the lid ends up in front of the handle before you start screwing.
• Put the thermos jug with closed lid on the hot plate.
• To switch on your appliance, press the 0/I switch twice. The red
pilot light will come on and the coffee will start flowing after a few
seconds.
• When you remove the jug from the appliance, a non-drip valve
will automatically operate to stop any drops of coffee falling onto
the hotplate. When you put the jug back into place, the non-drip
valve opens automatically and allows remaining coffee to filter
through into the jug.
Practical hints: When the water tank is empty, wait a few more
minutes, as some water might still drip out of the filter before
removing the jug.
• Before pouring the coffee, you should slightly open the lid of the
jug.
• The hot plate allows keeping the coffee hot for about 2 hours but
after this delay, your appliance will automatically cut out.
• You can switch off your appliance at any time simply by pressing
the 0/I switch until all pilot lights are off.
DESCALING AND CLEANING
• Descaling the coffee maker prolongs its life span. For
decalcification only use products especially made for descaling
of coffee makers and follow their instruction manual carefully.
• Never use a dishwasher to clean any part of your coffee maker
but clean the removable parts in soapy water and rinse them
with clear water.
• To clean the other parts, use a soft damp cloth.
7
USK TKM 2 - 070508

PRACTICAL HINTS
When you notice that the coffee making process is longer than it
should be it is probably time to decalcify the appliance. Do not wait
for the situation to get worse. The decalcifying frequency depends
on the amount of lime in water and therefore can be different from
a household to another. Therefore it is important to pay attention to
this. A good maintenance of your appliance will prolong its lifespan.
Guarantee claims will not be accepted for the replacement of a
heating element full of scale.
8
USK TKM 2 - 070508

CONSEJOS DE SEGURIDAD
1. LEA TODAS LAS INSTRUCCIONES.
2. Antes de utilizar el aparato, compruebe que el voltaje de la red
eléctrica coincide con el del aparato.
3. No toque las superficies calientes. Siempre utilice las asas o los
botones.
4. Para protegerse contra una descarga eléctrica, no sumerja el
aparato o el enchufe en agua o en otros líquidos.
5. Es siempre necesaria la supervisión cercana cuando se utiliza
este aparato cerca de niños. Este aparato no debe ser usado
por niños.
6. Desconecte el aparato de la toma de corriente cuando la
unidad no se encuentra en uso o antes de limpiarla. Deje enfriar
el aparato antes de insertar o sacar accesorios.
7. No opere este y ningún aparato si el cable o el enchufe están
dañados, o después de que el aparato ha funcionado
inadecuadamente o ha sido dañado en cualquier manera. El
aparato debe ser reemplazado por el fabricante o por un centro
de servicio autorizado o por una persona similar cualificada.
8. El uso de accesorios no recomendados por el fabricante puede
causar lesiones.
9. No use en exteriores
10. No permita que el cable cuelgue del borde de la mesa o del
mostrador o toque las partes calientes.
11. No coloque este aparato cerca de quemadores de gas o
eléctricos, o dentro de un horno caliente.
12. Tenga mucho cuidado cuando desplace un aparato lleno de
aceite caliente u otros líquidos calientes.
13. Enchufe siempre primero el cable al aparato y después en el
enchufe de la red eléctrica. Para desconectar el aparato,
ponga el interruptor en la posición apagada y desenchufe el
aparato.
14. No use este aparato más que para lo que ha sido diseñado.
15. Pueden ocurrir quemaduras si la tapa se levanta durante el ciclo
de calentamiento.
9
USK TKM 2 - 070508

16. Procure que el aparato no entre en contacto con materiales
fácilmente inflamables como cortinas, tejidos, etc., cuando esté
en funcionamiento, ya que podría provocar un incendio.
17. Si quiere eliminar la cal del aparato utilice solamente un
producto especialmente estudiado para este fin. No utilice
amoniaco o cualquier otro producto que pueda perjudicar la
salud.
18. Ponga sólo café molido en el filtro de café.
19. No haga funcionar la cafetera sin agua. Si su cafetera es
programable, no olvide ponerle agua antes de la programación.
Importante: nunca ponga la jarra en un microondas para
calentar el café. Rehusamos cualquier responsabilidad si no
respete esta instrucción.
GUARDE ESTAS INSTRUCCIONES
INFORMACIÓN SOBRE EL ENCHUFE POLARIZADO
Para reducir el riesgo de choque eléctrico, este aparato tiene un
enchufe polarizado (una pata es más ancha que la otra).
Como medida de seguridad, este enchufe calza en el
tomacorriente polarizado de una sola manera. Si el enchufe no
cabe totalmente en el tomacorriente, gire el enchufe. Si aún así no
calza, consulte a un servicio técnico cualificado. No intente anular
esta característica de seguridad.
INSTRUCCIONES DEL CABLE
El cable de alimentación del aparato es un cable corto a fin de
disminuir el riesgo de accidentes (caídas al tropezar con él, etc.)
Puede utilizar un alargador si es necesario.
• Asegúrese de que el nivel eléctrico del cable es igual o mayor
que el indicado. Una extensión con un bajo nivel eléctrico
correría el riesgo de sobrecalentarse y de estropearse.
• Para evitar riesgos colocar de forma tal que los niños no puedan
jalarlo o tropezar con él. Que no arrastre nunca por el suelo.
10
USK TKM 2 - 070508
 Loading...