

Page 1
Fax +32 2 359 95 50
1.
Copies of the I/B. Please reproduce them without any changes
except under special instruction from Team International BELGIUM.
The pages must be reproduced and folded in order to obtain a
booklet A5 (+/- 148.5 mm width x 210 mm height). When folding,
make sure you keep the good numbering when you turn the pages
of the I/B. Don’t change the page numbering. Keep the language
integrity.
Microwave oven
Microondas
USK MW 26146
www.KALORIK.com
120V~ 60Hz 1500W
Ï
Front cover page (first page)
Assembly page 1/64
Page 2
Copies of the I/B. Please reproduce them without any changes
except under special instruction from Team International BELGIUM.
The pages must be reproduced and folded in order to obtain a
booklet A5 (+/- 148.5 mm width x 210 mm height). When folding,
make sure you keep the good numbering when you turn the pages
of the I/B. Don’t change the page numbering. Keep the language
Fax +32 2 359 95 50
integrity.
IMPORTANT SAFEGUARDS
IMPORTANT SAFETY INSTRUCTIONS
The safety instructions in your manual are important and should be
read carefully. Keep your manual for future reference.
MAINTENANCE:
If your appliance is not maintained in a good condition, its surface
could be damaged and diminish inexorably the lifespan of the
appliance and lead to a dangerous situation.
SPECIFICATIONS
Output: 800W
Grill: 1300W
Convection: 1500 W
Steam: 800 W
Voltage – frequency: 220-230V~ 50Hz
Operation frequency: 2450MHz
Capacity: 25 Liters
Turntable system: {Φ315mm}
Net weight: Approx. 20 kg
IMPORTANT SAFETY INSTRUCTIONS
Please read these instructions carefully before using the appliance.
Important: People (including children) who are not able to use the
appliance in a safe way, due to their physical, sensorial or mental
capacity or their lack of experience or knowledge, must never use
the appliance except if they are supervised by a person responsible
for their safety or if they previously received instructions concerning
the safe use of the appliance.
Close supervision is necessary to prevent children from using the
appliance as a toy.
2
Assembly page 2/64
USK MW 26146 - 080425
Page 3

Copies of the I/B. Please reproduce them without any changes
except under special instruction from Team International BELGIUM.
The pages must be reproduced and folded in order to obtain a
booklet A5 (+/- 148.5 mm width x 210 mm height). When folding,
make sure you keep the good numbering when you turn the pages
of the I/B. Don’t change the page numbering. Keep the language
Fax +32 2 359 95 50
integrity.
WARNING: To reduce the risk of burns, electric shock, fire, injury to
persons or exposure to excessive microwave energy, please read all
instructions carefully before using the appliance:
1. Use this appliance only domestic use as described in this manual.
This appliance is not suitable for professional use. Do not use
corrosive chemicals in this appliance. This type of oven is
specifically designed to heat, cook, steam or dry food. It is not
designed for industrial or laboratory use.
2. Do not operate the oven when empty.
3. Do not attempt to operate this oven with the door open since
open-door operation can result in harmful exposure to microwave
energy. It is important not to defeat or tamper with the safety
interlocks.
4. Do not place any object between the oven front face and the
door or allow soil or cleaner residue to accumulate on sealing
surfaces.
5. WARNING :
Do not operate the oven if it is damaged. It is
particularly important that the oven door closes properly and that
there is no damage to the:
− Door (bent),
− Hinges and latches (broken or loosened),
− Door seals and sealing surfaces.
− (Inner or outer) windows of the door.
Do not use the oven until the repairs have been made by a
competent qualified service(*).
6. If steam appears between the inner and outer window when
cooking, immediately stop the oven, unplug it, and contact the
nearest customer service. Otherwise, you might be exposed to
microwave energy.
7. WARNING
It is hazardous for anyone other than a trained
person to carry out any service or repair operation that involves
the removal of any cover that gives protection against exposure
to microwave energy. Should the appliance or its power cord be
damaged, do not use this appliance. All repairs should be made
by a competent qualified service (*).
8. Do not attempt to disassemble the appliance or to remove feet,
seals etc.
3
Assembly page 3/64
USK MW 26146 - 080425
Page 4

Copies of the I/B. Please reproduce them without any changes
except under special instruction from Team International BELGIUM.
The pages must be reproduced and folded in order to obtain a
booklet A5 (+/- 148.5 mm width x 210 mm height). When folding,
make sure you keep the good numbering when you turn the pages
of the I/B. Don’t change the page numbering. Keep the language
Fax +32 2 359 95 50
integrity.
9. WARNING : Children should not use this appliance without
supervision except if they were previously given proper instructions
so that they can use it correctly and understand the risks linked to
improper use.
10. To reduce the risk of fire in the oven cavity:
a. When heating food in plastic or paper container, check the
power of the microwave oven to avoid any risk of fire.
b. Remove wire twist-ties from paper or plastic bags before
placing bag in oven.
c. If smoke is observed, switch off or unplug the appliance and
keep the door closed in order to stifle any flames.
d. Do not use the cavity for storage purposes. Do not leave paper
products, cooking utensils or food in the cavity when not in
use.
11. IMPORTANT: UTENSILS THAT ARE NOT SUITABLE FOR MICROWAVE
COOKING.
Always check if your utensils are microwave resistant before using
them in the appliance.
- Never use utensils with a metal handle.
- Never use utensils with metal decorations.
- Never use iron locking clips (not even covered with paper)
- Never use melamine receptacles as these contain a
substance that absorbs microwave energy. The receptacle
might break or carbonise and the cooking process would be
slower.
- The use of traditional thermometers is prohibited, use
microwave resistant thermometers.
- In case of doubt, please contact the supplier of the utensil
to know whether it is microwave resistant or not.
12. Do not prepare food in receptacles with too narrow an opening,
as this might cause these receptacles to explode.
13. WARNING : CAUTION,
Liquid or other food must not be heated
in sealed containers (such as receptacles with lid or feeding
bottle with dummy) since they are liable to explode.
14. Should the symbol
be indicated on a certain surface, you
need to be careful when handling the product. This symbol
means “CAUTION, this surface may get very hot during use”.
4
Assembly page 4/64
USK MW 26146 - 080425
Page 5

Copies of the I/B. Please reproduce them without any changes
except under special instruction from Team International BELGIUM.
The pages must be reproduced and folded in order to obtain a
booklet A5 (+/- 148.5 mm width x 210 mm height). When folding,
make sure you keep the good numbering when you turn the pages
of the I/B. Don’t change the page numbering. Keep the language
Fax +32 2 359 95 50
integrity.
15. Eggs in their shell or whole hard-boiled eggs must not be heated
in the microwave cooking mode as they might explode.
16. Microwave heating of beverage can result in delayed eruptive
boiling, therefore care has to be taken when you handle the
container.
17. CAUTION: Do not fry food in the oven. Hot oil can damage oven
parts and utensils and even result in skin burns. Do not warm up
greasy foods in the microwave oven, as it might catch fire.
18. Pierce foods with heavy skins such as potatoes, whole squash,
apples and chestnuts before cooking. Otherwise they might
explode.
19. The contents of feeding bottles and baby jars should be stirred or
shaken and the temperature should be checked before serving in
order to avoid burns.
20. Cooking utensils may become hot because of heat transferred
from the heated food. Potholders may be needed to handle the
utensil.
21. Before operating the oven in the microwave cooking mode,
make sure the glass tray, the motor shaft and the roller ring are in
correct position inside the oven. If you want to use the oven in the
steam mode, remove the glass tray and the roller ring.
22. Make sure the openings of microwave resistant receptacles are
neither obstructed nor covered in order to avoid that they
explode during operation.
23. Do not place the preparation directly on the glass tray, but put
them in a microwave resistant receptacle.
24. Food containing a mixture of water and grease should be left 30
to 60 seconds in the oven when switched off to allow the mixture
to come down to avoid bubbling, especially when a beef cube is
added.
25. It is necessary to clean regularly the cavity of your oven and to
remove any rests of food. Food remains on the heating elements
of the oven will produce smoke and bad smells.
26. Your appliance must never be switched on through an external
timer or any kind of separate remote control system.
27. Before using a steam function, insert the water tank and wait 30
seconds.
28. Never use a steam function with an empty water tank.
5
Assembly page 5/64
USK MW 26146 - 080425
Page 6

Copies of the I/B. Please reproduce them without any changes
except under special instruction from Team International BELGIUM.
The pages must be reproduced and folded in order to obtain a
booklet A5 (+/- 148.5 mm width x 210 mm height). When folding,
make sure you keep the good numbering when you turn the pages
of the I/B. Don’t change the page numbering. Keep the language
Fax +32 2 359 95 50
integrity.
29. Do not touch or pull out the steam generator while using a steam
function.
30. The steam generator can only be pulled out for cleaning and
maintenance. Do not immerse it in water or other fluids.
(*)
Competent qualified service: after sales department of the
producer or importer or any person who is qualified, approved and
competent to perform this kind of repairs in order to avoid all
danger. In any case you should return the appliance to this
electrician.
SAVE THESE INSTRUCTIONS
POLARIZED PLUG INSTRUCTIONS
Some appliances are equipped with a polarized plug (one blade is
wider than the other). To reduce the risk of electric shock, this plug
will fit into the polarized outlet only one way. If the plug does not
properly fit into the outlet at first, reverse it. If it still does not fit,
contact a competent qualified electrician. Do not attempt to modify
the plug in any way.
For appliances equipped with a standard plug, simply insert the plug
into the outlet without paying attention to the way you plug it.
SHORT CORD INSTRUCTIONS
A short power supply cord is provided to reduce the hazards resulting
from becoming entangled in, or tripping over a longer cord.
Extension cords may be used if care is exercised in their use.
• The electrical rating of the extension cord should be at least
that of the appliance. If the electrical rating of the extension
cord is too low, it could overheat and burn.
• The resulting extended cord should be arranged so that it will
not drape over the counter top or tabletop where it can be
pulled on by children or tripped over.
6
Assembly page 6/64
USK MW 26146 - 080425
Page 7
Copies of the I/B. Please reproduce them without any changes
except under special instruction from Team International BELGIUM.
The pages must be reproduced and folded in order to obtain a
booklet A5 (+/- 148.5 mm width x 210 mm height). When folding,
make sure you keep the good numbering when you turn the pages
of the I/B. Don’t change the page numbering. Keep the language
Fax +32 2 359 95 50
integrity.
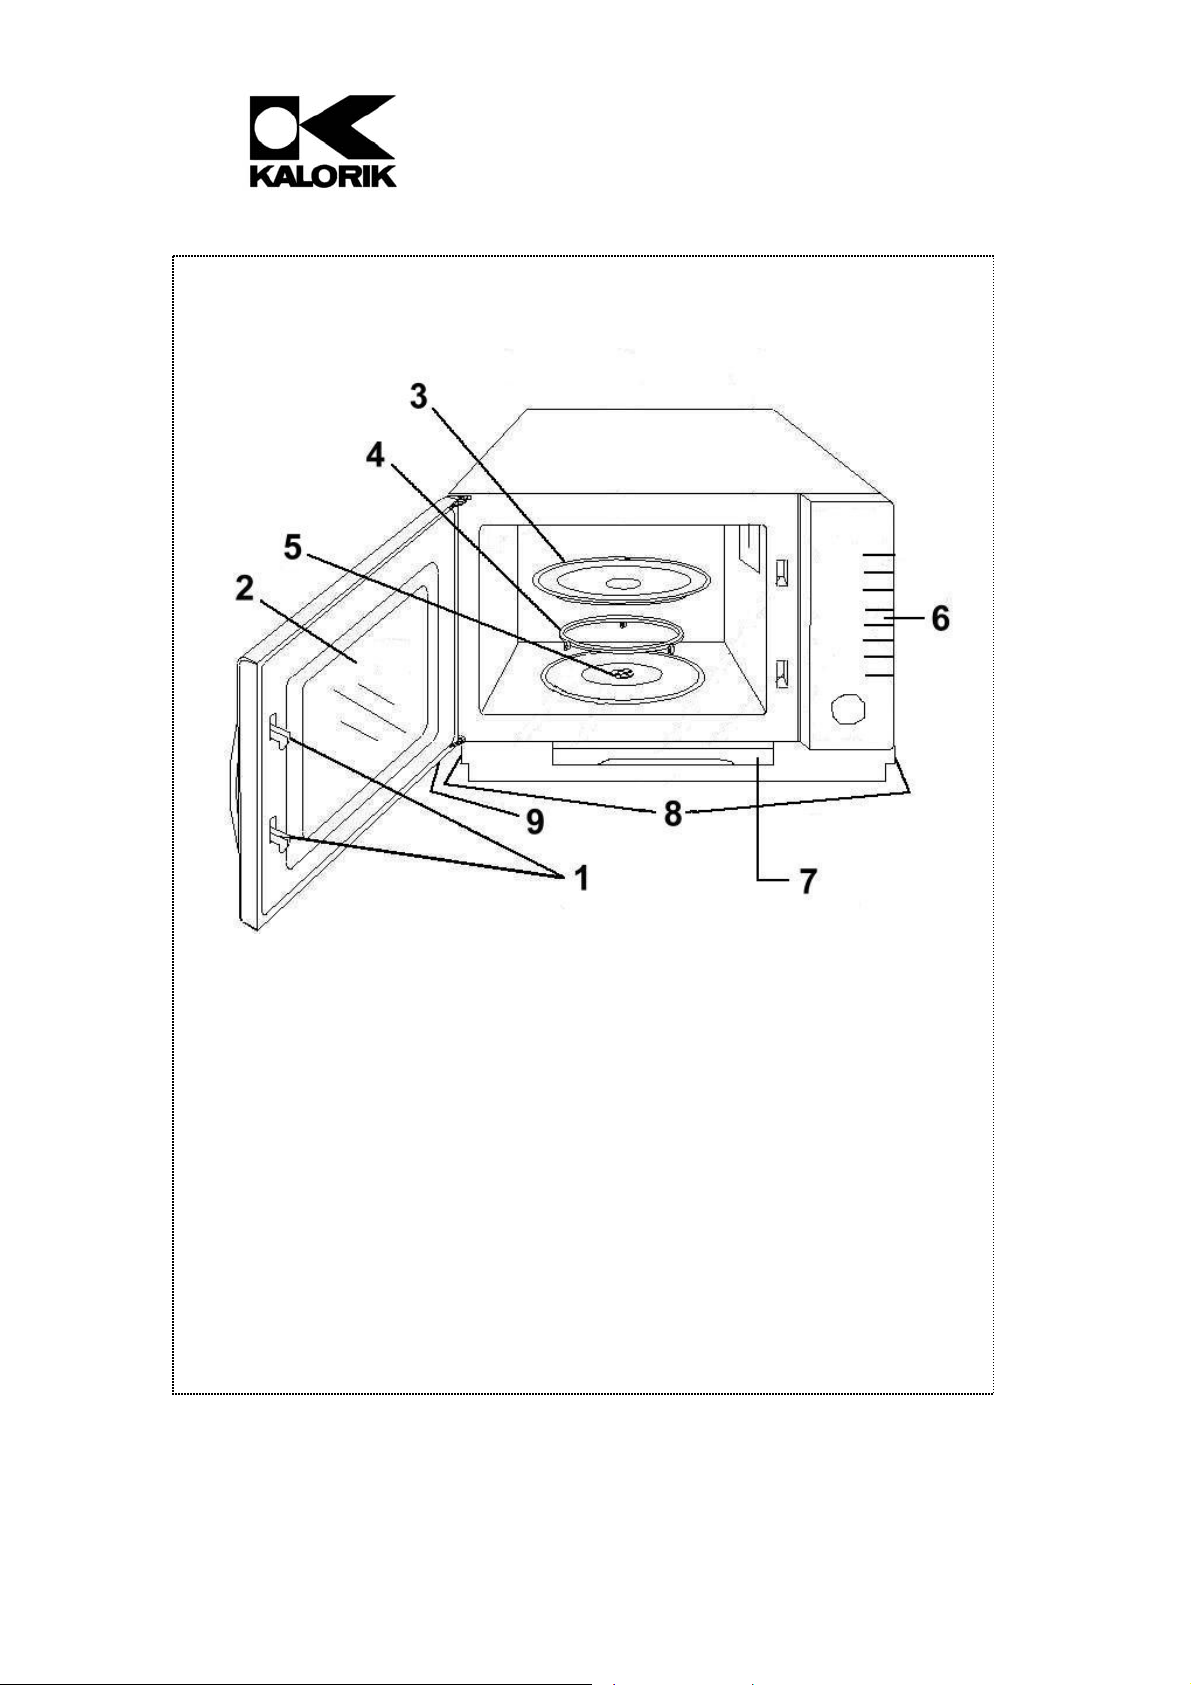
PART DESCRIPTION
1. Door safety lock system
2. Oven window
3. Glass tray
4. Roller ring
5. Shaft
6. Control panel
7. Water tank
8. Waste water tank
9. Steam generator
7
Assembly page 7/64
USK MW 26146 - 080425
Page 8

Copies of the I/B. Please reproduce them without any changes
except under special instruction from Team International BELGIUM.
The pages must be reproduced and folded in order to obtain a
booklet A5 (+/- 148.5 mm width x 210 mm height). When folding,
make sure you keep the good numbering when you turn the pages
of the I/B. Don’t change the page numbering. Keep the language
Fax +32 2 359 95 50
integrity.
INSTALLATION
1. Make sure that all the packing materials are removed from the
inside of the door.
2. Check the oven for any damage, such as misaligned or bent door,
damaged door seals and sealing surface, broken or loose door
hinges and latches and dents inside the cavity or on the door. If
there is any damage, do not operate the oven and contact a
competent qualified service.
3. This microwave oven must be placed on a flat, stable surface to
hold its weight (19.5 kg) and the heaviest food likely to be cooked
in the oven.
4. Do not place the oven where heat, moisture or high humidity are
generated, or near combustible materials.
5. Do not cover or block any openings on the appliance. Do not
remove the feet.
6. For correct operation, the oven must have sufficient airflow. Allow
20cm of space above the oven, 10cm at back and 8cm at both
sides.
7. The socket must be readily accessible so that it can be easily
unplugged in case of emergency.
8. Do not use the oven outdoors.
WARNING: THIS APPLIANCE MUST BE GROUNDED.
Avoid using extension cords or make sure they are compatible with
the power of your appliance.
We advise you to call for an electrician if you have any questions
concerning the technical installation of your appliance.
This appliance is protected by a safety fuse. Should this fuse be
replaced, please contact a competent qualified electrician (*).
8
Assembly page 8/64
USK MW 26146 - 080425
Page 9

Copies of the I/B. Please reproduce them without any changes
except under special instruction from Team International BELGIUM.
The pages must be reproduced and folded in order to obtain a
booklet A5 (+/- 148.5 mm width x 210 mm height). When folding,
make sure you keep the good numbering when you turn the pages
of the I/B. Don’t change the page numbering. Keep the language
Fax +32 2 359 95 50
integrity.
RADIO INTERFERENCE
Operation of the microwave oven can cause interference to your
radio, TV or similar equipment. When there is interference, it may be
reduced or eliminated by taking the following measures:
1. Clean door and sealing surface of the oven.
2. Reorient the receiving antenna of radio or television.
3. Move the microwave oven away from the receiver.
4. Plug the microwave oven into a different outlet so that
microwave oven and receiver are on different branch circuits.
MICROWAVE COOKING PRINCIPLES
1. Arrange food carefully. Place thickest areas towards outside of
dish.
2. Watch cooking time. Cook for the shortest amount of time
indicated and add more as needed. Food severely overcooked
can smoke or ignite.
3. Cover foods while cooking. Covers prevent spattering and help
foods to cook evenly.
4. Turn foods over once during microwaving to speed cooking of
such foods as chicken and hamburgers. Large items like roasts
must be turned over at least once.
5. Rearrange foods such as meatballs halfway through cooking
both from top to bottom and from the centre of the dish to the
outside.
STEAM COOKING PRINCIPLES
1. If you want to steam foodstuffs with the steam function, a steam
auto-cook function or a combinated function with steam, always
remove the glass tray and the roller ring before use. You can
leave the shaft inside the appliance.
2. Before use, make sure that the waste water tank is empty and
that there is sufficient water in the water tank. Also check if the
steam generator, the waste water tank and the water tank are
placed correctly.
9
Assembly page 9/64
USK MW 26146 - 080425
Page 10
Copies of the I/B. Please reproduce them without any changes
except under special instruction from Team International BELGIUM.
The pages must be reproduced and folded in order to obtain a
booklet A5 (+/- 148.5 mm width x 210 mm height). When folding,
make sure you keep the good numbering when you turn the pages
of the I/B. Don’t change the page numbering. Keep the language
Fax +32 2 359 95 50
integrity.
3. Only steam consumable food. Do not place too large pieces of
food in the oven cavity.
4. During the steaming process, the window stays clean. Do not
open the door too many times as a lot of steam will escape and
heat will be lost. For every time you open the door, the steaming
process will need 2 extra minutes.
5. At the end of the steam cooking process, it is best to wait 30
seconds before opening the door, as the steam remains in the
oven cavity for a while and thus helps steaming the foodstuffs
even after the oven has stopped.
UTENSILS GUIDE
1. We advise you to use utensils that are specially conceived for
microwave cooking as they allow energy to pass through the
container and heat the food.
2. Microwave cannot penetrate metal, so metal utensils or dishes
with metallic trim should not be used.
3. Do not use recycled paper products when microwave cooking, as
they may contain small metal fragments which may cause sparks
and/or fire.
4. Round/oval dishes rather than square/oblong ones are
recommended, as food in corners tends to overcook.
The table below is a general guide to help you select the correct
utensils.
Cookware
Microw
ave
Cooking
Grill
Combina
tion
Convect
ion
Stea
m
Heat–Resistant Glass Yes Yes Yes Yes Yes
Non Heat–Resistant
Glass
Heat–Resistant
Ceramics
Microwave–Safe
Plastic Dish
No No No
Yes
Yes Yes Yes Yes
Yes No No
No No
No No
Kitchen Paper Yes No No No No
10
Assembly page 10/64
USK MW 26146 - 080425
Page 11
Copies of the I/B. Please reproduce them without any changes
except under special instruction from Team International BELGIUM.
The pages must be reproduced and folded in order to obtain a
booklet A5 (+/- 148.5 mm width x 210 mm height). When folding,
make sure you keep the good numbering when you turn the pages
of the I/B. Don’t change the page numbering. Keep the language
Fax +32 2 359 95 50
integrity.
Metal Tray No Yes Yes Yes Yes
Metal Rack No Yes Yes Yes Yes
Aluminium Foil & Foil
Containers
No Yes No No Yes
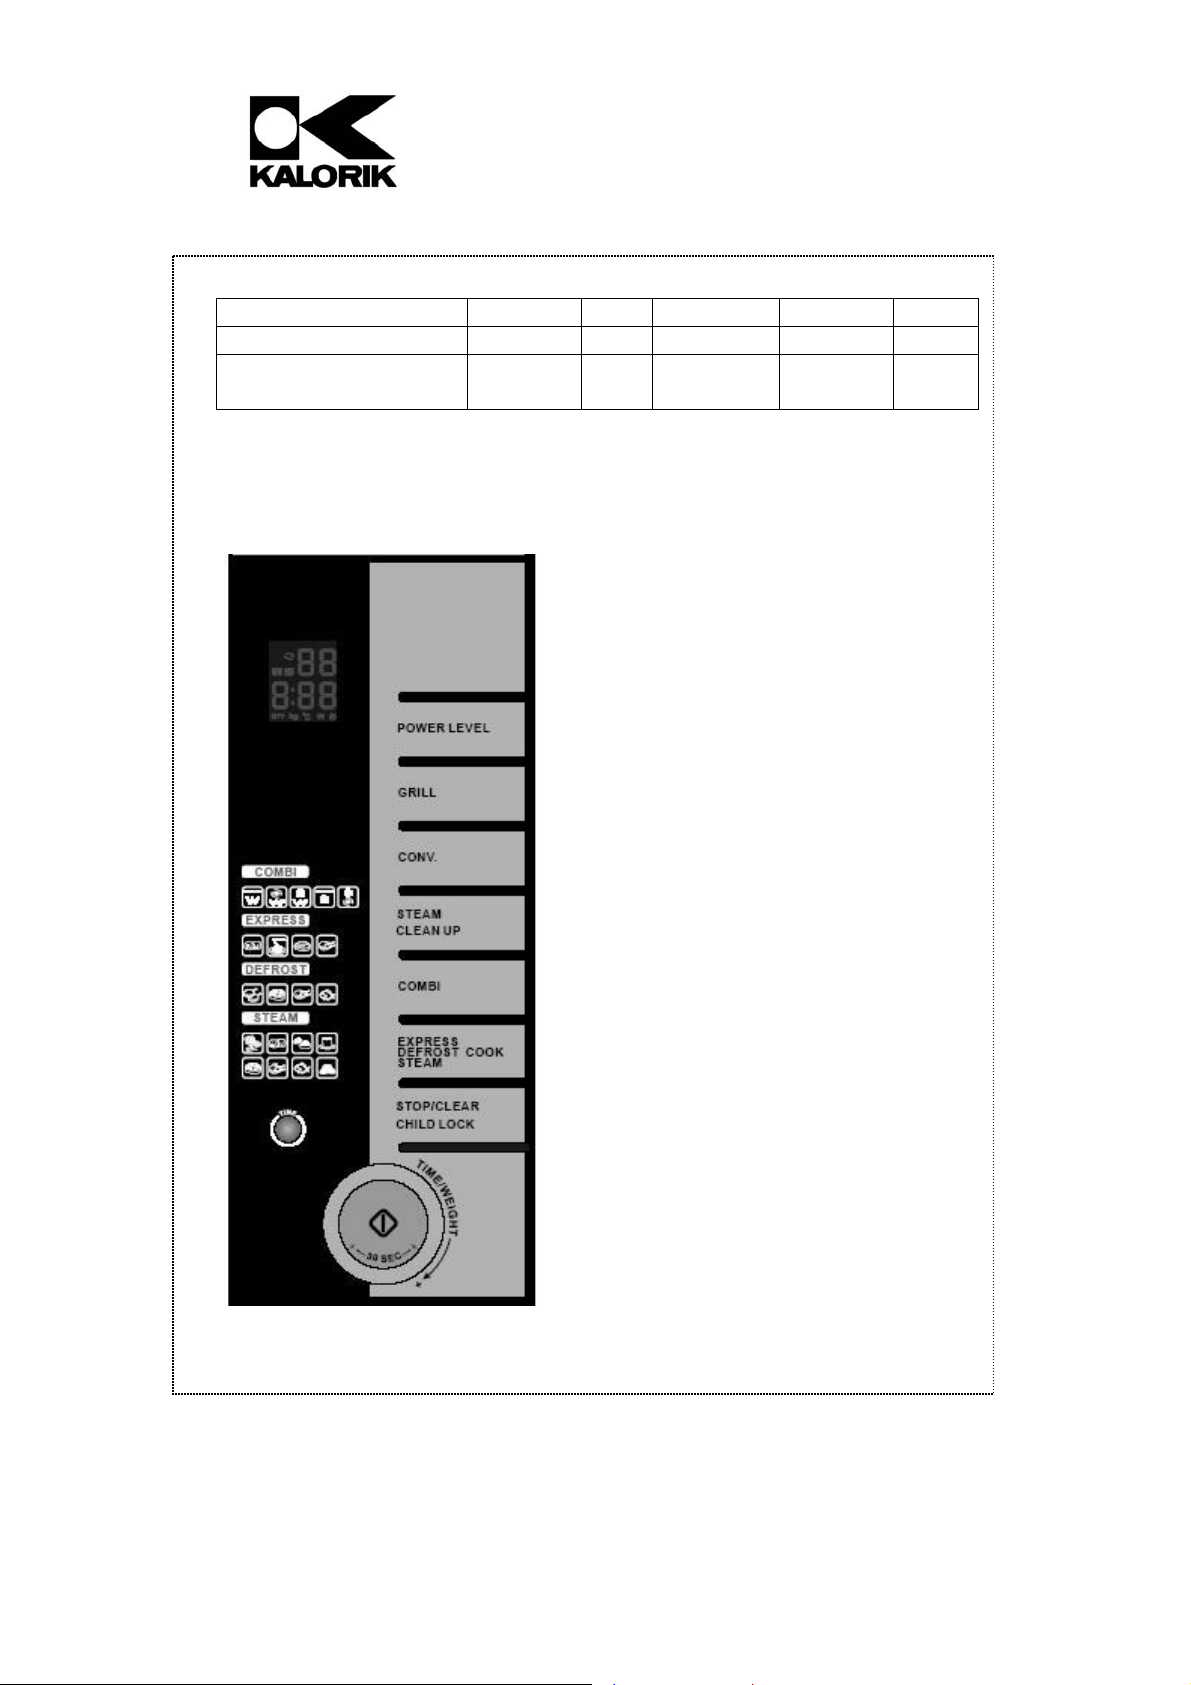
CONTROL PANEL
For each pad, please refer to the paragraph “USE” to know their
functions.
Display: indicates the cooking
time, the power, the present time
and the state of the different
settings or other adjustments.
POWER LEVEL: to set the
microwave cooking function (5
power levels) and to set the
microwave power level.
GRILL: to set the grill cooking
function.
CONV.: to set the convection
function and to set the
temperature for convection
cooking.
STEAM/CLEAN UP: to set the steam
function and to set the clean-up
function.
COMBI: to set a combination
cooking function.
EXPRESS/DEFROST/STEAM COOK:
to set the auto-menu, the defrost
by weight function or the steam
auto-cook function.
STOP/CLEAR/CHILD LOCK: to
pause or to stop the microwave
oven while in use or to cancel the
current program. It can also be
used to activate and to
deactivate the child safety lock.
11
Assembly page 11/64
USK MW 26146 - 080425
Page 12

Copies of the I/B. Please reproduce them without any changes
except under special instruction from Team International BELGIUM.
The pages must be reproduced and folded in order to obtain a
booklet A5 (+/- 148.5 mm width x 210 mm height). When folding,
make sure you keep the good numbering when you turn the pages
of the I/B. Don’t change the page numbering. Keep the language
Fax +32 2 359 95 50
integrity.
TIME: allows to set the clock or to
set the alarm clock.
/30 SEC (START): you can use
the START button to start the oven
once a function is set. It can also
be used to add 30 seconds to the
cooking time.
Rotary knob: allows regulating the
cooking times, power, weights or
current time.
USE
IMPORTANT REMARKS:
1) There must be a food preparation in the oven cavity before
starting the microwave oven.
2) Make sure the receptacle does not touch the walls of the cavity
in order not to disturb the rotation of the glass tray.
3) The metal rack supplied is microwave resistant and can be used
without any risk, both in grill or microwave function (or
combination) or also in the steam function. It can be used to put
the food nearer to the heating element or to put several
receptacles in the oven.
4) The nylon egg tray supplied can be used for the steam function
only. It should never be used for microwave cooking, grill cooking
or convection cooking…
Each time a pad is pressed, a short beep will sound to acknowledge
the press.
When the appliance starts, the light switches on in order to check the
cooking. The cooking time countdown begins.
At the end of the cooking time, 4 beeps will sound and the light
switches off. If you do not press any button or open the oven, 3
beeps will sound every minute.
If you press the "STOP/CLEAR" pad once while the oven is cooking,
the oven will pause (press the START button to continue cooking). If
you press “STOP/CLEAR” twice during the cooking process, the oven
12
Assembly page 12/64
USK MW 26146 - 080425
Page 13

Copies of the I/B. Please reproduce them without any changes
except under special instruction from Team International BELGIUM.
The pages must be reproduced and folded in order to obtain a
booklet A5 (+/- 148.5 mm width x 210 mm height). When folding,
make sure you keep the good numbering when you turn the pages
of the I/B. Don’t change the page numbering. Keep the language
Fax +32 2 359 95 50
integrity.
will stop. If you are setting a program when pressing "STOP/CLEAR",
the program will be cancelled.
IF YOU OPEN THE DOOR DURING THE COOKING PROCESS, THE OVEN
WILL STOP.
SETTING THE CLOCK
The oven has a digital clock. To set the time:
1. Press the "TIME" button twice. The display will show “0:00” and the
first “0” indicating the hour will start flashing.
2. Adjust the hour by turning the rotary knob.
3. Press "TIME" again to confirm the setting of the hour. The “00”
indicating the minutes will start flashing.
4. Adjust the minutes by turning the rotary knob.
5. Press "TIME" again to finish the setting. “:” will flash, and the set
time will light up.
If time resetting is needed afterwards, press "TIME" twice and
proceed as described above.
The oven can also work as an alarm clock:
1. Press “TIME” once. The “0” on the display will start flashing.
2. Set the time by turning the rotary knob (maximum 60 minutes).
The time will flash on the display.
3. Press the START button “
/30SEC”. The countdown begins.
4. At the end of the countdown, you will hear 4 beeps. If you do not
press any button or open the oven, 3 beeps will sound every
minute.
13
Assembly page 13/64
USK MW 26146 - 080425
Page 14
Copies of the I/B. Please reproduce them without any changes
except under special instruction from Team International BELGIUM.
The pages must be reproduced and folded in order to obtain a
booklet A5 (+/- 148.5 mm width x 210 mm height). When folding,
make sure you keep the good numbering when you turn the pages
of the I/B. Don’t change the page numbering. Keep the language
Fax +32 2 359 95 50
integrity.
SETTING THE COOKING TIME, POWER AND COOKING FUNCTION
a) Quick start
This function allows a quick and easy heating, for instance of a glass
of water.
Press the START button “
/30SEC” and the oven will start working at
full microwave power (100% power output, or 800W) for 30 seconds.
Each press of the START button will add 30 seconds to the cooking
time, which is shown on the display.
b) Microwave cooking
1. Press the "POWER LEVEL" button. “800” will be displayed, which is
the maximum power (800W).
2. If you do not wish to cook at the maximum power level, select
the desired power by pressing "POWER LEVEL" a number of times.
“800”, “550”, “400”, “250” and “100” will be displayed in turn,
indicating 800W, 550W, 400W, 250W and 100W respectively.
3. Set the cooking time by turning the rotary knob (maximum 60
minutes).
4. Press the START button “
/30SEC” to start cooking. The
countdown begins.
c) Grill cooking
The grill cooking is particularly useful for thin slices of meat, steaks,
chops, kebabs, sausages or pieces of chicken. It is also suitable for
hot sandwiches and au gratin dishes.
1. Press the “GRILL” button. “: 0” will be displayed and
appears
on the display as well.
2. Set the cooking time by turning the rotary knob (maximum 60
minutes).
3. Press the START button “
/30SEC” to start cooking. The
countdown begins.
14
Assembly page 14/64
USK MW 26146 - 080425
Page 15
Copies of the I/B. Please reproduce them without any changes
except under special instruction from Team International BELGIUM.
The pages must be reproduced and folded in order to obtain a
booklet A5 (+/- 148.5 mm width x 210 mm height). When folding,
make sure you keep the good numbering when you turn the pages
of the I/B. Don’t change the page numbering. Keep the language
Fax +32 2 359 95 50
integrity.
Note: The heating element will go out 15 seconds before the end of
the cooking time.
d) Convection cooking
The convection function can be used to preheat the oven to a
certain temperature and to cook food with convection.
1. Press the "CONV." button. On the display, “220” will start flashing,
which is the preset temperature.
2. Press the “CONV.” button again if you wish to set a different
temperature. You can choose between 7 temperature levels for
convection: 220°C, 200°C, 180°C, 160°C, 140°C, 120°C and 100°C.
3. Set the cooking time by turning the rotary knob (maximum 60
minutes).
4. Press the START button “
/30SEC” to start cooking. The
countdown begins.
Note: The heating element will go out 15 seconds before the end of
the cooking time.
e) Steam cooking
Before using the steam function, fill the water tank with water. To do
so, take out the water tank situated at the front side of your
microwave. Then open the water tank by turning the cap
anticlockwise and taking it off. Pour in the desired amount of water,
respecting the minimum and maximum levels indicated on the water
tank. Close the water tank by turning the cap clockwise until it clicks
and place the water tank back in the appliance. Make sure that it
fits perfectly and wait 30 seconds before use. See also section
“STEAM COOKING PRINCIPLES”.
1. Press the ”STEAM/CLEAN UP” button. “: 0” and
will be
displayed.
2. Set the cooking time by turning the rotary knob (maximum 30
minutes).
3. Press the START button “
/30SEC” to start cooking. The
countdown begins.
15
Assembly page 15/64
USK MW 26146 - 080425
Page 16

Copies of the I/B. Please reproduce them without any changes
except under special instruction from Team International BELGIUM.
The pages must be reproduced and folded in order to obtain a
booklet A5 (+/- 148.5 mm width x 210 mm height). When folding,
make sure you keep the good numbering when you turn the pages
of the I/B. Don’t change the page numbering. Keep the language
Fax +32 2 359 95 50
integrity.
Note: If there is not sufficient water in the water tank when using this
function, 8 beeps will sound. If you do not add water when that
happens, 4 beeps will sound every minute.
f) Combination cooking
You can choose between 5 combination cooking programs:
1. Microwave + Grill
1. Press the “COMBI” button once. “550” will be displayed, which is
the maximum power.
2. If you do not wish to cook at the maximum power level, select
the desired power by pressing "POWER LEVEL". You can choose
between 4 power levels: 550W, 400W, 250W and 100W.
3. Set the cooking time by turning the rotary knob (maximum 60
minutes).
4. Press the START button “
/30SEC” to start cooking. The
countdown begins.
Note: The heating element will go out 15 seconds before the end of
the cooking time.
2. Microwave + Convection
1. Press the "COMBI" button twice. On the display, “220” will start
flashing, which is the preset temperature.
2. Press the “CONV.” button if you wish to set a different
temperature. You can choose between 7 temperature levels for
convection: 220°C, 200°C, 180°C, 160°C, 140°C, 120°C and 100°C.
3. Press “POWER LEVEL” to select the power. You can choose
between 4 power levels: 550W, 400W, 250W and 100W.
4. Set the cooking time by turning the rotary knob (maximum 60
minutes).
5. Press the START button “
/30SEC” to start cooking. The
countdown begins.
16
Assembly page 16/64
USK MW 26146 - 080425
Page 17

Copies of the I/B. Please reproduce them without any changes
except under special instruction from Team International BELGIUM.
The pages must be reproduced and folded in order to obtain a
booklet A5 (+/- 148.5 mm width x 210 mm height). When folding,
make sure you keep the good numbering when you turn the pages
of the I/B. Don’t change the page numbering. Keep the language
Fax +32 2 359 95 50
integrity.
Note: The heating element will go out 15 seconds before the end of
the cooking time.
3. Microwave + Steam
1. Press the "COMBI" button three times. On the display, “800” will
start flashing, which is the preset power level.
2. Press “POWER LEVEL” to select the power. You can choose
between 5 power levels: 800W, 550W, 400W, 250W and 100W.
3. Set the cooking time by turning the rotary knob (maximum 60
minutes).
4. Press the START button “
/30SEC” to start cooking. The
countdown begins.
Note: If there is not sufficient water in the water tank when using this
function, 8 beeps will sound. If you do not add water when that
happens, 4 beeps will sound every minute. See also section “STEAM
COOKING PRINCIPLES”.
4. Grill + Steam
1. Press the "COMBI" button four times. “: 0” appears on the display.
2. Set the cooking time by turning the rotary knob (maximum 60
minutes).
3. Press the START button “
/30SEC” to start cooking. The
countdown begins.
Note: The heating element will go out 15 seconds before the end of
the cooking time.
If there is not sufficient water in the water tank when using this
function, 8 beeps will sound. If you do not add water when that
happens, 4 beeps will sound every minute. See also section “STEAM
COOKING PRINCIPLES”.
5. Convection + Steam
1. Press the "COMBI" button five times. “220” appears on the display,
which is the maximum temperature for convection.
17
Assembly page 17/64
USK MW 26146 - 080425
Page 18

Copies of the I/B. Please reproduce them without any changes
except under special instruction from Team International BELGIUM.
The pages must be reproduced and folded in order to obtain a
booklet A5 (+/- 148.5 mm width x 210 mm height). When folding,
make sure you keep the good numbering when you turn the pages
of the I/B. Don’t change the page numbering. Keep the language
Fax +32 2 359 95 50
integrity.
2. Press the “CONV.” button to set the temperature. You can
choose between 7 temperature levels for convection: 220°C,
200°C, 180°C, 160°C, 140°C, 120°C and 100°C.
3. Set the cooking time by turning the rotary knob (maximum 60
minutes).
4. Press the START button “
/30SEC” to start cooking. The
countdown begins.
Note: The heating element will go out 15 seconds before the end of
the cooking time.
If there is not sufficient water in the water tank when using this
function, 8 beeps will sound. If you do not add water when that
happens, 4 beeps will sound every minute. See also section “STEAM
COOKING PRINCIPLES”.
18
Assembly page 18/64
USK MW 26146 - 080425
Page 19
Copies of the I/B. Please reproduce them without any changes
except under special instruction from Team International BELGIUM.
The pages must be reproduced and folded in order to obtain a
booklet A5 (+/- 148.5 mm width x 210 mm height). When folding,
make sure you keep the good numbering when you turn the pages
of the I/B. Don’t change the page numbering. Keep the language
Fax +32 2 359 95 50
integrity.
g) AUTO-menu
The auto-functions select the appropriate cooking programme
according to the food you want to prepare.
1. Press the “EXPRESS/DEFROST/STEAM COOK” button once. “C - - 1”
appears on the display and “QTY” flashes.
2. Turn the rotary knob to select the desired auto-cook function
according to the type of food that needs to be cooked. You can
choose between 4 auto-cook functions (see table).
3. Press the START button “
/30SEC” to confirm the setting of the
auto-cook function.
4. Turn the rotary knob to set the quantity that needs to be cooked
(see table). The selected quantity flashes on the display.
5. Press the START button “
/30SEC” to start cooking. The
countdown begins.
Note: The heating element will go out 15 seconds before the end of
the cooking time.
AUTO
Code
Food Possible quantity
setting
Cooking
time
1 potato 6:00
2 potatoes 9:00
C -- 1 Potatoes
3 potatoes 12:00
4 potatoes 14:00
5 potatoes 16:00
6 potatoes 18:00
19
Assembly page 19/64
USK MW 26146 - 080425
Page 20
Copies of the I/B. Please reproduce them without any changes
except under special instruction from Team International BELGIUM.
The pages must be reproduced and folded in order to obtain a
booklet A5 (+/- 148.5 mm width x 210 mm height). When folding,
make sure you keep the good numbering when you turn the pages
of the I/B. Don’t change the page numbering. Keep the language
Fax +32 2 359 95 50
integrity.
0.20 kg 23:00
C -- 2 Rice/Pasta
0.30 kg 28:00
0.40 kg 31:00
0.50 kg 35:00
0.90 kg 20:00
1.0 kg 22:00
1.1 kg 25:00
C -- 3 Roast Beef
1.2 kg 27:00
1.3 kg 29:00
1.4 kg 30:00
1.5 kg 32:00
0.2 kg 7:00
0.3 kg 8:00
0.4 kg 10:00
0.5 kg 12:00
0.6 kg 14:00
0.7 kg 16:00
0.8 kg 18:00
0.9 kg 19:00
1.0 kg 20:00
1.1 kg 22:00
1.2 kg 24:00
C -- 4
Roast
Poultry
1.3 kg 26:00
1.4 kg 28:00
1.5 kg 30:00
1.6 kg 32:00
1.7 kg 34:00
1.8 kg 35:00
1.9 kg 36:00
2.0 kg 38:00
h) Defrost by weight
With this function, the power (250W) and time are set automatically
in order to defrost your preparation progressively without cooking it.
20
Assembly page 20/64
USK MW 26146 - 080425
Page 21

Copies of the I/B. Please reproduce them without any changes
except under special instruction from Team International BELGIUM.
The pages must be reproduced and folded in order to obtain a
booklet A5 (+/- 148.5 mm width x 210 mm height). When folding,
make sure you keep the good numbering when you turn the pages
of the I/B. Don’t change the page numbering. Keep the language
Fax +32 2 359 95 50
integrity.
1. Press the “EXPRESS/DEFROST/STEAM COOK” button twice. “d - - 1”
appears on the display and “kg” flashes.
2. Turn the rotary knob to select the desired defrost function
according to the type of food that needs to be defrosted. You
can choose between 4 defrost functions (see table).
3. Press the START button “
/30SEC” to confirm the setting of the
defrost function.
4. Turn the rotary knob to set the quantity that needs to be
defrosted (see table). The selected quantity flashes on the
display.
5. Press the START button “
/30SEC” to start the defrosting process.
The countdown begins.
Code Food Possible
quantity setting
d -- 1 Joint Meat
0.2 kg 4:30
Cooking
time
0.3 kg 5:32
0.4 kg 7:25
0.5 kg 8:15
0.6 kg 10:10
0.7 kg 18:00
0.8 kg 14:13
0.9 kg 16:15
1.0 kg 18:10
1.1 kg 20:26
1.2 kg 22:14
1.3 kg 24:23
1.4 kg 26:05
1.5 kg 28:27
1.6 kg 29:04
1.7 kg 30:09
1.8 kg 32:12
1.9 kg 33:16
21
Assembly page 21/64
USK MW 26146 - 080425
Page 22

Copies of the I/B. Please reproduce them without any changes
except under special instruction from Team International BELGIUM.
The pages must be reproduced and folded in order to obtain a
booklet A5 (+/- 148.5 mm width x 210 mm height). When folding,
make sure you keep the good numbering when you turn the pages
of the I/B. Don’t change the page numbering. Keep the language
Fax +32 2 359 95 50
integrity.
2.0 kg 34:30
0.2 kg 4:07
0.3 kg 6:17
0.4 kg 8:20
0.5 kg 10:10
0.6 kg 12:30
0.7 kg 14:10
0.8 kg 16:40
0.9 kg 18:35
1.0 kg 20:20
d -- 2 Steak/Chops
1.1 kg 21:30
1.2 kg 22:10
1.3 kg 23:26
1.4 kg 24:23
1.5 kg 25:20
1.6 kg 26:12
1.7 kg 27:26
1.8 kg 28:25
1.9 kg 29:15
2.0 kg 30:20
d -- 3 Chicken
Quarters
0.2 kg 3:05
0.3 kg 4:39
0.4 kg 6:11
0.5 kg 7:23
0.6 kg 8:53
0.7 kg 11:30
0.8 kg 12:30
0.9 kg 13:30
1.0 kg 14:20
1.1 kg 15:48
1.2 kg 17:30
1.3 kg 19:30
1.4 kg 20:10
1.5 kg 21:10
1.6 kg 22:47
1.7 kg 24:46
1.8 kg 25:21
22
Assembly page 22/64
USK MW 26146 - 080425
Page 23

Copies of the I/B. Please reproduce them without any changes
except under special instruction from Team International BELGIUM.
The pages must be reproduced and folded in order to obtain a
booklet A5 (+/- 148.5 mm width x 210 mm height). When folding,
make sure you keep the good numbering when you turn the pages
of the I/B. Don’t change the page numbering. Keep the language
Fax +32 2 359 95 50
integrity.
1.9 kg 26:10
2.0 kg 28:10
0.2 kg 7:00
0.3 kg 9:00
0.4 kg 12:00
0.5 kg 15:00
0.6 kg 16:00
0.7 kg 18:00
0.8 kg 20:00
0.9 kg 22:00
1.0 kg 24:00
d -- 4 Fish
1.1 kg 26:00
1.2 kg 28:00
1.3 kg 30:00
1.4 kg 32:00
1.5 kg 36:00
1.6 kg 38:00
1.7 kg 40:00
1.8 kg 42:00
1.9 kg 44:00
2.0 kg 45:00
i) Steam auto-cook function
1. Press the “EXPRESS/DEFROST/STEAM COOK” button three times. “S
- - 1” appears on the display and “kg” flashes.
2. Turn the rotary knob to select the desired steam auto-cook
function according to the type of food that needs to be cooked.
You can choose between 8 steam auto-cook functions (see
table).
3. Press the START button “
/30SEC” to confirm the setting of the
steam auto-cook function.
4. Turn the rotary knob to set the quantity that needs to be cooked
(see table). The selected quantity flashes on the display.
5. Press the START button “
/30SEC” to start the cooking process.
The countdown begins.
23
Assembly page 23/64
USK MW 26146 - 080425
Page 24

Copies of the I/B. Please reproduce them without any changes
except under special instruction from Team International BELGIUM.
The pages must be reproduced and folded in order to obtain a
booklet A5 (+/- 148.5 mm width x 210 mm height). When folding,
make sure you keep the good numbering when you turn the pages
of the I/B. Don’t change the page numbering. Keep the language
Fax +32 2 359 95 50
integrity.
Note: If there is not sufficient water in the water tank when using this
function, 8 beeps will sound. If you do not add water when that
happens, 4 beeps will sound every minute. See also section “STEAM
COOKING PRINCIPLES”.
Code Food Possible
quantity setting
S -- 1 Vegetables
S -- 2
Potato
Gratin
Frozen
S -- 3
Stuffed
Buns
S -- 4
Steamed
Eggs
0.10 kg 3:00
0.20 kg 4:00
0.10 kg 11:00
0.15 kg 13:00
0.20 kg 14:00
0.10 kg 9:00
0.20 kg 10:00
0.30 kg 11:00
0.05 kg 4:00
0.10 kg 11:00
Cooking
time
0.50 kg 36:00
S -- 5 Beef
0.75 kg 40:00
1.00 kg 44:00
0.50 kg 25:00
0.75 kg 29:00
S -- 6 Chicken
1.00 kg 32:00
1.25 kg 35:00
1.50 kg 39:00
0.30 kg 7:00
S -- 7 Fish
0.45 kg 9:00
0.60 kg 11:00
0.75 kg 13:00
S -- 8
Steamed
Whole Egg
0.20 kg 12:00
0.35 kg 13:00
Remark: For the Steamed Whole Egg function (S - - 8), the egg tray
supplied can be used. Up to 7 eggs can be steamed at the same
time.
24
Assembly page 24/64
USK MW 26146 - 080425
Page 25

Copies of the I/B. Please reproduce them without any changes
except under special instruction from Team International BELGIUM.
The pages must be reproduced and folded in order to obtain a
booklet A5 (+/- 148.5 mm width x 210 mm height). When folding,
make sure you keep the good numbering when you turn the pages
of the I/B. Don’t change the page numbering. Keep the language
Fax +32 2 359 95 50
integrity.
j) Adjusting the cooking time
During the cooking process, each press of the START button “
/30SEC” will add 30 seconds to the cooking time.
If you turn the rotary knob clockwise during the cooking process, the
cooking time will increase (10 seconds for each step). If you turn the
rotary knob anticlockwise, the cooking time will decrease (10
seconds for each step).
Note: The cooking time cannot be adjusted for the maximum
microwave power level (800W), the steam function, the auto-cook
functions and the defrost functions.
CHILDREN LOCKOUT FUNCTION
This oven has a safety device that locks the keys so that the oven
cannot be used when it is unsupervised.
To lock the control panel, press the button “STOP/CLEAR/CHILD
LOCK” for a number of seconds. “L” will appear on the display for 2
seconds before it returns to clock time. If you press a button when
the oven is in the locked state, “L” will appear on the display for 2
seconds.
To unlock, press the button “STOP/CLEAR/CHILD LOCK” again for a
number of seconds.
25
Assembly page 25/64
USK MW 26146 - 080425
Page 26

Copies of the I/B. Please reproduce them without any changes
except under special instruction from Team International BELGIUM.
The pages must be reproduced and folded in order to obtain a
booklet A5 (+/- 148.5 mm width x 210 mm height). When folding,
make sure you keep the good numbering when you turn the pages
of the I/B. Don’t change the page numbering. Keep the language
Fax +32 2 359 95 50
integrity.
BEFORE YOU CALL FOR SERVICE
If the oven fails to operate:
a) Check to ensure that the oven is plugged in securely. If it is not,
remove the plug from the outlet, wait 10 seconds and plug it in
again securely.
b) Check for a blown circuit fuse or a tripped main circuit breaker. If
these seem to be
operating properly, test the outlet with another appliance.
c) Check to ensure that the control panel is programmed correctly
and the timer is set.
d) Check to ensure that the door is securely closed. Otherwise, the
microwave energy will not flow into the oven.
e) Check to ensure that the steam generator is placed correctly
and that it is locked in place with the screw. Also check if it is
clean.
f) Check that the water tank and the waste water tank are placed
correctly and that they are clean.
IF NONE OF THE ABOVE RECTIFIES THE SITUATION, THEN CONTACT A
COMPETENT QUALIFIED ELECTRICIAN. DO NOT TRY TO ADJUST OR
REPAIR THE OVEN YOURSELF.
CLEANING AND CARE
1. Turn off the oven and remove the power plug from the wall socket
before cleaning.
2. It is very important to clean the oven door, as it is responsible for
the impenetrability of the oven. Therefore, make sure it is always
clean and make sure no object hinders the door from being
properly closed.
3. Keep the inside of the oven clean. When food splatters or spilled
liquids adhere to oven walls, wipe with a damp cloth. Mild
detergent may be used if the oven gets very dirty. Avoid the use
of spray and other harsh cleaners as they may stain, streak or dull
the door surface. The grill element has hinges; you can pull it down
to clean the roof of the oven cavity.
26
Assembly page 26/64
USK MW 26146 - 080425
Page 27

Copies of the I/B. Please reproduce them without any changes
except under special instruction from Team International BELGIUM.
The pages must be reproduced and folded in order to obtain a
booklet A5 (+/- 148.5 mm width x 210 mm height). When folding,
make sure you keep the good numbering when you turn the pages
of the I/B. Don’t change the page numbering. Keep the language
Fax +32 2 359 95 50
integrity.
4. The outside surfaces should be cleaned with a damp cloth. To
prevent damage to the operating parts inside the oven, water
should not be allowed to seep into the ventilation openings.
5. Do not allow the control panel to become wet. Clean with a soft,
damp cloth. When cleaning the control panel, leave oven door
open to prevent oven from accidentally turning on.
6. If steam accumulates inside or around the outside of the oven
door, wipe with a soft cloth. This may occur when the microwave
oven is operated under high humidity conditions, this is normal.
7. If you have used the steam feature, wipe the inside of the oven
immediately after use. Also clean the water tank, the slot for the
water tank and the steam generator from time to time. To take
the steam generator out of the appliance, you need to unscrew
the screw on the left side of your appliance and take off the small
plate. Then you can take out the steam generator, empty it and
wipe it with a soft cloth. After cleaning, put the steam generator
back in place and screw the small plate back on the appliance
to prevent the steam generator from being taken out during use.
8. The steam generator needs to be decalcified regularly, at least
every 20 uses. To do so, fill the water tank with vinegar and run 3
cycles with the STEAM/CLEAN UP function (see section “Steam
cooking”). If you do not decalcify the steam generator regularly,
the warranty becomes null and void.
9. The holes for the steam outlet should be clean at all times. You
can wipe the 9 holes on the left side of the oven cavity with a soft
cloth dipped in vinegar.
10. It is occasionally necessary to remove the glass tray for
cleaning. Wash the tray in warm sudsy water or in a dishwasher.
11. The roller ring and oven floor should be cleaned regularly to
avoid excessive noise. Simply wipe the bottom surface of the oven
with mild detergent. The roller ring may be washed in mild sudsy
water or dishwasher. When removing the roller ring from cavity
floor for cleaning, be sure to replace in the proper position.
12. Remove odours from your oven by combining a cup of water
with the juice and skin of one lemon in a deep microwaveable
bowl, microwave for 5 minutes. Wipe thoroughly and dry with a
soft cloth.
27
Assembly page 27/64
USK MW 26146 - 080425
Page 28

Copies of the I/B. Please reproduce them without any changes
except under special instruction from Team International BELGIUM.
The pages must be reproduced and folded in order to obtain a
booklet A5 (+/- 148.5 mm width x 210 mm height). When folding,
make sure you keep the good numbering when you turn the pages
of the I/B. Don’t change the page numbering. Keep the language
Fax +32 2 359 95 50
integrity.
13. When it becomes necessary to replace the oven light, please
consult the customer service to have it replaced.
14. You can also clean your microwave oven in an easy way with
the clean-up function. Make sure there is sufficient water in the
water tank and proceed as follows:
- Press the “STEAM/CLEAN UP” button twice.
- Press the START button “
/30SEC”. The oven cavity will
be cleansed with water and steam will appear in the
oven.
- Repeat above steps if necessary.
- Wipe the bottom of the oven cavity with a sponge to
remove the dirt that has fallen down.
- Let the appliance work for 4 minutes at 220°C in the
convection cooking mode. Then the oven is clean.
28
Assembly page 28/64
USK MW 26146 - 080425
Page 29

Copies of the I/B. Please reproduce them without any changes
except under special instruction from Team International BELGIUM.
The pages must be reproduced and folded in order to obtain a
booklet A5 (+/- 148.5 mm width x 210 mm height). When folding,
make sure you keep the good numbering when you turn the pages
of the I/B. Don’t change the page numbering. Keep the language
Fax +32 2 359 95 50
integrity.
WARRANTY
We suggest that you complete and return the enclosed Product
Registration Card promptly to facilitate verification of the date of
original purchase. However, return of the Product Registration Card is
not a condition of these warranties. You can also fill this warranty
card online, at the following address:
This KALORIK product is warranted for 1 year from the date of
purchase against defects in material and workmanship. This warranty
is not transferable. Keep the original sales receipt. Proof of purchase
is required to obtain warranty performance.
During this period, the KALORIK product that, upon inspection by
KALORIK, is proved defective, will be repaired or replaced, at
KALORIK's option, without charge to the customer. If a replacement
product is sent, it will carry the remaining warranty of the original
product.
This warranty does not apply to any defect arising from a buyer's or
user's misuse of the product, negligence, failure to follow KALORIK
instructions noted in the user’s manual, use on current or voltage
other than that stamped on the product, wear and tear, alteration
or repair not authorized by KALORIK, or use for commercial purposes.
There is no warranty for glass parts, glass containers, filter basket,
blades and agitators, and accessories in general. There is also no
warranty for parts lost by the user.
ANY WARRANTY OF MERCHANTABILITY OR FITNESS WITH RESPECT TO
THIS PRODUCT IS ALSO LIMITED TO THE ONE YEAR LIMITED WARRANTY
PERIOD
Some states do not allow limitation on how long an implied warranty
lasts or do not allow the exclusion of incidental or consequential
damages, so the above limitations may not apply to you. This
warranty gives you specific legal rights, and you may also have other
rights which vary from state to state.
29
Assembly page 29/64
www.KALORIK.com
USK MW 26146 - 080425
Page 30

Copies of the I/B. Please reproduce them without any changes
except under special instruction from Team International BELGIUM.
The pages must be reproduced and folded in order to obtain a
booklet A5 (+/- 148.5 mm width x 210 mm height). When folding,
make sure you keep the good numbering when you turn the pages
of the I/B. Don’t change the page numbering. Keep the language
Fax +32 2 359 95 50
integrity.
If the appliance should become defective within the warranty
period and more than 30 days after date of purchase, do not return
the appliance to the store: often, our Consumer Service
Representatives can help solve the problem without having the
product serviced. If servicing is needed, a Representative can
confirm whether the product is under warranty and direct you to the
nearest service location.
If this is the case, bring the product (or send it, postage prepaid),
along with proof of purchase and indicating a return authorization
number given by our Consumer Service Representatives, to the
nearest authorized KALORIK Service Center (please visit our website
at
www.KALORIK.com or call our Customer Service Department for
the address of the nearest authorized KALORIK Service Center).
If you send the product, please include a letter explaining the nature
of the claimed defect.
If you have additional questions, please call our Consumer Service
Department (please see below for complete contact information),
Monday through Friday from 9:00am - 6:00pm (EST). Please note
hours are subject to change.
If you would like to write, please send your letter to:
KALORIK Consumer Service department
Team International Group of America Inc
1400 N.W 159th Street, Suite 102
Miami Gardens, FL 33169 USA
Or call :
Toll Free: +1 888-521-TEAM
Only letters can be accepted at this address above. Shipments and
packages that do not have a return
authorization number will be
refused.
30
Assembly page 30/64
USK MW 26146 - 080425
Page 31

Copies of the I/B. Please reproduce them without any changes
except under special instruction from Team International BELGIUM.
The pages must be reproduced and folded in order to obtain a
booklet A5 (+/- 148.5 mm width x 210 mm height). When folding,
make sure you keep the good numbering when you turn the pages
of the I/B. Don’t change the page numbering. Keep the language
Fax +32 2 359 95 50
integrity.
CONSEJOS DE SEGURIDAD
IMPORTANTES INSTRUCCIONES DE SEGURIDAD
Las instrucciones de seguridad de su manual de instrucciones son
importantes y deben ser leídas con muchísima atención. Conserve
su manual para consultaciones ulteriores.
MANTENIMIENTO
Si no se mantiene su aparato en buen estado de limpieza, su
superficie podría dañarse y afectar de manera inexorable la
esperanza de vida de su aparato y provocar situaciones peligrosas.
ESPECIFICACIONES
Output: 800W
Grill: 1300W
Convección: 1500 W
Vapor: 800 W
Tension – frequencia: 220-230V~50Hz
Frecuencia operación: 2450MHz
Capacidad: 25 Litros
Uniformidad de cocinado: Sistema de giro {Φ315mm}
Peso neto: Approx.20 kg
IMPORTANTES CONSEJOS DE SEGURIDAD
Lea detenidamente el modo de empleo antes de utilizar el aparato.
Importante: Las personas (incluidos niños) con incapacidades físicas,
sensoriales o mentales, o sin experiencia o conocimiento nunca
deben utilizar el aparato, salvo si están bajo la vigilancia de una
persona responsable de su seguridad o si recibieron previamente
instrucciones con respecto al uso seguro del aparato.
Es necesario vigilar a los niños para que no jueguen con el aparato.
31
Assembly page 31/64
USK MW 26146 - 080425
Page 32

Copies of the I/B. Please reproduce them without any changes
except under special instruction from Team International BELGIUM.
The pages must be reproduced and folded in order to obtain a
booklet A5 (+/- 148.5 mm width x 210 mm height). When folding,
make sure you keep the good numbering when you turn the pages
of the I/B. Don’t change the page numbering. Keep the language
Fax +32 2 359 95 50
integrity.
¡CUIDADO! Para evitar riesgos de quemaduras, descargas
eléctricas, incendio, heridas o exposiciones excesivas a las
microondas, aconsejamos que siga estas instrucciones:
1. Utilice el aparato sólo para usos domésticos y de la manera
indicada en el manual de instrucciones. Este tipo de aparato es
de uso doméstico no profesional. No utilice productos químicos o
corrosivos que pudieran dañarlo. Este tipo de horno está
diseñado para calentar, cocinar, vapor o descongelar alimentos,
no está diseñado para uso industrial o de laboratorios.
2. No utilice el horno cuando esté vacío. Podría dañarlo.
3. No intente utilizar este horno microondas con la puerta abierta,
ya que puede provocar una exposición peligrosa a la energía de
las microondas.
4. No coloque ningún objeto entre la cara frontal del horno y la
puerta y procure no ensuciar los cierres y juntas de la puerta.
5. CUIDADO:
No utilice el horno microondas si está dañado. Es
particularmente importante que la puerta del horno cierre
correctamente, y que no haya daños en:
- Puerta (torcida o combada)
- Bisagras y pestillos (rotos o flojos)
- Juntas de la puerta.
- Cristales de la puerta (interior y exterior)
No vuelva a poner su aparato en marcha antes que sea
comprobado por un servicio técnico competente (*).
6. Durante la cocción de alimentos, si el vapor se introduce entre los
cristales interior y exterior de la puerta del horno, apáguelo
inmediatamente, desenchúfelo y llame al servicio post-venta más
cerca porque existe el riesgo de una exposición a la energía
microondas.
7. CUIDADO:
Es muy peligroso que cualquier persona no
cualificada efectúe operaciones de mantenimiento o
reparaciones que necesiten que se retire la tapa de protección
contra la energía microondas. Si el aparato o el cable están
dañados, no utilice el aparato. Cualquier reparación debe ser
realizada por un servicio técnico cualificado (*)
8. No intente desmontar las piezas del aparato como los pies, las
juntas, etc.
32
Assembly page 32/64
USK MW 26146 - 080425
Page 33

Copies of the I/B. Please reproduce them without any changes
except under special instruction from Team International BELGIUM.
The pages must be reproduced and folded in order to obtain a
booklet A5 (+/- 148.5 mm width x 210 mm height). When folding,
make sure you keep the good numbering when you turn the pages
of the I/B. Don’t change the page numbering. Keep the language
Fax +32 2 359 95 50
integrity.
9. CUIDADO: Los niños no deberían utilizar ese aparato sin vigilancia
salvo si se les han dado previamente instrucciones para que
puedan utilizarlo correctamente y entender los riesgos vinculados
con un uso no apropiado.
10. Para reducir el riego de fuego en el horno:
a. No exceda en tiempo de cocción de alimentos. Cuando los
alimentos se calientan en recipientes de materia plástica o
papel, compruebe la potencia del horno frecuentemente para
evitar riesgos de inflamación.
b. Retire las fijaciones de metal de las envolturas de los alimentos
antes de colocarlas en el horno.
c. Si aparece humo o si materiales se incendian, pare y
desconecte el horno y mantenga la puerta cerrada para
sofocar las posibles llamas.
d. Utilice el horno sólo para cocer alimentos. No lo utilice para
secar vestidos, esterilizar objetos o alimentos, para almacenar
objetos, etc. No deje nunca productos de papel, utensilios de
cocina o comida en el interior del horno.
11. IMPORTANTE: UTENSILIOS DE NO UTILIZAR NUNCA EN UN
MICROONDAS.
Compruebe siempre que los utensilios son adaptados al uso del
microondas:
- No utilice utensilios con un asa de metal.
- No utilice objetos metálicos.
- No utilice fijaciones metálicas cubiertas de papel.
- No utilice platos de melamina. Contienen una materia que
absorbe la energía microondas. Estos platos podrían partir o
quemar y la velocidad de cocción sería reducida.
- La utilización de termómetros convencionales es prohibida, utilice
termómetros adaptados a la cocción con microondas.
- Si no sabe si un utensilio está compatible con microondas, pida al
fornecedor del utensilio.
12. No caliente alimentos en recipientes que tengan una abertura
pequeña ya que podrían explotar en el microondas.
13.
ADVERTENCIA: Los líquidos u otros alimentos no deben
calentarse en recipientes herméticos (como botes de cristal o de
plástico con tapa, biberones con chupo, etc.) pues podrían
explotar.
33
Assembly page 33/64
USK MW 26146 - 080425
Page 34

Copies of the I/B. Please reproduce them without any changes
except under special instruction from Team International BELGIUM.
The pages must be reproduced and folded in order to obtain a
booklet A5 (+/- 148.5 mm width x 210 mm height). When folding,
make sure you keep the good numbering when you turn the pages
of the I/B. Don’t change the page numbering. Keep the language
Fax +32 2 359 95 50
integrity.
14. Cuando el símbolo se encuentra en una superficie
especifica. Recuerda que tiene que tener mucho cuidado e
significa: “¡CUIDADO! Esta superficie puede volverse muy caliente
durante el uso”.
15. Los huevos en su cáscara y los huevos duros enteros no deben
calentarse en el horno en función microondas pues podría
explotar.
16. El calentamiento de bebidas por microondas puede provocar un
brote brusco a causa del liquido en ebullición, por lo que deben
tomarse precauciones cuando se manipule el recipiente.
17. CUIDADO: No fría comida en el microondas. El aceite caliente
puede dañar partes del microondas y los utensilios e incluso
puede quemar el interior del aparato. No sobrecaliente la comida
con mucha grasa en el microondas, puede quemarse.
18. Perfore los alimentos con pieles duras tales con patatas,
calabazas, manzanas, etc. antes de cocinarlos.
19. El contenido de biberones y de botes de alimentos para bebés
se debe remover o agitar y tiene que verificar la temperatura,
antes de su consumo a fin de evitar quemaduras. Haga lo mismo
con la mayoría de los alimentos más o menos líquidos para que el
calor sea bien repartido.
20. Importante: su microondas sólo calienta el interior del recipiente.
Pero a veces, los alimentos o los líquidos calientan el recipiente y
producen vapor caliente: de consecuencia tenga mucho
cuidado cuando manipule o abra el recipiente.
21. Antes de la utilización del horno en modo de cocción
microondas, el plato de cristal, el aro y el trébol tienen que estar
correctamente posicionados en el horno. Si quiere utilizar el horno
en el modo vapor, quite el plato de cristal y el trebol.
22. Procure que los orificios de los recipientes o las tapas especificas
para microondas no estén tapados o obstruidos para evitar una
explosión.
23. No ponga los alimentos directamente sobre el plato de cristal.
Póngalos en un recipiente de cocina apropiado antes de
introducirlos en el microondas.
24. Los alimentos que contienen una mixtura de materias grasas y
agua (por ejemplo los caldos) deben ser dejados en el
34
Assembly page 34/64
USK MW 26146 - 080425
Page 35

Copies of the I/B. Please reproduce them without any changes
except under special instruction from Team International BELGIUM.
The pages must be reproduced and folded in order to obtain a
booklet A5 (+/- 148.5 mm width x 210 mm height). When folding,
make sure you keep the good numbering when you turn the pages
of the I/B. Don’t change the page numbering. Keep the language
Fax +32 2 359 95 50
integrity.
microondas apagado durante 30 a 60 segundos para evitar que
la mixtura trasborde.
25. Es preciso limpiar regularmente el interior del horno y remover los
restos de comida. Esos restos en los elementos calentadores
pueden producir humo y malos olores.
26. Su aparato nunca debe ser puesto en marcha mediante un
minutero externo o un sistema de mando a distancia separado.
27. Antes de utilizar la función vapor, insierte el depósito de agua y
espere 30 segundos.
28. No utilice nunca una función vapor con un depósito de agua
vacío.
29. No toque o no quite nunca el generator de vapor si estás
utilizando una función vapor.
30. El generador de vapor sólo puede estar quitado por razones de
limpieza y mantenimiento. No sumerja nunca el aparato en agua
o en cualquier otro líquido.
GUARDE ESTAS INSTRUCCIONES
INFORMACIÓN SOBRE EL ENCHUFE POLARIZADO
Algunos aparatos están provistos con un enchufe polarizado (una
pata es más ancha que la otra). Para reducir el riesgo de choque
eléctrico, este enchufe calza en el tomacorriente polarizado de una
sola manera. Si el enchufe no cabe totalmente en el tomacorriente,
gire el enchufe. Si aún así no calza, consulte a un servicio técnico
cualificado. No intente anular esta característica de seguridad.
Para los aparatos provistos con un enchufe clásico, basta con
insertar el enchufe en la toma de corriente.
INSTRUCCIONES DEL CABLE
El cable de alimentación del aparato es un cable corto a fin de
disminuir el riesgo de accidentes (caídas al tropezar con él, etc.)
Puede utilizar un alargador si es necesario.
• Asegúrese de que el nivel eléctrico del cable es igual o
mayor que el indicado. Una extensión con un bajo nivel
35
Assembly page 35/64
USK MW 26146 - 080425
Page 36

Copies of the I/B. Please reproduce them without any changes
except under special instruction from Team International BELGIUM.
The pages must be reproduced and folded in order to obtain a
booklet A5 (+/- 148.5 mm width x 210 mm height). When folding,
make sure you keep the good numbering when you turn the pages
of the I/B. Don’t change the page numbering. Keep the language
Fax +32 2 359 95 50
integrity.
eléctrico correría el riesgo de sobrecalentarse y de
estropearse.
• Para evitar riesgos colocar de forma tal que los niños no
puedan jalarlo o tropezar con él. Que no arrastre nunca por
el suelo.
36
Assembly page 36/64
USK MW 26146 - 080425
Page 37

Copies of the I/B. Please reproduce them without any changes
except under special instruction from Team International BELGIUM.
The pages must be reproduced and folded in order to obtain a
booklet A5 (+/- 148.5 mm width x 210 mm height). When folding,
make sure you keep the good numbering when you turn the pages
of the I/B. Don’t change the page numbering. Keep the language
Fax +32 2 359 95 50
integrity.
PARTES
1. Cierre de seguridad
2. Ventana
3. Plato de cristal
4. Trebol
5. Aro
6. Panel de mandos
7. Depósito de agua
8. Depósito de agua utilizadas
9. Generador de vapor
37
Assembly page 37/64
USK MW 26146 - 080425
Page 38

Copies of the I/B. Please reproduce them without any changes
except under special instruction from Team International BELGIUM.
The pages must be reproduced and folded in order to obtain a
booklet A5 (+/- 148.5 mm width x 210 mm height). When folding,
make sure you keep the good numbering when you turn the pages
of the I/B. Don’t change the page numbering. Keep the language
Fax +32 2 359 95 50
integrity.
INSTALACIÓN
1. Asegúrese de que todos los materiales de embalaje han sido
retirados del interior del microondas.
2. Verifique que el horno no tenga ningún daño externo, como
puerta torcida, cierres dañados, bisagras o pestillos flojos, y/o
abolladuras dentro de la cavidad o en la puerta. Si existe algún
daño no utilice el horno y contacte con personas del Servicio
Técnico Oficial.
3. Este horno microondas debe ser colocado en una superficie
estable y lisa, que mantenga su peso y el de la comida que se
vaya a cocinar.
4. No coloque el horno cerca de fuentes de calor, humedad o
cerca de materiales combustibles.
5. No cubra o bloquee aperturas en el aparato. No remueva los
pies.
6. Para su correcto funcionamiento el horno debe tener una
ventilación adecuada, se recomienda 20 cm encima del horno,
10 cm por detrás y 8 cm a ambos lados. No cubra o bloquee
ninguna entrada del aparato.
7. El enchufe debe ser fácilmente accesible de modo que pueda
ser desenchufado rápidamente en caso de emergencia.
8. No use el horno al aire libre.
ESTE APARATO DEBE SER ENCHUFADO EN UN ENCHUFE CON TOMA
DE TIERRA. Evite utilizar extensiones eléctricas o asegúrese que son
adaptadas a la potencia del aparato.
Nota: Si tiene alguna duda sobre la correcta instalación del aparato
consulte a un electricista o persona cualificada, ni el fabricante ni el
importador aceptaran cualquier responsabilidad por daño al
aparato o personas como resultado de un fallo al realizar la
conexión eléctrica.
¡CUIDADO!, El aparato está protegido con un fusible. En caso de
que éste debería ser substituido, llame al servicio técnico
competente (*).
38
Assembly page 38/64
USK MW 26146 - 080425
Page 39

Copies of the I/B. Please reproduce them without any changes
except under special instruction from Team International BELGIUM.
The pages must be reproduced and folded in order to obtain a
booklet A5 (+/- 148.5 mm width x 210 mm height). When folding,
make sure you keep the good numbering when you turn the pages
of the I/B. Don’t change the page numbering. Keep the language
Fax +32 2 359 95 50
integrity.
RADIO INTERFERENCIA
Utilizar el horno microondas puede causar interferencias en tu radio,
televisión o equipo similar.
Cuando haya interferencias se pueden reducir o eliminar tomando
las siguientes medidas.
1. Limpiar la puerta y la superficie de cierre del horno.
2. Reorientar la antena receptora de radio o televisión.
3. Cambiar de lugar el horno respecto al receptor.
4. Enchufar el horno a otra toma de corriente
PRINCIPIOS DE COCINA EN EL MICROONDAS
1. Ordene los alimentos cuidadosamente. Ponga los pedazos más
finos hacia el exterior de un plato resistente a microondas.
2. Vigile el tiempo de cocción. Escoja siempre el tiempo de
cocción más corto indicado en las envolturas. Vuelva a cocerlos
si necesario. Los alimentos demasiado cocidos pueden fumar o
incendiarse.
3. Cubra los alimentos cuando los cocina para evitar salpicaduras.
4. Déle la vuelta a los alimentos una vez durante el proceso de
cocción para que alimentos como pollo o hamburguesas
cuezan más rápido. Los alimentos mayores como asados deben
ser revueltos por lo menos una vez.
5. Aconsejamos que revuelva y desplace del centro hacia el
exterior del recipiente los alimentos como albóndigas durante la
cocción.
PRINCIPIOS DE COCCION CON VAPOR
1. Si quiere cocer comida con la función vapor, una función vapor
auto-cocción o una función combinada con vapor, siempre hay
que remover el plato de cristal y el trebol antes de utilizar el
horno. Puede dejar el aro dentro del aparato.
2. Antes del uso, compruebe que el depósito de aguas usadas está
vacío y que hay demasiada agua en el depósito. Compruebe
también si el generador de vapor, el depósito de aguas usadas y
el depósito están bien colocados.
39
Assembly page 39/64
USK MW 26146 - 080425
Page 40

Copies of the I/B. Please reproduce them without any changes
except under special instruction from Team International BELGIUM.
The pages must be reproduced and folded in order to obtain a
booklet A5 (+/- 148.5 mm width x 210 mm height). When folding,
make sure you keep the good numbering when you turn the pages
of the I/B. Don’t change the page numbering. Keep the language
Fax +32 2 359 95 50
integrity.
3. Cuece sólo comida comestible. No coloque trozos de comida
demasiados grandes dentro del horno.
4. Durante el proceso de emisión de vapor, el cristal se queda
limpio. No abra la puerta demasiado a menudo porqué mucho
vapor va a escaparse y calor se perderá. Cada vez que abre la
puerta, hay que prolongar el tiempo de cocción de dos minutos.
5. Al final del proceso de cocción, es mejor esperar 30 segundos
antes de abrir la puerta, puesto que el vapor queda dentro del
horno durante un tiempo y que pues, ayuda a cocer los
alimentos incluso después de que se haya parado el horno.
GUIA DE UTENSILIOS
1. El material ideal para uso en microondas es el transparente que
permite el paso de la energía al recipiente y caliente los
alimentos.
2. Las microondas no pueden atravesar el metal, así pues no utilice
utensilios de metal.
3. No utilice utensilios de papel reciclado cuando cocine en el
microondas, ya que pueden contener pequeños trozos de
metal y causar chispas.
4. Se recomiendan platos redondo u ovalados más que
cuadrados o rectangulares.
La tabla siguiente le ayudará a elegir los utensilios apropiados.
Utensilios Microondas Parrilla Combi Convección Vapor
Vidrio
resistente al
Sí
Sí Sí Sí Sí
calor
vidrio no
resistente al
No
No No No No
calor
Cerámica
resistente
Sí
Sí Sí Sí Sí
al calor
Patos en
plástico para
Sí
No No No No
Microondas
Papel de Sí No No No No
40
Assembly page 40/64
USK MW 26146 - 080425
Page 41

Bandeja de
Aluminio &
recipientes de
Fax +32 2 359 95 50
cocina
metal
Rejilla de
metal
Papel de
papel en
aluminio
Copies of the I/B. Please reproduce them without any changes
except under special instruction from Team International BELGIUM.
The pages must be reproduced and folded in order to obtain a
booklet A5 (+/- 148.5 mm width x 210 mm height). When folding,
make sure you keep the good numbering when you turn the pages
of the I/B. Don’t change the page numbering. Keep the language
integrity.
No
No
Sí Sí Sí Sí
Sí Sí Sí Sí
No Sí No No Sí
41
Assembly page 41/64
USK MW 26146 - 080425
Page 42

Copies of the I/B. Please reproduce them without any changes
except under special instruction from Team International BELGIUM.
The pages must be reproduced and folded in order to obtain a
booklet A5 (+/- 148.5 mm width x 210 mm height). When folding,
make sure you keep the good numbering when you turn the pages
of the I/B. Don’t change the page numbering. Keep the language
Fax +32 2 359 95 50
integrity.
PANEL DE MANDOS
Por cada tecla, véase el parrafo « FUNCIONAMIENTO » para
conocer su utilización.
Pantalla: Indica el tiempo de
cocción, la potencia y la hora y el
estado de los diferentes programas
u otros reglajes.
POWER LEVEL: para ajustar la función
de cocción del microondas (5
niveles de potencia) y para
determinar el nivel de potencia del
microondas.
GRILL: para ajustar la función de
cocción grill.
CONV.: para ajustar la función
cocción por convección y para
ajustar la temperatura para
convección.
STEAM/CLEAN UP: para ajustar la
función de vapor y ajustar la función
de limpieza.
COMBI: para ajustar una
combinación de la función de
cocción.
EXPRESS/DEFROST/STEAM COOK:
para ajustar el menu auto, la
decongelación según el peso o la
función de auto-cocción al vapor.
STOP/CLEAR/CHILD LOCK: para
hacer una pausa o parar el
microondas durante el uso o para
42
Assembly page 42/64
USK MW 26146 - 080425
Page 43

Fax +32 2 359 95 50
Copies of the I/B. Please reproduce them without any changes
except under special instruction from Team International BELGIUM.
The pages must be reproduced and folded in order to obtain a
booklet A5 (+/- 148.5 mm width x 210 mm height). When folding,
make sure you keep the good numbering when you turn the pages
of the I/B. Don’t change the page numbering. Keep the language
integrity.
anular el programa actual. Se
puede utilizar también para activar y
desactivar el bloqueo para niños.
TIME: permite el ajuste o la
verificación del reloj o para ajustar la
alarma del reloj
/30 SEC (START): permite la puesta
en marcha del horno cuando una
función esté programada. Se puede
utilizar para añadir 30 segundos al
tiempo de cocción.
Botón rotativo: permite el ajuste del
tiempo de cocción, de la potencia,
del peso o de la hora.
43
Assembly page 43/64
USK MW 26146 - 080425
Page 44

Copies of the I/B. Please reproduce them without any changes
except under special instruction from Team International BELGIUM.
The pages must be reproduced and folded in order to obtain a
booklet A5 (+/- 148.5 mm width x 210 mm height). When folding,
make sure you keep the good numbering when you turn the pages
of the I/B. Don’t change the page numbering. Keep the language
Fax +32 2 359 95 50
integrity.
FUNCIONAMIENTO
NOTA IMPORTANTE
1. La cavidad de su horno debe obligatoriamente contener una
preparación antes de la puesta en marcha.
2. Asegúrese que el recipiente no toque las paredes del horno
para que no impida la rotación del plato de cristal.
3. El soporte metálico entregado con su aparato es compatible
con la energía microondas y puede utilizarse sin riesgo, que
sea en posición grill o en posición microondas (o ambas) o
también en la función vapor. En posición grill, permite acercar
los alimentos de las resistencias para mejorar la cocción pero
permite también colocar varios platos en la cavidad.
4. La huevera provista también puede utilizarse por la función
vapor únicamente. No puede nunca utilizarse para la
cocción microondas, grill o convección.
Cada vez que pulse una tecla, se oye un bip brevo.
Cuando el aparato se pone en marcha, la luz se enciende para que
pueda controlar la cocción. La cuenta atrás del tiempo de cocción
empieza.
Al final de la cocción, se oye 4 bips y la luz se apaga. Si no presione
ningún botón o si abre el horno, se oirán tres bips cada minuto.
Si presione el botón "STOP/CLEAR" una vez durante el
funcionamiento del horno, la cocción se interrumpirá (presione el
botón START para seguir cociendo. Si presione el botón
"STOP/CLEAR" dos veces durante el funcionamiento del horno, el
horno se parará. Si ajusta un programa mientras presiona
"STOP/CLEAR", ese programa será anulado.
SI ABRE LA PUERTA DEL HORNO DURANTE EL PROCESO DE COCCION,
EL HORNO SE PARARA.
AJUSTE DEL RELOJ
El horno tiene un reloj digital. Para ajustar el tiempo:
1. Presione dos veces en « TIME » : « 0 :00 » aparece en la pantalla y
el primer « 0 » indicando las horas parpadeará.
44
Assembly page 44/64
USK MW 26146 - 080425
Page 45

Copies of the I/B. Please reproduce them without any changes
except under special instruction from Team International BELGIUM.
The pages must be reproduced and folded in order to obtain a
booklet A5 (+/- 148.5 mm width x 210 mm height). When folding,
make sure you keep the good numbering when you turn the pages
of the I/B. Don’t change the page numbering. Keep the language
Fax +32 2 359 95 50
integrity.
2. Gire el botón rotativo para ajustar las horas.
3. Presione otra vez en « TIME » para confirmar el ajuste de las horas.
El « 00 » indicando los minutos parpadeará
4. Gire el botón rotativo para ajustar las horas.
5. Pulse de nuevo "Timer/Clock" para confirmar el ajuste. « : »
parpadeará y la hora elegida se iluminará.
Por cualquier ajuste ulterior del reloj, pulse dos veces en "TIME " y
haga como indicado por encima.
El horno puede funcionar también cómo un reloj despertador.
1. Presione “TIME” una vez. El “0” en la pantalla parpadeará.
2. Ajuste el tiempo girando el botón rotativo (máximo 60 minutos). El
tiempo parpadeará en la pantalla.
3. Presione el botón START
/30 SEC El cuenta hacia atrás empieza.
4. Al final del cuento hacia atrás, se oirán 4 bips. Si no presione
ningún botón o si abre el horno, se oirán 3 bips cada minuto
45
Assembly page 45/64
USK MW 26146 - 080425
Page 46

Copies of the I/B. Please reproduce them without any changes
except under special instruction from Team International BELGIUM.
The pages must be reproduced and folded in order to obtain a
booklet A5 (+/- 148.5 mm width x 210 mm height). When folding,
make sure you keep the good numbering when you turn the pages
of the I/B. Don’t change the page numbering. Keep the language
Fax +32 2 359 95 50
integrity.
AJUSTE DEL TIEMPO, POTENCIAS Y MODOS DE COCCIÓN
a) Inicio rápido
Esa función permite un calentamiento fácil y rápido, por ejemplo
por un vaso de agua.
Presione el botón START
/30 SEC, el horno empezará a funcionar
con plena potencia microondas (100% de potencia o 800W)
durante 30 segundos. Cada presión en el botón START añadirá 30
segundos al tiempo de cocción, que aparece en la pantalla.
b) Cocción microondas
1. Presione el botón « POWER LEVEL ». “800” aparecerá, es la
potencia máxima (800W).
2. Si no quiere cocer con potencia máxima, elija el nivel de
potencia deseado presionando “POWER LEVEL” varias veces.
“800”, “550”, “400”, “250” y “100” aparecerán uno tras otro,
indicando 800W, 550W, 400W, 250W y 100W respectivamente.
3. Ajuste el tiempo de cocción girando el botón rotativo (máximo
60 minutos).
4. Presione el botón START “
/30SEC” para empezar la cocción. El
cuento hacia atrás empieza.
c) Cocción gril
La cocción gril es particularmente útil por lonchas finas de carne,
bistec, kebabs, salchicha or trozos de pollo. Se recomienda también
por bocadillos calientes y platos gratinados.
1. Pulse el botón "GRILL ", «0» apareceen la pantalla y
aparece también en la pantalla.
2. Ajuste el tiempo de cocción girando el botón rotativo (máximo
60 minutos).
3. Presione el botón START «
/30 SEC” para empezar la cocción.
El cuento hacia atrás empieza.
Nota: el elemento calentador se apagará 15 segundos antes del fin
de la cocción.
46
Assembly page 46/64
USK MW 26146 - 080425
Page 47

Copies of the I/B. Please reproduce them without any changes
except under special instruction from Team International BELGIUM.
The pages must be reproduced and folded in order to obtain a
booklet A5 (+/- 148.5 mm width x 210 mm height). When folding,
make sure you keep the good numbering when you turn the pages
of the I/B. Don’t change the page numbering. Keep the language
Fax +32 2 359 95 50
integrity.
d) Cocción por convección
La cocción con convección se puede utilizar para precalentar el
horno hasta cierta temperatura y para cocer comida con
convección.
1. Presione el botón « CONV ». « 220 » parpadeará en la pantalla. Es
la temperatura predefinida.
2. Presione el botón « CONV » otra vez si quiere ajustar una
temperatura diferente. Puede elegir entre 7 temperaturas por la
convección : 220°C, 20°C, 180°C, 160C, 140°C, 120°C y 100°C.
3. Ajuste el tiempo de cocción girando el botón rotativo (máximo
60 minutos).
4. Presione el botón START «
/30 SEC” para empezar la cocción. El
cuento hacia atrás empieza.
Nota: el elemento calentador se apagará 15 segundos antes del fin
de la cocción.
e) Cocción por vapor
Antes de utilizar la función vapor, llene el depósito de agua con
agua. Por eso, saque el depósito de agua colocado en la parte
delantera del microondas. Luego abre el depósito girando la tapa
en el sentido contrario de las agujas del reloj y sáquela. Vierta la
cantidad deseada de agua, respetando el nivel mínimo y máximo
indicado en el depósito de agua. Cierre el depósito girando la tapa
en el sentido de la agujas del reloj hasta que se encliqua y ponga
de nuevo el depùosito dentro del aparato. Compruebe que se
pone perfectamente y espere 30 segundos antes del uso. Véase
también el párrafo « PRINCIPIOS DE COCCION CON VAPOR »
Presione el botón « STEAM/CLEAN UP ». “:0” y
aparecerá.
Ajuste el tiempo de cocción girando el botón rotativo (máximo 30
segundos)
Presione el botón “
/30SEC” para empezar la cocción. El cuento
hacia atrás empieza.
47
Assembly page 47/64
USK MW 26146 - 080425
Page 48

Copies of the I/B. Please reproduce them without any changes
except under special instruction from Team International BELGIUM.
The pages must be reproduced and folded in order to obtain a
booklet A5 (+/- 148.5 mm width x 210 mm height). When folding,
make sure you keep the good numbering when you turn the pages
of the I/B. Don’t change the page numbering. Keep the language
Fax +32 2 359 95 50
integrity.
Nota : si no hay agua suficiente en el depósito de agua cuando
utiliza esta función, se oirán 8 bips. Si no añada agua cuando se
produce, se oirán 4 bips cada minuto.
f) Uso del modo de cocción combinada
Puede elegir entre 5 programas de cocción combinada.
1. Microondas + grill
1. Presione el botón « COMBI » una vez. « 550 » aparecerá, es la
potencia máxima.
2. Si no quiere cocer con potencia máxima, elija el nivel de
potencia deseado presionando “POWER LEVEL” .“Puede elegir
entre 4 niveles de potencia : 800W, 550W, 400W, 250W y 100W
respectivamente.
3. Ajuste el tiempo de cocción girando el botón rotativo (máximo
60 minutos).
4. Presione el botón START “
/30SEC” para empezar la cocción. El
cuento hacia atrás empieza.
2. Microondas y convección
1. Presione dos veces el botón “COMBI”. En la pantalla, “220”
parpadeará, es la temperatura predefinida.
2. Presione el botón « CONV » si quiere ajustar otra temperatura.
Puede elegir entre 7 temperaturas diferentes por la convección :
220°C, 200°C, 180°C, 160°C, 140°C, 120°C y 100°C.
3. Presione « POWER LEVEL » para elegir la potencia. Puede elegir
entre 4 niveles de potencia : 550X, 400W, 250 W y 100W.
4. Ajuste el tiempo de cocción girando el botón rotativo (máximo
60 minutos).
5. Presione el botón START“
/30SEC” para empezar la cocción. El
cuento hacia atrás empieza.
Nota: el elemento calentador se apagará 15 segundos antes del fin
de la cocción.
48
Assembly page 48/64
USK MW 26146 - 080425
Page 49

Copies of the I/B. Please reproduce them without any changes
except under special instruction from Team International BELGIUM.
The pages must be reproduced and folded in order to obtain a
booklet A5 (+/- 148.5 mm width x 210 mm height). When folding,
make sure you keep the good numbering when you turn the pages
of the I/B. Don’t change the page numbering. Keep the language
Fax +32 2 359 95 50
integrity.
3. Microondas y vapor
1. Presione el botón “COMBI” tres veces. “800” aparece en la
pantalla, es el nivel de potecia predefinido.
2. Presione « POWER LEVEL » para elegir la potencia. Puede elegir
entre 5 niveles de potencia : 800W, 550W, 400W, 250W y 100W.
3. Ajuste el tiempo de cocción girando el botón rotativo (máximo
60 minutos).
4. Presione el botón “
/30SEC” para empezar la cocción. El
cuento hacia atrás empieza.
Nota : si no hay agua suficiente en el depósito de agua cuando
utiliza esta función, se oirán 8 bips. Si no añada agua cuando se
produce, se oirán 4 bips cada minuto. Véase también el párrafo
« PRINCIPIOS DE COCCION CON VAPOR »
4. Grill + vapor
1. Presione el botón « COMBI » cuatro veces. « :0 » aparece en la
pantalla.
2. Ajuste el tiempo de cocción girando el botón rotativo (máximo
60 minutos).
3. Presione el botón START“
/30SEC” para empezar la cocción. El
cuento hacia atrás empieza.
Nota: el elemento calentador se apagará 15 segundos antes del fin
de la cocción. Nota : si no hay agua suficiente en el depósito de
agua cuando utiliza esta función, se oirán 8 bips. Si no añada agua
cuando se produce, se oirán 4 bips cada minuto. Véase también el
párrafo « PRINCIPIOS DE COCCION CON VAPOR »
5. Convección + vapor
1. Presione el botón « COMBI » 5 veces. « 220 » aparece en la
pantalla, es la temperatura máxima para la convección.
2. Presione el botón « CONV » para ajustar la temperatura. Puede
elegir entre 7 temperaturas para la convección : 220°C, 200°C,
180°C, 160°C, 140°C, 120°C y 100°C.
49
Assembly page 49/64
USK MW 26146 - 080425
Page 50

Copies of the I/B. Please reproduce them without any changes
except under special instruction from Team International BELGIUM.
The pages must be reproduced and folded in order to obtain a
booklet A5 (+/- 148.5 mm width x 210 mm height). When folding,
make sure you keep the good numbering when you turn the pages
of the I/B. Don’t change the page numbering. Keep the language
Fax +32 2 359 95 50
integrity.
3. Ajuste el tiempo de cocción girando el botón rotativo (máximo
60 minutos).
4. Presione el botón START“
/30SEC” para empezar la cocción. El
cuento hacia atrás empieza.
Nota: el elemento calentador se apagará 15 segundos antes del fin
de la cocción. Si no hay agua suficiente en el depósito de agua
cuando utiliza esta función, se oirán 8 bips. Si no añada agua
cuando se produce, se oirán 4 bips cada minuto. Véase también el
párrafo « PRINCIPIOS DE COCCION CON VAPOR »
g) Menu AUTO
Las funciones auto eligen el programa de cocción apropiado según
la comida que quiere preparar.
1. Presione el botón “EXPRESS/DEFROST/STEAM COOK” una vez. “C -
- 1” aparece en la pantalla y “QTY” parpadea.
2. Gire el botón rotativo para elegir la función auto-cocción
deseada según el tipo de comida que debe estar cocida.
Puede elegir entre 4 funciones de auto-cocción. (vea la tabla).
3. Presione el botón START “
/30SEC” para confirmar el ajuste de
la función auto-cocción.
4. Gire el botón rotativo para decidir de la cantidad que debe
estar cocida (vease tabla). La cantidad elegida parpadea en la
pantalla.
5. Presione el botón START“
/30SEC” para empezar la cocción. El
cuento hacia atrás empieza.
Nota: el elemento calentador se apagará 15 segundos antes del fin
de la cocción.
50
Assembly page 50/64
USK MW 26146 - 080425
Page 51

Fax +32 2 359 95 50
Código
AUTO
C -- 1 Patata
C -- 2 Arroz/Pasta
C -- 3
C -- 4 Volatería
Copies of the I/B. Please reproduce them without any changes
except under special instruction from Team International BELGIUM.
The pages must be reproduced and folded in order to obtain a
booklet A5 (+/- 148.5 mm width x 210 mm height). When folding,
make sure you keep the good numbering when you turn the pages
of the I/B. Don’t change the page numbering. Keep the language
integrity.
Comida Ajuste posible
de la cantidad
Tiempo
de
cocción
1 patata 6:00
2 patatas 9:00
3 patatas 12:00
4 patatas 14:00
5 patatas 16:00
6 patatas 18:00
0.20 kg 23:00
0.30 kg 28:00
0.40 kg 31:00
0.50 kg 35:00
0.90 kg 20:00
1.0 kg 22:00
Carne
asada
1.1 kg 25:00
1.2 kg 27:00
1.3 kg 29:00
1.4 kg 30:00
1.5 kg 32:00
0.2 kg 7:00
asada
0.3 kg 8:00
0.4 kg 10:00
0.5 kg 12:00
0.6 kg 14:00
0.7 kg 16:00
0.8 kg 18:00
0.9 kg 19:00
1.0 kg 20:00
1.1 kg 22:00
1.2 kg 24:00
1.3 kg 26:00
1.4 kg 28:00
1.5 kg 30:00
1.6 kg 32:00
1.7 kg 34:00
51
Assembly page 51/64
USK MW 26146 - 080425
Page 52

Copies of the I/B. Please reproduce them without any changes
except under special instruction from Team International BELGIUM.
The pages must be reproduced and folded in order to obtain a
booklet A5 (+/- 148.5 mm width x 210 mm height). When folding,
make sure you keep the good numbering when you turn the pages
of the I/B. Don’t change the page numbering. Keep the language
Fax +32 2 359 95 50
integrity.
1.8 kg 35:00
1.9 kg 36:00
2.0 kg 38:00
h) Descongelación según el peso
Con esta función, la potencia (250W) y el tiempo de cocción están
ajustados automáticamente para descongelar progresivamente su
preparación sin cocerla.
1. Presione el botón “EXPRESS/DEFROST/STEAM COOK” dos veces.
« d - - 1 » aparece en la pantalla y « kg » parpadea.
2. Gire el botón rotativo para elegir la función de descongelación
deseada según el tipo de comida que debe estar
descongelada. Puede elegir entre 4 funciones de
descongelación.
3. Pulse el botón START “
/30SEC” para confirmar el ajuste de la
función descongelación.
4. Gire el botón rotativo para definir la cantidad que debe estar
descongelada (vease la tabla). La cantidad seleccionada
parpadea en la pantalla.
5. Pulse el botón START “
/30SEC” para empezar la
descongelación.El cuento hacia atrás empieza.
Código Comida Ajuste
posible de la
cantidad
d -- 1 Carne
0.2 kg 4:30
Tiempo
de
cocción
0.3 kg 5:32
0.4 kg 7:25
0.5 kg 8:15
0.6 kg 10:10
0.7 kg 18:00
0.8 kg 14:13
0.9 kg 16:15
1.0 kg 18:10
1.1 kg 20:26
1.2 kg 22:14
52
Assembly page 52/64
USK MW 26146 - 080425
Page 53

Copies of the I/B. Please reproduce them without any changes
except under special instruction from Team International BELGIUM.
The pages must be reproduced and folded in order to obtain a
booklet A5 (+/- 148.5 mm width x 210 mm height). When folding,
make sure you keep the good numbering when you turn the pages
of the I/B. Don’t change the page numbering. Keep the language
Fax +32 2 359 95 50
integrity.
1.3 kg 24:23
1.4 kg 26:05
1.5 kg 28:27
1.6 kg 29:04
1.7 kg 30:09
1.8 kg 32:12
1.9 kg 33:16
2.0 kg 34:30
0.2 kg 4:07
0.3 kg 6:17
0.4 kg 8:20
0.5 kg 10:10
0.6 kg 12:30
0.7 kg 14:10
0.8 kg 16:40
0.9 kg 18:35
1.0 kg 20:20
d -- 2 Bistec/Chuletas
1.1 kg 21:30
1.2 kg 22:10
1.3 kg 23:26
1.4 kg 24:23
1.5 kg 25:20
1.6 kg 26:12
1.7 kg 27:26
1.8 kg 28:25
1.9 kg 29:15
2.0 kg 30:20
d -- 3 Trozos de pollo
0.2 kg 3:05
0.3 kg 4:39
0.4 kg 6:11
0.5 kg 7:23
0.6 kg 8:53
0.7 kg 11:30
0.8 kg 12:30
0.9 kg 13:30
1.0 kg 14:20
1.1 kg 15:48
53
Assembly page 53/64
USK MW 26146 - 080425
Page 54

Copies of the I/B. Please reproduce them without any changes
except under special instruction from Team International BELGIUM.
The pages must be reproduced and folded in order to obtain a
booklet A5 (+/- 148.5 mm width x 210 mm height). When folding,
make sure you keep the good numbering when you turn the pages
of the I/B. Don’t change the page numbering. Keep the language
Fax +32 2 359 95 50
integrity.
1.2 kg 17:30
1.3 kg 19:30
1.4 kg 20:10
1.5 kg 21:10
1.6 kg 22:47
1.7 kg 24:46
1.8 kg 25:21
1.9 kg 26:10
2.0 kg 28:10
0.2 kg 7:00
0.3 kg 9:00
0.4 kg 12:00
0.5 kg 15:00
0.6 kg 16:00
0.7 kg 18:00
0.8 kg 20:00
0.9 kg 22:00
1.0 kg 24:00
d -- 4 Pescado
1.1 kg 26:00
1.2 kg 28:00
1.3 kg 30:00
1.4 kg 32:00
1.5 kg 36:00
1.6 kg 38:00
1.7 kg 40:00
1.8 kg 42:00
1.9 kg 44:00
2.0 kg 45:00
i) Función vapor auto-cocción
1. Presione el botón “EXPRESS/DEFROST/STEAM COOK” tres veces. “S
- - 1” aparece enla pantalla y “kg” parpadea.
2. Gire el botón rotativo para definir la función de auto-cocción
vapor deseada según el tipo de comida que debe estar cocida.
Puede elegir entre 8 funciones de auto-cocción con vapor (vea
la tabla).
54
Assembly page 54/64
USK MW 26146 - 080425
Page 55

Copies of the I/B. Please reproduce them without any changes
except under special instruction from Team International BELGIUM.
The pages must be reproduced and folded in order to obtain a
booklet A5 (+/- 148.5 mm width x 210 mm height). When folding,
make sure you keep the good numbering when you turn the pages
of the I/B. Don’t change the page numbering. Keep the language
Fax +32 2 359 95 50
integrity.
3. Presione el botón START “ /30SEC” para confirmar el ajuste de
la función auto-cocción vapor.
4. Gire el botón rotativo para definir la cantidad que debe estar
cocida (vease la tabla). La cantidad deseada parpadea en la
pantalla.
5. Presione el botón START“
/30SEC” para empezar la cocción. El
cuento hacia atrás empieza.
Nota : Si no hay agua suficiente en el depósito de agua cuando
utiliza esta función, se oirán 8 bips. Si no añada agua cuando se
produce, se oirán 4 bips cada minuto. Véase también el párrafo
« PRINCIPIOS DE COCCION CON VAPOR »
Código Comida Cantidad
posible de
comida
S -- 1 Verduras
S -- 2
S -- 3
Patatas
gratinadas
Pequeños
panes
S -- 4 Huevos
0.10 kg 3:00
0.20 kg 4:00
0.10 kg 11:00
0.15 kg 13:00
0.20 kg 14:00
0.10 kg 9:00
0.20 kg 10:00
0.30 kg 11:00
0.05 kg 4:00
0.10 kg 11:00
Tiempo
de
cocción
0.50 kg 36:00
S -- 5 Carne
0.75 kg 40:00
1.00 kg 44:00
0.50 kg 25:00
0.75 kg 29:00
S -- 6 Pollo
1.00 kg 32:00
1.25 kg 35:00
1.50 kg 39:00
0.30 kg 7:00
S -- 7 Pescado
0.45 kg 9:00
0.60 kg 11:00
0.75 kg 13:00
S -- 8 Huevos 0.20 kg 12:00
55
Assembly page 55/64
USK MW 26146 - 080425
Page 56

Copies of the I/B. Please reproduce them without any changes
except under special instruction from Team International BELGIUM.
The pages must be reproduced and folded in order to obtain a
booklet A5 (+/- 148.5 mm width x 210 mm height). When folding,
make sure you keep the good numbering when you turn the pages
of the I/B. Don’t change the page numbering. Keep the language
Fax +32 2 359 95 50
integrity.
duros 0.35 kg 13:00
Nota : para la función huevos duros (S - - 8), se puede utilizar la
huevera. Se puede cocer hasta 7 huevos al mismo tiempo.
j) Ajuste del tiempo de cocción
Durante el proceso de cocción, cada presión en la tecla START “
/30SEC” añadirá 30 segundos al tiempo de cocción.
Si gira el botón rotativo en el sentido de las agujas del reloj durante
el proceso de cocción, el tiempo de cocción aumentará (10
segundos por cada presión). Si gire el botón rotativo en el sentido
contrario de las agujas del reloj, el tiempo de cocción disminuirá (10
segundos por cada presión).
Nota : el tiempo de cocción no puede ajustarse en el nivel máximo
de potencia microondas (800W), la función vapor, las funciones de
auto-cocción y las funciones de descongelación.
BLOQUEO DE LAS TECLAS
Ese horno está provisto con un dispositivo de seguridad por niños
para que no puedan utilizar el horno sin vigilancia. Ese dispositivo
bloquea las teclas del aparato.
Para poner ese dispositivo en marcha, pulse el botón
« STOP/CLEAR/CHILD LOCK” durante unos segundos. “L” aparecerá
en la pantalla durante dos segundos antes de volver al modo reloj.
Si presione un botón cuando el horno está en modo de bloqueo,
« L » aparecerá en la pantalla durante dos segundos.
Para desbloquear las teclas, pulse de nuevo el botón
STOP/CLEAR/CHILD LOCK” durante unos segundos.
ANTES DE LLAMAR AL SERVICIO TÉCNICO
Si su horno microondas no funciona:
56
Assembly page 56/64
USK MW 26146 - 080425
Page 57

Copies of the I/B. Please reproduce them without any changes
except under special instruction from Team International BELGIUM.
The pages must be reproduced and folded in order to obtain a
booklet A5 (+/- 148.5 mm width x 210 mm height). When folding,
make sure you keep the good numbering when you turn the pages
of the I/B. Don’t change the page numbering. Keep the language
Fax +32 2 359 95 50
integrity.
A) Compruebe que está correctamente enchufado a la red. Si no
es así enchúfelo correctamente, espere 10 segundos e intente
ponerlo en marcha de nuevo.
B) Compruebe que la red eléctrica funciona correctamente y que
los fusibles del circuito de su casa no han saltado por cualquier
circunstancia.
C) Compruebe que el panel de control ha sido programado
correctamente y el programador está conectado.
D) Compruebe que la puerta está correctamente cerrada, si ello no
es así el mecanismo de seguridad del microondas impedirá su
funcionamiento.
E) Compruebe que el generador de vapor está correctamente
colocado y que está bloqueado con el tornillo. Compruebe
también su limpieza.
F) Compruebe que el depósito de agua y el depósito de aguas
usadas estén correctamente colocados y limpios.
SI TODO LO ANTERIOR ES CORRECTO Y SU MICROONDAS CONTINUA
SIN FUNCIONAR, LLAME AL SERVICIO TÉCNICO OFICIAL, NO INTENTE
REPARARLO VD. MISMO.
LIMPIEZA Y CUIDADOS
1. Apague el horno y desconecte del enchufe de la pared antes
de limpiar el microondas.
2. Mantenga limpio el interior del horno. Cuando las paredes
interiores del mismo estén sucias de salpicadura límpielas con un
trapo húmedo. Puede utilizar detergentes suaves si el horno está
muy sucio. Evite usar sprays u otros limpiadores duros ya que
pueden manchar o rayar la superficie de la puerta.
3. Las superficies exteriores deben limpiarse con un paño húmedo.
No utilice agua para limpiar el horno ya que puede filtrarse por
los orificios de ventilación. El elemento gril tiene bisagras, puede
sacarlo para limpiar la cumbre de la cavidad del horno.
4. Limpie la ventada por ambos lados con un trapo húmedo para
quitar salpicadura.
5. El panel de control no se puede mojar. Límpielo con un trapo
húmedo y blando. Cuando limpie el panel deje la puerta del
horno abierta para evitar que se encienda accidentalmente.
57
Assembly page 57/64
USK MW 26146 - 080425
Page 58

Copies of the I/B. Please reproduce them without any changes
except under special instruction from Team International BELGIUM.
The pages must be reproduced and folded in order to obtain a
booklet A5 (+/- 148.5 mm width x 210 mm height). When folding,
make sure you keep the good numbering when you turn the pages
of the I/B. Don’t change the page numbering. Keep the language
Fax +32 2 359 95 50
integrity.
6. Si se acumula vapor o vaho dentro del horno límpielo con un
trapo suave. Ello puede ocurrir cuando el microondas funciona
en condiciones de elevada humedad y es completamente
normal.
7. Si ha utilizado la función vapor, limpie el interior del horno
inmediatamente después del uso. Limpie también el depósito
de agua, así que su alojamiento y el generador de vapor de vez
en cuando. Para sacar el generador de vapor, tiene que
destornillar el tornillo en el lado izquierdo del aparato y sacar el
pequeño plato. Luego puede sacar el generador de vapor,
vaciarlo y limpiarlo con un pañuelo suave. Después de limpiar,
ponga de nuevo el generador en su sitio y tornille el pequeño
plato en el aparato para impedir que el generador esté sacado
durante el uso.
8. El generador de vapor tiene que estar desincrustado
regularmente, al menos cada 20 usos. Por eso, llene el depósito
con agua y vinagre y hágalo funcionar tres veces con la
función STEAM/CLEAN UP (vea el párrafo Cocción vapor). Si no
desincrusta el generador, la garantía vuelve nula.
9. Los orificios por la salida del vapor deberían estar siempre
limpios. Puede limpiar los 9 orificios en el lado izquierdo de la
cavidad del horno con un pañuelo suave y vinagre.
10. De vez en cuando es necesario quitar la bandeja de cristal para
su limpieza. Lave la bandeja con agua templada, con jabón o
en el lavavajillas.
11. El anillo giratorio y el suelo interior del horno deben limpiarse
regularmente. El anillo puede lavarse con agua jabonosa o en
el lavavajillas. Cuando retire el anillo para su limpieza asegúrese
de volver a colocarlo de nuevo correctamente.
12. Limpie las paredes haciendo funcionar el horno durante 5
minutos con un bol con agua y el jugo y la piel de un limón.
Límpielo bien y secuelo con un trapo suave.
13. Cuando sea necesario cambiar la luz del horno por favor
consulte al servicio técnico oficial para que se lo hagan.
14. Puede también limpiar su microondas fácilmente con la función
clean-up. Compruebe que haya agua suficiente en el depósito
y haga lo siguiente.
- Presione el botón “STEAM/CLEAN UP” dos veces.
58
Assembly page 58/64
USK MW 26146 - 080425
Page 59

Fax +32 2 359 95 50
- Presione el botón START “ /30SEC”. La cavidad del
- Repita las etapas previas si es necesario.
- Limpie el fondo de la cavidad del horno con una
- Deja funcionar elparato durante 4 minutos a 220°C en
Copies of the I/B. Please reproduce them without any changes
except under special instruction from Team International BELGIUM.
The pages must be reproduced and folded in order to obtain a
booklet A5 (+/- 148.5 mm width x 210 mm height). When folding,
make sure you keep the good numbering when you turn the pages
of the I/B. Don’t change the page numbering. Keep the language
integrity.
horno se limpiará con agua y vapor aparecerá en el
horno.
esponja para sacar la suciedad que ha caído.
el modo cocción por convección. Ahora el horno está
limpio.
59
Assembly page 59/64
USK MW 26146 - 080425
Page 60

Copies of the I/B. Please reproduce them without any changes
except under special instruction from Team International BELGIUM.
The pages must be reproduced and folded in order to obtain a
booklet A5 (+/- 148.5 mm width x 210 mm height). When folding,
make sure you keep the good numbering when you turn the pages
of the I/B. Don’t change the page numbering. Keep the language
Fax +32 2 359 95 50
integrity.
GARANTÍA
Le sugerimos rellenen y nos envíen rápidamente la Carta de Registro
de Producto adjunto para facilitar la verificación de la fecha de
compra. Por lo tanto, la devolución de esa Carta de Registro de
Producto no es una condición imprescindible para la aplicación de
esa garantía. Puede también rellenar esa carta de garantía en línea
a la dirección siguiente :
www.KALORIK.com
A partir de la fecha de compra, ese producto KALORIK está
garantizado un año contra los defectos materiales y de fabricación.
Esa garantía no es transferable. Conserve la prueba de compra
original. Se exige una prueba de compra para obtener la aplicación
de la garantía.
Durante ese périodo, el producto KALORIK que, después de una
inspección por parte de KALORIK, se revela defectuoso, será
reparado o reemplazado, según lo que decide KALORIK, sin gastos
por el consumidor. Si se envía un producto de reemplazamiento, se
aplicará la garantía que queda del producto original.
Esa garantía no se aplica a los defectos debidos a una mala
utilización por parte del comprador o del utilizador, a una
negligencia, al no respeto del manual de instrucciones KALORIK, a
una utilización en un circuito eléctrico cuyo voltaje es diferente de el
que figura en el producto, a un desgaste normal, a modificaciones
o reparaciones no autorizadas por KALORIK, o a un uso con fines
comerciales. No existe garantía por las partes de cristal, jarras de
cristal, filtros, cestos, hojas y accesorios en general. No existe
tampoco garantía por las piezas perdidas por el utilizador.
Toda garantía de valor comercial o de adaptabilidad a ese
producto está limitada a un año también.
Algunos estados no ponen límites a la duración de la garantía tácita
o no autorizan la exclusión de daños y perjuicios accesorios o
indirectos, se puede que las restricciones anteriormente
mencionadas no se apliquen a Usted. Esa garantía le da derechos
60
Assembly page 60/64
USK MW 26146 - 080425
Page 61

Copies of the I/B. Please reproduce them without any changes
except under special instruction from Team International BELGIUM.
The pages must be reproduced and folded in order to obtain a
booklet A5 (+/- 148.5 mm width x 210 mm height). When folding,
make sure you keep the good numbering when you turn the pages
of the I/B. Don’t change the page numbering. Keep the language
Fax +32 2 359 95 50
integrity.
legales particulares y algunos derechos pueden variar de un estado
a otro.
Si el aparato tuviera un defecto durante el periodo de garantía y
más de 30 días después de que se compró, no devuelva el aparato
en la tienda donde le compró : a menudo, nuestro Servicio al
Consumidor puede ayudar a resolver el problema sin que el
producto tuviera que estar reparado. Si hace falta una reparación,
un representante puede confirmar si el producto está bajo garantía
y dirigirle al servicio post-venta lo más próximo.
Si fuera el caso, traiga el producto (o envíalo, correctamente
franqueado) así que una prueba de compra que menciona el
número de autorización de retorno, indicado por nuestro Servicio al
Consumidor, al servicio post-venta KALORIK lo más próximo. (Visite
nuestro sitio internet
www.KALORIK.com o llame al Servicio al
Consumidor para obtener la dirección del Servicio post-venta
KALORIK exclusivo lo más próximo).
Si envía el producto, le rogamos añadan una letra que explica el
defecto.
Si tiene preguntas adicionales, por favor llame al Servicio al
Consumidor (véase abajo para los datos completos), de lunes a
viernes, de las 9 a las 18 (EST). Note que las horas pueden ser
modificadas.
Si quiere escribirnos, puede hacerlo a la dirección siguiente :
KALORIK Servicio al Consumidor
Team International Group of America Inc
1400 N.W 159th Street, Suite 102
Miami Gardens, FL 33169 USA
O llame gratuitamente al +1 888-521-TEAM
Sólo las letras se aceptan en la dirección anteriormente
mencionada. Los envíos y paquetes que no tienen número de
autorización de retorno serán rechazados.
61
Assembly page 61/64
USK MW 26146 - 080425
Page 62

Fax +32 2 359 95 50
Copies of the I/B. Please reproduce them without any changes
except under special instruction from Team International BELGIUM.
The pages must be reproduced and folded in order to obtain a
booklet A5 (+/- 148.5 mm width x 210 mm height). When folding,
make sure you keep the good numbering when you turn the pages
of the I/B. Don’t change the page numbering. Keep the language
integrity.
62
Assembly page 62/64
USK MW 26146 - 080425
Page 63

Fax +32 2 359 95 50
Copies of the I/B. Please reproduce them without any changes
except under special instruction from Team International BELGIUM.
The pages must be reproduced and folded in order to obtain a
booklet A5 (+/- 148.5 mm width x 210 mm height). When folding,
make sure you keep the good numbering when you turn the pages
of the I/B. Don’t change the page numbering. Keep the language
integrity.
63 USK MW 26146 - 080425
Assembly page 63/64
Page 64

Fax +32 2 359 95 50
Copies of the I/B. Please reproduce them without any changes
except under special instruction from Team International BELGIUM.
The pages must be reproduced and folded in order to obtain a
booklet A5 (+/- 148.5 mm width x 210 mm height). When folding,
make sure you keep the good numbering when you turn the pages
of the I/B. Don’t change the page numbering. Keep the language
integrity.
K080211
www.KALORIK.com
Ï
Back cover page (last page)
Assembly page 64/64
 Loading...