

Kalorik USK FT 4, USK DGR 31031 Operating Instructions Manual

Deep fat fryer
Freidora
Friteuse
Fritadeira
USK FT 4
www.KALORIK.com
120V~ 900W

IMPORTANT SAFEGUARDS
1. READ ALL INSTRUCTIONS
2.
Check that your mains voltage corresponds to that stated on the
rating plate of the appliance before using the appliance.
Do not touch hot surfaces. Use handles or knobs.
3.
4. To protect against electric shock do not immerse cord, plugs, the
appliance or its control panel in water or other liquid.
5. Close supervision is necessary when the appliance is used by or
near children.
6.
Do not operate any appliance with a damaged cord or plug or
after the appliance malfunctions or has been damaged in any
manner. Return appliance to the nearest authorized service
facility for examination, repair, or adjustment.
7. Do not place any items on top or next to this appliance at any
time. To prevent a fire, keep this appliance clear of contact with
any flammable materials including curtains, draperies, walls,
plastic materials, etc., at all times.
8. Unplug from outlet when not in use and before cleaning. Allow to
cool before putting on or taking off parts, and before cleaning
the appliance.
9. Do not place any flammable materials in or close to the Deep
Fryer, such as paper, cardboard, plastic or flammable
substances.
10. Oversized foods must not be inserted into the Deep Fryer as they
may create a fire.
11. The use of accessory attachments not recommended by the
appliance manufacturer may cause injuries.
12. Do not use outdoors.
13.
Do not let cord hang over edge of table or counter or touch hot
surfaces.
Do not use with an extension cord.
14.
15. Do not place on or near a hot gas or electric burner, or in a
heated oven.
2
USK FT 4 - 071218

16. Extreme caution must be used when moving an appliance
containing hot oil or other hot liquids.
17. It is forbidden to place the lid on the deep fat fryer when it is in
use, as this could cause fire or oil overflow. For this kind of fryer
the lid should only be used for storing and moving (as soon as the
deep fat fryer has cooled down).
18. Always attach plug to appliance first, then plug cord in the wall
outlet. To disconnect, remove plug from wall outlet.
19. Do not use appliance for other than intended use.
20. Be sure the handle is properly assembled to basket and locked in
place. See detailed assembly instructions
SAVE THESE INSTRUCTIONS
POLARIZED PLUG INSTRUCTIONS
Some appliances are equipped with a polarized plug (one blade is
wider than the other). To reduce the risk of electric shock, this plug
will fit into the polarized outlet only one way. If the plug does not
properly fit into the outlet at first, reverse it. If it still does not fit,
contact a competent qualified electrician. Do not attempt to modify
the plug in any way.
For appliances equipped with a standard plug, simply insert the plug
into the outlet without paying attention to the way you plug it.
SHORT CORD INSTRUCTIONS
A short power supply cord is provided to reduce the hazards resulting
from becoming entangled in, or tripping over a longer cord. Do not
use the appliance with an extension cord.
3
USK FT 4 - 071218
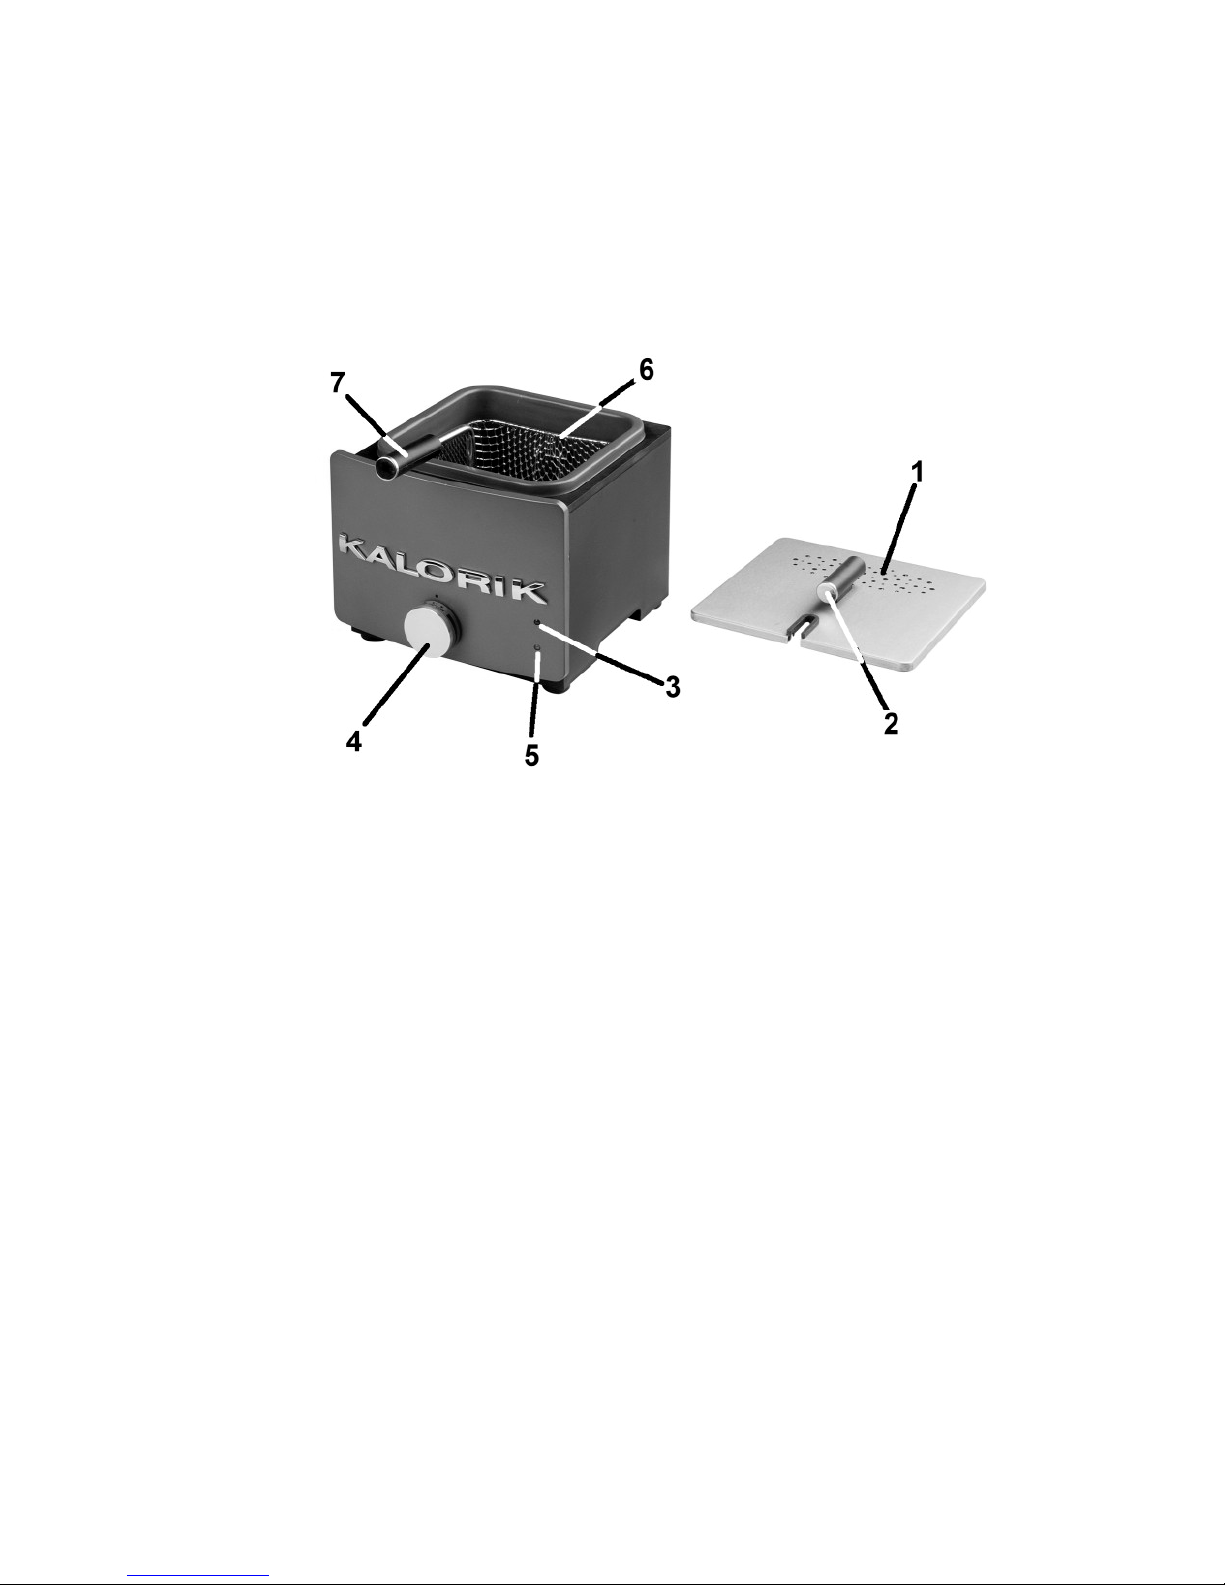
PART DESCRIPTION
1. Filter
2. Handle of the lid
3. Power light
4. Thermostat
5. Pilot light
6. Basket
7. Handle of the basket
BEFORE USE
• Remove all packaging from the unit.
• Remove the lid, basket, handle and any accessory form the
appliance.
• Before you use the deep fat fryer for the first time, we
recommend that you clean the lid, bowl, basket, handle and
housing of the deep fat fryer with warm soapy water with a soft
cloth.
• Attach the handle to the basket by sliding it upwards in the
support that is inside the basket. Pay attention to slide the handle
4
USK FT 4 - 071218

until you hear a click. It means that the handle is correctly placed
in the basket.
FIRST USE
• When using the appliance for the first time, pour the required
amount of oil in the bowl, making sure that the level is between
the MIN and MAX marks indicated inside the bowl.
• We recommend that you use a liquid oil that is suitable for deep
fat frying. Check the label on the bottle. If you wish to use a solid
fat, cut the fat in small pieces. Plug it into an electrical outlet. Put
the thermostat on the minimum position and add the fat pieces
slowly. When the fat has melted, set the thermostat to the desired
temperature. WARNING: FAILURE TO OBSERVE THIS WILL DAMAGE
YOUR DEEP FAT FRYER.
USE
• Place the lid on the deep fat fryer, plug it into an electrical outlet.
The red pilot light turns on.
• Set the thermostat to the desired temperature. The yellow pilot
light will illuminate. As soon as the desired temperature is
reached, the pilot light will go out. When the temperature falls,
the thermostat will be activated again, and the pilot light will
illuminate. It will go out again as soon as the temperature is
reached.
• When the fryer has reached the desired temperature, remove the
lid and take out the basket with the handle. Place the food slowly
into the basket to avoid splashes.
5
USK FT 4 - 071218

• Lower the basket slowly into the fryer. We advise you not to put
the lid during cooking.
• When the food is ready, lift out the basket, make it rest at an
angle on the lip of the bowl with the hook situated in front of the
handle and allow the food to drain.
• Warning: Show care when removing the lid as hot steam may be
emitted.
• Ensure the food is thoroughly cooked inside and out.
• Your deep fat fryer does not have an ON/OFF switch. After use,
turn the thermostat to its minimum position and unplug the
appliance and let its lid open to accelerate the cooling. Never
move the appliance as long as the oil or fat is still hot.
FOR BEST RESULTS
• Always dry food well before frying. Very ‘wet’ food can cause the
oil to ‘foam’ and may overflow.
• Food for frying should be roughly of the same size to ensure the
food cooks evenly and thoroughly.
• Many types of food may need to be coated before frying -
typical coatings are batter or breadcrumbs.
• Always wait until the fryer has reached the desired temperature
and the light has gone out, before adding the food.
• Do not overfill the basket.
RECIPES
Fresh Chips
• Fresh chips are best fried in two stages.
• Use ‘old’ potatoes (not ‘new’ potatoes). Cut the potatoes into
equal sizes. Rinse the chipped potatoes under running water to
reduce the starch level. Dry thoroughly and separate the pieces.
• Do not exceed the recommended weight. When the
temperature has reached 355°F, place the chips in the basket,
close the lid and slowly lower the basket into the oil
• For 200g of chips, fry for +/- 5 minutes on 355°F then raise the
basket. Do not open the lid.
6
USK FT 4 - 071218

• Wait until the temperature light goes out again, lower the basket
and fry for a further 2 minutes.
• Raise the basket and let the chips drain.
• For best results, before serving gently dab the chips with
absorbent paper to remove excess oil.
• Frying times may vary slightly on the type of potatoes used and
the thickness of the chips.
Onion Rings
• Frying temperature - 355° F for 4 to 5 minutes
• Peel the onions and slice. Separate the slices into rings
• Dip the rings into a bowl of seasoned milk
• Then dust the rings in plain flour
• Place the rings separately in the frying basket and fry a few at a
time.
Breaded Mushrooms
• Frying temperature - 350° F for 4 to 5 minutes
• Beat 1 egg and dip the mushrooms into the egg
• Then coat the mushrooms with breadcrumbs
• Place separately into the frying basket and fry a few at a time.
Goujons of Sole
• Frying temperature - 320° F for 3-4 minutes
• Cut the sole fillet into small strips. Coat the strips in some seasoned
plain flour
• Then dip the strips into beaten egg and coat with breadcrumbs.
• Place separately into the frying basket and fry a few at a time.
7
USK FT 4 - 071218

TEMPERATURE GUIDE FOR BEST RESULTS
FOOD TEMPERATURE (°F) TIME Minute
(approximately)
Breaded Fillet of fish 340 6-7
Scampi 300 4-6
Chicken Breast 350 4-5
Breaded Chicken pieces 340 12-15
Onion Rings 355 4
Breaded Mushrooms 355 3-4
Broccoli Fritters 365 3-4
Courgette Fritters 365 3-4
Celery in batter 355 3-4
Chips First Stage 340 8
Chips Second Stage 355 3
CLEANING
• Caution: never immerse the appliance in water or any other
liquid.
• Unplug the deep fat fryer and wait until the unit is completely
cool before cleaning. Do not use strong detergents or abrasive
clothes/liquid, as this will damage the deep fat fryer.
• When changing the oil - take this opportunity to clean the interior
of the bowl. Pour the oil from the bowl and dry the interior of the
bowl with absorbent paper. Then wipe the interior of the bowl in
warm soapy water. Attention: given the electronic unit under the
appliance, never immerse the item entirely in water. Dry
thoroughly.
• Change the oil regularly. Pour out the old oil from the bowl and
dispose of oil thoughtfully.
• Clean your deep fat fryer regularly. This will prolong the life of your
deep fat fryer.
STORING
• Wait until the deep fat fryer is completely cool before storing.
• The unit can be stored with the oil inside. Ensure the lid is tightly
closed to avoid dust getting into the oil.
8
USK FT 4 - 071218

WARRANTY
We suggest that you complete and return the enclosed Product
Registration Card promptly to facilitate verification of the date of
original purchase. However, return of the Product Registration Card is
not a condition of these warranties. You can also fill this warranty
card online, at the following address: www.KALORIK.com
This KALORIK product is warranted for 1 year from the date of
purchase against defects in material and workmanship. This warranty
is not transferable. Keep the original sales receipt. Proof of purchase
is required to obtain warranty performance.
During this period, the KALORIK product that, upon inspection by
KALORIK, is proved defective, will be repaired or replaced, at
KALORIK's option, without charge to the customer. If a replacement
product is sent, it will carry the remaining warranty of the original
product.
This warranty does not apply to any defect arising from a buyer's or
user's misuse of the product, negligence, failure to follow KALORIK
instructions noted in the user’s manual, use on current or voltage
other than that stamped on the product, wear and tear, alteration
or repair not authorized by KALORIK, or use for commercial purposes.
There is no warranty for glass parts, glass containers, filter basket,
blades and agitators, and accessories in general. There is also no
warranty for parts lost by the user.
ANY WARRANTY OF MERCHANTABILITY OR FITNESS WITH RESPECT TO
THIS PRODUCT IS ALSO LIMITED TO THE ONE YEAR LIMITED WARRANTY
PERIOD
Some states do not allow limitation on how long an implied warranty
lasts or do not allow the exclusion of incidental or consequential
damages, so the above limitations may not apply to you. This
warranty gives you specific legal rights, and you may also have other
rights which vary from state to state.
9
USK FT 4 - 071218

If the appliance should become defective within the warranty
period and more than 30 days after date of purchase, do not return
the appliance to the store: often, our Consumer Service
Representatives can help solve the problem without having the
product serviced. If servicing is needed, a Representative can
confirm whether the product is under warranty and direct you to the
nearest service location.
If this is the case, bring the product (or send it, postage prepaid),
along with proof of purchase and indicating a return authorization
number given by our Consumer Service Representatives, to the
nearest authorized KALORIK Service Center (please visit our website
at www.KALORIK.com
or call our Customer Service Department for
the address of the nearest authorized KALORIK Service Center).
If you send the product, please include a letter explaining the nature
of the claimed defect.
If you have additional questions, please call our Consumer Service
Department (please see below for complete contact information),
Monday through Friday from 9:00am - 6:00pm (EST). Please note
hours are subject to change.
If you would like to write, please send your letter to:
KALORIK Consumer Service department
Team International Group of America Inc
1400 N.W 159th Street, Suite 102
Miami Gardens, FL 33169 USA
Or call :
Toll Free: +1 888-521-TEAM
Only letters can be accepted at this address above. Shipments and
packages that do not have a return authorization number will be
refused.
10
USK FT 4 - 071218

CONSEJOS DE SEGURIDAD
1. LEA TODAS LAS INSTRUCCIONES.
2. Antes de utilizar el aparato, compruebe que el voltaje de la red
eléctrica coincide con el indicado en la placa de datos técnicos
del aparato.
3. No toque las superficies calientes. Utilice las asas o los botones.
4. Para protegerse contra una descarga eléctrica, no sumerja el
aparato o el enchufe en agua o en otros líquidos.
5. Es siempre necesaria la supervisión cercana cuando este
aparato sea utilizado cerca de niños. Este aparato no debe ser
usado por niños.
6. No opere el aparato si el cable o el enchufe están dañados, o
después de que el aparato ha funcionado inadecuadamente,
se ha caído o ha sido dañado en cualquier manera. El aparato
debe ser llevado al fabricante o a un centro de servicio
autorizado para ser comprobado y reparado.
7. No ponga ningún objeto encima o cerca del aparato. Procure
que el aparato no entre nunca en contacto con materiales
inflamables como cortinas, tejidos, etc., podría provocar un
incendio.
8. Desenchufe el aparato cuando no lo use o antes de limpiarlo.
Deje que el aparato enfrie antes de quitar o poner accesorios o
antes de limpiar el aparato.
9. No ponga materiales inflamables como papel, cartón o plástico
en la freidora.
10. Alimentos muy grandes no deben ser freidos en la freidora ya
que podrían provocar un incendio.
11. El uso de accesorios que no sean los recomendados por el
fabricante puede causar incendios, descargas eléctricas o
heridas.
12. No use en el exterior.
13. No permita que el cable cuelgue del borde de la mesa o del
mostrador o toque las partes calientes.
14. No utilice con un alargador.
11
USK FT 4 - 071218

15. No coloque este aparato sobre o cerca de quemadores de gas
o eléctricos, o dentro de un horno caliente.
16. Tenga mucho cuidado cuando desplace un aparato lleno de
aceite caliente o otros líquidos calientes.
17. Está prohibido colocar la tapadera en la freidora durante el
funcionamiento, ya que podría provocar un incendio o hacer
rebasar la freidora. Para este tipo de freidora, la tapadera sólo se
utiliza para guardar y desplazar el aparato (una vez que haya
enfriado).
18. Enchufe siempre primero el cable al aparato y después en el
enchufe de la red eléctrica. Para desconectar el aparato,
desenchúfelo.
19. No use este aparato más que para lo que ha sido diseñado.
20. Asegúrese que el asa está correctamente acoplada en la cesta
y bloqueada en su lugar. Véase las instrucciones de montaje.
GUARDE ESTAS INSTRUCCIONES
INFORMACIÓN SOBRE EL ENCHUFE POLARIZADO
Algunos aparatos están provistos con un enchufe polarizado (una
pata es más ancha que la otra). Para reducir el riesgo de choque
eléctrico, este enchufe calza en el tomacorriente polarizado de una
sola manera. Si el enchufe no cabe totalmente en el tomacorriente,
gire el enchufe. Si aún así no calza, consulte a un servicio técnico
cualificado. No intente anular esta característica de seguridad.
Para los aparatos provistos con un enchufe clásico, basta con
insertar el enchufe en la toma de corriente.
INSTRUCCIONES DEL CABLE
El cable de alimentación del aparato es un cable corto a fin de
disminuir el riesgo de accidentes (caídas al tropezar con él, etc.).
No utilice el aparato con un alargador.
12
USK FT 4 - 071218
 Loading...