

Page 1
Fax +32 2 359 95 50
Copies of the I/B. Please reproduce them without any
changes except under special instruction from Team
International BELGIUM. The pages must be reproduced and
folded in order to obtain a booklet A5 (+/- 148.5 mm width x
210 mm height). When folding, make sure you keep the good
numbering when you turn the pages of the I/B. Don’t change
the page numbering. Keep the language integrity. Print only
what is inside the frame.
Multi-function
Can Opener
Abrelatas multi-
funcional
USK DO 36918
www.KALORIK.com
Front cover page (first page)
Assembly page 1/20
120V~60Hz 60W
Page 2

Copies of the I/B. Please reproduce them without any
changes except under special instruction from Team
International BELGIUM. The pages must be reproduced and
folded in order to obtain a booklet A5 (+/- 148.5 mm width x
210 mm height). When folding, make sure you keep the good
Fax +32 2 359 95 50
numbering when you turn the pages of the I/B. Don’t change
the page numbering. Keep the language integrity. Print only
what is inside the frame.
IMPORTANT SAFEGUARDS
When using electrical appliances, basic safety precautions should
always be followed, including the following:
1. READ ALL INSTRUCTIONS
2. Check that your mains voltage corresponds to that stated on the
rating plate of the appliance before using the appliance.
3. To protect against electrical shock do not immerse cord, plug, or
the motor unit in water or other liquid.
4. Close supervision is necessary when the appliance is used by or
near children.
5. Unplug from outlet when not in use and before putting on or
taking off parts or before cleaning.
6. Do not operate any appliance with a damaged cord or plug or
after the appliance malfunctions or has been damaged in any
manner. Return appliance to the authorized service facility for
examination, repair, or adjustment.
7. The use of accessory attachment not recommended by the
appliance manufacturer may cause fire, electric shock or injuries.
8. Do not use outdoors or for commercial purposes.
9. Do not let cord hang over edge of table or counter or touch hot
surfaces.
10. Do not place on or near a hot gas or electric burner, or in a
heated oven.
11. Always attach plug to appliance first, then plug cord into the wall
outlet. To disconnect remove the plug from the wall outlet.
12. Do not use appliance for other than intended use.
13. Do not open cans under pressure.
14. This kind of appliance cannot function continuously; it is not a
professional type of appliance. It is necessary to make temporary
stops. You should not try to open more than 5 cans in a row,
without letting the motor cool down afterwards for at least 10
minutes.
15. It is absolutely necessary to keep this appliance clean at all times
as it comes into direct contact with food.
2
Assembly page 2/20
USK DO 36918 - 110808
Page 3

Copies of the I/B. Please reproduce them without any
changes except under special instruction from Team
International BELGIUM. The pages must be reproduced and
folded in order to obtain a booklet A5 (+/- 148.5 mm width x
210 mm height). When folding, make sure you keep the good
Fax +32 2 359 95 50
16. Avoid contacting moving parts.
17. Do not open cans of flammable liquids such as lighter fluids.
numbering when you turn the pages of the I/B. Don’t change
the page numbering. Keep the language integrity. Print only
what is inside the frame.
SAVE THESE INSTRUCTIONS
HOUSEHOLD USE ONLY
POLARIZED PLUG INSTRUCTIONS
This appliances is equipped with a polarized plug (one blade is wider
than the other). To reduce the risk of electric shock, this plug will fit
into the polarized outlet only one way. If the plug does not properly
fit into the outlet at first, reverse it. If it still does not fit, contact a
competent qualified electrician. Do not attempt to modify the plug in
any way.
SHORT CORD INSTRUCTIONS
A short power supply cord is provided to reduce the hazards resulting
from becoming entangled in, or tripping over a longer cord.
Extension cords may be used if care is exercised in their use.
• The electrical rating of the extension cord should be at least
that of the appliance. If the electrical rating of the extension
cord is too low, it could overheat and burn.
• The resulting extended cord should be arranged so that it will
not drape over the counter top or tabletop where it can be
pulled on by children or tripped over.
3
Assembly page 3/20
USK DO 36918 - 110808
Page 4

Copies of the I/B. Please reproduce them without any
changes except under special instruction from Team
International BELGIUM. The pages must be reproduced and
folded in order to obtain a booklet A5 (+/- 148.5 mm width x
210 mm height). When folding, make sure you keep the good
Fax +32 2 359 95 50
numbering when you turn the pages of the I/B. Don’t change
the page numbering. Keep the language integrity. Print only
what is inside the frame.
KNOW YOUR CAN OPENER
Magnet
1. Magnet
Locating post
5. Locating Post
Blade bracket
2. Blade
Bracket
Blade
3. Blade
Drive wheel
4. Drive wheel
Bottle opener
6. Bottle Opener
7. Sharpener
Knife sharpener
8. Cable
Cord storage
Base cover
9. Base
storage
HOW TO USE CAN OPENER
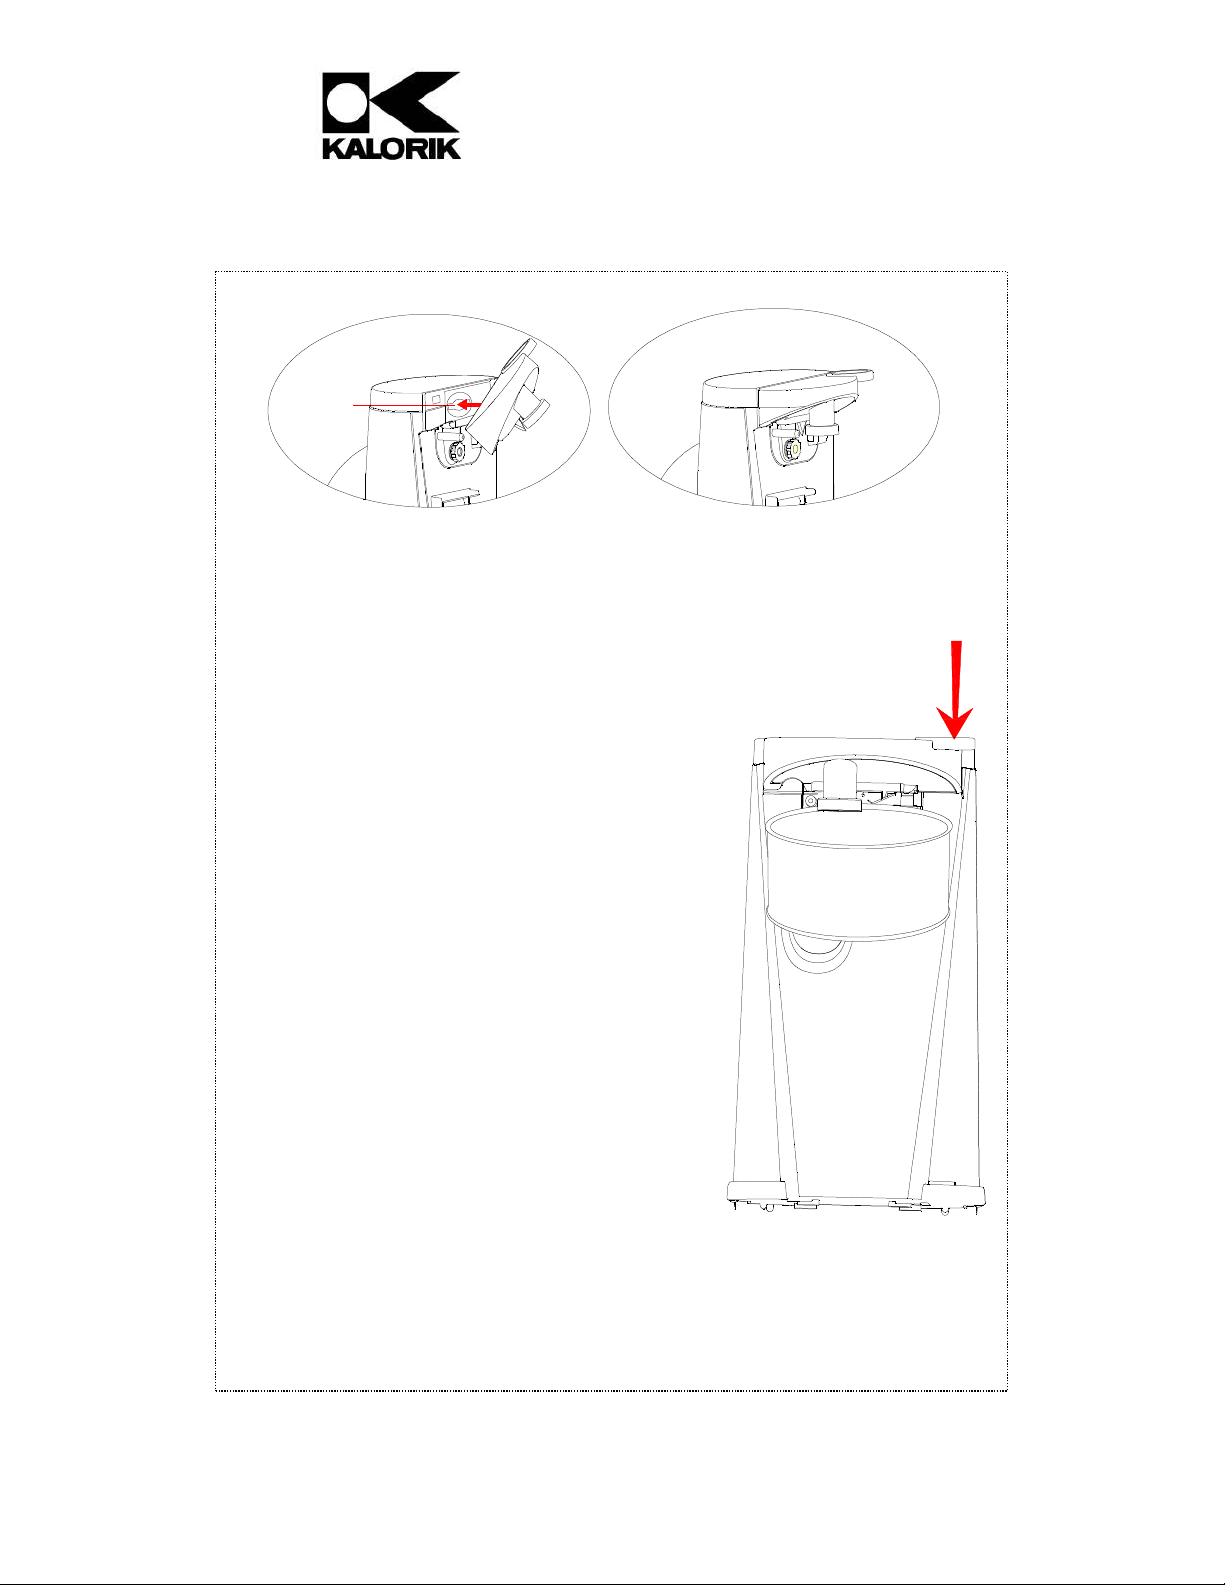
1. Attach the blade bracket to the can opener. Make the key tabs
align with the key slots, push it frontward to fix it (see Fig. 1), then
release the blade bracket (see Fig. 2).
4
Assembly page 4/20
USK DO 36918 - 110808
Page 5
Copies of the I/B. Please reproduce them without any
changes except under special instruction from Team
International BELGIUM. The pages must be reproduced and
folded in order to obtain a booklet A5 (+/- 148.5 mm width x
210 mm height). When folding, make sure you keep the good
Fax +32 2 359 95 50
numbering when you turn the pages of the I/B. Don’t change
the page numbering. Keep the language integrity. Print only
what is inside the frame.
Key slot
Fig. 1 Fig. 2
2. Plug the unit into a standard 120v outlet.
3. Lift the blade bracket; tip the can so
that its rim is under the locating post. The lid
of the can will be attracted by the magnet.
4. Press down the right side of blade
bracket, making sure the blade is inside the
rim of the can (see Fig. 3). The drive wheel
will start rotating the can and the blade will
cut the can open. The can will be held in
place automatically.
5. Because of the hands-free feature, it is
not necessary to hold the blade bracket
down or support the can during the can
opening. However, you may have to hold
the housing of can opener when cutting
very tall or heavy cans to avoid the
appliance to tilt.
6. When the can is opened, the can
opener will stop automatically. To remove
the can, hold it with one hand and raise
the blade bracket with the other.
Fig. 3
5
Assembly page 5/20
USK DO 36918 - 110808
Page 6

Copies of the I/B. Please reproduce them without any
changes except under special instruction from Team
International BELGIUM. The pages must be reproduced and
folded in order to obtain a booklet A5 (+/- 148.5 mm width x
210 mm height). When folding, make sure you keep the good
Fax +32 2 359 95 50
numbering when you turn the pages of the I/B. Don’t change
the page numbering. Keep the language integrity. Print only
what is inside the frame.
Caution: Avoid contact with the cut edges of the can or lids, as they
are sharp. Carefully remove the lid from the magnet and discard
immediately.
Note: the quantities of the cans opened each time do not exceed 5
pieces
7. You may stuff excess lengths of cord into the back storage of the
unit and feed the cord through the notch for convenient storage.
Note: Can Opening tips
1. This can opener should not be used to open cans designed to be
opened by another method, such as a pull tab, peel-off foil seal,
or rolling key. This can opener will not open rimless cans or cans
with angled corners.
2. If there is a dent in the rim of a can, open the other end or start
the cutting action just beyond the dent. Cans with heavy seams,
uneven rims or odd shapes may cause the can opener to stall, If
this occurs, turn the can slightly by hand to aid the cutting action.
3. Frozen juices or foods in cardboard cans should be opened as
soon as they are removed from the freezer.
4. Aluminum lids will not stick to the magnet.
TO OPEN BOTTLES
1. To open a bottle, grasp it and position the cap under the metal
hook part in the bottle opener (see Fig. 4).
Important: Be sure the metal hook part is not under the bottle neck,
or the glass may break. Hold the can opener with one hand and pull
down to pop the cap off with the other one.
2. The bottle opener at the front of the unit will only remove metal
bottle caps. Do not use it for screw-off caps, punch in tabs, or on
cans with pull ring.
6
Assembly page 6/20
USK DO 36918 - 110808
Page 7

Fax +32 2 359 95 50
Copies of the I/B. Please reproduce them without any
changes except under special instruction from Team
International BELGIUM. The pages must be reproduced and
folded in order to obtain a booklet A5 (+/- 148.5 mm width x
210 mm height). When folding, make sure you keep the good
numbering when you turn the pages of the I/B. Don’t change
the page numbering. Keep the language integrity. Print only
what is inside the frame.
Hold the can opener
with one hand
Pull down to pop the cap
off with the other hand
Fig. 4
HOW TO USE THE KNIFE SHARPENER
This appliance is equipped with an extra-hard corundum stone to
sharpen knifes is seconds.
Unplug the power supply, and then place the knife which is intended
to be sharpened in the slot of knife sharpener at the back of the unit.
For best results, sharpen the entire
length carefully pulling the knife
through the slot back and forth (see
Fig. 5), until you achieve desired
sharpness.
After sharpening, wash and dry the
knife.
Note: Use caution with the knife after
sharpening.
Hold the can opener
with one hand
Fig. 5
7
Assembly page 7/20
USK DO 36918 - 110808
Page 8

Copies of the I/B. Please reproduce them without any
changes except under special instruction from Team
International BELGIUM. The pages must be reproduced and
folded in order to obtain a booklet A5 (+/- 148.5 mm width x
210 mm height). When folding, make sure you keep the good
Fax +32 2 359 95 50
numbering when you turn the pages of the I/B. Don’t change
the page numbering. Keep the language integrity. Print only
what is inside the frame.
Note: Knife sharpening tips
1. Clean and dry the knives before sharpening.
2. Do not attempt to sharpen serrated blades, as this will smooth
their edges.
3. Do not attempt to sharpen scissors.
CARE AND CLEANING
1. Before cleaning any part of the can opener, unplug the cord.\
2. To remove the blade for easy cleaning, lift the blade bracket up
and pull blade assembly out. The assembly can be washed by
hand in soapy water, rinsed or wiped with a sponge and dried
thoroughly. It is NOT dishwasher-safe. Reverse the procedure to
replace the blade bracket assembly.
3. Before replacing the blade assembly, wipe the can opener
housing, and area around the drive wheel with a slightly damp
cloth or sponge. To remove stubborn spots, wipe surfaces with a
damp cloth with soapy water. Dry thoroughly. Do not use
abrasive cleaners or pads on any part of the can opener as they
would damage the finish.
8
Assembly page 8/20
USK DO 36918 - 110808
Page 9

Copies of the I/B. Please reproduce them without any
changes except under special instruction from Team
International BELGIUM. The pages must be reproduced and
folded in order to obtain a booklet A5 (+/- 148.5 mm width x
210 mm height). When folding, make sure you keep the good
Fax +32 2 359 95 50
numbering when you turn the pages of the I/B. Don’t change
the page numbering. Keep the language integrity. Print only
what is inside the frame.
WARRANTY
We suggest that you complete and return the enclosed Product
Registration Card promptly to facilitate verification of the date of
original purchase. However, return of the Product Registration Card is
not a condition of these warranties. You can also fill this warranty
card online, at the following address: www.KALORIK.com
This KALORIK product is warranted in the U.S.A. for 1 year from the
date of purchase against defects in material and workmanship. This
warranty is not transferable. Keep the original sales receipt. Proof of
purchase is required to obtain warranty performance.
During this period, the KALORIK product that, upon inspection by
KALORIK, is proved defective, will be repaired or replaced, at
Kalorik’s option, without charge to the customer. If a replacement
product is sent, it will carry the remaining warranty of the original
product.
This warranty does not apply to any defect arising from a buyer's or
user's misuse of the product, negligence, failure to follow KALORIK
instructions noted in the user’s manual, use on current or voltage
other than that stamped on the product, wear and tear, alteration
or repair not authorized by KALORIK, or use for commercial purposes.
There is no warranty for glass parts, glass containers, filter basket,
blades and agitators, and accessories in general. There is also no
warranty for parts lost by the user.
ANY WARRANTY OF MERCHANTABILITY OR FITNESS WITH RESPECT TO
THIS PRODUCT IS ALSO LIMITED TO THE ONE YEAR LIMITED WARRANTY
PERIOD.
Some states do not allow limitation on how long an implied warranty
lasts or do not allow the exclusion of incidental or consequential
damages, so the above limitations may not apply to you. This
warranty gives you specific legal rights, and you may also have other
rights which vary from state to state.
If the appliance should become defective within the warranty
period and more than 30 days after date of purchase, do not return
9
Assembly page 9/20
USK DO 36918 - 110808
Page 10

Copies of the I/B. Please reproduce them without any
changes except under special instruction from Team
International BELGIUM. The pages must be reproduced and
folded in order to obtain a booklet A5 (+/- 148.5 mm width x
210 mm height). When folding, make sure you keep the good
Fax +32 2 359 95 50
numbering when you turn the pages of the I/B. Don’t change
the page numbering. Keep the language integrity. Print only
what is inside the frame.
the appliance to the store: often, our Consumer Service
Representatives can help solve the problem without having the
product serviced. If servicing is needed, a Representative can
confirm whether the product is under warranty and direct you to the
nearest service location.
If this is the case, bring the product, or send it, postage prepaid by
the user (all Kalorik customers are responsible for the initial shipment
back to the warranty center), along with proof of purchase and
indicating a return authorization number given by our Consumer
Service Representatives, to the authorized KALORIK Service Center
(please visit our website at www.KALORIK.com or call our Customer
Service Department for the address of our authorized KALORIK
Service Center).
If you send the product, please include a letter explaining the nature
of the claimed defect.
If you have additional questions, please call our Consumer Service
Department (please see below for complete contact information),
Monday through Friday from 9:00am - 6:00pm (EST). Please note
hours are subject to change.
If you would like to write, please send your letter to:
KALORIK Consumer Service Department
Team International Group of America Inc.
1400 N.W 159th Street, Suite 102
Miami Gardens, FL 33169 USA
Or call:
Toll Free: +1 888-521-TEAM / +1 888-KALORIK
Only letters can be accepted at this address above. Shipments and
packages that do not have a return authorization number will be
refused.
10
Assembly page 10/20
USK DO 36918 - 110808
Page 11

Copies of the I/B. Please reproduce them without any
changes except under special instruction from Team
International BELGIUM. The pages must be reproduced and
folded in order to obtain a booklet A5 (+/- 148.5 mm width x
210 mm height). When folding, make sure you keep the good
Fax +32 2 359 95 50
numbering when you turn the pages of the I/B. Don’t change
the page numbering. Keep the language integrity. Print only
what is inside the frame.
INSTRUCCIONES DE FUNCIONAMIENTO
ADVERTENCIAS DE SEGURIDAD
Al utilizarse aparatos eléctricos siempre se deberán acatar las
precauciones básicas de seguridad, incluyendo las siguientes:
LEA TODAS LAS INSTRUCCIONES
1. Verifique que la corriente eléctrica corresponda a la indicada en
la placa de potencia eléctrica del aparato, antes de ser
utilizado.
2. Para protegerse de una posible descarga eléctrica no sumerja
el cable, el enchufe o el motor del aparato en agua ni en ningún
otro líquido.
3. Se requiere la supervisión de un adulto en caso de que el
aparato sea utilizado por niños o cerca de éstos.
4. Desconectar el aparato cuando no esté en uso, como así
también antes de colocar o quitar accesorios, o antes de su
limpieza.
5. Nunca ponga en funcionamiento un aparato cuyo cable y/o
enchufe estén dañados, ni en caso de que no esté funcionando
apropiadamente o haya sufrido algún daño. Devuelva el
aparato a la agencia autorizada más cercana a su hogar para
su revisación, reparación, o ajuste.
6. El uso de accesorios no recomendados por el fabricante del
aparato, podría causar fuego y descargas eléctricas.
7. No utilizar el aparato a la intemperie o con fines comerciales, no
es un aparato de tipo profesional.
8. No permita que el cable cuelgue del borde de una mesa o
mesada, o toque superficies calientes.
9. No coloque el aparato encima o cerca de hornallas calientes,
ya sean a gas o eléctricas, o adentro de un horno caliente.
10. Siempre conecte primero el enchufe en el aparato, luego
conecte el cable en el tomacorriente. Para desconectar
desenchufe el aparato del tomacorriente.
11. Utilice el aparato pura y exclusivamente para los fines indicados.
12.
Este tipo de aparato no puede funcionar ininterrumpidamente;
no es un aparato de tipo profesional. Es imprescindible
interrumpir su funcionamiento temporariamente. Tras abrir 5 latas
11
Assembly page 11/20
USK DO 36918 - 110808
Page 12

Copies of the I/B. Please reproduce them without any
changes except under special instruction from Team
International BELGIUM. The pages must be reproduced and
folded in order to obtain a booklet A5 (+/- 148.5 mm width x
210 mm height). When folding, make sure you keep the good
Fax +32 2 359 95 50
numbering when you turn the pages of the I/B. Don’t change
the page numbering. Keep the language integrity. Print only
what is inside the frame.
seguidas, debe dejar enfriarse el motor durante al menos 10
minutos.
13. Es absolutamente necesario mantener este aparato limpio
permanentemente dado que está en contacto directo con la
comida
14. No abra las latas bajo presión.
15.
Evite el contacto con las partes en movimiento.
16.
No abra latas con líquidos inflamables, como por ejemplo,
líquido para encendedores.
GUARDE ESTAS INSTRUCCIONES
SOLAMENTE PARA USO DOMESTICO
INSTRUCCIONES PARA ENCHUFE POLARIZADO
Este aparato cuenta con un enchufe polarizado (una clavija es más
ancha que la otra). Para evitar todo riesgo de shock eléctrico, dicho
enchufe va a encajar en la salida polarizada solamente de una
forma. Si en un principio el enchufe no encaja en el tomacorriente,
inviértalo. Si aun así no encaja, solicite el servicio de un electricista
habilitado y certificado. No trate por ningún medio de modificar el
enchufe.
INSTRUCCIONES PARA CABLE CORTO
Este aparato está provisto de un cable corto, con el fin de evitar el
peligro de posibles enredos en el mismo, o de posibles tropiezos con
un cable largo. Se puede utilizar una extensión de cable siempre y
cuando se lo utilice con la precaución necesaria.
• La potencia eléctrica de la extensión de cable deberá ser
como mínimo igual a la del aparato. En caso de que la
potencia eléctrica de la extensión de cable fuese
demasiado baja, podría recalentarse y quemarse.
• La extensión de cable deberá ser acomodada de forma tal
que no cuelgue de la mesada o de la mesa y evitar así que los
niños tropiecen o tiren de la misma.
12
Assembly page 12/20
USK DO 36918 - 110808
Page 13

Copies of the I/B. Please reproduce them without any
1. Imán
de posi
ción
la cuchilla
tracción
changes except under special instruction from Team
International BELGIUM. The pages must be reproduced and
folded in order to obtain a booklet A5 (+/- 148.5 mm width x
210 mm height). When folding, make sure you keep the good
Fax +32 2 359 95 50
numbering when you turn the pages of the I/B. Don’t change
the page numbering. Keep the language integrity. Print only
what is inside the frame.
CONOZCA SU ABRELATAS
Magnet
Locating post
5. Señalizador
Blade bracket
2. Soporte de
Blade
3. Cuchilla
Drive wheel
4. Rueda de
Bottle opener
6. Abre-botellas
7. Afilador
Knife sharpener
8. Recoge
Cord storage
Base cover
9. Base
cable
MODO DE EMPLEO ABRELATAS
1. Fije el soporte de la cuchilla al aparato, alineando las cuñas del
soporte con las ranuras de este y empujar hacia el frente para
colocarlo en posición (ver fig. 1), a continuación, suelte el soporte
(ver fig. 2)
13
Assembly page 13/20
USK DO 36918 - 110808
Page 14

Fax +32 2 359 95 50
Key slot
Copies of the I/B. Please reproduce them without any
changes except under special instruction from Team
International BELGIUM. The pages must be reproduced and
folded in order to obtain a booklet A5 (+/- 148.5 mm width x
210 mm height). When folding, make sure you keep the good
numbering when you turn the pages of the I/B. Don’t change
the page numbering. Keep the language integrity. Print only
what is inside the frame.
Fig. 1 Fig. 2
2. Conecte el aparato a un enchufe
estándar de 120v.
3. Levante el soporte de la cuchilla,
Posicione la lata de forma que su borde
se encuentre bajo el señalizador de
posición. La tapa de la lata será atraída
por el imán.
4. Presione el lado derecho del soporte
de la cuchilla, asegurándose de que la
cuchilla esté en el interior del borde de
la lata (ver fig. 3). La rueda de tracción
comenzará a girar la lata y la cuchilla la
abrirá. La lata se mantendrá en el lugar
de forma automática.
5. Gracias a su función de manos libres,
no es necesario mantener el soporte de
la cuchilla presionado o sujetar la lata
durante el proceso de apertura de esta.
Sin embargo, puede que tenga que
mantener sujeto el cuerpo del aparato
cuando quiera abrir latas muy altos o
pesadas para evitar que el aparato se
Fig. 3
incline.
6. Cuando la lata esté abierta, el abrelatas se detendrá
14
Assembly page 14/20
USK DO 36918 - 110808
Page 15

Copies of the I/B. Please reproduce them without any
changes except under special instruction from Team
International BELGIUM. The pages must be reproduced and
folded in order to obtain a booklet A5 (+/- 148.5 mm width x
210 mm height). When folding, make sure you keep the good
Fax +32 2 359 95 50
numbering when you turn the pages of the I/B. Don’t change
the page numbering. Keep the language integrity. Print only
what is inside the frame.
automáticamente. Para retirar la lata, sujétela con una mano y
levante el soporte de la cuchilla con la otra.
Precaución: Evite el contacto con los bordes de la lata o de la tapa,
ya que están muy afiladas. Retire con cuidado la tapa del imán y
deséchela inmediatamente.
Nota: No abra más de 5 latas seguidas.
7. Es posible recoger el exceso de cable en el recoge cables situado
en la parte posterior de la unidad y acoplar la longitud del cable a la
necesaria.
Nota: Consejos para el abrelatas
1. Este abrelatas no debe ser utilizado para abrir latas diseñadas a ser
abiertas por otro método, como latas con lengüeta, con sello de
aluminio a despegar, o con llave para girar. Este abrelatas abrirá latas
sin borde o latas con esquinas en ángulo.
2. Si hay una abolladura en el borde de una lata, abra por el otro
extremo, o inicie la acción de cortar más allá de la abolladura. Latas
con bordes desiguales, soldaduras espesas o formas extrañas puede
causar que el abrelatas se detenga. Si esto ocurre, gire ligeramente la
lata con la mano para ayudar a la acción de corte.
3. Jugos o alimentos congelados en latas de cartón, deben ser
abiertos tan pronto como se sacan del congelador.
4. Las tapas de aluminio no se pegan al imán.
MODO DE EMPLEO ABRE BOTELLAS
1. Para abrir una botella, sujétela y posicione su cápsula bajo el
gancho de metal en el abridor de botellas (ver fig. 4).
Importante: Asegúrese de que la parte del gancho de metal no este
bajo el cuello de la botella, o el cristal puede romperse. Sostenga el
aparato con una mano y tire con la otra la botella hacia abajo para
sacar su cápsula.
2. El abre botellas situado en la parte delantera de la unidad sólo
15
Assembly page 15/20
USK DO 36918 - 110808
Page 16

Copies of the I/B. Please reproduce them without any
changes except under special instruction from Team
International BELGIUM. The pages must be reproduced and
folded in order to obtain a booklet A5 (+/- 148.5 mm width x
210 mm height). When folding, make sure you keep the good
Fax +32 2 359 95 50
numbering when you turn the pages of the I/B. Don’t change
the page numbering. Keep the language integrity. Print only
what is inside the frame.
quita los las cápsulas de metal de las botellas. No lo utilice para
tapones de rosca, o para abrir latas con anilla de cierre.
Sostenga el afilador
Hold the can opener
con una mano
with one hand
Tire de la botella para retirar
la tapa con la otra mano
Pull down to pop the cap
off with the other hand
Fig. 4
MODO DE EMPLEO DEL AFILADOR
Este aparato está equipado con una
piedra de corindón extra-dura para
afilar los cuchillos tan solo en unos
segundos.
Desconecte el aparato, y luego coloque
el cuchillo que está destinado a ser
afiladas en la ranura del afilador de
cuchillos en la parte posterior de la
unidad.
Para mejores resultados, afilar toda la
longitud de la cuchilla cuidadosamente,
tirando del cuchillo por la ranura en un
movimiento de ida y vuelta (ver fig. 5),
hasta lograr el afilado deseado.
16
Assembly page 16/20
Sostenga el afilador
Hold the can opener
con una mano
with one hand
USK DO 36918 - 110808
Sostenga el afilador
Page 17

Copies of the I/B. Please reproduce them without any
changes except under special instruction from Team
International BELGIUM. The pages must be reproduced and
folded in order to obtain a booklet A5 (+/- 148.5 mm width x
210 mm height). When folding, make sure you keep the good
Fax +32 2 359 95 50
numbering when you turn the pages of the I/B. Don’t change
the page numbering. Keep the language integrity. Print only
what is inside the frame.
Tras el afilado, lave y seque el cuchillo.
Nota: Tenga cuidado con el cuchillo una vez afilado
Nota: consejos para el afilador
1. Limpie y seque los cuchillos antes de afilar.
2. No afile hojas dentadas, ya que esto suaviza sus bordes.
3. No afile las tijeras.
MANTENIMIENTO Y LIMPIEZA
1. Antes de limpiar cualquier parte del abrelatas, desconecte el
cable.
2. Para sacar la cuchilla facilitando su limpieza, levante el soporte de
la cuchilla hacia arriba y tire del ensamblaje de la cuchilla. Este
puede lavarse a mano con agua jabonosa, enjuague o limpie con
una esponja y seque completamente. No es apto para el lavavajillas.
Invierta el procedimiento para l ensamblar del soporte de la cuchilla
3. Antes de volver a colocar la cuchilla, limpie la caja del abridor de
latas, y el área alrededor de la rueda de tracción con un paño
ligeramente húmedo o una esponja. Para quitar manchas difíciles,
limpie las superficies con un paño humedecido con agua jabonosa.
Seque por completo. No use limpiadores abrasivos en ninguna parte
del abrelatas, ya que podría dañar el acabado.
17
Assembly page 17/20
USK DO 36918 - 110808
Page 18

Fax +32 2 359 95 50
Copies of the I/B. Please reproduce them without any
changes except under special instruction from Team
International BELGIUM. The pages must be reproduced and
folded in order to obtain a booklet A5 (+/- 148.5 mm width x
210 mm height). When folding, make sure you keep the good
numbering when you turn the pages of the I/B. Don’t change
the page numbering. Keep the language integrity. Print only
what is inside the frame.
GARANTÍA
Le sugerimos rellenen y nos envíen rápidamente la Tarjeta de
Registro de Producto adjunta para facilitar la verificación de la
fecha de compra. Por lo tanto, la devolución de esa Tarjeta de
Registro de Producto no es una condición imprescindible para la
aplicación de esa garantía. Puede también rellenar dicha tarjeta de
garantía en línea en la dirección siguiente: www.KALORIK.com
A partir de la fecha de compra, este producto KALORIK está
garantizado un año contra los defectos materiales y de fabricación,
en los Estados Unidos. Esta garantía no es transferible. Conserve la
prueba de compra original. Se exige una prueba de compra para
obtener la aplicación de la garantía.
Durante este período, si el producto KALORIK después de una
inspección por parte de KALORIK, se manifiesta defectuoso, será
reparado o reemplazado, según lo que decida KALORIK, sin gastos
para el consumidor. Si se envía un producto de reemplazo, se
aplicará la garantía que queda del producto original.
Esta garantía no se aplica a los defectos causados por una mala
utilización por parte del comprador o del usuario, o una negligencia
al no respeto del manual de instrucciones KALORIK, o una utilización
en un circuito eléctrico cuyo voltaje es diferente al que figura en el
producto, o un desgaste normal, o modificaciones o reparaciones
no autorizadas por KALORIK, o por un uso con fines comerciales. No
existe garantía por las partes de cristal, jarras de cristal, filtros, cestos,
cuchillas y accesorios en general. No existe tampoco garantía por
las piezas perdidas por el usuario.
Toda garantía de valor comercial o de adaptabilidad a este
producto está limitada a un año también.
Algunos estados no ponen límites a la duración de la garantía tácita
o no autorizan la exclusión de daños y perjuicios accesorios o
indirectos, por lo que puede que las restricciones anteriormente
mencionadas no le sean aplicables a Usted. Esta garantía le otorga
derechos legales particulares, pero usted puede tener también otros
18
Assembly page 18/20
USK DO 36918 - 110808
Page 19

Copies of the I/B. Please reproduce them without any
changes except under special instruction from Team
International BELGIUM. The pages must be reproduced and
folded in order to obtain a booklet A5 (+/- 148.5 mm width x
210 mm height). When folding, make sure you keep the good
Fax +32 2 359 95 50
numbering when you turn the pages of the I/B. Don’t change
the page numbering. Keep the language integrity. Print only
what is inside the frame.
derechos que varían de un estado a otro y algunos derechos
pueden variar de un estado a otro.
Si el aparato tuviera un defecto durante el periodo de garantía y / o
más de 30 días después de que se compró, no devuelva el aparato
en la tienda donde le compró: a menudo, nuestro Servicio al
Consumidor puede ayudar a resolver el problema sin que el
producto tenga que ser reparado. Si hace falta una reparación, uno
de nuestros representantes puede confirmar si el producto está bajo
garantía y dirigirle al servicio post-venta más próximo.
Si fuera el caso, traiga el producto (o envíelo, correctamente
franqueado) con la prueba de compra que mencione el número de
autorización de devolución indicado por nuestro Servicio al
Consumidor, al servicio post-venta KALORIK más próximo. (Visite
nuestra web www.KALORIK.com o llame al Servicio al Consumidor
para obtener la dirección del Servicio post-venta KALORIK exclusivo
más próximo).
Si envía el producto, le rogamos añadan una carta explicando la
naturaleza del defecto.
Si tiene preguntas adicionales, por favor llame al Servicio al
Consumidor (véase abajo para los datos completos), de lunes a
viernes, de las 9 a las 18 (EST). Note que las horas pueden ser
modificadas.
Si quiere escribirnos, puede hacerlo a la dirección siguiente:
KALORIK Servicio al Consumidor
Team International Group of America Inc.
1400 N.W 159th Street, Suite 102
Miami Gardens, FL 33169 USA
O llame gratuitamente (U.S.A.) al +1 888-521-TEAM / +1 888-KALORIK
Las cartas se aceptan solamente en la dirección anteriormente
mencionada. Los envíos y paquetes que no tengan número de
autorización de devolución serán rechazados
.
19
Assembly page 19/20
USK DO 36918 - 110808
Page 20

Fax +32 2 359 95 50
Copies of the I/B. Please reproduce them without any
changes except under special instruction from Team
International BELGIUM. The pages must be reproduced and
folded in order to obtain a booklet A5 (+/- 148.5 mm width x
210 mm height). When folding, make sure you keep the good
numbering when you turn the pages of the I/B. Don’t change
the page numbering. Keep the language integrity. Print only
what is inside the frame.
K110808
20
Assembly page 20/20
USK DO 36918 - 110808
 Loading...