

Page 1
Steam Iron with
retractable cord
USK DA 31066
USK DA 31067
www.KALORIK.com
120V~ 60Hz 1200W
Page 2
IMPORTANT SAFEGUARDS
When using your appliance, basic safety precautions should always
be followed, including the following:
READ ALL INSTRUCTIONS
WARNING:
To reduce the risk of fire, electric shock or
injury:
1. Use the iron only for its intended use.
2. Check that your mains voltage corresponds to that stated on the
appliance.
3. To protect against electrical shock do NOT immerse cord, plugs,
or iron in water or other liquid.
4. The temperature dial and steam knob always be turned to 0/MIN
before plugging or unplugging from the outlet. Never yank the
cord to disconnect form the outlet; instead, grasp the plug and
pull to disconnect.
5. Unwind the power cord completely before using.
6. Do not allow the cord to touch the hot surfaces. Let the iron cool
down completely before putting away. Rewind the cord
completely when storing.
7. Always disconnect the iron from the electrical outlet when filling
with water or emptying and when not in use.
8. Do not operate the iron with a damaged cord or plug or after the
appliance has been dropped or damaged in any manner. To
avoid the risk of electric shock, do not disassemble the iron, take
it to a qualified serviceman for examination and repair. Incorrect
reassembly can cause a risk of electric shock when the iron is
used.
9. Close supervision is necessary when the appliance is used by or
near children. Children should NOT play with this appliance. This
appliance is not intended for use by persons (including children)
2
DA31066 / 31067 - 091112
Page 3

with reduced physical, sensory or mental capabilities, or lack of
experience and knowledge, unless they have been given
supervision or instruction concerning use of the appliance by a
person responsible for their safety.
10. Burns can occur from touching hot metal parts, hot water or
steam. Use caution when you turn a steam iron upside down –
there may be hot water in the water tank.
11. If the iron is not operating normally, disconnect from the power
supply and have the iron serviced by an authorized service
center.
12. Deposit or Mineral in tap water will generate limescale and
eventually block the steam holes, therefore it is advisable to use
distilled water.
13. When placing the iron on a stand, ensure that the surface on
which the stand is placed is stable.
14. The iron is not to be used if it has been dropped, if there are
visible signs of damage or if it is leaking.
SPECIAL INSTRUCTIONS
• To avoid a circuit overload, do not operate another high
wattage appliance on the same circuit.
• If an extension cord is absolutely necessary, a 10-ampere cord
should be used. Cords rated for less amperage may overheat.
Care should be taken to arrange the cord so that it cannot be
pulled or tripped over.
SAVE THESE INSTRUCTIONS
POLARIZED PLUG INSTRUCTIONS
This appliances is equipped with a polarized plug (one blade is wider
than the other). To reduce the risk of electric shock, this plug will fit
into the polarized outlet only one way. If the plug does not properly
fit into the outlet at first, reverse it. If it still does not fit, contact a
competent qualified electrician. Do not attempt to modify the plug in
any way.
3
Assembly page 3/16
DA31066 / 31067 - 091112
Page 4
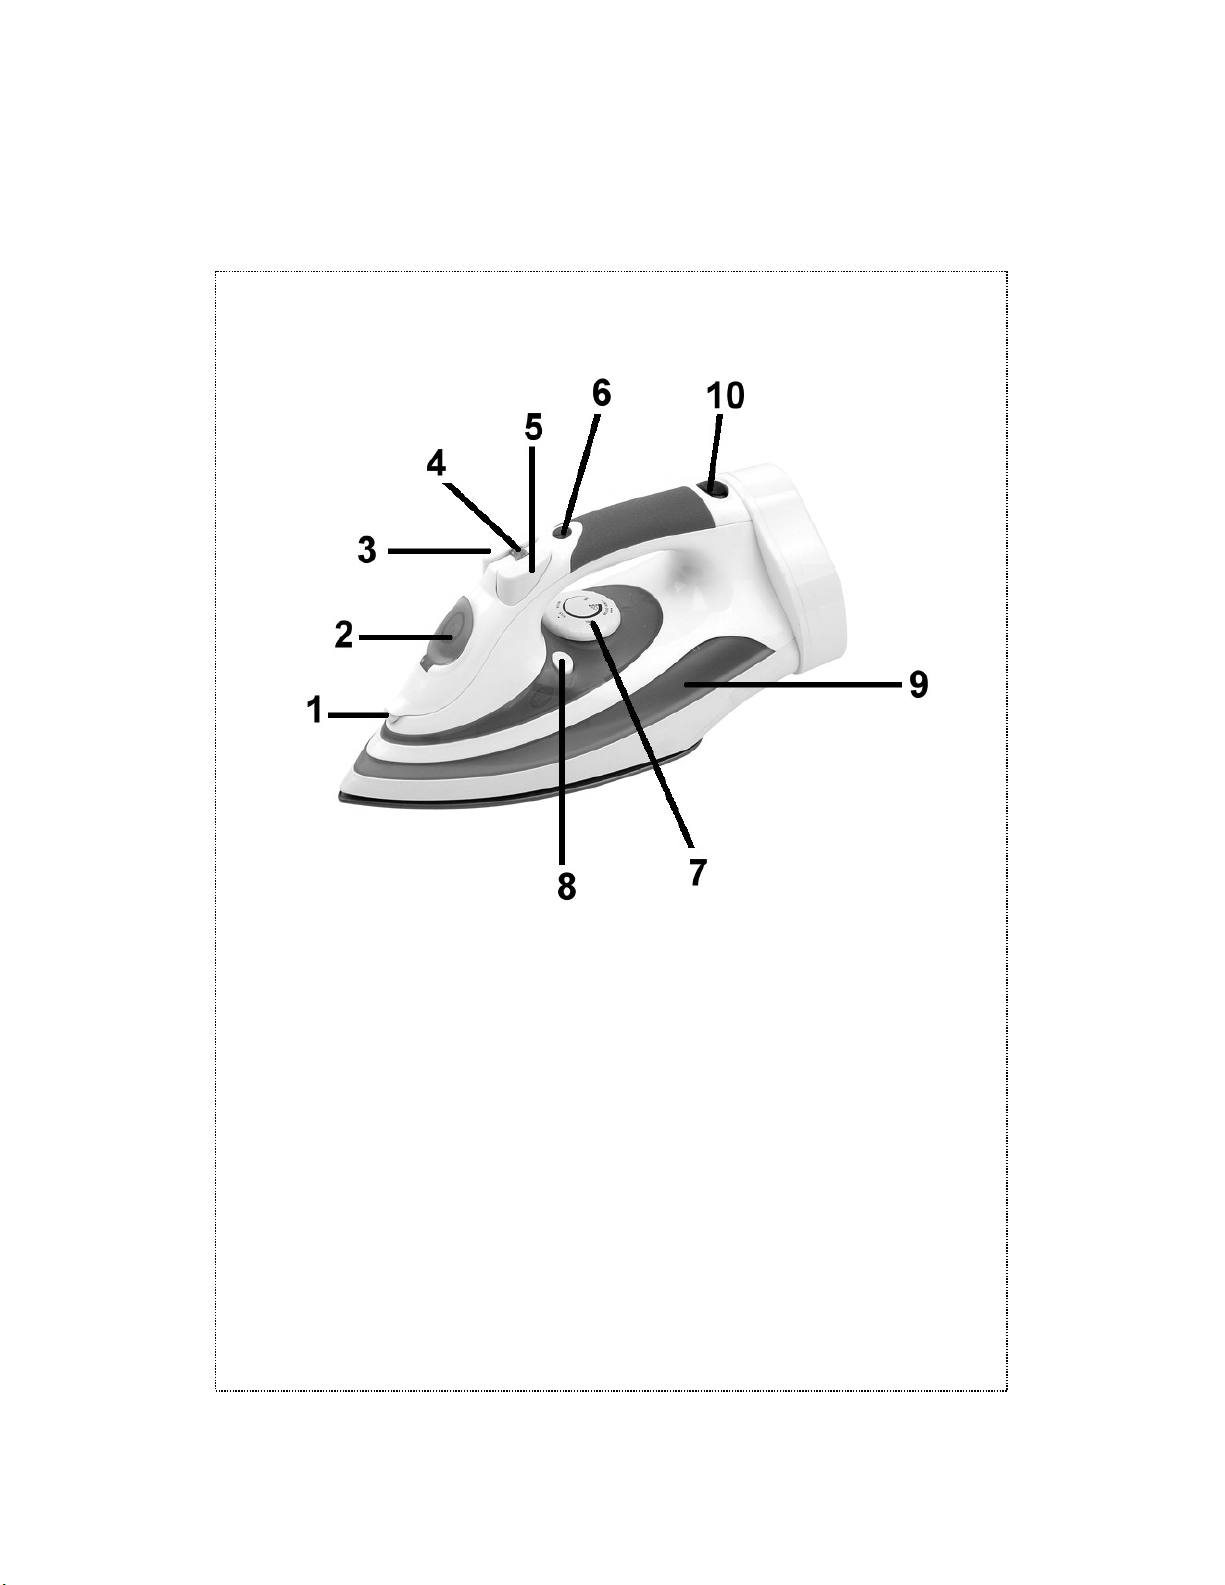
PART DESCRIPTION
1. Spray nozzle
2. Lid of the filling opening
3. Burst of steam button
4. Steam regulator
5. Spray button
6. Temperature indicator
7. Temperature dial
8. Self-clean button
9. Water tank
10. Cord Rewinding Button
4
Assembly page 4/16
DA31066 / 31067 - 091112
Page 5
CAUTION BEFORE FIRST USE
• The iron has been greased, and as a result, the iron may slightly
smoke when switched on for the first time. After a short while, this
will cease.
• Before using for the first time, remove any sticker or protective foil
from the soleplate. Clean the soleplate with a soft cloth.
• Keep the soleplate smooth: avoid hard contact with metal
objects (such as clothes rack, button and slide fastener).
FILLING THE WATER TANK
• Use preferably demineralized water.
• Make sure the iron is unplugged from the outlet
• Turn the temperature dial to "MIN" and the variable steam dial to
the "0" setting.
• To fill the water tank, open the lid of the filling opening and pour
water through the fill opening, the iron put at an angle of 45°,
using the beaker. Never exceed the MAX mark indicated in on
the appliance.
• When ironing, unplug the appliance before refilling. Fill the water
tank by holding the appliance in 45° angle position without
putting down the hot soleplate, unless you have a heat-resistant
base.
TEMPERATURE SETTINGS
• You can choose the temperature setting in function of the
material of cloth to iron.
• In order to turn the iron to the desired temperature, please turn the
temperature knob clockwise into the required position (see table
below). If you have a doubt, take a look at the garment’s label.
5
Assembly page 5/16
DA31066 / 31067 - 091112
Page 6

Caution
::::
Instructions on
Label
Type of Fabric Thermostat dial
Please note that on the garment label means that this article m shall
Nylon
Silk
Wool
Cotton
Linen
not be ironed.
MIN
MAX
AUTO SHUT-OFF FEATURE
Your iron is equipped with an auto shut-off feature. This safety
measure will shut the iron off when detecting no movement.
When in horizontal position, please note that the iron will shut off
automatically when no movement is detected during a 30 seconds
period. When in vertical position (standing on its heel), please note
that the iron will shut off automatically when no movement is
detected for 8 minutes.
ANTI DRIP FEATURE
This iron is equipped with an anti drip feature that will protects fabrics
from water spotting even at low temperatures.
DRY IRONING
• Unwind the power cord.
• Plug the appliance in the socket.
• Turn the variable steam dial (steam regulator) on position 0.
• Before running the iron, please classify the clothes as per their
label, as it will be quicker for the iron to heat up than to cool, the
clothes (such as synthetic fabric, silk etc) with lower ironing
temperature shall be ironed first, and then iron the clothes (such
as wool, cotton and linen etc) compatible with higher
temperature settings
• Put the iron on its end, and turn the thermostat dial to the MIN
position.
6
Assembly page 6/16
DA31066 / 31067 - 091112
Page 7

• Plug in the iron and select the temperature by turning the
thermostat dial. If there is water in the reservoir, make sure the
steam regulator is set to OFF position. Wait until the indicator light
goes off, showing that the required temperature has been
reached.
STEAM IRONING
• Fill water in the iron as per the water-filling method above.
• Unwind the power cord.
• Plug the appliance in the socket.
• Set the thermostat dial to MAX position, otherwise water may leak
from the soleplate.
• Put the iron on its heel to warm up, until the indicator light goes
off.
• Set the steam regulator correctly, increase the steam output by
rotating the steam regulator anticlockwise, otherwise decrease
the steam output by rotating it clockwise.
Caution: Set the temperature dial within the steam range (' ' or
' '). If temperature setting is too low, water may drip from
soleplate.
Check the garment label before ironing because some clothes may
be damaged when exposed to steam or water. Typically, synthetic
fabrics, nylon, synthetic silk and silk cannot be ironed with steam
otherwise it may damage the fabric.
BURST OF STEAM / VERTICAL STEAM
The burst of steam feature provides additional steam for
removing stubborn creases.
• Set the thermostat dial button to MAX, wait until the indicator light
goes off.
• Release the steam by pressing the steam button.
• Wait for several minutes and let the steam penetrate through the
fabric, and then release more steam through pressing this button
again.
7
Assembly page 7/16
DA31066 / 31067 - 091112
Page 8

Note:
• There should be 3-5 seconds rest between two times of pressing
Steam Button in order to obtain the best steaming result.
• Fill the water to the Max position before using this function.
• In order to prevent the water leaking from the soleplate, please
do not press the steam button continuously for more than 5
seconds.
This button also allows you to iron delicate articles of clothing
vertically. This feature is called "vertical steam". To do so, hang your
article of clothing on a hanger, keep the steam button pressed and
pass the iron to and fro in front of the article of clothing, making sure
that the soleplate does not come into contact with the article of
clothing. The distance between the soleplate and the article of
clothing depends on the kind of textile and the creases.
SPRAY
• Produces a mist for removing stubborn creases.
• Spray can be used at any temperature setting and during
either dry or steam pressing, provided there is water in the tank.
Press down the spray button to spray.
SELF-CLEANING
To remove dirt and dust, the iron should be cleaned at least once a
month.
• Fill the iron with water to 1/2 of its maximum capacity. Turn the
steam regulator to “0” or “No Steam” position and the thermostat
dial to the MIN position. Plug the iron into the mains socket.
• Turn the thermostat dial to Max position.
• Wait until the power indicator light goes off, i.e. the steam iron
has reached its preset temperature.
• Hold the iron horizontally over a sink or basin.
• Press the “Self-cleaning button” and hold it down while shaking
the iron lightly to eliminate the dirt. The plate gives off hot water
and steam.
8
Assembly page 8/16
DA31066 / 31067 - 091112
Page 9

• During this operation you can press the steam button a number
of times, remembering to pause for at least five seconds between
one burst of steam and the next.
• When the tank is empty, release the Self-cleaning button.
• At the end, turn the thermostat dial to the MIN position and
unplug the iron from the mains socket. Leave the iron to cool and
clean the plate with a soft cloth.
RETRACTABLE CORD
• To unwind, simply pull the cord to desired length. Do not try to
unwind cord beyond its maximum capacity (See : Fig. 2)
• In case the cord is not pulled out easily, pull cord firmly.
• To rewind the cord, please hold the cord firmly in one hand while
pressing and holding the “Cord Release” Button while guiding the
cord into the storage area. Failure to hold the plug may cause
plug to fly and hit you or objects/persons around you (See : Fig. 3)
• The cord reel is compact, to enable a multi-layer winding of the
cord. In case the cord cannot fully rewind, pull out the cord and
steer cord evenly on the reel.
Fig. 2
CAUTION: Always hold the plug while retracting the cord. Do not let
the cord retract freely. Cord may jam on reel or loose cord may whip
back and forth and could cause injury. Do not allow children to play
with the retractable cord feature as the cord may cause injury.
Fig. 3
9
Assembly page 9/16
DA31066 / 31067 - 091112
Page 10

WHEN YOU ARE FINISHED IRONING
• Turn the temperature dial to "MIN" and unplug iron from electrical
outlet.
• Rewind the power cord.
• With the soleplate facing away from you, turn the iron upside
down to empty the water tank.
• Then store the hot iron on its heel so that any remaining moisture
will evaporate. When the soleplate has totally cooled down, you
may store the iron away.
CARE AND CLEANING
• Clean the iron regularly according to the hardness of the water
and the use frequency (see section : SELF CLEANING)
• Never use vinegar or other liquids to descale the iron internally.
• To clean the plastic parts of the iron, use a humid cloth.
• To clean the stainless steel soleplate, make sure you use a
product made especially for this purpose. Never use abrasive
products.
• Wipe off the soleplate with a damp cloth and a non-abrasive
(liquid) cleaner.
• If the fiber adheres to the soleplate, use a damp cloth with
vinegar to wipe off the soleplate.
• Never use strong acid or alkali in order to avoid damaging the
soleplate.
• If limescale blocks the steam hole, please remove it with a
toothpick; taking care not to damage the surface of the soleplate.
10
Assembly page 10/16
DA31066 / 31067 - 091112
Page 11

TROUBLESHOOTING
Iron won’t heat * Is the iron plugged in and the outlet working? Check the
outlet by plugging in a lamp.
* Is the Thermostat Dial turned to a fabric setting?
Water is leaking
out of the iron
Iron won’t steam * Check the water level.
Iron leaves spots
on clothing
Wrinkles not
removed
Fabric/Clothing
scorched
Twisted cord * If iron cord should become twisted, turn iron off (o), turn
* Do not overfill the water tank.
* If steam ironing, is Steam Regulator in the steam position
and the Thermostat Dial in the steam range ? Did the iron
have enough time to preheat?
* If dry ironing, make sure the Steam Regulator is in the 0
(no steam) position.
* If using burst steam, press button less frequently (not
more than once every two seconds.
* Follow the Self-cleaning instructions one or two times with
tap water (not distilled) to “condition” the iron.
* Is the Steam Regulator in the STEAM position?
* Has the iron had enough time to preheat?
* ALWAYS empty the Water Reservoir of the iron after
using. Water left in the tank may discolor clothing and
soleplate.
* Check Thermostat Dial is set to correct fabric.
* Check Thermostat Dial and set to lower setting.
* Allow iron to cool down 5 minutes before continuing.
Thermostat Dial to MIN (o) and unplug iron. Let cool.
Empty water from iron. Hold iron cord in the middle of
entire length. Let plug and iron dangle freely until cord
uncoils. This will extend the life of your iron cord.
11
Assembly page 11/16
DA31066 / 31067 - 091112
Page 12

WARRANTY
We suggest that you complete and return the enclosed Product
Registration Card promptly to facilitate verification of the date of
original purchase. However, return of the Product Registration Card is
not a condition of these warranties. You can also fill this warranty
card online, at the following address: www.KALORIK.com
This KALORIK product is warranted for 1 year from the date of
purchase against defects in material and workmanship. This warranty
is not transferable. Keep the original sales receipt. Proof of purchase
is required to obtain warranty performance.
During this period, the KALORIK product that, upon inspection by
KALORIK, is proved defective, will be repaired or replaced, at
KALORIK's option, without charge to the customer. If a replacement
product is sent, it will carry the remaining warranty of the original
product.
This warranty does not apply to any defect arising from a buyer's or
user's misuse of the product, negligence, failure to follow KALORIK
instructions noted in the user’s manual, use on current or voltage
other than that stamped on the product, wear and tear, alteration
or repair not authorized by KALORIK, or use for commercial purposes.
There is no warranty for glass parts, glass containers, filter basket,
blades and agitators, and accessories in general. There is also no
warranty for parts lost by the user.
ANY WARRANTY OF MERCHANTABILITY OR FITNESS WITH RESPECT TO
THIS PRODUCT IS ALSO LIMITED TO THE ONE YEAR LIMITED WARRANTY
PERIOD
Some states do not allow limitation on how long an implied warranty
lasts or do not allow the exclusion of incidental or consequential
damages, so the above limitations may not apply to you. This
warranty gives you specific legal rights, and you may also have other
rights which vary from state to state.
12
Assembly page 12/16
DA31066 / 31067 - 091112
Page 13

If the appliance should become defective within the warranty
period and more than 30 days after date of purchase, do not return
the appliance to the store: often, our Consumer Service
Representatives can help solve the problem without having the
product serviced. If servicing is needed, a Representative can
confirm whether the product is under warranty and direct you to the
nearest service location.
If this is the case, bring the product (or send it, postage prepaid),
along with proof of purchase and indicating a return authorization
number given by our Consumer Service Representatives, to the
nearest authorized KALORIK Service Center (please visit our website
at www.KALORIK.com or call our Customer Service Department for
the address of the nearest authorized KALORIK Service Center).
If you send the product, please include a letter explaining the nature
of the claimed defect.
If you have additional questions, please call our Consumer Service
Department (please see below for complete contact information),
Monday through Friday from 9:00am - 6:00pm (EST). Please note
hours are subject to change.
If you would like to write, please send your letter to:
KALORIK Consumer Service department
Team International Group of America Inc
1400 N.W 159th Street, Suite 102
Miami Gardens, FL 33169 USA
Or call :
Toll Free: +1 888-521-TEAM
Only letters can be accepted at this address above. Shipments and
packages that do not have a return authorization number will be
refused.
13
Assembly page 13/16
DA31066 / 31067 - 091112
Page 14

14
Assembly page 14/16
DA31066 / 31067 - 091112
Page 15

15
Assembly page 15/16
DA31066 / 31067 - 091112
Page 16

091112
16
Assembly page 16/16
DA31066 / 31067 - 091112
 Loading...