

Page 1

Multi-purpose Mixer
Batidora de uso múltiple
Mixer à usage multiple
Varinha com
aplicações múltiplas
USK CMM 1
120V~60Hz 180Wnom/220Wmax
Page 2

IMPORTANT SAFEGUARDS
1. READ ALL INSTRUCTIONS
2. Check that your mains voltage corresponds to that stated on the
rating plate of the appliance before using the appliance.
3. To protect against electrical shock do not immerse cord, plug, or
the motor unit in water or other liquid.
4. Close supervision is necessary when the appliance is used by or
near children.
5. Unplug from outlet when not in use and before putting on or
taking off parts or before cleaning.
6. Avoid contacting moving parts.
7. Do not operate any appliance with a damaged cord or plug or
after the appliance malfunctions or has been damaged in any
manner. Return appliance to the nearest authorized service
facility for examination, repair, or adjustment.
8. The use of attachments not recommended or sold by the
manufacturer may cause fire, electric shock or injury.
9. Do not use outdoors.
10. Do not let cord hang over edge of table or counter or touch hot
surfaces.
11. Do not place on or near a hot gas or electric burner, or in a
heated oven.
12. Keep hands, hair, clothing, as well as spatulas and other utensils
away from beaters or hooks during operation of the hand mixer
to reduce the risk of injury to persons, and/or damage to the
appliance.
13. Remove all accessories before washing.
14. Blades of the chopper and the stick mixer are sharp. Handle
carefully.
15. Always attach plug to appliance first, then plug cord into the wall
outlet. To disconnect remove the plug from the wall outlet.
16. Do not use appliance for other than intended use.
17. Only use this citrus press to extract the juice from tender fruits
(orange, lemon, grapefruit...). Never try to extract the juice from
2
USK CMM1 - 070323
Page 3

fruits such as pineapple, mango or other fruits that are too hard
and/or too large.
18. This kind of appliance cannot function continuously, it is not a
professional type of appliance. It is necessary to make temporary
stops. Check the section "Important information" in the instruction
manual.
19. It is absolutely necessary to keep this appliance clean at all times
as it comes into direct contact with food.
20. The appliance is designed for preparing small quantities of food,
which have to be consumed rather quickly. It is not designed for
preparing large quantities at once.
21. To disconnect the appliance remove the plug from the wall
outlet.
22. Do not attempt to defeat the appliance interlock mechanisms.
23. Keep hands and utensils away from the cutting blade while
chopping or mixing food to reduce the risk of severe injury to
persons or damage to the appliance. A scraper may be used but
only when the appliance is not running.
24. When mixing liquids, especially hot liquids, use a tall container or
make small quantities at a time to reduce spillage.
SAVE THESE INSTRUCTIONS
POLARIZED PLUG INSTRUCTIONS
This appliance has a polarized plug (one blade is wider than the
other). To reduce the risk of electric shock, this plug will fit into the
polarized outlet only one way. If the plug does not properly fit into
the outlet at first, reverse it. If it still does not fit, contact a competent
qualified electrician. Do not attempt to modify the plug in any way.
SHORT CORD INSTRUCTIONS
A short power supply cord is provided to reduce the hazards resulting
from becoming entangled in, or tripping over a longer cord.
Extension cords may be used if care is exercised in their use.
3
Assembly page 3/44
USK CMM1 - 070323
Page 4
• The electrical rating of the extension cord should be at least that
of the appliance. If the electrical rating of the extension cord is
too low, it could overheat and burn.
• The resulting extended cord should be arranged so that it will not
drape over the counter top or tabletop where it can be pulled on
by children or tripped over.
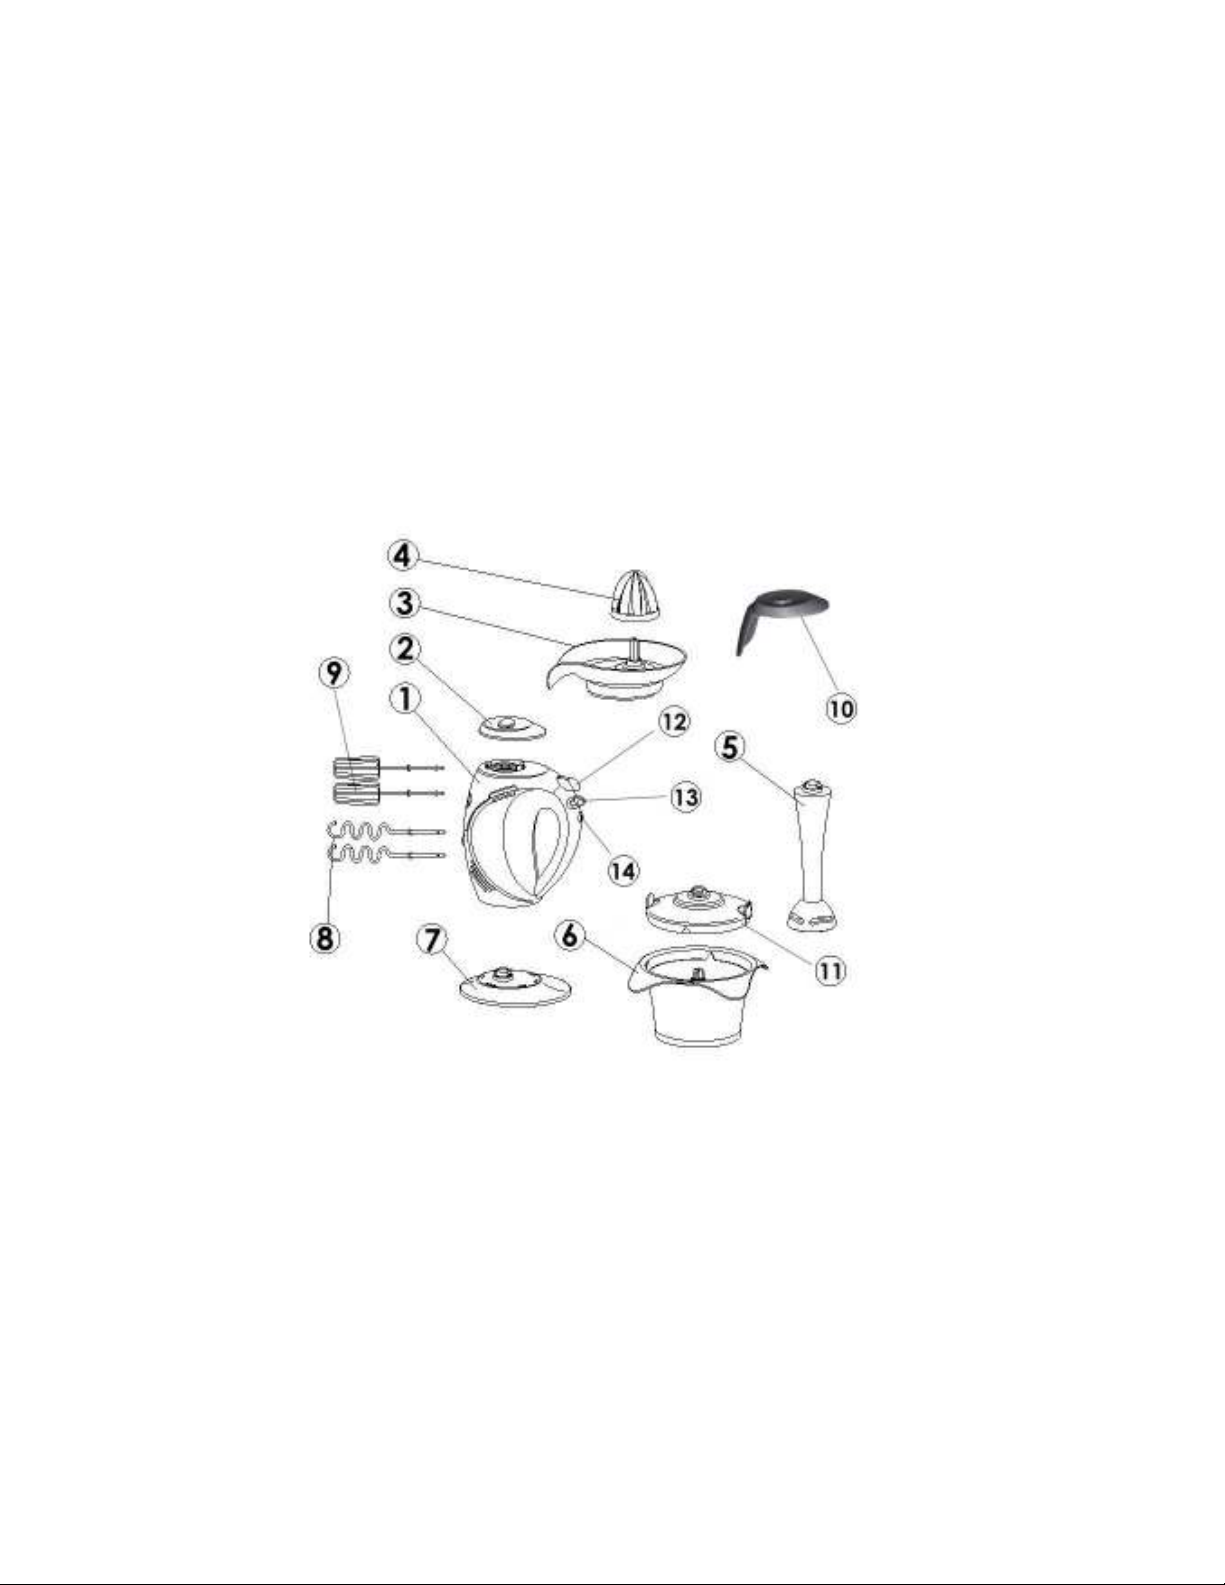
PART DESCRIPTION
1. Motor unit
2. Lid for hand mixer and
citrus press function
3. Citrus press juice tray
4. Citrus press cone
5. Stick mixer
6. Chopper bowl
7. Base
8. Hooks
9. Beaters
10. Lid for chopper and stick
mixer function
11. Chopper lid
12. Ejection button
13. Speed switch
14. “Stick” mixer switch
4
Assembly page 4/44
USK CMM1 - 070323
Page 5

IMPORTANT INFORMATION
This appliance is not for professional use. You should follow the
requested breaks. Failure to follow this instruction carefully may result
in damage to the motor. Please refer to below speed settings for the
maximum continuous usage time. The breaks should last at least 10
minutes.
SPEED SETTINGS
Depending on the accessory you are using, you can use the
following speed setting.
HAND MIXER speeds 1 to 5 (KB= 5 mins)
STICK ATTACHMENT: speeds 4 to 5 + stick switch (KB=1 min)
CHOPPER: speeds 3 to 5 (KB= 1 min)
CITRUS PRESS: exclusively speed 1 (KB= 3 mins)
(KB= XX min where XX is the maximum usage time). After you used it
for this time, you should make a break of at least 10 minutes)
Variable speeds: place the speed switch on the speed setting you
want.
GENERAL USE
Always respect the below assembly instructions because safety
devices block any unsafe use and the appliance would not work
properly.
5
Assembly page 5/44
USK CMM1 - 070323
Page 6
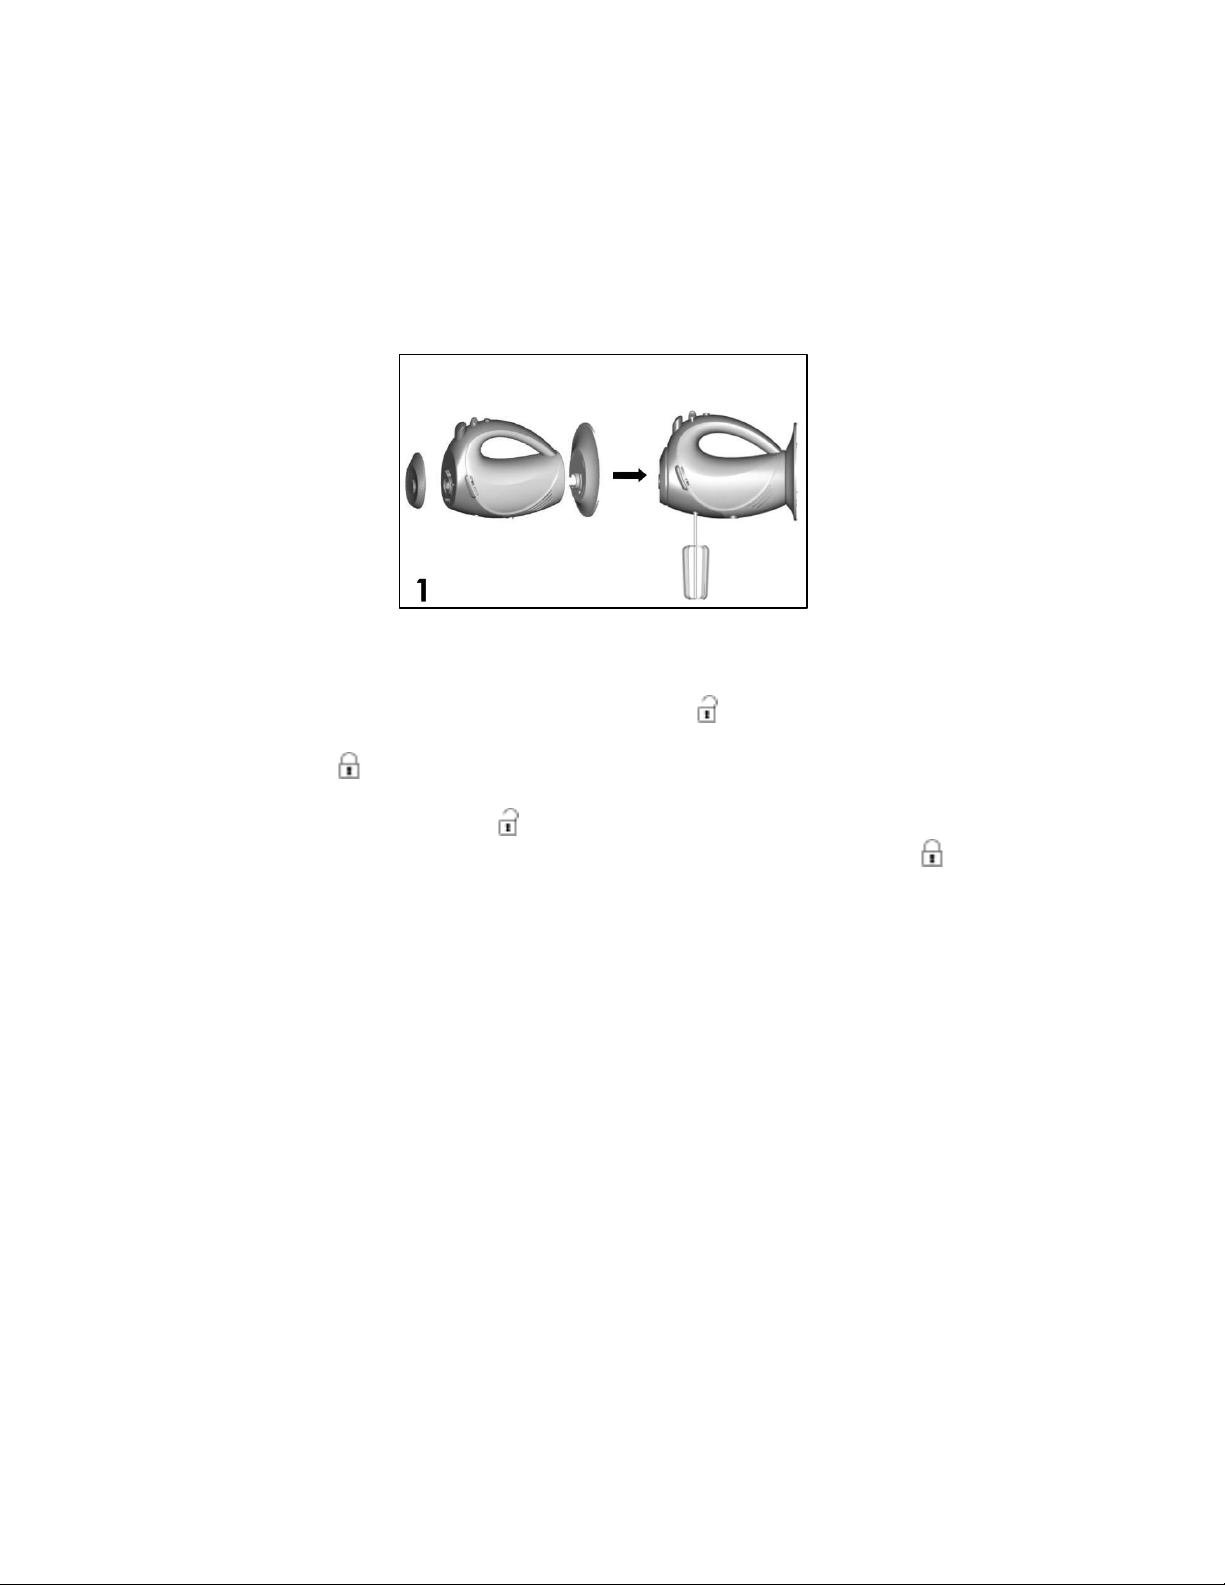
USE OF THE HAND MIXER
With this accessory you can beat (beaters) and mix (hooks) food.
• Make sure the appliance is unplugged.
• Place the safety lid (11) on top of the motor unit making sure the
arrow on the motor unit is in front of the
lid. Then turn the lid clockwise until the arrow ends up in front of
the
symbol.
• Fit the base on the motor unit making sure the arrow on the motor
unit is in front of the
symbol located on the base. Then turn the
motor unit anticlockwise until the arrow ends up in front of the
• If the lid and the base are not properly fitted, it will be impossible
to switch on the hand mixer.
• Insert the beaters or hooks in the openings. Check their locking by
pulling them lightly.
• To disassemble the hand mixer, proceed inversely except for the
beaters and hooks that have to be ejected by pressing the
ejection button (12).
symbol located on the
.
6
Assembly page 6/44
USK CMM1 - 070323
Page 7
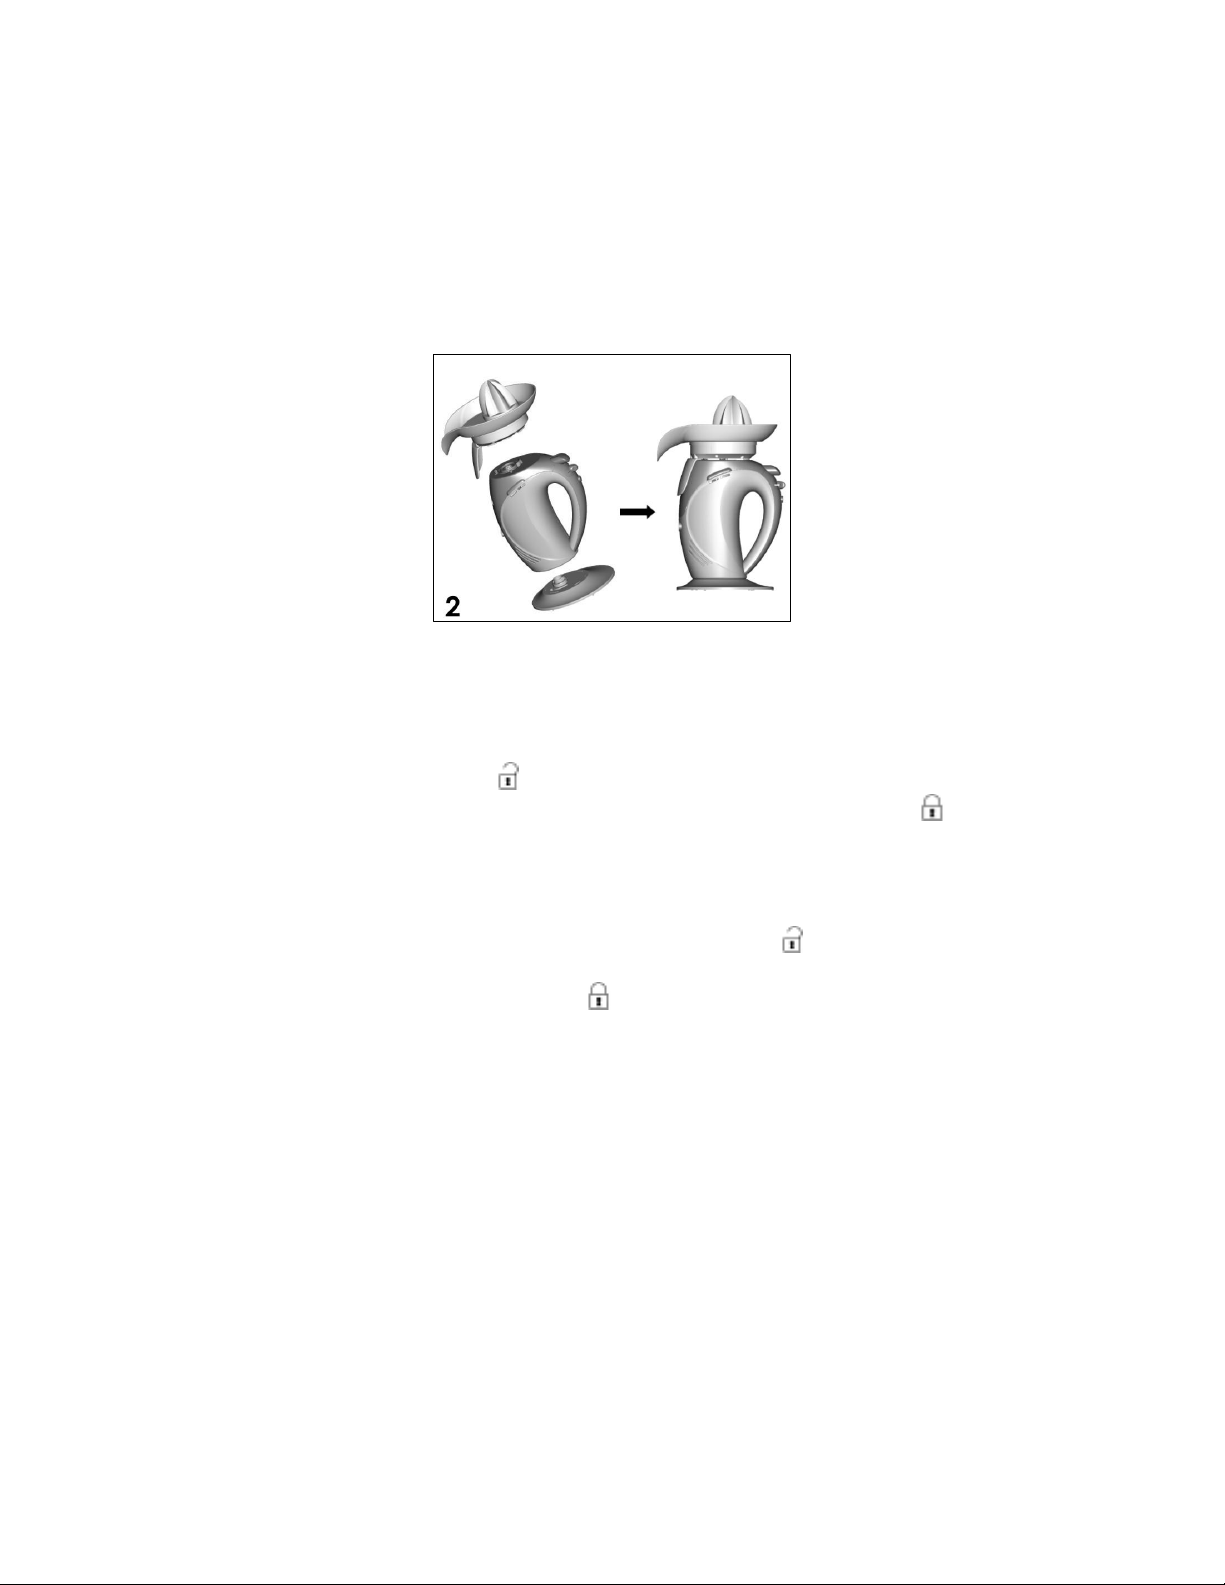
USE OF THE CITRUS PRESS
This accessory allows you to prepare fruit juices.
• Make sure the appliance is unplugged.
• Fit the base on the motor unit making sure the arrow on the motor
unit is in front of the
motor unit anticlockwise until the arrow ends up in front of the
If the base is not properly fitted, it will be impossible to switch on
the citrus press.
• Put the motor unit vertically on its base.
• Place the citrus press juice tray on top of the motor unit making
sure the arrow on the motor unit is in front of the
located on the accessory. Then turn the tray clockwise until the
arrow ends up in front of the
• Place the cone on the shaft of the juice tray.
• Put a container below the spout of the tray to collect the juice.
• To disassemble the citrus press, proceed inversely.
symbol located on the base. Then turn the
.
symbol
symbol.
7
Assembly page 7/44
USK CMM1 - 070323
Page 8
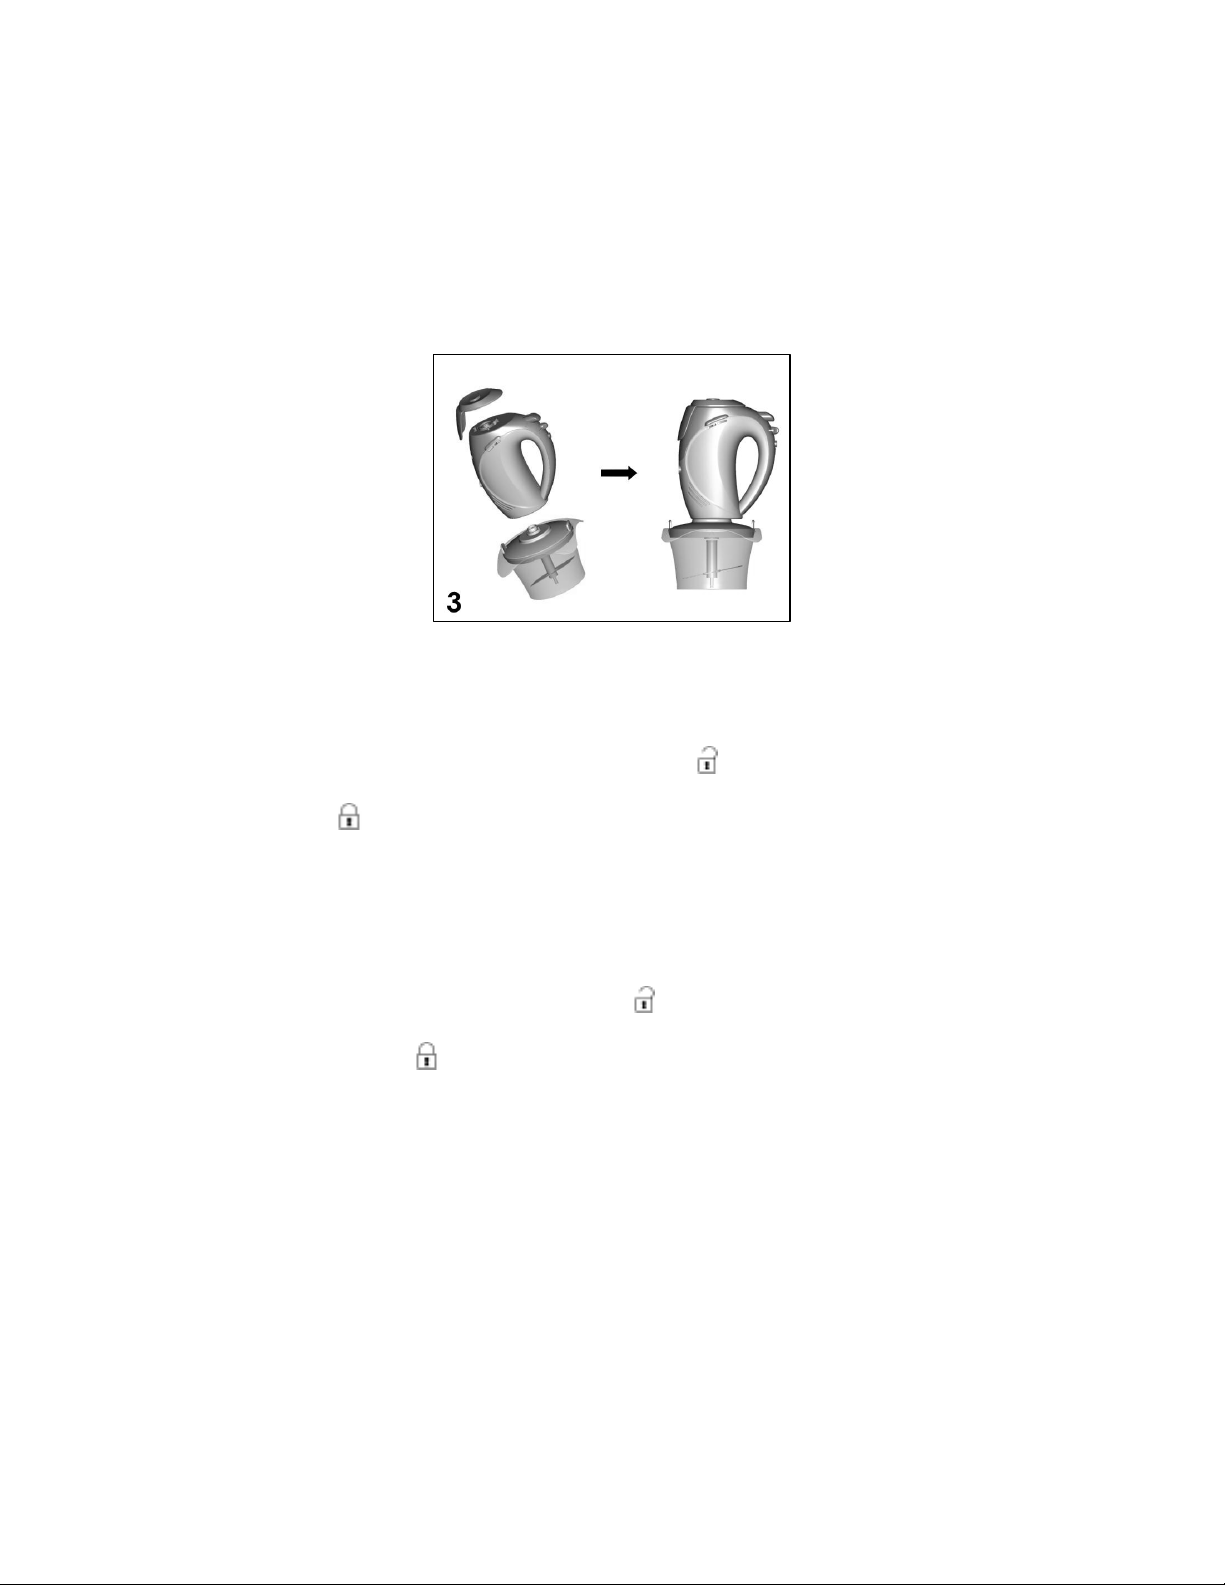
USE OF THE CHOPPER
With this accessory you can chop condiments, dried fruits or meat.
To chop meat, it is recommended to cut it into small pieces first.
• Make sure the appliance is unplugged.
• Place the safety lid (10) on top of the motor unit making sure the
arrow on the motor unit is in front of the
lid. Then turn the lid clockwise until the arrow ends up in front of
the
symbol. If the lid is not properly fitted, it will be impossible to
fix the motor unit on the chopper lid.
• Put the blade on the shaft of the chopper bowl. Be careful not to
hurt yourself with the blade as it is very sharp.
• Place the lid of the chopper on the bowl making sure the lugs of
the lid insert into the slots of the bowl.
• Place the motor unit on the shaft of the lid making sure the arrow
on the motor unit is in front of the
symbol located on the lid.
Then turn the motor unit anticlockwise until the arrow ends up in
front of the
symbol.
• To disassemble the chopper, proceed inversely.
Note: To remove the lid of the chopper bowl, press its fins.
• Be careful when cleaning the chopper as the blades are very
sharp.
symbol located on the
8
Assembly page 8/44
USK CMM1 - 070323
Page 9
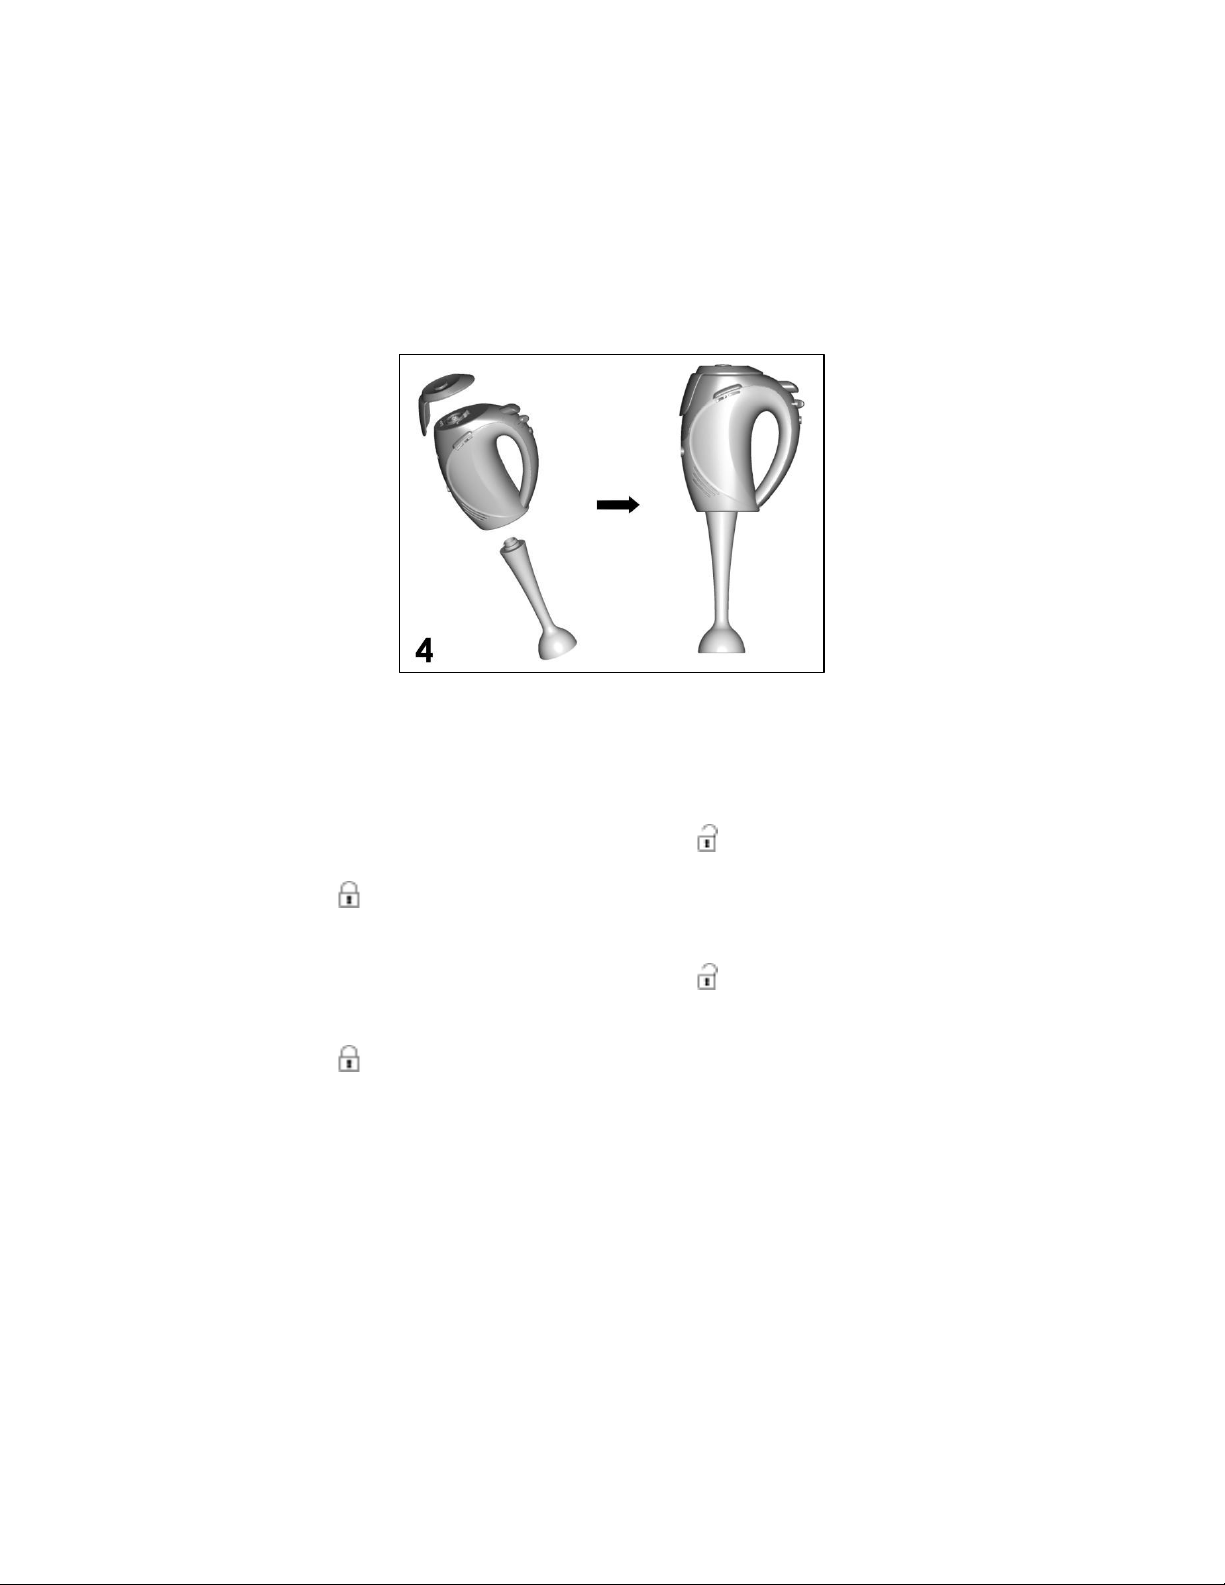
USE OF THE STICK ATTACHMENT
With this accessory you can mix food as for example vegetables to
prepare soups but also to mix liquids. Always use it in a vertical
position with blades facing downwards.
• Make sure the appliance is unplugged.
• Place the safety lid (10) on top of the motor unit making sure the
arrow on the motor unit is in front of the
lid. Then turn the lid clockwise until the arrow ends up in front of
the
insert the stick attachment in the opening.
• Insert the stick attachment into the opening making sure the
arrow on the motor unit is in front of the
stick attachment. Push the stick attachment in and turn it
simultaneously anticlockwise until the arrow ends up in front of
the
• To disassemble the stick attachment, proceed inversely.
• Be careful when cleaning the stick attachment, as the blades are
very sharp.
• Note: the stick mixer is to be used with speeds 4 or 5 and with the
“stick” button. When mixing food, put your appliance on speed 4
or 5, then press the stick button. Once you release the button, the
appliance stops. Always take care to put back the speed switch
to 0 after use in order to avoid using other attachments at an
unsuitable speed, which can be dangerous.
symbol. If the lid is not properly fitted, it will be impossible to
symbol. Check the locking by pulling the stick attachment.
symbol located on the
symbol located on the
9
Assembly page 9/44
USK CMM1 - 070323
Page 10

CLEANING
• Unplug the appliance before cleaning.
• Remove the accessories before washing them in soap water. Do
not use scouring pads for the plastic materials. Rinse with clear
water and let dry before each new use. Do not put the
accessories in the dishwasher.
• Wipe the outside with kitchen paper or a slightly moistened soft
cloth.
• Never clean the appliance with abrasive products, as these
would damage the housing.
• Never immerse the motor unit in water or any other liquid.
10
Assembly page 10/44
USK CMM1 - 070323
Page 11
CONSEJOS DE SEGURIDAD
1. LEA TODAS LAS INSTRUCCIONES.
2. Antes de utilizar el aparto, compruebe que el voltaje de la red
eléctrica coincide con el aparato.
3. Para protegerse contra una descarga eléctrica, no sumerja el
cable de alimentación, la clavija o el bloque motor en agua o
en otros líquidos.
4. Es siempre necesaria la supervisión cercana cuando este
aparato sea utilizado cerca de niños. Este aparato no debe ser
usado por niños.
5. Desenchufe el aparato siempre que no lo use o antes de
limpiarlo.
6. No toque las partes en movimiento.
7. No opere el aparato si el cable o el enchufe están dañados, o
después de que el aparato ha funcionado inadecuadamente,
se ha caído o ha sido dañado en cualquier manera. El aparato
debe ser llevado al fabricante o a un centro de servicio
autorizado para ser comprobado y reparado.
8. El uso de accesorios que no sean los recomendados o vendidos
por el fabricante puede causar incendios, descargas eléctricas o
lesiones.
9. No use en el exterior.
10. No permita que el cable cuelgue del borde de la mesa o del
mostrador o que toque una superficie caliente.
11. No coloque este aparato sobre o cerca de quemadores de gas
o eléctricos, o dentro de un horno caliente.
12. Mantenga manos, cabellos, ropas, espátulas y otros utensilios
lejos de los batidores y amasadores cuando utilice la batidora
para evitar heridas e/o daños en el aparato.
13. Quite todos los accesorios antes de limpiar el aparato.
14. Las cuchillas de la picadora y de la batidora de varilla están muy
afiladas. Tenga cuidado de no cortarse cuando las manipule.
11
Assembly page 11/44
USK CMM1 - 070323
Page 12

15. Enchufe siempre primero el cable al aparato y después en el
enchufe de la red eléctrica. Para desconectar el aparato,
desenchúfelo.
16. No use este aparato más que para lo que ha sido diseñado.
17. Utilice este exprimidor solo para exprimir frutos blandos (naranja,
limón, pomelo, etc.). No intente exprimir frutos como piñas,
mango, u otros frutos duros y/o muy grandes.
18. Este aparato no puede funcionar de manera continuada, no es
un aparato profesional. Es necesario efectuar pausas a intervalos
regulares. Consulte el punto "Tiempo de utilización" en el modo
de empleo.
19. Es indispensable guardar el aparato limpio, ya que está en
contacto directo con los alimentos.
20. Este aparato está concebido para la extracción de una
pequeña cantidad de zumo, cuya consumición no debe ser muy
tardía. El aparato no está concebido para preparar grandes
cantidades a la vez. Para desconectar el aparato,
desenchúfelo.
21. No intente bloquear los mecanismos de seguridad.
22. Durante el uso de la picadora o de la batidora de varilla,
mantenga las manos u otros utensilios lejos de las cuchillas en
movimiento para evitar heridas o daños al aparato. Puede utilizar
un raspador sólo cuando el aparato esté desenchufado.
23. Cuando mezcle líquidos, especialmente líquidos calientes, utilice
un recipiente alto o prepare pequeñas cantidades de una vez
para evitar salpicaduras.
GUARDE ESTAS INSTRUCCIONES
INFORMACIÓN SOBRE EL ENCHUFE POLARIZADO
Para reducir el riesgo de choque eléctrico, este aparato tiene un
enchufe polarizado (una pata es más ancha que la otra).
Como medida de seguridad, este enchufe calza en el
tomacorriente polarizado de una sola manera. Si el enchufe no
cabe totalmente en el tomacorriente, gire el enchufe. Si aún así no
calza, consulte a un servicio técnico cualificado. No intente anular
esta característica de seguridad.
12
Assembly page 12/44
USK CMM1 - 070323
Page 13

INSTRUCCIONES DEL CABLE
El cable de alimentación del aparato es un cable corto a fin de
disminuir el riesgo de accidentes (caídas al tropezar con él, etc.)
Puede utilizar un alargador si es necesario.
• Asegúrese de que el nivel eléctrico del cable es igual o mayor
que el indicado. Una extensión con un bajo nivel eléctrico
correría el riesgo de sobrecalentarse y de estropearse.
• Para evitar riesgos colocar de forma tal que los niños no puedan
jalarlo o tropezar con él. Que no arrastre nunca por el suelo.
13
Assembly page 13/44
USK CMM1 - 070323
Page 14

PARTES
1. Bloque motor
2. Tapa para función batidora y exprimidor
3. Cubeta del exprimidor
4. Piña del exprimidor
5. Varilla
6. Tazón de la picadora
7. Base
8. Amasadores
9. Batidores
10. Tapa para función picadora y varilla
11. Tapa de la picadora
12. Botón de expulsión
13. Selector de velocidad
14. Interruptor « Stick » mixer
14
Assembly page 14/44
USK CMM1 - 070323
Page 15

TIEMPO DE UTILIZACIÓN
Este aparato no es para usos profesionales. Es necesario realizar
paradas a intervalos regulares. Para una utilización óptima de su
aparato y evitar el deterioro de su motor, controle el tiempo de
utilización continuada máximo indicado más abajo en “Selección
de las velocidades”. Las pausas de utilización tienen que durar por
los menos 10 minutos.
SELECCIÓN DE LAS VELOCIDADES
Dependiendo del accesorio utilizado, puede seleccionar las
siguientes velocidades:
BATIDORA velocidad 1 a 5 (KB=5 mins)
BATIDORA DE VARILLA velocidad 4 a 5 + interruptor
stick(KB=1min)
PICADORA velocidad 3 a 5 (KB= 1 min)
EXPRIMIDOR Velocidad 1 únicamente (KB= 3 mins)
(KB= XX min dónde xx es el tiempo de uso máximo). Una vez
transcurrido ese tiempo, es preciso hacer una pausa de al menos
diez minutos.
Velocidades ajustables: Coloque el selector de velocidad en la
posición de la velocidad deseada.
UTILIZACIÓN GENERAL
Respete los ensamblajes abajo descritos porque los dispositivos de
seguridad impiden que se utilice el aparato de modo no seguro y
porque el aparato no funcionaria correctamente.
15
Assembly page 15/44
USK CMM1 - 070323
Page 16

UTILIZACIÓN DE LA BATIDORA
Esta función permite batir o amasar alimentos.
• Asegúrese de que el aparato está desenchufado.
• Coloque la tapa de seguridad (2) en la parte superior del bloque
motor asegurándose de que la flecha del bloque motor se
encuentra enfrente del símbolo
Y gírela en el sentido de las agujas del reloj hasta que la flecha
esté alineada con el símbolo
• Acople la base en el bloque motor asegurándose de que la
flecha del bloque motor se encuentra enfrente del símbolo
la base. Y gire el bloque motor en el sentido contrario de las
agujas del reloj hasta que la flecha esté alineada con el símbolo
.
• Si la tapa o la base no están correctamente fijados, la batidora
no se pondrá en marcha.
• Introduzca los batidores o los amasadores en los orificios previstos
para este fin. Tire ligeramente de los batidores para comprobar
que están correctamente fijados.
• Para desmontar la batidora, proceda de modo contrario
excepto por los batidores y amasadores que deben ser
expulsados con el botón de expulsión.
que se encuentra en la tapa.
.
de
16
Assembly page 16/44
USK CMM1 - 070323
Page 17

UTILIZACIÓN DEL EXPRIMIDOR
Con este accesorio se puede preparar zumos de fruta.
• Asegúrese de que el aparato está desenchufado.
• Acople la base en el bloque motor asegurándose de que la
flecha del bloque motor se encuentra enfrente del símbolo
la base. Y gire el bloque motor en el sentido contrario de las
agujas del reloj hasta que la flecha esté alineada con el símbolo
. Si la base no está correctamente fijada, el exprimidor no se
pondrá en marcha.
• Ponga el bloque motor verticalmente en la base.
• Coloque la cubeta del exprimidor en la parte superior del bloque
motor asegurándose de que la flecha del bloque motor se
encuentra en frente del símbolo
gire el accesorio en el sentido de las agujas del reloj hasta que la
flecha esté alineada con el símbolo
• Introduzca la piña en el eje.
• Coloque un recipiente para recoger el zumo debajo del pitorro
de la cubeta.
• Para desmontar el exprimidor, proceda de modo inverso.
ubicado en el accesorio. Y
.
de
17
Assembly page 17/44
USK CMM1 - 070323
Page 18

UTILIZACIÓN DE LA PICADORA
Con este accesorio se puede picar condimentos, fruta seca o
carne. Para picar carne, aconsejase cortarla en pedazos de
antemano.
• Asegúrese de que el aparato está desenchufado.
• Coloque la tapa de seguridad (10) en la parte superior del
bloque motor asegurándose de que la flecha del bloque motor
se encuentra enfrente del símbolo
sentido de las agujas del reloj hasta que la flecha esté alineada
con el símbolo
colocada, será imposible acoplar el bloque motor con la tapa
de la picadora
• Ponga la cuchilla en el eje del tazón de la picadora. Tenga
cuidado de no herirse con la cuchilla ya que está muy afilada.
• Ponga la tapa de la picadora en el tazón asegurándose de que
los salientes de la tapa se introduzcan en las ranuras del tazón.
• Coloque el bloque motor en el eje de la tapa asegurándose de
que la flecha del bloque motor se encuentra enfrente del
símbolo
contrario de las agujas del reloj hasta que la flecha esté
alineada con el símbolo
• Para desmontar la picador, proceda de modo inverso.
Nota: Para quitar la tapa del tazón de la picadora, es necesario
apretar las aletas.
• Tenga cuidado cuando limpie la picadora ya que las cuchillas
están muy afiladas.
de la tapa. Y gire el bloque motor en el sentido
. Si la tapa de seguridad no está correctamente
.
de la tapa. Y gírela en el
18
Assembly page 18/44
USK CMM1 - 070323
Page 19

UTILIZACIÓN DE LA BATIDORA DE VARILLA
Con este accesorio se puede triturar alimentos como legumbres
para preparar sopas, y también batir líquidos. Sólo debe ser utilizado
en posición vertical y con las cuchillas hacia abajo.
• Asegúrese de que el aparato está desenchufado.
• Coloque la tapa de seguridad (10) en la parte superior del
bloque motor asegurándose de que la flecha del bloque motor
se encuentra enfrente del símbolo
en el sentido de las agujas del reloj hasta que la flecha esté
alineada con el símbolo
correctamente colocada, será imposible acoplar la varilla con el
bloque motor.
• Inserte la varilla en el orificio asegurándose de que la flecha del
bloque motor se encuentra enfrente del símbolo
Encaje la varilla y gírela simultáneamente en el sentido contrario
de las agujas del reloj hasta que la flecha esté alineada con el
símbolo
• Para desmontar la batidora de varilla, proceda de modo inverso.
• Tenga cuidado cuando limpie la varilla ya que las cuchillas están
muy afiladas.
• Nota : el stick mixer debe utilizarse con las velocidades 4 o 5 y
con el botón “stick”. Si quiere triturar comida, ponga su aparato
en velocidad 4 o 5 y pulse el botón « stick ». Al relajar ese botón,
el aparato se para. Siempre tenga cuidado de poner el selector
. Compruebe el cierre tirando de la varilla.
. Si la tapa de seguridad no está
de la tapa. Y gire la tapa
de la varilla
19
Assembly page 19/44
USK CMM1 - 070323
Page 20

de velocidad en posición « 0 » para evitar que se utilice otros
accesorios a velocidades inadaptadas, lo que puede ser
peligroso.
LIMPIEZA
• Desenchufe siempre el aparato de la red antes de limpiarlo.
• Quite los accesorios antes de limpiarlos con agua y detergente.
Evite utilizar esponjas abrasivas para limpiar las partes de plástica.
Pase los accesorios por agua y déjelos secar antes de volver a
utilizarlos. No los ponga en el lavavajillas.
• Pase su aparato con un papel absorbente o un trapo suave y
ligeramente húmedo.
• No limpie nunca el aparato con productos abrasivos que
podrían dañar el revestimiento.
• No sumerja nunca el bloque motor en el agua o en cualquier
otro líquido.
20
Assembly page 20/44
USK CMM1 - 070323
Page 21

CONSIGNES DE SECURITE
1. LISEZ L’ENSEMBLE DES INSTRUCTIONS.
2. Avant d'utiliser l'appareil, vérifiez que la tension du réseau
correspond bien à celle notée sur la plaque signalétique de votre
appareil.
3. Pour écarter les risques d’électrocution, n'immergez pas le
cordon, la fiche ou le bloc moteur dans l'eau ou dans tout autre
liquide.
4. Faites particulièrement attention lorsque I’appareil est utilisé par
ou en présence d’enfants.
5. Débranchez l'appareil de la prise murale lorsqu’il n’est pas utilisé
ou avant de le nettoyer.
6. Evitez de toucher les parties en mouvement.
7. Ne faites pas fonctionner l'appareil si son cordon ou sa fiche est
endommagé ou si l'appareil a présenté un dysfonctionnement
ou est endommagé. Retournez l’appareil au centre de service
autorisé pour le faire vérifier ou réparer.
8. L'utilisation d’accessoires non recommandés ou vendus par le
fabricant présente des risques d’incendie, d’électrocution ou de
blessure.
9. N'utilisez pas l'appareil à l'extérieur.
10. Ne laissez pas le cordon pendre de la table ou d'un comptoir et
évitez qu’il touche une surface chaude.
11. Ne placez pas l'appareil sur ou près d'un brûleur à gaz ou
électrique ou dans un four chaud.
12. Gardez mains, cheveux, vêtements, spatules et autres ustensiles à
distance des fouets et des malaxeurs lorsque vous utilisez le
batteur pour éviter de vous blesser et/ou d’endommager
l’appareil.
13. Retirez tous les accessoires avant de nettoyer l’appareil.
14. Les lames du hachoir et du pied mixer sont très tranchantes.
Prenez garde de ne pas vous couper en les manipulant.
15. Insérez toujours le cordon d'abord dans l'appareil et ensuite dans
la prise murale. Pour déconnecter l'appareil, débranchez-le.
21
Assembly page 21/44
USK CMM1 - 070323
Page 22

16. N'utilisez pas cet appareil à des fins autres que celles pour
lesquelles il est conçu.
17. N’utilisez ce presse-fruits que pour extraire le jus des fruits tendres
(orange, citrons, pamplemousses,...). N’essayez pas d’extraire le
jus de fruits comme les ananas, les mangues ou autres fruits trop
durs et/ou trop grands.
18. Ce genre d’appareil ne peut fonctionner de façon continue, il ne
s’agit pas d’un appareil de type professionnel. Il est nécessaire
d’effectuer des pauses à intervalles réguliers. Consultez la
rubrique « Intervalles d’utilisation » du mode d’emploi.
19. Il est indispensable de garder cet appareil propre étant donné
qu’il est en contact direct avec la nourriture.
20. L’appareil est conçu pour l’extraction d’une petite quantité de
jus dont la consommation ne doit pas être trop tardive. L’appareil
n’est pas conçu pour la préparation de grandes quantités à la
fois.
21. Pour déconnecter l'appareil, débranchez-le.
22. N’essayez pas bloquer les mécanismes de sécurité.
23. Lors des préparations avec le hachoir ou le pied mixer, maintenez
vos mains ou tout autre ustensile à distance des lames en
mouvement pour éviter tout risque de blessure ou
d’endommagement de l’appareil. Vous pouvez utiliser un grattoir
uniquement lorsque l'appareil est hors tension.
24. Lorsque vous mixez des liquides, en particulier des liquides
chauds, utilisez un récipient haut ou préparez de petites quantités
à la fois pour éviter les éclaboussures.
CONSERVEZ CES INSTRUCTIONS
CONSIGNES CONCERNANT LA FICHE POLARISEE
Ce produit est muni d'une fiche polarisée (une lame plus large que
l'autre). Ce genre de fiche n'entre que d'une façon dans une prise
polarisée, afin de minimiser les risques de chocs électriques. Si vous
n'arrivez pas à enfoncer la fiche à fond dans la prise, retournez la
fiche et réessayez. Si cela ne fonctionne toujours pas, faites appel à
un service qualifié compétent. N'essayez jamais de modifier la fiche!
22
Assembly page 22/44
USK CMM1 - 070323
Page 23

CONSIGNES CONCERNANT LE CORDON
Le cordon d’alimentation de l’appareil est un cordon de type court,
et ce afin de diminuer les risques d’accidents (chute si vous marchez
sur le cordon...). Vous pouvez toutefois utiliser une rallonge si
nécessaire mais:
• Assurez-vous que l'ampérage de la rallonge soit égal ou supérieur
à celui de l'appareil. Une rallonge avec un ampérage inférieur à
celui de l'appareil risquerait de surchauffer et de brûler.
• La rallonge ne doit pas pendre du plan de travail ou de la table
afin d'éviter que les enfants ne le tirent ou trébuchent.
23
Assembly page 23/44
USK CMM1 - 070323
Page 24

DESCRIPTION
1. Bloc moteur
2. Couvercle pour fonction batteur et presse-agrumes
3. Filtre du presse-agrumes
4. Cône du presse-agrumes
5. Pied mixer
6. Bol du hachoir
7. Base
8. Malaxeurs
9. Fouets
10. Couvercle pour fonction hachoir et pied mixeur
11. Couvercle du hachoir
12. Bouton d’éjection
13. Sélecteur de vitesses
14. Interrupteur « Stick » mixer
24
Assembly page 24/44
USK CMM1 - 070323
Page 25

INTERVALLES D’UTILISATION
Cet appareil ne peut être utilisé de façon professionnelle. Vous
devez respecter les pauses de fonctionnement. Dans le cas
contraire vous risqueriez d’endommager le moteur. Référez-vous aux
indications données ci-dessous dans « Sélection des vitesses » pour
connaître la durée maximale d’utilisation continue. Les pauses de
fonctionnement doivent durer au moins 10 minutes.
SELECTION DES VITESSES
Selon l’accessoire utilisé, vous pouvez utiliser les vitesses suivantes :
BATTEUR vitesses 1 à 5 + (KB=5 mins)
PIED MIXER: vitesses 4 à 5 + interrupteur stick (KB=1min)
HACHOIR: vitesses 3 à 5 (KB=1 min)
PRESSE-AGRUMES: vitesse 1 uniquement (KB = 3 mins)
(KB= XX min où xx est la durée maximale). Après avoir utilisé votre
mixer pendant ce temps, faites une pause d’au moins 10 minutes)
Vitesses réglables: placez le sélecteur de vitesse sur la position de la
vitesse que vous désirez.
UTILISATION GENERALE
Veuillez respecter les assemblages définis ci-dessous car des
dispositifs de sécurité empêchent tout usage non sûr et votre
appareil ne fonctionnerait pas correctement.
25
Assembly page 25/44
USK CMM1 - 070323
Page 26

UTILISATION DU BATTEUR
Cette fonction permet de battre (fouets) et malaxer (crochets) des
aliments.
• Assurez-vous que l’appareil est débranché.
• Placez le couvercle de sécurité (2) sur le haut du bloc moteur en
vous assurant que la flèche du bloc moteur se trouve en face du
symbole
dans le sens des aiguilles d’une montre jusqu’à ce que la flèche
soit alignée avec le symbole
• Montez la base sur le bloc moteur en vous assurant que la flèche
du bloc moteur se trouve en face du symbole
base. Puis faites tourner le bloc moteur dans le sens inverse des
aiguilles d’une montre jusqu’à ce que la flèche soit alignée avec
le symbole
• Si le couvercle et la base ne sont pas bien placés, le batteur ne
se mettra pas en marche.
• Insérez les fouets ou les malaxeurs dans les orifices prévus à cet
effet. Tirez légèrement sur les fouets pour vous assurer qu’ils sont
bien fixés.
• Pour démonter l’ensemble, procédez de façon inverse si ce n’est
pour les fouets et crochets qui doivent être éjectés à l’aide du
bouton d’éjection (12).
situé sur le couvercle. Puis faites tourner le couvercle
.
situé sur la
.
26
Assembly page 26/44
USK CMM1 - 070323
Page 27

UTILISATION DU PRESSE-AGRUMES
Cet accessoire permet de réaliser des jus de fruits.
• Assurez-vous que l’appareil est débranché.
• Montez la base sur le bloc moteur en vous assurant que la flèche
du bloc moteur se trouve en face du symbole
Puis faites tourner le bloc moteur dans le sens inverse des aiguilles
d’une montre jusqu’à ce que la flèche soit alignée avec le
symbole
. Si la base n’est pas bien placée, le presse-agrumes
ne se mettra pas en marche.
• Posez le bloc moteur verticalement sur sa base.
• Placez la coupelle du presse-agrumes sur le haut du bloc moteur
en vous assurant que la flèche du bloc moteur se trouve en face
du symbole
situé sur l’accessoire. Puis faites tourner la coupelle
dans le sens des aiguilles d’une montre jusqu’à ce que la flèche
soit alignée avec le symbole
.
• Insérez le cône sur l’axe de la coupelle.
• Placez un récipient sous le bec verseur de la coupelle afin de
récupérer le jus.
• Pour démonter l’ensemble, procédez de façon inverse.
situé sur la base.
27
Assembly page 27/44
USK CMM1 - 070323
Page 28

UTILISATION DU HACHOIR
Cet accessoire permet de hacher des condiments des fruits secs ou
de la viande. Pour cette dernière, il est conseillé de la couper en
morceau au préalable.
• Assurez-vous que l’appareil est débranché.
• Placez le couvercle de sécurité (10) sur le haut du bloc moteur en
vous assurant que la flèche du bloc moteur se trouve en face du
symbole
dans le sens des aiguilles d’une montre jusqu’à ce que la flèche
soit alignée avec le symbole
placé, il sera impossible fixer le bloc moteur sur le couvercle du
hachoir.
• Placez la lame sur l’axe du bol du hachoir. Prenez garde de ne
pas vous blesser car elle est très coupante.
• Placez le couvercle du hachoir sur le bol en vous assurant que les
ergots du couvercle s’insèrent bien dans les fentes du bol.
• Positionnez le bloc moteur sur l’axe du couvercle en vous
assurant la flèche du bloc moteur se trouve en face du symbole
situé sur le couvercle. Puis faites tourner le bloc moteur dans le
sens inverse des aiguilles d’une montre jusqu’à ce que la flèche
soit alignée avec le symbole
• Pour retirer le hachoir, procédez de façon contraire.
• Note : Pour retirer le couvercle du bol du hachoir, il est nécessaire
d’appuyer sur ses ailettes.
• Attention lors du nettoyage du hachoir car les lames sont très
coupantes.
situé sur le couvercle. Puis faites tourner le couvercle
. Si le couvercle n’est pas bien
.
28
Assembly page 28/44
USK CMM1 - 070323
Page 29

UTILISATION DU PIED MIXER
cet accessoire permet de mixer des aliments tel que des légumes
pour réaliser des soupes mais aussi pour mélanger des liquides. Il ne
doit être utilisé que dans une position verticale avec les lames
orientée vers le bas.
• Assurez-vous que l’appareil est débranché.
• Placez le couvercle de sécurité (10) sur le haut du bloc moteur en
vous assurant que la flèche du bloc moteur se trouve en face du
symbole
dans le sens des aiguilles d’une montre jusqu’à ce que la flèche
soit alignée avec le symbole
placé, il sera impossible d’insérer le pied mixer dans l’ouverture.
• Insérez le pied dans l’ouverture en vous assurant que la flèche
située sur le bloc moteur se trouve en face du symbole
le pied mixer. Enfoncez le pied mixer et faites-le tourner
simultanément dans le sens inverse des aiguilles d’une montre
jusqu’à ce que la flèche soit alignée avec le symbole
le verrouillage en tirant sur le pied.
• Pour retirer le pied mixer, procédez de façon contraire.
• Attention lors du nettoyage du pied car les lames sont très
coupantes.
• Remarque: le stick mixer doit être utilisé avec les vitesses 4 ou 5 et
avec le bouton « stick ». Lorsque vous mixez de la nourriture ou du
liquide, mettez votre appareil en vitesse 4 ou 5 et appuyez
situé sur le couvercle. Puis faites tourner le couvercle
. Si le couvercle n’est pas bien
situé sur
. Vérifiez
29
Assembly page 29/44
USK CMM1 - 070323
Page 30

ensuite sur le bouton « stick ». Une fois que vous relâchez le
bouton, l’appareil s’arrête. Prenez soin de toujours remettre le
sélecteur de vitesse de votre appareil en position « 0 » après
usage afin d’éviter d’utiliser d’autres accessoires à une vitesse
inadaptée, ce qui peut présenter des risques pour l’utilisateur.
NETTOYAGE
• Veuillez toujours débrancher la fiche de la prise de courant avant
de nettoyer l'appareil.
• Retirez les accessoires avant de les nettoyer dans de l'eau
savonneuse. Evitez les tampons abrasifs pour les matériaux
plastiques. Rincez à l’eau claire et laissez sécher avant un nouvel
usage. Ne les placez pas au lave-vaisselle.
• Essuyez l’appareil à l’aide de papier absorbant ou d’un chiffon
doux légèrement humide.
• Ne nettoyez jamais votre appareil à l’aide de produits abrasifs
car cela abîmerait le revêtement.
• N'immergez pas le bloc moteur dans de l'eau ou tout autre
liquide.
30
Assembly page 30/44
USK CMM1 - 070323
Page 31

PARA A SUA SEGURANÇA
1. LEIA COM ATENÇÃO AS INSTRUÇÕES DE UTILIZAÇÃO.
2. Antes de utilizar o aparelho, confirme que a corrente eléctrica
que vai utilizar é a indicada na placa sinalética que se encontra
na base do aparelho.
3. Para evitar riscos de descargas eléctricas, nunca mergulhe o
cabo da alimentação, a ficha ou o bloco do motor em água ou
outros líquidos.
4. Tenha particular atenção, quando estiver a utilizar o aparelho ou
tenha este ligado à corrente eléctrica, se tiver crianças ou
pessoas que necessitem de ser vigiadas perto do aparelho.
5. Retire a ficha do cabo da alimentação da tomada eléctrica
mural sempre que o aparelho não esteja a ser utilizado ou antes
de o limpar.
6. Evite tocar as partes em movimento.
7. Não utilize o aparelho com a ficha ou o cabo da alimentação
danificados ou se o próprio aparelho apresentar danos. Leve o
aparelho a um centro de assistência técnica credenciado para
verificar ou arranjar os danos que ele apresente.
8. A utilização de acessórios não recomendados ou não vendidos
pelo fabricante pode originar riscos de incêndio, de descargas
eléctricas ou queimaduras.
9. Não utilize o aparelho ao ar livre.
10. Não deixe que o cabo da alimentação fique pendurado ou
toque em qualquer superfície quente.
11. Não coloque o aparelho em cima ou perto de um queimador a
gás ou eléctrico ou de um forno quente.
12. Mantenha as mãos, cabelos, roupa, espátulas e outro utensílios
afastados dos batedores durante a utilização da batedeira. Evite
feridas e/ou danos no aparelho.
13. Retire todos os acessórios antes de limpar o aparelho.
14. As lâminas da picadora e do pé da varinha são muito cortantes.
Tenha cuidado de não ferir-se.
31
Assembly page 31/44
USK CMM1 - 070323
Page 32

15. Insira primeiro a extremidade do cabo da alimentação ao
aparelho e só depois a ficha do cabo na tomada eléctrica
mural. Para desligar o aparelho, retire a ficha do cabo da
alimentação da tomada eléctrica.
16. Não utilize o aparelho para outros fins que aqueles para que foi
concebido.
17. Utilize este espremedor só para extrair o sumo de frutas tenras
(laranjas, limões, toranja,...). Não tente extrair o sumo de frutas
tais como ananás, mangas ou outras frutas demasiado duras
e/ou grandes.
18. Este aparelho não pode funcionar de forma continua. Não é um
aparelho de tipo profissional. É necessário respeitar as pausas
de funcionamento. Veja o parágrafo "Pausas na utilização" do
manual de instruções.
19. Após cada utilização o aparelho tem de ser limpo já que está
em contacto directo com alimentos.
20. O aparelho foi concebido para a preparação de pequenas
quantidades de sumo para que sejam consumidas no momento.
O aparelho não foi concebido para a preparação de grandes
quantidades de alimentos de uma só vez.
21. Para desligar o aparelho, retire a ficha do cabo da alimentação
da tomada eléctrica.
22. Não tente bloquear os mecanismos de segurança.
23. Durante as preparações com a picadora ou o pé da varinha,
mantenha as mãos ou qualquer outros utensílios afastados das
lâminas em movimento. Evite feridas ou danos no aparelho.
Pode utilizar um raspador apenas com a ficha do cabo da
alimentação retirada da tomada eléctrica.
24. Quando misturar líquidos, particularmente líquidos quentes, utilize
um recipiente alto ou prepara pequenas quantidades de uma
vez para evitar salpicos.
32
Assembly page 32/44
USK CMM1 - 070323
Page 33

GUARDE AS INSTRUÇÕES
FICHA POLARIZADA
Para a sua segurança, este aparelho está equipado com uma ficha
polarizada de corrente alterna que contém uma lâmina mais larga
do que a outra. Esta ficha encaixa na tomada apenas de uma
forma única. Se não conseguir introduzir completamente a ficha na
tomada eléctrica, tente pôr a ficha ao contrário. Se ainda assim a
ficha não encaixar, contacte o serviço técnico habilitado para
substituir a tomada eléctrica. Não tente modificar este dispositivo.
CABO DA ALIMENTAÇÃO CURTO
O cabo da alimentação é curto para diminuir riscos de acidentes
como quedas ao pisar o cabo. Se necessário pode utilizar uma
extensão unicamente para o aparelho mas:
• Confirme que a amperagem da extensão é igual ou superior à
exigida pelo aparelho. Se a extensão tiver uma amperagem
inferior à do aparelho, pode provocar sobre aquecimentos e dar
origem a riscos de incêndio.
•
Evite os acidentes verificando que o cabo da extensão eléctrica
não fica pendurado. Evite que as crianças possam puxar ou
tropeçar no cabo.
33
Assembly page 33/44
USK CMM1 - 070323
Page 34

PARTES
1. Bloco do motor
2. Tampa para função batedeira y espremedor de citrinos
3. Bandeja do espremedor de citrinos
4. Cone do espremedor de citrinos
5. Varinha
6. Recipiente da picadora
7. Base
8. Batedores de massas grossas
9. Batedores de massas finas
10. Tampa para função picadora y varinha
11. Tampa da picadora
12. Botão da expulsão
13. Selector de velocidades
14. Interruptor « Stick » varinha
34
Assembly page 34/44
USK CMM1 - 070323
Page 35

PAUSAS NA UTILIZAÇÃO
O aparelho não pode ser utilizado com fins profissionais. Respeite
sempre as pausas de funcionamento. Se assim não proceder pode
originar problemas no motor. Cumpra a indicação inscrita mais
baixo em “Selecção das velocidades” onde encontra o tempo
máximo do funcionamento contínuo. Pausas: durante a utilização
do aparelho as pausas devem ter a duração mínima de10 minutos.
SELECÇÃO DAS VELOCIDADES
Pode utilizar as seguintes velocidades:
BATEDEIRA velocidade 1 a 5 (KB= 5 mins)
PÉ DA VARINHA: velocidade 4 a 5 + interruptor stick
(KB= 1 min)
PICADORA: velocidade 3 a 5 (KB= 1 min)
ESPREMEDOR DE CITRINOS: apenas velocidade 1 (KB = 3 mins)
(KB= xx min onde xx é o tempo máximo). Depois devem fazer uma
pausa de duração mínima de 10 minutos.
Velocidades reguláveis: coloque o selector de velocidades na
posição da velocidade desejada.
UTILIZAÇÃO GERAL
Respeite as instruções de montagem abaixo indicadas porque os
dispositivos de segurança impedem que se utilize o aparelho de
forma não segura e porque o aparelho não funcionaria
correctamente.
35
Assembly page 35/44
USK CMM1 - 070323
Page 36

UTILIZAÇÃO DA BATEDEIRA
Esta função permite bater e amassar alimentos.
• Certifique-se que a ficha do cabo da alimentação está retirada
da tomada eléctrica.
• Coloque a tampa de segurança (2) na parte superior do bloco
do motor verificando que a seta do bloco do motor se encontra
em frente do símbolo
ponteiros do relógio até a seta estiver alinhada com o símbolo
.
• Junte a base do bloco do motor verificando que a seta do
bloco do motor se encontra em frente do símbolo
Gire o bloco do motor no sentido contrário ao dos ponteiros do
relógio até a seta estiver alinhada com o símbolo
• Se a tampa e a base não estiverem correctamente colocadas,
será impossível ligar a batedeira.
• Introduza os batedores de massas finas ou grossas nos orifícios
previstos para este fim. Puxe ligeiramente os batedores para
certificar-se que estão bem fixados.
• Para desmontar a batedeira, proceda de forma contrária
excepto para os batedores que são para ser expulsos com o
botão da expulsão (12).
da tampa. Gire a tampa no sentido dos
da base.
.
36
Assembly page 36/44
USK CMM1 - 070323
Page 37

UTILIZAÇÃO DO ESPREMEDOR DE CITRINOS
Este acessório permite preparar sumos de fruta.
• Certifique-se que a ficha do cabo da alimentação está retirada
da tomada eléctrica.
• Junte a base do bloco do motor verificando que a seta do
bloco do motor se encontra em frente do símbolo
Gire o bloco do motor no sentido contrário ao dos ponteiros do
relógio até a seta estiver alinhada com o símbolo
não estiver correctamente colocada, será impossível ligar o
espremedor de citrinos.
• Ponha o bloco do motor verticalmente na base.
• Coloque a bandeja do espremedor na parte superior do bloco
do motor verificando que a seta do bloco do motor se encontra
em frente do símbolo
da tampa. Gire a bandeja no sentido
contrário ao dos ponteiros do relógio até a seta estiver alinhada
com o símbolo
.
• Introduza o cone no eixo da bandeja.
• Ponha um recipiente por baixo do bico vertedor da bandeja
para recolher o sumo.
• Para desmontar o espremedor de citrinos, proceda de forma
inversa.
da base.
. Se a base
37
Assembly page 37/44
USK CMM1 - 070323
Page 38

UTILIZAÇÃO DA PICADORA
Este acessório permite cortar frutos secos ou picar a carne. Para
picar a carne aconselha-se a cortá-la em pequenos pedaços antes
de a picar.
• Certifique-se que a ficha do cabo da alimentação está retirada
da tomada eléctrica.
• Coloque a tampa de segurança (10) na parte superior do bloco
do motor verificando que a seta do bloco do motor se encontra
em frente do símbolo
ponteiros do relógio até a seta estiver alinhada com o símbolo
. Se a tampa não estiver correctamente colocada, será
impossível juntar o bloco do motor à tampa da picadora.
• Coloque a lâmina no eixo da taça da picadora. Tenha cuidado
de não ferir-se com as lâminas porque estão muito cortantes.
• Coloque a tampa da picadora na taça verificando que as
saliências da tampa se encaixem nas ranhuras da taça.
• Coloque o bloco do motor no eixo da tampa verificando que a
seta do bloco do motor se encontra em frente do símbolo
tampa. Gire o bloco do motor no sentido contrário ao dos
ponteiros do relógio até a seta estiver alinhada com o símbolo
.
• Para retirar a picadora, proceda de forma contrária.
• Nota: Para retirar a tampa da taça da picadora, é preciso
apertar as aletas.
• Tenha cuidado ao limpar a picadora, não se corte com a
lâminas.
da tampa. Gire a tampa no sentido dos
da
38
Assembly page 38/44
USK CMM1 - 070323
Page 39

UTILIZAÇÃO DO PÉ DA VARINHA
Este acessório permite misturar os alimentos como sejam os legumes
cozidos para fazer sopas mas também permite a mistura de líquidos.
Só deve ser utilizado na posição vertical e com as lâminas para
baixo.
• Certifique-se que a ficha do cabo da alimentação está retirada
da tomada eléctrica.
• Coloque a tampa de segurança (10) na parte superior do bloco
do motor verificando que a seta do bloco do motor se encontra
em frente do símbolo
ponteiros do relógio até a seta estiver alinhada com o símbolo
. Se a tampa não estiver correctamente colocada, será
impossível encaixar o pé da varinha no orifício.
• Encaixe o pé da varinha no orifício verificando que a seta do
bloco do motor se encontra em frente do símbolo
varinha. Encaixe o pé da varinha e gire-o simultaneamente no
sentido contrário ao dos ponteiros do relógio até a seta estiver
alinhada com o símbolo
puxando-o ligeiramente.
• Para retirar o pé da varinha, proceda de forma contrária.
• Atenção : na limpeza tenha em atenção que as lâminas são
muito cortantes.
• Nota: o stick varinha deve utilizarse com as velocidades 4 o 5 é
com o botão "stick". Para misturar comida o líquidos, coloque su
aparato em velocidad 4 o 5 y pulse ao botão "stick". Si se solta
ese botão, o aparato se para. Sempre tenha cuidado de
da tampa. Gire a tampa no sentido dos
do pé da
. Certifique-se que está bem unido
39
Assembly page 39/44
USK CMM1 - 070323
Page 40

colocar o selector de velocidades em posiçáo "0" para evitar
que se utilice outros acessórios a velocidades inadaptadas, lo
que pode ser perigoso.
LIMPEZA
• Retire a ficha do cabo da alimentação da tomada eléctrica
antes limpar o aparelho.
• Retire os acessórios antes de os limpar com água em sabonária.
Não utilize esponjas abrasivas para as partes plásticas. Passe-os
por água e deixe-os secar antes de voltar a usá-los. Não ponha
nenhum dos acessórios do aparelho na máquina de lavar louça
• Limpe o aparelho com papel absorvente ou um pano
ligeiramente humedecido.
• Não utilize produtos abrasivos para limpar o aparelho. Poderia
danificar o revestimento.
• Nunca mergulhe o corpo do motor em água ou outros líquidos.
40
Assembly page 40/44
USK CMM1 - 070323
Page 41

41
Assembly page 41/44
USK CMM1 - 070323
Page 42

42
Assembly page 42/44
USK CMM1 - 070323
Page 43

43
Assembly page 43/44
USK CMM1 - 070323
Page 44

K070323
Back cover page (last page)
Assembly page 44/44
 Loading...