

Page 1
Copies of the I/B. Please reproduce them without any
changes except under special instruction from Team
International BELGIUM. The pages must be reproduced and
folded in order to obtain a booklet A5 (+/- 148.5 mm width x
210 mm height). When folding, make sure you keep the good
Fax +32 2 359 95 50
numbering when you turn the pages of the I/B. Don’ t change
the page numbering. Keep the language integrity.
Coffee brewer/ Grinder
Cafetera / Molino de café
USK CCG 19322
www.KALORIK.com
Front cover page (first page)
120V~ 1000W
Ï
Assembly page 1/32
Page 2

Copies of the I/B. Please reproduce them without any
changes except under special instruction from Team
International BELGIUM. The pages must be reproduced and
folded in order to obtain a booklet A5 (+/- 148.5 mm width x
210 mm height). When folding, make sure you keep the good
Fax +32 2 359 95 50
numbering when you turn the pages of the I/B. Don’ t change
the page numbering. Keep the language integrity.
IMPORTANT SAFEGUARDS
1. READ ALL INSTRUCTIONS
2. Check that your mains voltage corresponds to that stated on the
appliance.
3. Do not touch hot surfaces. Use handles or knobs.
4. To protect against electrical shock do not immerse cord, plugs, or
the coffee maker in water or other liquid.
5. Close supervision is necessary when any appliance is used by or
near children.
6. Unplug from outlet when not in use and before cleaning. Allow to
cool before putting on or taking off parts.
7. Do not operate any appliance with a damaged cord or plug or
after the appliance malfunctions or has been damaged in any
manner. Return appliance to the nearest authorized service
facility for examination, repair, or adjustment.
8. The use of accessory attachments not recommended by the
appliance manufacturer may cause injuries.
9. Do not use outdoors.
10. Do not let cord hang over edge of table or counter, or touch hot
surfaces.
11. Do not place on or near a hot gas or electric burner, or in a
heated oven.
12. Extreme caution must be used when moving an appliance
containing hot oil or other hot liquids.
2 USK CCG 19322 - 080626
Assembly page 2/32
Page 3

Copies of the I/B. Please reproduce them without any
changes except under special instruction from Team
International BELGIUM. The pages must be reproduced and
folded in order to obtain a booklet A5 (+/- 148.5 mm width x
210 mm height). When folding, make sure you keep the good
Fax +32 2 359 95 50
numbering when you turn the pages of the I/B. Don’ t change
the page numbering. Keep the language integrity.
13. Always attach plug to appliance first, then plug cord into the wall
outlet. To disconnect, put the switch in off position, then remove
plug from wall outlet.
14. Do not use appliance for other than intended use.
15. Scalding may occur if the lid of the appliance is removed during
the brewing cycles.
16. Make sure the appliance never comes into contact with
inflammable materials such as curtains, textiles, ... when it is in use
as they might catch fire.
17. When removing lime scale, only use special products for the
removal of lime scale. Never use ammonia or any other
substance that might damage your health.
18. Only put ground coffee in the filter.
19. Never use your coffee maker without water in it. If you have a
programmable coffee maker, make sure to fill it with water
before programming it.
Important: never put the jug in a microwave oven to warm up the
coffee. We will not take any responsibility if you do so.
20. Be careful with the blade of the grinder. It is very sharp.
SAVE THESE INSTRUCTIONS
POLARIZED PLUG INSTRUCTIONS
Some appliances are equipped with a polarized plug (one blade is
wider than the other). To reduce the risk of elect ric shock, this plug
will fit into the polarized outlet only one way. If the plug does not
properly fit into the outlet at first, reverse it. If it still does not fit,
3 USK CCG 19322 - 080626
Assembly page 3/32
Page 4

Copies of the I/B. Please reproduce them without any
changes except under special instruction from Team
International BELGIUM. The pages must be reproduced and
folded in order to obtain a booklet A5 (+/- 148.5 mm width x
210 mm height). When folding, make sure you keep the good
Fax +32 2 359 95 50
numbering when you turn the pages of the I/B. Don’ t change
the page numbering. Keep the language integrity.
contact a competent qualified electrician. Do not attempt to modify
the plug in any way.
For appliances equipped with a standard plug , simply insert the plug
into the outlet without paying attention to the way you plug it.
SHORT CORD INSTRUCTIONS
A short power supply cord is provided to reduce the hazards resulting
from becoming entangled in, or tripping over a longer cord.
Extension cords may be used if care is exercised in their use.
• The electrical rating of the extension cord should be at least
that of the appliance. If the electrical rating of the extension
cord is too low, it could overheat and burn.
• The resulting extended cord should be arranged so that it will
not drape over the counter top or tabletop where it can be
pulled on by children or tripped over.
4 USK CCG 19322 - 080626
Assembly page 4/32
Page 5
Copies of the I/B. Please reproduce them without any
changes except under special instruction from Team
International BELGIUM. The pages must be reproduced and
folded in order to obtain a booklet A5 (+/- 148.5 mm width x
210 mm height). When folding, make sure you keep the good
Fax +32 2 359 95 50
numbering when you turn the pages of the I/B. Don’ t change
the page numbering. Keep the language integrity.
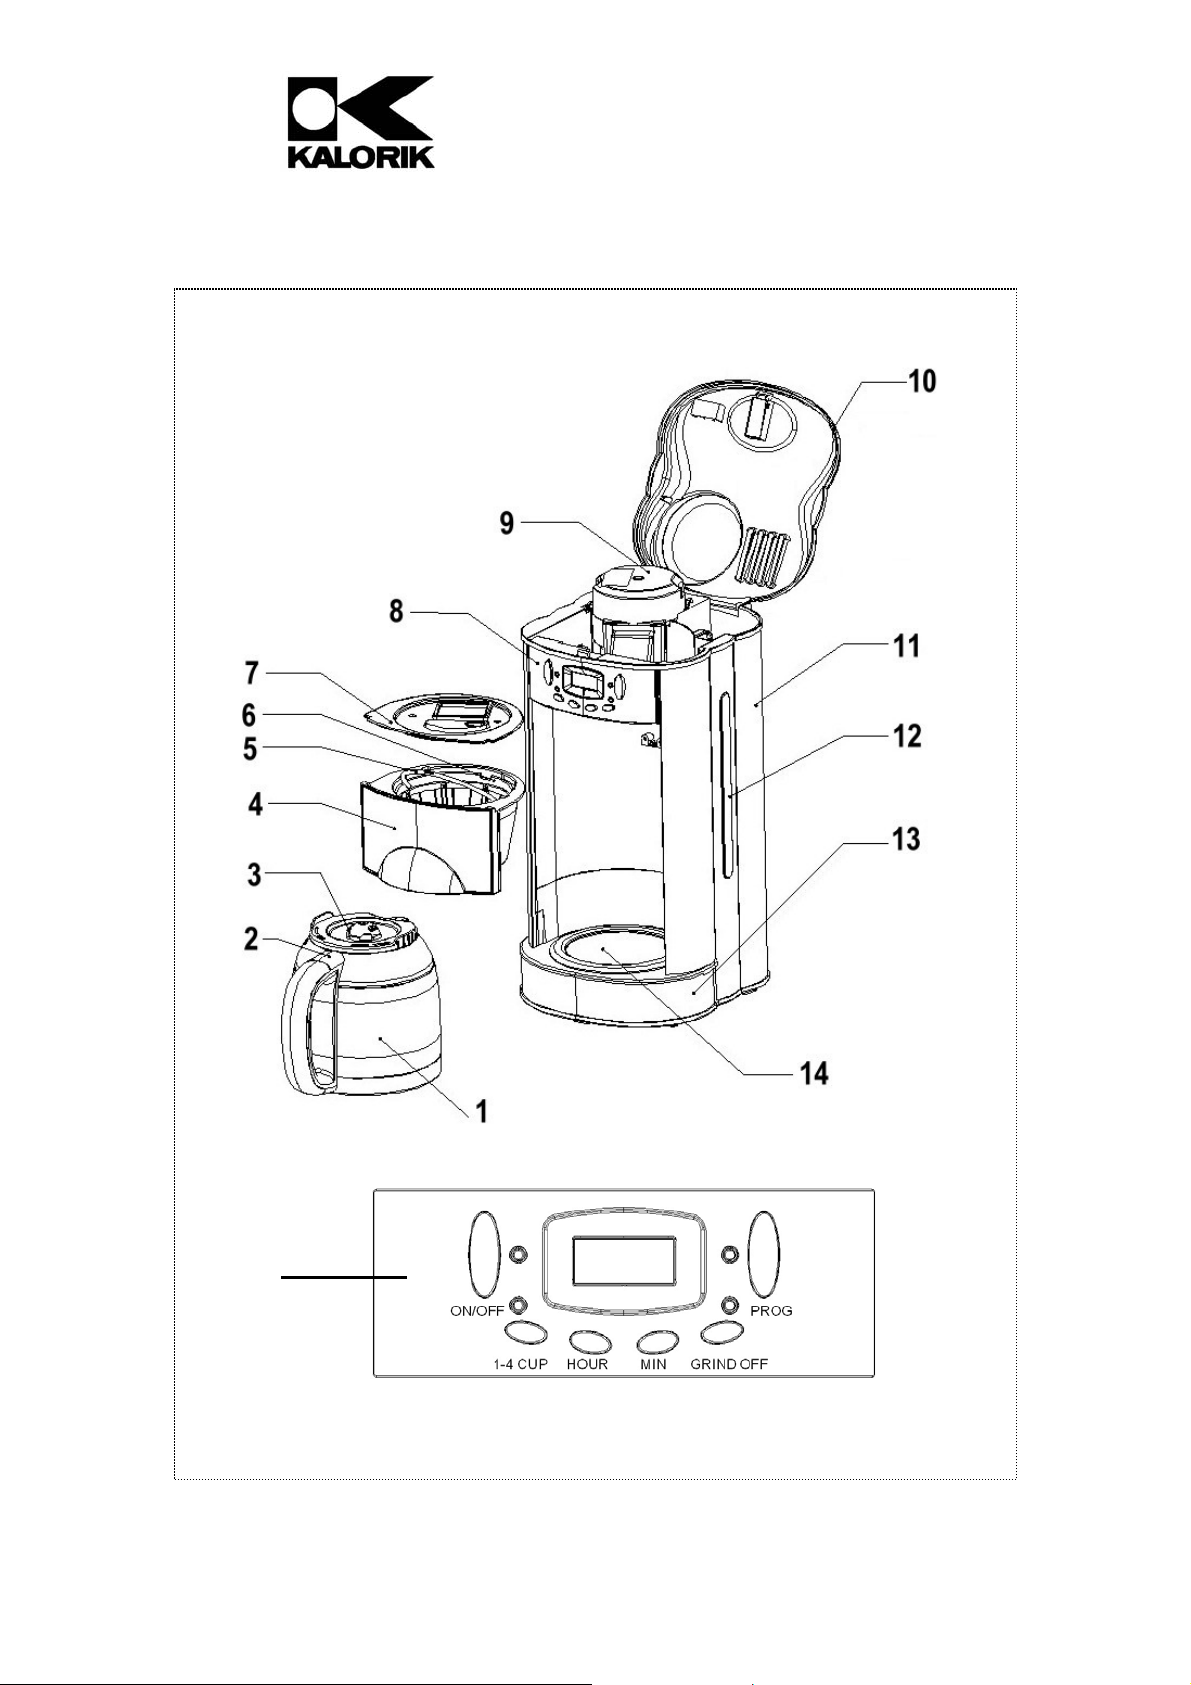
PART DESCRIPTION
8
5 USK CCG 19322 - 080626
Assembly page 5/32
Page 6

Copies of the I/B. Please reproduce them without any
changes except under special instruction from Team
International BELGIUM. The pages must be reproduced and
folded in order to obtain a booklet A5 (+/- 148.5 mm width x
210 mm height). When folding, make sure you keep the good
Fax +32 2 359 95 50
numbering when you turn the pages of the I/B. Don’ t change
the page numbering. Keep the language integrity.
1. Glass jug
2. Jug handle
3. Jug lid
4. Filter holder
5. Handle of the filter
6. Permanent filter
7. Lid of the filter holder
8. Control panel
9. Coffee grinder
10. Water tank lid
11. Water tank
12. Water level indicator
13. Base
14. Hot plate
BEFORE FIRST USE
When you use your appliance for the first time, pour fresh water
•
into the water tank (without coffee), press the GRIND OFF button
and switch on the appliance.
• Once all the water has passed through, switch off the appliance
and let it cool down. When it is cold enough repeat the process 3
times with fresh water.
6 USK CCG 19322 - 080626
Assembly page 6/32
Page 7

Copies of the I/B. Please reproduce them without any
changes except under special instruction from Team
International BELGIUM. The pages must be reproduced and
folded in order to obtain a booklet A5 (+/- 148.5 mm width x
210 mm height). When folding, make sure you keep the good
Fax +32 2 359 95 50
numbering when you turn the pages of the I/B. Don’ t change
the page numbering. Keep the language integrity.
SETTING THE CLOCK
• Plug in your coffee maker. The time "12:00" will be displayed on
the electronic digital clock.
• To set the current time, press the PROG button once and
‘CLOCK’ will be displayed. Then press the HOUR button to set the
hours, and the MIN button to change the minutes.
• Every time you press one of those buttons, the hour or minutes will
increase by 1 unit but if you hold them, the time will roll forward
more quickly.
• When the setting is finished, wait about 15 seconds or press PROG
until CLOCK disappears from the display.
7 USK CCG 19322 - 080626
Assembly page 7/32
Page 8
Copies of the I/B. Please reproduce them without any
changes except under special instruction from Team
International BELGIUM. The pages must be reproduced and
folded in order to obtain a booklet A5 (+/- 148.5 mm width x
210 mm height). When folding, make sure you keep the good
Fax +32 2 359 95 50
numbering when you turn the pages of the I/B. Don’ t change
the page numbering. Keep the language integrity.
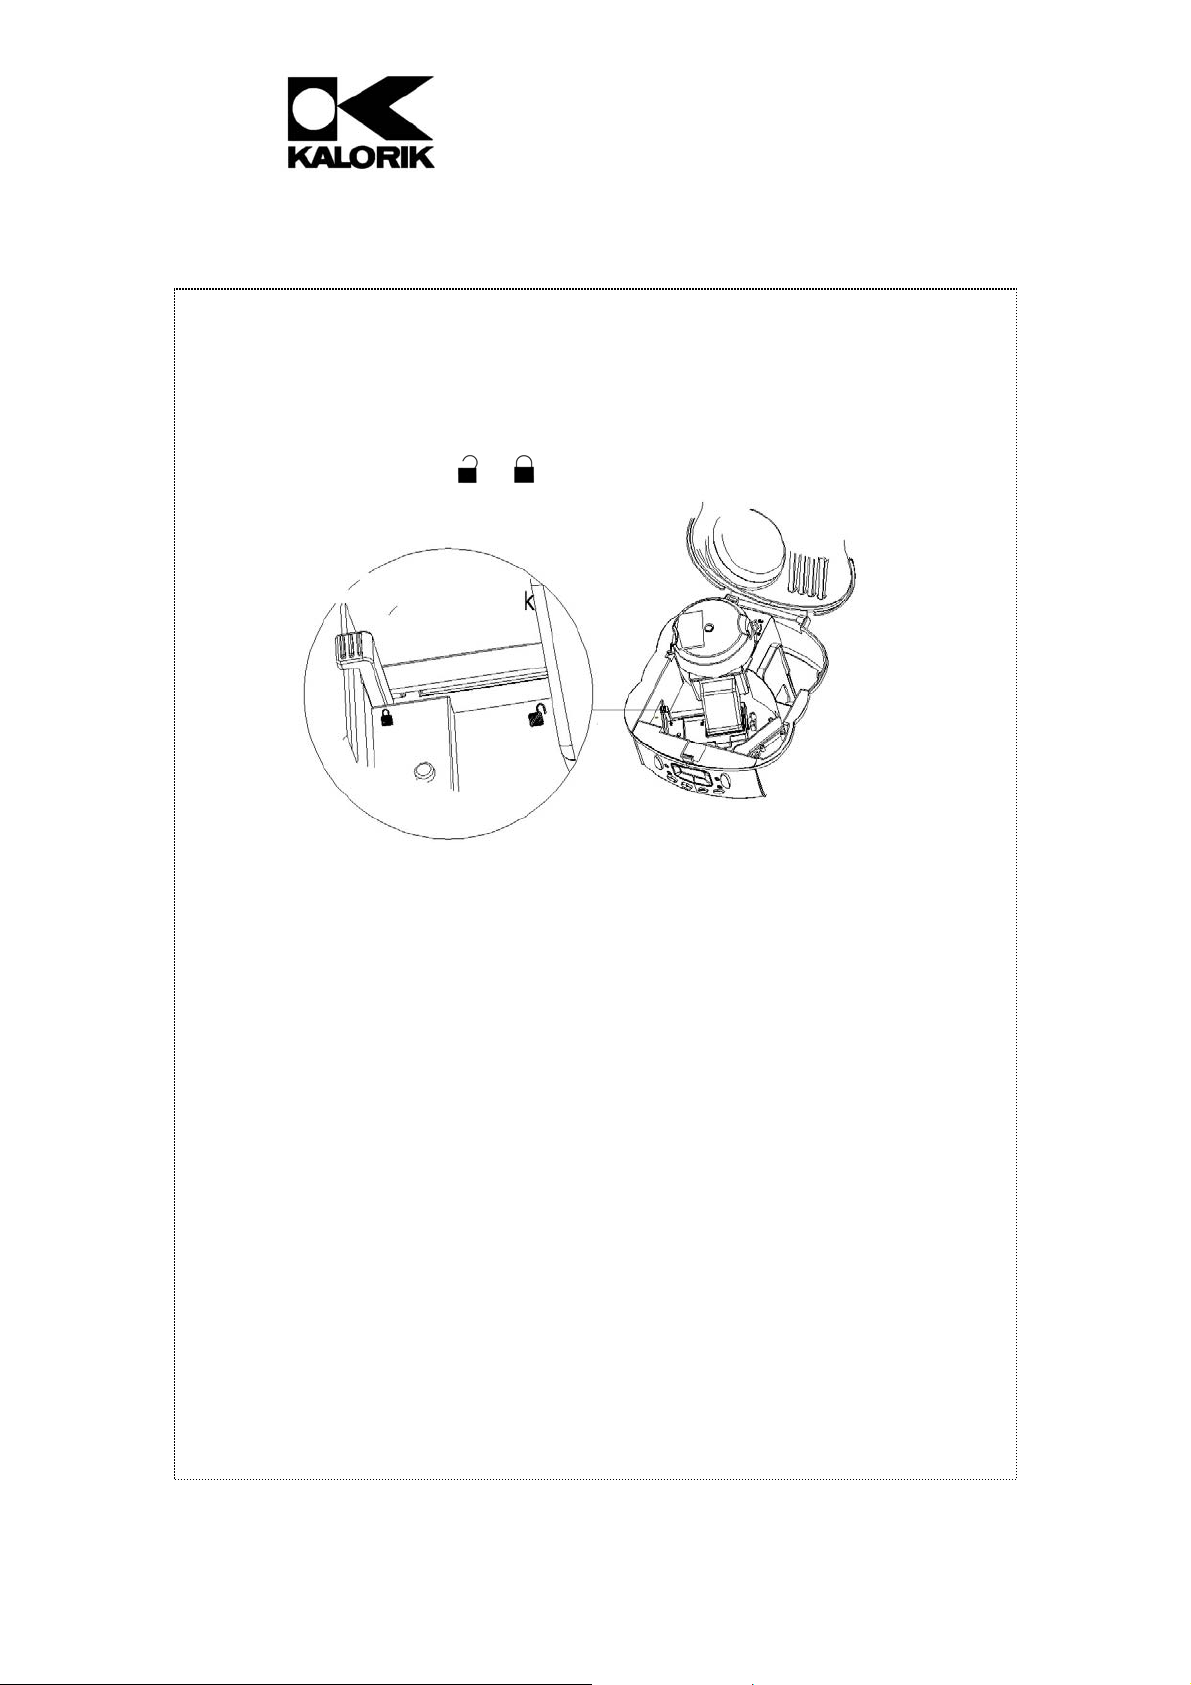
USING THE COFFEE GRINDER
NOTE: Before each use of the coffee grinder, slide the device
allowing the freshly ground coffee to fall directly inside the
permanent filter from
to .
Open the lid of the water tank. •
•
Remove the lid from the coffee grinder and take the coffee
grinder out.
•
Fill it with the desired amount of coffee beans, depending on the
quantity of cups you want to brew. There are 3 marks inside the
coffee beans container indicating the quantity to use to prepare
4, 8 or 10 cups. Do not overfill the coffee grinder.
•
If you want to grind coffee to prepare only 1 to 4 cups of coffee,
press the 1-4 cup button. It will reduce the time of grinding coffee
to 20 seconds instead of 30 seconds for 5 to 10 cups (default
setting).
NOTE: you cannot select the 1-4 cup setting if you have switch off
the coffee grinder by pressing the GRIND OFF button.
•
Place the coffee grinder correctly on its shaft.
8 USK CCG 19322 - 080626
Assembly page 8/32
Page 9
Copies of the I/B. Please reproduce them without any
changes except under special instruction from Team
International BELGIUM. The pages must be reproduced and
folded in order to obtain a booklet A5 (+/- 148.5 mm width x
210 mm height). When folding, make sure you keep the good
Fax +32 2 359 95 50
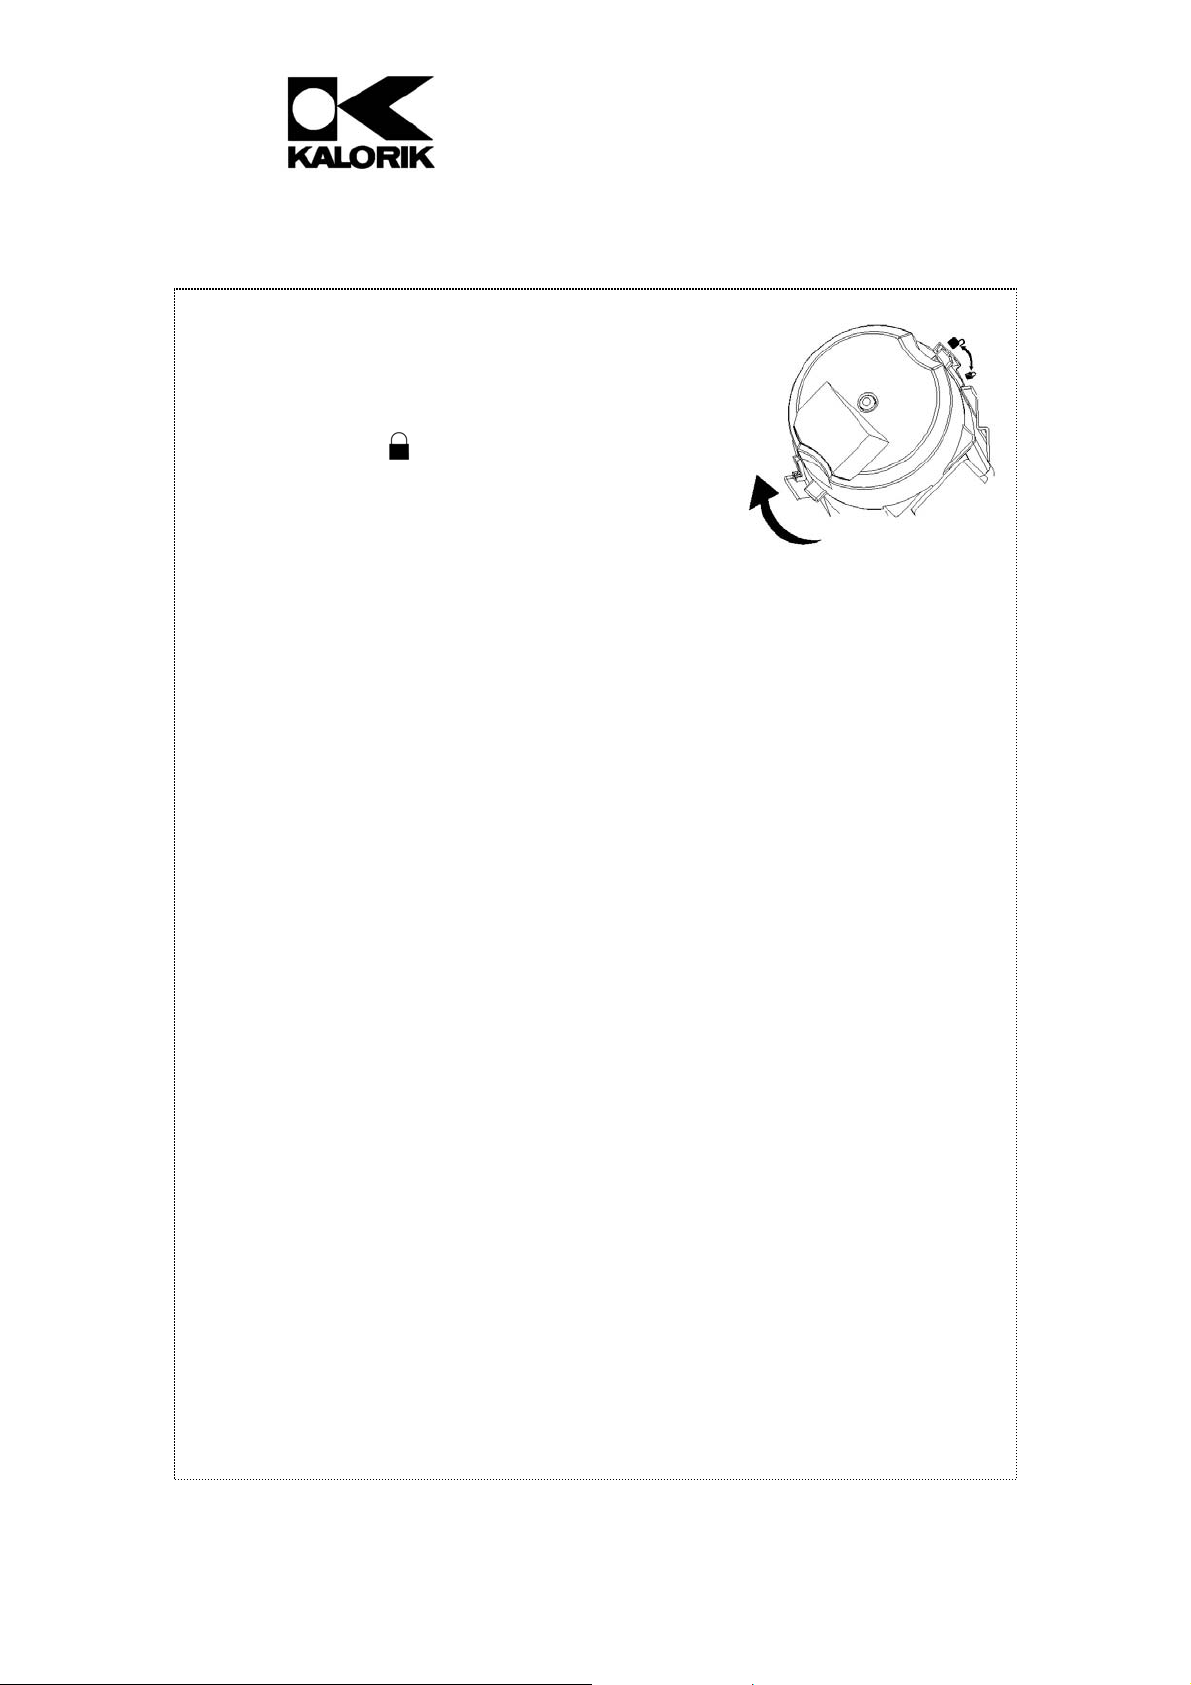
Close the lid of the coffee grinder, making
•
numbering when you turn the pages of the I/B. Don’ t change
the page numbering. Keep the language integrity.
sure the lugs of the lid insert in the slots of
the appliance. The lug should end up in
front of the
symbol located on the
appliance.
• The brewing will start immediately after the
grinding of the coffee. Therefore, make sure
you proceed as indicated in the “MANUAL
OPERATION” section, or the
“PROGRAMMING THE COFFEE MAKER”
section of this user manual.
HINT: when the lid of the water tank and coffee grinder is left open,
beeps will sound and “OPEN” will be displayed on the screen to
remind you that the appliance cannot work with the lid open. We
therefore advise you to fill the water tank and the coffee grinder
before plugging in the appliance.
9 USK CCG 19322 - 080626
Assembly page 9/32
Page 10

Copies of the I/B. Please reproduce them without any
changes except under special instruction from Team
International BELGIUM. The pages must be reproduced and
folded in order to obtain a booklet A5 (+/- 148.5 mm width x
210 mm height). When folding, make sure you keep the good
Fax +32 2 359 95 50
numbering when you turn the pages of the I/B. Don’ t change
the page numbering. Keep the language integrity.
MANUAL OPERATION
• Slide the release / open button of the lid of the water tank and lift
the lid open. Fill the water tank with cold water. The number of
cups can be read on the graduated water tank. Close the lid.
• Pull the filter holder out using its handle, fill the permanent filter
with the desired quantity of ground coffee or use the grinder (see
“USING THE COFFEE GRINDER” section). Then replace the filter
holder in its initial position.
NOTE: If you do not want to use the grinder and decide to fill the
filter with normal ground coffee, press the GRIND OFF button, the
orange pilot light will come on.
NOTE: You cannot switch this “GRIND OFF” function on or off if the
on/off light (Red), or the timer light (Green) are already lighted.
• Make sure the jug is placed correctly on the hotplate.
• To switch on your appliance, press once the ON/OFF switch. The
red pilot light will come on and the coffee will start flowing after a
few seconds.
When you remove the jug from the appliance, a non-drip valve
•
will automatically operate to stop any drops of coffee dripping
onto the hotplate. Replacement of the jug automatically opens
the non-drip valve and allows remaining coffee to filter trough
into the jug.
• Once the water tank is empty, we advise you to wait until the
brewing process is finished and the filter has run empty before
removing the jug.
• You can switch off your appliance anytime simply by pressing the
ON/OFF switch until all pilot lights are off.
10 USK CCG 19322 - 080626
Assembly page 10/32
Page 11

Copies of the I/B. Please reproduce them without any
changes except under special instruction from Team
International BELGIUM. The pages must be reproduced and
folded in order to obtain a booklet A5 (+/- 148.5 mm width x
210 mm height). When folding, make sure you keep the good
Fax +32 2 359 95 50
numbering when you turn the pages of the I/B. Don’ t change
the page numbering. Keep the language integrity.
PROGRAMMING THE COFFEE MAKER
Your coffee maker has a 24 hours timing, but the programmed clock
remains in the memory as long as you do not modify it.
• Check the time displayed on the clock.
• Slide the release button of the lid of the water tank and lift it. Fill
the water tank with cold water. The number of cups can be read
on the graduated water tank. Close the lid.
• Pull the filter holder out using its handle, fill the permanent filter
with the desired quantity of ground coffee or use the grinder (see
“USING THE COFFEE GRINDER” section). Then replace the filter
holder in its initial position.
NOTE: If you do not want to use the grinder and decide to fill the
filter with normal ground coffee, press the GRIND OFF button, the
orange pilot light will come on.
NOTE: You cannot switch this “GRIND OFF” function on or off if the
on/off light (Red), or the timer light (Green) are already lighted.
• Press the PROG button twice successively. The time "12:00" and
‘TIMER" will be displayed on the electronic digital clock.
• Set the desired programming time doing the same as described
for the setting of the clock.
• Once the setting is finished, wait about 15 seconds or press PROG
key until “TIMER” disappears. The programming time will
disappear and will be replaced by the time of the clock.
• Make sure the jug is placed correctly on the hotplate.
• Then press the ON/OFF switch twice successively and the green
PROG pilot light will come on. The coffee machine is ready to
start at the set time.
11 USK CCG 19322 - 080626
Assembly page 11/32
Page 12

Copies of the I/B. Please reproduce them without any
changes except under special instruction from Team
International BELGIUM. The pages must be reproduced and
folded in order to obtain a booklet A5 (+/- 148.5 mm width x
210 mm height). When folding, make sure you keep the good
Fax +32 2 359 95 50
numbering when you turn the pages of the I/B. Don’ t change
the page numbering. Keep the language integrity.
• To check or to modify the programming time, press the PROG
button twice until TIMER appears and it will be displayed. You can
now modify it as you like.
• When your appliance will start at the set time, the green pilot light
will go out and the red ON/OFF pilot light will come on, indicating
that the brewing process has started.
• You can switch off your appliance anytime simply by pressing the
ON/OFF switch until all pilot lights are off.
When you remove the jug from the appliance, a non-drip valve
•
will automatically operate to stop any drops of coffee dripping
onto the hotplate. Replacement of the jug automatically opens
the non-drip valve and allows remaining coffee to filter trough
into the jug.
• Once the water tank is empty, we advise you to wait until the
brewing process is finished and the filter has run empty before
removing the jug.
12 USK CCG 19322 - 080626
Assembly page 12/32
Page 13

Copies of the I/B. Please reproduce them without any
changes except under special instruction from Team
International BELGIUM. The pages must be reproduced and
folded in order to obtain a booklet A5 (+/- 148.5 mm width x
210 mm height). When folding, make sure you keep the good
Fax +32 2 359 95 50
numbering when you turn the pages of the I/B. Don’ t change
the page numbering. Keep the language integrity.
DESCALING AND CLEANING
Descaling the coffee maker prolongs its life span. For
•
decalcification only use products especially made for descaling
of coffee makers and follow their instruction manual carefully.
NOTE: Make sure you press the GRIND OFF button before starting
descaling.
•
Never put any part of the appliance in the dishwasher. Clean the
jug, the filter holder, the permanent filter, the coffee grinder and
its lid with soapy water and rinse them with clear water.
•
IMPORTANT HINT :Regularly check that the coffee grinder grid or
grinder chute is not blocked by coffee powder. If so, clean it with
the small brush located at the end of the measuring spoon.
•
To clean the plastic parts of the appliance and the hot plate, use
a humid, non abrasive cloth.
PRACTICAL HINTS
When you notice that the coffee making process is longer than it
should be it is probably time to decalcify the appliance. Do not wait
for the situation to get worse. The decalcifying frequency depends
on the amount of lime in water and therefore can be different from
a household to another. Therefore it is important to pay attention to
this. A good maintenance of your appliance will prolong its lifespan.
Guarantee claims will not be accepted for the replacement of a
heating element full of scale.
13 USK CCG 19322 - 080626
Assembly page 13/32
Page 14

Copies of the I/B. Please reproduce them without any
changes except under special instruction from Team
International BELGIUM. The pages must be reproduced and
folded in order to obtain a booklet A5 (+/- 148.5 mm width x
210 mm height). When folding, make sure you keep the good
Fax +32 2 359 95 50
numbering when you turn the pages of the I/B. Don’ t change
the page numbering. Keep the language integrity.
WARRANTY
We suggest that you complete and return the enclosed Product
Registration Card promptly to facilitate verification of the date of
original purchase. However, return of the Product Registration Card is
not a condition of these warranties. You can also fill this warranty
card online, at the following address:
www.KALORIK.com
This KALORIK product is warranted for 1 year from the date of
purchase against defects in material and workmanship. This warranty
is not transferable. Keep the original sales receipt. Proof of purchase
is required to obtain warranty performance.
During this period, the KALORIK product that, upon inspection by
KALORIK, is proved defective, will be repaired or replaced, at
KALORIK's option, without charge to the customer. If a replacement
product is sent, it will carry the remaining warranty of the original
product.
This warranty does not apply to any defect arising from a buyer's or
user's misuse of the product, negligence, failure to follow KALORIK
instructions noted in the user’s manual, use on current or voltage
other than that stamped on the product, wear and tear, alteration
or repair not authorized by KALORIK, or use for commercial purposes.
There is no warranty for glass parts, glass containers, filter basket,
blades and agitators, and accessories in general. There is also no
warranty for parts lost by the user.
14 USK CCG 19322 - 080626
Assembly page 14/32
Page 15

Copies of the I/B. Please reproduce them without any
changes except under special instruction from Team
International BELGIUM. The pages must be reproduced and
folded in order to obtain a booklet A5 (+/- 148.5 mm width x
210 mm height). When folding, make sure you keep the good
Fax +32 2 359 95 50
numbering when you turn the pages of the I/B. Don’ t change
the page numbering. Keep the language integrity.
ANY WARRANTY OF MERCHANTABILITY OR FITNESS WITH RESPECT TO
THIS PRODUCT IS ALSO LIMITED TO THE ONE YEAR LIMITED WARRANTY
PERIOD
Some states do not allow limitation on how long an implied warranty
lasts or do not allow the exclusion of incidental or consequential
damages, so the above limitations may not apply to you. This
warranty gives you specific legal rights, and you may also have other
rights which vary from state to state.
If the appliance should become defective within the warranty
period and more than 30 days after date of purchase, do not return
the appliance to the store: often, our Consumer Service
Representatives can help solve the problem without having the
product serviced. If servicing is needed, a Representative can
confirm whether the product is under warranty and direct you to the
nearest service location.
If this is the case, bring the product (or send it, postage prepaid),
along with proof of purchase and indicating a return authorization
number given by our Consumer Service Representatives, to the
nearest authorized KALORIK Service Center (please visit our website
at
www.KALORIK.com or call our Customer Service Department for
the address of the nearest authorized KALORIK Service Center).
If you send the product, please include a letter explaining the nature
of the claimed defect.
15 USK CCG 19322 - 080626
Assembly page 15/32
Page 16

Copies of the I/B. Please reproduce them without any
changes except under special instruction from Team
International BELGIUM. The pages must be reproduced and
folded in order to obtain a booklet A5 (+/- 148.5 mm width x
210 mm height). When folding, make sure you keep the good
Fax +32 2 359 95 50
numbering when you turn the pages of the I/B. Don’ t change
the page numbering. Keep the language integrity.
If you have additional questions, please call our Consumer Service
Department (please see below for complete contact information),
Monday through Friday from 9:00am - 6:00pm (EST). Please note
hours are subject to change.
If you would like to write, please send your letter to:
KALORIK Consumer Service department
Team International Group of America Inc
1400 N.W 159th Street, Suite 102
Miami Gardens, FL 33169 USA
Or call :
Toll Free: +1 888-521-TEAM
Only letters can be accepted at this address above. Shipments and
packages that do not have a return
authorization number will be
refused.
16 USK CCG 19322 - 080626
Assembly page 16/32
Page 17

Copies of the I/B. Please reproduce them without any
changes except under special instruction from Team
International BELGIUM. The pages must be reproduced and
folded in order to obtain a booklet A5 (+/- 148.5 mm width x
210 mm height). When folding, make sure you keep the good
Fax +32 2 359 95 50
numbering when you turn the pages of the I/B. Don’ t change
the page numbering. Keep the language integrity.
CONSEJOS DE SEGURIDAD
1. LEA TODAS LAS INSTRUCCIONES.
2. Antes de utilizar el aparato, compruebe que el voltaje de la red
eléctrica coincide con el del aparato.
3. No toque las superficies calientes. Siempre utilice las asas o los
botones.
4. Para protegerse contra una descarga eléctrica, no sumerja el
aparato o el enchufe en agua o en otros líquidos.
5. Es siempre necesaria la supervisión cercana cuando se utiliza
este aparato cerca de niños. Este aparato no debe ser usado
por niños.
6. Desconecte el aparato de la toma de corriente cuando la
unidad no se encuentra en uso o antes de limpiarla. Deje enfriar
el aparato antes de insertar o sacar accesorios.
7. No opere este y ningún aparato si el cable o el enchufe están
dañados, o después de que el aparato ha funcionado
inadecuadamente o ha sido dañado en cualquier manera. El
aparato debe ser reemplazado por el fabricante o por un centro
de servicio autorizado o por una persona similar cualificada.
8. El uso de accesorios no recomendados por el fabricante puede
causar lesiones.
9. No use en exteriores
10. No permita que el cable cuelgue del borde de la mesa o del
mostrador o toque las partes calientes.
11. No coloque este aparato cerca de quemadores de gas o
eléctricos, o dentro de un horno caliente.
17 USK CCG 19322 - 080626
Assembly page 17/32
Page 18

Copies of the I/B. Please reproduce them without any
changes except under special instruction from Team
International BELGIUM. The pages must be reproduced and
folded in order to obtain a booklet A5 (+/- 148.5 mm width x
210 mm height). When folding, make sure you keep the good
Fax +32 2 359 95 50
numbering when you turn the pages of the I/B. Don’ t change
the page numbering. Keep the language integrity.
12. Tenga mucho cuidado cuando desplace un aparato lleno de
aceite caliente u otros líquidos calientes.
13. Enchufe siempre primero el cable al aparato y después en el
enchufe de la red eléctrica. Para desconectar el aparato,
ponga el interruptor en la posición apagada y desenchufe el
aparato.
14. No use este aparato más que para lo que ha sido diseñado.
15. Pueden ocurrir quemaduras si la tapa se levanta durante el ciclo
de calentamiento.
16. Procure que el aparato no entre en contacto con materiales
fácilmente inflamables como cortinas, tejidos, etc., cuando esté
en funcionamiento, ya que podría provocar un incendio.
17. Si quiere eliminar la cal del aparato utilice solamente un
producto especialmente estudiado para este fin. No utilice
amoniaco o cualquier otro producto que pueda perjudicar la
salud.
18. Ponga sólo café molido en el filtro de café.
19. No haga funcionar la cafetera sin agua. Si su cafetera es
programable, no olvide ponerle agua antes de la programación.
Importante: nunca ponga la jarra en un microondas para
calentar el café. Rehusamos cualquier responsabilidad si no
respete esta instrucción.
20. Tenga cuidado con la cuchilla del molinillo ya que está muy
cortante.
18 USK CCG 19322 - 080626
Assembly page 18/32
Page 19

Copies of the I/B. Please reproduce them without any
changes except under special instruction from Team
International BELGIUM. The pages must be reproduced and
folded in order to obtain a booklet A5 (+/- 148.5 mm width x
210 mm height). When folding, make sure you keep the good
Fax +32 2 359 95 50
numbering when you turn the pages of the I/B. Don’ t change
the page numbering. Keep the language integrity.
GUARDE ESTAS INSTRUCCIONES
INFORMACIÓN SOBRE EL ENCHUFE POLARIZADO
Algunos aparatos están provistos con un enchufe polarizado (una
pata es más ancha que la otra). Para reducir el riesgo de choque
eléctrico, este enchufe calza en el tomacorriente polarizado de una
sola manera. Si el enchufe no cabe totalmente en el tomacorriente,
gire el enchufe. Si aún así no calza, consulte a un servicio técnico
cualificado. No intente anular esta característica de seguridad.
Para los aparatos provistos con un enchufe clásico, basta con
insertar el enchufe en la toma de corriente.
INSTRUCCIONES DEL CABLE
El cable de alimentación del aparato es un cable corto a fin de
disminuir el riesgo de accidentes (caídas al tropezar con él, etc.)
Puede utilizar un alargador si es necesario.
• Asegúrese de que el nivel eléctrico del cable es igual o mayor
que el indicado. Una extensión con un bajo nivel eléctrico
correría el riesgo de sobrecalentarse y de estropearse.
• Para evitar riesgos colocar de forma tal que los niños no puedan
jalarlo o tropezar con él. Que no arrastre nunca por el suelo.
19 USK CCG 19322 - 080626
Assembly page 19/32
Page 20

Fax +32 2 359 95 50
PARTES
Copies of the I/B. Please reproduce them without any
changes except under special instruction from Team
International BELGIUM. The pages must be reproduced and
folded in order to obtain a booklet A5 (+/- 148.5 mm width x
210 mm height). When folding, make sure you keep the good
numbering when you turn the pages of the I/B. Don’ t change
the page numbering. Keep the language integrity.
8
20 USK CCG 19322 - 080626
Assembly page 20/32
Page 21

Fax +32 2 359 95 50
1. Jarra de cristal
2. Asa de la jarra
3. Tapa de la jarra
4. Porta filtro
5. Asa del filtro
6. Filtro permanente
7. Tapa del porta filtro
8. Panel de mandos
9. Molinillo de café
Copies of the I/B. Please reproduce them without any
changes except under special instruction from Team
International BELGIUM. The pages must be reproduced and
folded in order to obtain a booklet A5 (+/- 148.5 mm width x
210 mm height). When folding, make sure you keep the good
numbering when you turn the pages of the I/B. Don’ t change
the page numbering. Keep the language integrity.
10. Tapa del depósito de agua
11. Depósito de agua
12. Indicador del nivel de agua
13. Base
14. Resistencia
ANTES DE LA PRIMERA UTILIZACIÓN
Antes de utilizar el aparato por primera vez, eche agua en el
•
depósito (pero sin poner café), pulse el botón GRIND OFF y
ponga el aparato en marcha.
• Cuando el agua haya pasado, apague el aparato y repita esta
operación 2 veces sucesivas, esperando cada vez que el
aparato haya enfriado.
21 USK CCG 19322 - 080626
Assembly page 21/32
Page 22

Copies of the I/B. Please reproduce them without any
changes except under special instruction from Team
International BELGIUM. The pages must be reproduced and
folded in order to obtain a booklet A5 (+/- 148.5 mm width x
210 mm height). When folding, make sure you keep the good
Fax +32 2 359 95 50
numbering when you turn the pages of the I/B. Don’ t change
the page numbering. Keep the language integrity.
COMO REGULAR EL RELOJ
• Enchufe su aparato. La hora "12:00" aparece en la pantalla del
reloj digital.
• Para ajustar la hora actual, presione el botón PROG y ‘CLOCK’
aparece en la pantalla del reloj digital. Después, presione los
botones HOUR para las horas y MIN para los minutos.
• Las horas y los minutos cambiarán despacio al principio, unidad
por unidad. Si sigue presionando, las horas y los minutos
cambiarán rápidamente.
• Una vez la hora actual aparezca en la pantalla, espere unos 15
segundos y ‘CLOCK’ desaparecerá de la pantalla.
22 USK CCG 19322 - 080626
Assembly page 22/32
Page 23

Copies of the I/B. Please reproduce them without any
changes except under special instruction from Team
International BELGIUM. The pages must be reproduced and
folded in order to obtain a booklet A5 (+/- 148.5 mm width x
210 mm height). When folding, make sure you keep the good
Fax +32 2 359 95 50
numbering when you turn the pages of the I/B. Don’ t change
the page numbering. Keep the language integrity.
UTILIZAR EL MOLINILLO DE CAFÉ
NOTA: Antes de utilizar el molinillo de café, deslice siempre el
dispositivo (desde
hacia ) que permite que el café apenas
molido caiga en el filtro permanente.
Abra la tapa del depósito de agua. •
•
Quite la tapa del molinillo de café y saque el molinillo de café.
•
Llénelo con la cantidad deseada de granos de café, según la
cantidad de tazas que quiere preparar. Los 3 señales en el
recipiente de los granos de café indican la cantidad necesaria
para preparar 4, 8 o 10 tazas. No llene demasiado el molinillo de
café.
•
Si quiere moler café para preparar apenas 1 a 4 tazas de café,
apriete el botón 1-4 cup. El tiempo de moler el café será
entonces de 20 segundos envés de 30 segundos para 5-10 tazas
(ajuste predefinido).
NOTA: no se puede seleccionar la función 1-4 cup si el molinillo
de café está apagado (si el botón GRIND OFF está encendido).
•
Coloque el molinillo de café correctamente en su eje.
23 USK CCG 19322 - 080626
Assembly page 23/32
Page 24

Copies of the I/B. Please reproduce them without any
changes except under special instruction from Team
International BELGIUM. The pages must be reproduced and
folded in order to obtain a booklet A5 (+/- 148.5 mm width x
210 mm height). When folding, make sure you keep the good
Fax +32 2 359 95 50
Cierre la tapa del molinillo, asegurándose
•
numbering when you turn the pages of the I/B. Don’ t change
the page numbering. Keep the language integrity.
de que los salientes de la tapa se
introduzcan en la ranuras del aparato. La
tapa está cerrada cuando el saliente se
encuentra enfrente del símbolo
ubicado
en el aparato.
• En cuanto el café esté molido, la cafetera
se pondrá en funcionamiento. Entonces, es
necesario seguir las instrucciones indicadas
en el párrafo “UTILIZACIÓN MANUAL DE LA
CAFETERA” o en el párrafo ”PROGRAMAR
LA CAFETERA” de este manual.
CONSEJO: cuando la tapa del depósito de agua y del molinillo de
café está abierto, suenan señales y “OPEN” aparecerá en la
pantalla para recordarle que el aparato no puede funcionar con la
tapa abierta. Aconsejamos entonces que llene el depósito de agua
y el molinillo de café antes de enchufar el aparato.
24 USK CCG 19322 - 080626
Assembly page 24/32
Page 25

Copies of the I/B. Please reproduce them without any
changes except under special instruction from Team
International BELGIUM. The pages must be reproduced and
folded in order to obtain a booklet A5 (+/- 148.5 mm width x
210 mm height). When folding, make sure you keep the good
Fax +32 2 359 95 50
numbering when you turn the pages of the I/B. Don’ t change
the page numbering. Keep the language integrity.
UTILIZACIÓN MANUAL DE LA CAFETERA
• Deslice el botón de apertura de la tapa del depósito y levante la
tapa. Llene el depósito con agua fría. El número de tazas que
puede obtener está indicado en el depósito de agua graduado.
Cierre la tapadera.
• Saque el porta filtro tirando de su asa, llene el filtro permanente
con la cantidad deseada de café molido o utilice el molinillo
(véase párrafo “UTILIZAR EL MOLINILLO DE CAFÉ”). Luego vuelva a
colocar el porta-filtro en su lugar inicial.
NOTA: Si no quiere utilizar el molinillo de café y decida llenar el
filtro con café molido normal, pulse el botón GRIND OFF, el
testigo luminoso naranja se encenderá.
NOTA: No puede encender o apagar esta función “GRIND OFF”
si el testigo encendido / apagado (rojo) o el testigo del
temporizador (verde) están ya iluminados.
• Compruebe que la jarra está bien instalada sobre la resistencia.
• Para poner el aparato en marcha, apriete el interruptor ON/OFF.
El testigo luminoso rojo se enciende y el café empieza a verter
después de algunos segundos.
• Puede parar el aparato en cualquier momento, apretando el
interruptor ON/OFF hasta que los testigos luminosos estén
apagados.
Cuando retire la jarra del aparato, una válvula antigoteo se
•
cierre automáticamente para evitar que caiga alguna gota de
café sobre la resistencia. Cuando vuelva a poner la jarra, el
sistema antigoteo se detiene y deja que el café sobrante pase a
la jarra.
• Cuando ya no haya agua en el depósito, espere hasta que el
café deje de pasar antes de retirar la jarra.
25 USK CCG 19322 - 080626
Assembly page 25/32
Page 26

Copies of the I/B. Please reproduce them without any
changes except under special instruction from Team
International BELGIUM. The pages must be reproduced and
folded in order to obtain a booklet A5 (+/- 148.5 mm width x
210 mm height). When folding, make sure you keep the good
Fax +32 2 359 95 50
numbering when you turn the pages of the I/B. Don’ t change
the page numbering. Keep the language integrity.
PROGRAMAR LA CAFETERA
Su cafetera está equipada de un programador de 24 horas, pero la
hora programada se queda en memoria mientras no la cambie.
• Compruebe la hora indicada en el reloj.
• Deslice el botón de apertura de la tapa del depósito y levántela.
Llene el depósito con agua fría. El número de tazas que puede
obtener está indicado en el depósito de agua graduado. Cierre
la tapadera.
• Saque el porta filtro tirando de su asa, llene el filtro permanente
con la cantidad deseada de café molido o utilice el molinillo
(véase párrafo “UTILIZAR EL MOLINILLO DE CAFÉ”). Luego vuelva a
colocar el porta-filtro en su lugar inicial.
NOTA: Si no quiere utilizar el molinillo de café y decida llenar el
filtro con café molido normal, pulse el botón GRIND OFF, el
testigo luminoso naranja se encenderá.
NOTA: No puede encender o apagar esta función “GRIND OFF”
si el testigo encendido / apagado (rojo) o el testigo del
temporizador (verde) están ya iluminados.
• Pulse dos veces el botón PROG. La hora "12:00" y “TIMER”
aparecen en la pantalla del reloj digital.
• Ajuste la hora a la que desea que su cafetera empiece
siguiendo las instrucciones para regular el reloj.
• Una vez el ajuste terminado, espere unos 15 segundos o presione
el botón PROG hasta que “TIMER” desaparezca. La hora
programada desaparecerá y será sustituida por la del reloj.
• Compruebe que la jarra está bien instalada sobre la resistencia.
26 USK CCG 19322 - 080626
Assembly page 26/32
Page 27

Copies of the I/B. Please reproduce them without any
changes except under special instruction from Team
International BELGIUM. The pages must be reproduced and
folded in order to obtain a booklet A5 (+/- 148.5 mm width x
210 mm height). When folding, make sure you keep the good
Fax +32 2 359 95 50
numbering when you turn the pages of the I/B. Don’ t change
the page numbering. Keep the language integrity.
• Presione dos veces el interruptor ON/OFF, el testigo luminoso
verde PROG se enciende. Su cafetera está preparada para
ponerse en marcha automáticamente.
• Para verificar la hora de programación, presione el botón PROG
hasta que “TIMER” aparezca en la pantalla. Puede entonces
modificar la hora de programación como quiera.
• Cuando se llega a la hora programada, la cafetera empieza a
funcionar automáticamente y el testigo luminoso rojo ON/OFF se
enciende.
• Puede parar el aparato en cualquier momento, apretando el
interruptor ON/OFF hasta que los testigos luminosos estén
apagados.
Cuando retire la jarra del aparato, una válvula antigoteo se
•
cierre automáticamente para evitar que caiga alguna gota de
café sobre la resistencia. Cuando vuelva a poner la jarra, el
sistema antigoteo se detiene y deja que el café sobrante pase a
la jarra.
• Cuando ya no haya agua en el depósito, espere hasta que el
café deje de pasar antes de retirar la jarra.
27 USK CCG 19322 - 080626
Assembly page 27/32
Page 28

Copies of the I/B. Please reproduce them without any
changes except under special instruction from Team
International BELGIUM. The pages must be reproduced and
folded in order to obtain a booklet A5 (+/- 148.5 mm width x
210 mm height). When folding, make sure you keep the good
Fax +32 2 359 95 50
numbering when you turn the pages of the I/B. Don’ t change
the page numbering. Keep the language integrity.
DESCALCIFICACIÓN Y LIMPIEZA
Le aconsejamos desincrustar su aparato con regularidad para
•
conservar la cafetera en buen estado. Para ello, utilice un
desincrustante para cafeteras eléctricas que venden en el
mercado y siga sus instrucciones.
NOTA: No olvide presionar el botón GRIND OFF antes de empezar
la descalcificación.
•
No introduzca ninguna parte del aparato en el lavavajillas.
Limpie la jarra, el porta filtro, el filtro permanente, el molinillo de
café y su tapa con agua caliente jabonosa y páselos por agua
clara.
•
CONSEJO IMPORTANTE: Compruebe regularmente que la rejilla
del molinillo de café o que el receptáculo no esté tapada por
café molido. Si fuera el caso, límpiela con el pequeño cepillo
que se encuentra en la extremidad de la cuchara medidora.
•
Para limpiar las partes en plástico y la resistencia, utilice una
esponja no abrasiva o un paño húmedo.
CONSEJOS PRÁCTICOS
Cuando empiece a notar que el café tarda en pasar más tiempo
de lo habitual, decalcifique su aparato y no espere, sobre todo, a
que la situación se agrave. La frecuencia de desincrustación
depende de la dureza del agua y varia entonces de una casa a
otra. Es muy importante comprobar regularmente que no se forme
cal en su cafetera. El mantenimiento de su cafetera es importante
para la duración de vida de su aparato. Tenga en cuenta que la
garantía no cubre los deterioros causados por el mal uso, ni el
recambio de la resistencia por estar cubierta de cal.
28 USK CCG 19322 - 080626
Assembly page 28/32
Page 29

Copies of the I/B. Please reproduce them without any
changes except under special instruction from Team
International BELGIUM. The pages must be reproduced and
folded in order to obtain a booklet A5 (+/- 148.5 mm width x
210 mm height). When folding, make sure you keep the good
Fax +32 2 359 95 50
numbering when you turn the pages of the I/B. Don’ t change
the page numbering. Keep the language integrity.
GARANTÍA
Le sugerimos rellenen y nos envíen rápidamente la Tarjeta adjunta
de Registro de Producto adjunto para facilitar la verificación de la
fecha de compra. Por lo tanto, la devolución de esa Tarjeta de
Registro de Producto no es una condición imprescindible para la
aplicación de esa garantía. Puede también rellenar esa carta de
garantía en línea en la dirección siguiente :
www.KALORIK.com
A partir de la fecha de compra, este producto KALORIK está
garantizado un año contra los defectos materiales y de fabricación.
Esta garantía no es transferable. Conserve la prueba de compra
original. Se exige una prueba de compra para obtener la aplicación
de la garantía.
Durante este périodo, si el producto KALORIK que, después de una
inspección por parte de KALORIK, se manifiesta defectuoso, será
reparado o reemplazado, según lo que decida KALORIK, sin gastos
para el consumidor. Si se envía un producto de reemplazamiento, se
aplicará la garantía que queda del producto original.
Esta garantía no se aplica a los defectos causados por una mala
utilización por parte del comprador o del utilizador, a una
negligencia, al no respeto del manual de instrucciones KALORIK, a
una utilización en un circuito eléctrico cuyo voltaje es diferente al
que figura en el producto, a un desgaste normal, a modificaciones
o reparaciones no autorizadas por KALORIK, o por un uso con fines
comerciales. No existe garantía por las partes de cristal, jarras de
cristal, filtros, cestos, hojas y accesorios en general. No existe
tampoco garantía por las piezas perdidas por el utilizador.
29 USK CCG 19322 - 080626
Assembly page 29/32
Page 30

Copies of the I/B. Please reproduce them without any
changes except under special instruction from Team
International BELGIUM. The pages must be reproduced and
folded in order to obtain a booklet A5 (+/- 148.5 mm width x
210 mm height). When folding, make sure you keep the good
Fax +32 2 359 95 50
numbering when you turn the pages of the I/B. Don’ t change
the page numbering. Keep the language integrity.
Toda garantía de valor comercial o de adaptabilidad a este
producto está limitada a un año también.
Algunos estados no ponen límites a la duración de la garantía tácita
o no autorizan la exclusión de daños y perjuicios accesorios o
indirectos, por lo que puede que las restricciones anteriormente
mencionadas no le sean aplicables a Usted. Esta garantía le otorga
derechos legales particulares, pero usted puede tener también otros
derechos que varían de un estado a otro y algunos derechos
pueden variar de un estado a otro.
Si el aparato tuviera un defecto durante el periodo de garantía y
más de 30 días después de que se compró, no devuelva el aparato
en la tienda donde le compró : a menudo, nuestro Servicio al
Consumidor puede ayudar a resolver el problema sin que el
producto tenga que ser reparado. Si hace falta una reparación, uno
de nuestros representantes puede confirmar si el producto está bajo
garantía y dirigirle al servicio post-venta lo más próximo.
Si fuera el caso, traiga el producto (o envíalo, correctamente
franqueado) con la prueba de compra que mencione el número de
autorización de devolución indicado por nuestro Servicio al
Consumidor, al servicio post-venta KALORIK lo más próximo. (Visite
nuestra web
www.KALORIK.com o llame al Servicio al Consumidor
para obtener la dirección del Servicio post-venta KALORIK exclusivo
lo más próximo).
Si envía el producto, le rogamos añadan una carta explicando la
naturaleza del defecto.
30 USK CCG 19322 - 080626
Assembly page 30/32
Page 31

Copies of the I/B. Please reproduce them without any
changes except under special instruction from Team
International BELGIUM. The pages must be reproduced and
folded in order to obtain a booklet A5 (+/- 148.5 mm width x
210 mm height). When folding, make sure you keep the good
Fax +32 2 359 95 50
numbering when you turn the pages of the I/B. Don’ t change
the page numbering. Keep the language integrity.
Si tiene preguntas adicionales, por favor llame al Servicio al
Consumidor (véase abajo para los datos completos), de lunes a
viernes, de las 9 a las 18 (EST). Note que las horas pueden ser
modificadas.
Si quiere escribirnos, puede hacerlo a la dirección siguiente :
KALORIK Servicio al Consumidor
Team International Group of America Inc
1400 N.W 159th Street, Suite 102
Miami Gardens, FL 33169 USA
O llame gratuitamente al +1 888-521-TEAM
Las cartas se aceptan solamente en la dirección anteriormente
mencionada. Los envíos y paquetes que no tengan número de
autorización de devolución serán rechazados.
31 USK CCG 19322 - 080626
Assembly page 31/32
Page 32

Copies of the I/B. Please reproduce them without any
changes except under special instruction from Team
International BELGIUM. The pages must be reproduced and
folded in order to obtain a booklet A5 (+/- 148.5 mm width x
210 mm height). When folding, make sure you keep the good
Fax +32 2 359 95 50
numbering when you turn the pages of the I/B. Don’ t change
the page numbering. Keep the language integrity.
K080626
www.KALORIK.com
Ï
Back cover page (last page)
Assembly page 32/32
 Loading...