

Kalorik USK BSET 1 Operating Instructions Manual
Breakfast set
Set desayuno
Set petit-déjeuner
Set Pequeno-Almoço
USK BSET 1
120V~60Hz 1450W
All manuals and user guides at all-guides.com
all-guides.com
2
USK BSET 1 - 060901
IMPORTANT SAFEGUARDS
When using your appliance, basic safety precautions should always
be followed, including the following:
1. READ ALL INSTRUCTIONS
2. Check that your mains voltage corresponds to that stated on the
appliance.
3. Do not touch hot surfaces. Use handles or knobs.
4. To protect against electrical shock do not immerse cord, plugs, or
the appliance in water or other liquid.
5. Close supervision is necessary when the appliance is used by or
near children.
6. Unplug from outlet when not in use and before cleaning. Allow to
cool before putting on or taking off parts.
7. Do not operate any appliance with a damaged cord or plug or
after the appliance malfunctions or has been damaged in any
manner. Return appliance to the nearest authorized service
facility for examination, repair, or adjustment.
8. The use of accessory attachments not recommended by the
appliance manufacturer may cause injuries.
9. Do not use outdoors.
10. Do not let cord hang over edge of table or counter, or touch hot
surfaces.
11. Do not place on or near a hot gas or electric burner, or in a
heated oven.
12. Always attach plug to appliance first, then plug cord into the wall
outlet. To disconnect, turn any control to off (or 0), then remove
plug from wall outlet.
13. Do not use appliance for other than intended use.
14. Oversize foods, metal foil packages, or utensils must not be
inserted in a toaster as they may involve a risk of fire or electric
shock.
15. A fire may occur if the appliance is covered or touching
flammable material, including curtains, draperies, walls, and the
All manuals and user guides at all-guides.com

3
USK BSET 1 - 060901
like, when in operation. Do not store any item on top of the
appliance when in operation.
16. Extreme caution must be used when moving an appliance
containing hot oil or other hot liquids.
17. Do not clean with metal scouring pads. Pieces can break off the
pad and touch electrical parts involving a risk of electric shock.
18. Extreme caution should be exercised when using containers
constructed of other than metal or glass.
19. Do not store any materials, other than manufacturers
recommended accessories, in this oven when not in use.
20. Do not place any of the following materials in the oven: paper,
cardboard, plastic, and the like.
21. Do not cover crumb tray or any part of the oven with metal foil.
This causes overheating of the oven.
22. Scalding may occur if the lid of the coffee maker is removed
during the brewing cycles.
23. The preheating of the appliance is not necessary.
24. To disconnect the appliance, put all knobs in off (or 0) position
and remove the plug from the wall outlet.
SAVE THESE INSTRUCTIONS
POLARIZED PLUG INSTRUCTIONS
This appliance has a polarized plug (one blade is wider than the
other). To reduce the risk of electric shock, this plug will fit into the
polarized outlet only one way. If the plug does not properly fit into
the outlet at first, reverse it. If it still does not fit, contact a competent
qualified electrician. Do not attempt to modify the plug in any way.
SHORT CORD INSTRUCTIONS
A short power supply cord is provided to reduce the hazards resulting
from becoming entangled in, or tripping over a longer cord.
Extension cords may be used if care is exercised in their use.
• The electrical rating of the extension cord should be at least
that of the appliance. If the electrical rating of the extension
cord is too low, it could overheat and burn.
All manuals and user guides at all-guides.com
4
USK BSET 1 - 060901
• The resulting extended cord should be arranged so that it will
not drape over the counter top or tabletop where it can be
pulled on by children or tripped over.
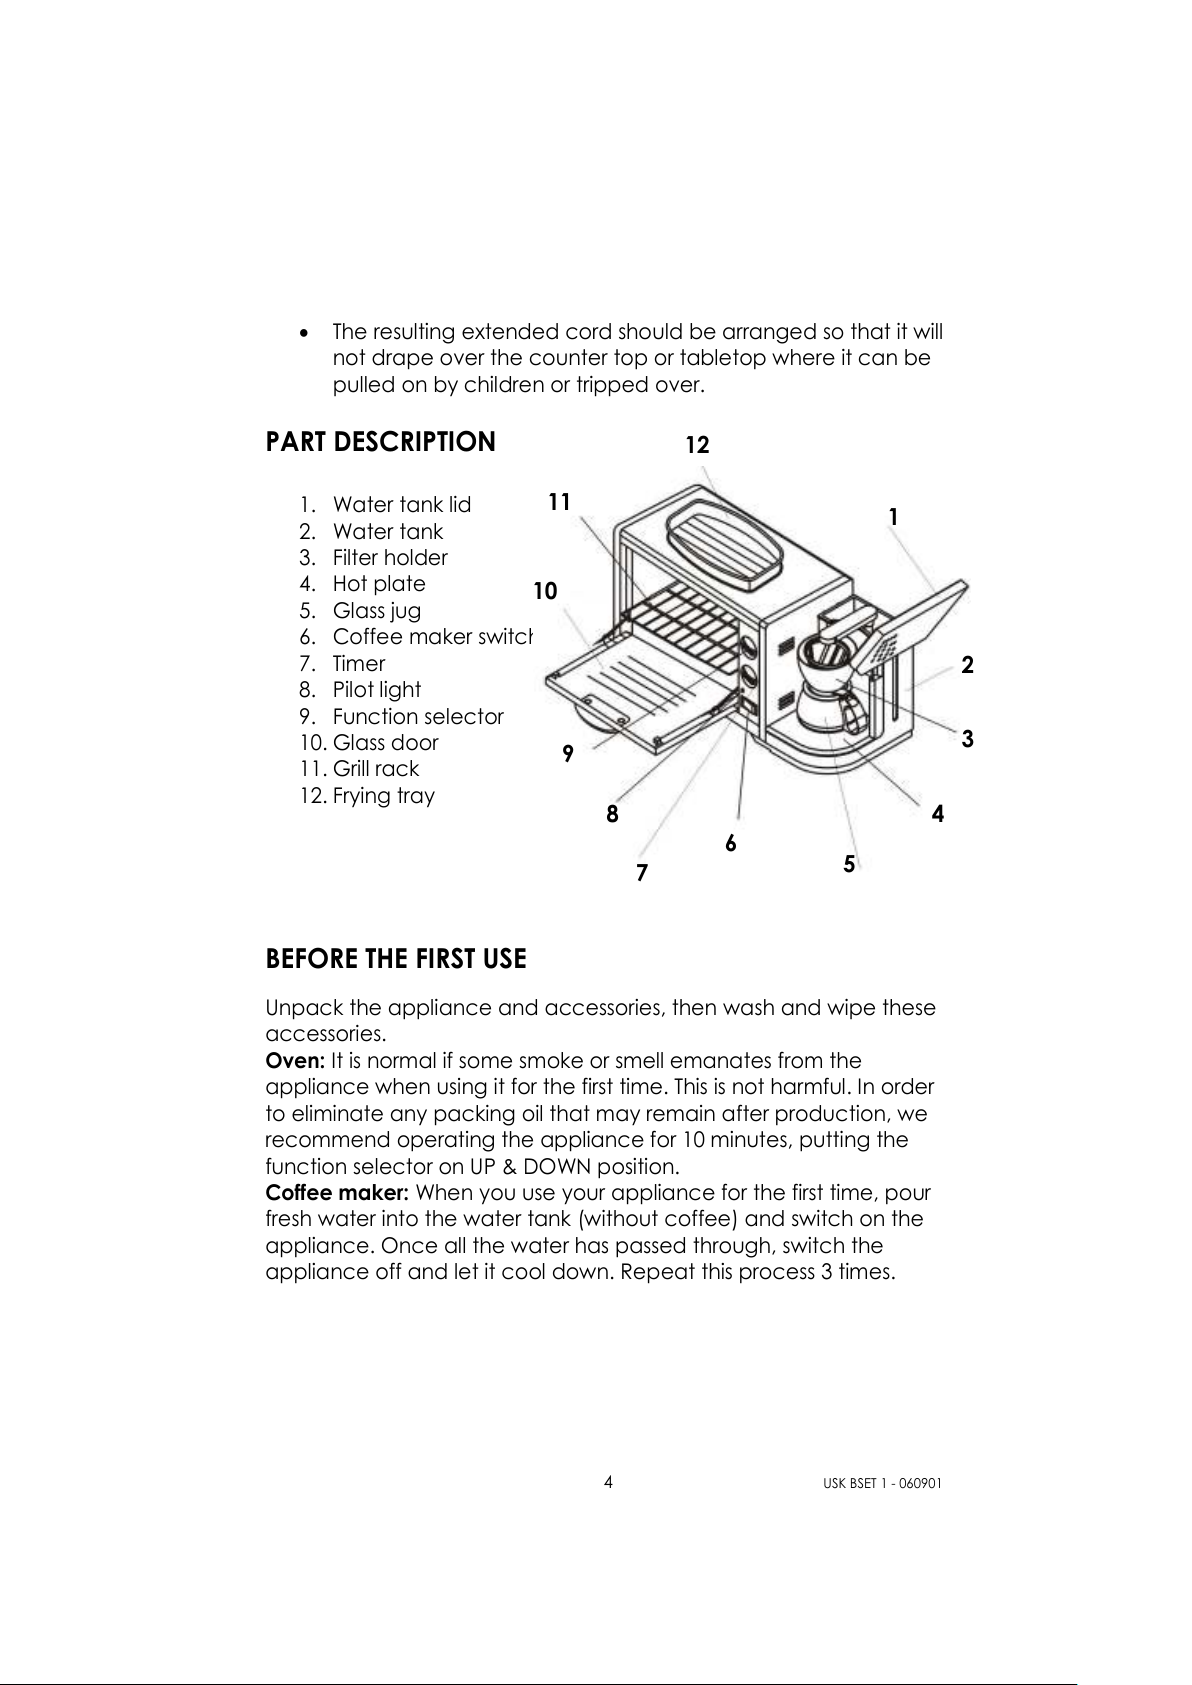
PART DESCRIPTION
1. Water tank lid
2. Water tank
3. Filter holder
4. Hot plate
5. Glass jug
6. Coffee maker switch
7. Timer
8. Pilot light
9. Function selector
10. Glass door
11. Grill rack
12. Frying tray
BEFORE THE FIRST USE
Unpack the appliance and accessories, then wash and wipe these
accessories.
Oven: It is normal if some smoke or smell emanates from the
appliance when using it for the first time. This is not harmful. In order
to eliminate any packing oil that may remain after production, we
recommend operating the appliance for 10 minutes, putting the
function selector on UP & DOWN position.
Coffee maker: When you use your appliance for the first time, pour
fresh water into the water tank (without coffee) and switch on the
appliance. Once all the water has passed through, switch the
appliance off and let it cool down. Repeat this process 3 times.
6
8
9
11
10
1
2
4
3
5
7
12
All manuals and user guides at all-guides.com
5
USK BSET 1 - 060901
HOW TO USE THE OVEN
• Before using the appliance, clean the surface of the trays with a
damp cloth and wipe dry. Put some butter or cooking oil in the
baking tray. The non-stick coating of the frying tray makes the use
of butter or oil optional.
• Put the frying tray in the opening foreseen on top of the oven.
• Put the function selector in OFF position.
• Plug the unit into the power supply socket.
• Turn the function selector to the desired position:
- DOWN: only the lower heating element heats up to bake or
reheat a preparation without roasting it.
- UP & DOWN: both heating elements will heat up to bake and
roast the preparation.
- UP: only the upper heating element heats up in order to roast
the preparation or to heat up the frying tray.
•
Turn the timer knob to choose the required time, indicated in
minutes on the appliance. The pilot light will come on, indicating
that the oven is heating.
• Thanks to the heat resistant glass door, you can check the food
during use, which means you can adjust the cooking setting and
time if necessary according to your own appreciation.
• You can also put food in the frying pan on top of the oven. To fry
the food, make sure the upper heating element is activated.
Even if you do not fry food in the tray, leave the tray on top of the
oven during use, otherwise the oven is open and heat might
escape through the top.
• If you want to stop before the selected time is over, turn the timer
to "0" and put the function selector in OFF position.
•
A sound will be heard when the cooking time has elapsed. The
appliance will switch off automatically. As soon as the food is
ready, turn the function selector to OFF.
• Carefully open the door, preferably using an oven glove.
• Be very careful not to touch the rack or when removing the tray,
as these might be very hot and you might get burned.
All manuals and user guides at all-guides.com
6
USK BSET 1 - 060901
CLEANING AND MAINTENANCE
Switch off the appliance by putting the knobs of the control panel in
OFF, LOW or "0" position. Before cleaning, unplug the appliance from
outlet and allow it to cool down.
Inside cleaning
• Wipe trays with absorbent paper toweling or a soft cloth. To
remove baked on food pour a little cooking oil on the food and
allow to stand for five to ten minutes. This should soften the food
and allow it to be removed with absorbent paper toweling or a
soft cloth.
• If the above method fails to remove the food we suggest wiping
the trays with damp cloth and a little detergent.
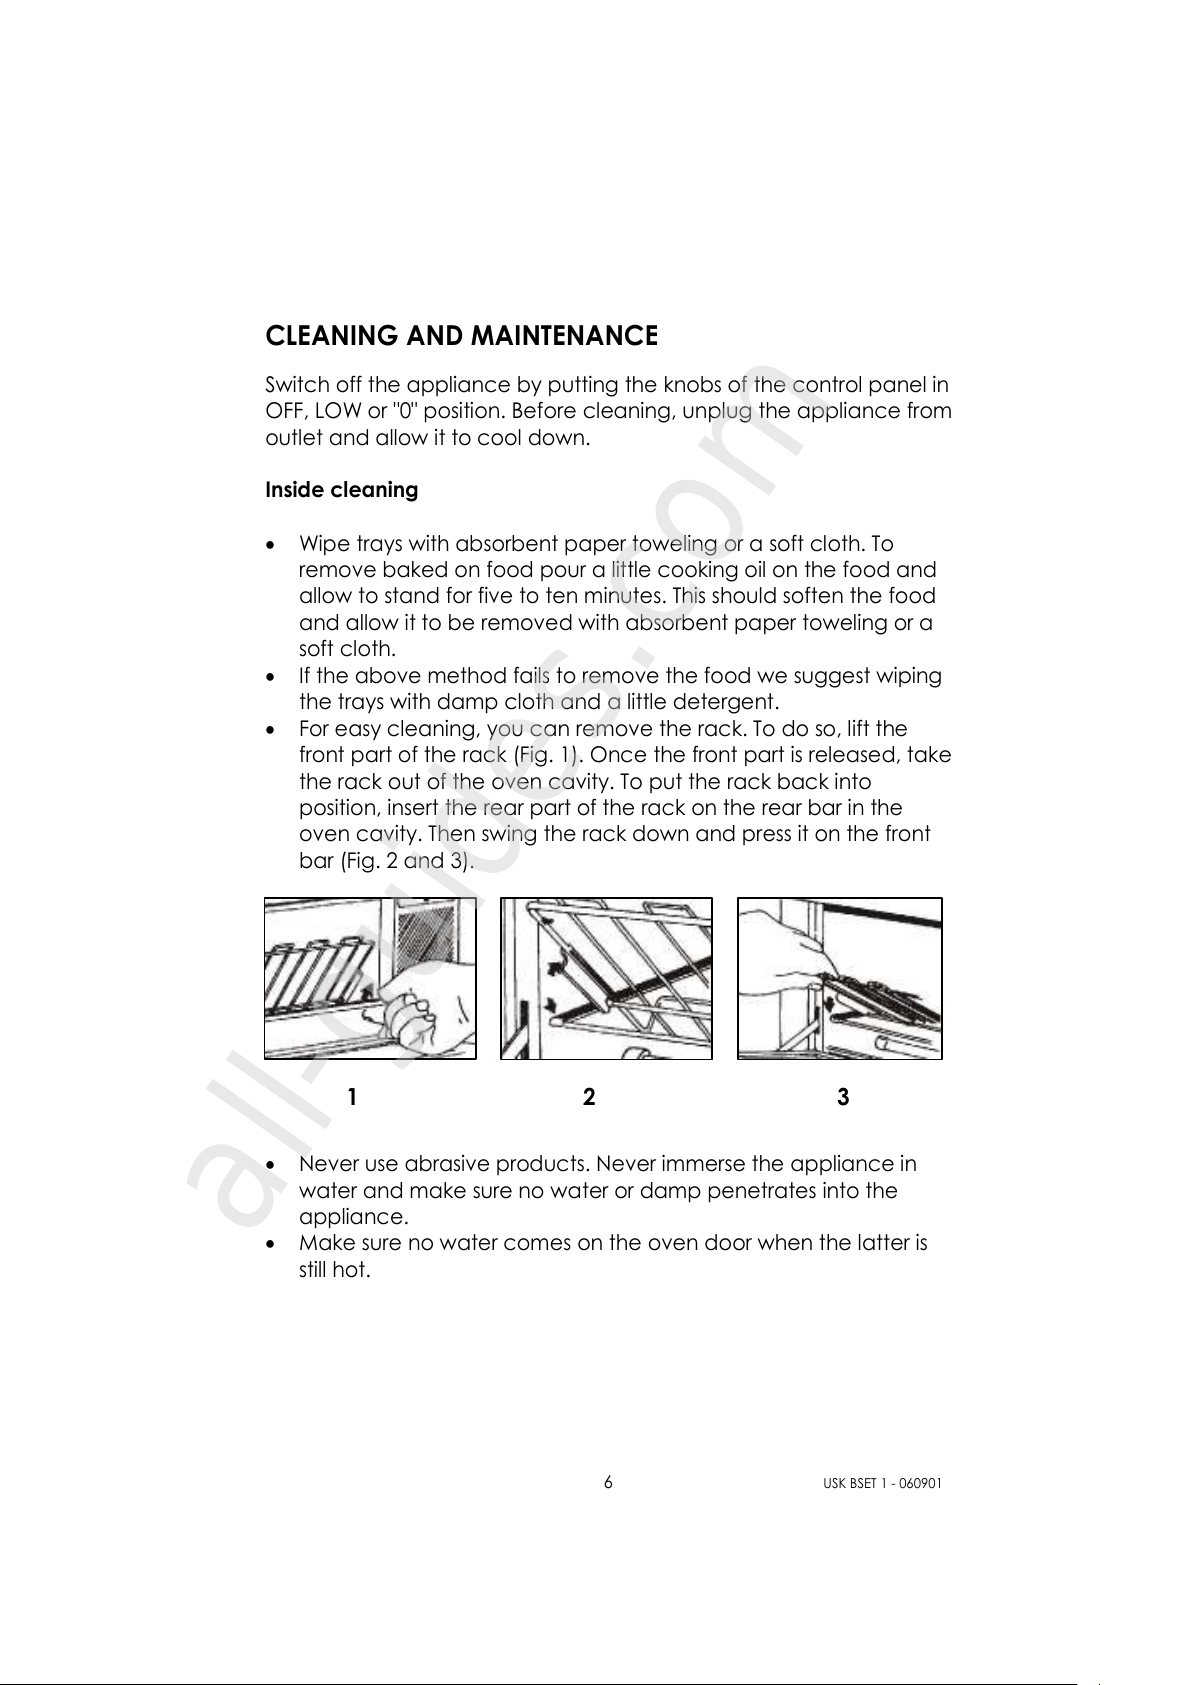
• For easy cleaning, you can remove the rack. To do so, lift the
front part of the rack (Fig. 1). Once the front part is released, take
the rack out of the oven cavity. To put the rack back into
position, insert the rear part of the rack on the rear bar in the
oven cavity. Then swing the rack down and press it on the front
bar (Fig. 2 and 3).
• Never use abrasive products. Never immerse the appliance in
water and make sure no water or damp penetrates into the
appliance.
• Make sure no water comes on the oven door when the latter is
still hot.
1 2 3
All manuals and user guides at all-guides.com
all-guides.com
7
USK BSET 1 - 060901
Outside cleaning
• Wipe clean with soft dry cloth or paper toweling
• Do not use steel wool, scouring pads or abrasive cleaners.
Do not immerse in water or any other liquid.
HOW TO USE THE COFFEE MAKER
• Open the lid of the water tank and pour the desired volume of
water in it. The water level can be read off the water level
indicator on the water tank. Never exceed the maximum level
indicated.
• Swing the filter holder by pulling at its handle, insert a paper filter
or permanent filter (depending on the model) in the filter holder
and add the desired quantity of ground coffee.
• Put the filter holder back into its initial position and make sure it is
closed properly.
• Never forget to close the lid of the water tank before switching
on your coffee maker.
• Put the glass jug with closed lid on the base of the appliance.
• Switch on the coffee maker. The pilot light of the switch will be
illuminated, indicating that your appliance is operating. Thanks to
the keep warm function, your coffee is warmed up as long as the
appliance is switched on. Note that the appliance will be
switched on as long as you do not switch it off manually.
However, we advise you not to let the appliance switched on
more than 2 hours and make sure that you never let an empty jug
on the appliance.
• When you remove the jug from the appliance, a non-drip valve
will automatically operate to stop any drops of coffee dripping
onto the hotplate. Replacement of the carafe automatically
opens the non-drip valve and allows remaining coffee to filter
trough into the jug.
• When the water tank is empty, wait a few additional minutes
before removing the jug.
All manuals and user guides at all-guides.com

8
USK BSET 1 - 060901
DESCALING AND CLEANING
• Descaling the coffee maker prolongs its life span. To descale your
coffee maker only use products especially made for this purpose
and read their instruction manual carefully.
• To simplify cleaning, you can remove the swing filter holder.
• Clean the jug and the filter holder in soapy water and rinse them
with clear water.
• For the other parts of the appliance such as the hot plate, use
soft damp cloth.
• Never use a dishwasher to clean any part of your coffee maker
PRACTICAL HINTS
When you notice that the coffee making process is longer than it
should be it is probably time to descale the appliance. Do not wait
until the situation gets worse. The descaling frequency depends on
the amount of lime in water and therefore can be different from
family to family. Therefore it is important to pay attention to this. A
good maintenance of your appliance will prolong its lifespan.
Guarantee claims will not be accepted for the replacement of a
heating element full of scale.
All manuals and user guides at all-guides.com
9
USK BSET 1 - 060901
CONSEJOS DE SEGURIDAD
Cuando use algún aparato eléctrico siempre deben seguirse
precauciones básicas de seguridad incluyendo las siguientes:
1. LEA TODAS LAS INSTRUCCIONES.
2. Antes de utilizar el aparato, compruebe que el voltaje de la red
eléctrica coincide con el del aparato.
3. No toque las superficies calientes. Siempre utilice las asas o los
botones.
4. Para protegerse contra una descarga eléctrica, no sumerja el
aparato o el enchufe en agua o en otros líquidos.
5. Es siempre necesaria la supervisión cercana cuando este
aparato sea utilizado cerca de niños. Este aparato no debe ser
usado por niños.
6. Desconecte el aparato de la toma de corriente cuando la
unidad no se encuentre en uso y antes de limpiarla. Deje enfriar
el aparato antes de insertar o sacar accesorios.
7. No opere este y ningún aparato si el cable o el enchufe están
quemados o dañados, o después de que el aparato ha
funcionado inadecuadamente, se ha caído o ha sido dañado
en cualquier manera. El aparato debe ser reemplazado por el
fabricante o por un centro de servicio autorizado o por una
persona similar calificada.
8. El uso de accesorios o aditamentos que no sean los
recomendados por el fabricante pueden causar incendios,
descargas eléctricas o lesiones.
9. No use en exteriores
10. No permita que el cable cuelgue de la orilla de la mesa o del
mostrador o toque las partes calientes.
11. No coloque este aparato cerca de quemadores de estufas de
gas o eléctricas, o dentro de un horno caliente.
12. Enchufe siempre primero el cable al aparato y después en el
enchufe de la red eléctrica. Para desconectar el aparato, gire
los botones hacia la posición apagada (off o 0) y desenchufe el
aparato.
All manuals and user guides at all-guides.com
10
USK BSET 1 - 060901
13. No use este aparato mas que para lo que ha sido diseñado.
14. Los alimentos grandes o utensilios metálicos no deben
introducirse en el aparato ya que pueden crear el riesgo de
incendio.
15. Puede ocurrir un incendio si el aparato está en funcionamiento y
se encuentra en contacto o cubierto con materiales inflamables,
incluyendo cortinas, tapicerías, paredes, etc. No coloque ningún
objeto sobre el aparato cuando éste se encuentre en
funcionamiento.
16. Cuando ase alimentos, tenga mucho cuidado cuando saque la
bandeja o deseche grasa caliente.
17. No limpie el aparato con fibras metálicas abrasivas. Se pueden
romper pequeños pedazos de las fibras y pueden entrar en
contacto con las partes eléctricas, lo anterior puede ocasionar
una descarga eléctrica.
18. Debe tener extremo cuidado cuando use contenedores que no
estén hechos de metal o de vidrio.
19. Cuando esta unidad no se encuentre en uso, no almacene
ningún otro material que no sean los accesorios recomendados
por el fabricante.
20. No coloque dentro del horno ningún material inflamable, tal
como papel, cartón, plástico o cualquier material que pueda
incendiarse o derretirse.
21. No cubra con papel aluminio la bandeja para migas o ninguna
otra parte del horno. Este causará que el aparato se sobre
caliente.
22. Pueden ocurrir quemaduras si la tapa se levanta durante el ciclo
de calentamiento.
23. No es necesario precalentare el aparato.
24. Para desconectar este aparato, coloque todos los controles en
la posición de apagado (OFF o 0) y desenchufe el aparato.
GUARDE ESTAS INSTRUCCIONES
All manuals and user guides at all-guides.com
 Loading...