

Page 1
Copies of the I/B. Please reproduce them without any
Fax +1 305 430 9280
changes except under special instruction from Team
International USA. The pages must be reproduced and folded
in order to obtain a booklet A5 (+/- 148.5 mm width x 210 mm
height). When folding, make sure you keep the good
numbering when you turn the pages of the I/B. Don’t change
the page numbering. Keep the language integrity. Print only
Cupcake Maker
Maquina para hacer
Magdalenas
Cupcake Maker
what is inside the frame.
MFM 37992
www.KALORIK.com
120V~60Hz 1000W (8.3A)
Front cover page (first page)
Assembly page 1/36
Page 2
Copies of the I/B. Please reproduce them without any
changes except under special instruction from Team
International USA. The pages must be reproduced and folded
in order to obtain a booklet A5 (+/- 148.5 mm width x 210 mm
height). When folding, make sure you keep the good
Fax +1 305 430 9280
numbering when you turn the pages of the I/B. Don’t change
the page numbering. Keep the language integrity. Print only
what is inside the frame.
IMPORTANT SAFEGUARDS
When using electrical appliances, basic safety precautions should
always be followed, including the following:
1. READ ALL INSTRUCTIONS
2. Check that your mains voltage corresponds to that stated on the
rating plate of the appliance, before using the appliance.
3. Do not touch hot surfaces. Use the handles.
4. To protect against electrical shock do not immerse cord, plug, or
the appliance in water or any other liquid.
5. Please keep out of reach of children and pets. This product is not
intended for use by children, by persons with reduced physical,
sensory or mental capabilities, or lacking experience or
knowledge, unless they have been given supervision or instruction
concerning the use of the product, by a person responsible for
their safety. Extra caution is always necessary when using this
product.
6. Unplug from outlet when not in use and before cleaning. Allow to
cool before cleaning the appliance.
7. Do not operate any appliance with a damaged cord or plug or
after the appliance malfunctions or has been damaged in any
manner. Return the appliance to the manufacturer’s authorized
service facility for examination, repair, or adjustment.
8. The use of accessory attachments not recommended by the
appliance manufacturer may cause injuries, fire or electric shock.
9. Do not use outdoors.
10. Do not let the cord hang over the edge of the table or counter,
or touch hot surfaces.
11. Do not place on or near a hot gas or electric burner, or in a
heated oven.
12. Extreme caution must be used when moving an appliance
containing hot oil or other hot liquids.
13. To disconnect, remove the plug from the wall outlet.
14. Do not use the appliance for other than intended use.
2
Assembly page 2/36
MFM 37992 - 120501
Page 3

Copies of the I/B. Please reproduce them without any
changes except under special instruction from Team
International USA. The pages must be reproduced and folded
in order to obtain a booklet A5 (+/- 148.5 mm width x 210 mm
height). When folding, make sure you keep the good
Fax +1 305 430 9280
numbering when you turn the pages of the I/B. Don’t change
the page numbering. Keep the language integrity. Print only
what is inside the frame.
15. When using this appliance, provide adequate airspace above
and on all sides for air circulation. On surfaces where heat may
cause a problem, an insulated hot pad is recommended.
16. Do not leave unit unattended during use.
17. Always use the product on a clean, flat, hard, dry surface. There
should be no material such as a tablecloth or plastic between
the unit and surface. A fire may occur if this appliance is covered,
or touching flammable material, including curtains, draperies,
walls, and the like, when in operation.
18. It is absolutely necessary to keep this appliance clean at all times
as it comes into direct contact with food.
19. Be careful not to scratch the non-stick coating of the cooking
plate, as you might get little pieces of this coating into the food. If
scraping is necessary, unplug the appliance and use a classic
wooden spatula or a heat resistant plastic one.
20. The appliance shall not be operated using a separate timer or
separate remote device.
SAVE THESE INSTRUCTIONS
HOUSEHOLD USE ONLY
POLARIZED PLUG INSTRUCTIONS
This appliance is equipped with a polarized plug (one blade is wider
than the other). To reduce the risk of electric shock, this plug will fit
into the polarized outlet only one way. If the plug does not properly
fit into the outlet at first, reverse it. If it still does not fit, contact a
qualified electrician. Do not attempt to modify the plug in any way.
3
Assembly page 3/36
MFM 37992 - 120501
Page 4
Copies of the I/B. Please reproduce them without any
6
changes except under special instruction from Team
International USA. The pages must be reproduced and folded
in order to obtain a booklet A5 (+/- 148.5 mm width x 210 mm
height). When folding, make sure you keep the good
Fax +1 305 430 9280
numbering when you turn the pages of the I/B. Don’t change
the page numbering. Keep the language integrity. Print only
what is inside the frame.
SHORT CORD INSTRUCTIONS
A short power supply cord is provided to reduce the hazards resulting
from becoming entangled in, or tripping over a longer cord.
Extension cords may be used if care is exercised in their use.
• The electrical rating of the extension cord should be at least
that of the appliance. If the electrical rating of the extension
cord is too low, it could overheat and burn.
• The resulting extended cord should be arranged so that it will
not drape over the counter top or tabletop where it can be
pulled on by children or tripped over.
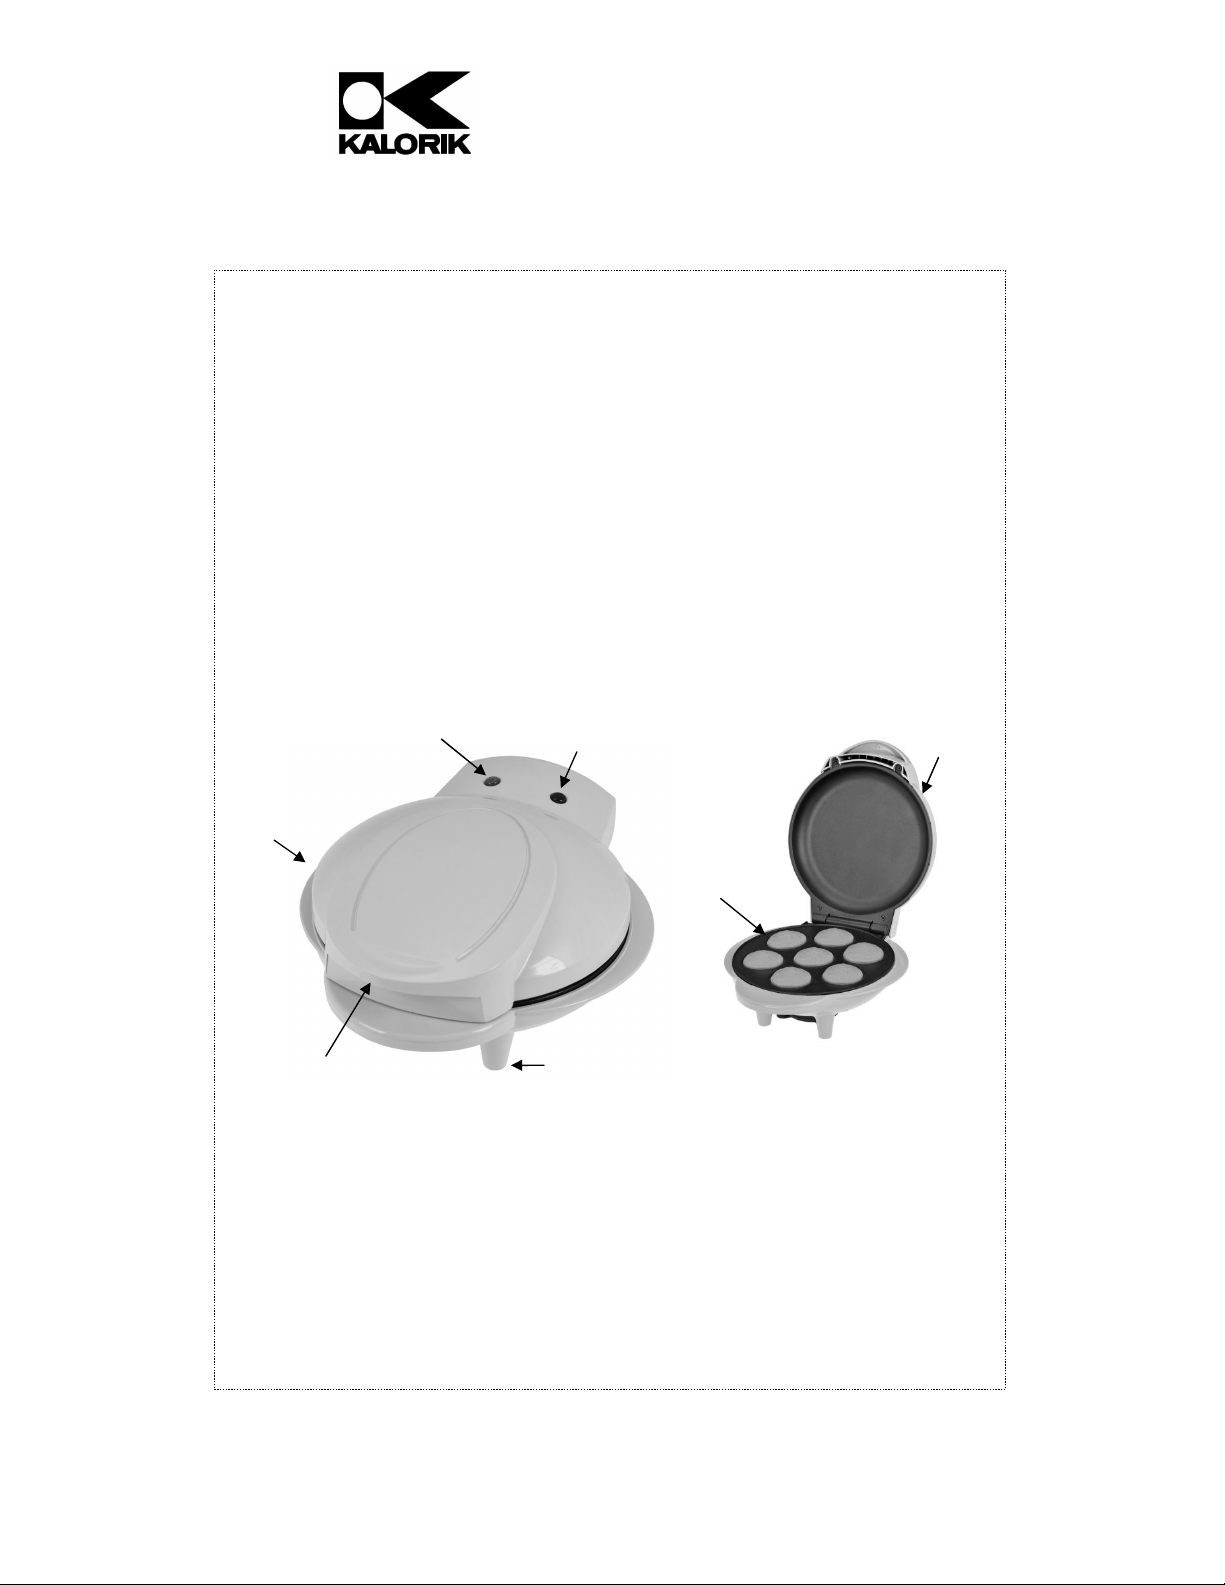
PART DESCRIPTION
2
1
1. Front handle
2. Side handle
3. Power light
4. Temperature ready light
5. Non-skid feet
6. Lower baking plate
7. Upper baking plate
4
3
5
7
4
Assembly page 4/36
MFM 37992 - 120501
Page 5

Copies of the I/B. Please reproduce them without any
changes except under special instruction from Team
International USA. The pages must be reproduced and folded
in order to obtain a booklet A5 (+/- 148.5 mm width x 210 mm
height). When folding, make sure you keep the good
Fax +1 305 430 9280
numbering when you turn the pages of the I/B. Don’t change
the page numbering. Keep the language integrity. Print only
what is inside the frame.
OPERATION
• On first use, the protective coating might burn off, causing
smoking. This is NOT harmful and will disappear after a short time.
• When using for the first time, wipe the surface of the plates with a
damp cloth, then dry. DO NOT IMMERSE THE APPLIANCE IN WATER!
• Position the appliance on a flat, heat-resistant, level surface.
• Close the appliance and plug into the electrical outlet. The red
power light (3) will come on, to indicate that the appliance is
switched on.
• The green temperature pilot light (4) will stay off, to indicate the
appliance is warming up. When the green pilot light goes on, it
means that the preset cooking temperature is reached and unit is
ready for use.
Note: During use, this pilot light will come on and off regularly. This
simply means that the thermostat is regulating the appliance's
temperature.
Caution: During operation, the baking plates and the surfaces on the
appliance get hot. The appliance might also generate steam. Pay
attention not to get burned. Always use oven mitts for protection,
when opening or closing the lid.
• Open the appliance, using the front handle (1) and an oven mitt.
• Lightly brush the lower cooking plate (6) with butter, margarine, or
• Alternatively, insert cupcake liners (paper cupcake cups). This
• Pour the batter evenly into the sections of the bottom plate (6),
• Bake until golden brown, or when the cupcakes are cooked
• When the cupcakes are ready, remove them with a plastic or
Avoid contact with the hot surfaces.
cooking oil. For best results, use a cooking spray.
model accepts 1 ½” and 2” paper liners.
not all the way to the edges (Do not overfill: approximately 1
tablespoon per mini cupcake), and close the lid of the
appliance.
throughout. Doneness can be measured by inserting a toothpick
into the middle (it should come out clean and dry).
wooden spatula, or inserting a plastic fork or a wooden stick from
the sides of the cupcakes. Never use any sharp metallic objects,
as this might damage the non-stick coating of the plates.
5
Assembly page 5/36
MFM 37992 - 120501
Page 6

Copies of the I/B. Please reproduce them without any
changes except under special instruction from Team
International USA. The pages must be reproduced and folded
in order to obtain a booklet A5 (+/- 148.5 mm width x 210 mm
height). When folding, make sure you keep the good
Fax +1 305 430 9280
numbering when you turn the pages of the I/B. Don’t change
the page numbering. Keep the language integrity. Print only
what is inside the frame.
• Leave the cupcakes to cool on a plate or on a rack.
• When baking is finished, unplug the cord from the wall socket
and leave the appliance open to cool.
Tips:
• Prepare all the ingredients and batter before starting to preheat
the appliance.
• The cupcake maker does not necessarily need to be preheated
for cupcakes. Just spoon the batter into the shapes and bake.
However, it will work equally well if pre-heated. The cooking time
will then be shorter.
• You can fill the sections easily using disposable pastry bags or
sealable plastic food storage bags with their corner clipped.
• Actual cooking time may vary, depending on the ingredients
and type of cupcakes; in general, count 6 to 8 minutes cooking
time per batch. The more batches you do, the lower the cooking
time.
• Different recipes may rise differently while cooking. Pre-test a new
batter before starting full batches of cupcakes, in order to see
the optimal level of batter needed to manage perfectly shaped
cupcakes, but avoid overflows.
• Cupcakes are very fragile when hot. Be careful when removing,
and allow them to stand at least 5 minutes on a rack before
serving.
• Using liners (paper baking cups) will make it easier to remove and
serve. If cooking brownie type mixes, you have to use liners as the
cupcake will then be too fragile to remove, and they must cool in
order to hold their shape. Liners will also increase the cooking
time (by 1 to 2 minutes approximately). This model accepts 1 1/2”
and 2” paper liners.
• Leave cupcake unfrosted if they need to be packed for lunch or
travel.
• Use a small spatula or knife to spread the frosting, if desired, or
use a decorating bag. Dipping a cupcake in a dark chocolate
glaze will also give excellent results. Use sprinkles on frosted
cupcakes whenever desired.
• Use your favorite cupcake batter recipe, or convenient pre-
packaged mixes.
6
Assembly page 6/36
MFM 37992 - 120501
Page 7

Copies of the I/B. Please reproduce them without any
changes except under special instruction from Team
International USA. The pages must be reproduced and folded
in order to obtain a booklet A5 (+/- 148.5 mm width x 210 mm
height). When folding, make sure you keep the good
Fax +1 305 430 9280
numbering when you turn the pages of the I/B. Don’t change
the page numbering. Keep the language integrity. Print only
what is inside the frame.
See below for cupcake recipes. Examples are many that you can
find on the internet or in specialized cupcake books. Cake mixes are
also a fast and convenient way to make a batter.
CUPCAKE RECIPES
Easy Vanilla Cupcakes
2 cup all-purpose flour
1 ½ cup sugar
3 teaspoon baking powder
½ tsp. salt
½ cup shortening (or butter)
1 cup milk (2%)
2 large eggs
1 ½ tsp. pure vanilla extract
Baking spray (like PAM)
Instructions:
• In a bowl, combine the flour with the baking powder, salt,
shortening or butter left at room temperature, milk and vanilla.
Mix at low or medium speed for 2 minutes.
• Scrape and add the eggs. Mix at medium speed (for 1 minute)
and then on high (for 1 minute) until smooth and well mixed
• Cook in the appliance after spraying the oil on the plates, as
explained above in this user manual.
• Prepare the icing by beating together the butter and sugar with
an electric beater.
• Once well combined, add the vanilla extract and water. Beat
until creamy and smooth.
For the icing:
5 Oz. softened butter
8 Oz. confectioner sugar
1 tsp. Vanilla extract
2 tsp. hot water
7
Assembly page 7/36
MFM 37992 - 120501
Page 8

Copies of the I/B. Please reproduce them without any
changes except under special instruction from Team
International USA. The pages must be reproduced and folded
in order to obtain a booklet A5 (+/- 148.5 mm width x 210 mm
height). When folding, make sure you keep the good
Fax +1 305 430 9280
Red Velvet Cupcakes
2 1/2 cups of self-rising flour
2 cups sugar
1/2 cup powdered baking cocoa
1 teaspoon baking powder
1/4 teaspoon salt
1 teaspoon baking soda
numbering when you turn the pages of the I/B. Don’t change
the page numbering. Keep the language integrity. Print only
what is inside the frame.
2 sticks butter, softened
4 large eggs
1 cup buttermilk
1 1/2 teaspoon vanilla extract
1 teaspoon red food coloring
Instructions:
• In a large bowl, blend cocoa, flour, baking powder, baking soda
and salt.
• In a separate bowl, cream together the butter and sugar until
light and fluffy.
• Beat the eggs and the buttermilk then add and mix thoroughly.
• Mix in the vanilla and the food coloring.
Lemon Meringue Cupcakes
2 1/2 cups self-rising flour
1 tablespoon baking powder
1/2 teaspoon salt
1 cup softened butter
2 cups sugar
4 eggs
2 tablespoons of lemon zest, plus 2
tablespoons fresh lemon juice
1 1/2 teaspoon pure vanilla extract
1 cup buttermilk
Instructions:
• In a large bowl cream the butter and sugar until pale and fluffy.
• Add eggs, one at a time. Beat in zest, vanilla and flour
• Add buttermilk and lemon juice, beat all ingredients together.
Banana Chocolate Chip Cupcakes
1 medium egg
1 ½ cups of flour
¾ cup of milk
1 cup of chocolate chips
1 cup of brown sugar
½ cup of puréed banana
¼ cup of vegetable oil
3 teaspoons of baking powder
1/4 teaspoon of salt
½ teaspoon of cinnamon
1/2 teaspoon of nutmeg
Instructions:
• In large bowl, mix egg, milk, banana, and oil.
• In small bowl mix together; flour, baking powder, salt, cinnamon,
and nutmeg.
• Mix the dry ingredients into the egg mixture until just moistened,
but still lumpy, Add in the chocolate chips.
8
Assembly page 8/36
MFM 37992 - 120501
Page 9

Copies of the I/B. Please reproduce them without any
changes except under special instruction from Team
International USA. The pages must be reproduced and folded
in order to obtain a booklet A5 (+/- 148.5 mm width x 210 mm
height). When folding, make sure you keep the good
Fax +1 305 430 9280
numbering when you turn the pages of the I/B. Don’t change
the page numbering. Keep the language integrity. Print only
what is inside the frame.
Blueberry Muffins
1 1/2 cups of fresh blueberries
2 eggs
2 cups of flour
1 cup sugar
1/2 cup milk
1/4 cup butter
2 tsp. baking powder
1 tsp. vanilla extract
1/2 teaspoon salt
Instructions:
• In large bowl combine and mix butter, eggs, salt and sugar.
• In a separate bowl combine the baking powder and flour.
• Add butter mixture and milk, mix until just combined and still
lumpy. Be careful not to over-mix.
• Add vanilla and mix all ingredients together, finally add in the
blueberries.
Chocolate Cupcakes
1 stick butter
1 ¼ cup sugar
2 eggs
¾ cup flour
1 teaspoon baking powder
¼ teaspoon salt
½ cup unsweetened cocoa powder
½ cup milk
1 ½ teaspoons vanilla extract
Instructions:
• Mix the butter with an electric mixer until it is soft, and then add
the sugar. Beat about 3 minutes.
• Add the eggs, one at a time, beating until they are well
combined.
• In a separate bowl, combine the dry ingredients and whisk them
to incorporate them.
• Add the dry ingredients to the butter and sugar, and mix, just to
combine.
• Add the liquids (milk & vanilla), combine all ingredients together.
9
Assembly page 9/36
MFM 37992 - 120501
Page 10

Copies of the I/B. Please reproduce them without any
changes except under special instruction from Team
International USA. The pages must be reproduced and folded
in order to obtain a booklet A5 (+/- 148.5 mm width x 210 mm
height). When folding, make sure you keep the good
Fax +1 305 430 9280
numbering when you turn the pages of the I/B. Don’t change
the page numbering. Keep the language integrity. Print only
what is inside the frame.
Chocolate glaze frosting
1 1/2 cup of chocolate chips
2 tbsp. melted butter
½ tbsp. light corn syrup
Instructions:
• Cook chocolate chips and butter in microwave for 1 minute stir
and microwave 30/60 sec. until melted; then stir in the corn syrup.
Cream cheese frosting
3 oz. of cream cheese
1/2 cup melted butter
2 ¼ cup powdered sugar
1 tsp. vanilla extract
Instructions:
• Beat together until smooth
CLEANING
• Before cleaning, unplug and wait for the appliance to cool down
completely.
• Wipe the outside with only a slightly moistened cloth ensuring that
no moisture, oil or grease enters the cooling slots.
• Wipe the inside and the edges of the plate with a paper towel or
soft cloth.
• Do not clean the inside or outside with any abrasive scouring pad
or steel wool as this will damage the finish.
• If there is any batter baked onto the plate, we advise using
vegetable oil to soften it, and then waiting 5 minutes before
removing it.
• DO NOT IMMERSE THE APPLIANCE, POWER CORD, OR PLUG, IN
WATER OR ANY OTHER LIQUID.
Note: you can wrap the power cord around the base situated under
the appliance, for storage, or if the cord is too long.
10
Assembly page 10/36
MFM 37992 - 120501
Page 11

Copies of the I/B. Please reproduce them without any
changes except under special instruction from Team
International USA. The pages must be reproduced and folded
in order to obtain a booklet A5 (+/- 148.5 mm width x 210 mm
height). When folding, make sure you keep the good
Fax +1 305 430 9280
numbering when you turn the pages of the I/B. Don’t change
the page numbering. Keep the language integrity. Print only
what is inside the frame.
WARRANTY
We suggest that you complete and return the enclosed Product
Registration Card promptly to facilitate verification of the date of
original purchase. However, return of the Product Registration Card is
not a condition of these warranties. You can also fill out this warranty
card online, at the following address: www.KALORIK.com
This KALORIK product is warranted in the U.S.A. for 1 year from the
date of purchase against defects in material and workmanship. This
warranty is not transferable. Keep the original sales receipt. Proof of
purchase is required to obtain warranty performance.
During this period, if the KALORIK product, upon inspection by
KALORIK, is proven defective, it will be repaired or replaced, at
Kalorik’s option, without charge to the customer. If a replacement
product is sent, it will carry the remaining warranty of the original
product.
This warranty does not apply to any defect arising from a buyer's or
user's misuse of the product, negligence, failure to follow KALORIK
instructions noted in the user’s manual, use on current or voltage
other than that stamped on the product, wear and tear, alteration
or repair not authorized by KALORIK, or use for commercial purposes.
There is no warranty for glass parts, glass containers, filter basket,
blades and agitators, and accessories in general. There is also no
warranty for parts lost by the user.
ANY WARRANTY OF MERCHANTABILITY OR FITNESS WITH RESPECT TO
THIS PRODUCT IS ALSO LIMITED TO THE ONE YEAR LIMITED WARRANTY
PERIOD.
Some states do not allow limitation on how long an implied warranty
lasts or do not allow the exclusion of incidental or consequential
damages, so the above limitations may not apply to you. This
warranty gives you specific legal rights, and you may also have other
rights which vary from state to state.
11
Assembly page 11/36
MFM 37992 - 120501
Page 12

Copies of the I/B. Please reproduce them without any
changes except under special instruction from Team
International USA. The pages must be reproduced and folded
in order to obtain a booklet A5 (+/- 148.5 mm width x 210 mm
height). When folding, make sure you keep the good
Fax +1 305 430 9280
numbering when you turn the pages of the I/B. Don’t change
the page numbering. Keep the language integrity. Print only
what is inside the frame.
If the appliance should become defective within the warranty
period and more than 30 days after date of purchase, do not return
the appliance to the store: often, our Customer Service
Representatives can help solve the problem without having the
product serviced. If servicing is needed, a Representative can
confirm whether the product is under warranty and direct you to the
nearest service location.
If this is the case, bring the product, or send it, postage prepaid by
the user (all Kalorik customers are responsible for the initial shipment
back to the warranty center), along with proof of purchase and
indicating a return authorization number given by our Customer
Service Representatives, to the authorized KALORIK Service Center
(please visit our website at www.KALORIK.com or call our Customer
Service Department for the address of our authorized KALORIK
Service Center).
If you send the product, please include a letter explaining the nature
of the claimed defect.
If you have additional questions, please call our Customer Service
Department (please see below for complete contact information),
Monday through Thursday from 9:00am - 5:00pm (EST) and Friday
from 9:00am - 4:00pm (EST). Please note hours are subject to change.
If you would like to write, please send your letter to:
KALORIK Customer Service Department
Team International Group of America Inc.
1400 N.W 159th Street, Suite 102
Miami Gardens, FL 33169 USA
Or call:
Toll Free: +1 888-521-TEAM / +1 888-KALORIK
Only letters can be accepted at this address above. Shipments and
packages that do not have a return authorization number will be
refused.
12
Assembly page 12/36
MFM 37992 - 120501
Page 13

Copies of the I/B. Please reproduce them without any
changes except under special instruction from Team
International USA. The pages must be reproduced and folded
in order to obtain a booklet A5 (+/- 148.5 mm width x 210 mm
height). When folding, make sure you keep the good
Fax +1 305 430 9280
numbering when you turn the pages of the I/B. Don’t change
the page numbering. Keep the language integrity. Print only
what is inside the frame.
CONSEJOS DE SEGURIDAD
Cuando use algún aparato eléctrico siempre deben seguirse
precauciones básicas de seguridad incluyendo las siguientes:
1. LEA TODAS LAS INSTRUCCIONES.
2. Antes de utilizar el aparato, compruebe que el voltaje de la red
eléctrica coincide con el indicado en la placa de datos técnicos
del aparato.
3. No toque las superficies calientes. Utilice siempre las pegas.
4. Para protegerse contra una descarga eléctrica, no sumerja el
aparato, el cable de alimentación o el enchufe en agua o en
otros líquidos.
5. Manténgalo fuera del alcance de los niños y mascotas. Este
producto no está destinado a ser utilizado por niños, personas
con discapacidades físicas, sensoriales o mentales, o que
carecen de experiencia o conocimiento, a menos que no sean
supervisados o instruidos acerca del uso del producto, por una
persona responsable de su seguridad. Cuando se utiliza este
producto siempre es necesaria una precaución extrema.
6. Desconecte el aparato de la toma de corriente cuando la
unidad no se encuentra en uso o antes de limpiarla. Deje enfriar
el aparato antes de limpiarlo.
7. No opere este y ningún aparato si el cable o el enchufe están
quemados o dañados, o después de que el aparato ha
funcionado inadecuadamente o ha sido dañado en cualquier
manera. El aparato debe ser remplazado por el fabricante o por
un centro de servicio autorizado o por una persona similar
calificada.
8. El uso de accesorios no recomendados por el fabricante pueden
causar incendios, descargas eléctricas o lesiones.
9. No use en exteriores
10. No permita que el cable cuelgue del borde de la mesa o del
mostrador o toque las partes calientes.
11. No coloque este aparato cerca de quemadores de gas o
eléctricos, o dentro de un horno caliente.
12. Tenga mucho cuidado cuando desplace un aparato lleno de
aceite caliente u otros líquidos calientes.
13
Assembly page 13/36
MFM 37992 - 120501
Page 14

Copies of the I/B. Please reproduce them without any
changes except under special instruction from Team
International USA. The pages must be reproduced and folded
in order to obtain a booklet A5 (+/- 148.5 mm width x 210 mm
height). When folding, make sure you keep the good
Fax +1 305 430 9280
numbering when you turn the pages of the I/B. Don’t change
the page numbering. Keep the language integrity. Print only
what is inside the frame.
13. Enchufe siempre primero el cable al aparato y después en el
enchufe de la red eléctrica. Para desconectar el aparato,
desenchúfelo el aparato.
14. No use este aparato más que para lo que ha sido diseñado.
15. Asegúrese de que el espacio libre alrededor del aparato esté
suficiente mientras esté en funcionamiento, a fin que el aire
circule bien. En las superficies donde el calor pueda causar
problemas, se recomienda usar un posa-fuentes aislante.
16. No deje el aparato sin vigilancia mientras esté en uso.
17. Siempre use el producto sobre una superficie limpia, plana, dura
y seca. Nunca coloque materiales como por ejemplo un mantel
o un plástico entre la unidad y la superficie. Puede ocurrir un
incendio si el aparato está en funcionamiento y se encuentra en
contacto o cubierto con materiales inflamables, incluyendo
cortinas, tapicerías, paredes, etc.
18. Es indispensable guardar el aparato limpio, ya que está en
contacto directo con los alimentos.
19. Procure no rallar el revestimiento anti-adherente de la placa de
cocción, ya que en caso contrario podría encontrar partículas
del revestimiento en la comida. Si es necesario raspar las placas,
desenchufe el aparato y utilice sólo una espátula de madera o
de plástico resistente al calor.
20. El aparato no es compatible para el uso de minutaría o
dispositivo de control remoto.
GUARDE ESTAS INSTRUCCIONES
SOLAMENTE PARA USO DOMESTICO
INFORMACIÓN SOBRE EL ENCHUFE POLARIZADO
El aparato está provistos con un enchufe polarizado (una pata es
más ancha que la otra). Para reducir el riesgo de choque eléctrico,
este enchufe calza en el tomacorriente polarizado de una sola
manera. Si el enchufe no cabe totalmente en el tomacorriente, gire
el enchufe. Si aun así no calza, consulte a un servicio técnico
cualificado. No intente anular esta característica de seguridad.
14
Assembly page 14/36
MFM 37992 - 120501
Page 15

Copies of the I/B. Please reproduce them without any
changes except under special instruction from Team
International USA. The pages must be reproduced and folded
in order to obtain a booklet A5 (+/- 148.5 mm width x 210 mm
height). When folding, make sure you keep the good
Fax +1 305 430 9280
numbering when you turn the pages of the I/B. Don’t change
the page numbering. Keep the language integrity. Print only
what is inside the frame.
INSTRUCCIONES DEL CABLE
El cable de alimentación del aparato es un cable corto a fin de
disminuir el riesgo de accidentes (caídas al tropezar con él, etc.)
Puede utilizar una extensión si es necesaria.
• Asegúrese de que el nivel eléctrico del cable es igual o mayor
que el indicado. Una extensión con un bajo nivel eléctrico
conllevaría el riesgo de sobrecalentarse y de estropearse.
• Para evitar riesgos coloque el cable de forma tal que los niños no
puedan jalarlo o tropezar con él.
PARTES
2
1
1. Asa frontal
2. Asa lateral
3. Luz de encendido
4. Luz de temperatura lista
5. Pata anti-deslizante
6. Plancha de hornear inferior
7. Plancha de hornear superior
4
3
6
5
7
15
Assembly page 15/36
MFM 37992 - 120501
Page 16

Fax +1 305 430 9280
Copies of the I/B. Please reproduce them without any
changes except under special instruction from Team
International USA. The pages must be reproduced and folded
in order to obtain a booklet A5 (+/- 148.5 mm width x 210 mm
height). When folding, make sure you keep the good
numbering when you turn the pages of the I/B. Don’t change
the page numbering. Keep the language integrity. Print only
what is inside the frame.
MODO DE EMPLEO
• La primera vez que se enchufa, hace humo y huele. Esto es
normal, puesto que en su fabricación se pueden haber adherido
grasas que se estén quemando. No está peligroso y
desaparecerá rápidamente.
• Cuando utilice el aparato por primera vez, páselo con un paño
humedecido y séquelo. NO SUMERJA EL APARATO EN EL AGUA!
• Coloque el aparato en una superficie plana, resistente al calor.
• Cierre el aparato y enchufe la clavija a la red eléctrica. El testigo
luminoso rojo (3) se encenderá indicando que el aparato está en
funcionamiento.
• El testigo luminoso verde (4) esta apagado, indicando que el
aparato está calentando. Cuando el testigo luminoso verde se
enciende, indica que la temperatura previamente programada,
de fábrica, está alcanzada.
Nota: Durante el funcionamiento ese testigo luminoso irá enciendo y
apagándose regularmente. Ello indica sólo que el termostato está
regulando la temperatura del aparato.
Atención: Durante la utilización, las placas y las superficies/caras del
aparato se calientan. Puede también ocurrir que el aparato genere
humo. Téngalo en cuenta para evitar quemaduras. Use guantes para
horno a fin de protegerse cada vez que abra o cierre la tapa.
• Abra el aparato, utilizando la manija frontal y un guante para
horno. Evite el contacto con las superficies calientes.
• Unte la placa de hornear inferior (6) con un poco de
mantequilla, margarina o aceite. Para obtener los mejores
resultados utilice aceite en aerosol.
• Como alternativa, coloque las cazoletas de papel de las
magdalenas. Con este aparato puede utilizar cazoletas de
papel de 1 ½” y 2”.
• Vierta la masa uniformemente en los moldes de la placa inferior
(6), pero sin excederse en el llenado de los moldes
(aproximadamente 1 cucharada por mini magdalena), y cierre
el aparato.
• Hornear hasta que alcancen un color dorado, o hasta que las
magdalenas estén completamente cocidos. Se puede verificar
16
Assembly page 16/36
MFM 37992 - 120501
Page 17

Copies of the I/B. Please reproduce them without any
changes except under special instruction from Team
International USA. The pages must be reproduced and folded
in order to obtain a booklet A5 (+/- 148.5 mm width x 210 mm
height). When folding, make sure you keep the good
Fax +1 305 430 9280
numbering when you turn the pages of the I/B. Don’t change
the page numbering. Keep the language integrity. Print only
what is inside the frame.
el grado de cocción introduciendo un escarbadiente en el
centro (al extraerlo, el escarbadiente debe salir limpio y seco).
• Cuando las magdalenas estén cocidas, retírelas de la placa con
una espátula de madera o plástico, o introduciendo un tenedor
de plástico o un palillo de madera a los lados de las
magdalenas. No utilice nunca objetos metálicos que podrían
dañar el revestimiento antiadherente.
• Deje enfriar las magdalenas en una placa o colóquelos sobre
rejilla.
• Al final de la cocción, desenchufe la clavija de la toma de
corriente y deje el aparato abierto para que enfríe.
Consejos:
• Prepare todos los ingredientes y masa antes de pre-calentar el
aparato.
• La maquina de hacer magdalenas no necesita precalentarse.
Ponga una cucharada de la masa en cada cazoleta y
comience. De todas formas, la maquina funcionará igual de
bien si se precalienta, en este caso el tiempo de cocción será
mas corto.
• Llene las secciones cuidadosamente utilizando mangas de
repostería, o utilizando una bolsa de plástico para
almacenamiento de comida, a la cual se le cortará uno de sus
ángulos.
• El tiempo real de cocción puede variar, dependiendo de los
ingredientes y del tipo de las magdalenas; en general, considere
de 6 a 8 minutos de cocción por tanda.
• Una receta diferente puede leudar en forma diferente durante
la cocción. Realice una prueba con una masa nueva antes de
comenzar a llenar tandas de magdalenas, a fin de corroborar el
nivel más óptimo de levadura necesario para que sus
magdalenas tengan una forma perfecta, pero con cuidado de
no excederse en el llenado.
• Las magdalenas son muy delicadas cuando están calientes.
Tenga cuidado cuando las saque, y déjelas enfriar durante al
menos, 5 minutos antes de servirlas.
• Si usa cazoletas de papel es más fácil sacarlas y servirlas. Y si
prepara mezclas de brownies, debe usar cazoletas de papel ya
17
Assembly page 17/36
MFM 37992 - 120501
Page 18

Copies of the I/B. Please reproduce them without any
changes except under special instruction from Team
International USA. The pages must be reproduced and folded
in order to obtain a booklet A5 (+/- 148.5 mm width x 210 mm
height). When folding, make sure you keep the good
Fax +1 305 430 9280
numbering when you turn the pages of the I/B. Don’t change
the page numbering. Keep the language integrity. Print only
what is inside the frame.
que los brownis son más frágiles de quitar y tienen que enfriarse
para mantener su forma. Las cazoletas de papel aumentan el
tiempo de cocción (entre 1 a 2 minutos aproximadamente). Ese
modelo acepta cazoletas de papel de 1 1/2” a 2”.
• Deje las magdalenas glaseadas si van a ser embaladas para el
almuerzo o viaje.
• Utilice una pequeña espátula o un cuchillo para extender el
glaseado, o use un paquete de decoración. Mojar la
magdalena en chocolate también le dará excelentes resultados.
Espolvoree o decore sus magdalenas como lo desee.
• Para hacer magdalenas use su recepta favorita o los mezclados
ya listos para cocción.
Vea a continuación recetas de magdalenas. Usted puede
encontrar muchos ejemplos en Internet o en libros especializados en
preparación de magdalenas. Las mezclas de tortas listas para
hornear son asimismo un buen método para la preparación de la
masa.
RECETAS DE MAGDALENAS
Magdalenas vainilla
2 tazas de harina
1 ½ taza de azucar
3 cucharaditas de levadura
½ cdta. salt
½ taza de mantecha (o mantequilla)
1 taza de leche (2%)
2 huevos grandes
1 ½ cdta. Extracto puro de vainilla
Aceite en aerosol (como PAM)
Instrucciones:
• En un recipiente, mezcle la harina con la levadura, la sal, la
manteca o mantequilla dejada en temperatura ambiente, la
leche y la vainilla. Mezcle todo a velocidad media durante 2
minutos.
• Quite la cáscara de los huevos y añádalos. Mezcle a velocidad
media durante (1 minuto), y luego a velocidad alta (durante 1
minuto) hasta que la masa este suave y bien mezclada.
• Eche la mezcla en las cazoletas después de rociar el aceite en
las placas como se ha explicado en el manual anteriormente.
18
Assembly page 18/36
Para el glaseado:
5 Oz. de mantequilla derretida
8 Oz. Azucar
1 cdta. Extracto de vainilla
2 cdta. De agua caliente
MFM 37992 - 120501
Page 19

Copies of the I/B. Please reproduce them without any
changes except under special instruction from Team
International USA. The pages must be reproduced and folded
in order to obtain a booklet A5 (+/- 148.5 mm width x 210 mm
height). When folding, make sure you keep the good
Fax +1 305 430 9280
numbering when you turn the pages of the I/B. Don’t change
the page numbering. Keep the language integrity. Print only
what is inside the frame.
• Prepare el glaseado batiendo la mantequilla y el azúcar con una
batidora eléctrica.
• Una vez bien mezclados, añada el extracto de vanilla y el agua.
Bata hasta que quede cremoso y suave.
Magdalenas Terciopelo Rojo
2 1/2 tazas / 160g de harina leudante
2 tazas / 400g de azúcar
1/2 taza / 60g de cacao en polvo
para hornear
1 cucharadita de polvo de hornear
1/4 cucharadita de sal
1 cucharadita de bicarbonato de
soda
2 barras / 220g de manteca,
ablandada
4 huevos grandes
1 taza de leche de manteca
1 1/2 cucharadita de extracto de
vainilla
1 cucharadita de colorante rojo para
comida
Instrucciones:
• En un bol grande, mezcle el cacao, la harina, el polvo de
hornear, el bicarbonato de soda y la sal.
• En un bol aparte, mezcle la manteca junto con el azúcar,
batiendo hasta obtener una crema clara y esponjosa.
• Bata los huevos y la leche de manteca, y luego incorpore a lo
anterior y mezcle cuidadosamente.
• Incorpore la vainilla y el colorante de comida. Mezcle.
Magdalenas con sabor Merengue de Limón
2 1/2 tazas / 160g de harina leudante
1 cucharada de polvo de hornear
1/2 cucharadita de sal
1 taza / 240g de manteca
ablandada
2 tazas / 400g de azúcar
4 huevos
2 cucharadas de ralladura de limón,
más 2 cucharadas de jugo de limón
fresco.
1 1/2 cucharadita de extracto de
vainilla puro
1 taza / 250ml de leche de manteca
Instrucciones:
• En un bol grande bata la manteca y el azúcar hasta obtener
una crema pálida y esponjosa.
• Agregue los huevos, uno por uno. Incorpore y mezcle la
ralladura de limón, la vainilla y la harina.
• Agregue la leche de manteca y el jugo de limón, y bata todos
los ingredientes juntos.
19
Assembly page 19/36
MFM 37992 - 120501
Page 20

Copies of the I/B. Please reproduce them without any
changes except under special instruction from Team
International USA. The pages must be reproduced and folded
in order to obtain a booklet A5 (+/- 148.5 mm width x 210 mm
height). When folding, make sure you keep the good
Fax +1 305 430 9280
Magdalenas con sabor Banana Chocolate
1 huevo mediano
1 ½ taza / 180g de harina
¾ taza / 180ml de leche
1 taza / 220g de copitos de
chocolate
1 taza / 180g de azúcar moreno
numbering when you turn the pages of the I/B. Don’t change
the page numbering. Keep the language integrity. Print only
what is inside the frame.
½ taza de puré de banana
¼ taza / 60ml de aceite vegetal
3 cucharaditas de polvo de hornear
1/4 cucharadita de sal
½ cucharadita de canela
1/2 cucharadita de nuez moscada
Instrucciones:
• En un bol grande, mezcle el huevo, la leche, la banana, y el
aceite.
• En un bol pequeño mezcle juntos la harina, el polvo de hornear,
la sal, la canela y la nuez moscada.
• Incorpore los ingredientes secos a la mezcla del huevo hasta que
dichos ingredientes comiencen a humedecerse, pero todavía
estén grumosos, Agregue los copitos de chocolate.
Magdalenas de Arándanos
1 1/2 taza de arándanos frescos
2 huevos
2 tazas de harina
1 taza de azúcar
1/2 taza de leche
1/4 taza de manteca
2 cucharaditas de polvo de hornear
1 cucharadita de extracto de vainilla
1/2 cucharadita de sal
Instrucciones:
• En un bol grande combine y mezcle la manteca, los huevos, la
sal y el azúcar.
• En un bol aparte combine la harina y el polvo de hornear.
• Agregue a esto la mezcla de la manteca, y la leche, y mezcle
hasta que los ingredientes se incorporen pero todavía estén
grumosos. Tenga cuidado de no mezclar en exceso.
• Agregue la vainilla y mezcle todos los ingredientes juntos, y para
finalizar agregue los arándanos.
Magdalenas de Chocolate
1 barra / 110g de manteca
1 ¼ taza / 150g de azúcar
2 huevos
¾ taza / 100g de harina
3 cucharaditas de polvo de hornear
¼ cucharadita de sal
½ taza / 60g de cacao en polvo
amargo
½ taza / 125ml de leche
1 ½ cucharadita / 7ml de extracto de
vainilla
20
Assembly page 20/36
MFM 37992 - 120501
Page 21

Copies of the I/B. Please reproduce them without any
changes except under special instruction from Team
International USA. The pages must be reproduced and folded
in order to obtain a booklet A5 (+/- 148.5 mm width x 210 mm
height). When folding, make sure you keep the good
Fax +1 305 430 9280
numbering when you turn the pages of the I/B. Don’t change
the page numbering. Keep the language integrity. Print only
what is inside the frame.
Instrucciones:
• Mezcle la manteca con un batidor eléctrico hasta que esté
suave, y luego agregue el azúcar. Bata durante 3 minutos.
• Agregue los huevos, uno por uno, hasta que se hayan
incorporado completamente.
• En un bol aparte, combine los ingredientes secos y únalos para
incorporarlos a la otra mezcla.
• Agregue los ingredientes secos a la mezcla de manteca y
azúcar, y mezcle hasta combinar toda la preparación.
• Agregue los líquidos (la leche y la vainilla), y combine todos los
ingredientes juntos.
Baño glaseado de chocolate
1 1/2 taza / 300g de copitos de chocolate
2 cucharaditas / 30g de manteca derretida
½ cucharadita / 7ml de jarabe de maíz liviano [light]
Instrucciones:
• Cocine los copitos de chocolate y la manteca en el horno de
micro-ondas durante 1 minuto, mezcle y continúe cocinando en
micro-ondas durante 30/60 segundos hasta que se derrita; luego
incorpore y mezcle con el jarabe de maíz.
Baño glaseado de queso-crema
3 oz. de queso-crema
1/2 taza de manteca derretida
2 ¼ tazas de azúcar impalpable
1 cucharadita de extracto de vainilla
Instrucciones:
Bata los ingredientes juntos hasta obtener una mezcla suave.
21
Assembly page 21/36
MFM 37992 - 120501
Page 22

Copies of the I/B. Please reproduce them without any
changes except under special instruction from Team
International USA. The pages must be reproduced and folded
in order to obtain a booklet A5 (+/- 148.5 mm width x 210 mm
height). When folding, make sure you keep the good
Fax +1 305 430 9280
numbering when you turn the pages of the I/B. Don’t change
the page numbering. Keep the language integrity. Print only
what is inside the frame.
LIMPIEZA
• Desenchufe y deje enfriar el aparato antes de limpiarlo.
• Limpie el exterior del aparato con un paño ligeramente
humedecido, asegurándose de que no haya humedad, aceite o
grasa que se infiltre en las aeraciones que enfrían el aparato.
• Limpie el interior de su aparato con un papel absorbente o un
trapo suave.
• No limpie nunca su aparato (exterior o interior) con productos
abrasivos ya que estropearía el revestimiento.
• Si queda masa cocida en la placa, aconsejamos que utilice
aceite vegetal para ablandarla y espere 5 minutos antes de
quitarla.
• NO SUMERJA EL APARATO EN AGUA NI EN NINGÚN OTRO LIQUIDO.
Nota: usted puede enroscar el cable alrededor de los ganchos
situados abajo del aparato para guardarlo, o en caso de que el
cable sea demasiado largo.
22
Assembly page 22/36
MFM 37992 - 120501
Page 23

Copies of the I/B. Please reproduce them without any
changes except under special instruction from Team
International USA. The pages must be reproduced and folded
in order to obtain a booklet A5 (+/- 148.5 mm width x 210 mm
height). When folding, make sure you keep the good
Fax +1 305 430 9280
numbering when you turn the pages of the I/B. Don’t change
the page numbering. Keep the language integrity. Print only
what is inside the frame.
GARANTÍA
Le sugerimos rellenen y nos envíen rápidamente la Tarjeta de
Registro de Producto adjunta para facilitar la verificación de la
fecha de compra. Por lo tanto, la devolución de esa Tarjeta de
Registro de Producto no es una condición imprescindible para la
aplicación de esa garantía. Puede también rellenar dicha tarjeta de
garantía en línea en la dirección siguiente: www.KALORIK.com
A partir de la fecha de compra, este producto KALORIK está
garantizado un año contra los defectos materiales y de fabricación,
en los Estados Unidos. Esta garantía no es transferible. Conserve la
prueba de compra original. Se exige una prueba de compra para
obtener la aplicación de la garantía.
Durante este período, si el producto KALORIK después de una
inspección por parte de KALORIK, se manifiesta defectuoso, será
reparado o remplazado, según lo que decida KALORIK, sin gastos
para el consumidor. Si se envía un producto de remplazo, se
aplicará la garantía que queda del producto original.
Esta garantía no se aplica a los defectos causados por una mala
utilización por parte del comprador o del usuario, o una negligencia
al no respeto del manual de instrucciones KALORIK, o una utilización
en un circuito eléctrico cuyo voltaje es diferente al que figura en el
producto, o un desgaste normal, o modificaciones o reparaciones
no autorizadas por KALORIK, o por un uso con fines comerciales. No
existe garantía por las partes de cristal, jarras de cristal, filtros, cestos,
cuchillas y accesorios en general. No existe tampoco garantía por
las piezas perdidas por el usuario.
Toda garantía de valor comercial o de adaptabilidad a este
producto está limitada a un año también.
Algunos estados no ponen límites a la duración de la garantía tácita
o no autorizan la exclusión de daños y perjuicios accesorios o
indirectos, por lo que puede que las restricciones anteriormente
mencionadas no le sean aplicables a Usted. Esta garantía le otorga
derechos legales particulares, pero usted puede tener también otros
23
Assembly page 23/36
MFM 37992 - 120501
Page 24

Copies of the I/B. Please reproduce them without any
changes except under special instruction from Team
International USA. The pages must be reproduced and folded
in order to obtain a booklet A5 (+/- 148.5 mm width x 210 mm
height). When folding, make sure you keep the good
Fax +1 305 430 9280
numbering when you turn the pages of the I/B. Don’t change
the page numbering. Keep the language integrity. Print only
what is inside the frame.
derechos que varían de un estado a otro y algunos derechos
pueden variar de un estado a otro.
Si el aparato tuviera un defecto durante el periodo de garantía y / o
más de 30 días después de que se compró, no devuelva el aparato
en la tienda donde le compró: a menudo, nuestro Servicio al
Consumidor puede ayudar a resolver el problema sin que el
producto tenga que ser reparado. Si hace falta una reparación, uno
de nuestros representantes puede confirmar si el producto está bajo
garantía y dirigirle al servicio post-venta más próximo.
Si fuera el caso, traiga el producto (o envíelo, correctamente
franqueado) con la prueba de compra que mencione el número de
autorización de devolución indicado por nuestro Servicio al
Consumidor, al servicio post-venta KALORIK más próximo. (Visite
nuestra web www.KALORIK.com o llame al Servicio al Consumidor
para obtener la dirección del Servicio post-venta KALORIK exclusivo
más próximo).
Si envía el producto, le rogamos añadan una carta explicando la
naturaleza del defecto.
Si tiene preguntas adicionales, por favor llame al Servicio al
Consumidor (véase abajo para los datos completos), de lunes a
jueves
, de las 9:00 a las 17:00 (EST), y el viernes de las 9:00 a las 16:00
(EST). Note que las horas pueden ser modificadas.
Si quiere escribirnos, puede hacerlo a la dirección siguiente:
KALORIK Servicio al Consumidor
Team International Group of America Inc.
1400 N.W 159th Street, Suite 102
Miami Gardens, FL 33169 USA
O llame gratuitamente (U.S.A.) al +1 888-521-TEAM / +1 888-KALORIK
Las cartas se aceptan solamente en la dirección anteriormente
mencionada. Los envíos y paquetes que no tengan número de
autorización de devolución serán rechazados.
24
Assembly page 24/36
MFM 37992 - 120501
Page 25

Copies of the I/B. Please reproduce them without any
changes except under special instruction from Team
International USA. The pages must be reproduced and folded
in order to obtain a booklet A5 (+/- 148.5 mm width x 210 mm
height). When folding, make sure you keep the good
Fax +1 305 430 9280
numbering when you turn the pages of the I/B. Don’t change
the page numbering. Keep the language integrity. Print only
what is inside the frame.
CONSIGNES DE SECURITE
Pour utiliser un appareil électrique, des précautions élémentaires
sont à respecter, telles que celles énumérées ci-dessous :
1. LISEZ L’ENSEMBLE DES INSTRUCTIONS.
2. Avant d'utiliser l'appareil, vérifiez que la tension du réseau
correspond bien à celle notée sur la plaque signalétique de votre
appareil.
3. Ne touchez pas les surfaces chaudes. Manipulez les poignées et
les boutons.
4. Pour écarter les risques d’électrocution, n'immergez pas le
cordon, la fiche ou l'appareil dans l'eau ou dans tout autre
liquide.
5. Gardez hors de portée des enfants et animaux domestiques. Cet
appareil n’est pas conçu pour être utilisé par des enfants, ou des
personnes aux facultés mentales ou motrices réduites, ou sans
expérience, à moins que ceux-ci ne soient supervisés ou aient été
formés à l’usage de ce produit, par une personne responsable
de leur sécurité. Faites particulièrement attention en utilisant cet
appareil.
6. Débranchez l'appareil de la prise murale lorsqu’il n’est pas utilisé
ou avant de le nettoyer. Laissez l'appareil refroidir avant de le
nettoyer.
7. Ne faites pas fonctionner l'appareil si son cordon ou sa fiche est
endommagé ou si l'appareil a présenté un dysfonctionnement
ou est endommagé. Retournez l’appareil au centre de service
autorisé par le fabricant, pour le faire vérifier ou réparer.
8. L'utilisation d’accessoires non recommandés par le fabricant
présente des risques d’incendie, d’électrocution ou de blessure.
9. N'utilisez pas l'appareil à l'extérieur.
10. Ne laissez pas le cordon pendre de la table ou d'un comptoir et
évitez qu’il touche une surface chaude.
11. Ne placez pas l'appareil sur ou près d'un brûleur à gaz ou
électrique ou dans un four chaud.
12. Soyez extrêmement prudent lorsque vous déplacez un appareil
contenant de l'huile chaude ou d'autres liquides chauds.
13. Pour déconnecter l'appareil, débranchez-le de la prise murale.
25
Assembly page 25/36
MFM 37992 - 120501
Page 26

Copies of the I/B. Please reproduce them without any
changes except under special instruction from Team
International USA. The pages must be reproduced and folded
in order to obtain a booklet A5 (+/- 148.5 mm width x 210 mm
height). When folding, make sure you keep the good
Fax +1 305 430 9280
numbering when you turn the pages of the I/B. Don’t change
the page numbering. Keep the language integrity. Print only
what is inside the frame.
14. N'utilisez pas cet appareil à des fins autres que celles pour
lesquelles il est conçu.
15. Assurez-vous qu'il y ait assez d'espace libre autour de l'appareil
lorsqu'il est en fonctionnement afin qu'il y ait suffisamment de
circulation l'air. Si vous utilisez l'appareil sur une surface où la
chaleur pose problème, il est conseillé de placer un support
thermorésistant sous l'appareil.
16. Ne laissez pas l'appareil sans surveillance lorsqu'il est en
fonctionnement.
17. Utilisez toujours l'appareil sur une surface propre, plane, dure et
sèche. Assurez-vous qu'il n'y ait pas de matériaux tels qu'une
nappe ou du plastique entre l'appareil et la surface sur laquelle il
est posé. Veillez à ce que l’appareil ne rentre pas en contact
avec des matériaux facilement inflammables comme les rideaux,
les tissus,... lorsqu’il est en fonctionnement car le feu pourrait se
déclarer.
18. Il est indispensable de garder cet appareil propre étant donné
qu’il est en contact direct avec la nourriture.
19. Veillez à ne pas griffer le revêtement antiadhésif des plaques de
cuisson. S'il est nécessaire de gratter les plaques, utilisez une
spatule en bois, ou en plastique spécialement étudié pour résister
à la chaleur.
20. Ne tentez pas de faire fonctionner cet appareil en utilisant un
système de minuterie externe, ou de contrôle à distance
CONSERVEZ CES INSTRUCTIONS
USAGE DOMESTIQUE UNIQUEMENT
INSTRUCTIONS POUR LES FICHES POLARISÉES
Cet appareil a une fiche polarisée (une des deux tiges métalliques
est plus longue que l’autre). Pour réduire le risque de choc
électrique, cette prise ne peut être introduite que d’une seule façon
dans la fiche murale. Si cette prise ne rentre pas correctement dans
la fiche, retournez-la. Si elle ne rentre toujours pas, contactez un
électricien qualifié. N’essayez jamais de modifier vous-même la prise
polarisée.
26
Assembly page 26/36
MFM 37992 - 120501
Page 27

Copies of the I/B. Please reproduce them without any
1
2
4
5
changes except under special instruction from Team
International USA. The pages must be reproduced and folded
in order to obtain a booklet A5 (+/- 148.5 mm width x 210 mm
height). When folding, make sure you keep the good
Fax +1 305 430 9280
numbering when you turn the pages of the I/B. Don’t change
the page numbering. Keep the language integrity. Print only
what is inside the frame.
CONSIGNES CONCERNANT LE CORDON
Le cordon d’alimentation de l’appareil est un cordon de type court,
et ce afin de diminuer les risques d’accidents (chute si vous marchez
sur le cordon...). Vous pouvez toutefois utiliser une rallonge si
nécessaire mais:
• Assurez-vous que l'ampérage de la rallonge soit égal ou
supérieur à celui de l'appareil. Une rallonge avec un
ampérage inférieur à celui de l'appareil risquerait de
surchauffer et de brûler.
• La rallonge ne doit pas pendre du plan de travail ou de la
table afin d'éviter que les enfants ne le tirent ou trébuchent.
DESCRIPTION
1. Poignée frontale
2. Poignées latérales
3. Témoin de mise sous tension
4. Témoin de température
5. Pieds antiglisse
6. Plaque de cuisson inférieure
7. Plaque de cuisson supérieure
3
6
7
27
Assembly page 27/36
MFM 37992 - 120501
Page 28

Copies of the I/B. Please reproduce them without any
changes except under special instruction from Team
International USA. The pages must be reproduced and folded
in order to obtain a booklet A5 (+/- 148.5 mm width x 210 mm
height). When folding, make sure you keep the good
Fax +1 305 430 9280
numbering when you turn the pages of the I/B. Don’t change
the page numbering. Keep the language integrity. Print only
what is inside the frame.
UTILISATION
• Lors de la première utilisation la couche antiadhésive peut
produire de la fumée. Celle-ci n'est pas nocive et s’estompera
rapidement.
• Lorsque vous utilisez votre appareil pour la première fois, essuyez-
les plaques de cuisson avec un chiffon humide, puis séchez-les.
N’IMMERGEZ PAS L’APPAREIL DANS L’EAU.
• Placez l’appareil sur une surface plane et résistante à la chaleur.
• Fermez votre appareil et branchez la fiche de votre appareil
dans la prise de courant. Le témoin lumineux rouge (3) s’allume,
vous indiquant ainsi que l’appareil est sous tension.
• Le témoin lumineux vert (4) reste éteint, pour indiquer que
l’appareil continue de préchauffer. Lorsque le témoin lumineux
vert s'allume, cela signifie que la température de cuisson
prédéterminée en usine est atteinte.
Note : Pendant l'utilisation, ce témoin lumineux s'éteindra et se
rallumera régulièrement. Cela signifie simplement que le thermostat
règle la température de l'appareil.
Attention : pendant l'utilisation, les plaques et les surfaces de
l’appareil deviennent chaudes. L’appareil peut aussi générer de la
vapeur. Faites attention de ne pas vous brûler. Utilisez toujours des
gants de cuisine, pour ouvrir ou fermer le dessus de l’appareil.
• Ouvrez l’appareil, en utilisant la poignée située sur le devant de
l’appareil (1) et des gants de cuisine. Evitez tout contact avec
des surfaces chaudes.
• Enduisez légèrement la plaque de cuisson inférieure (6) de
matière grasse (telle que du beurre, de la margarine ou toute
autre graisse de cuisson). Pour des résultats optimaux, utilisez de
l’huile de cuisson en vaporisateur.
• Alternativement, vous pouvez utiliser des papiers de cuisson
spéciaux pour cupcake. Ce modèle accepte les papiers de
cuisson 38mm et de 50mm (1 ½ pouces et 2 pouces)
• Déposez la pâte sur la plaque inférieure (6) de façon à ce qu’elle
se répartisse équitablement dans toutes les formes (sans en
mettre trop – environ une cuillère à soupe par forme -) puis fermer
28
Assembly page 28/36
MFM 37992 - 120501
Page 29

Copies of the I/B. Please reproduce them without any
changes except under special instruction from Team
International USA. The pages must be reproduced and folded
in order to obtain a booklet A5 (+/- 148.5 mm width x 210 mm
height). When folding, make sure you keep the good
Fax +1 305 430 9280
numbering when you turn the pages of the I/B. Don’t change
the page numbering. Keep the language integrity. Print only
what is inside the frame.
le dessus de l’appareil. Ne mettez pas trop de pâte sinon celle-ci
risque de déborder sur les côtés.
• Faites cuire jusqu’à l’obtention d’une couleur dorée, ou jusqu’à ce
que les mini muffins soient cuits à cœur. La cuisson peut être
contrôlée en insérant une pique en bois jusqu’au centre (elle doit
ressortir propre et sèche).
• Quand les muffins sont cuits, retirez-les avec une spatule en
plastique ou en bois, ou en insérant précautionneusement une
fourchette en plastique ou une pique en bois sur le côté. N'utilisez
pas d'objets métalliques sur les plaques car ceux-ci pourraient en
abîmer le revêtement.
• Laissez les muffins refroidir dans une assiette ou sur une grille.
• Lorsque vous avez terminé d’utiliser l’appareil, débranchez-le et
laissez-le ouvert afin que les plaques puissent refroidir.
Conseils pratiques :
• Préparez tous les ingrédients et la pâte avant de préchauffer
l’appareil.
• L’appareil à muffins ne doit pas nécessairement être préchauffé.
Mettez simplement la pâte dans les formes et lancez la cuisson.
Cependant, l’appareil peut également être préchauffé; dans ce
cas le temps de cuisson sera plus court.
• Remplissez les formes en utilisant une poche à douille, ou un sac
refermable jetable dont vous aurez découpé un coin.
• Le temps de cuisson est variable, en fonction des ingrédients et
du type de muffin; en général, comptez de 6 à 8 minutes de
cuisson par fournée. Plus vous ferez de fournées, plus le temps de
cuisson sera court.
• Des recettes de pâtes vont gonfler de façons différentes selon les
cas, pendant la cuisson. Testez une nouvelle pâte avant de
démarrer des fournées complètes, afin de déterminer le degré
optimal de remplissage des formes, qui permettra d’obtenir des
muffins bien formés, mais sans débordement.
• Les muffins sont très fragiles quand ils sont chauds. Faites attention
en les retirant de l’appareil, et laissez-les refroidir au moins 5
minutes sur une grille avant de les servir.
• Il sera plus facile de démouler et de servir les muffins si vous utilisez
de papiers de cuisson spécialement conçus pour les muffins. Si
vous utilisez une pâte de type « brownie », les papiers de cuisson
sont indispensables car sinon, les muffins seront trop fragiles pour
29
Assembly page 29/36
MFM 37992 - 120501
Page 30

Copies of the I/B. Please reproduce them without any
changes except under special instruction from Team
International USA. The pages must be reproduced and folded
in order to obtain a booklet A5 (+/- 148.5 mm width x 210 mm
height). When folding, make sure you keep the good
Fax +1 305 430 9280
numbering when you turn the pages of the I/B. Don’t change
the page numbering. Keep the language integrity. Print only
what is inside the frame.
être démoulés, et doivent être mis à refroidir pour garder leur
forme. Les papiers de cuisson augmentent le temps de cuisson
de 1 à 2 minutes. Ce modèle accepte les papiers de cuisson
d’environ 38mm ou 50mm (1 ½ ou 2 pouces).
• Ne mettez pas de garniture / décoration sur le muffin si celui-ci
doit voyager ou doit être emballé.
• Utilisez une petite spatule ou le plat d’un couteau pour étaler la
garniture / le glaçage, ou une petite poche à douilles pour la
décoration alimentaire. Tremper les muffins dans un glaçage au
chocolat noir peut également donner d’excellents résultats.
Ajoutez de la décoration alimentaire (perles de sucres,
vermicelles, etc.) si désiré.
• Voir ci-dessous pour des recettes de muffins. Il existe de
nombreuses recettes que vous pouvez trouver sur internet ou
dans des livres consacrés aux muffins (« Cupcakes »).
NETTOYAGE
• Veuillez retirer la fiche de la prise de courant et attendre que
l’appareil et les plaques refroidissent totalement avant de les
nettoyer.
• Essuyez l’intérieur et les angles de l’appareil à l’aide de papier
absorbant ou d’un chiffon doux.
• Essuyez l’extérieur de l’appareil à l’aide d’un chiffon légèrement
humide, en vous assurant que l'humidité, l’huile ou la graisse ne
s’infiltre pas dans les aérations de refroidissement de l’appareil.
• Ne nettoyez jamais votre appareil (extérieur et intérieur) à l’aide
de produits ou matières abrasifs car cela abîmerait le
revêtement.
• Si de la pâte brulée est difficile à enlever sur les plaques, il est
conseillé de verser un peu d'huile végétale dessus et d'attendre 5
minutes avant de l'enlever.
• N'IMMERGEZ PAS L'APPAREIL, LE CORDON OU LA FICHE, DANS
L'EAU OU TOUT AUTRE LIQUIDE.
Note : vous pouvez enrouler le cordon d’alimentation autour de la
partie inferieure sous l’appareil, pour le rangement ou si le cordon
est trop long.
30
Assembly page 30/36
MFM 37992 - 120501
Page 31

Copies of the I/B. Please reproduce them without any
changes except under special instruction from Team
International USA. The pages must be reproduced and folded
in order to obtain a booklet A5 (+/- 148.5 mm width x 210 mm
height). When folding, make sure you keep the good
Fax +1 305 430 9280
numbering when you turn the pages of the I/B. Don’t change
the page numbering. Keep the language integrity. Print only
what is inside the frame.
RECETTES DE MUFFINS
Muffins à la Vanille
250g de farine
200g de sucre
3 cuillerées à café de poudre à lever
2 œufs larges
7 ml d’extrait de vanille
Pour le glaçage :
125g de beurre ramolli (à température ambiante)
225g de sucre glace
5ml d’extrait de vanille
10ml d’eau chaude
Instructions :
• Dans un bol, mélangez la farine avec la poudre à lever, le sel, la
margarine ou le beurre laissé à température ambiante, le lait et
la vanille. Battez à vitesse basse ou moyenne pendant 2 minutes.
• Grattez les bords et ajoutez les œufs. Mélangez à vitesse
moyenne pendant 1 minute, puis sur un vitesse rapide pendant
une autre minute.
• Faites cuire dans l‘appareil, après avoir graissé les plaques de
cuisson, comme expliqué plus haut.
• Préparez le glaçage et battant ensemble le beurre et le sucre, en
utilisant un batteur électrique.
• Une fois l’ensemble bien mélangé, ajoutez l’extrait de vanille et
l’eau. Battez jusqu’à l’obtention d’un mélange crémeux et lisse.
Muffins « Velours rouge »
160g de farine auto-levante
400g de sucre
60g de poudre de cacao
1 cuillerée à café de poudre à lever
1 pincée de sel
220g de beurre
1 cuillerée à café de bicarbonate de soude
Instructions :
• Dans un grand bol, mélangez le cacao, la farine, la poudre à
lever, le bicarbonate de soude et le sel.
1 pincée de sel
110g de margarine or de beurre
230ml de lait demi-écrémé (2%)
250ml de babeurre (Lait fermenté)
4 œufs
1 cuillerée à café de colorant
alimentaire rouge
1 1/2 cuillère à café d’extrait de
vanille
31
Assembly page 31/36
MFM 37992 - 120501
Page 32

Copies of the I/B. Please reproduce them without any
changes except under special instruction from Team
International USA. The pages must be reproduced and folded
in order to obtain a booklet A5 (+/- 148.5 mm width x 210 mm
height). When folding, make sure you keep the good
Fax +1 305 430 9280
numbering when you turn the pages of the I/B. Don’t change
the page numbering. Keep the language integrity. Print only
what is inside the frame.
• Dans un autre bol, mélangez le beurre et le sucre jusqu’à
l’obtention d’une pate crémeuse, légère et aérée.
• Battez les œufs et le babeurre (Lait fermenté ou « Buttermilk »)
puis ajouter tous les ingrédients et battez le tout jusqu’à
l’obtention d’une pate homogène.
• Incorporez l’extrait de vanille et le colorant alimentaire et finissez
de battre.
Muffins Meringués au Citron
160g de farine auto-levante
1 cuillerée à café de poudre à lever
400g de sucre
1 pincée de sel
240g de beurre ramolli
4 œufs
2 cuillérées à soupe de zeste de
citron
2 cuillérées à soupe de jus de citron
1 1/2 cuillerée à café d’extrait de
vanille
250ml de babeurre (Lait fermenté)
Instructions :
• Dans un grand bol, mélangez le beurre et le sucre jusqu’à
l’obtention d’une pate crémeuse, et pale.
• Ajoutez les œufs, un par un. Avec un batteur, mélangez les
zestes, la vanille et la farine.
• Incorporez le babeurre et le jus de citron, mélangez intimement.
Muffins à la Banane et Pépites de Chocolat
1 œuf moyen
180g de farine
180ml de lait
220g de pépites de chocolat
180g de sucre brun
1 banane réduite en purée
60ml d’huile végétale
3 cuillerée à café de poudre à lever
1 pincée de sel
½ cuillerée à café de cannelle
moulue
½ cuillerée à café de noix de
muscade râpée
Instructions :
• Dans un grand bol, mélangez les œufs, le lait, la banane et
l’huile.
• Dans un petit bol, mélangez la farine, la poudre à lever, le sel et
les épices.
• Incorporez grossièrement les ingrédients secs dans le mélange
d’œuf, Ajoutez les pépites de chocolat.
32
Assembly page 32/36
NM 39527 - 120501
Page 33

Copies of the I/B. Please reproduce them without any
changes except under special instruction from Team
International USA. The pages must be reproduced and folded
in order to obtain a booklet A5 (+/- 148.5 mm width x 210 mm
height). When folding, make sure you keep the good
Fax +1 305 430 9280
numbering when you turn the pages of the I/B. Don’t change
the page numbering. Keep the language integrity. Print only
what is inside the frame.
Muffins au Chocolat
110g de beurre
150g de sucre
2 œufs
100g de farine
3 cuillerées à café de poudre à lever
1 pincée de sel
60g de poudre de cacao
125ml de lait
7ml d’extrait de vanille
Instructions :
• Battez le beurre avec un fouet électrique jusqu’à ce qu’il soit
mou, puis ajoutez le sucre. Battez intimement pendant 3 minutes.
• Ajoutez les œufs, un par un, jusqu’à ce qu’ils soient parfaitement
incorporés.
• Dans un autre bol, mélangez les ingrédients secs au fouet.
• Ajoutez les ingrédients secs au beurre et au sucre, et incorporez-
les.
• Ajoutez ensuite les liquides (lait et vanille), jusqu’à l’incorporation
complète.
Glaçage au Chocolat
300g de chocolat à fondre (ou pépites de chocolat)
30g de beurre fondu
7ml de miel ou sirop d’érable (ou sirop de mais léger)
Instructions:
• Faites fondre le chocolat et le beurre au four à micro-onde
pendant 1 minute, remuez, puis remettez au four à micro-onde
pendant 30s / 1 minute. Incorporez le sirop dans le chocolat
fondu.
33
Assembly page 33/36
NM 39527 - 120501
Page 34

Fax +1 305 430 9280
Copies of the I/B. Please reproduce them without any
changes except under special instruction from Team
International USA. The pages must be reproduced and folded
in order to obtain a booklet A5 (+/- 148.5 mm width x 210 mm
height). When folding, make sure you keep the good
numbering when you turn the pages of the I/B. Don’t change
the page numbering. Keep the language integrity. Print only
what is inside the frame.
GARANTIE
Nous vous suggérons de remplir et de nous renvoyer rapidement la
Carte d’Enregistrement Produit ci-jointe afin de faciliter la vérification
de la date d’achat. Cependant, le renvoi de la Carte
d’Enregistrement Produit n’est pas une condition indispensable à
l’application de la présente garantie. Vous pouvez aussi remplir
cette carte de garantie en ligne à l’adresse suivante :
www.KALORIK.com.
A compter de la date d’achat, ce produit KALORIK est garanti un
an, sur le territoire des Etats-Unis, contre les défauts matériels et de
fabrication. Cette garantie n’est pas transférable. Conservez la
preuve d’achat originelle. Une preuve d’achat est exigée pour
obtenir l’application de la garantie.
Durant cette période, le produit KALORIK qui, après inspection par
KALORIK, s’avère défectueux, sera réparé ou remplacé, au choix de
KALORIK, sans frais pour le consommateur. Si un produit de
remplacement est envoyé, c’est la garantie restante du produit
originel qui s’appliquera.
La présente garantie ne s’applique pas aux défauts dus à une
mauvaise utilisation de la part de l’acheteur ou de l’utilisateur, à une
négligence, au non-respect des consignes du manuel d’utilisation
KALORIK, à une utilisation sur un circuit électrique au voltage
différent de celui renseigné sur le produit, à une usure normale, à des
modifications ou réparations non autorisées par KALORIK, ou par un
usage à des fins commerciales. Il n’existe pas de garantie pour les
parties en verre, récipients en verre, filtres, paniers, lames et
accessoires en général. Il n’existe également pas de garantie pour
les pièces perdues par l’utilisateur.
Toute garantie de valeur commerciale ou d’adaptabilité à ce
produit est également limitée à la garantie d’un an.
Certains états ne limitent pas la longueur de la garantie tacite ou
n’autorisent pas l’exclusion de dommages-intérêts accessoires ou
indirects, les restrictions ci-dessus peuvent donc ne pas s’appliquer à
34
Assembly page 34/36
NM 39527 - 120501
Page 35

Copies of the I/B. Please reproduce them without any
changes except under special instruction from Team
International USA. The pages must be reproduced and folded
in order to obtain a booklet A5 (+/- 148.5 mm width x 210 mm
height). When folding, make sure you keep the good
Fax +1 305 430 9280
numbering when you turn the pages of the I/B. Don’t change
the page numbering. Keep the language integrity. Print only
what is inside the frame.
vous. Cette garantie vous donne des droits légaux particuliers, et
certains droits peuvent varier d’un état à l’autre.
Si l’appareil devait présenter un défaut durant la période de
garantie et plus de 30 jours après l’achat, ne ramenez pas l’appareil
au magasin : souvent, notre Service Clientèle peut aider à résoudre
le problème sans que le produit ne doive être réparé. Si une
réparation est nécessaire, un représentant peut confirmer si le
produit est sous garantie et vous rediriger vers notre centre de
réparation.
Le cas échéant, ramenez le produit (ou envoyez-le, dûment
affranchi), ainsi qu’une preuve d’achat, en mentionnant le numéro
d’autorisation de retour, indiqué par notre service clientèle, au
service après-vente KALORIK agrée (visitez notre site internet
www.KALORIK.com ou appelez notre département Service Clientèle
pour obtenir l’adresse du service après-vente KALORIK agréé).
Si vous envoyez le produit, veuillez y joindre une lettre expliquant la
nature du défaut.
Si vous avez des questions complémentaires, veuillez appeler notre
département Service Clientèle (voyez plus bas pour les coordonnées
complètes), du Lundi au Jeudi de 9h à 17h (EST) et le Vendredi de 9h
à 16h (EST). Veuillez noter que les heures sont sujettes à modification.
Si vous souhaitez nous écrire, adressez votre courrier à:
KALORIK Customer Service Department
Team International Group of America Inc.
1400 N.W 159th Street, Suite 102
Miami Gardens, FL 33169 USA
Ou appelez (Gratuitement des Etats-Unis): +1 888-521-TEAM ou +1
888-KALORIK.
Seules les lettres seront acceptées à l’adresse ci-dessus. Les envois
et colis n’ayant pas de numéro d’autorisation de retour seront
refusés.
35
Assembly page 35/36
NM 39527 - 120501
Page 36

Fax +1 305 430 9280
Copies of the I/B. Please reproduce them without any
changes except under special instruction from Team
International USA. The pages must be reproduced and folded
in order to obtain a booklet A5 (+/- 148.5 mm width x 210 mm
height). When folding, make sure you keep the good
numbering when you turn the pages of the I/B. Don’t change
the page numbering. Keep the language integrity. Print only
what is inside the frame.
36
Assembly page 36/36
NM 39527 - 120501
 Loading...