

Page 1

Copies of the I/B. Please reproduce them without any
changes except under special instruction from Team
International BELGIUM. The pages must be reproduced
and folded in order to obtain a booklet A5 (+/- 148.5 mm
width x 210 mm height). When folding, make sure you
keep the good numbering when you turn the pages of
Fax +32 2 359 95 50
Multiuse 3-in-1 Stick
mixer set
3-en-1 Batidora uso
múltiple
Set Mixeur 3-en-1
multi-usages
the I/B. Don’t change the page numbering. Keep the
language integrity. Print only what is inside the frame.
CMM 39732
120V ~ 60Hz - 200W
www.KALORIK.com
Front cover page (first page)
Assembly page 1/32
Page 2

Copies of the I/B. Please reproduce them without any
changes except under special instruction from Team
International BELGIUM. The pages must be reproduced
and folded in order to obtain a booklet A5 (+/- 148.5 mm
width x 210 mm height). When folding, make sure you
Fax +32 2 359 95 50
keep the good numbering when you turn the pages of
the I/B. Don’t change the page numbering. Keep the
language integrity. Print only what is inside the frame.
IMPORTANT SAFEGUARDS
When using electrical appliances, basic safety precautions should
always be followed, including the following:
1. READ ALL INSTRUCTIONS
2.
Check that the voltage in your home corresponds to that stated
on the rating plate of the appliance, before using.
3. To protect against electric shock do not immerse cord, plug, or
motor unit in water or other liquid.
4. Close supervision is necessary when the appliance is used by or
near children.
5. Unplug from outlet when not in use, before putting on or taking
off parts and before cleaning.
6. Avoid touching moving parts.
7. Do not operate any appliance with a damaged cord or plug or
after the appliance malfunctions, or is dropped or damaged in
any manner. Return appliance to the nearest authorized service
facility for examination, repair or electrical or mechanical
adjustment.
8. The use of accessory attachments not recommended by the
appliance manufacturer may cause injuries.
9. Do not use outdoors.
10. Do not let cord hang over edge of table or counter or touch hot
surfaces.
11. Do not place on or near a hot gas or electric burner, or in a
heated oven.
12. To disconnect, pull plug from the wall socket. Do not disconnect
with wet hands.
13. Remove the accessories from the motor unit before washing.
14. The blades of the stick mixer are sharp. Handle carefully.
15. Keep hands, hair, loose clothes and utensils away from moving
blades while processing food to reduce the risk of severe injury to
persons or damage to the appliance. A scraper may be used but
must be used only when the appliance is not running.
16. When mixing liquids, especially hot liquids, use a tall container or
make small quantities at a time to reduce spillage.
2
Assembly page 2/32
CMM 39732 - 120501
Page 3

Fax +32 2 359 95 50
Copies of the I/B. Please reproduce them without any
changes except under special instruction from Team
International BELGIUM. The pages must be reproduced
and folded in order to obtain a booklet A5 (+/- 148.5 mm
width x 210 mm height). When folding, make sure you
keep the good numbering when you turn the pages of
the I/B. Don’t change the page numbering. Keep the
language integrity. Print only what is inside the frame.
Caution: Special Safeguards
Blender attachment
1. Always unplug the appliance before changing accessories or
approaching parts which move when in use.
2. Never touch the blades while the machine is plugged in.
3. Never blend hot oil or fat.
Chopper
1. Care is needed when handing the cutting blade, especially
when removing the blade from the bowl, emptying the bowl and
during cleaning. Do not touch the sharp blades!
2. Always remove the chopper blade before emptying the bowl.
3. Never remove the cover before the blade has completely
stopped.
SAVE THESE INSTRUCTIONS
HOUSEHOLD USE ONLY
POLARIZED PLUG INSTRUCTIONS
This appliances is equipped with a polarized plug (one blade is wider
than the other). To reduce the risk of electric shock, this plug will fit
into the polarized outlet only one way. If the plug does not properly
fit into the outlet at first, reverse it. If it still does not fit, contact a
competent qualified electrician. Do not attempt to modify the plug in
any way.
SHORT CORD INSTRUCTIONS
A short power supply cord is provided to reduce the hazards resulting
from becoming entangled in, or tripping over a longer cord.
Extension cords may be used if care is exercised in their use.
• The electrical rating of the extension cord should be at least that
of the appliance. If the electrical rating of the extension cord is
too low, it could overheat and burn.
3
Assembly page 3/32
CMM 39732 - 120501
Page 4
Copies of the I/B. Please reproduce them without any
changes except under special instruction from Team
International BELGIUM. The pages must be reproduced
and folded in order to obtain a booklet A5 (+/- 148.5 mm
width x 210 mm height). When folding, make sure you
Fax +32 2 359 95 50
keep the good numbering when you turn the pages of
the I/B. Don’t change the page numbering. Keep the
language integrity. Print only what is inside the frame.
• The resulting extended cord should be arranged so that it will not
hang over the counter top or tabletop where it can be pulled on
by children or tripped over.
IMPORTANT INFORMATION
This appliance is not for professional use. You should follow the
requested breaks. Failure to follow this instruction carefully may result
in damage to the motor. Please refer to the rating label for the
maximum continuous usage time (KB xx min where xx is the maximum
usage time). The breaks should last at least 10 minutes.
Note: the KB indicates a maximum continuous motor usage time. In
general, this appliance is used using a pulse pattern, so the real
maximum usage time is actually much longer than the KB indicated
on the rating label.
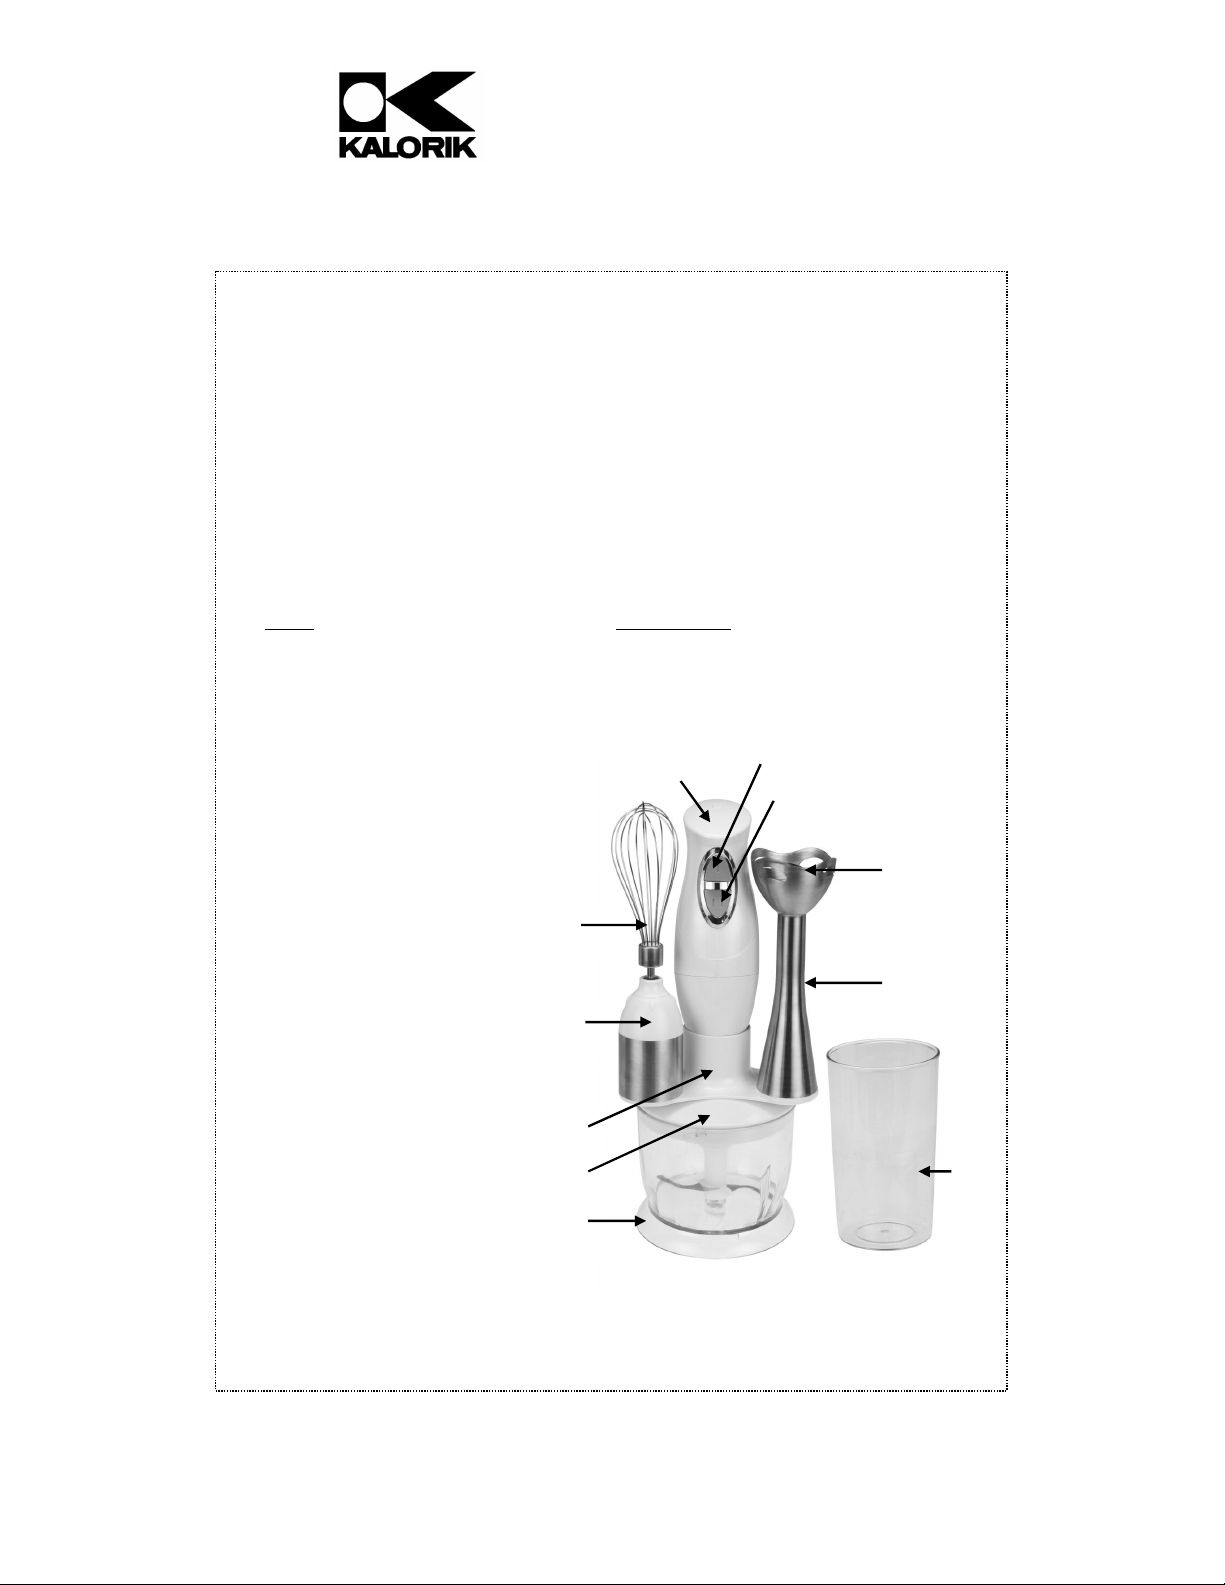
PARTS DESCRIPTION
1. Stainless steel blade
2. Removable Stainless steel
shaft
3. Mixing cup
4. Chopper bowl with
stainless steel blade
5. Chopper lid
6. Accessories holder
7. Whisk base
8. Stainless steel whisk
9. Motor block / handle
10. Speed “I”
11. Speed “II”
9
10
11
1
8
2
7
6
5
4
3
4
Assembly page 4/32
CMM 39732 - 120501
Page 5

Copies of the I/B. Please reproduce them without any
changes except under special instruction from Team
International BELGIUM. The pages must be reproduced
and folded in order to obtain a booklet A5 (+/- 148.5 mm
width x 210 mm height). When folding, make sure you
Fax +32 2 359 95 50
keep the good numbering when you turn the pages of
the I/B. Don’t change the page numbering. Keep the
language integrity. Print only what is inside the frame.
HOW TO USE WITH THE BLENDER SHAFT
Your new stick mixer is convenient and easy to use, for powerful high
speed blending. It is great for shakes, soups, sauces, omelettes and
much, much more.
• Before using for the first time, the appliance should be cleaned
with a damp cloth. Ensure the unit is unplugged first!
• Screw the shaft (2) onto the screw thread at the bottom of the
motor unit (9). For this, hold the motor block and turn the shaft
counter clockwise until it locks in. Gentle pressure by hand will
ensure that the shaft is fully tightened on to the motor unit.
• Put the ingredients into a suitable container such as a tall mixing
bowl, cooking pan or mixing cup. Do not overfill, to avoid
splashing when the motor is switched on.
• Plug into a wall outlet.
• Put the shaft’s head vertically into the ingredients before pressing
one of the switches. This will prevent splashing when the motor is
switched on.
• Switch on motor by choosing “Speed I“ (10) or “Speed II” (11)
and blend but remember to use for no longer than 1 minute of
continuous motor use. The motor must then be rested for 10
minutes.
Note: we recommend starting with the lower speed setting (“I”) and
then increase the blade rotation speed by selecting speed “II” if
needed.
Tips:
• Never fill the mixing cup to more than 2/3 full, to prevent over
flowing.
• Always blend ingredients together with water or other liquid with
the stick blender.
• Do not use the stick blender to blend dry, hard foods only, such
as coffee beans, ice cubes, sugar, cereals, chocolate etc.
• Always use the appliance on a secure, dry level surface.
5
Assembly page 5/32
MS 39731 - 120501
Page 6

Copies of the I/B. Please reproduce them without any
changes except under special instruction from Team
International BELGIUM. The pages must be reproduced
and folded in order to obtain a booklet A5 (+/- 148.5 mm
width x 210 mm height). When folding, make sure you
Fax +32 2 359 95 50
keep the good numbering when you turn the pages of
the I/B. Don’t change the page numbering. Keep the
language integrity. Print only what is inside the frame.
HOW TO USE WITH THE CHOPPER BOWL
• Make sure the motor block is disconnected from the power
outlet.
•
Place the chopping blade on the center pin inside the chopper
bowl (4).
• Place the chopper bowl on an anti-slip pad.
• Add food in chopper bowl, such as meat, cheese, onions, herbs,
garlic, bread crumbs or crackers, etc.
• Put the chopper lid (5) on the chopper bowl (4), by inserting the
grooves on the side of the lid into the pins inside the wall of the
bowl, and locking it with a twisting motion clockwise.
• Place the motor block (9) onto the chopper’s lid, and lock it in
place by applying a gentle twisting motion clockwise.
• Plug the appliance into a wall outlet.
• Pulse on any switch, “Speed 1” (10) or “Speed II” (11) to operate
the chopper. During the processing, hold the motor unit with one
hand and the chopper bowl with the other.
• After use, unplug it and take the motor unit off of the chopper
cover (with a counter clockwise twisting motion); then remove
the chopper lid (also with a counter clockwise twisting motion) –
make sure beforehand that the blades are completely stopped -
•
Carefully remove the blade
sharp!
• Remove the processed food from the bowl.
Note: remember to use for no longer than 1 minute of continuous
motor use. The motor must then be rested for 10 minutes. Keep food
quantity to process under 1 lb. (450g).
– handle with caution because it is sharp!
– handle with caution because it is
6
Assembly page 6/32
MS 39731 - 120501
Page 7

Copies of the I/B. Please reproduce them without any
changes except under special instruction from Team
International BELGIUM. The pages must be reproduced
and folded in order to obtain a booklet A5 (+/- 148.5 mm
width x 210 mm height). When folding, make sure you
Fax +32 2 359 95 50
keep the good numbering when you turn the pages of
the I/B. Don’t change the page numbering. Keep the
language integrity. Print only what is inside the frame.
HOW TO USE WITH THE WHISK ATTACHEMENT
• Make sure the motor block is disconnected from the power
outlet.
• Insert the stainless steel whisk (8) gently on its base (7), until you
hear a click sound, indicating that the whisk is securely inserted.
• Screw the whisk assembly (7) + (8) onto the screw thread at the
bottom of the motor unit. For this, hold the motor block and turn
the whisk assembly counter clockwise until it locks in. Gentle
pressure by hand will ensure that the whisk assembly is fully
tightened on to the motor unit.
• Put the ingredients into a suitable container such as a tall mixing
bowl, cooking pan or mixing cup. Do not overfill, to avoid
splashing when the motor is switched on.
• Plug the appliance into a wall outlet.
• Put the whisk vertically into the ingredients before pressing one of
the switches. This will prevent splashing when the motor is
switched on.
• Switch on motor by choosing “Speed I“ or “Speed II” and blend,
but remember to use for no longer than 1 minute of continuous
motor use. The motor must then be rested for 10 minutes.
CLEANING
• Caution: Always unplug the unit before cleaning.
• The motor unit should only be wiped down with a moist cloth.
• Unscrew the shaft, or the whisk assembly, from the screw thread
at the bottom of the motor unit, by holding the motor block and
gently turning the shaft clockwise to dis-assemble it.
• Wash the shaft under running water immediately after use. If it is
very dirty, it can be washed in warm soapy water.
• Dry the detachable shaft thoroughly after washing.
• The mixing cup, the chopper bowl, the chopper blade and the
stainless steel whisk (without its base) are dishwasher safe, or can
be cleaned in warm soapy water.
• The chopper lid (5) and the whisk base (7) may be rinsed under
the tap, but do not immerse in water.
NEVER IMMERSE THE MOTOR UNIT IN WATER OR ANY LIQUID!
7
Assembly page 7/32
MS 39731 - 120501
Page 8

Copies of the I/B. Please reproduce them without any
changes except under special instruction from Team
International BELGIUM. The pages must be reproduced
and folded in order to obtain a booklet A5 (+/- 148.5 mm
width x 210 mm height). When folding, make sure you
Fax +32 2 359 95 50
keep the good numbering when you turn the pages of
the I/B. Don’t change the page numbering. Keep the
language integrity. Print only what is inside the frame.
STORAGE
To store all the accessories and the unit cleanly and safely, please
proceed as follows:
• Assemble the chopper, as explained in the paragraph “How to
use with the Chopper bowl”.
• Place the accessory holder (6), centred on the lid of the
chopper.
• Place the motor block, as explained in the paragraph “How to
use with the Chopper bowl”.
• Place the whisk assembly on one of the domes of the accessory
holder, and lock it in place with a clockwise twisting motion.
• Place the blending shaft on the other dome, and lock it in place
with a clockwise twisting motion.
• To disassemble, proceed with reverse action and order.
• Alternatively, you can hang the motor block with only the
blending shaft attached to it, using the hanging loop located
where the power cord meets the motor block.
NOTE: NEVER PUT THE MIXING CUP INTO THE MICROWAVE
8
Assembly page 8/32
MS 39731 - 120501
Page 9

Copies of the I/B. Please reproduce them without any
changes except under special instruction from Team
International BELGIUM. The pages must be reproduced
and folded in order to obtain a booklet A5 (+/- 148.5 mm
width x 210 mm height). When folding, make sure you
Fax +32 2 359 95 50
keep the good numbering when you turn the pages of
the I/B. Don’t change the page numbering. Keep the
language integrity. Print only what is inside the frame.
WARRANTY
We suggest that you complete and return the enclosed Product
Registration Card promptly to facilitate verification of the date of
original purchase. However, return of the Product Registration Card is
not a condition of these warranties. You can also fill out this warranty
card online, at the following address: www.KALORIK.com
This KALORIK product is warranted in the U.S.A. for 1 year from the
date of purchase against defects in material and workmanship. This
warranty is not transferable. Keep the original sales receipt. Proof of
purchase is required to obtain warranty performance.
During this period, if the KALORIK product, upon inspection by
KALORIK, is proven defective, it will be repaired or replaced, at
Kalorik’s option, without charge to the customer. If a replacement
product is sent, it will carry the remaining warranty of the original
product.
This warranty does not apply to any defect arising from a buyer's or
user's misuse of the product, negligence, failure to follow KALORIK
instructions noted in the user’s manual, use on current or voltage
other than that stamped on the product, wear and tear, alteration
or repair not authorized by KALORIK, or use for commercial purposes.
There is no warranty for glass parts, glass containers, filter basket,
blades and agitators, and accessories in general. There is also no
warranty for parts lost by the user.
ANY WARRANTY OF MERCHANTABILITY OR FITNESS WITH RESPECT TO
THIS PRODUCT IS ALSO LIMITED TO THE ONE YEAR LIMITED WARRANTY
PERIOD.
Some states do not allow limitation on how long an implied warranty
lasts or do not allow the exclusion of incidental or consequential
damages, so the above limitations may not apply to you. This
warranty gives you specific legal rights, and you may also have other
rights which vary from state to state.
9
Assembly page 9/32
MS 39731 - 120501
Page 10

Copies of the I/B. Please reproduce them without any
changes except under special instruction from Team
International BELGIUM. The pages must be reproduced
and folded in order to obtain a booklet A5 (+/- 148.5 mm
width x 210 mm height). When folding, make sure you
Fax +32 2 359 95 50
keep the good numbering when you turn the pages of
the I/B. Don’t change the page numbering. Keep the
language integrity. Print only what is inside the frame.
If the appliance should become defective within the warranty
period and more than 30 days after date of purchase, do not return
the appliance to the store: often, our Customer Service
Representatives can help solve the problem without having the
product serviced. If servicing is needed, a Representative can
confirm whether the product is under warranty and direct you to the
nearest service location.
If this is the case, bring the product, or send it, postage prepaid by
the user (all Kalorik customers are responsible for the initial shipment
back to the warranty center), along with proof of purchase and a
return authorization number indicated on the outer package, given
by our Customer Service Representatives. Send to the authorized
KALORIK Service Center (please visit our website at
www.KALORIK.com or call our Customer Service Department for the
address of our authorized KALORIK Service Center).
When sending the product, please include a letter explaining the
nature of the claimed defect.
If you have additional questions, please call our Customer Service
Department (please see below for complete contact information),
Monday through Thursday from 9:00am - 5:00pm (EST) and Friday
from 9:00am - 4:00pm (EST). Please note hours are subject to change.
If you would like to write, please send your letter to:
KALORIK Customer Service Department
Team International Group of America Inc.
1400 N.W 159th Street, Suite 102
Miami Gardens, FL 33169 USA
Or call:
Toll Free: +1 888-521-TEAM / +1 888-KALORIK
Only letters can be accepted at this address above. Shipments and
packages that do not have a return authorization number will be
refused.
10
Assembly page 10/32
MS 39731 - 120501
Page 11

Copies of the I/B. Please reproduce them without any
changes except under special instruction from Team
International BELGIUM. The pages must be reproduced
and folded in order to obtain a booklet A5 (+/- 148.5 mm
width x 210 mm height). When folding, make sure you
Fax +32 2 359 95 50
keep the good numbering when you turn the pages of
the I/B. Don’t change the page numbering. Keep the
language integrity. Print only what is inside the frame.
CONSEJOS DE SEGURIDAD
Cuando se utilizan aparatos eléctricos, hay unas precauciones
básicas de seguridad que siempre se deben seguir, tales como:
1. LEA TODAS LAS INSTRUCCIONES.
2.
Antes de utilizar el aparto, compruebe que el voltaje de la red
eléctrica coincide con el aparato.
3. Para protegerse contra una descarga eléctrica, no sumerja el
cable de alimentación, la clavija o el bloque motor en agua o
en otros líquidos.
4.
Es siempre necesaria la supervisión cercana cuando este
aparato sea utilizado cerca de niños. Este aparato no debe ser
usado por niños.
5. Desenchufe el aparato siempre que no lo use o antes de
limpiarlo.
6. No toque las partes en movimiento.
7. No opere el aparato si el cable o el enchufe están dañados, o
después de que el aparato ha funcionado inadecuadamente,
se ha caído o ha sido dañado en cualquier manera. El aparato
debe ser llevado al fabricante o a un centro de servicio
autorizado para ser comprobado y reparado o ajustado
mecánicamente o eléctricamente.
8. El uso de accesorios que no sean los recomendados por el
fabricante puede causar incendios, descargas eléctricas o
heridas.
9. No use en el exterior.
10. No permita que el cable cuelgue del borde de la mesa o del
mostrador o que toque una superficie caliente.
11. No coloque este aparato sobre o cerca de quemadores de gas
o eléctricos, o dentro de un horno caliente.
12. Para desconectar el aparato, desenchúfelo. Atención: No
desconectar con las manos mojadas.
13. Desmonte los accesorios del bloque motor antes de la limpieza.
14. Las cuchillas de la batidora de varilla están muy afiladas. Tenga
cuidado de no cortarse cuando las manipule.
15. Durante el uso, mantenga las manos, pelo, ropa suelta u otros
utensilios lejos de las cuchillas en movimiento para evitar heridas
11
Assembly page 11/32
MS 39731 - 120501
Page 12

Copies of the I/B. Please reproduce them without any
changes except under special instruction from Team
International BELGIUM. The pages must be reproduced
and folded in order to obtain a booklet A5 (+/- 148.5 mm
width x 210 mm height). When folding, make sure you
Fax +32 2 359 95 50
keep the good numbering when you turn the pages of
the I/B. Don’t change the page numbering. Keep the
language integrity. Print only what is inside the frame.
o daños al aparato. Puede utilizar un raspador sólo cuando el
aparato esté desenchufado.
16. Cuando misture líquidos, especialmente líquidos calientes, utilice
un recipiente alto o prepare pequeñas cantidades para evitar
derrame.
Atención: Precauciones especiales
Varilla de la batidora:
1. Desenchufe siempre su aparato antes de cambiar los accesorios
o si necesita acercarse o tocar las piezas que se mueven con el
uso.
2. No toque nunca las cuchillas mientras el aparato este
enchufado.
3. No mezcle o bata nunca aceite o grasa caliente.
Picadora:
1. Hay que tener mucho cuidado cuando se maneja la cuchilla de
la picadora, especialmente cuando se quita de la taza, se vacía
el recipiente y se procede a su limpieza. Las cuchillas están muy
afiladas.
2. Retire siempre la cuchilla del recipiente antes de vaciarlo.
3. No quite nunca la tapa antes de que la cuchilla se haya
detenido completamente.
GUARDE ESTAS INSTRUCCIONES
SOLAMENTE PARA USO DOMESTICO
12
Assembly page 12/32
MS 39731 - 120501
Page 13

Copies of the I/B. Please reproduce them without any
changes except under special instruction from Team
International BELGIUM. The pages must be reproduced
and folded in order to obtain a booklet A5 (+/- 148.5 mm
width x 210 mm height). When folding, make sure you
Fax +32 2 359 95 50
keep the good numbering when you turn the pages of
the I/B. Don’t change the page numbering. Keep the
language integrity. Print only what is inside the frame.
INFORMACIÓN SOBRE EL ENCHUFE POLARIZADO
Este aparato está provistos con un enchufe polarizado (una pata es
más ancha que la otra). Para reducir el riesgo de choque eléctrico,
este enchufe calza en el tomacorriente polarizado de una sola
manera. Si el enchufe no cabe totalmente en el tomacorriente, gire
el enchufe. Si aún así no calza, consulte a un servicio técnico
cualificado. No intente anular esta característica de seguridad.
INSTRUCCIONES DEL CABLE
El cable de alimentación del aparato es un cable corto a fin de
disminuir el riesgo de accidentes (caídas al tropezar con él, etc.)
Puede utilizar un alargador si es necesario.
• Asegúrese de que el nivel eléctrico del cable es igual o mayor
que el indicado. Una extensión con un bajo nivel eléctrico
conllevaría el riesgo de su sobrecalentamiento y daño.
• Para evitar riesgos, coloque el aparato de forma tal que los niños
no puedan jalarlo o tropezar con él. Que no arrastre nunca por el
suelo.
TIEMPO DE UTILIZACIÓN
Este aparato no es para usos profesionales. Es necesario realizar
paradas a intervalos regulares. No realizar esas paradas podría
dañar el motor. Para una utilización óptima de su aparato y evitar el
deterioro de su motor, controle el tiempo de utilización continuada
máxima indicada en la placa de características. (KB xx min. donde
xx es la duración máxima). Las pausas de utilización tienen que
durar por los menos 10 minutos. Las pausas de utilización tienen que
durar por los menos 10 minutos.
Nota: el KB indica el tiempo máximo de uso continuado del motor.
En general, este aparato se utiliza usando un patrón de pulsos, por lo
que el tiempo máximo de uso real es mucho mayor que el KB
indicado en la etiqueta de clasificación.
13
Assembly page 13/32
MS 39731 - 120501
Page 14

Fax +32 2 359 95 50
Copies of the I/B. Please reproduce them without any
changes except under special instruction from Team
International BELGIUM. The pages must be reproduced
and folded in order to obtain a booklet A5 (+/- 148.5 mm
width x 210 mm height). When folding, make sure you
keep the good numbering when you turn the pages of
the I/B. Don’t change the page numbering. Keep the
language integrity. Print only what is inside the frame.
PARTES
9
10
11
1. Cuchilla de acero
inoxidable
2. Varilla desmontable
1
3. Vaso
4. Vaso de la picadora
8
con cuchilla de acero
inoxidable.
5. Tapa de la picadora
6. Soporte de los
7
2
accesorios
7. Base pie batidor
8. Batidor de acero
inoxidable
9. Motor
10. Velocidad “I”
11. Velocidad “II”
6
5
4
MODO DE EMPLEO CON LA VARILLA
Fácil, práctica y simple de limpiar, esta batidora es ideal para batir
leche, sopas, huevos, etc.
• Antes de utilizar el aparato por primera vez, la varilla debe ser
limpiada con un paño húmedo.
• Atornille la parte separable dentro de la rosca en la parte
inferior del bloque motor girando hacia la derecha hasta que
quede bloqueada. Haga una leve presión sólo para
asegurarse de que la varilla está totalmente acoplada a la
unidad del motor
• Vierta los ingredientes en el vaso batidor o en otro recipiente
vigilando las cantidades para evitar salpicaduras.
• Conecte la clavija a la red eléctrica.
• Introduzca la varilla del aparato verticalmente dentro del vaso
donde se encuentran los ingredientes antes de presionar uno
de los interruptores “Velocidad I” o “Velocidad II”. Esto evitará
salpicaduras cuando el motor esté en marcha.
3
14
Assembly page 14/32
MS 39731 - 120501
Page 15

Copies of the I/B. Please reproduce them without any
changes except under special instruction from Team
International BELGIUM. The pages must be reproduced
and folded in order to obtain a booklet A5 (+/- 148.5
mm width x 210 mm height). When folding, make sure
Fax +32 2 359 95 50
you keep the good numbering when you turn the
pages of the I/B. Don’t change the page numbering.
Keep the language integrity. Print only what is inside
the frame.
• Enciende el motor escogiendo “Velocidad I” o “Velocidad II” y
bata. Nunca utilice el aparato durante más de 1 minuto de
manera continua. Después, es necesario efectuar pausas de 10
minutos.
Nota: se recomienda comenzar con la velocidad baja (“I”) y
aumentar la velocidad alta “II” si necesario.
Consejos:
• Nunca llene a mas de 2/3 el vaso a realizar la mezcla pare
evitar que esta desborde.
• Para batir mezcle siempre los ingredientes con agua u otro
líquido.
• No utilice la batidora mara mezclar alimentos secos y duros,
como granos de café, cubitos de hielo, azúcar, cereales,
chocolates, etc.
• Utilice siempre el aparato sobre una superficie segura, seca y
nivelada.
MODO DE EMPLEO CON LA PICADORA
•
Compruebe que el aparato esta desconectado de la
corriente eléctrica.
•
Coloque la cuchilla sobre el pasador central en el interior del
vaso de la picadora (4)
cuchilla esta muy afilada!
• Coloque el recipiente/vaso de la picadora sobre un lugar no
deslizante.
• Añada los alimentos en el vaso, tales como carne, queso,
cebolla, hierbas, ajo, galletas, etc...
• Coloque la tapa (5) sobre el vaso de la picadora (4),
insertando las ranuras a los lados de la tapa, a los salientes del
interior del vaso de la picadora y bloquéelo con un movimiento
de giro hacia la derecha.
• Coloque y bloquee el cuerpo motor (9) en la tapa de la
picadora con un suave movimiento giratorio hacia la derecha.
• Enchufe el aparato.
• Pulse el interruptor (10) u (11) para que empiece a funcionar.
Durante la utilización mantenga l bloque motor con una mano
y el recipiente/vaso de la picadora con la otra.
– hágalo con cuidado, ya que la
15
Assembly page 15/32
MS 39731 - 120501
Page 16

Copies of the I/B. Please reproduce them without any
changes except under special instruction from Team
International BELGIUM. The pages must be reproduced
and folded in order to obtain a booklet A5 (+/- 148.5
mm width x 210 mm height). When folding, make sure
Fax +32 2 359 95 50
you keep the good numbering when you turn the
pages of the I/B. Don’t change the page numbering.
Keep the language integrity. Print only what is inside
the frame.
• Tras el uso, desenchúfelo y quite el motor de la tapa con un
suave giro hacia la izquierda, luego retire la tapa, también con
un movimiento de giro hacia la izquierda y asegúrese de
antemano que las cuchillas estén completamente paradas.
•
Quite la cuchilla -
Atención: hágalo con cuidado, ya que la
cuchilla esta muy afilada!
•
Quite el alimento del vaso de la picadora.
Nota: Recuerde, el tiempo máximo de uso es 1 minuto, luego el
motor debe estar en reposo durante 10 minutos. No exceda de 1
libra (450g) de los alimentos a procesar.
MODO DE EMPLEO CON EL BATIDOR
• Compruebe que el aparato esta desenchufado.
• Introduzca el pie batidor (8) suavemente en la base (7), hasta
que oiga un “click“ lo que indica que el batidor esta bien
insertado.
• Enrosque la base del batidor (7) + (8) dentro de la rosca en la
parte inferior del bloque motor girando hacia la derecha hasta
que quede bloqueada. Haga una leve presión sólo para
asegurarse de que el ensamblaje está bien hecho a la unidad
motor.
• Vierta los ingredientes en el vaso batidor o en otro recipiente
vigilando las cantidades para evitar salpicaduras.
• Enchufe el aparato.
• Introduzca el batidor verticalmente dentro del vaso donde se
encuentran los ingredientes antes de presionar uno de los
interruptores “Velocidad I” o “Velocidad II”. Esto evitará
salpicaduras cuando el motor esté en marcha.
• Enciende el motor escogiendo “Velocidad I” o “Velocidad II” y
bata. Nunca utilice el aparato durante más de 1 minuto de
manera continua. Después, es necesario efectuar pausas de 10
minutos.
16
Assembly page 16/32
MS 39731 - 120501
Page 17

Copies of the I/B. Please reproduce them without any
changes except under special instruction from Team
International BELGIUM. The pages must be reproduced
and folded in order to obtain a booklet A5 (+/- 148.5
mm width x 210 mm height). When folding, make sure
Fax +32 2 359 95 50
you keep the good numbering when you turn the
pages of the I/B. Don’t change the page numbering.
Keep the language integrity. Print only what is inside
the frame.
LIMPIEZA
• Atención: Desenchufe el aparato antes de proceder a su limpieza.
• El bloque del motor no tiene que ser limpiado más que con una
bayeta húmeda.
• Desenrosque la varilla (o el ensamblaje del batidor)
manteniendo sujeto el bloque motor y girando hacia la
izquierda la varilla hasta que se separen. Lave bien la varilla
inmediatamente tras el uso bajo el chorro de agua del grifo, y
si esta muy sucia lávela con agua tibia y jabón.
• Seque siempre cuidadosamente la varilla tras lavarla.
• El vaso, el recipiente/vaso de la picadora, la cuchilla de la
picadora, y el batidor (sin su base) pueden lavarse en el
lavavajillas, o pueden lavarse con agua jabonosa caliente.
• La tapa de la picadora (5) y la base del batidor (7) puede
limpiarse bajo el grifo, pero no pueden sumergirse en agua.
NO SUMERJA NUNCA EL BLOQUE MOTOR EN EL AGUA O EN
CUALQUIER OTRO LÍQUIDO.
COMO RECOGER SU APARATO
Para recoger los accesorios y la unidad de una forma limpia y
segura, proceda de la siguiente forma:
• Monte la picadora, como se explica en el apartado “modo de
empleo con la picadora””.
• Coloque el soporte de los accesorios (6), centrado en la tapa
de la picadora.
• Coloque el bloque motor, como se explica en el “Modo de
empleo con la picadora”.
• Coloque el batidor en su soporte encajándolo con el giro a la
derecha.
• Coloque la varilla en el bloque motor bloqueando con un giro
a la derecha como indicado en el “Modo de empleo con la
varilla”.
• Para desmontar, proceda con giro en sentido contrario.
• Como alternativa, puede con el soporte del bloque motor
colgar la batidora con la varilla o el batidor.
NOTA: NUNCA INTRODUZCA EL VASO PARA LA MEZCLA EN EL
MICROONDAS!
17
Assembly page 17/32
MS 39731 - 120501
Page 18

Copies of the I/B. Please reproduce them without any
changes except under special instruction from Team
International BELGIUM. The pages must be reproduced
and folded in order to obtain a booklet A5 (+/- 148.5
mm width x 210 mm height). When folding, make sure
Fax +32 2 359 95 50
you keep the good numbering when you turn the
pages of the I/B. Don’t change the page numbering.
Keep the language integrity. Print only what is inside
the frame.
GARANTÍA
Le sugerimos rellenen y nos envíen rápidamente la Tarjeta de
Registro de Producto adjunta para facilitar la verificación de la
fecha de compra. Por lo tanto, la devolución de esa Tarjeta de
Registro de Producto no es una condición imprescindible para la
aplicación de esa garantía. Puede también rellenar dicha tarjeta
de garantía en línea en la dirección siguiente: www.KALORIK.com
A partir de la fecha de compra, este producto KALORIK está
garantizado un año contra los defectos materiales y de
fabricación, en los Estados Unidos. Esta garantía no es transferible.
Conserve la prueba de compra original. Se exige una prueba de
compra para obtener la aplicación de la garantía.
Durante este período, si el producto KALORIK después de una
inspección por parte de KALORIK, se manifiesta defectuoso, será
reparado o remplazado, según lo que decida KALORIK, sin gastos
para el consumidor. Si se envía un producto de remplazo, se
aplicará la garantía que queda del producto original.
Esta garantía no se aplica a los defectos causados por una mala
utilización por parte del comprador o del usuario, o una
negligencia al no respeto del manual de instrucciones KALORIK, o
una utilización en un circuito eléctrico cuyo voltaje es diferente al
que figura en el producto, o un desgaste normal, o modificaciones
o reparaciones no autorizadas por KALORIK, o por un uso con fines
comerciales. No existe garantía por las partes de cristal, jarras de
cristal, filtros, cestos, cuchillas y accesorios en general. No existe
tampoco garantía por las piezas perdidas por el usuario.
Toda garantía de valor comercial o de adaptabilidad a este
producto está limitada a un año también.
Algunos estados no ponen límites a la duración de la garantía
tácita o no autorizan la exclusión de daños y perjuicios accesorios
o indirectos, por lo que puede que las restricciones anteriormente
mencionadas no le sean aplicables a Usted. Esta garantía le
otorga derechos legales particulares, pero usted puede tener
18
Assembly page 18/32
MS 39731 - 120501
Page 19

Copies of the I/B. Please reproduce them without any
changes except under special instruction from Team
International BELGIUM. The pages must be reproduced
and folded in order to obtain a booklet A5 (+/- 148.5
mm width x 210 mm height). When folding, make sure
Fax +32 2 359 95 50
you keep the good numbering when you turn the
pages of the I/B. Don’t change the page numbering.
Keep the language integrity. Print only what is inside
the frame.
también otros derechos que varían de un estado a otro y algunos
derechos pueden variar de un estado a otro.
Si el aparato tuviera un defecto durante el periodo de garantía y /
o más de 30 días después de que se compró, no devuelva el
aparato en la tienda donde le compró: a menudo, nuestro
Servicio al Consumidor puede ayudar a resolver el problema sin
que el producto tenga que ser reparado. Si hace falta una
reparación, uno de nuestros representantes puede confirmar si el
producto está bajo garantía y dirigirle al servicio post-venta.
Si fuera el caso, traiga el producto (o envíelo, correctamente
franqueado) con la prueba de compra que mencione el número
de autorización de devolución indicado por nuestro Servicio al
Consumidor, al servicio post-venta KALORIK más próximo. (Visite
nuestra web www.KALORIK.com o llame al Servicio al Consumidor
para obtener la dirección del Servicio post-venta KALORIK
exclusivo más próximo).
Si envía el producto, le rogamos añadan una carta explicando la
naturaleza del defecto.
Si tiene preguntas adicionales, por favor llame al Servicio al
Consumidor (véase abajo para los datos completos), de lunes a
jueves
, de las 9:00 a las 17:00 (EST), y el viernes de las 9:00 a las
16:00 (EST). Note que las horas pueden ser modificadas.
Si quiere escribirnos, puede hacerlo a la dirección siguiente:
KALORIK Servicio al Consumidor
Team International Group of America Inc.
1400 N.W 159th Street, Suite 102
Miami Gardens, FL 33169 USA
O llame gratuitamente (U.S.A.) al +1 888-521-TEAM / +1 888KALORIK
Las cartas se aceptan solamente en la dirección anteriormente
mencionada. Los envíos y paquetes que no tengan número de
autorización de devolución serán rechazados
.
19
Assembly page 19/32
MS 39731 - 120501
Page 20

Copies of the I/B. Please reproduce them without any
changes except under special instruction from Team
International BELGIUM. The pages must be reproduced
and folded in order to obtain a booklet A5 (+/- 148.5
mm width x 210 mm height). When folding, make sure
Fax +32 2 359 95 50
you keep the good numbering when you turn the
pages of the I/B. Don’t change the page numbering.
Keep the language integrity. Print only what is inside
the frame.
CONSIGNES DE SECURITE
Pour utiliser un appareil électrique, des précautions élémentaires
sont à respecter, telles que celles énumérées ci-dessous :
1. Lire toutes les instructions avant l’emploi.
2. Avant d'utiliser l'appareil, vérifiez que la tension du réseau
correspond bien à celle de l'appareil.
3. Pour éviter tout risque de choc électrique, ne plongez jamais
l'appareil, son cordon, sa fiche électrique ou son bloc moteur,
dans l'eau ou dans tout autre liquide.
4. Ne laissez jamais votre appareil sans surveillance lorsque celui-ci
est en marche. Ne le laissez ni à la portée des enfants ni à la
portée de personnes non responsables.
5. Débranchez l’appareil lorsqu’il n’est pas en utilisation. Il est
indispensable de débrancher l’appareil avant de monter le
pied ou tout autre accessoire ou avant de le(s) démonter et
donc aussi avant de les nettoyer.
6. Eviter tout contact avec les parties en mouvement.
7. N’utilisez pas l’appareil avec un cordon ou une prise
endommagée, ou après avoir constaté une mal-fonction, ou
après que l’appareil soit tombé ou ait été endommagé de
quelque manière que ce soit. Retournez l’appareil au centre de
réparation autorisé pour examen, réparation ou ajustement
mécanique ou électrique.
8. Ne pas utiliser d’accessoires non recommandés par le
fabricant, cela peut présenter un danger pour l’utilisateur et
risque d’endommager l’appareil.
9. Veillez à ne pas utiliser l'appareil à l'extérieur et entreposez-le
dans un endroit sec.
10. Ne laissez pas le cordon pendre pour qu’il ne puisse pas être
accroché accidentellement, ou toucher des surfaces chaudes.
11. Ne pas poser sur ou près d’un réchaud à gaz ou des plaques
Utilisez l’appareil uniquement pour des usages domestiques et
de la manière indiquée dans la notice.
12. Pour déconnecter l’appareil, tirez simplement sur la fiche et
retirez-la de la prise murale. Ne retirez pas la fiche avec des
mains mouillées.
20
Assembly page 20/32
MS 39731 - 120501
Page 21

Copies of the I/B. Please reproduce them without any
changes except under special instruction from Team
International BELGIUM. The pages must be reproduced
and folded in order to obtain a booklet A5 (+/- 148.5
mm width x 210 mm height). When folding, make sure
Fax +32 2 359 95 50
you keep the good numbering when you turn the
pages of the I/B. Don’t change the page numbering.
Keep the language integrity. Print only what is inside
the frame.
13. Retirez les accessoires du bloc moteur avant le nettoyage.
14. Les lames sont coupantes ; manipulez-les prudemment.
15. Gardez vos mains, cheveux, vêtements et/ou tout ustensile hors
du récipient pendant le fonctionnement de l’appareil afin
d’éviter de graves blessures et tout risque d’endommager
l’appareil. Un grattoir (pour aider à nettoyer les lames) peut
être utilisé mais seulement lorsque l’appareil est débranché.
16. Pour mixer des liquides, et tout particulièrement des liquides
chauds, utilisez un récipient avec des bords haut, ou procédez
avec de petites quantités à chaque fois pour éviter tout risque
de projection.
Attention : Instructions Spéciales
Pied pour le mixage
1. Débranchez toujours l’appareil avant de changer les
accessoires ou d’approcher des parties qui pourraient entrer en
mouvement.
2. Ne touchez jamais les lames quand l’appareil est connecté à
une prise de courant.
3. Ne mixez jamais de l’huile chaude ou de la graisse chaude.
Hachoir
1. Faites particulièrement attention en manipulant la lame,
particulièrement en la retirant du bol, en vidant le bol et
pendant le nettoyage. Ne touchez pas les lames, elles sont
tranchantes !
2. Retirez toujours la lame avant de vider le contenu du bol.
3. Ne retirez jamais le couvercle du hachoir avant l’arrêt complet
des lames.
CONSERVEZ CES INSTRUCTIONS
USAGE DOMESTIQUE UNIQUEMENT
21
Assembly page 21/32
MS 39731 - 120501
Page 22

Copies of the I/B. Please reproduce them without any
changes except under special instruction from Team
International BELGIUM. The pages must be reproduced
and folded in order to obtain a booklet A5 (+/- 148.5
mm width x 210 mm height). When folding, make sure
Fax +32 2 359 95 50
you keep the good numbering when you turn the
pages of the I/B. Don’t change the page numbering.
Keep the language integrity. Print only what is inside
the frame.
CONSIGNES CONCERNANT LA FICHE
POLARISEE
Ce produit est muni d'une fiche polarisée (une lame plus large que
l'autre). Ce genre de fiche n'entre que d'une façon dans une prise
polarisée, afin de minimiser les risques de chocs électriques. Si vous
n'arrivez pas à enfoncer la fiche à fond dans la prise, retournez la
fiche et réessayez. Si cela ne fonctionne toujours pas, faites appel
à un service qualifié compétent. N'essayez jamais de modifier la
fiche!
CONSIGNES CONCERNANT LE CORDON
Le cordon d’alimentation de l’appareil est un cordon de type
court, et ce afin de diminuer les risques d’accidents (chute si vous
marchez sur le cordon...). Vous pouvez toutefois utiliser une
rallonge si nécessaire mais:
• Assurez-vous que l'ampérage de la rallonge soit égal ou
supérieur à celui de l'appareil. Une rallonge avec un
ampérage inférieur à celui de l'appareil risquerait de
surchauffer et de brûler.
• La rallonge ne doit pas pendre du plan de travail ou de la
table afin d'éviter que les enfants ne le tirent ou trébuchent.
INFORMATION IMPORTANTE
Cet appareil ne peut être utilisé de façon professionnelle. Vous
devez respecter les pauses de fonctionnement. Dans le cas
contraire vous risqueriez d’endommager le moteur. Référez-vous à
la plaque signalétique de votre appareil pour connaître la durée
maximale d’utilisation continue (notée KB xx min. où xx est la durée
maximale). Les pauses de fonctionnement doivent durer au moins
10 minutes.
Note : il s’agit du temps d’utilisation du moteur en continu. En
général, cet appareil est utilisé en procédant par pulsations
successives, le temps maximum d’utilisation réel est donc bien plus
important que celui indiqué sur la plaque signalétique.
22
Assembly page 22/32
MS 39731 - 120501
Page 23

Fax +32 2 359 95 50
Copies of the I/B. Please reproduce them without any
changes except under special instruction from Team
International BELGIUM. The pages must be reproduced
and folded in order to obtain a booklet A5 (+/- 148.5
mm width x 210 mm height). When folding, make sure
you keep the good numbering when you turn the
pages of the I/B. Don’t change the page numbering.
Keep the language integrity. Print only what is inside
the frame.
DESCRIPTION
9
10
11
1. Lame en acier
inoxydable
2. Pied amovible en
1
acier inoxydable
3. Gobelet de mixage
8
4. Hachoir avec lame
en acier inoxydable
5. Couvercle du
hachoir
7
2
6. Porte-accessoires
7. Base pour le fouet
8. Fouet en acier
inoxydable
9. Bloc-moteur
10. Vitesse “I”
11. Vitesse “II”
6
5
4
UTILISATION AVEC LE PIED DE MIXAGE
Facile, pratique et simple à nettoyer, ce mixeur convient
parfaitement pour préparer vos milk-shakes, soupes, purées,
omelettes et bien d’autres recettes encore !
• Avant la première utilisation, l'appareil doit être nettoyé avec un
linge ou papier absorbant légèrement humide.
• Vissez le pied sur le pas de vis situé au bas du moteur. Pour cela,
maintenez le bloc moteur et donnez un mouvement de rotation
au pied en acier, dans le sens contraire des aiguilles d’une
montre, jusqu’à ce qu’il soit verrouillé. Une légère pression de la
main garantira que le pied soit bien fixé au bloc-moteur.
• Versez les ingrédients dans le gobelet fourni ou dans un autre
récipient à rebord haut, en dosant de façon à ne pas dépasser
un niveau tel que vous risqueriez d’être éclaboussé au moment
du démarrage du moteur!
3
23
Assembly page 23/32
MS 39731 - 120501
Page 24

Copies of the I/B. Please reproduce them without any
changes except under special instruction from Team
International BELGIUM. The pages must be reproduced
and folded in order to obtain a booklet A5 (+/- 148.5 mm
width x 210 mm height). When folding, make sure you
Fax +32 2 359 95 50
keep the good numbering when you turn the pages of
the I/B. Don’t change the page numbering. Keep the
language integrity. Print only what is inside the frame.
• Branchez le cordon secteur dans une prise murale.
• Plongez le pied de l'appareil, verticalement, au sein des
ingrédients, avant de mettre en marche le mixeur. Cela évitera
des éclaboussures lorsque le moteur sera mis sous tension.
• Allumez le moteur en appuyant sur le bouton « Vitesse 1 » ou
« Vitesse 2 » et mixez, mais souvenez-vous de ne pas utiliser
l'appareil pendant plus d’1 minute en continu. Le moteur doit
ensuite être mis en pause pendant 10 minutes.
Note : nous vous recommandons de commencer avec la vitesse
basse « I » et d’augmenter la vitesse de rotation des lames en
sélectionnant la vitesse « II » si nécessaire.
Conseils pratiques :
• Ne remplissez jamais le gobelet de mixage à plus de 2/3 de sa
capacité, pour éviter tout débordement.
• Ne mixez pas d’ingrédients avec le mixeur, sans ajouter au
préalable de l’eau ou autres liquides.
• N’utiliser pas l’appareil pour mixer des ingrédients secs et durs tes
que des grains de café, des cubes de glace, du sucre, des
céréales, du chocolat, etc.
UTILISATION AVEC LE HACHOIR
• Assurez-vous en premier lieu que le bloc moteur est bien
déconnecté de la source de courant.
• Placez la lame sur le picot central, dans le bol du hachoir (4).
Procédez avec attention car la lame est tranchante !
• Placez le hachoir sur un support antidérapant.
• Ajouter la nourriture à hacher dans le bol (viande, fromage, ail,
oignons, herbes aromatiques, miettes de pain ou crackers, etc.).
• Placez le couvercle (5) sur le bol (4), en insérant les rainures sur les
côtés du couvercle dans les protubérances sur les côtés du bol,
et en le verrouillant, en donnant une légère rotation dans le sens
des aiguilles d’une montre.
• Placez le bloc moteur (9) au centre du couvercle, et verrouillez-le
en place en lui donnant un léger mouvement de rotation dans le
sens des aiguilles d’une montre.
• Branchez l’appareil sur une prise murale.
24
Assembly page 24/32
MS 39731 - 120501
Page 25

Copies of the I/B. Please reproduce them without any
changes except under special instruction from Team
International BELGIUM. The pages must be reproduced
and folded in order to obtain a booklet A5 (+/- 148.5 mm
width x 210 mm height). When folding, make sure you
Fax +32 2 359 95 50
keep the good numbering when you turn the pages of
the I/B. Don’t change the page numbering. Keep the
language integrity. Print only what is inside the frame.
• Appuyez par pulsation sur un des boutons « Vitesse 1 » ou
« Vitesse 2 » pour mettre le hachoir en marche. Pendant
l’utilisation, tenez le bloc-moteur dans une main pendant que
vous maintiendrez le bol du hachoir dans une autre.
• Apres usage, débranchez et retirez le bloc-moteur du couvercle
(en y appliquant un mouvement de rotation dans le sens inverse
des aiguilles d’une montre) et retirez le couvercle (également en
y appliquant un mouvement de rotation dans le sens inverse des
aiguilles d’une montre) – avant cela, prenez soin que les lames
soient arrêtées complètement -.
• Retirez soigneusement la lame -
lame est tranchante !
Procédez avec attention car la
• Retirez la nourriture hachée du bol.
Note : souvenez-vous de ne pas utiliser l'appareil pendant plus d’1
minute en continu. Le moteur doit ensuite être mis en pause
pendant 10 minutes. Ne hachez pas plus de 1lb. / 450g à la fois.
UTILISATION AVEC LE FOUET
• Assurez-vous en premier lieu que le bloc moteur est bien
déconnecté de la source de courant.
• Insérez le fouet en acier inoxydable (8) doucement sur sa base
(7), jusqu’à ce que vous entendiez un léger click, indiquant que
le fouet est bien verrouillé en place.
• Vissez l’assemblage du fouet (7) + (8) sur le pas de vis situé au bas
du moteur. Pour cela, maintenez le bloc moteur et donnez un
mouvement de rotation à la base du fouet, dans le sens contraire
des aiguilles d’une montre, jusqu’à ce qu’elle soit verrouillée. Une
légère pression de la main garantira que la base soit bien fixée
au bloc-moteur.
• Versez les ingrédients dans le gobelet fourni ou dans un autre
récipient à rebord haut, en dosant de façon à ne pas dépasser
un niveau tel que vous risqueriez d’être éclaboussé au moment
du démarrage du moteur!
• Branchez le cordon secteur dans une prise murale.
• Plongez le fouet, verticalement, au sein des ingrédients, avant de
mettre en marche le mixeur. Cela évitera des éclaboussures
lorsque le moteur sera mis sous tension.
25
Assembly page 25/32
MS 39731 - 120501
Page 26

Copies of the I/B. Please reproduce them without any
changes except under special instruction from Team
International BELGIUM. The pages must be reproduced
and folded in order to obtain a booklet A5 (+/- 148.5 mm
width x 210 mm height). When folding, make sure you
Fax +32 2 359 95 50
keep the good numbering when you turn the pages of
the I/B. Don’t change the page numbering. Keep the
language integrity. Print only what is inside the frame.
• Allumez le moteur en appuyant sur le bouton « Vitesse 1 » ou
« Vitesse 2 » et mixez, mais souvenez-vous de ne pas utiliser
l'appareil pendant plus d’1 minute en continu. Le moteur doit
ensuite être mis en pause pendant 10 minutes.
NETTOYAGE
• Attention : prenez soin de toujours débrancher l’appareil avant
de procéder au nettoyage de celui-ci.
• Le bloc moteur ne doit être nettoyé qu’avec un linge ou une
éponge légèrement humide.
• Détachez le pied de mixage (ou la base du fouet) du bloc-
moteur, en tenant le bloc-moteur et en dévissant l’accessoire en
le tournant dans le sens des aiguilles d’une montre pour le
démonter.
• Lavez le pied de mixage sous l’eau courante, immédiatement
après l’utilisation. Si le pied est très sale, il peut être lavé à la
main dans de l’eau chaude savonneuse.
• Séchez le pied consciencieusement après le lavage.
• Le gobelet, le bol-hachoir, la lame du hachoir et le fouet en
acier (8) peuvent être lavés au lave-vaisselle, ou à la main avec
de l’eau chaude savonneuse.
• Le couvercle du hachoir (5) et la base du fouet (7) peuvent être
rincés sous l’eau, mais pas lavés au lave-vaisselle.
NE PAS PLONGER LE BLOC MOTEUR DANS DE L’EAU OU TOUT AUTRE
LIQUIDE !
RANGEMENT
Pour ranger l’appareil et tous ses accessoires en toute sécurité et
dans un minimum de place, procédez comme suit :
• Assemblez le hachoir comme indiqué au paragraphe
« UTILISATION AVEC LE HACHOIR ».
• Placez le porte-accessoires (6), centré sur le couvercle du
hachoir.
• Ajoutez ensuite le bloc-moteur, comme indiqué au paragraphe
« UTILISATION AVEC LE HACHOIR ».
26
Assembly page 26/32
MS 39731 - 120501
Page 27

Copies of the I/B. Please reproduce them without any
changes except under special instruction from Team
International BELGIUM. The pages must be reproduced
and folded in order to obtain a booklet A5 (+/- 148.5 mm
width x 210 mm height). When folding, make sure you
Fax +32 2 359 95 50
keep the good numbering when you turn the pages of
the I/B. Don’t change the page numbering. Keep the
language integrity. Print only what is inside the frame.
• Placez l’assemblage du fouet et de sa base (7) + (8) sur un des
dômes du porte-accessoires, et verrouillez-le en y donnant un
mouvement de rotation dans le sens des aiguilles d’une montre.
• Placez le pied de mixage sur l’autre dôme, et verrouillez-le en y
donnant un mouvement de rotation dans le sens des aiguilles
d’une montre.
• Pour démonter, procédez dans le sens et dans l’ordre inverse.
• Sinon, vous pouvez également suspendre à un crochet le bloc
moteur (seulement avec le pied de mixage assemblé), en
utilisant l’anneau de suspension qui se situe à l’endroit où le
cordon d’alimentation rejoint le bloc-moteur.
NOTE : NE METTEZ JAMAIS LE GOBELET AU FOUR MICRO-ONDES
27
Assembly page 27/32
MS 39731 - 120501
Page 28

Fax +32 2 359 95 50
Copies of the I/B. Please reproduce them without any
changes except under special instruction from Team
International BELGIUM. The pages must be reproduced
and folded in order to obtain a booklet A5 (+/- 148.5 mm
width x 210 mm height). When folding, make sure you
keep the good numbering when you turn the pages of
the I/B. Don’t change the page numbering. Keep the
language integrity. Print only what is inside the frame.
GARANTIE
Nous vous suggérons de remplir et de nous renvoyer rapidement la
Carte d’Enregistrement Produit ci-jointe afin de faciliter la vérification
de la date d’achat. Cependant, le renvoi de la Carte
d’Enregistrement Produit n’est pas une condition indispensable à
l’application de la présente garantie. Vous pouvez aussi remplir
cette carte de garantie en ligne à l’adresse suivante :
www.KALORIK.com.
A compter de la date d’achat, ce produit KALORIK est garanti un
an, sur le territoire des Etats-Unis, contre les défauts matériels et de
fabrication. Cette garantie n’est pas transférable. Conservez la
preuve d’achat originelle. Une preuve d’achat est exigée pour
obtenir l’application de la garantie.
Durant cette période, le produit KALORIK qui, après inspection par
KALORIK, s’avère défectueux, sera réparé ou remplacé, au choix de
KALORIK, sans frais pour le consommateur. Si un produit de
remplacement est envoyé, c’est la garantie restante du produit
originel qui s’appliquera.
La présente garantie ne s’applique pas aux défauts dus à une
mauvaise utilisation de la part de l’acheteur ou de l’utilisateur, à une
négligence, au non-respect des consignes du manuel d’utilisation
KALORIK, à une utilisation sur un circuit électrique au voltage
différent de celui renseigné sur le produit, à une usure normale, à des
modifications ou réparations non autorisées par KALORIK, ou par un
usage à des fins commerciales. Il n’existe pas de garantie pour les
parties en verre, récipients en verre, filtres, paniers, lames et
accessoires en général. Il n’existe également pas de garantie pour
les pièces perdues par l’utilisateur.
Toute garantie de valeur commerciale ou d’adaptabilité à ce
produit est également limitée à la garantie d’un an.
Certains états ne limitent pas la longueur de la garantie tacite ou
n’autorisent pas l’exclusion de dommages-intérêts accessoires ou
indirects, les restrictions ci-dessus peuvent donc ne pas s’appliquer à
28
Assembly page 28/32
MS 39731 - 120501
Page 29

Copies of the I/B. Please reproduce them without any
changes except under special instruction from Team
International BELGIUM. The pages must be reproduced
and folded in order to obtain a booklet A5 (+/- 148.5 mm
width x 210 mm height). When folding, make sure you
Fax +32 2 359 95 50
keep the good numbering when you turn the pages of
the I/B. Don’t change the page numbering. Keep the
language integrity. Print only what is inside the frame.
vous. Cette garantie vous donne des droits légaux particuliers, et
certains droits peuvent varier d’un état à l’autre.
Si l’appareil devait présenter un défaut durant la période de
garantie et plus de 30 jours après l’achat, ne ramenez pas l’appareil
au magasin : souvent, notre Service Clientèle peut aider à résoudre
le problème sans que le produit ne doive être réparé. Si une
réparation est nécessaire, un représentant peut confirmer si le
produit est sous garantie et vous rediriger vers notre centre de
réparation.
Le cas échéant, ramenez le produit (ou envoyez-le, dûment
affranchi), ainsi qu’une preuve d’achat, en mentionnant le numéro
d’autorisation de retour, indiqué par notre service clientèle, au
service après-vente KALORIK agrée (visitez notre site internet
www.KALORIK.com ou appelez notre département Service Clientèle
pour obtenir l’adresse du service après-vente KALORIK agréé).
Si vous envoyez le produit, veuillez y joindre une lettre expliquant la
nature du défaut.
Si vous avez des questions complémentaires, veuillez appeler notre
département Service Clientèle (voyez plus bas pour les coordonnées
complètes), du Lundi au Jeudi de 9h à 17h (EST) et le Vendredi de 9h
à 16h (EST). Veuillez noter que les heures sont sujettes à modification.
Si vous souhaitez nous écrire, adressez votre courrier à:
KALORIK Consumer Service Department
Team International Group of America Inc.
1400 N.W 159th Street, Suite 102
Miami Gardens, FL 33169 USA
Ou appelez (Gratuitement des Etats-Unis): +1 888-521-TEAM ou +1
888-KALORIK.
Seules les lettres seront acceptées à l’adresse ci-dessus. Les envois
et colis n’ayant pas de numéro d’autorisation de retour seront
refusés.
29
Assembly page 29/32
MS 39731 - 120501
Page 30

Fax +32 2 359 95 50
NOTES:
Copies of the I/B. Please reproduce them without any
changes except under special instruction from Team
International BELGIUM. The pages must be reproduced
and folded in order to obtain a booklet A5 (+/- 148.5 mm
width x 210 mm height). When folding, make sure you
keep the good numbering when you turn the pages of
the I/B. Don’t change the page numbering. Keep the
language integrity. Print only what is inside the frame.
30
Assembly page 30/32
MS 39731 - 120501
Page 31

Fax +32 2 359 95 50
NOTES:
Copies of the I/B. Please reproduce them without any
changes except under special instruction from Team
International BELGIUM. The pages must be reproduced
and folded in order to obtain a booklet A5 (+/- 148.5 mm
width x 210 mm height). When folding, make sure you
keep the good numbering when you turn the pages of
the I/B. Don’t change the page numbering. Keep the
language integrity. Print only what is inside the frame.
31
Assembly page 31/32
MS 39731 - 120501
Page 32

Fax +32 2 359 95 50
NOTES:
Copies of the I/B. Please reproduce them without any
changes except under special instruction from Team
International BELGIUM. The pages must be reproduced
and folded in order to obtain a booklet A5 (+/- 148.5 mm
width x 210 mm height). When folding, make sure you
keep the good numbering when you turn the pages of
the I/B. Don’t change the page numbering. Keep the
language integrity. Print only what is inside the frame.
32
Assembly page 32/32
MS 39731 - 120501
 Loading...