

Page 1
Copies of the I/B. Please reproduce them without any
changes except under special instruction from Team
International BELGIUM. The pages must be reproduced
and folded in order to obtain a booklet A5 (+/- 148.5 mm
width x 210 mm height). When folding, make sure you
keep the good numbering when you turn the pages of
the I/B. Don’t change the page numbering. Keep the
Fax +32 2 359 95 50
Breakfast station
language integrity. Print only what is inside the frame.
I/B Version
070305
www.KALORIK.com
BSET 41707
120V~ 60Hz - 1250 W (10A)
Front cover page (first page)
Assembly page 1/16
Page 2

Copies of the I/B. Please reproduce them without any
changes except under special instruction from Team
International BELGIUM. The pages must be reproduced
and folded in order to obtain a booklet A5 (+/- 148.5 mm
width x 210 mm height). When folding, make sure you
keep the good numbering when you turn the pages of
the I/B. Don’t change the page numbering. Keep the
Fax +32 2 359 95 50
language integrity. Print only what is inside the frame.
IMPORTANT SAFEGUARDS
When using electrical appliances,
electric shock and injury, basic safety precautions should always be
followed, including the following:
1. READ ALL INSTRUCTIONS BEFORE USING.
2. Check that the voltage in your home corresponds to what is stated
on the appliance.
3. Do not touch hot surfaces. Use handles or knobs.
4. To protect against electrical shock, fire or personal injury, do not
immerse cord, plugs, or the appliance in water or other liquid, or
rinse under a tap.
5. Close supervision is necessary when any appliance is used by or near
children.
6. This appliance is not intended for use by persons (including children)
with reduced physical, sensory or mental capabilities or lack of
experience and knowledge, unless they have been given
supervision or instruction concerning use of the appliance by a
person responsible for their safety. Children should be supervised to
ensure they do not play with the appliance.
7. Do NOT leave the Breakfast Station unattended when in use.
8. Unplug from outlet when not in use and before cleaning. Allow to
cool before putting on or taking off parts.
9. To disconnect, turn any control to “off” (or 0), then remove the plug
from wall outlet.
10. Do NOT move or lift the Breakfast Station while the power cord is still
connected to the wall outlet or still on. Always ensure it is switched
off and has cooled down before moving the appliance.
11. Do not operate any appliance with a damaged cord or plug or
after the appliance malfunctions or has been damaged in any
manner. Return the appliance to the nearest authorized service
facility for examination, repair, or adjustment.
12. Do not let the cord hang over the edge of a table or counter, or
touch hot surfaces.
13. The unit has no user-serviceable parts contained within. Do not
attempt to repair, disassemble or modify the appliance.
14. Do not use the appliance for other than its intended use.
in order to
reduce the risk of fire,
2
BSET 41707 – 120501
Assembly page 2/16
Page 3

Copies of the I/B. Please reproduce them without any
changes except under special instruction from Team
International BELGIUM. The pages must be reproduced
and folded in order to obtain a booklet A5 (+/- 148.5 mm
width x 210 mm height). When folding, make sure you
keep the good numbering when you turn the pages of
the I/B. Don’t change the page numbering. Keep the
Fax +32 2 359 95 50
language integrity. Print only what is inside the frame.
15. The use of accessory attachments not recommended by the
appliance manufacturer may cause fire, electric shock, or injuries.
16. Do not use outdoors.
17. Do not place on or near a hot gas or electric burner, or in a heated
oven.
18. Oversized foods or metal foil packages or metal utensils must not be
inserted in a toaster as they may create a fire or risk of electric shock.
19. A fire may occur if the toaster is covered or touching flammable
material, including curtains, draperies, walls, and the like, when in
operation. Do not store any item other than the bun warmer
included, on top of the appliance when in operation.
20. Extreme caution must be used when moving an appliance
containing hot oil or other hot liquids.
21. Do not clean any parts with metal scouring pads. Pieces can break
off the pad and touch electrical parts involving a risk of electric
shock.
22. Never pour water, or any other liquid, into the toaster slots.
23. Do NOT attempt to dislodge food from the toaster when the
appliance is plugged in.
24. Remove breadcrumbs periodically. Accumulation of bread crumbs
can cause a potential electrical and fire hazard.
25. Do NOT pull or carry by the cord, bend the cord, use the cord as a
handle, close a door on the cord, or pull the cord around sharp
edges or corners. Keep the cord away from heated surfaces.
26. Do NOT wrap the cord around the outside of the Breakfast Station.
Use the cord storage cleats at the bottom of the unit.
27. The Breakfast Station is not intended to be operated by means of an
external timer or any type of separate remote control system.
28. A preheat time for this appliance is not required except for using the
grill/griddle function, which has to preheat for 5 minutes.
29. After the egg cooking process has begun, do NOT add water or any
other liquid to the Mini Pan.
30. Avoid reaching over the Egg Cooker when it is in use. The steam
vents emit hot steam and there is a danger of scalding yourself.
31. The egg piercer on the bottom of the measuring cup is sharp, please
handle with care.
32. Always allow the unit to cool before storing or covering.
33. Allow adequate space above and around the Breakfast Station for
air circulation.
3
BSET 41707 – 120501
Assembly page 3/16
Page 4

Copies of the I/B. Please reproduce them without any
changes except under special instruction from Team
International BELGIUM. The pages must be reproduced
and folded in order to obtain a booklet A5 (+/- 148.5 mm
width x 210 mm height). When folding, make sure you
keep the good numbering when you turn the pages of
the I/B. Don’t change the page numbering. Keep the
Fax +32 2 359 95 50
34. Thoroughly clean all parts that come in contact with food with hot
soapy water and dry thoroughly before using for the first time.
language integrity. Print only what is inside the frame.
WARNING - Risk of Fire or Electric Shock! Do not remove any cover or
attempt to access electric parts inside this appliance. No user
serviceable parts inside. Repair should be done by authorized
service personnel only!
SAVE THESE INSTRUCTIONS
HOUSEHOLD USE ONLY
POLARIZED PLUG
This appliance has a polarized plug (one blade is wider than the other).
To reduce the risk of electric shock, this plug is intended to fit into a
polarized outlet only one way. If the plug does not fit fully into the outlet,
reverse the plug. If it still does not fit, contact a qualified electrician. Do
not attempt to modify the plug in any way.
SHORT CORD INSTRUCTIONS
A short power supply cord is to be provided to reduce the risk
resulting from becoming entangled in or tripping over a longer cord.
An extension cord is available and may be used if care is exercised
in their use.
• If an extension cord is used, the marked electrical rating of the
extension cord should be at least as great as the electrical
rating of the appliance.
• The extension cord should be arranged so that it will not
drape over the countertop or table top where it can be
pulled on by children or tripped over unintentionally.
4
BSET 41707 – 120501
Assembly page 4/16
Page 5
Copies of the I/B. Please reproduce them without any
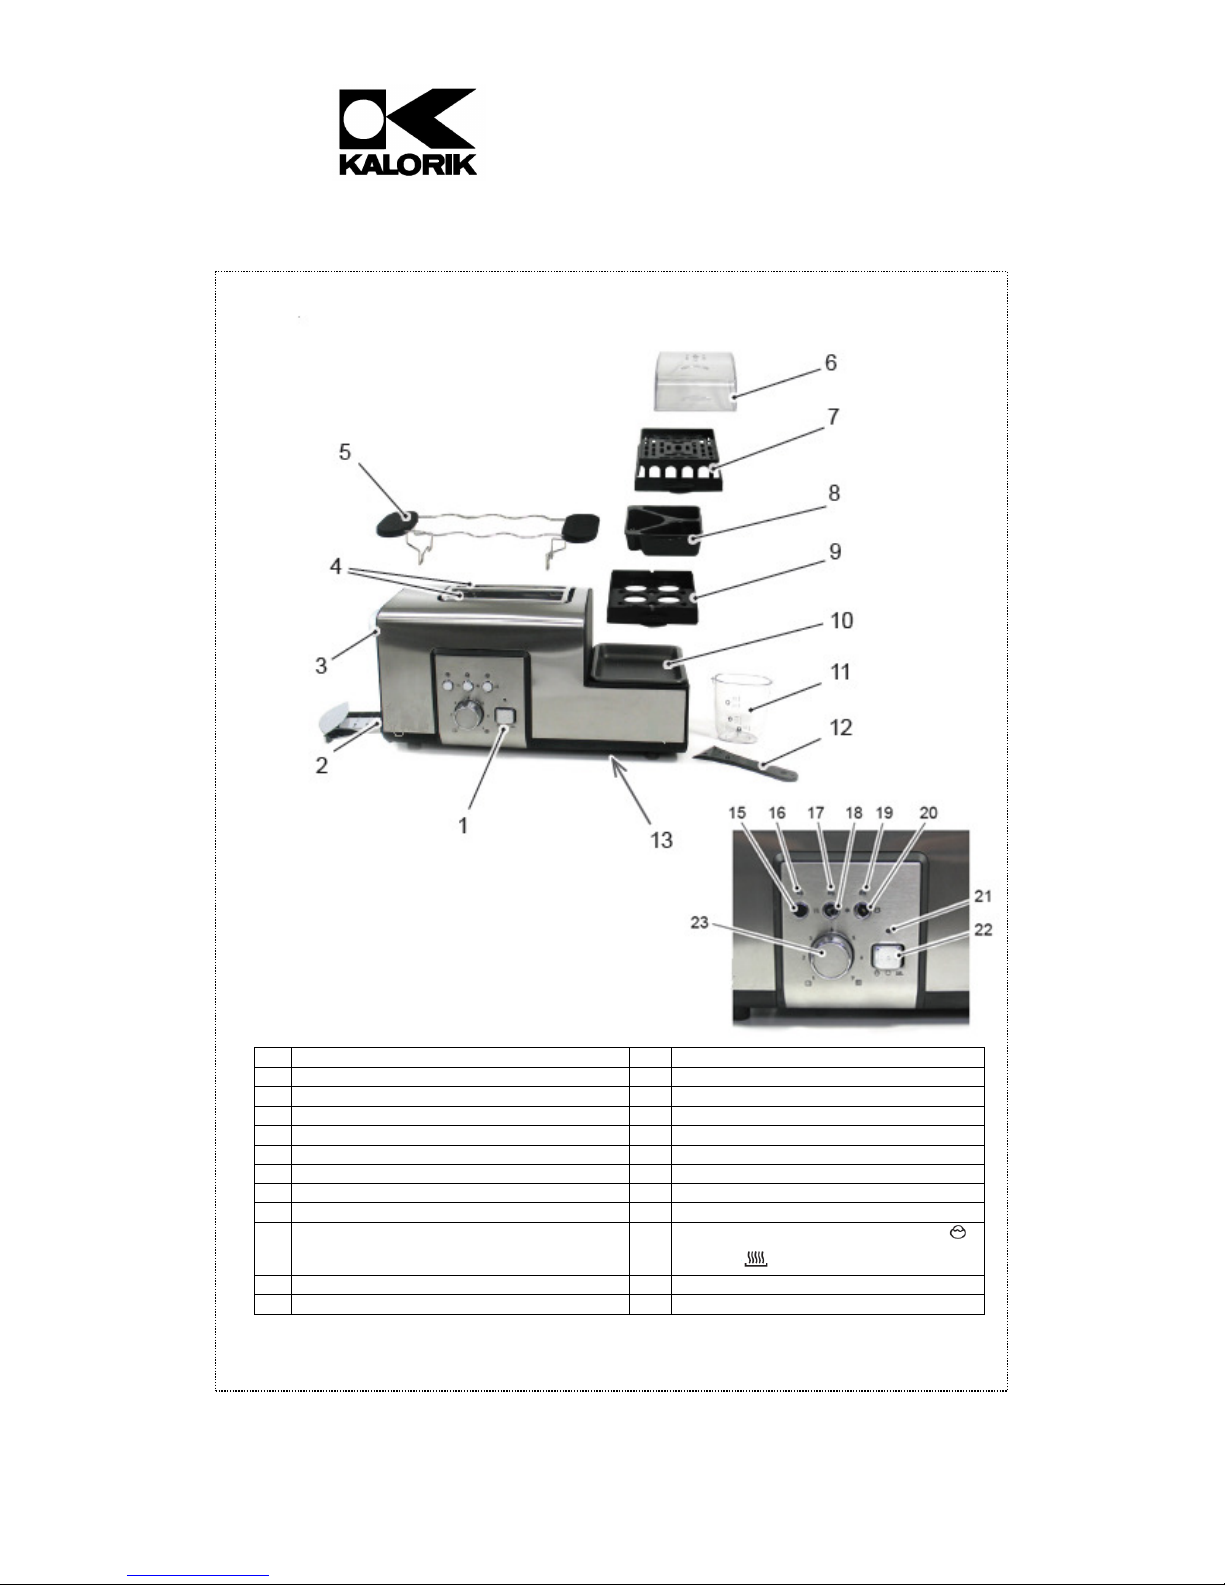
1 Control Panel
13
Cable
Storage (under the base)
2 Crumb Tray
14
User Manual (not illustrated above)
3 Toaster
Lever 15 Reheat Button
4 Toaster
Slots 16 R
eheat Indicator Light
5 Bun
Warming
Rack 17 Defrost Indicator Light
6 Egg Cooker Lid
18
Defrost Button
7 Steam
ing basket
19
Toasting Indicator Light
8 Poaching Tray
20
Cancel Button
9 Egg Holder Insert
21
Mini Pan Indicator Light
10 Mini Pan
22
11 Measuring cup with scale and egg piercer
23
Rotary
Dial for Browning Level
12 Spatula
changes except under special instruction from Team
International BELGIUM. The pages must be reproduced
and folded in order to obtain a booklet A5 (+/- 148.5 mm
width x 210 mm height). When folding, make sure you
keep the good numbering when you turn the pages of
the I/B. Don’t change the page numbering. Keep the
Fax +32 2 359 95 50
language integrity. Print only what is inside the frame.
PARTS LIST AND CONTROL PANEL
Mini Pan Selector Switch (Boil/Poach ,
OFF, Fry )
5
BSET 41707 – 120501
Assembly page 5/16
Page 6

Fax +32 2 359 95 50
Copies of the I/B. Please reproduce them without any
changes except under special instruction from Team
International BELGIUM. The pages must be reproduced
and folded in order to obtain a booklet A5 (+/- 148.5 mm
width x 210 mm height). When folding, make sure you
keep the good numbering when you turn the pages of
the I/B. Don’t change the page numbering. Keep the
language integrity. Print only what is inside the frame.
BEFORE THE FIRST USE
• Unpack the appliance and accessories. Wash all parts,
attachments and accessories in warm soapy water and dry
thoroughly. Wipe the exterior of the toaster and Crumb Tray with
a slightly damp cloth.
• Thoroughly read through the manual before using for the first
time.
• Position the appliance on a flat, level and heat resistant surface
so that it is also positioned at least 2 inches (5cm) away from any
surrounding object.
• Operate the toaster function 3 to 4 times (without bread) and set
to the maximum browning level. During initial use, the Toaster
may emit a slight odor along with small amounts of smoke. This is
normal and will subside with further use.
OPERATING INSTRUCTIONS
HOW TO USE THE TOASTER
The Breakfast Station’s toaster allows you to toast up to 2 slices of
bread or bagels. It also allows you to warm buns, croissants, or rolls
with the included Bun Rack. Below are some general guidelines for
toasting bread that you should be aware of:
1. Different types of bread have different browning requirements.
For example, white bread should be toasted at a lower level
while darker bread requires toasting at a higher setting.
2. While familiarizing yourself with the appliance, you should try
setting the browning level at 3 or 4 until you are accustomed with
the use of the toaster.
3. Only use bread slices that easily fit into the toaster slots. Never
force bread into the slots as it can become stuck.
4. Only operate the toaster when the crumb tray is correctly
inserted.
5. When toasting only one slice of bread, select a lower browning
level.
Operating Instructions
1. Insert 1 or 2 slices of bread into the Toaster Slot.
6
BSET 41707 – 120501
Assembly page 6/16
Page 7

Copies of the I/B. Please reproduce them without any
changes except under special instruction from Team
International BELGIUM. The pages must be reproduced
and folded in order to obtain a booklet A5 (+/- 148.5 mm
width x 210 mm height). When folding, make sure you
keep the good numbering when you turn the pages of
the I/B. Don’t change the page numbering. Keep the
Fax +32 2 359 95 50
language integrity. Print only what is inside the frame.
2. Turn the rotary knob to the desired browning level (1 – Lowest
Setting, 7- Highest Setting).
3. Push the Toasting Lever down until it locks. Toasting will
commence automatically as soon as it is locked in place. The
Toasting Indicator Light will illuminate.
4. Once completed, the toaster will switch off and the Toasting
Lever will return to its upper position, ejecting the bread. The
Toasting Indicator Light will switch OFF.
5. Remove the bread from the Toasting Slots.
6. You can cancel the toasting at any time by pressing the STOP /
CANCEL button. This will return the Toasting Lever to its upright
position.
7. The Toasting Lever can also be raised manually during toasting if
required.
WARNING: The toaster’s housing will get very hot during use; do NOT
touch hot surfaces. To prevent burns, always allow the toaster to cool
completely before handling, cleaning, or storing it.
Toasting Frozen Bread
1. Begin toasting as described in the above section, inserting the
bread into the slots, selecting the desired browning level, and
pushing the Toasting Lever down until it locks.
2. Press the DEFROST button, the defrost indicator light will illuminate.
This function will allow for additional time for the toast to reach
the desired browning level.
3. After toasting is complete, the defrost indicator light will turn OFF.
Reheating Toast
1. This toaster also features a heating function that allows you to
reheat toast.
2. Begin toasting as described in the above toasting section,
inserting the bread into the slots, selecting the desired browning
level, and pushing the Toasting Lever down until it locks.
3. Press the REHEAT button; the reheat indicator light will illuminate.
This function will use a lower toasting time, which will allow the
toast to be warmed without getting burnt.
4. After reheating is completed, the reheat indicator light will turn
OFF.
7
BSET 41707 – 120501
Assembly page 7/16
Page 8

Copies of the I/B. Please reproduce them without any
changes except under special instruction from Team
International BELGIUM. The pages must be reproduced
and folded in order to obtain a booklet A5 (+/- 148.5 mm
width x 210 mm height). When folding, make sure you
keep the good numbering when you turn the pages of
the I/B. Don’t change the page numbering. Keep the
Fax +32 2 359 95 50
language integrity. Print only what is inside the frame.
Using the Bun Warming Rack
1. Push down the locking handles on either side of the Bun Rack.
2. Place the Bun Rack over the Toasting Slots. You will see 4 slots
where the locking handles will sit in. Please ensure these are
secured in the slot.
3. Place a maximum of 2 buns, rolls, croissants, or bagels onto
the Bun Rack.
4. Turn the rotary knob to your desired browning level then push
down the Toasting Lever to commence toasting.
5. Once complete, the Toasting Lever will automatically return to
its upper position.
6. If needed, turn the bun or bagel over to toast the other side,
repeating step 4 above.
7. If a lower browning setting is selected, the bun rack can also
be used to reheat or keep bread or croissants warm.
USING THE EGG COOKER
Functions
The Egg Cooker allows you to:
1. Fry Eggs (and other types of food, including small strips of bacon or
ham) – Max 2 eggs
2. Boil Eggs – Max. 6 eggs
8
BSET 41707 – 120501
Assembly page 8/16
Page 9

Copies of the I/B. Please reproduce them without any
changes except under special instruction from Team
International BELGIUM. The pages must be reproduced
and folded in order to obtain a booklet A5 (+/- 148.5 mm
width x 210 mm height). When folding, make sure you
keep the good numbering when you turn the pages of
the I/B. Don’t change the page numbering. Keep the
Fax +32 2 359 95 50
language integrity. Print only what is inside the frame.
3. Poach Eggs – Max. 3 eggs
4. Reheat or steam foods
• The egg cooker can be used independently of the toasting
function.
• Cooking time for eggs will depend on your desired style,
personal taste, as well as the size, quantity, and initial
temperature of the eggs.
• Use fresh water for boiling eggs or steaming food.
• Use the scale on the provided measuring cup to determine
the required amount of water to be used.
Egg Preparation Times
Refer to the guide below for approximate cooking times. Please note
that this is a rough guide and will depend on the size of the egg and
the number of eggs you are cooking.
Cooking Level Yolk Cooking Time
Soft Liquid egg yolk Approx. 8-9
minutes
Medium Partially cooked
egg yolk
Hard Completely
cooked egg yolk
Approx. 13-14
minutes
Approx. 16-18
minutes
Measuring Cup
The provided measuring cup serves as
an approximate guide for determining
how much water will be needed for
boiling eggs. The amount of water will
vary depending on the quantity of
eggs being cooked and on how hard
or soft the eggs will be cooked. The
following table can also be used as an
approximate guide for determining the
amount of water to be used.
9
BSET 41707 – 120501
Assembly page 9/16
Page 10

Copies of the I/B. Please reproduce them without any
changes except under special instruction from Team
International BELGIUM. The pages must be reproduced
and folded in order to obtain a booklet A5 (+/- 148.5 mm
width x 210 mm height). When folding, make sure you
keep the good numbering when you turn the pages of
the I/B. Don’t change the page numbering. Keep the
Fax +32 2 359 95 50
language integrity. Print only what is inside the frame.
For example, if you want to soft-boil 2 eggs, fill the measuring cup
with water up to the number 2 next to the “SOFT” level option. This
same method applies for soft-, medium-, and hard-boiled eggs.
NOTE: The harder the egg is boiled, the more water will be needed.
The more eggs are being cooked at a time, the less water will be
needed!
WARNING: The measuring cup is equipped with an egg piercer on
the bottom that is very sharp; please handle with care to avoid
injury.
Below is a table with the approximate amount of water needed to
achieve the cooking level you want.
Egg Preparation Table
Cooking Level Number
of Eggs
Water
Level in ml
Water
level in
Fl.Oz.
Hard 1 140ml 4.7 Fl.Oz.
2 130ml 4.4 Fl.Oz.
4 120ml 4.1 Fl.Oz.
6 110ml 3.7 Fl.Oz.
Medium 1 75ml 2.5 Fl.Oz.
2 68ml 2.3 Fl.Oz.
4 55ml 1.9 Fl.Oz.
6 45ml 1.5 Fl.Oz.
Soft 1 40ml 1.4 Fl.Oz.
2 36ml 1.2 Fl.Oz.
4 31ml 1.0 Fl.Oz.
6 28ml 0.9 Fl.Oz.
Please reference the table above should the included measuring
cup be misplaced. Water quantities are approximate.
Boiling Eggs
1. Use the measuring cup or refer to egg preparation table above
to determine the amount of water required for the desired
number of eggs. Pour the measured water into the Mini Pan.
10
BSET 41707 – 120501
Assembly page 10/16
Page 11

Copies of the I/B. Please reproduce them without any
changes except under special instruction from Team
International BELGIUM. The pages must be reproduced
and folded in order to obtain a booklet A5 (+/- 148.5 mm
width x 210 mm height). When folding, make sure you
keep the good numbering when you turn the pages of
the I/B. Don’t change the page numbering. Keep the
Fax +32 2 359 95 50
language integrity. Print only what is inside the frame.
2. Place the Egg Holder Insert onto the Mini Pan. (Please note that
the Egg Holder Insert has been marked to indicate the correct
position in which it should be placed).
3. Use the egg piercer underneath the measuring cup to puncture
the eggs. We recommend puncturing the larger end of the egg
to help prevent it from cracking during cooking.
WARNING: The egg piercer underneath the measuring cup is very
sharp; please handle with care to avoid injury.
4. Place the eggs onto the Egg Holder Insert (pierced side up).
5. Place the lid over the Egg Holder Insert.
6. Turn the Mini Pan Selector Switch to the BOIL/POACH position. The
indicator light will illuminate.
7. Boiling is completed when the water has completely evaporated;
an audible beep will sound.
8. Turn the Mini Pan Selector Switch to the OFF position.
9. Remove the lid.
WARNING: Be careful to avoid the steam that rises when you remove
the lid. Steam will also rise from the lid steam vents. This steam is very
hot and can scald your skin.
10. Immediately rinse the eggs under cold water for easier eggshell
removal.
Poaching Eggs
1. Fill the measuring cup to the middle level for 1 egg (75mL / 2.5
Fl.Oz.) and then pour the water into the Mini Pan.
2. Place the Egg Holder Insert onto the Mini Pan. (Please note that
the Egg Holder Insert has been marked to indicate the correct
position in which it should be placed).
3. Lightly oil the Poaching Tray and then crack the eggs into the
compartments.
4. Place the Poaching Tray on the Egg Holder Insert, then place lid
on top.
WARNING: Never place the Poaching Tray, Steamer Insert, or Egg
Cooker Lid directly onto the Mini Pan. Only the Egg Holder Insert can
be placed over the Mini Pan.
11
BSET 41707 – 120501
Assembly page 11/16
Page 12

Copies of the I/B. Please reproduce them without any
changes except under special instruction from Team
International BELGIUM. The pages must be reproduced
and folded in order to obtain a booklet A5 (+/- 148.5 mm
width x 210 mm height). When folding, make sure you
keep the good numbering when you turn the pages of
the I/B. Don’t change the page numbering. Keep the
Fax +32 2 359 95 50
language integrity. Print only what is inside the frame.
5. Turn the Mini Pan Selector Switch to the BOIL/POACH position. The
indicator light will illuminate.
6. Poaching is completed when the water has completely
evaporated and an audible beep will sound.
7. Turn the Mini Pan Selector Switch to the OFF position.
8. Remove the lid.
WARNING: Be careful to avoid the steam that rises when you remove
the lid. Steam will also rise from the lid steam vents. This steam is very
hot and can scald your skin.
9. Use the Spatula or spoon to scoop out the poached eggs onto
your serving plate or toast.
Steaming/Re-heating Other Foods
1. Pour the required amount of water into the Mini Pan, depending
on what you are re-heating or steaming. Generally, the bigger
the food item, the longer it will take to steam and the more water
will be required.
2. Place the Egg Holder Insert onto the Mini Pan (please note the
Egg Holder Insert has been marked to indicate the correct
position to be placed).
3. Food can either be placed directly onto the Egg Holder Insert or
into the Steaming basket or Poaching Tray.
4. Place the lid on top of the Egg Holder Insert, Steaming Basket, or
Poaching Tray.
5. Turn the Mini Pan Selector Switch to the BOIL/POACH position. The
indicator light will illuminate.
6. Re-heating/Steaming is completed when the water has
completely evaporated, and an audible beep has sounded.
7. Turn the Mini Pan Selector Switch to the OFF position.
8. Remove the lid.
WARNING: Be careful to avoid the steam that rises when you remove
the lid. Steam will also rise from the lid steam vents. This steam is very
hot and can scald your skin.
9. Use tongs or serving utensils to remove your food. Be careful as
the food will be hot!
12
BSET 41707 – 120501
Assembly page 12/16
Page 13

Copies of the I/B. Please reproduce them without any
changes except under special instruction from Team
International BELGIUM. The pages must be reproduced
and folded in order to obtain a booklet A5 (+/- 148.5 mm
width x 210 mm height). When folding, make sure you
keep the good numbering when you turn the pages of
the I/B. Don’t change the page numbering. Keep the
Fax +32 2 359 95 50
language integrity. Print only what is inside the frame.
FRYING ON THE MINI PAN
1. The Mini Pan can be used to fry eggs as well as small, thin cuts
of meat (bacon, ham etc.).
2. Turn the Mini Pan Selector Switch to the FRY position.
3. For best results, preheat the Mini Pan for a few minutes to
allow it to heat up before use.
4. Always spray, wipe, or brush the Mini Pan with cooking oil
before use.
5. Place the food to be fried into the Mini Pan. Be careful of
splattering oil from the pan.
6. After frying is completed, turn the Mini Pan Selector Switch to
WARNING: Never place the lid onto the Mini Pan while using the
frying function. Only use butter or cooking oil on the Mini Pan. Avoid
placing any flammable substance on the Mini Pan or in its vicinity. Do
not use sharp objects or metal tongs as they may scratch the surface
of the pan.
the OFF position. The indicator light will turn off.
USEFUL HINTS
• Keep eggs refrigerated until ready to cook.
• Eggs should be stored in an egg carton or in an egg
compartment in your refrigerator; this keeps them from drying out
and absorbing refrigerator odors.
• Eggs should be stored sitting large-side up; this helps them stay
fresh longer and keep their yolks centered.
• You will learn to adjust the water level to achieve your desired
hardness/softness for boiled eggs. Add more water for firmer eggs
and add less water if you prefer softer eggs.
• For hard-boiled eggs, it is recommended to immerse the eggs
into cold water immediately after cooking. This helps stop the
cooking process and prevents a dark ring from developing
around the yolk. It also makes it easier to peel the eggshells.
• If not serving immediately, it is advised to place boiled eggs in the
refrigerator. Hard-boiled eggs in the shell can keep for up to one
week if they are properly refrigerated.
• To easily peel hard-boiled eggs, roll them gently on the counter
using the palm of your hand to crack the shell.
13
Assembly page 13/16
BSET 41707 – 120501
Page 14

Copies of the I/B. Please reproduce them without any
changes except under special instruction from Team
International BELGIUM. The pages must be reproduced
and folded in order to obtain a booklet A5 (+/- 148.5 mm
width x 210 mm height). When folding, make sure you
keep the good numbering when you turn the pages of
the I/B. Don’t change the page numbering. Keep the
Fax +32 2 359 95 50
language integrity. Print only what is inside the frame.
CLEANING, CARE AND MAINTENANCE
WARNING: Ensure that the Breakfast Station has cooled sufficiently
and has been switched off and unplugged before cleaning!
Cleaning the Mini Pan
The Mini Pan has a non-stick coated surface. Be careful when
cleaning to avoid scratching or damaging its surface.
1. Do NOT use abrasive cleaning agents or metal brushes, nylon
brushes, or other objects that could scratch the pan’s surface
during cleaning.
2. Clean the pan after each use. Leftovers that stick to the pan can
burn into the coating if not removed correctly.
3. Carefully scrape off any leftovers with the included spatula.
4. Wipe down the Mini Pan with a damp cloth or paper towel that
has been moistened with one tablespoon of white vinegar. This
helps remove mineral deposits left behind from water during
cooking. If the unit is not cleaned with white vinegar on a regular
basis, the mineral deposits will accumulate on the Mini Pan.
NOTE: If there are hard-to-remove stains or leftovers, connect the unit
to the power outlet and switch ON. Pour some water into the pan
and then turn on the Mini Pan frying function. Let the water heat up,
then let it cool slightly before using the Spatula or a cloth to wipe it
down again.
Cleaning the Toaster and Egg Boiler Parts
1. Pull the Crumb Tray out of the toaster, empty it, and then wipe it
down with a damp cloth.
2. Ensure that the Crumb Tray is thoroughly dry before placing it
back in the toaster.
3. All attachments (Bun Rack, Egg Holder Insert, Steamer Insert,
Poaching Tray and Egg Cooker Lid) can be washed with warm,
soapy water, or washed in a dishwasher.
Any other servicing should be performed by an authorized service
representative!
DO NOT IMMERSE THE BREAKFAST STATION IN WATER
OR ANY OTHER LIQUID!
14
BSET 41707 – 120501
Assembly page 14/16
Page 15

Copies of the I/B. Please reproduce them without any
changes except under special instruction from Team
International BELGIUM. The pages must be reproduced
and folded in order to obtain a booklet A5 (+/- 148.5 mm
width x 210 mm height). When folding, make sure you
keep the good numbering when you turn the pages of
the I/B. Don’t change the page numbering. Keep the
Fax +32 2 359 95 50
language integrity. Print only what is inside the frame.
WARRANTY
We suggest that you complete and return the enclosed Product
Registration Card promptly to facilitate verification of the date of
original purchase. However, return of the Product Registration Card is
not a condition of these warranties. You can also fill out this warranty
card online, at the following address: www.KALORIK.com
This KALORIK product is warranted in the U.S.A. for 1 year from the
date of purchase against defects in material and workmanship. This
warranty is not transferable. Keep the original sales receipt. Proof of
purchase is required to obtain warranty performance.
During this period, if the KALORIK product, upon inspection by
KALORIK, is proven defective, it will be repaired or replaced, at
Kalorik’s option, without charge to the customer. If a replacement
product is sent, it will carry the remaining warranty of the original
product.
This warranty does not apply to any defect arising from a buyer's or
user's misuse of the product, negligence, failure to follow KALORIK
instructions noted in the user’s manual, use on current or voltage
other than that stamped on the product, wear and tear, alteration
or repair not authorized by KALORIK, or use for commercial purposes.
There is no warranty for glass parts, glass containers, filter basket,
blades and agitators, and accessories in general. There is also no
warranty for parts lost by the user.
ANY WARRANTY OF MERCHANTABILITY OR FITNESS WITH RESPECT TO
THIS PRODUCT IS ALSO LIMITED TO THE ONE YEAR LIMITED WARRANTY
PERIOD.
Some states do not allow limitation on how long an implied warranty
lasts or do not allow the exclusion of incidental or consequential
damages, so the above limitations may not apply to you. This
warranty gives you specific legal rights, and you may also have other
rights which vary from state to state.
15
BSET 41707 – 120501
Assembly page 15/16
Page 16

Copies of the I/B. Please reproduce them without any
changes except under special instruction from Team
International BELGIUM. The pages must be reproduced
and folded in order to obtain a booklet A5 (+/- 148.5 mm
width x 210 mm height). When folding, make sure you
keep the good numbering when you turn the pages of
the I/B. Don’t change the page numbering. Keep the
Fax +32 2 359 95 50
language integrity. Print only what is inside the frame.
If the appliance should become defective within the warranty
period and more than 30 days after date of purchase, do not return
the appliance to the store: often, our Customer Service
Representatives can help solve the problem without having the
product serviced. If servicing is needed, a Representative can
confirm whether the product is under warranty and direct you to the
nearest service location.
If this is the case, bring the product, or send it, postage prepaid by
the user (all Kalorik customers are responsible for the initial shipment
back to the warranty center), along with proof of purchase and a
return authorization number indicated on the outer package, given
by our Customer Service Representatives. Send to the authorized
KALORIK Service Center (please visit our website at
www.KALORIK.com or call our Customer Service Department for the
address of our authorized KALORIK Service Center).
When sending the product, please include a letter explaining the
nature of the claimed defect.
If you have additional questions, please call our Customer Service
Department (please see below for complete contact information),
Monday through Thursday from 9:00am - 5:00pm (EST) and Friday
from 9:00am - 4:00pm (EST). Please note hours are subject to change.
If you would like to write, please send your letter to:
KALORIK Customer Service Department
Team International Group of America Inc.
1400 N.W 159th Street, Suite 102
Miami Gardens, FL 33169 USA
Or call:
Toll Free: +1 888-521-TEAM / +1 888-KALORIK
Only letters can be accepted at this address above. Shipments and
packages that do not have a return authorization number will be
refused.
16
BSET 41707 – 120501
Assembly page 16/16
 Loading...