

Kaliber Gaming KeyMander 2 User Manual

KeyMander™ 2 3Play
Keyboard/Mouse Sharing Switch for PC & Game Consoles
User Manual
www.kalibergaming.com
www.iogear.com
1

About this Manual
This User Manual is provided to help you get the most from your system. It
covers all aspects of installation, configuration and operation. An overview of
the information found in the manual is provided below.
Chapter 1, Introduction, introduces you to the KeyMander 2 3Play. Its
purpose, features, benefits, and requirements are presented, and its front and
back panel components are described.
Chapter 2, Setup, describes how to set up your KeyMander 2 3Play. The
necessary steps for configuring the mouse settings and hardware setup are
provided.
Chapter 3, Basic Operation, describes how to use the keyboard, mouse, and
PS/Xbox game controller with your KeyMander 2 3Play.
Chapter 4, Using the K2 App, explains how to use the KeyMander 2 App
with your KeyMander 2 3Play, as well as how to create and edit game
profiles.
Chapter 5, Firmware Upgrade, explains how to download the firmware
upgrade utility and install updates on the KeyMander 2 3Play.
Chapter 6, Troubleshooting, explains how to solve common issues with the
KeyMander 2 3Play.
The Appendix, provides helpful tips, specifications, and other technical
information regarding the KeyMander 2 3Play.
© 2020 IOGEAR. All rights reserved. “KG Kaliber Gaming”, “IOGEAR” and “Keymander” are
registered and other trademarks of, and the Keymander2 is a product of, Aten Technology, Inc.
“PS4” and “PS3” are registered trademarks of Sony Interactive Entertainment Inc. “Sony” is a
registered trademark of Sony Corporation. “Microsoft” and “Xbox” are registered trademark of
Microsoft Corporation. “Nintendo Switch” is a registered trademark of Nintendo of America, Inc.
All other trademarks are the property of their respective owners. References to compatible
products, such as those produced by Nintendo, Microsoft, Sony, Google, Apple, Bluetooth and
USB, are not intended to suggest any endorsement or sponsorship by or affiliation with those
product manufacturers. Tested to comply with FCC and CE standards.”
Manual Date: 2020-11-06
2

Package Contents
1 x 1 GES1337 KeyMander 2 3Play
1 x 1 Micro USB Cable
1 x 1 Quick Start Guide*
Check to make sure that all the components are present and that nothing got
damaged in shipping. If you encounter a problem, contact your dealer.
Read this manual thoroughly and follow the installation and operation
procedures carefully to prevent any damage to the unit, and/or any of the
devices connected to it.
* Features may have been added to the KeyMander 2 3Play since this manual
was published. Please visit our website to download the most up-to-date
version.
3

Table of Contents
Table of Contents ........................................................................ 4
Chapter 1 ..................................................................................... 8
Introduction ................................................................................ 8
Overview .....................................................................................................8
Features .......................................................................................................9
Requirements ............................................................................................10
Game Console / Controller ...................................................................10
PC / Keyboard and Mouse ....................................................................10
Audio Support .......................................................................................10
Operating Systems ................................................................................11
Components ..............................................................................................11
GES1337 Front View..............................................................................11
GES1337 Top View ................................................................................12
GE1337P2 Side View .............................................................................13
Chapter 2 ................................................................................... 14
Setup ......................................................................................... 14
Connecting Hardware ................................................................................14
PC Setup ................................................................................................14
Xbox One / Xbox 360 Setup ..................................................................17
PS4 / PS3 Setup .....................................................................................22
Nintendo Switch Setup .........................................................................27
Chapter 3 ................................................................................... 33
Basic Operation ......................................................................... 33
Overview ...................................................................................................33
4

Chapter 1. Introduction
Controller to Keyboard Button Layout ..................................................33
Controller Crossover Function ...................................................................35
Reset Function ...........................................................................................35
Chapter 4 ................................................................................... 36
Using the K2 App ....................................................................... 36
Overview ...................................................................................................36
Installing the K2 App .............................................................................36
Opening the K2 App ..............................................................................37
Signing Up an Account ..........................................................................37
Connecting the K2 App .........................................................................40
Device Tab .................................................................................................43
Device Settings ......................................................................................44
Firmware Upgrade ................................................................................46
Reset Device ..........................................................................................49
Port Configuration.................................................................................50
Changing Game Profile..........................................................................51
Editing Game Profile .............................................................................52
Game Center Tab.......................................................................................53
Library Tab .................................................................................................55
Account .................................................................................................56
Changing Username ..............................................................................58
Changing Password ...............................................................................59
Backing Up and Restoring Game Profiles ..............................................60
Downloading a Profile from Game Center ............................................63
Adding a Game Profile ..........................................................................66
Editing, Deleting and Sharing a Profile ..................................................69
Uploading & Customizing Controls for a Profile ........................................73
5

GES1337 KeyMander 2 3Play User Manual
Uploading a Profile ................................................................................73
Customizing Controls for a Profile ........................................................74
Sensitivity ..............................................................................................75
General Mode .......................................................................................76
General Mode Advanced Settings .........................................................77
Aim Mode (Aim-Down-Sight) ................................................................89
Walk Mode ............................................................................................91
Weapon Mode ......................................................................................92
Mapping ................................................................................................93
Turbo ...................................................................................................... 100
Macro ..................................................................................................... 103
Chapter 5 ................................................................................. 107
Firmware Upgrade .................................................................. 107
The Firmware Upgrade Utility ................................................................ 107
Before You Begin ................................................................................ 107
Starting the Upgrade .......................................................................... 107
Upgrade Succeeded ........................................................................... 110
Upgrade Failed ................................................................................... 110
Firmware Upgrade Recovery ............................................................. 111
Chapter 6 ................................................................................. 112
Troubleshooting ...................................................................... 112
Troubleshooting ..................................................................................... 112
Micro USB Cable Problems ................................................................ 112
PlayStation 4 ...................................................................................... 112
Xbox One ............................................................................................ 113
Nintendo Switch ................................................................................. 114
LED Indicator Behavior ........................................................................... 115
6

Chapter 1. Introduction
Appendix ................................................................................. 116
Mouse Performance ............................................................... 116
Understanding Mouse Performance ...................................................... 116
Sensitivity Settings ............................................................................. 116
Maximum Turn Speed (In-Game) ....................................................... 117
Turn Speed Settings (K2 App) ............................................................ 119
Deadzone Settings (K2 App and In-Game) ......................................... 119
Resolution (Mouse Hardware/Software and K2 App)........................ 119
Technical Support ................................................................................... 121
International ...................................................................................... 121
North America .................................................................................... 121
Safety Instructions .................................................................................. 122
General ............................................................................................... 122
Specifications.......................................................................................... 124
Limited Warranty ................................................................................... 125
7

Chapter 1
Introduction
Overview
The KeyMander® 2 3Play™ from Kaliber Gaming by IOGEAR is a
keyboard/mouse sharing switch for PC and game consoles, that allows
gamers to share their keyboard and mouse between any (3) three of the
following devices, PC, Xbox One®, Xbox 360®, PS4™, PS3™, or Nintendo
Switch™. Use your keyboard and mouse skills to dominate all your favorite
First-Person Shooter (FPS), Role Playing Games (RPG) and Real-Time
Strategy (RTS) games, then use the hotkey to instantly switch keyboard and
mouse focus to your PC. The KeyMander 2 3Play has an easy to use app that
allows you to customize all game controller buttons for use on a keyboard
and mouse. Advanced features allow you to custom map keys, create macros,
set turbo buttons, and adjust the mouse sensitivity. Quick macro setup allows
you to program up to 8 button press combinations and set it to a single key,
so one press executes multiple commands.
Easy setup- simply click a controller button, and press a key to use and its set
for use on the keyboard. The KeyMander 2 3Play app allows you to map, set
controller sensitivity and switches profiles directly from the keyboard.
With the KeyMander 2 3Play you can create an unlimited number of
keyboard and mouse configuration profiles - each suited for specific game
play. Profiles can be switched and configured during live gaming for quick
adjustments. The KeyMander 2 3Play gives gamers the ability to customize
and fine tune all controls for the expert advantage with every game.
The KeyMander 2 3Play allows you to:
Use a keyboard & mouse in place of your controller on Xbox One,
Xbox 360, PS4, PS3 & Nintendo Switch game systems
Share a keyboard & mouse between up to 3 PCs and game
consoles with hot key switching
Swap original controllers between PS4, Xbox One and Nintendo
Switch using the Controller Crossover Function
Simultaneously use a keyboard, mouse, and controller
Connect your Android/iOS smartphone using the K2 App to provide
custom key mapping, mouse sensitivity & more
8

Chapter 1. Introduction
Download game profiles from the Game Center in the K2 app or
create custom profiles for specific games & scenarios
Make on-the-fly adjustments while live gaming
Program a key for Microphone mute or PTT (push-to-talk) on
headsets without mute functions
Enable traction control to improve accuracy when turning onto
targets behind you
Create Macro commands which perform up to 8 controller
commands with a single key press
Use Turbo Mode to make semi-auto guns operate as full-auto guns
in compatible games
Share game profiles with friends and backup your profile library to
the cloud
Receive OTA (over-the-air) firmware upgrades for easier and faster
product updates
Features
Gamepad Emulation transforms keyboard and mouse signals into game
controller signals for keyboard and mouse use on a PS, Xbox, and
Nintendo Switch game consoles
Easy gamepad to keyboard key mapping and advanced configuration via
KeyMander 2 3Play app
Macro editor allows for detailed configuration and command sequence
control of a gamepads controller buttons
Macros can combine up to 8 controller commands into a single key
Turbo Mode can turn semi-auto weapons into full-auto weapons
Hot Swap between the PS3/PS4/Xbox One/Xbox 360/Nintendo Switch
controller and keyboard/mouse instantly
Supports Controller Crossover Function - interchanges different
factory-supplied controllers between game consoles
Note: The KeyMander 2 3Play does not support use with PS1, PS2, or the
original Xbox consoles.
9

GES1337 KeyMander 2 3Play User Manual
Controller Requirements for KeyMander 2 3Play
Xbox One
Original Xbox One wireless controller connected via included micro USB
cable
Xbox 360
Original Xbox 360 wired controller (Wireless Play and Charge kit is not
supported)
PS3
Original PS3 wireless controller connected via a mini USB cable (Sony
DualShock 3 SIXAXIS controller is recommended)
PS4
Original PS4 wireless controller connected via included micro USB cable
(Sony DualShock®4 V2 controller required for headset support)
Nintendo
Switch
Nintendo Switch does not require controller connected, but does require
Switch to be placed into Nintendo Switch Dock
Supported Headsets
Xbox One
Connect 3.5mm headset to original Xbox One controller.
Xbox 360
Connect X360 wired headset to original Xbox 360 controller.
PS3
Headset not supported with controller. Connect USB headset directly to
the PS3 console.
PS4
Connect 3.5mm headset to the original PS4 Gen 2 controller, or connect
USB headset directly to the PS4 console.
Nintendo
Switch
Connect 3.5mm headset to the Nintendo Switch or connect USB headset
directly to Switch dock.
Requirements
Game Console / Controller
1 or more PS3, PS4, Xbox 360, Xbox One, or Nintendo Switch Console
1 Wired Game Controller
PC / Keyboard and Mouse
1 or more PC
1 USB Keyboard and Mouse
Audio Support
10
Chapter 1. Introduction
Software Platform
Version
Android
Version 7 and up
iOS
Version 10 and up
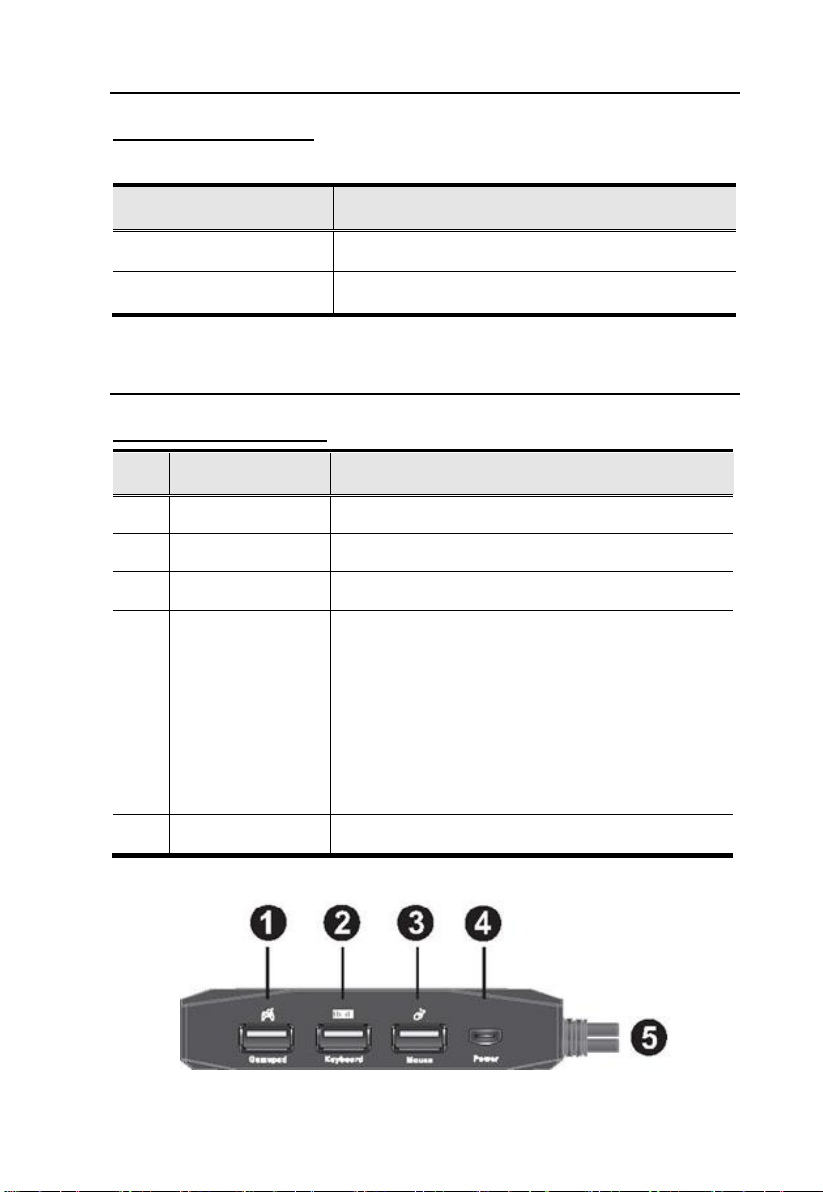
No.
Component
Description
1
Gamepad USB Port
Plug the PS/Xbox game controller into this port.
2
Keyboard USB Port
Plug a USB keyboard into this port.
3
Mouse USB Port
Plug a USB mouse into this port.
4
Power Port
This micro USB port provides optional power to the
unit. KeyMander 2 3Play will function without additional
power, however some RGB keyboards such as those
with built-in USB hubs, etc. may require additional
power. If the KeyMander 2 LED indicator is flashing
red or a low voltage warning appears on the K2 app,
connect a micro USB cable between the KeyMander 2
3Play’s Power port and a USB power supply (minimum
2A output) such as a charger for a tablet or
smartphone.
5
PC/ Console Ports
Connect to PC and game consoles. See Side View.
Operating Systems
Supported operating systems for the K2 App, are shown in the table, below:
Components
GES1337 Front View
11
GES1337 KeyMander 2 3Play User Manual
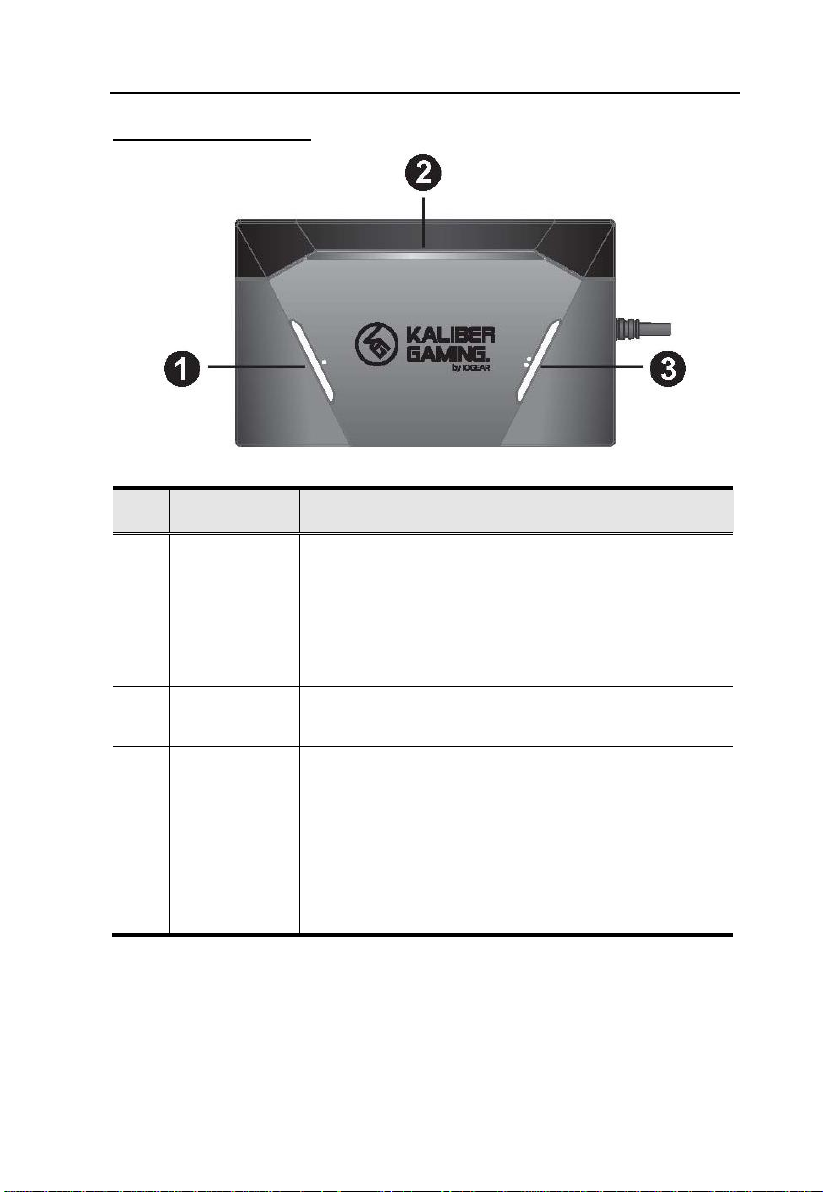
No.
Component
Description
1
Bluetooth
Pairing
Pushbutton
Press the button to pair up your mobile device with the
KeyMander 2 3Play app. This button is also used in
conjunction with the Mode Button to enter the Firmware
Upgrade Mode, and hardware reset.
See The Firmware Upgrade Utility.
See Reset Function.
2
LED Indicator
The LED indicator provides system alerts and feedback for
different operating modes.
3
Port Switching
Pushbutton
Press the button to switch between Port 1, Port 2, and Port
3. This port is also used in conjunction with the Bluetooth
Pairing Button to enter the Firmware Upgrade Mode, and
hardware reset. Press the button three times quickly to
perform a default reset and set the system back to factory
settings.
See The Firmware Upgrade Utility.
See Reset Function.
GES1337 Top View
12

GE1337P2 Side View
No.
Component
Description
1
USB Type-A
Connection Port 1
(PC or Console)
The USB Type-A Connection Port 1 (PC or Console) is
used to connect the GES1337 to a PC or game console.
This port also provides power to the unit when connected
to a PC or game console. Recommended port for PC.
2
USB Type-A
Connection Port 2
(PC or Console)
The USB Type-A Connection Port 2 (PC or Console) is
used to connect the GES1337 to a PC or game console.
This port also provides power to the unit when connected
to a PC or game console.
3
Micro USB
Type-B Female
Connection Port 3
(PC or Console)
The Micro USB Type-B Female Connection Port 3 (PC or
Console) is used to connect the GES1337 to a PC or
game console. This port also provides power to the unit
when connected to a PC or game console.
Chapter 1. Introduction
Note: All USB Connection Ports can connect to a PC or game console.
13

Chapter 2
Setup
Connecting Hardware
KeyMander 2 3Play requires slightly different connection steps depending
upon which device is being connected. The diagram below shows general
connections, but please follow the instructions for each device type.
PC Setup
To connect the KeyMander 2 3Play to PC, follow the steps below.
1. Download and install KeyMander 2 App and create a user account to
manage your game profiles. For more information, see Using the K2 App.
Note: If you are using an Android phone / tablet, please make sure to en-
able the GPS function before you begin to use this app. If you are
using iPhone / iPad with iOS version 13 or above, please make sure
to enable the Bluetooth Permission for this app.
2. Begin with the PC powered off, then connect your keyboard to the
Keyboard port.
14

Chapter 2. Setup
Note: If you are using a wireless keyboard / mouse set, plug the receiver
into the Keyboard Port.
3. Connect your mouse to the Mouse Port.
4. Connect the USB connection Port 1, 2, or 3 to a USB port on the PC.
Note: It is recommended to use Port 1 for PC and Port 2/3 for games
consoles. If you are only connecting game consoles use Port 1 for
the first console.
5. If Port 1 is already used for connection of another PC or other game
console, connect this PC to Port 2 or 3 as explained in step 4.
6. If Port 1 and Port 2 are already used, connect your PC to Port 3 using a
micro USB cable (not supplied). After connecting the micro USB to Port
3, connect the USB end as explained in Step 4.
7. Connect the KeyMander 2 3Play to a 5V/2A DC power supply if
necessary. If your KeyMander 2 LED is flashing red or you receive a low
voltage notification on the K2 App, you need to connect an additional
5V/2A USB power supply (not included).
Note: Some RGB keyboards and nearly all keyboards with built-in USB
ports or headphone jacks require more power than KeyMander 2
3Play can provide, so an external USB power supply (minimum 2
amps) is required.
8. Turn on the PC, wait for it to boot and recognize the KeyMander 2 3Play
is connected. The KeyMander 2 3Play’s LED will be glowing white.
9. After the PC has booted, confirm the mouse and keyboard are working,
then press your mouse DPI button to change to your preferred DPI setting
for use with the PC. If your PC screen is set to a lower resolution setting,
you may find a lower setting of 800-2000 DPI on your mouse works best
when your KeyMander 3Play is focused on your PC. If you have a large
or high-resolution monitor, you may find the same DPI setting you use
with your game console, which our recommendation is 3500-4000 DPI or
higher also works fine when switching focus to PC. If you need to change
your mouse’s pre-programmed DPI settings, you will first need to connect
your mouse directly to the PC so the driver can see your mouse, make
your changes and save them to the mouse, then unplug from the PC and
reconnect the mouse to the KeyMander 2 3Play when done
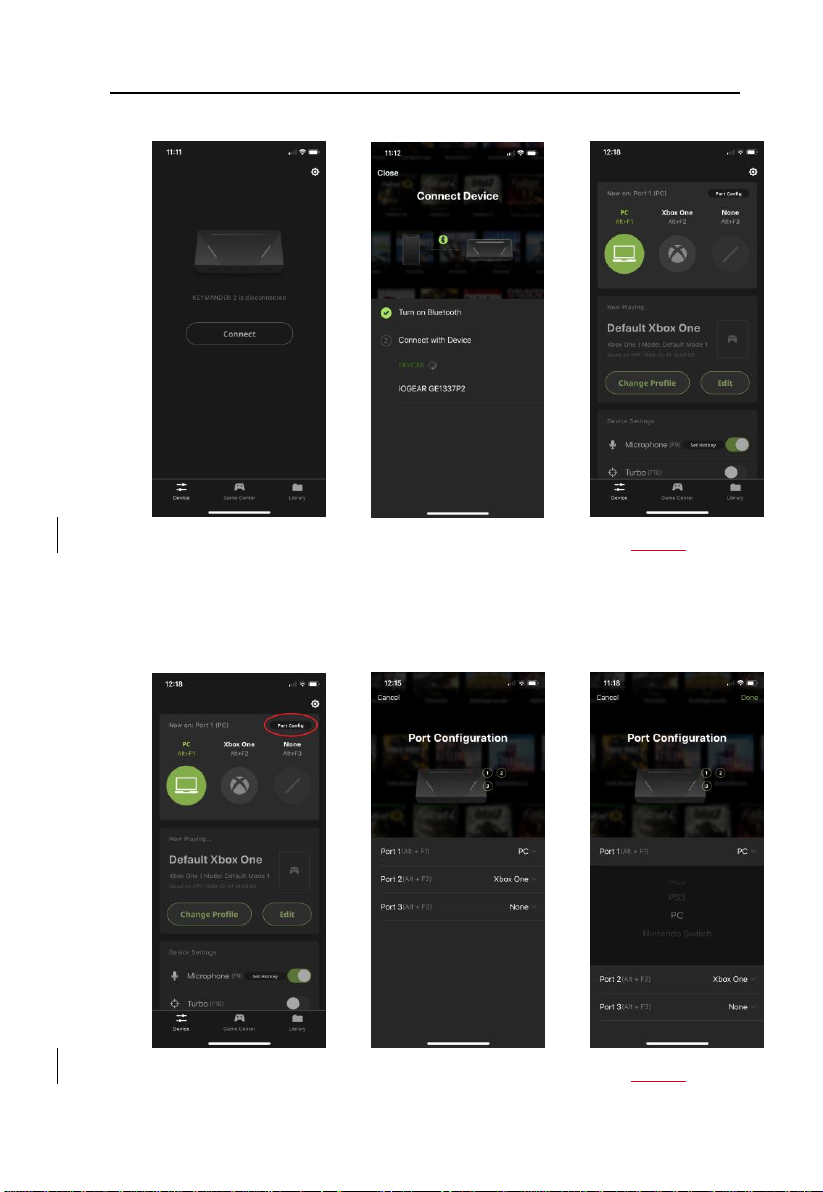
10. Press the Bluetooth Pairing Button to put KeyMander 2 3Play into pairing
mode, then press the Connect button on the Device tab of the K2 App on
15
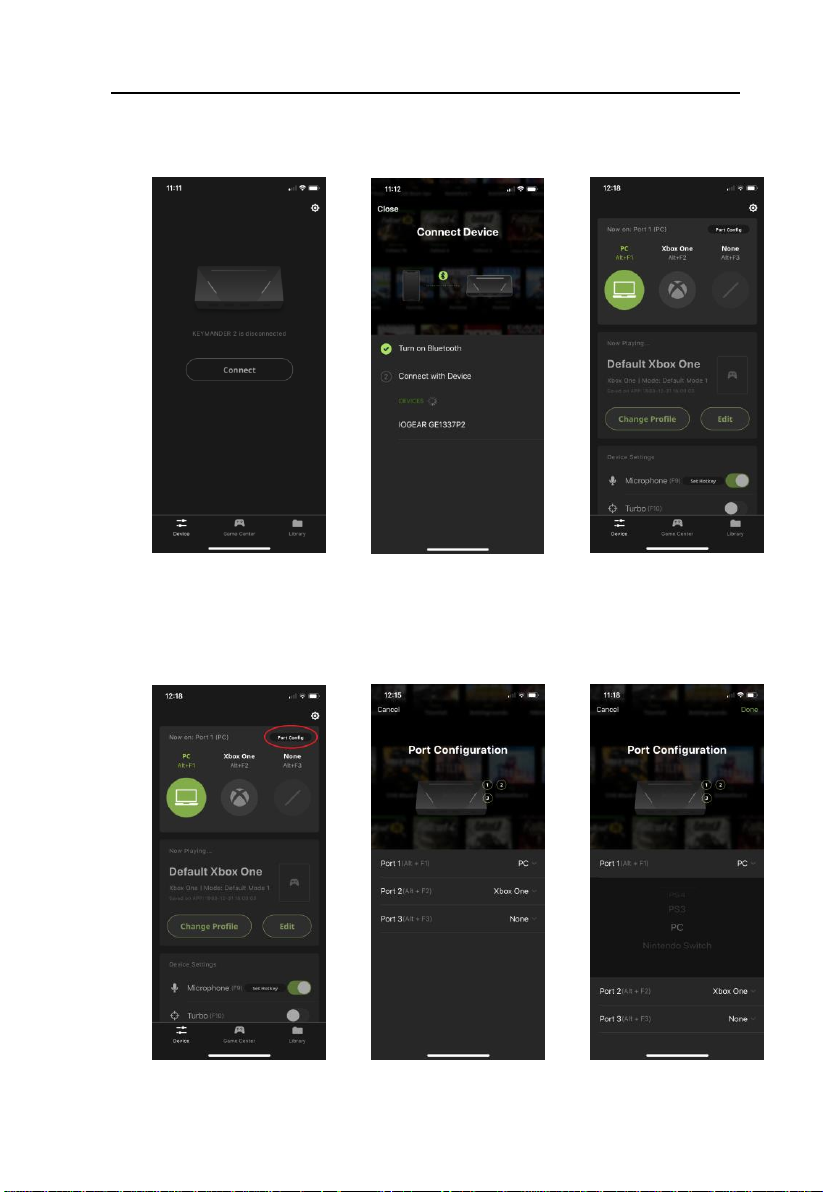
GES1337 KeyMander 2 3Play User Manual
your mobile device (Image 1). Next, select GES1337P under DEVICES
(Image 2). When the Device Tab shows the current profile and device
settings it is ready to configure the port connections (Image 3).
Image 1
Image 2
Image 3
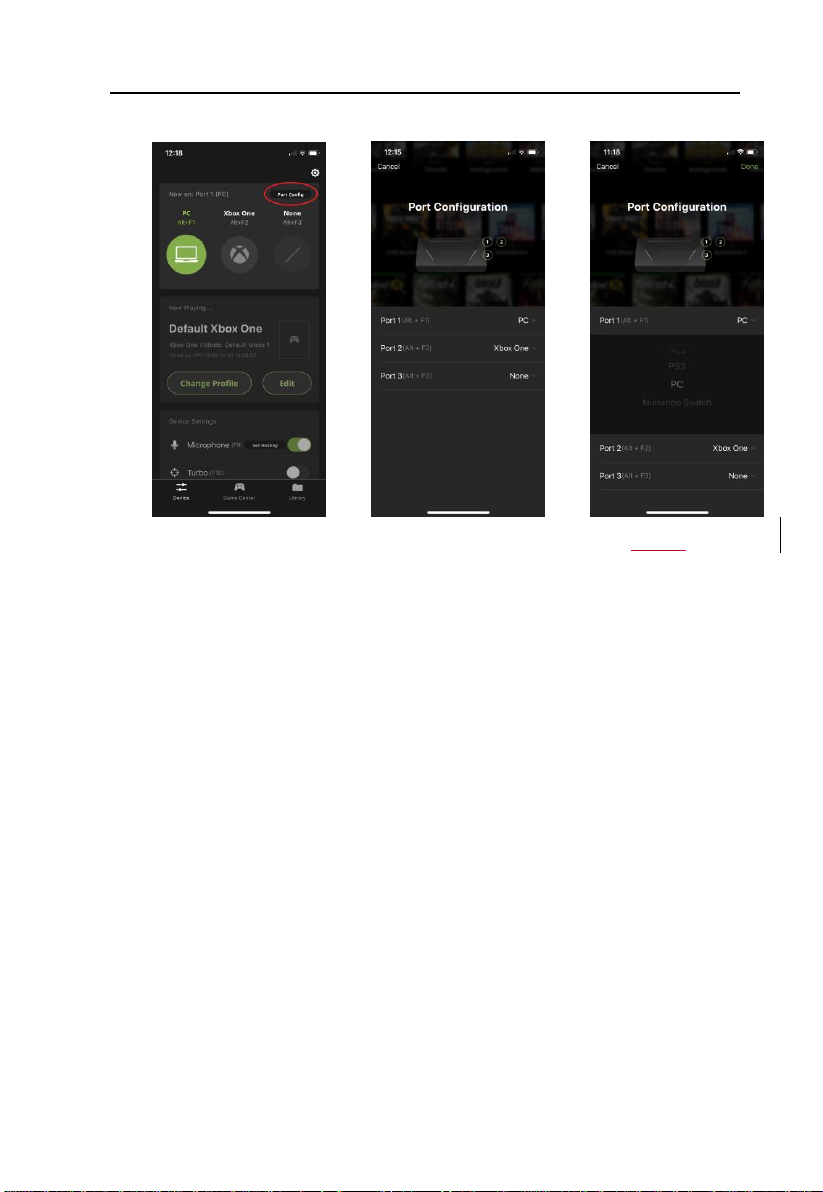
11. On the Device tab of the K2 App press the Port Config button (Image 4).
Select Port 1, 2 or 3 (Image 5) and choose your device from the selection
wheel (Image 6) and press Done to exit.
16
Image 4
Image 5
Image 6
Chapter 2. Setup
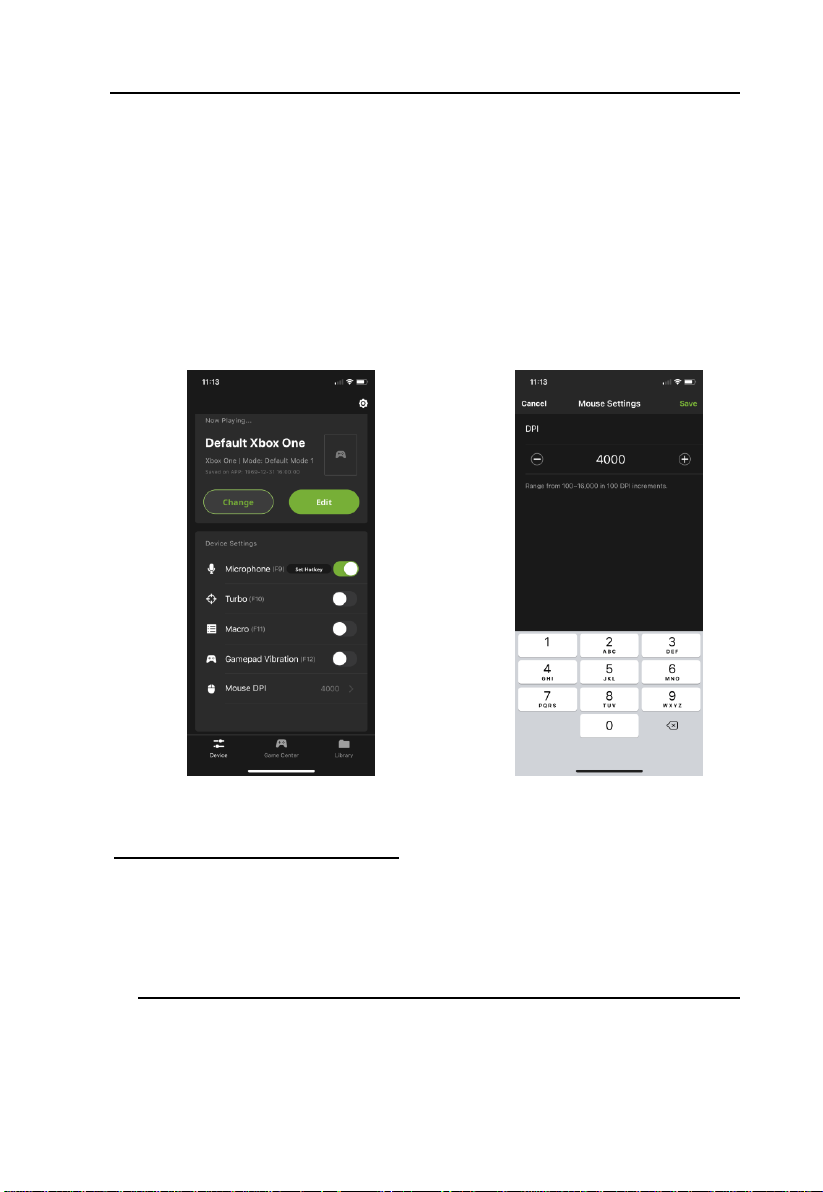
12. After completing the Port Configuration, press the PC icon on the Device
tab to switch operating modes to the PC if it is not already in PC mode.
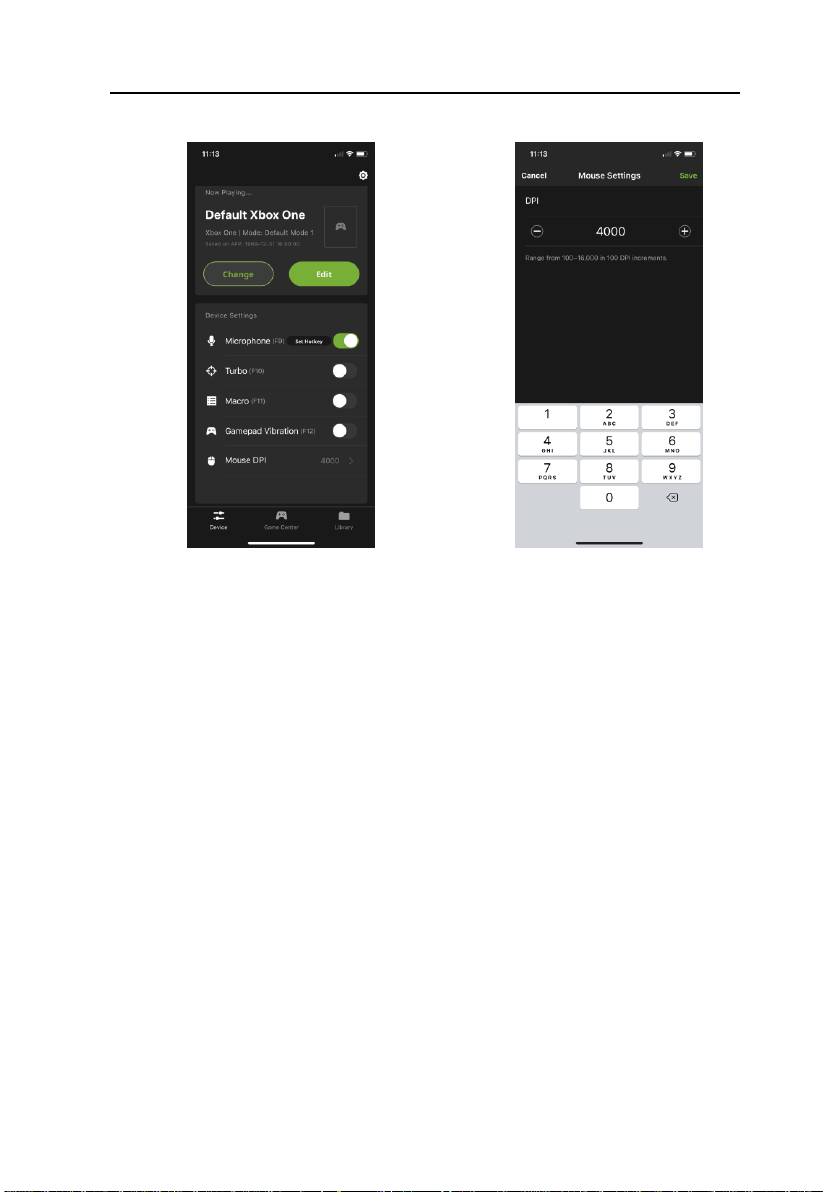
13. The default Mouse DPI setting in the K2 App is 4000 and you need to set
the mouse to match or choose an alternate setting. On the Device tab,
scroll down and tap Mouse DPI (Image 7) then on the Mouse Settings
page (Image 8) enter the DPI setting of your mouse. While our
recommended settings of 3500-4000 DPI work fine for most games, we
do encourage you to test other DPI settings. You may find that higher
settings like 8000 DPI or more may work better for you with some games,
depending upon things like aim-assist built, etc.
Image 7
Image 8
Xbox One / Xbox 360 Setup
To connect the KeyMander 2 3Play to Xbox One/Xbox 360, follow the steps
below.
14. Download and install KeyMander 2 App and create a user account to
manage your game profiles. For more information, see Using the K2 App.
Note: If you are using an Android phone / tablet, please make sure to en-
able the GPS function before you begin to use this app. If you are
using iPhone / iPad with iOS version 13 or above, please make sure
to enable the Bluetooth Permission for this app.
17

GES1337 KeyMander 2 3Play User Manual
15. Begin with the console and controller powered off, then connect your
controller to the Gamepad port with the micro USB cable provided in the
box with the KeyMander 2 3Play.
16. Connect your keyboard to the Keyboard port.
Note: If you are using a wireless keyboard / mouse set, plug the receiver
into the Keyboard Port.
17. Connect your mouse to the Mouse Port.
18. Xbox One users connect the USB Type-A Connection Port 1, 2, or 3 to a
USB port on the back of the console. DO NOT use the USB port on the
front or side of Xbox One consoles as they usually have lower power
output than the rear ports. Xbox 360 users also connect to a rear USB port
on the console.
Note: If you are using a PC and game console(s), it is recommended to
use Port 1 for PC and Port 2/3 for games consoles. If you are only
connecting game consoles use Port 1 for the first console.
19. If Port 1 is already used for connection of a PC or other game console,
connect your Xbox One or Xbox 360 to Port 2 or 3 as explained in step 5.
20. If Port 1 and Port 2 are already used, connect your Xbox One or Xbox
360 to Port 3 using a micro USB cable (not supplied). After connecting
the micro USB to Port 3, connect the USB end as explained in Step 5.
21. Connect the KeyMander 2 3Play to a 5V/2A DC power supply if
necessary. If your KeyMander 2 LED is flashing red or you receive a low
voltage notification on the K2 App, you need to connect an additional
5V/2A USB power supply (not included).
Note: Some RGB keyboards and nearly all keyboards with built-in USB
ports or headphone jacks require more power than KeyMander 2
3Play can provide, so an external USB power supply (minimum 2
amps) is required.
22. Turn on the Xbox One using the power button on the console. DO NOT
press the power button on a controller! The controller should light up by
itself indicating it is in USB mode and the KeyMander 2 3Play’s LED
will be glowing blue indicating the default PS4 profile is loaded.
23. Press the Bluetooth Pairing Button to put KeyMander 2 3Play into pairing
mode, then press the Connect button on the Device tab of the K2 App on
your mobile device (Image 1). Next, select GES1337P under DEVICES
18

Chapter 2. Setup
(Image 2). When the Device Tab shows the current profile and device
settings it is ready to configure the port connections (Image 3).
Image 1
Image 2
Image 3
24. On the Device tab of the K2 App press the Port Config button (Image 4).
Select Port 1, 2 or 3 (Image 5) and choose your device from the selection
wheel (Image 6). Select the devices connected to the other ports and press
Done to exit.
19

GES1337 KeyMander 2 3Play User Manual
Image 4
Image 5
Image 6
25. After completing the Port Configuration, press the Xbox icon on the
Device tab to switch operating modes to the Xbox.
26. The default Mouse DPI setting in the K2 App is 4000 and you need to set
the mouse to match or choose an alternate setting. On the Device tab,
scroll down and tap Mouse DPI (Image 7) then on the Mouse Settings
page (Image 8) enter the DPI setting of your mouse. While our
recommended settings of 3500-4000 DPI work fine for most games, we
do encourage you to test other DPI settings. You may find that higher
settings like 8000 DPI or more may work better for you with some games,
depending upon things like aim-assist built, etc.
20

Chapter 2. Setup
Image 7
Image 8
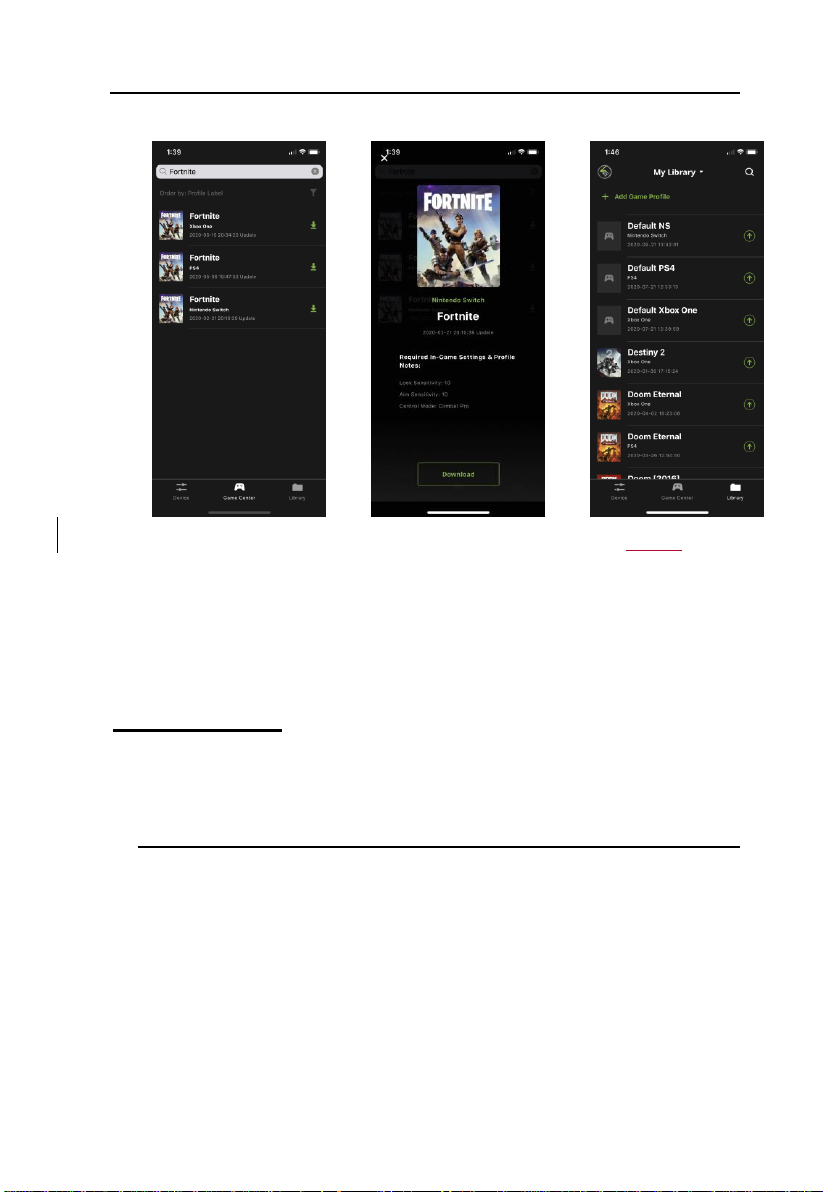
27. Open the Game Center tab on the K2 App and use the search function to
find your game (Image 9). Select the Xbox One version by tapping on the
game’s cover art image. The required in-game settings are shown above
the download button (Image 10). Press the download button. Open the
Library tab and scroll to the profile you just downloaded, then press the
up arrow to load the profile. If there is no profile available for your game,
select Default Xbox One or Xbox 360 profile (Image 11) and press the up
arrow to load the profile.
21
GES1337 KeyMander 2 3Play User Manual
Image 9
Image 10
Image 11
28. Once you have the profile loaded, open the settings menu inside the game
and make the changes shown on the profile in Game Center (Image 10).
NOTE: if using the default Xbox One profile you need to change the
game’s aim and look settings to maximum, then adjust mouse sensitivity
and key bindings as desired.
PS4 / PS3 Setup
To connect the KeyMander 2 3Play to PS4/PS3, follow the steps below.
1. Download and install KeyMander 2 App and create a user account to
manage your game profiles. For more information, see Using the K2 App.
Note: If you are using an Android phone / tablet, please make sure to en-
able the GPS function before you begin to use this app. If you are
using iPhone / iPad with iOS version 13 or above, please make sure
to enable the Bluetooth Permission for this app.
2. Begin with the console and controller powered off, then connect your
controller to the Gamepad port with the micro USB cable provided in the
box with the KeyMander 2 3Play.
3. Connect your keyboard to the Keyboard port.
22

Chapter 2. Setup
Note: If you are using a wireless keyboard / mouse set, plug the receiver
into the Keyboard Port.
4. Connect your mouse to the Mouse Port.
5. Connect the USB Type-A Connection Port 1, 2, or 3 to a USB port on the
back of the console.
Note: If you are using a PC and game console(s), it is recommended to
use Port 1 for PC and Port 2/3 for games consoles. If you are only
connecting game consoles use Port 1 for the first console.
6. If Port 1 is already used for connection of a PC or other game console,
connect your PS4/PS3 to Port 2 or 3 as explained in step 5.
7. If Port 1 and Port 2 are already used, connect your PS4/PS3 to Port 3
using a micro USB cable (not supplied). After connecting the micro USB
to Port 3, connect the USB end as explained in Step 5.
8. Connect the KeyMander 2 3Play to a 5V/2A DC power supply if
necessary. If your KeyMander 2 LED is flashing red or you receive a low
voltage notification on the K2 App, you need to connect an additional
5V/2A USB power supply (not included).
Note: Some RGB keyboards and nearly all keyboards with built-in USB
ports or headphone jacks require more power than KeyMander 2
3Play can provide, so an external USB power supply (minimum 2
amps) is required.
9. Turn on the PS4/PS3. The KeyMander 2 3Play’s LED will be glowing
blue indicating the default PS4 profile is loaded.
10. Press the Bluetooth Pairing Button to put KeyMander 2 3Play into pairing
mode, then press the Connect button on the Device tab of the K2 App on
your mobile device (Image 1). Next, select GES1337P under DEVICES
(Image 2). When the Device Tab shows the current profile and device
settings it is ready to configure the port connections (Image 3).
23
GES1337 KeyMander 2 3Play User Manual
Image 1
11. On the Device tab of the K2 App press the Port Config button (Image 4).
Select Port 1, 2 or 3 (Image 5) and choose your device from the selection
wheel (Image 6). Select the devices connected to the other ports and press
Done to exit.
Image 4
Image 2
Image 5
Image 3
Image 6
24

Chapter 2. Setup
12. After completing the Port Configuration, press the PS4 or PS3 icon on the
Device tab to switch operating modes to the PS4 or PS3.
13. The default Mouse DPI setting in the K2 App is 4000 and you need to set
the mouse to match or choose an alternate setting. On the Device tab,
scroll down and tap Mouse DPI (Image 7) then on the Mouse Settings
page (Image 8) enter the DPI setting of your mouse. While our
recommended settings of 3500-4000 DPI work fine for most games, we
do encourage you to test other DPI settings. You may find that higher
settings like 8000 DPI or more may work better for you with some games,
depending upon things like aim-assist built, etc.
Image 7
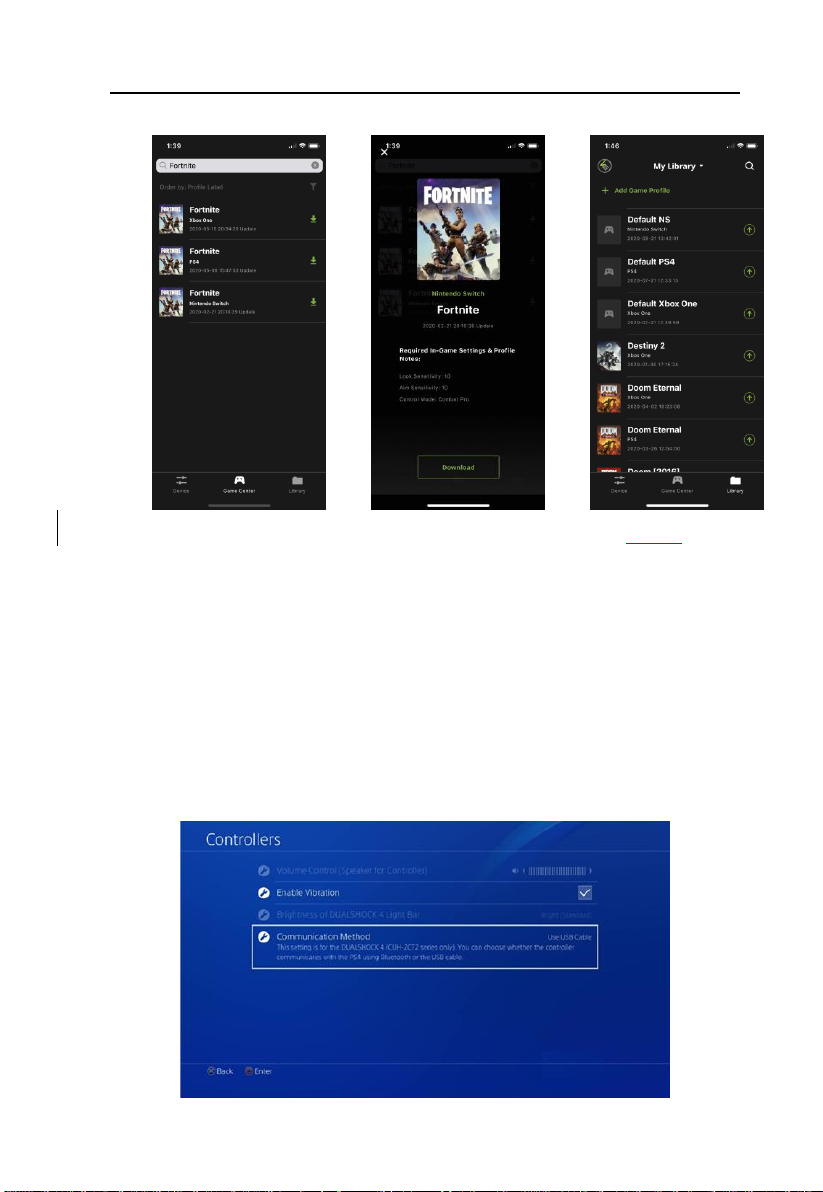
14. Open the Game Center tab on the K2 App and use the search function to
find your game (Image 9). Select the PS4 version by tapping on the
game’s cover art image. The required in-game settings are shown above
the download button (Image 10). Press the download button. Open the
Library tab and scroll to the profile you just downloaded, then press the
up arrow to load the profile. If there is no profile available for your game,
select Default PS4 or PS3 profile (Image 11) and press the up arrow to
load the profile.
Image 8
25
GES1337 KeyMander 2 3Play User Manual
Image 9
Image 10
Image 11
15. Once you have the profile loaded, open the settings menu inside the game
and make the changes shown on the profile in Game Center (Image 10).
NOTE: if using the default PS4 or PS3 profile you need to change the
game’s aim and look settings to maximum, then adjust mouse sensitivity
and key bindings as desired.
16. For PS4 Pro or PS4 Slim consoles using the DualShock 4 Slim controller,
you will need to change the controller’s communication method from
Bluetooth to USB in the PS4 settings menu. Go to Settings > Devices >
Controllers > Communication Method, and select Use USB Cable as
shown in the following image:
26

Chapter 2. Setup
Nintendo Switch Setup
To connect the KeyMander 2 3Play to a Nintendo Switch, follow the steps
below.
1. Download and install KeyMander 2 App and create a user account to
manage your game profiles. For more information, see Using the K2 App.
Note: If you are using an Android phone / tablet, please make sure to en-
able the GPS function before you begin to use this app. If you are
using iPhone / iPad with iOS version 13 or above, please make sure
to enable the Bluetooth Permission for this app.
2. Begin with the Nintendo Switch powered off and placed into the Switch
dock, making sure the dock is connected to power and to your monitor. It
is not necessary to connect a controller to use KeyMander 2 3Play with
the Nintendo Swtich, but if you wish to use the Nintendo Pro Controller
connect it now to the Gamepad port with the micro USB cable provided
in the box with the KeyMander 2 3Play.
3. Connect your keyboard to the Keyboard port.
Note: If you are using a wireless keyboard / mouse set, plug the receiver
into the Keyboard Port.
4. Connect your mouse to the Mouse Port.
5. Connect the USB Type-A Connection Port 1, 2, or 3 to a USB port on the
back of the console.
Note: If you are using a PC and game console(s), it is recommended to
use Port 1 for PC and Port 2/3 for games consoles. If you are only
connecting game consoles use Port 1 for the first console.
6. If Port 1 is already used for connection of a PC or other game console,
connect your Nintendo Switch to Port 2 or 3 as explained in step 5.
7. If Port 1 and Port 2 are already used, connect your Nintendo Switch to
Port 3 using a micro USB cable (not supplied). After connecting the
micro USB to Port 3, connect the USB end as explained in Step 5.
8. Connect the KeyMander 2 3Play to a 5V/2A DC power supply if
necessary. If your KeyMander 2 LED is flashing red or you receive a low
voltage notification on the K2 App, you need to connect an additional
5V/2A USB power supply (not included).
27
GES1337 KeyMander 2 3Play User Manual
Note: Some RGB keyboards and nearly all keyboards with built-in USB
ports or headphone jacks require more power than KeyMander 2
3Play can provide, so an external USB power supply (minimum 2
amps) is required.
9. Turn on the Nintendo Switch using the power button on the top of the
Switch. The KeyMander 2 3Play’s LED will be glowing blue indicating
the default PS4 profile is loaded. NOTE: you must keep the JoyCons
connected to the Nintendo Switch or it will not function with the
KeyMander 2 3Play
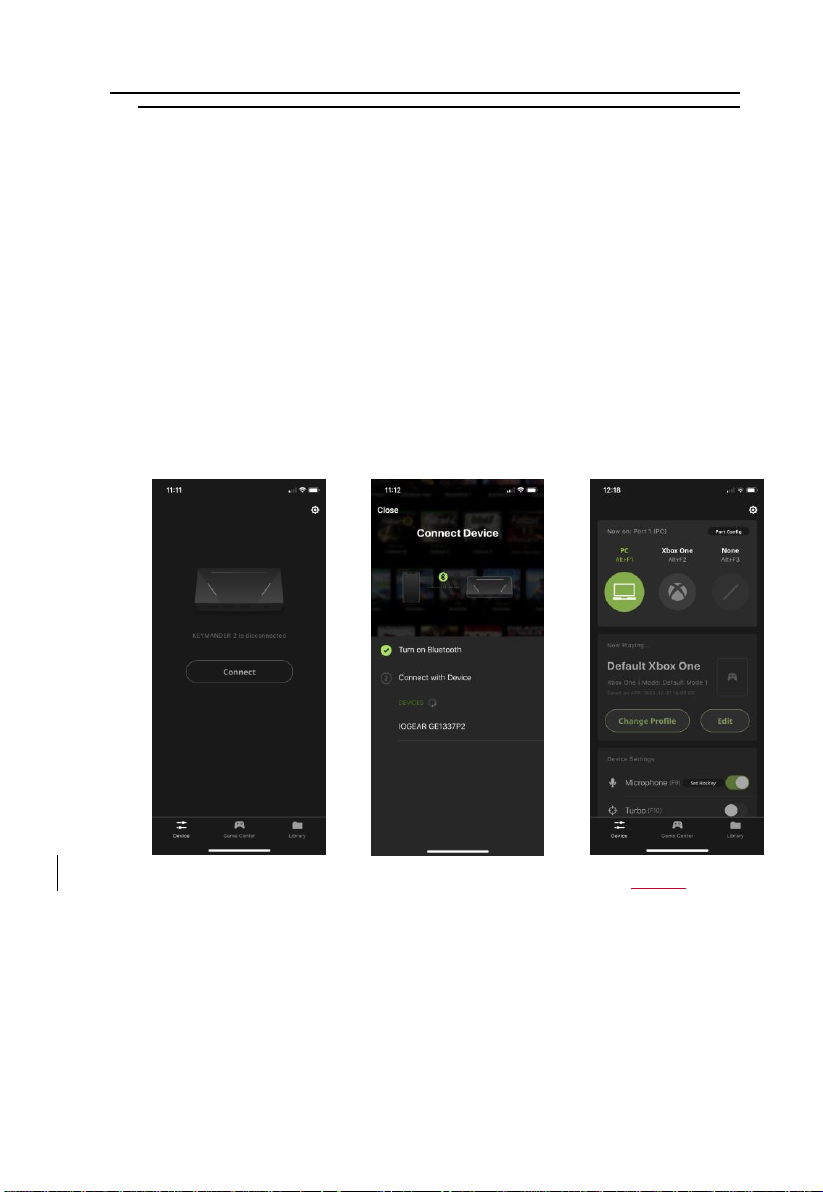
10. Press the Bluetooth Pairing Button to put KeyMander 2 3Play into pairing
mode, then press the Connect button on the Device tab of the K2 App on
your mobile device (Image 1). Next, select GES1337P under DEVICES
(Image 2). When the Device Tab shows the current profile and device
settings it is ready to configure the port connections (Image 3).
Image 1
Image 2
Image 3
11. On the Device tab of the K2 App press the Port Config button (Image 4).
Select Port 1, 2 or 3 (Image 5) and choose your device from the selection
wheel (Image 6). Select the devices connected to the other ports and press
Done to exit.
28
Chapter 2. Setup
Image 4
Image 5
Image 6
12. After completing the Port Configuration, press the Nintendo Switch icon
on the Device tab to switch operating modes to the Nintendo Switch.
13. The default Mouse DPI setting in the K2 App is 4000 and you need to set
the mouse to match or choose an alternate setting. On the Device tab,
scroll down and tap Mouse DPI (Image 7) then on the Mouse Settings
page (Image 8) enter the DPI setting of your mouse. While our
recommended settings of 3500-4000 DPI work fine for most games, we
do encourage you to test other DPI settings. You may find that higher
settings like 8000 DPI or more may work better for you with some games,
depending upon things like aim-assist built, etc.
29
GES1337 KeyMander 2 3Play User Manual
Image 7
Image 8
14. Open the Game Center tab on the K2 App and use the search function to
find your game (Image 9). Select the Nintendo Switch version by tapping
on the game’s cover art image. The required in-game settings are shown
above the download button (Image 10). Press the download button. Open
the Library tab and scroll to the profile you just downloaded, then press
the up arrow to load the profile. If there is no profile available for your
game, select Default Nintendo Switch profile (Image 11) and press the up
arrow to load the profile.
30
 Loading...