


Item No.: KL-7010F 12V
LEXUS RX350
Battery Operated Ride-On Vehicle
CHILDREN’S PRODUCTS
Assembly Manual & User’s Guide
Adult Assembly Required
WARNING:
Please read this manual carefully before assembly and use.
This manual contains safety instructions and important information which will
help you assemble the unit. Please keep this manual for future purposes.
CHILDREN’S PRODUCTS
LEXUS RX350 is a registered trademark owned and licensed by TOYOTA MOTOR
CORPORATION. Manufactured by Kalee Children’s Products Co., Ltd.

2 11
Age: 3 and up
Maximum Capacity: 30 kg / 66 lbs
Maximum Speed: 3.0-4.5 km/h / 1.8-2.8 mph
Battery Type: Sealed lead-acid rechargeable, 12 Volt 7Ah
Charging time: Always charge the battery for 8-10 hours before first use
Power input for Charger: A/C 100-240 Volts 60 Hz
Power output to Battery: DC 14 Volts, 1000mA
Vehicle / Battery Specifications:
WARNING:
To reduce the risk of injury, adult supervision
is required.
Never use on roadways, near motor vehicles,
on or near steep inclines or steps, swimming
pools or other bodies of water. Always wear
shoes and never allow more than 1 rider.
WARNING:
Contains small parts, sharp points and
sharp edges. Adult assembly required.
WARNING:
Choking Hazard! Contains small
parts. Not for children under 3 years old!
WARNING:
This toy is unsuitable for children under
3 years due to its maximum speed.
WARNING:
Not to be used in traffic.
CHARGING CAUTIONS:
- Charging the battery should only be done by adults.
- The charger is not a toy. Do not allow children to play with the
charger or to recharge the battery.
- Turn the power switch to “OFF” when charging.
- Before the first use, you should charge the battery for 8-10 hours.
Do not charge the battery for more than 16 hours to avoid
overheating the charger.
- It is normal for the charger to feel warm during charging. If the
charger feels very hot, stop charging, unplug the charger and check
the battery and charger.
- Use the charger in dry locations only.
- Regularly check the charger, battery and their connectors for
excessive wear or damage each time you charge the battery. If
damage or excessive wear is detected, do not use the charger or the
battery until you have replaced the worn or damaged part.
- Only use the charger specified by the manufacturer.
WARNING -
Risk of fire. Do not by-pass fuse. Replace only
with the correct amperage fuse.
4. Foot Pedal Switch: Turn the car on its side, and you will see a foot
pedal cover where the foot pedal switch is. There should be 3 screws
holding down that cover. Once the cover is off you will see wires leading
into the F/R switch. Use your hands to push each individual wires into
the switch and see if it runs.
5. Motor Connection: Remove the seat and you will see a main wire going
to the back motor. You will see a white plastic connector, please
disengage that white connector and you will see 2 metal prongs and 2
metal holes. Check if the 2 metal prongs are aligned properly and
reconnect the connector.
Problem: The vehicle runs slowly:
If the car is not functioning at its normal speed, please recharge the
battery for another 8 to 10 hours.
If you have any missing or damaged parts or need assembly assistance,
please contact our service center directly. Do not return this product to
the retailer, they do not stock replacement parts.
Support Website: http://support.bigtoysusa.com
Made in China
You can help protect the environment! Please
remember to respect the local regulations:
hand in the non-working electrical equipments
to an appropriate waste disposal center.
Manufactured by:
Kalee Children’s Products Co., Ltd. Quanzhou
Wuli Industrial Zone, Jinjiang, Fujian, China
www.kalee.com
changes or modifications not expressly approved by the party responsible for
compliance could void the user’s authority to operate the equipment.

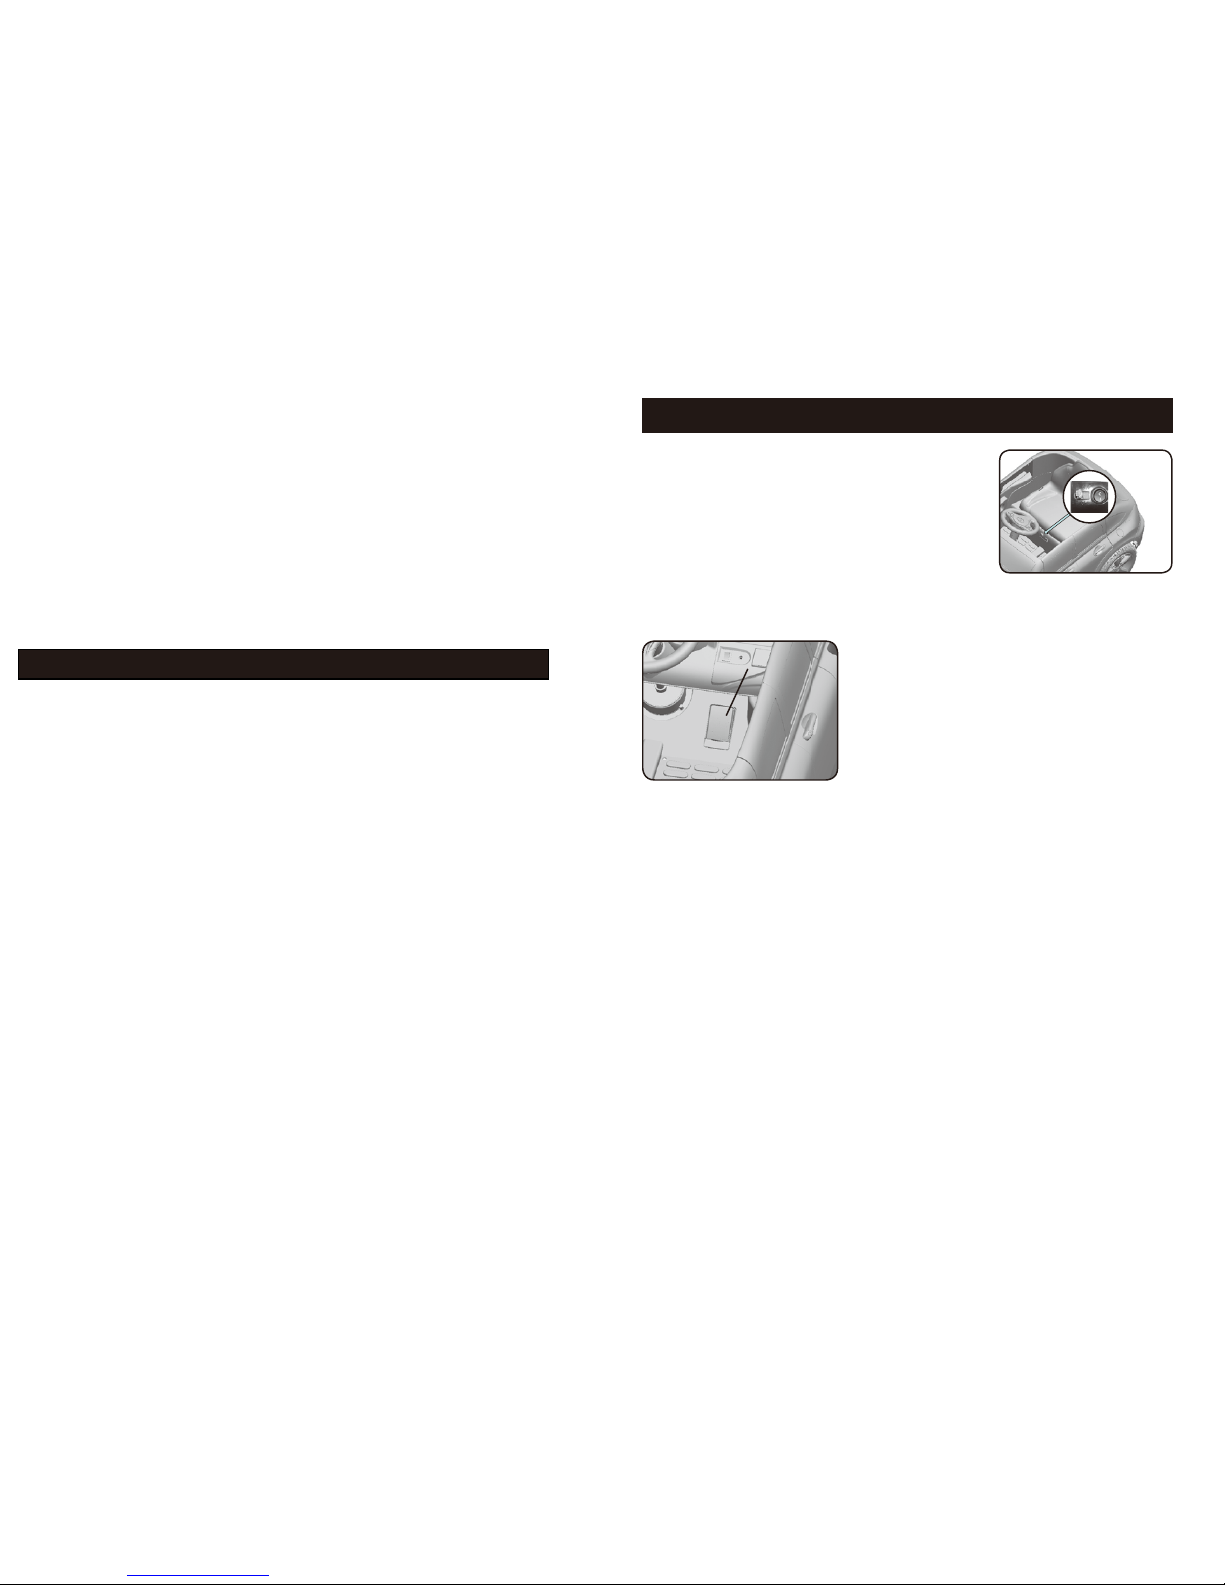
Charging the Battery:
● The socket for charging the battery is
located near the seat.
● Connect the charger plug into the DC jack,
then plug the charger into a household outlet.
● Charge the battery for 8-10 hours. Never
charge more than 16 hours.
● When the battery is fully charged, unplug the
charger and store it in a cool and dry place.
Note: The car can not be operated when
the charger is connected to the car.
Trouble Shooting Tips:
Problem: The vehicle does not turn on
If the car is not functioning at all please follow these troubleshooting steps
listed below. After each step, please put the car in forward gear and step on
the pedal to see if the car will move.
1. Charger: Unplug the charger completely from the car. The car will not
work if the charger is plugged into the car.
2. Battery Connection: There is a battery cover that goes over the battery to
hide the positive and negative wires. Undo the bar that holds the battery
down to release the cover. Once the cover is loose, check the positive and
negative wire to see if they are properly connected. You may also pull lightly
on each wire to see if they are connected.
3. F/R Switch: Use a Phillip screw driver and undo the screws that hold down
Forward and Reverse switch. Pull the switch out and you should see wires
running into the back of the switch. Use your hand and push each individual
wires into the socket.
10
3
Safety Precautions:
BATTERY SAFETY WARNING:
- Only use the battery and charger supplied by the manufacturer.
- Do not connect the battery terminals directly together. This will cause
the battery to short-circuit.
- Never short-circuit the battery terminals or modify the electrical system.
Alterations may cause a fire resulting in serious injuries.
- Do not mix old and new batteries or batteries of different types.
- Remove batteries during long periods of non-use. Always remove batteries
from the product. Dispose of batteries safely. Do not dispose of batteries in
fires. The batteries may explode or leak.
- If removable, rechargeable batteries are used, they are only to be charged
by adults or by children at least 8 years old.
- Recharge the battery fully before storage, then charge it every 3 months to
extend the life of the battery.
- Only use the battery specified by the manufacturer.
- Non-rechargeable batteries are not to be recharged.
- Rechargeable batteries are to be removed from the toy before being charged.
- Batteries are to be inserted with the correct polarity.
- Exhausted batteries are to be removed from the toy.
The ride on vehicle is equipped with a built-in thermal circuit breaker.
The thermal circuit breaker is a self-resetting safety device which
automatically “trips” and shuts down the operation of the vehicle if it is
overloaded or the driving conditions are too severe. Once the circuit
breaker has tripped it will automatically reset itself after approximately
25 seconds and allow the rider to resume normal operation.
Caution:
- While riding, adult supervision is required at all times.
- Adults must teach their children about safe driving procedures.
- The toy should be used with caution since skill is required to avoid falls or
collisions causing injury to the user or third parties.
- Check the seat to ensure it has been fitted and secured with a bolt before
driving.
- Inspect all wires and connections of the vehicle periodically.
- Use the toy only on flat surfaces, such as sidewalks, driveways or playgrounds.
Do not ride the vehicle in dangerous places such as busy streets, roads,
highways, swimming pools and other bodies of water, in a dark area, hilly
muddy or sandy areas.
- To avoid suffocation of children please destroy all plastic bags after assembly
of the vehicle.
- Do not use this vehicle outdoors when it is raining.
- Don't allow children to operate the charger or play with the battery.
- Do not exceed the recommended weight limit of 30kg / 66lbs. Please
follow the correct weight and age limits allowed to drive this vehicle.
- It is prohibited to change the circuit or add other electric parts.
- Always wear a helmet when riding.
Operation of the Vehicle:
9
Accelerator pedal
1.Make sure the battery is fully charged and the
motor plug is connected to the battery plug.
2.Turn on the power button located under the seat .
The direction switch is located on dashboard.
Press the direction switch to “F” and press the
accelerator pedal, vehicle will move forward.
Headlights come on while moving forward.
3.To stop the vehicle remove foot from accelerator
pedal. When stopped press the direction switch
to “B” then press the accelerator pedal, vehicle
will move backward.
NOTE: Do not change directions while vehicle is in motion.
4.Press the button in the center of the steering
wheel for horn sound.
5.Press the Power switch on the vehicle to “OFF”
when don’t using the vehicle.
6.MP3 Jack: Plug in MP3 to play music. Audio
Line(#13) included with the car.
7.Before useing remote controller, press the
R/C/ PEDAL switch on the dashboard to the
R/C position. Make sure the F/B switch is in the
middle position. Switch on the remote controllor.
Press the arrow buttons on remote controller for
going to different directions.
8.When use the remote control, Press the switch to the R/C position. Make sure
the F/B switch is in the middle position. Press the left side of forward-key to
go forward or backward-key to go in reverse. Press the right side of left-key
to move the vehicle left or right-key to turn the vehicle right.
4
Maintaining your vehicle:
- It is a parents responsibility to check main parts of the vehicle before use.
Regularly examine the vehicle for potential hazards, such as the battery,
charge cable, cord and plug. Ensure screws are tightened. If there are any
damages, the vehicle must not be used until these damages have been
properly repaired or replaced.
- Occasionally use a lightweight oil to lubricate moving parts such as the
wheels and steering linkages.
- Keep the vehicle in an upturned position, do not overturn or incline it. It is
recommended to store the vehicle indoors when not in use. If stored
outdoors, the vehicle needs to be covered by a tarp for protection against
weather elements.
- This toy should be kept away from fire. Keep the vehicle away from sources
of heat, such as stoves and heaters. Plastic parts may melt. While charging
ensure all flammable liquids are well away from the vehicle.
- ADULTS ONLY to recharge the battery after each use. Recharge the battery
at least once a month when the vehicle is not being used.
- Use a soft, dry cloth to clean vehicle.
- DO NOT use any chemical liquids to clean the plastic surface of the vehicle.
- DO NOT wash the vehicle with soap and water.
- DO NOT drive the vehicle in rainy or snowy weather. Water will damage the
motor, electric system and battery.
- When not in use all electrical sources should be turned off. Press the power
switch to the Nuetral position to turn the power off. Also disconnect the
battery connection under the seat.
- Please do not change the structure of this product and circuit system.
- DO NOT use the vehicle for other purposes except riding.
- It is not recommended to drive the vehicle on wet surfaces or on slopes
greater than 15 degrees.
- Make sure you come to a complete stop before changing directions from
forward to reverse.
- Please turn the power off when not in use.
- In order to avoid accidents, please ensure the vehicle is safe before driving.
- Do not let any child touch the wheels or be near them when the vehicle
is moving.
- The charger used for the vehicle is to be regularly examined for damage
to the cord, plug, enclosure and other parts, and in the event of such
damage, must not be used until that damage had been repaired.
- Clean the vehicle only with a damp cloth and never submerge vehicle
in water or spray with water directly from a hose.
This equipment has been tested and found to comply with the
limits for a Class B digital device, pursuant to part 15 of the FCC Rules.
These limits are designed to provide reasonable protection against harmful
interference in a residential installation.This equipment generates, uses
and can radiate radio frequency energy and, if not installed and used in
accordance with the instructions, may cause harmful interference to radio
communications. However, there is no guarantee that interference will not
occur in a particular installation. If this equipment does cause harmful
interference to radio or television reception, which can be determined by
turning the equipment off and on, the user is encouraged to try to correct
the interference by one or more of the following
measures:
—Reorient or relocate the receiving antenna.
—Increase the separation between the equipment and receiver.
—Connect the equipment into an outlet on a circuit different from that to
which the receiver is connected.
—Consult the dealer or an experienced radio/TV technician for help.
NOTE:

5
Part List:
Part No. Description Qty
1. Steering Wheel 1 pc
2. Rearview Mirror 1 pair
3. Body 1 pc
4. Gearbox 2 pcs
5. Seat 1 pc
6. Wheel 4 pcs
7. Wrench 2 pcs
8. Axle for Rear Wheel 1 pc
9. Hub Cap 4 pcs
10. M8 Nut 4 pcs
11. Φ20x10.5x2 Washer 8 pcs
12. Charger 1 pc
13. Audio Line 1 pc
14. M5 Screw 1 pc
15. M5 Nut 1 pc
16. TA4x12x7 Screw 1 pc
17. Screwdriver (not included) 1 pc
18. PA3x10x5 Screw 20 pcs
19.
Remote Control 1 pc
Remarks:
1.
All screws, nuts and washers are pre-fixed.
2.
Screwdriver was not included.
8
2. 2.4G paired instructions:
(1). Install 2 x AAA batteries into remote controller.
(2). Make sure the remote controller is on “OFF” position which is
on the right hand side of remote controller.
(3). Switch the power button to “OFF” on the car (the power button
is under the seat).
(4). Press the RC/OFF/PEDAL switch to RC mode on the dashboard of car.
(5). Hold the “Forward” button on the remote controller by your left hand,
then turn on the controller by your right hand. The LED light will be
twinkling with marquee on the indicator, please keep holding the “Forward”
button by your left hand.
(6). Then press the power button to “ON” on the car. If all of three LED light on,
it means the signal have been paired successful. You can release your
left hand, and start to use the remote control function.
(7). If the LED light of remote controller still is twinkling with marquee,
that means the paired connection is fail, please start from step 2(2) again
or call the customer service.
ON/OFF
FORWARD-KEY
BACKWARD-KEY
LED LIGHT(SPEED-INDICATOR)
SPEED-SELECT-KEY
LEFT-KEY
RIGHT-KEY

6 7
1. Use description:
(1). Panel description of remote control
(2). Switch “OFF” when the remote is not used.
(The power switch is on the right)
(3). The Speed-Select key & Speed-Select indicator is used to select
the speed grade of the car. The grade will change in the range
of 3-leves: low (one Speed-Indicator flush), medium
(two Speed-Indicator flush) and high (three Speed-Indicator flush)
speed. The change of the order is LOW-MEDIUM-HIGH-MEDIUM-LOW
as the button pressed.
Note: Only the forward direction moving can own this function,
the backward not.
Battery installation
(4).Unfastening the rear cover screw and remove it, install 2 x AAA 1.5V
batteries. Be sure the correction of polarity of battery.
ON/OFF
FORWARD-KEY
BACKWARD-KEY
LED LIGHT(SPEED-INDICATOR)
SPEED-SELECT-KEY
LEFT-KEY
RIGHT-KEY
How to assemble the vehicle:
Step 1:
● Insert onto the front axle: wheel (#6),
Φ20x10.5x2 washer (#11), M8 nut (#10).
● Tighten the nut with wrench (#7).
Remark: If the axle is too long, please add
one piece of Φ20x10.5x2 Washer (#11)
● Attach the hub cap(#9) onto the front
wheel, insert 5xPA3x10x5 screws(#18) and
tighten with screwdriver (not included).
● Repeat the same step for other front wheel.
Step 4:
● Attach the rearview mirror (#2) onto the body.
Step 2:
● Insert the axle for rear wheel (#8) into the
hole of the body.
● Insert gearbox with motor (#4) onto the
rear right axle, then connect the white plug
to the motor plug.
● Then insert the wheel (#6), Φ20x10.5x2
washer (#11), M8 nut (#10).
● Tighten the nut with wrench (#7).
● Attach the hub cap (#9) onto the rear wheel.
insert 5xPA3x10x5 screws(#18) and tighten
with screwdriver (not included).
Step 3:
● Assemble rear left wheel same as Step 2.
wheel (#6)
Φ20x10.5x2
washer (#11)
wrench (#7)
M8 nut (#10)
hub cap (#9)
PA3x10x5 Screw
wheel (#6)
M8 nut (#10)
hub cap (#9)
gearbox (#4)
wrench (#7)
Φ20x10.5x2 washer (#11)
White plug
PA3x10x5 Screw
4.
5.
Step 5:
● Undo the M5 screw (#14) and M5 nut (#15) from
the steering wheel (#1).
● Connect the plug of the steering wheel to the
plug of the vehicle.
● Place the steering wheel onto the steering wheel
column.
● Insert the screw through the hole of the steering
wheel.
● Attach the nut to another side of the steering
wheel, tighten the screw with the screwdriver
(Not included)
 Loading...