

Artisan Fire Pizza Oven
USE AND CARE GUIDE
1.800.868.1699 1

KalamazooGourmet.com2

Important Safety Warnings
This appliance is FOR OUTDOOR USE ONLY. It is not to be used inside a garage, other
building or any type of enclosed area.
WARNING: Failure to follow the information in this Use and Care Guide exactly may result
in fire or explosion, causing property damage, personal injury or death. Read and follow all
warnings and instructions before assembling and using the appliance.
WARNING: This appliance is not intended to be installed in or on a boat or recreational
vehicle.
DANGER: IF YOU SMELL GAS:
1. Shut-off gas to the appliance.
2. Extinguish any open flame.
3. Open grill hood.
4. If odor continues, keep away from the appliance and immediately call your
gas supplier or fire department.
Failure to follow these instructions could result in fire or explosion which could
cause property damage, personal injury or death.
WARNING: FOR YOUR SAFETY:
1. Do not store or use gasoline or other flammable liquids or vapors in the
vicinity of this or any other appliance.
2. An LP cylinder not connected for use shall not be stored in the vicinity of this
or any other appliance.
3. Improper installation, adjustment, alteration, service or maintenance can
cause property damage, injury or death. Read the installation, operating
and maintenance instructions thoroughly before installing or servicing this
equipment.
IMPORTANT: Damage caused by a failure to heed the warnings or
follow the safety instructions and practices described in this Use and
Care Guide is not covered by the warranty.
1.800.868.1699 1
This Use and Care Guide
contains important
information necessary for the
proper assembly and safe use
of the pizza oven.
Thank you for choosing Kalamazoo
Outdoor Gourmet cooking equipment.
Because of the high performance nature
and unique design of the Artisan Fire
Pizza Oven, we recommend familiarizing
yourself with this book before using your
pizza oven for the first time. Your Use and
Care Guide contains important safety
information as well as helpful guidance
for successful cooking experiences and
care. Following the guidance of this book
will help ensure many years of outdoor
cooking enjoyment.
Read and follow all warnings
and instructions before
assembling and using the
pizza oven.
Follow all warnings and
instructions when using the
pizza oven.
Keep the Use and Care Guide
for future reference
Should you ever have any questions about cooking
with or caring for your Artisan Fire Pizza Oven, we are
here to help. Contact Kalamazoo Outdoor Gourmet
Customer Service at:
1.800.868.1699
or
customerservice@KalamazooGourmet.com
Please have your model number and serial number
ready or include it in your email.
Model Number
F AFPO-C-NG
F AFPO-C-LP
F AFPO-C-BLK-LP
Serial Number
Version 22.09.2017
KalamazooGourmet.com2

Table of Contents
Safe Operation 4
Liquid Propane Tank Safety 6
Liquid Propane Gas Requirements 8
Natural Gas Requirements 9
Bulk Propane Gas Requirements 10
Leak Testing 11
Locating the Pizza Oven 12
Required Clearances 12
Initial Assembly 13
Pizza Oven Controls 14
Lighting Your Pizza Oven 16
Burner Adjustments 17
Cooking with Your Pizza Oven 21
Recipes 25
Caring for Your Pizza Oven 58
Troubleshooting 61
Installation Checklist 62
Packing List 63
Dimensions 64
About Kalamazoo Outdoor Gourmet 69
1.800.868.1699 3

Safe Operation
WARNING: When in use, portions of your pizza oven get hot enough to cause
severe burns. Children and pets should never be left alone or unattended in
the area where the pizza oven is being used. Never allow children to sit, stand
or play on or around the pizza oven.
IMPORTANT: Improper use or installation is dangerous. Because this
pizza oven produces intense heat, the risk of accidents or potential injuries
is increased. Extreme care must be taken. Carefully follow all instructions,
including the following:
To reduce the risk of fire, burns or other injury, read this Use and Care Guide thoroughly. Begin by ensuring
proper installation and servicing. Do not repair or replace any part of the pizza oven yourself unless it is
specifically recommended in this Use and Care Guide. All other service must be carried out by a qualified
gas technician.
Never allow children to operate the pizza oven. Do not store items of interest to children in or around the
pizza oven.
Do not heat unopened food containers in the pizza oven. The build up of pressure resulting from the heat
may cause the container to burst.
Never lean on any part of the pizza oven. When lighting the pizza oven, always pay close attention to what
you are doing. Make sure you are aware of which burner you are lighting and can see whether or not it is
lit. Make sure you have ready access to the ignition button and burner valves when you are lighting the
burner. Make sure you are pushing the ignition button when you attempt to light the burner.
When the burners are on or the oven is still hot, do not touch the cooking deck, any part of the oven’s
interior or any surface near the open front of the pizza oven. These areas become extremely hot and may
cause severe burns. Likewise, do not touch any part of the pizza oven roof, especially near the “chimney”
at the back of the roof.
Do not use any cleaner, including water, on a hot pizza oven. Never use any liquids when cleaning the
cooking deck.
Be sure all control knobs are in the OFF position and the pizza oven is cool before using any aerosol
cleaner on it or near it. The chemical used for aerosol propellant could ignite in the presence of heat.
Never use aerosol cleaner on the cooking deck.
Always use dry pot holders or gloves on hot surfaces or cooking tools: moist or damp pot holders or
gloves may cause steam burns. Never use a towel or bulky cloth in place of pot holders. Do not let pot
holders touch hot portions of the pizza oven or allow them to get near the open flame.
Do not operate the pizza oven under an unprotected combustible construction. Use only in a well-
ventilated area. The oven is for outdoor use only.
KalamazooGourmet.com4

Safe Operation CONTINUED
Do not obstruct any of the openings on the pizza oven or otherwise obstruct the flow of combustion and
ventilation air. Do not build the pizza oven into any structure that is closer than 6 inches from the sides,
back and top.
Keep all gas hoses away from the hot surfaces of the pizza oven, including all external surfaces of the unit.
Keep all electrical cords away from the hot surfaces of the pizza oven.
Ensure proper installation and servicing by following all instructions in this Use and Care Guide and any
other instructions or markings provided with this product. Have your pizza oven installed by a qualified
technician. Have the installer show you where the gas supply shut off valve is located and instruct you in its
operation so that you can shut off the gas to the pizza oven.
If you smell gas, there is likely a problem with the installation. If the connections are not perfectly sealed,
you can have a small leak resulting in the faint smell of gas -- even if the pizza oven appears to be working
properly. Close the gas supply shut off valve and call a qualified technician to locate and resolve the leak.
California Proposition 65 Warning:
The burning of gas cooking fuel generates some by-products that are on the
list of substances which are known by the State of California to cause cancer
or reproductive harm. California law requires business’s to warn customers
of potential exposure to such substances. To minimize exposure to these
substances, always operate the pizza oven according to this Use and Care
Guide and ensure you provide good ventilation when cooking with gas.
1.800.868.1699 5

Important LP Tank Safety Information
A liquid propane cylinder should never be “overfilled” beyond the cylinder
filling capacity. “Overfilling” may create a dangerous condition.
“Overfilled” tanks can build up excess pressure. The standard safety device on
tanks is the safety relief valve. This valve vents propane gas vapors to relieve
excess pressure. These vapors are combustible and can be ignited.
To avoid risk of fire or explosion, take the following safety precautions:
Never replace the liquid propane regulator or hose with a different type than the model supplied.
Never use a dented or rusty LP tank.
Never connect the pizza oven to anything other than the fuel source indicated on the serial plate. Factory
conversion kits are available for switching fuel sources. Contact Kalamazoo Outdoor Gourmet or an
authorized dealer for details. Conversion kit installation must be done by a qualified technician.
The LP-gas cylinder must include a collar to protect the cylinder valve from damage.
Ensure proper ventilation of the cylinder. The cylinder supply system must be arranged for vapor
withdrawal.
DANGER:
A. Do not store a spare LP-gas cylinder under or near this appliance;
B. Never fill the cylinder beyond 80 percent full; and
C. If instructions A and B are not followed exactly, a fire causing
death or serious injury may occur.
KalamazooGourmet.com6
LP Tank Safety Information CONTINUED
The LP-gas supply cylinder to be used must be constructed and marked in accordance with the
specifications for LP-gas cylinders, U.S. Department of Transportation (DOT) or the standard for Cylinders,
Spheres and Tubes for the Transportation of Dangerous Goods, CAN/CSA-B339.
When the pizza oven is not in use, the gas must be turned off at the supply cylinder.
The pizza oven may be stored indoors, but only if the cylinder is disconnected and removed from the oven.
An LP cylinder MUST NEVER BE STORED INDOORS.
Cylinders must be stored outdoors out of the reach of children and must not be stored in a building,
garage or any other enclosed area.
The pressure regulator and hose assembly supplied with the pizza oven must be used. Replacement
pressure regulators and hose assemblies must be the type specified by Kalamazoo Outdoor Gourmet. For
replacement parts, contact Kalamazoo Outdoor Gourmet customer service at 1.800.868.1699.
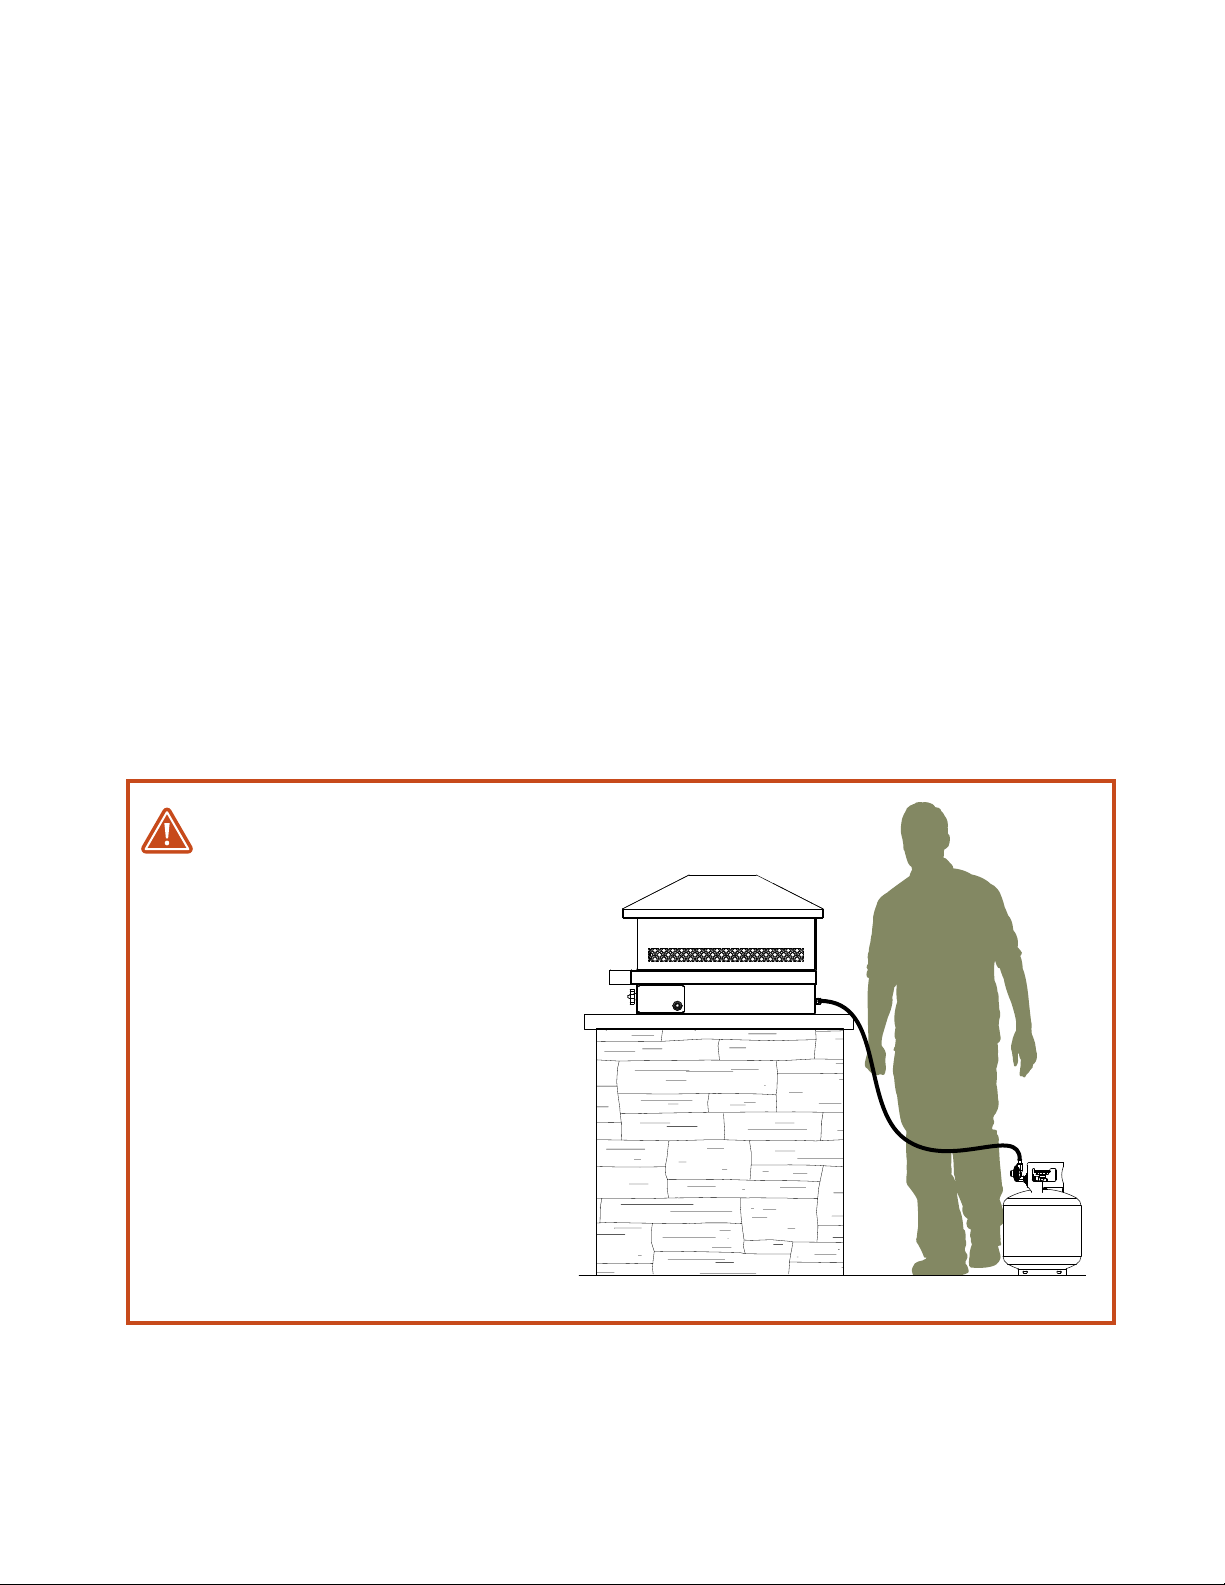
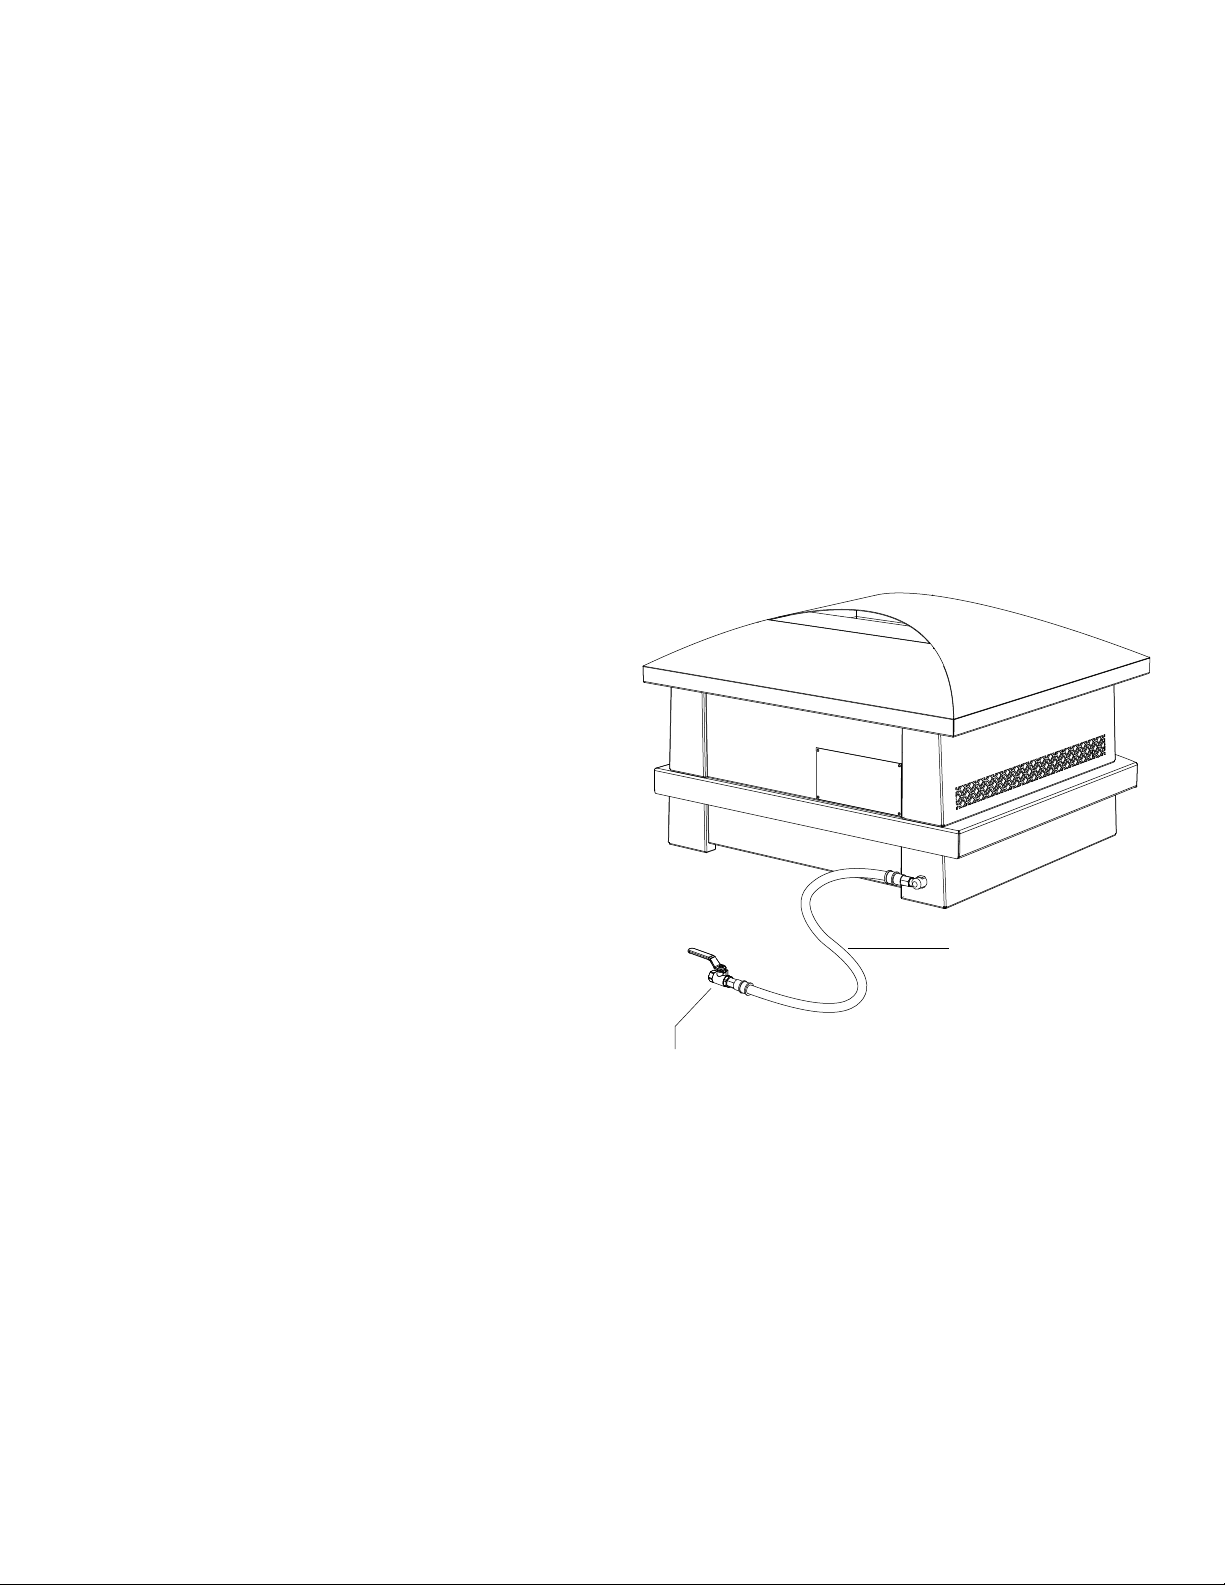
DANGER:
Do not route the gas supply
hose or locate a propane
cylinder in a way that may
create a tripping hazard.
Tripping over, or getting
caught on, a gas supply
hose may pull a pizza oven
off the counter or tip it over
creating serious risk of injury
and fire.
FIGURE 1
1.800.868.1699 7
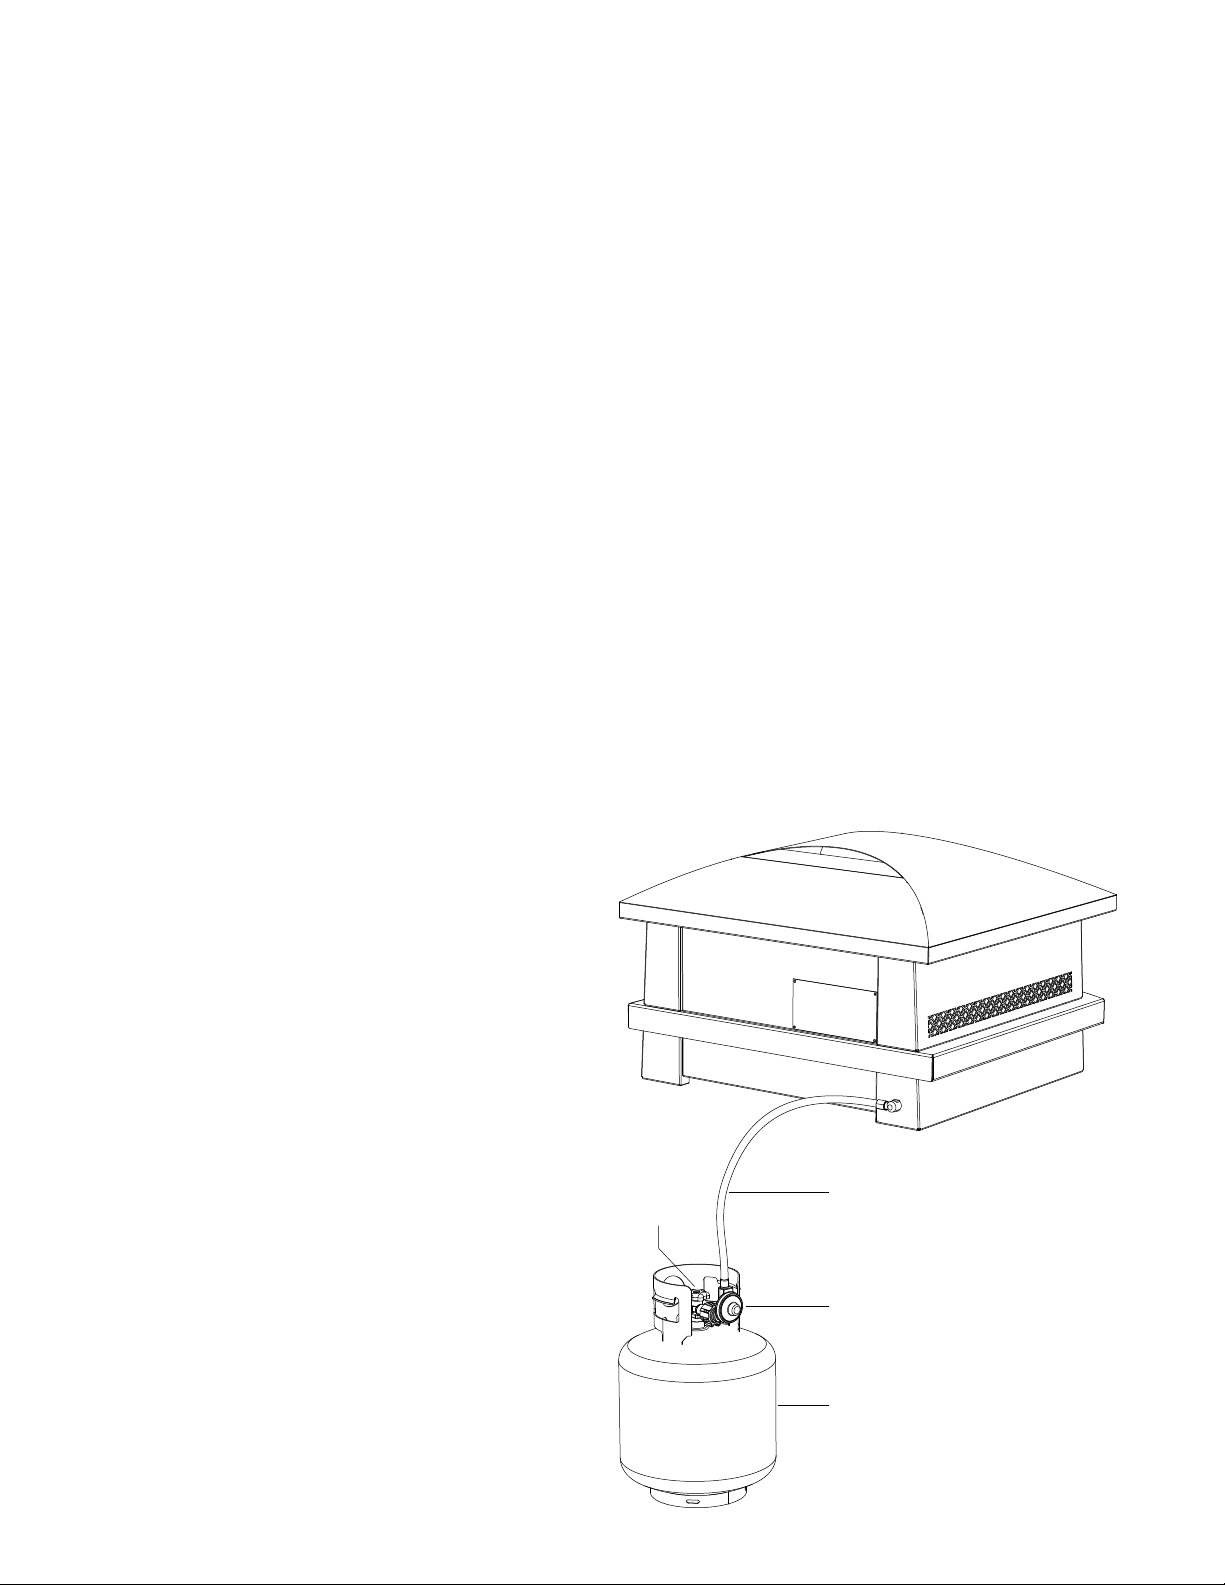
Liquid Propane Gas Requirements
(20-Pound Cylinder)
Verify the type of gas your pizza oven has been configured for by the factory
by checking the serial plate on the back of the oven. Pizza ovens configured for
liquid propane (LP) gas are orificed differently than ovens configured for natural
gas (NG). Pizza ovens configured for use with 20-pound LP cylinders (Type 1)
are shipped with an LP regulator hose assembly attached.
Connection: LP regulator hose assembly (included) connects to the pizza oven
via 0.5" NPT male with a 0.375" flare adapter (included).
Operating Pressure: 11.0" W.C.
To connect the LP regulator hose assembly to the LP tank, first make sure the main valve on the tank is
completely closed. Make sure also that the control valves on the front of the pizza oven are OFF.
Thread the regulator inlet over the tank valve. Use care to ensure proper alignment of the threaded coupler
and avoid cross-threading or damaging the coupler. Turn the black coupler clockwise until tightened up, but
do not over-tighten.
IMPORTANT: Always close the main valve on the
tank before disconnecting or transporting the tank.
IMPORTANT: After connecting a fresh LP tank,
you may need to purge air from the system. Before
lighting, open the main valve on the tank. Turn
the control valves on the pizza oven to the HIGH
position for about 15 seconds to purge air from the
system. Turn the control valves on the pizza oven
OFF and wait 5 minutes for any gas to clear. Finally,
continue with the normal lighting procedure.
The installation must conform with local codes. In
the absence of local codes, the installation must
conform with the National Fuel Gas Code, ANSI
Z223.1/NFPA 54; Storage and Handling of Liquefied
Petroleum Gases, ANSI/NFPA 58; Natural Gas and
Propane Installation Code, CSA B149.1; or Propane
Storage and Handling, CSA B149.2.
Cylinder Requirements: Never use
a dented or rusty LP tank. Never
use a cylinder with a damaged
valve. Always check for leaks after
connecting an LP tank.
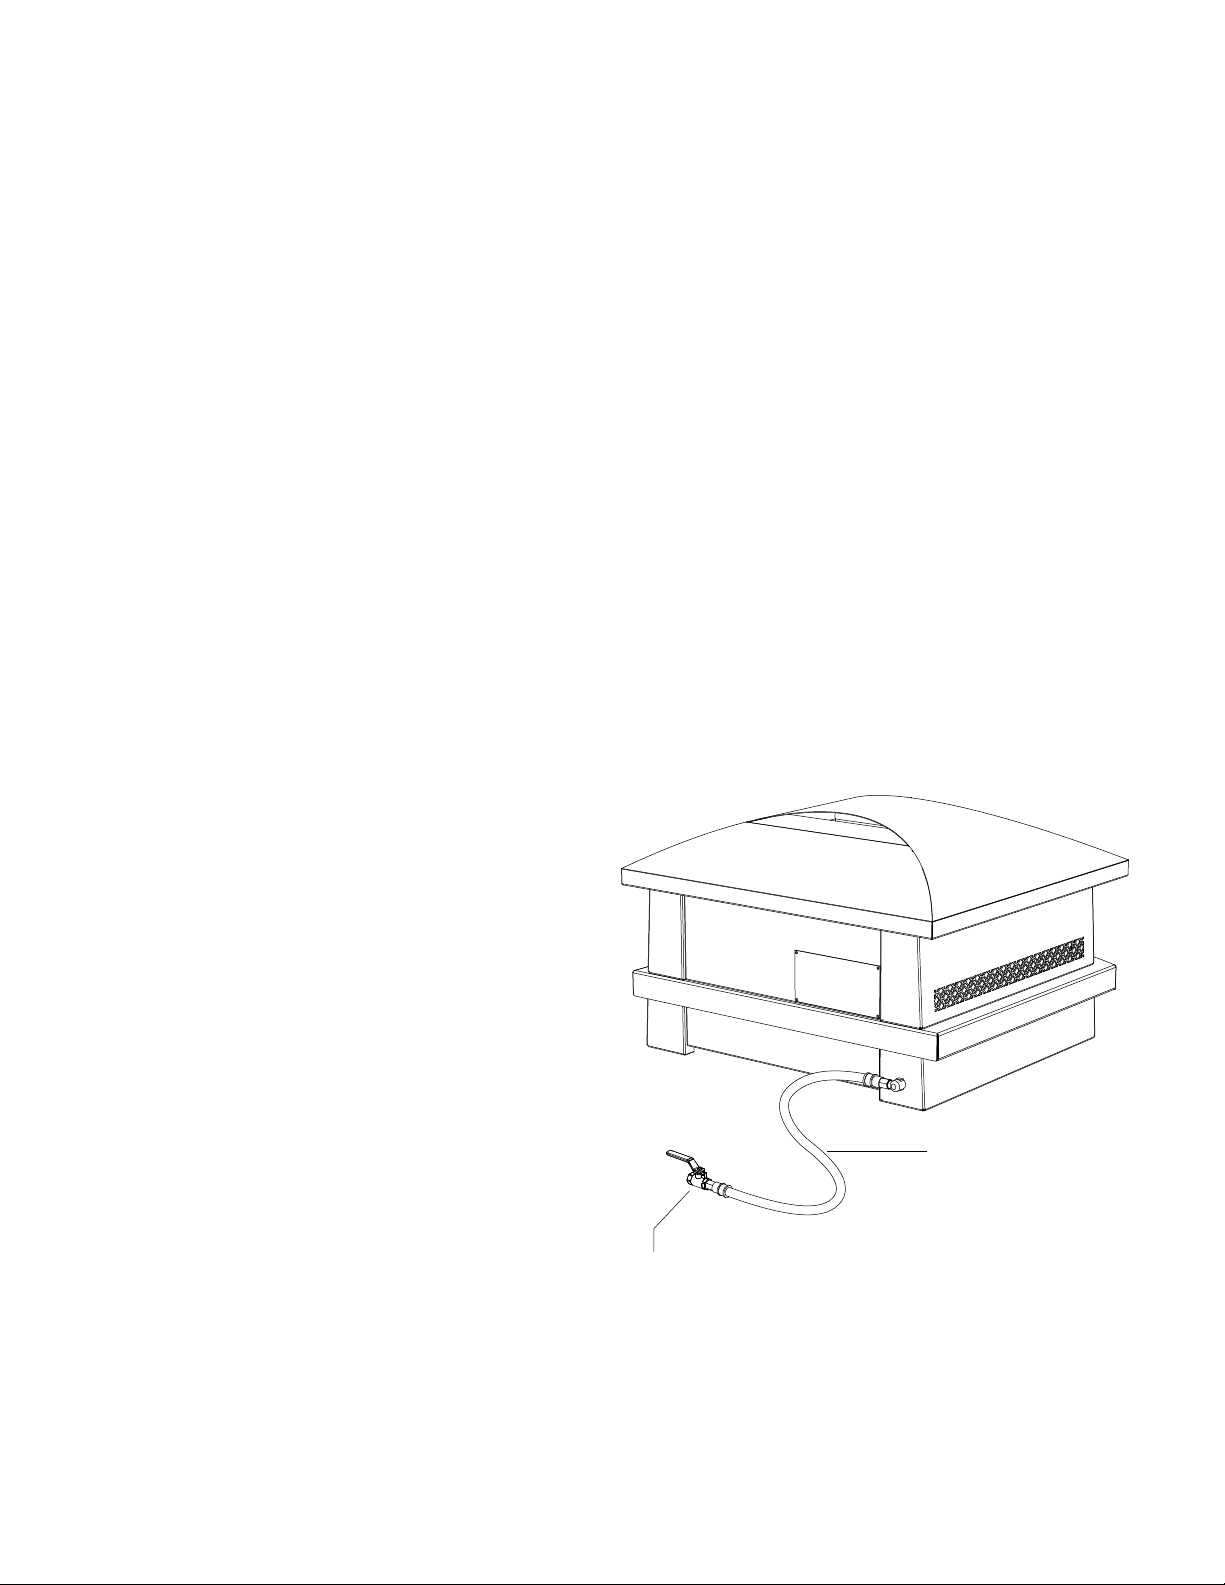
FIGURE 2
MAIN
VALVE
LP REGULATOR HOSE
ASSEMBLY PROVIDED
TYPE 1 REGULATOR
20-POUND LP TANK
(NOT INCLUDED)
KalamazooGourmet.com8
Natural Gas Requirements
Verify the type of gas your pizza oven has been configured for by the factory
by checking the serial plate on the back of the oven. Pizza ovens configured for
natural gas (NG) are orificed differently than ovens configured for liquid propane
(LP) gas. Pizza ovens configured for use with natural gas are shipped with a gray
hose with a quick-connect fitting.
Connection: Quick-connect hose assembly (included) connects to the pizza oven
via 0.5" NPT male with a 0.375" flare adapter (included). The quick-connect
fitting (included) threads onto a 0.375” male NPT connection point (not included).
Operating Pressure: 7.0" W.C.
IMPORTANT: Always close gas supply shutoff valve
before disconnecting the pizza oven gas supply hose.
IMPORTANT: An installer-supplied safety shutoff valve
MUST be installed on the natural gas supply line for the
pizza oven. The valve should be easily accessed and
located between 3 and 20 feet away from the oven.
All gas connections should be made by a qualified
technician. The installation and all installer-supplied
parts must conform to local codes. In the absence
of local codes, the installation and all parts should
conform to the National Fuel Gas Code, ANSI Z223.1/
NFPA 54 or Natural Gas and Propane Installation Code,
CSA B149.1.
All pipe sealants must be an approved type.
Artisan Fire Pizza Oven BTUs: 52,000
IMPORTANT: Diameter and length of the gas supply
pipe may limit the pressure and BTU delivery of gas to
the oven. The installer must ensure proper delivery to
the pizza oven or it will not operate properly.
FIGURE 3
GAS HOSE
ASSEMBLY
PROVIDED
INSTALLER-SUPPLIED
SHUTOFF VALVE MUST
BE EASILY ACCESSIBLE
The appliance and its individual shutoff valve must be
disconnected from the gas supply piping system during
any pressure testing of that system at pressures in
excess of 1/2 psi (3.5 kPa).
During any pressure testing of the gas supply piping
system at test pressures equal to or less than 1/2 psi
(3.5 kPa), the appliance must be isolated from the
system by closing its individual manual shutoff valve.
1.800.868.1699 9
Bulk Supply Liquid Propane Gas
Requirements
Verify the type of gas your pizza oven has been configured for by the factory
by checking the serial plate on the back of the oven. Pizza ovens configured for
liquid propane (LP) gas are orificed differently than ovens configured for natural
gas (NG). Pizza ovens configured for use with bulk LP tanks are shipped with a
gray hose with a quick-connect fitting.
Connection: Quick-connect hose assembly (included) connects to the pizza
oven via 0.5" NPT male with a 0.375" flare adapter (included). The quickconnect fitting (included) threads onto a 0.375” male NPT connection point
(not included).
Operating Pressure: 11.0" W.C.
A step down regulator MUST be used on an LP hose system to reduce the pressure down to 11.0" W.C. for the
pizza oven.
IMPORTANT: Always close gas supply shutoff valve
before disconnecting the pizza oven gas supply
hose.
IMPORTANT: An installer-supplied safety shutoff
valve MUST be installed on the gas supply line for
the pizza oven. The valve should be easily accessed
and located between 3 and 20 feet away from the
oven.
All gas connections should be made by a qualified
technician. The installation and all installer-supplied
parts must conform to local codes. In the absence
of local codes, the installation and all parts should
conform to the National Fuel Gas Code, ANSI
Z223.1/NFPA 54; Storage and Handling of Liquefied
Petroleum Gases, ANSI/NFPA 58; Natural Gas and
Propane Installation Code, CSA B149.1; or Propane
Storage and Handling, CSA B149.2.
All pipe sealants must be an approved type.
FIGURE 4
GAS HOSE
ASSEMBLY
PROVIDED
INSTALLER-SUPPLIED
SHUTOFF VALVE MUST
BE EASILY ACCESSIBLE
KalamazooGourmet.com10

Leak Testing
Although gas connections on the pizza oven are leak tested at the factory
prior to shipment, a complete test must be performed after installation due to
possible mishandling during shipping or installation.
Periodic checks are also recommended. Immediately check for leaks if you
smell gas.
Never use an open flame to look for leaks.
Before Testing: Extinguish all open flames. Do not smoke.
You will need a spray bottle, a brush or a rag. For LP units using a 20-pound cylinder, a full cylinder should be
used.
IMPORTANT: Homeowners should only check for leaks on the gas connections that are external to the pizza
oven. If the valves or other internal connections need to be checked, please call a qualified technician or
Kalamazoo Outdoor Gourmet customer service at 1.800.868.1699.
To Conduct the Test:
Make a soap solution of one part liquid dish soap and one part water.
Make sure both pizza oven control valves are in the OFF position. Turn the gas supply ON. Use a spray bottle,
brush or rag to apply the mild soap solution to all connections from the supply line or LP cylinder to the
connection on the back of the pizza oven. Check all connections. Soap bubbles will appear at any connections
with a leak. Turn OFF the gas supply and tighten any leaky connections. Recheck, applying more mild soap
solution.
IMPORTANT: Do not use the pizza oven until all connections have been
checked and do not leak.
1.800.868.1699 11

Pizza Oven Location
The Artisan Fire Pizza Oven is designed for easy placement on an outdoor
countertop. It may also be used on a suitable table or cart. It is recommended
that the pizza oven be placed on a non-combustible surface.
Choosing a Location: Important consideration for pizza oven placement
include exposure to wind, proximity to foot traffic and areas where people
congregate, and access to the gas supply.
Do not place the pizza oven in a location where the door opening is likely to be exposed to strong wind.
Do not place the pizza oven where it is likely to be bumped into or inadvertently touched by passers by. It is
recommended that the countertop or other surface extend 9 inches beyond the sides and back of the pizza
oven as a safety clearance to protect people from injury.
Do not place the pizza oven on a table or cart that is unable to safely support the 100-pound weight of the
pizza oven or may topple or tip over.
Do not place the pizza oven on any surface that allows the pizza oven to slide easily or inadvertently change
position.
Never place the pizza oven where the gas hose creates a safety hazard (see Figure 1). Tripping over an exposed
gas hose may create a gas leak, pull the pizza oven off the counter or create other serious safety hazards.
Never locate the pizza oven in a building, breezeway, shed or other such enclosed areas.
The pizza oven is not intended to be installed in or on a boat or recreational vehicle.
IMPORTANT: Do not build the pizza oven into any type of enclosure.
Proper air circulation in and around the pizza oven is critical to its
operation. Maintain at least 6 inches of clearance around the sides and
back of the pizza oven, and 12 inches above the top. Do not obstruct
the open space below the pizza oven. NEVER place the pizza oven
underneath an overhead combustible surface. The pizza oven must be
placed on top of a non-combustible surface.
For ease of use and safe operation, it is recommended the surface on which
the pizza oven sits be at least 36 inches high (counter-height) and not more
than 42 inches high (bar-height).
KalamazooGourmet.com12
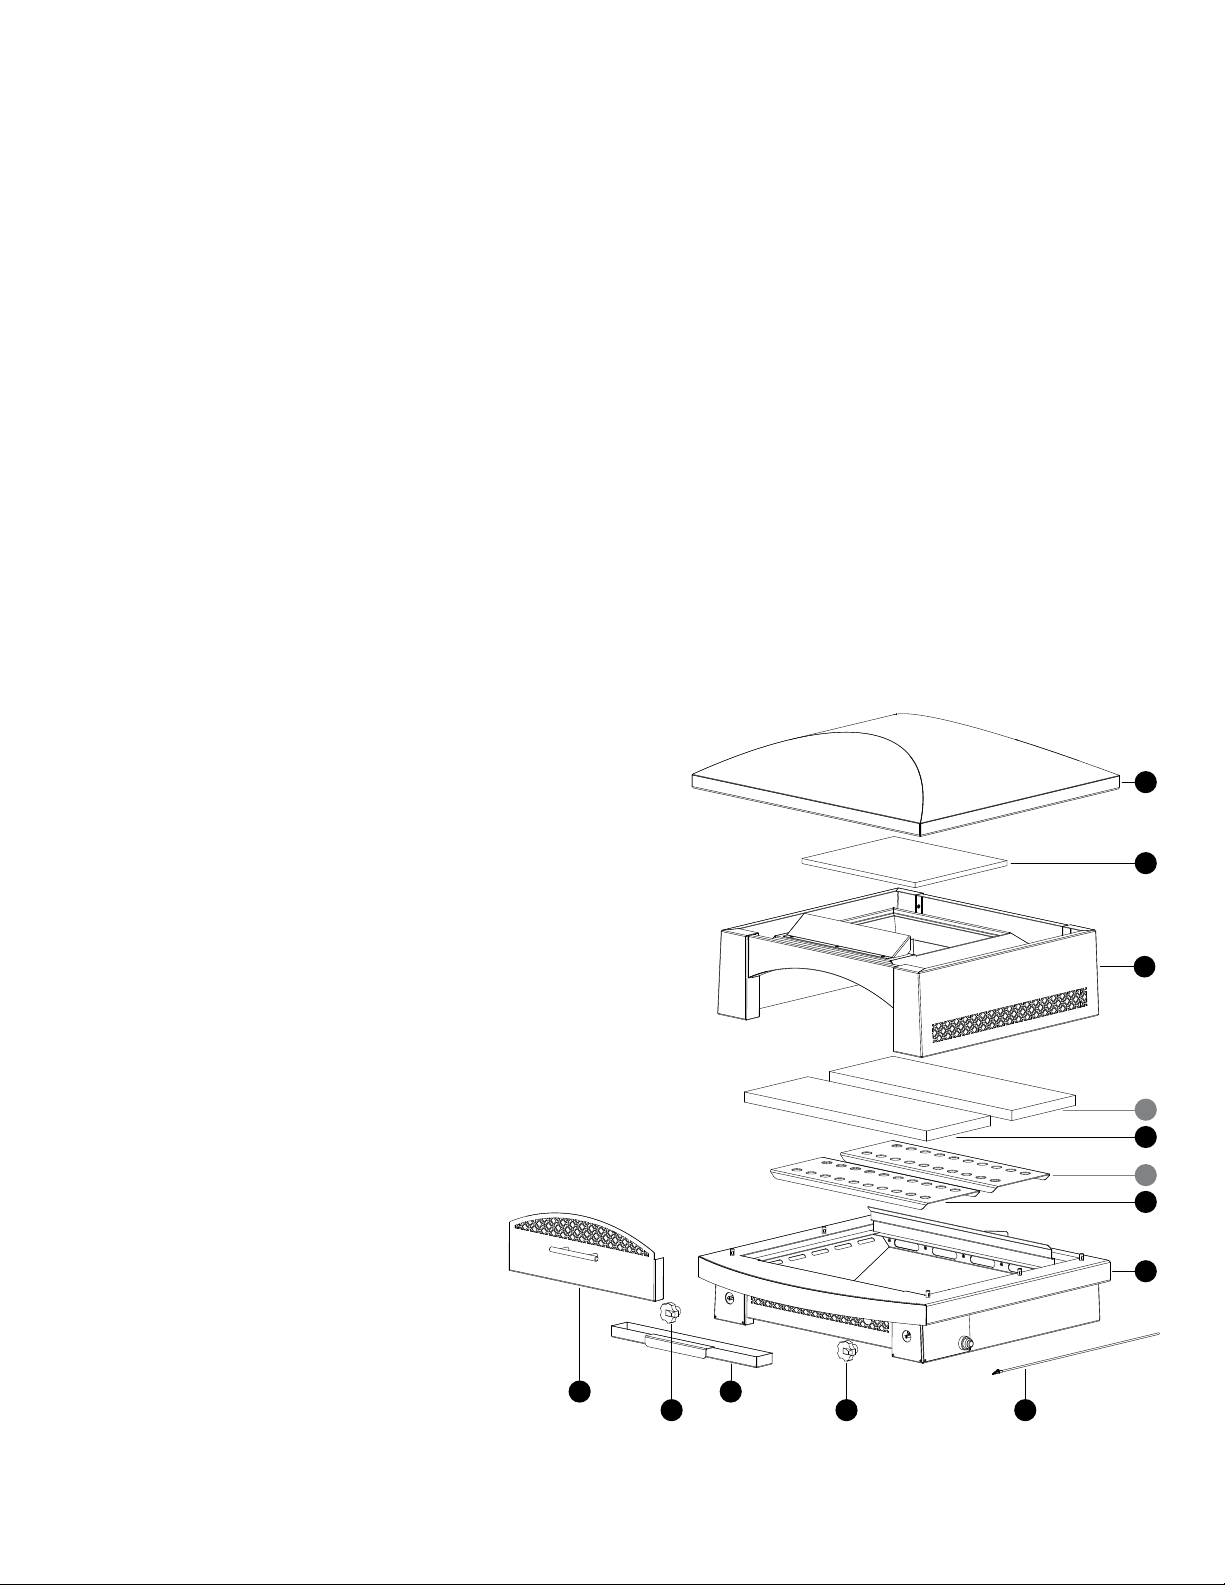
Initial Assembly
For easier care and service, your Artisan Fire Pizza Oven stacks together. No
tools are required for initial assembly.
A. Place BASE UNIT A in the desired location, 6 inches away from any combustible surface on the sides,
back and front. The pizza oven may NOT be placed underneath any overhead combustible surface.
B. Insert HEAT DIFFUSERS B into BASE UNIT A. These will be positioned between the lower burner and
the cooking decks.
C. Remove COOKING DECKS C from the cardboard box. Remove any stickers from the cooking deck.
Carefully insert the cooking decks into BASE UNIT A. Sudden impact will crack the cooking decks, so
use caution.
D. Place MID BODY D onto BASE UNIT A, aligning the holes in the bottom of MID BODY D with the
small posts on BASE UNIT A. MID BODY D should sit flat and be positively located by the posts.
E. Insert CEILING STONE E into the top opening of MID BODY D. Remove any tape that may have been
used during shipping.
F. Place ROOF F onto MID BODY D. The large opening at the top should face rearward. This is the
exhaust “chimney.”
G. If not already on the unit, mount CONTROL
KNOBS G & H on the valve posts. Be sure
the flat side of the opening in the knob
casting is aligned with the flat side of the
valve stem (see Figure 11). The metal tab
welded into the knob opening is placed
against the round side of the valve stem.
I. Insert CRUMB TRAY I into the opening on
the front of the unit below the main shelf. It
sits on a ledge. Crumbs can be brushed off
the cooking deck down into the gap at the
front of the stone, falling into the crumb tray.
FIGURE 5
F
E
D
WARNING: The crumb tray will become hot
during operation. To avoid burns, be certain
the oven is cool before touching the tray, or
use an appropriate cooking mitt.
J. The pizza oven DOOR J sits in the
doorway.
WARNING: Never operate the
oven with the door in place.
K. MANUAL IGNITION WAND K is
for use in manually igniting the
oven. It may be stored on the
ledge on the underside of the side
shelf on BASE UNIT A.
J
1.800.868.1699 13
I
HG
K
C
C
B
B
A
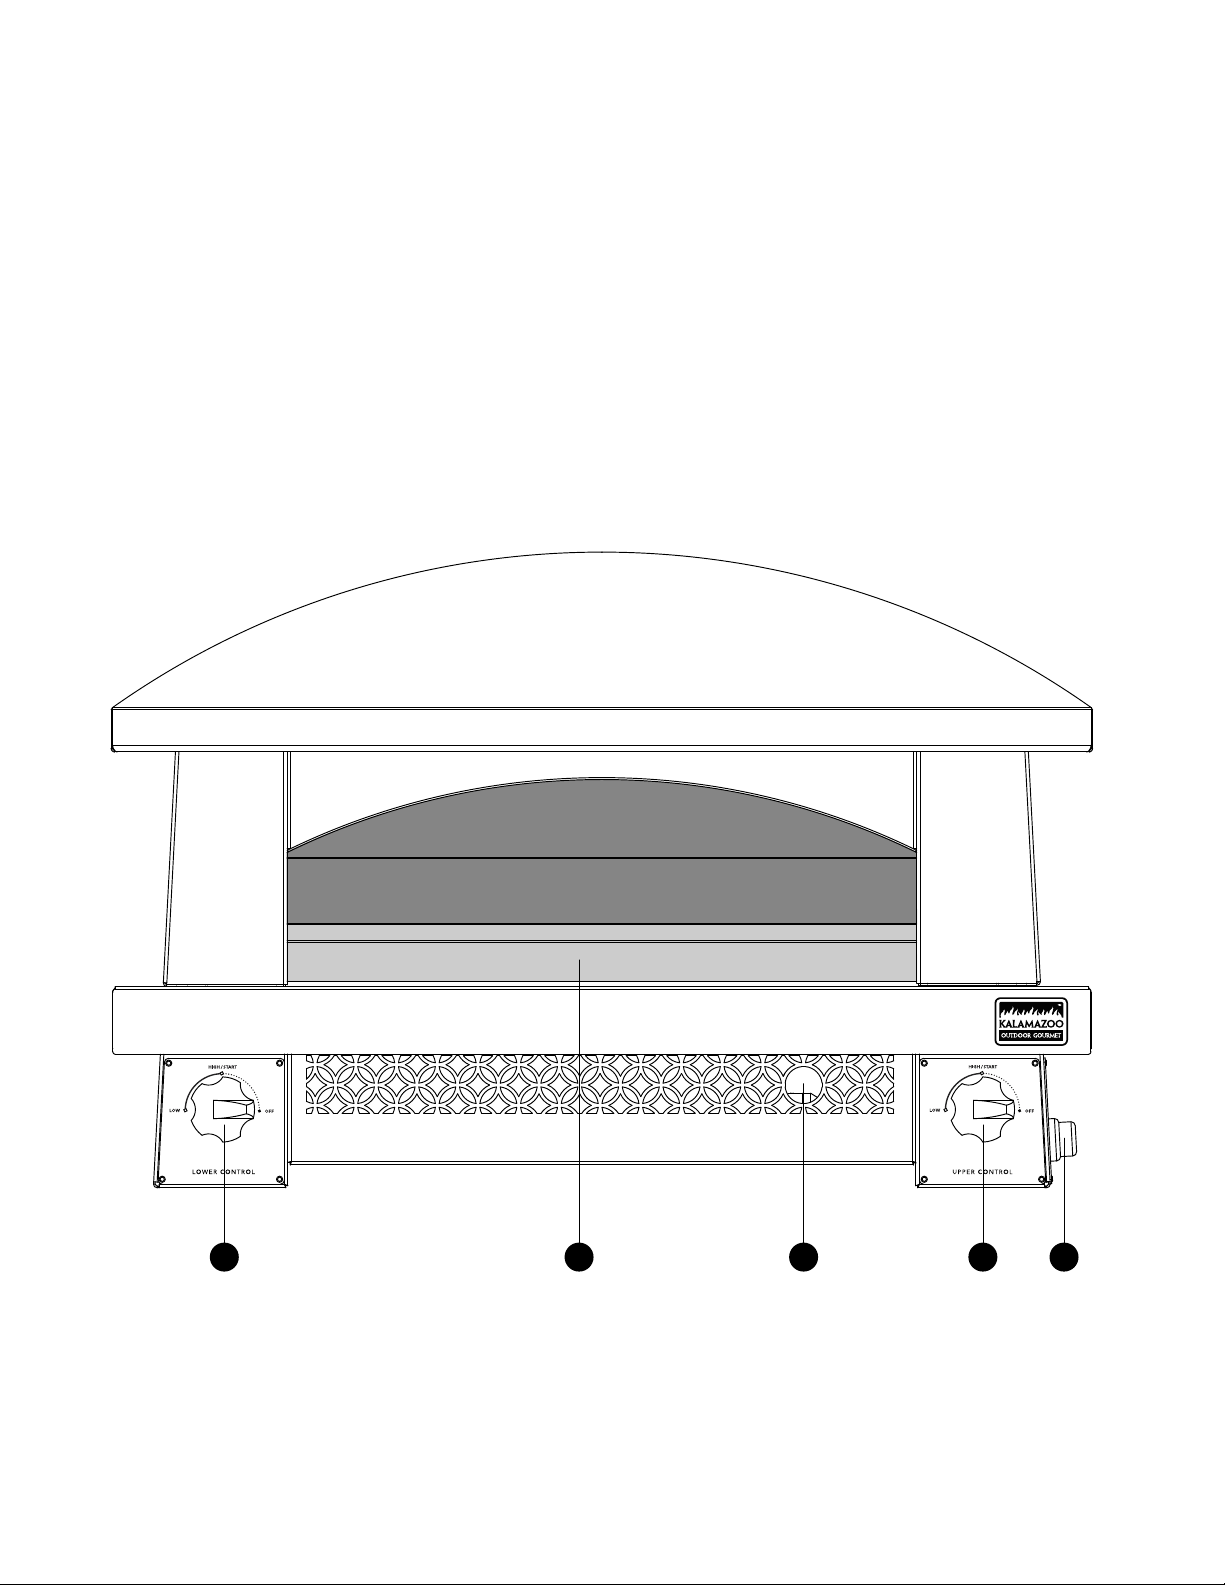
Pizza Oven Controls
A. Lower Burner Control: Controls the height of the flame on the burner below the cooking deck.
B. Upper Burner Control: Controls the height of the flame on the burner at the rear of the cooking deck. On
HIGH, this flame is visible above the Cooking Deck Backstop E.
C. Electronic Ignition Button: Depress to trigger the electronic ignition. Unscrew and remove to replace the
ignition system battery.
D. Lower Burner Viewport: Allows visual confirmation of lower burner status. Use as manual ignition port for
manual lighting procedure (SEE LIGHTING YOUR PIZZA OVEN).
E. Cooking Deck Backstop: Prevents pizzas from falling off the back of the cooking deck and into the upper
burner area. For manual lighting procedure, a match must be extended past this backstop to light the
upper burner (SEE LIGHTING YOUR PIZZA OVEN).
FIGURE 6
A BDE C
KalamazooGourmet.com14

Before You Cook
A quick safety check should be performed before each time you use the
pizza oven.
1. Clean and inspect the gas hose. If there is evidence of abrasion, wear, cuts or leaks, do not use the
pizza oven. The hose must be replaced prior to using the pizza oven. Replace the hose assembly with
the exact type specified by Kalamazoo Outdoor Gourmet.
2. Ensure the gas hose is clear of the pizza oven. Keep the fuel supply hose away from any heated
surface(s).
3. Check that the area near the pizza oven is clear of combustible materials and vapors, including alcohol,
gasoline, aerosol containers and dry goods. Keep electrical cords from being in contact with the pizza
oven.
4. Check that nothing is interfering with the safe operation of the oven by obstructing the ventilation
around and under the unit. The pizza oven requires 6 inches of clearance to the left, right and back of
the unit with no obstructions above.
5. Do not use the oven with overly loose-fitting clothing, especially loose sleeves that may come in
contact with the hot surfaces inside the oven or near the door.
6. Have insulated gloves with long cuffs ready and available.
While You are Cooking
1. Never move the pizza oven while it is in use or when it is hot.
2. The use of alcohol, prescription or non-prescription drugs may impair your ability to properly assemble
or safely operate the pizza oven.
3. Do not touch the top of the pizza oven, the front shelf or any surfaces inside or near the door opening
while the oven is hot. These surfaces can cause serious burns.
4. Be very careful transporting hot pizzas. The toppings can cause serious burns to yourself or those
around you.
5. Only use a long-handled brass bristle brush to clean the cooking deck. The handle must be long
enough that your hands stay safely outside of the oven.
6. Never empty the crumb tray while the oven is hot. The tray and its contents become very hot while the
oven is in use.
Follow all warnings and instructions when using this appliance.
This appliance is not intended for and should never be used as a heater.
This appliance is not intended for commercial use.
1.800.868.1699 15

Lighting Your Pizza Oven
Before lighting your pizza oven, be sure you have followed the instructions in
this Use and Care Guide regarding proper setup, placement, gas connections,
leak testing and safe operation, all of which precede this page.
IMPORTANT: Do not use the pizza oven if the odor of gas is present at any time. Follow leak testing
procedures before using the pizza oven.
IMPORTANT: Your pizza oven is equipped with safety valves that prevent the flow of gas unless the integrated
sensors detect the heat of a flame. To light each burner, you must bypass the sensor by pressing in on the
control knob until the flame from the lit burner has sufficiently heated the sensor. The lower burner/control
knob and upper burner/control knob each has its own separate sensor.
Standard Lighting Procedure:
1. Remove the pizza oven door and set aside. DO NOT OPERATE THE PIZZA OVEN WITH THE DOOR INSTALLED.
2. Make sure the LOWER BURNER and UPPER BURNER control knobs are in the OFF position.
3. Turn the main gas supply on.
4. If lighting both burners, light the LOWER BURNER first. Keeping your face well away from the unit,
sight through the lower burner viewport (see Figure 6:D). Push inward on the LOWER BURNER
control knob (see Figure 6:A) and rotate to the HIGH/START position. While continuing to hold in the
control knob, press the ELECTRONIC IGNITION BUTTON (see Figure 6:C). You should hear clicking
and ignition should take place within 4 to 5 seconds. Watch through the lower burner viewport to
confirm ignition. If the burner does not light within this time, turn the knob to the OFF position and
wait 5 minutes for the gas to dissipate before trying again. If you do not hear clicking, refer to the
troubleshooting section of this Use and Care Guide. Once the burner is lit, continue pressing in the
control knob for at least 10 seconds until the safety valve sensor has detected the heat of the
flame.
5. To light the UPPER BURNER, you can look through the open door of the pizza oven, keeping your
face well away from the opening. Push inward on the UPPER BURNER control knob (see Figure 6:B)
and rotate to the HIGH/START position. While continuing to hold in the control knob, press the
ELECTRONIC IGNITION BUTTON. You should hear clicking and ignition should take place within
4 to 5 seconds. If the burner does not light within this time, turn the knob to the OFF position and
wait 5 minutes for the gas to dissipate before trying again. If you do not hear clicking, refer to the
troubleshooting section of this Use and Care Guide. Once the burner is lit, continue pressing in the
control knob for at least 10 seconds until the safety valve sensor has detected the heat of the flame.
Manual Lighting Procedure:
FOLLOW THE STANDARD LIGHTING PROCEDURE, but utilize a paper match inserted into the clip on the end
of the provided manual ignition wand rather than the electronic ignition.
To light the LOWER BURNER, insert the lit match and wand through the lower burner viewport (see Figure 6:D)
to a position above the lower burner. To light the UPPER BURNER, use the wand to hold the lit match at the
rear of the oven above the upper burner.
Light and position the match BEFORE turning on the corresponding control knob. If the burner does not light
immediately, turn the knob to the OFF position and wait 5 minutes for the gas to dissipate before trying again.
Once the burner is lit, continue pressing in the control knob for at least 10 seconds until the safety valve
sensor has detected the heat of the flame.
KalamazooGourmet.com16
Burner Adjustments
Every burner is tested and adjusted at the factory for proper performance. If
a burner is not operating properly, it may be due to variations in the local gas
supply or because of an obstructed air shutter or orifice. Flames should be
stable without lifting from the burner. The flames should burn cleanly without
creating any sooty residue.
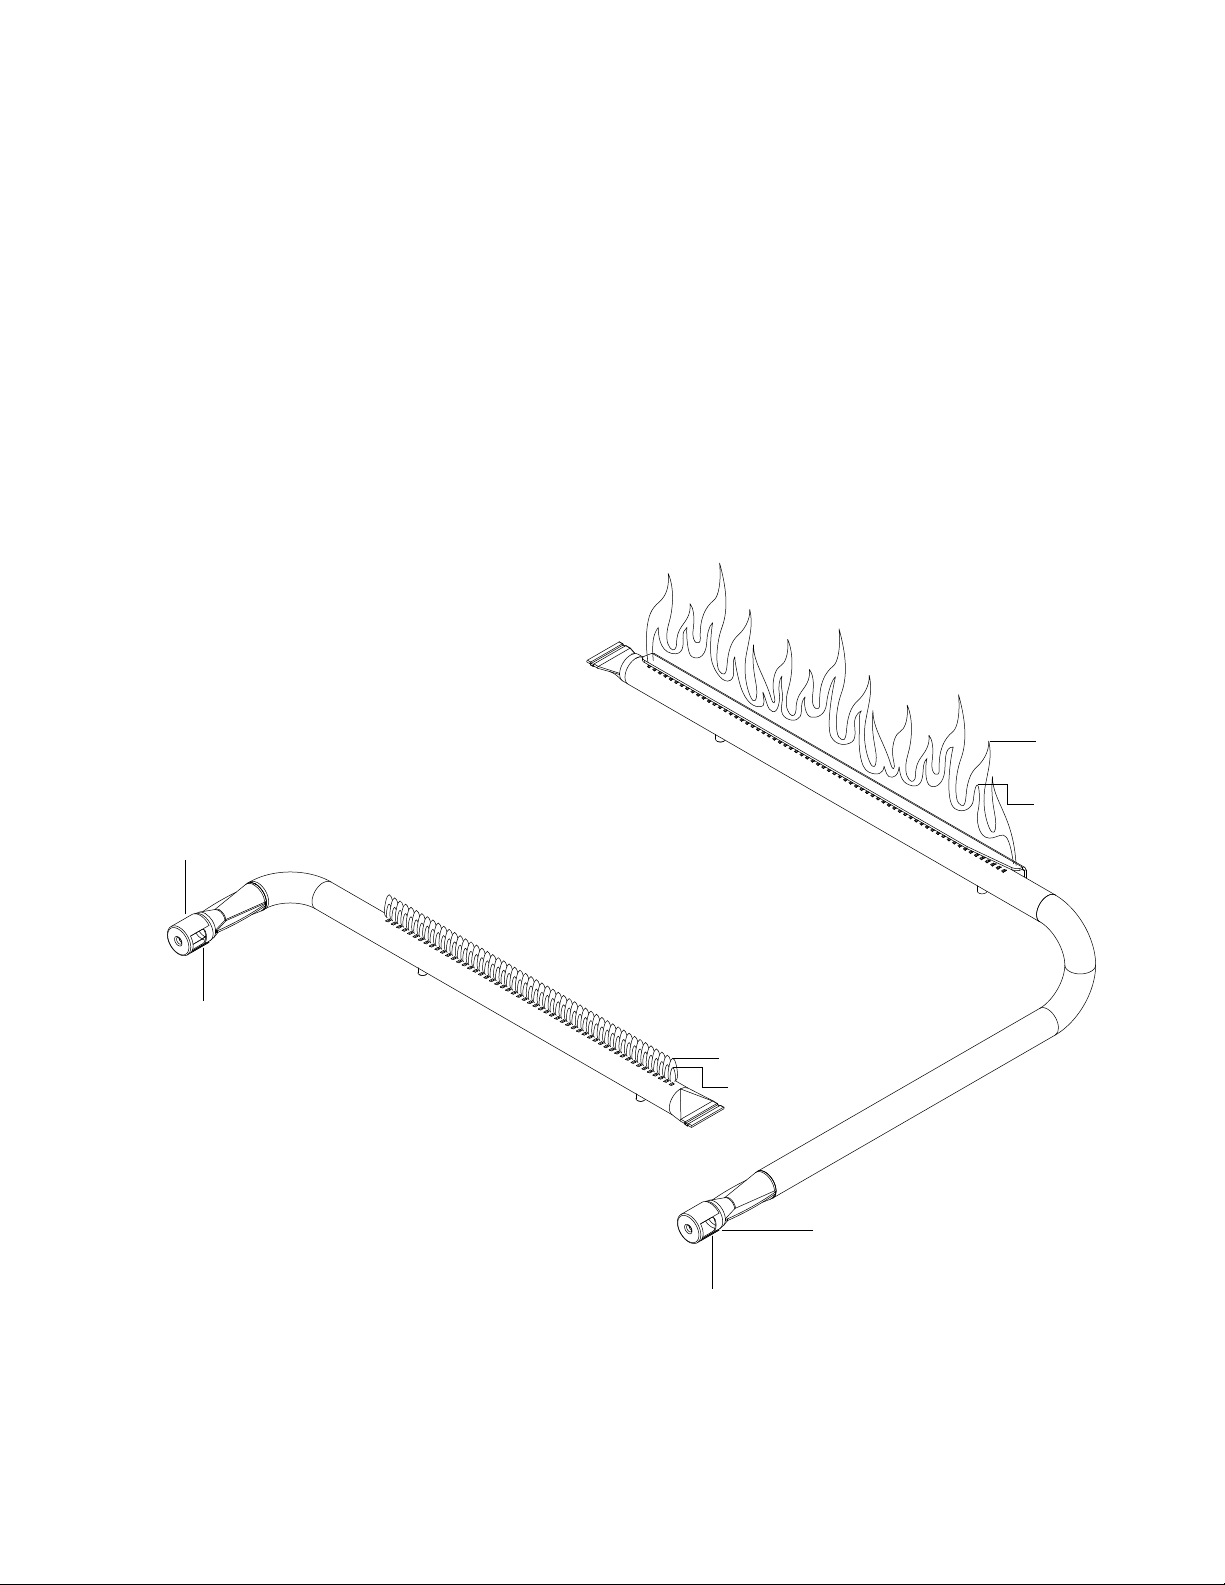
Upper Burner Flame Characteristics:
The flame should be predominantly orange and clearly visible at the back of the oven. The flame
diffuser on the burner is designed to create a more visually appealing flame for your oven. It diffuses
the gas coming out of the ports, making it so that there are not individual flames with individual cones.
The inner cone should be
approximately 3 inches high in
average.
The outer cone should not touch the
ceiling inside the pizza oven. If the
tips of the outer cone are making
contact with the ceiling, the flames
are too high.
FIGURE 7
OUTER CONE
AIR SHUTTER
LOCK SCREW
LOWER BURNER
Lower Burner Flame Characteristics:
The flame should be blue and stable with
only a small amount of orange, if any, at
the tips. There should be little noise and no
lifting.
The inner cone should be 1/4 inch high.
The outer cone should be 5/8 inch high.
UPPER BURNER
OUTER CONE
INNER CONE
LOCK SCREW
INNER CONE
AIR SHUTTER
Visually compare the flames in your pizza oven and adjust if necessary, using the instructions on the
following pages.
1.800.868.1699 17

Burner Adjustments CONTINUED
IMPORTANT: A sooty flame is usually caused by dirt, debris or spider nests blocking the air shutter or orifice.
This is a dangerous condition. The pizza oven should NOT be used until the problem is rectified. If you are not
comfortable addressing the issue yourself, please hire a qualified technician or contact Kalamazoo Outdoor
Gourmet Customer Service at 1.800.868.1699.
To Clean the Air Shutter:
It is possible to visually inspect the air shutter from below without dismantling the unit. The air shutter is
located directly behind the control valve for that burner (See figure 8, air shutters A and E).
Turn off the gas supply shutoff valve or close the main valve on the LP cylinder. Ensure the pizza oven control
knobs are in the OFF position. CAREFULLY rotate and move that corner of the pizza oven to extend no more
than 6 inches off the edge of the countertop (See figures 9 and 10). Use a flashlight to view the screened
openings of the air shutter from below. Remove any obvious obstructions from the screen protecting the air
shutter.
To Adjust the Air Shutter:
It is possible to adjust the air shutter from below without dismantling the unit. The air shutter is located directly
behind the control valve for that burner (See figure 8).
Turn off the gas supply shutoff valve or close the main valve on the LP cylinder. Ensure the pizza oven control
knobs are in the OFF position. CAREFULLY rotate and move that corner of the pizza oven to extend no more
than 6 inches off the edge of the countertop (See figures 9 and 10). Use a screwdriver to loosen the lock screw
(Figure 8: B, F). Be careful not to remove the lock screw. Once loose, you can rotate the air shutter to adjust
the amount of air entering the venturi.
Visually inspect that the gas hose has not been stressed, dislodged or otherwise affected by moving the pizza
oven. If it is safe to do so, and with the pizza oven control knobs in the OFF position, turn on the gas supply
valve or open the main valve on the LP cylinder. Light the burner to be adjusted. LIGHT ONLY THE BURNER
TO BE ADJUSTED. Rotate the air shutter to adjust the amount of air entering the venturi.
For a lifting flame, progressively close the air shutter until the flame no longer lifts from the burner. For a sooty
flame, progressively open the air shutter until the flame burns cleanly.
Once adjusted to a stable flame that burns cleanly and does not lift, turn the pizza oven control knob to the
OFF position. Tighten the lock screw. Re-light and confirm the adjustment is good. Turn the pizza oven control
knob to the OFF position. Turn off the gas supply shutoff valve or close the main valve on the LP cylinder.
Return the pizza oven to its normal position on the countertop. Once again, visually inspect that the gas hose
has not been stressed, dislodged or otherwise affected by moving the pizza oven.
IMPORTANT: If the flame from the upper burner is contacting the ceiling inside the pizza oven, contact
Kalamazoo Outdoor Gourmet Customer Service. You may have higher than normal gas pressure and may need
a smaller orifice for this burner.
KalamazooGourmet.com18
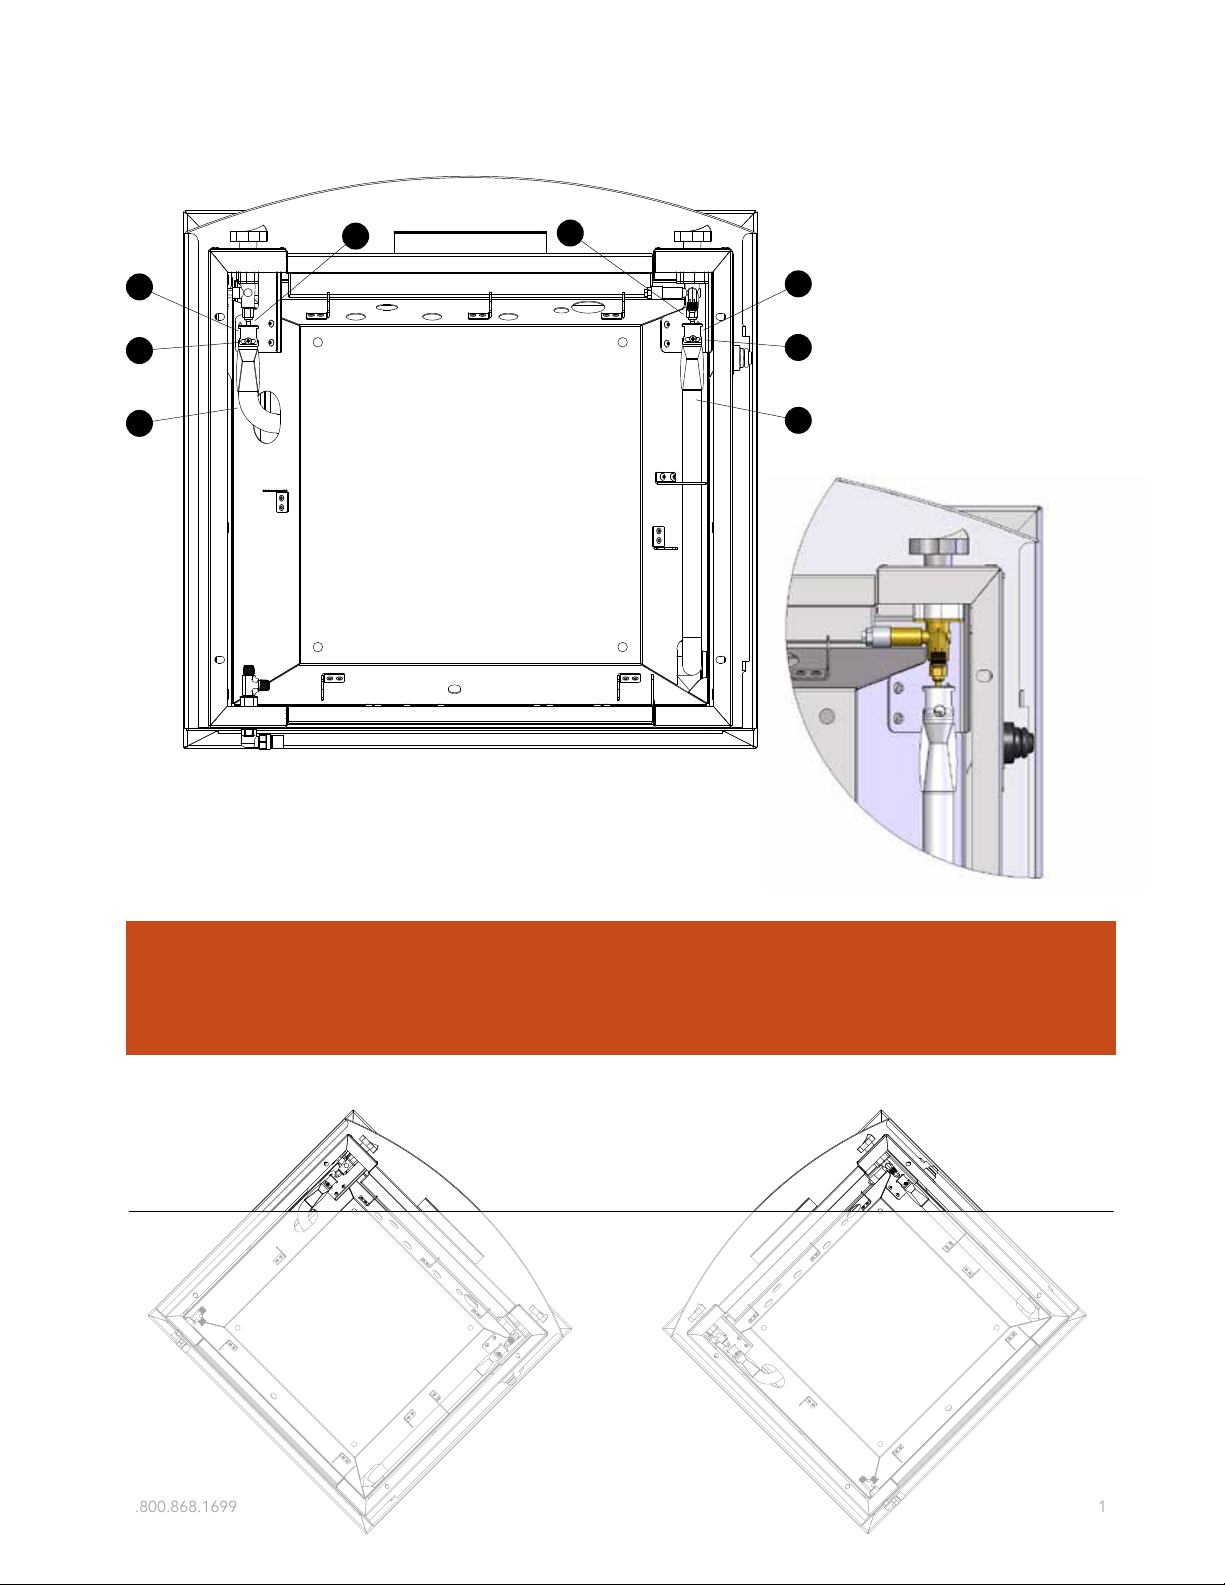
FIGURE 8 (BOTTOM VIEW)
A. Air shutter
D
A
B
C
H
E
F
G
B. Lock screw
C. Lower burner body
D. Brass orifice
E. Air shutter
F. Lock screw
G. Upper burner body
H. Brass orifice
IMPORTANT: Always ensure brass orifices (D and H above) are inserted into
the holes in the ends of the air shutters (A and E above) and centered.
FIGURE 10FIGURE 9
1.800.868.1699 19
KalamazooGourmet.com20
Cooking with Your Pizza Oven
IMPORTANT: The Artisan Fire Pizza Oven is a high-performance piece of
equipment that gets very hot. Use caution when working with the oven and do
not leave the oven unattended. Use insulated gloves with a long cuff to protect
your hands and forearms from heat.
Essential Equipment
Leather insulated gloves with long cuffs to protect your hands and forearms.
Long-handled brass brush, preferably “push broom” style, for cleaning the cooking deck
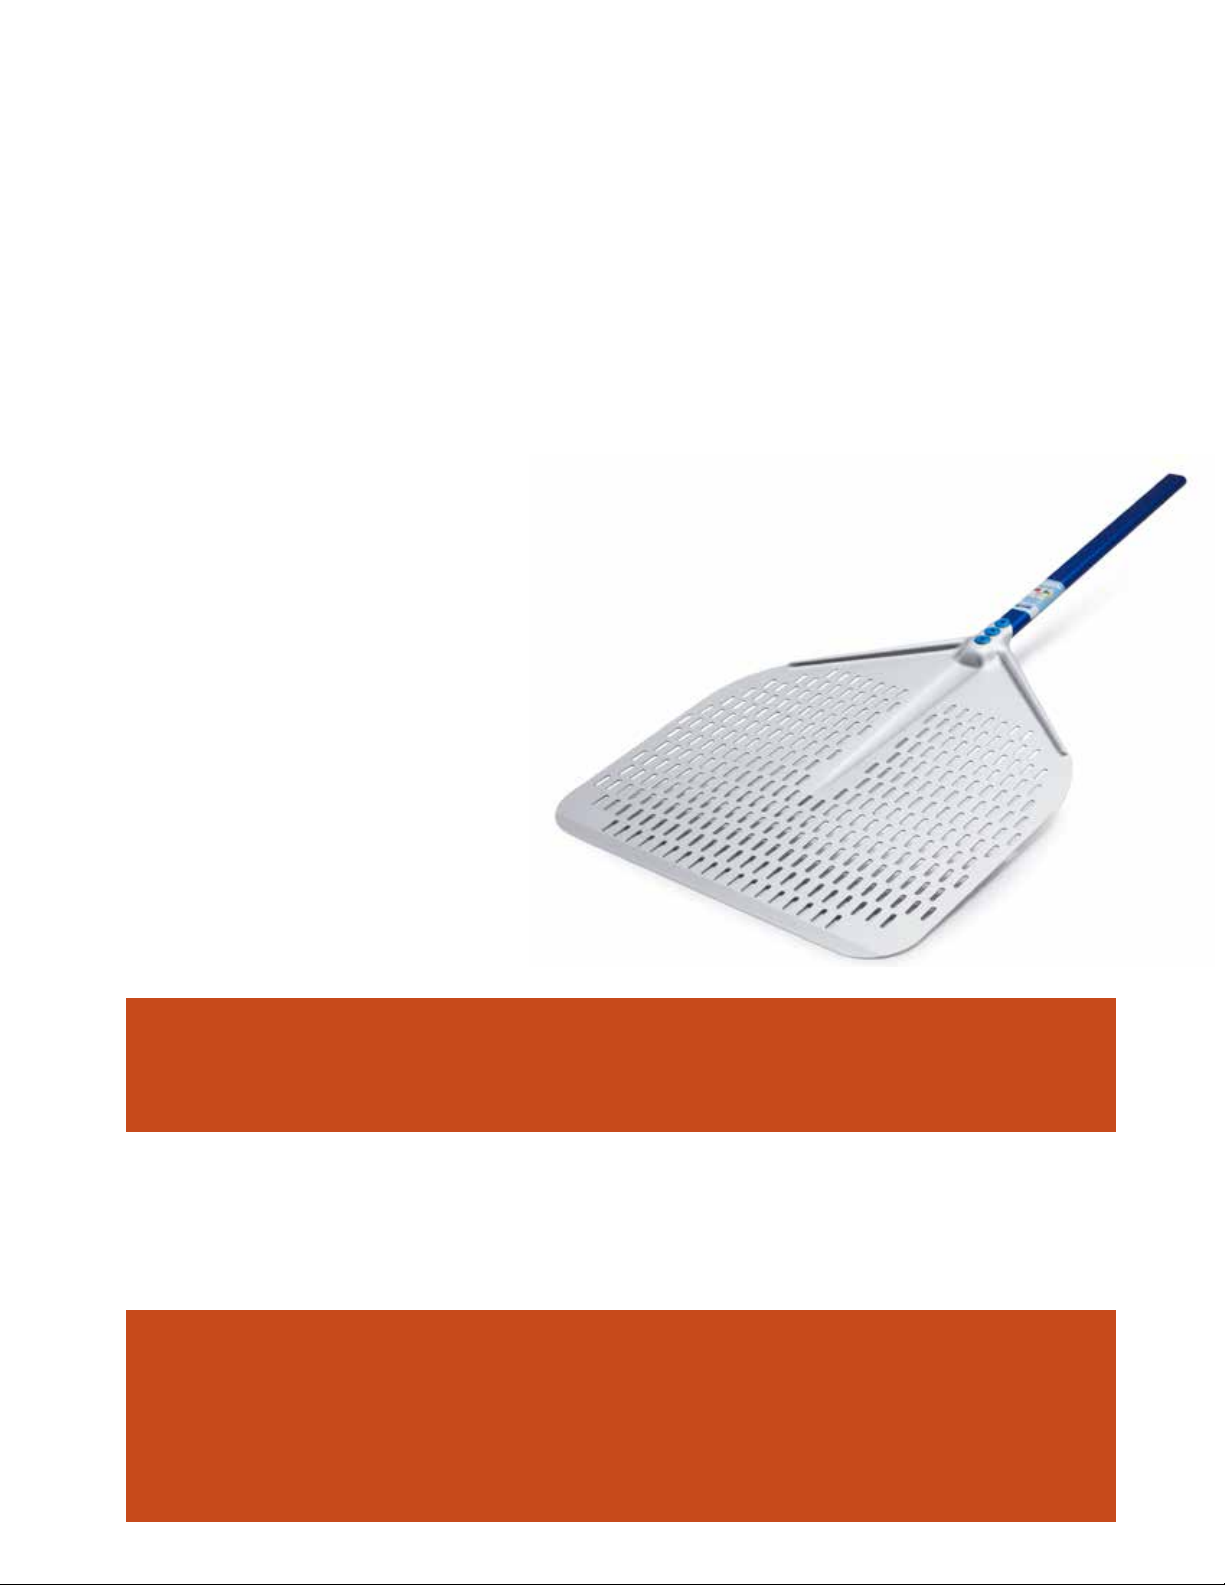
Heat-resistant pizza peels for transferring pizzas into the oven and rotating pizzas while cooking
Aluminum pizza screen to slow down the cooking of the crust when needed
Check out Kalamazoo’s Pizza Master’s Essentials Kit for the best pizza peels available
Other Helpful Accessories
Dough divider/scraper
Large-diameter pizza cutting wheel
Heavy-gauge deep dish pizza pan
Cast iron skillet and/or fajita pans
Digital scale
Artisan Fire Pizza Oven Cover
IMPORTANT: Before cooking, become familiar with all the information in
this Use and Care Guide regarding safe operation of your pizza oven.
Preheating
The Artisan Fire Pizza Oven is ready to cook in as little as 20 minutes, however,
we recommend at least 45 minutes of preheating for optimum performance.
IMPORTANT: Always remove the door before operating the pizza oven.
The door is for use only when the pizza oven is OFF. It is not intended
for cooking. It is intended only for keeping foreign objects out of the
oven when it is not in use.
1.800.868.1699 21

General Operating Tips
Thin Crust Pizza
Crust formed to less than 1/8” thick
Upper burner on HIGH
Lower burner on LOW
Cook for approximately 3 minutes
Rotate pizza 3 to 4 times during cooking
Medium Crust Pizza
Crust formed to 1/4” thick
Upper burner on MEDIUM
Lower burner turned OFF a couple of
minutes before putting pizza in the oven
after preheating on LOW
Cook for approximately 8 minutes
Rotate pizza 3 to 4 times during cooking
Deep Dish Pizza
Use heavy-gauge aluminum pizza pan
Upper burner on MEDIUM
Lower burner MEDIUM
IMPORTANT: Never put greasy,
oily or buttery foods directly on
the cooking deck. For cookies,
meats and other items, use a
pan or cast iron skillet.
Temperature Range
When the oven is fully pre-heated, with
both burners on HIGH, the Artisan Fire Pizza
Oven is capable of intense heat in excess of
800ºF. The heat is most intense at the rear
of the cooking deck and least intense at the
front. Once you are familiar with cooking in
the oven, you will be able to use this to your
advantage in turning out perfect pizzas. Only
the thinnest of pizzas with a reserved amount
of toppings should be cooked at the upper
end of the temperature range. Specialty flours
may be needed to avoid burning the dough.
Cooling rack placed between pan and
cooking deck
Cook for approximately 40 minutes
Rotate pizza every 5 to 8 minutes
Calzones
Upper burner on MEDIUM
Lower burner turned OFF a couple of
minutes before putting calzones in the oven
after preheating on LOW
Cook for approximately 7 minutes
Rotate calzones once during cooking
Roasted Meats or Vegetables
Upper burner on HIGH
Lower burner LOW
Preheat cast iron skillet in the oven
Cook food in preheated skillet
Rotate skillet for even roasting
When the upper burner is set to LOW and the
lower burner is LOW or OFF, the oven cooks
at a very low and slow speed. Temperatures
can be as low as 300ºF.
Why no Thermometer?
With the intense and dynamic heat
characteristics of the Artisan Fire Pizza
Oven, we have found that a thermometer is
misleading at best, resulting in poorly-cooked
pizzas. After hundreds of tests, we have
developed the guide on the left for basic
burner settings. We recommend you learn to
trust your eyes and experiences to determine
how quickly a pizza is cooking and when it
has reached perfection.
Cook with your pizza oven a few
times to learn the ropes before
hosting your first pizza party.
KalamazooGourmet.com22

Additional Cooking Tips
Use corn meal or flour between the dough and the peel to help slide the pizza off the peel. Be sure the
dough is floured enough so that it is not sticky on the bottom.
Do not leave an assembled pizza on the countertop or the peel longer than absolutely necessary. This can
lead to the pizza sticking to the surface.
Cook thin to medium crust pizzas directly on the cooking deck.
Use multiple, smaller “flicking” gestures to coax the pizza off the peel into the oven. Trying to do it with
one, larger gesture is more likely to dislodge pizza toppings.
Do not overload a thin-crust or medium-crust pizza with too much toppings. This will most often lead to a
soggy center crust. When in doubt, less is more.
If the pizza sticks to the cooking deck, the deck was probably not hot enough before the pizza was put
onto the deck.
Do not put a frozen pizza on the cooking deck. It is almost certain to stick and to become burned before it
releases.
Rotate pizzas for even cooking. The oven is hottest at the back.
Brush burnt cornmeal or flour off the cooking deck and into the crumb tray before cooking the next pizza.
If you have any difficulty rotating the pizza inside the oven using a peel, try using a smaller pizza peel
designed for turning. Or try long-handled grill tongs to do the job. You can also use the tongs to lift the
edge of the pizza to check on the bottom of the crust.
Avoid letting the pizza contact the cooking deck backstop (Figure 6:E). This is a very hot surface that will
quickly burn the crust.
1.800.868.1699 23

24

Recipes
Pizza making is the perfect opportunity for creative expression. It is relatively
casual, so there is less pressure, and follows a simple structure within which you
can try a host of variations.
Pizza making is also great for communal cooking. People can gather to make a
variety of pizzas using their own toppings. The short cooking time offers instant
gratification and encourages experimentation.
Following are a selection of recipes we’ve created over the years. Sure, some
of them are pretty “out there,” but they are all delicious. We encourage you to
give them a try — and to come up with your own. We’d be especially grateful
if you shoot us a note to share your creations and experiences.
Two thoughts may help you on your way...
Use the freshest and best ingredients you can. Making your pizzas with
seasonal ingredients grown locally can be very rewarding. Try artisan cheeses.
Keep a log of the ingredients you like best and what you did with them.
And, keep your pizzas on the simple side, using only three or four main
ingredients. Once you establish a few combinations as your favorites, start
riffing on those for new creations.
Most importantly of all, enjoy yourself and eat well!
Your pizza oven can cook more than just pizzas and bread. In this section,
we share quick recipes for roasted asparagus and a grilled cheese
panini. You can also roast meats — just be sure to do it in an appropriate
roasting pan and never directly on the cooking deck.
1.800.868.1699 25

26

Artisan Fire Pizza Dough
This Neapolitan-inspired pizza dough utilizes a blend of bread flour and Tipo
'00 flour — the Italian flour used by Neapolitan pizza restaurants because of its
high burning point. We have optimized this dough recipe for use in the Artisan
Fire Pizza Oven when making Neapolitan-style pizzas. The flour blend yields
good overall color and the desired leapording.
This dough is a little more difficult to handle than the White Wine Pizza Dough
and is intended for use only with sparse toppings in the Neapolitan style.
Yields 7 10-ounce Dough Balls
(about 2kg dough)
50ml luke-warm tap water
2 teaspoons honey
5 grams active dry yeast
700ml cold tap water
450g Caputo Tipo 00 flour
800g unbleached bread flour
45g kosher salt
NOTES
For an interesting flavor and texture
alternative, try substituting 300g of
rye flour for 300g of bread flour.
All ingredients are measured by
weight. Metric measurements are
used for added precision (1 gram =
0.035 ounces) and to make it easier to
calculate the hydration (ratio of wet to
dry ingredients by weight).
Directions
Dissolve the honey in the warm water. Stir in the yeast. Let sit for 5
minutes to activate. It should become quite frothy.
Combine the yeast mixture with the cold water and ’00 flour in a large
bowl. Stir well to create a batter. Add half of the bread flour (400g)
and stir well to combine. Add the remaining half of the bread flour
and the salt. Work these into the dough, then remove from the bowl
onto a clean work surface. Knead until the dough is evenly combined
and has a consistent texture, about 8 minutes.
Return the dough to the mixing bowl and cover tightly. Let the dough
rest for 1 hour.
Divide the dough into 7 equal, 10-ounce (284g) parts, working each
part into a smooth ball and tucking in any corners or edges. Coat
each ball in olive oil and place them into covered dough boxes or on
baking sheets. Cover tightly and refrigerate for 12 to 24 hours.
Remove the dough boxes from the refrigerator and let the dough rest
at room temperature for 2 to 4 hours before making pizzas.
To form the pizza crusts, work the dough gently with your hands.
Never use a rolling pin or pinch the dough too firmly. This will “bruise”
the dough. Start with the dough ball on a floured work surface. Press
gently outward toward the edges with your fingers, rotating the dough
as you work your way around to create a disk. Lift the disk from the
surface and begin to gently stretch it. Once it is about 7 inches in
diameter, let gravity begin to help you shape the dough. Hold the disk
from the top with both hands. Try to use the flats of your fingers rather
than your fingertips. Sway the dough back and forth to stretch it, and
shuffle your hands along to rotate the dough as you sway back and
forth. You can also stretch the dough across the backs of your fists.
Combine these techniques in the manner that suits you best.
When the dough is ready for toppings, it should be about 1/8-inch
thick and roughly 12 inches in diameter. Do not create a lip for the
perimeter. The dough should be an even thickness from edge to
edge. The lip should rise around the edge in the oven (keep the
toppings ¾ inch from the edge).
1.800.868.1699 27

KalamazooGourmet.com28

Margherita Pizza
The key to a good Margherita pie is a brightly-flavored raw tomato sauce
and good quality fresh mozzarella cheese. The last defining factor is the
basil, and there are three schools of thought to how basil is used on this
classic pizza. Perhaps the most traditional method is to place 4 whole
basil leaves on the pizza before it goes in the oven. The other popular
approach places the leaves on top when it comes out of the oven. The
last approach is to chiffonade the leaves and distribute all over the
pizza. We started doing the third option at demos and parties so that
everybody got some basil even when the pizza slices were quite small.
Feel free to add basil in whichever way you prefer. In the photo you can
see the chiffonade of basil distributed on top of the sauce and under the
cheese to help preserve a fresher flavor to the herb while still infusing the
whole pizza as it cooks.
Yields a 10 inch pizza
1 10-ounce ball Artisan Fire Pizza
Dough
2 ounces Raw Pizza Sauce
Pecorino Romano cheese
Extra virgin olive oil
4 basil leaves, cut chiffonade
2 to 3 ounces fresh mozzarella cheese,
cut into strips
Directions
Preheat the pizza oven for cooking with the upper burner control on
HIGH and the lower burner control on LOW.
Lightly dust the work surface and the dough ball with ‘00 flour.
Working on a lightly-floured surface (we use Caputo ’00 flour), form the
dough into a 10-inch pizza. Spread the sauce into an even layer. Grate
a little Pecorino onto the sauce using a microplane grater. Drizzle on
a swirl of olive oil. Distribute the basil, followed by the strips of fresh
mozzarella.
Transfer to the pizza oven directly on the cooking deck and bake for
2 to 3 minutes until the crust browned. Rotate several times for even
baking.
Remove, let rest for a minute or two, slice and serve.
1.800.868.1699 29

KalamazooGourmet.com30

Charcuterie Pizza
This pizza is amazing! Cheese and cured meats are not new to pizza
(think pepperoni pizza), but great cheese and great cured meats can
elevate pizza to another level. In particular, the buttery and nutty Campo
de Montalban makes an incredible contribution. The pork pate exterior
becomes mouth-wateringly crisp from the high heat of the pizza oven.
You can follow these specific ingredients, or use the leftovers from almost
any meat and cheese board.
Yields a 10 inch pizza
1 Artisan Fire Pizza Dough ball,
10 ounces
Caputo '00 flour for dusting
1 ounce triple cream French cheese (I
used Délice de Bourgogne)
1 ounce Campo de Montalban,
cut into 1/2-inch cubes (this is a
Manchego-like cheese, but made
from a blend of sheeps’, cows’ and
goats’ milk)
1/2 ounce wild boar salami (I used
Creminelli brand)
1/2 ounce truffle sausage (I used
Charlito’s Cucina)
1 ounce pork pate
Extra virgin olive oil
Directions
Preheat the pizza oven for cooking with the upper burner control on
HIGH and the lower burner control on LOW.
Lightly dust the work surface and the dough ball with ‘00 flour.
Gently form the dough into a 10 inch crust about 1/8 inch thick.
Top the dough with dabs of the triple-cream cheese, plus the Campo
de Montalban and meats. Drizzle with olive oil.
Transfer the assembled pizza onto a pizza peel dusted with ‘00 flour.
Transfer to the pizza oven directly on the cooking deck and bake for
2 to 3 minutes until the crust and cheese are browned. Rotate several
times for even baking.
Remove, let rest for a minute or two, slice and serve.
1.800.868.1699 31

32

Oh My! Meatball Pizza
I make a lot of pizzas that are lighter, and often vegetarian. This pizza is quite
the opposite, and my new favorite (for a short while, anyway). Tender meatballs
take on a delicate char and crispness on the outside from the intense heat of
the pizza oven. A little mild dry salami and garlicky tomato sauce round out the
flavor. I also like to add a little sliced green onion, but that is purely optional.
Yields 1 10 inch pizza
1 10-ounce ball Artisan Fire Pizza
Dough
2 ounces Oven-roasted Pizza Sauce
2 ounces scamorza cheese, cut into
1/2-inch cubes
Mild dry salami (choose a rather soft
one if possible), cut to 1/8-inch dice
4 golf-ball-size Italian meatballs,
pre-cooked and cut in half (I like Chef
Anne Burrell’s recipe)
Green onion, sliced (optional)
Directions
Preheat the pizza oven for cooking with the upper burner control on
HIGH and the lower burner control on LOW.
Working on a lightly-floured surface (we use Caputo ’00 flour), form
the dough into a 10-inch pizza. Spread the sauce into an even layer.
Distribute the cubed cheese, followed by the salami and meatballs.
Transfer to the pizza oven directly on the cooking deck and bake for
2 to 3 minutes until the the cheese is melted through and the crust is
browned. Rotate several times for even baking.
1.800.868.1699 33

34

BLT Pizza
The BLT sandwich is a quintessential summer treat. It makes for a great pizza
as well. The chew of the dough and the warm bacon contrast perfectly with
the crisp, refreshing lettuce. We use a little cheddar cheese to weigh down the
dough while baking and to keep the bacon in place.
Yields 1 10 inch pizza
1 10-ounce ball Artisan Fire Pizza
Dough
1 tablespoon prepared mayonnaise
1/2 teaspoon sherry vinegar
¼ teaspoon maple syrup
2 ounces cheddar cheese (I used
Lincolnshire Poacher), cut into small
rectangles
4 slices bacon, cooked to about 75%
doneness and cut up
1 small head romaine lettuce, chilled,
sliced crosswise
8 heirloom cherry tomatoes,
quartered lengthwise
Directions
Preheat the pizza oven for cooking with the upper burner control on
HIGH and the lower burner control on LOW.
Whisk together the mayonnaise, vinegar and maple syrup to create a
dressing. Reserve.
Working on a lightly-floured surface (we use Caputo ‘00 flour), form
the dough into a 10-inch pizza. Distribute the cheese and bacon on
the dough.
Transfer to the pizza oven directly on the cooking deck and bake for
2 to 3 minutes until the cheese is melted and the crust is browned.
Rotate several times for even baking.
Remove the pizza and let it cool for a couple of minutes. Slice it into
quarters and then top with the romaine and tomatoes. Drizzle on the
dressing.
1.800.868.1699 35

KalamazooGourmet.com36

Kalamazoo Supreme Pizza
This version American classic “supreme” pizza substitutes poblano
peppers for the typical green bell peppers, and uses pickled cherry
peppers instead of red bell peppers.
Yields 1 10 inch pizza
1 10-ounce ball Artisan Fire Pizza
Dough
2 ounces Oven-roasted Pizza Sauce
(recipe follows)
Pecorino Romano cheese
1 ounce smoked low-moisture
mozzarella, cut into ½-inch cubes
1 ounce scamorza cheese, cut into
1/2-inch cubes
6 small pickled Italian cherry peppers,
stemmed, seeded and cut up
6 black olives, pitted and halved
1 crimini mushroom, stemmed, halved
and sliced
1/4 fresh poblano chile, stemmed,
seeded and thinly-sliced
1 thin slice of red onion, broken into
individual rings and cut
4 ounces Italian sausage, casings
removed, and cooked in clumps (I
cook them in a cast iron skillet in the
pizza oven)
1 ounce pepperoni or uncured salami,
sliced and cut into wide strips
Directions
Preheat the pizza oven for cooking with the upper burner control on
HIGH and the lower burner control on LOW.
Working on a lightly-floured surface (we use Caputo ’00 flour), form the
dough into a 10-inch pizza.
Spread the sauce into an even layer. Grate a light dusting of Pecorino
over the top using a microplane grater. Distribute the cubed cheeses,
followed by the cherry peppers, olives, mushroom, red onion, poblano
and sausages.
Transfer to the pizza oven directly on the cooking deck and bake for
about 3 minutes until the cheese is melted through and the crust is
browned around the edges. Rotate several times for even baking.
Slice and serve.
Note: Pizzas with a lot of toppings like this one need a bit more time
for the crust to cook through – especially in the center. After the
bottom of the pizza has taken on a moderate amount of color cooking
directly on the ceramic cooking deck, slide a pizza screen underneath
to slow down the cooking from below.
Oven-roasted Tomato Sauce
Yields 10 to 14 ounces sauce, enough for 5 to 7 10-inch pizzas
1 28 ounce can of whole, peeled tomatoes, preferably San
Marzano tomatoes, and preferably without basil
1 1/2 teaspoons kosher salt
1/4 cup extra virgin olive oil
8 whole cloves garlic, peeled and lightly smashed
Combine the canned tomatoes with their juices in a blender along with
the salt. Blend until the tomatoes are broken down but not completely
smooth.
Combine the olive oil and garlic in a cast-iron vessel large enough
to hold the initial volume of sauce. I use a small Dutch oven without
the lid. Place the vessel in the pizza oven and cook, uncovered, until
the garlic is browned, about 12 minutes. Carefully pour in the tomato
sauce and return to the oven. Roast an additional 15 to 20 minutes,
stirring once or twice.
The garlic will be completely black in the end, and the sauce will
ideally have a browned skin on top. Stir the skin into the sauce. When
using on pizzas, allow the olive oil to separate a bit from the tomato
sauce. Avoid the olive oil and garlic cloves when spooning or ladling
1.800.868.1699 37
the sauce from the vessel.

KalamazooGourmet.com38

Asparagus and Prosciutto Pizza
This combination of asparagus, prosciutto, goat cheese and crème
fraîche is a Kalamazoo favorite.
Yields 1 10 inch pizza
1 10-ounce ball Artisan Fire Pizza
Dough
Extra virgin olive oil
4 thick asparagus spears
2 tablespoons crème fraîche
4 very thin slices prosciutto
1 ½ ounce chèvre
Directions
Preheat the pizza oven for cooking with the upper burner control on
HIGH and the lower burner control on LOW.
Remove and discard the bases of the asparagus spears. Thinly slice the
spears on an extreme bias (to yield long oval slices) up to the base of
the tip. Toss the tips and sliceswith olive oil in a bowl and reserve.
Working on a lightly-floured surface (we use Caputo ‘00 flour), form
the dough into a 10-inch pizza. Gently spread the crème fraîche onto
the dough with the back of a spoon or a rubber spatula. Tear the
prosciutto slices into smaller pieces and lay them on the crème fraîche.
Add the goat cheese and the asparagus slices. Place the 4 asparagus
tips on the 4 quadrants of the pizza. Drizzle with a small amount of
olive oil.
Transfer to the pizza oven directly on the cooking deck and bake for
about 3 minutes until the crust is browned around the edges. Rotate
several times for even baking.
Slice into four equal slices with an asparagus tip in the center of each.
1.800.868.1699 39

KalamazooGourmet.com40

Chocolate Hazelnut Raspberry Pizza
For the uninitiated, chocolate hazelnut creams (like Nutella®) are delicious
spreads, but also very sweet. So we tame it for the base of our pizza with a
little unsweetened chocolate. Served hot with raspberries, this is a one-of-akind dessert.
Yields 1 10 inch pizza
1 10-ounce ball Artisan Fire Pizza
Dough
About 5 ounces chocolate hazelnut
spread, heated in the microwave
for 45 seconds to soften (I used All
Natural Cocoa Haze with fair trade
cocoa, but Nutella® will also work)
1 square (1/2 ounce) Ghiradelli®
unsweetened chocolate (100%
Cacao), chopped up
About 20 fresh raspberries
Powdered sugar
Directions
Preheat the pizza oven for cooking with the upper burner control on
HIGH and the lower burner control on LOW.
Working on a lightly-floured surface (we use Caputo ‘00 flour), form
the dough into a 10-inch pizza.
Transfer the crust to the pizza oven directly on the cooking deck to par
bake for about 1 minute, rotating once.
Remove the crust from the oven and spread on the chocolate hazelnut
spread. Top with chocolate and then raspberries. Return it to the pizza
oven and cook until the toppings are heated through and the crust is
browned. Rotate several times for even baking.
Remove the pizza from the oven, dust with powdered sugar and enjoy.
1.800.868.1699 41

42

White Wine Pizza Dough
Making pizza dough from scratch really isn’t a lot of work. You don’t need to
dig out the mixer and use the dough hook for kneading. Try kneading the
dough by hand right in the mixing bowl, and you may find yourself making
dough from scratch more often.
This dough is easy to work with and appropriate for a wide variety of pizza
styles and calzones.
Yields 28 ounces of dough
¾ cup warm water
Pinch of sugar
3 teaspoons active dry yeast
1/4 cup white wine, at room
temperature
1¼ teaspoons kosher salt
2 tablespoons olive oil, plus extra for
coating
3 cups bread flour
2 teaspoons honey
Directions
Put 6 tablespoons of the lukewarm (100° to 110°F) water, sugar and
yeast in a small bowl, mix well and set aside for 5 minutes or until
frothy.
In a large bowl, whisk together the remaining water with the white
wine, salt and 2 tablespoons olive oil. Use a wooden spoon to stir in 1
cup of the flour, creating a batter. Stir the honey and the yeast mixture
into the batter.
Add the remaining flour and continue stirring with the wooden spoon
for a few minutes. Knead the mixture in the bowl until smooth and
relatively firm. Clean the sides of the bowl, oil the dough with a little
more olive oil and cover the bowl with a towel.
Let rise for 45 minutes. A good tip is to run a load of dishes in the
dishwasher while the dough rises right above the washer door. The
warm, moist air helps with the rising.
After 45 to 60 minutes, punch the dough down, split in half or
quarters, knead again briefly and let rest 15 minutes more before
rolling into pizza crusts. Unused dough may be frozen..
Makes enough dough for two 14-inch round pizzas or 4 individual
pizzas. For more pizzas, make the dough 1 batch at a time rather than
multiplying the recipe.
1.800.868.1699 43

44

Zucchini Pizza Pinwheels
A lot like a calzone, but with a beautiful presentation, these pizza pinwheels are
wonderful starters for parties. Fresh zucchini melds with Spanish cheese and
sweetened tomatoes.
Yields 4 pinwheels
1 batch White Wine Pizza Dough,
about 28 ounces
1 cup grape tomatoes, quartered
1 tablespoon light brown sugar
1 cup shredded zucchini (1 fresh
zucchini should provide enough)
1 cup shredded manchego cheese
1/2 teaspoon fine sea salt
1 egg, beaten
Directions
Preheat the pizza oven for cooking with the upper burner control on
MEDIUM and the lower burner control on LOW.
Stir together the grape tomatoes with the brown sugar in a small bowl
and let sit for at least 15 minutes.
Spread the shredded zucchini out on a large cutting board and let it
air-dry for 15 minutes.
Discard the liquid in the tomato bowl and combine the tomatoes,
zucchini, cheese and salt in a large bowl.
Roll out the pizza dough into a square about 15 inches to a side. Trim
the large dough into four smaller, perfect squares, then roll those
thinner until they are each roughly 8 inches to a side.
Start with one square. Stretch the corners to elongate them, making
the dough into a four-pointed star. Transfer to a pizza prep peel
dusted with cornmeal. Spoon the zucchini filling onto the dough in
a square shape that is on a diagonal to the four-pointed star. Lift two
opposing corners of the star to the middle, folding over the filling and
firmly press them together between your fingers to join at the middle.
Repeat with the other two corners and then press the four corners
together at the middle.
Repeat to make a total of four pinwheels on your pizza prep peel.
Optionally, for more golden tops, lightly brush the top areas of the
dough with the beaten egg.
Turn the lower burner control to OFF.
Transfer the pinwheels to the pizza oven, directly onto the cooking
deck, and bake until golden brown on top and cooked through, about
7 minutes.
1.800.868.1699 45

46

Deep-Dish Three-Cheese Sausage Pizza
If you like lasagna, you’ll love this pizza.
Yields a 12 inch pizza
2 pounds fresh Roma tomatoes
4 cloves garlic
1/2 teaspoon kosher salt
1 batch White Wine Pizza Dough,
about 28 ounces
12 ounces scarmoza cheese,
shredded
8 ounces ricotta
1 teaspoon fresh thyme leaves
12 ounces fresh mozzarella (Ovolone),
drained and dried in a mesh strainer
2 pork sausages, casings removed
and broken into small pieces
You will also need a cooling rack and
a 12 inch heavy aluminum pizza pan, 2
inches deep. It should be made from
at least 14 gauge material.
Directions
Preheat the pizza oven for cooking with the upper burner control on
MEDIUM and the lower burner control on MEDIUM.
Combine the tomatoes, garlic and salt in a blender and puree until
very smooth. Transfer to a saucepan. Reduce over medium heat,
stirring frequently until thickened into a sauce.
Form the dough into a large circle, larger than the pizza pan and only
1/4 inch thick. The perimeter can be thicker. Place it over the pan and
let it sag into position. Coax it into the corners of the pan, leaving the
dough hanging over the edges.
Spread the scarmoza cheese into a bottom layer on the dough. Place
the cooling rack onto the cooking deck in the pizza oven. Place the
pizza pan with the dough and scarmoza onto the cooling rack. Cook,
rotating frequently until the cheese is fully-melted. This helps pre-crisp
the crust and the melted cheese forms a protective layer that helps
prevent the crust from becoming soggy. Remove from the pizza oven
using gloves or oven mitts.
Layer in the ricotta cheese, followed by the thyme leaves, and the
fresh mozzarella, keeping the layers as level as possible. Ladle on the
tomato sauce and then add the sausage. Use small pieces, evenlyspaced to help ensure the raw sausage will cook fully.
With all the ingredients in the pizza pan, the pan should be only
halfway full. The toppings will expand when cooking. Fold in the crust
that is hanging over the edge of the pan, getting it all inside the pan,
but keeping it high on the sides. If any pizza toppings overflow the
sides of the crust, the pizza will be soggy.
Put the pizza pan back into the oven on top of the cooling rack. The
cooling rack creates an air gap that helps keep the bottom crust from
burning. Cook for at least 40 minutes, rotating ever 5 to 8 minutes.
The toppings should be bubbling, the sausage should be fully-cooked
and the edges of the crust should be dark.
Remove from the oven and let rest 10 minutes before cutting and
serving.
1.800.868.1699 47

48

Horseradish-encrusted Filet
As the creators of the Hybrid Fire Grill, you can imagine we have grilled far
more than our fair share of steaks. But, you can also make a truly fantastic steak
by roasting it in the Artisan Fire Pizza Oven. Give this recipe a try, and we are
certain you will agree. This dish was inspired by the horseradish crust served at
Wildfire steakhouses.
The filets take on a perfect brown crust from the intense sear of the cast iron.
Because the steak is surrounded by heat, it cooks quickly. Even the sides
are nicely browned, while the interior maintains a perfect, medium-rare. The
horseradish crust adds a delicious bit of sophistication, and the slices of
baguette soak up the rich, flavorful juices.
Serves 2
3 tablespoons unsalted butter,
brought to room temperature
2 tablespoons prepared horseradish
1/4 cup plus 2 tablespoons panko
bread crumbs
2 tablespoons finely-grated pecorino
romano cheese
2 thin slices of French baguette,
roughly the same diameter as the
steaks
2 beef tenderloin steaks, about 2 1/2
inches thick, 12 ounces each, brought
to room temperature
Extra virgin olive oil
Fine sea salt
Freshly-cracked black pepper
Cast iron pan(s)
Directions
Preheat the Artisan Fire Pizza Oven with both burners on HIGH.
To make the horseradish crust, combine the butter, horseradish, panko
and romano cheese. Split into two equal parts and form into two discs
the same size as the filets. Reserve at room temperature.
Brush the steaks with olive oil on all sides. Season with salt and
pepper.
Preheat the cast iron pan(s) in the hot oven, directly on the cooking
deck, for 10 minutes.
While the pan is preheating, lightly toast the baguette slices directly
on the cooking deck of the oven for about 30 seconds. Reserve.
Place the steaks in the cast iron pan(s) in the pizza oven. Roast for 6
minutes, rotating each steak 180 degrees in the pan(s) after 3 minutes.
Carefully remove the pan(s) from the oven. Flip the steaks over, top
with the horseradish mixture, and return to the oven. Roast for about 6
minutes more, again rotating the steaks 180 degrees after 3 minutes.
Remove the steaks from the oven and check the internal temperature.
The target temperature is 125°F.
Transfer the steaks to serving plates, placing each one on top of a slice
of toasted bread. Let rest for 5 minutes before serving.
1.800.868.1699 49

50

Oven-roasted Clams
Little neck clams are roasted open-faced in the pizza oven with a bit of garlic
butter, bacon, poblano and panko. The high heat of the pizza oven roasts
the clams quickly. The melted garlic butter pools in the shell, complementing
the briny flavor of the clams, while the crispy panko crumbs offer the perfect
crunch. Each bite sized morsel is simply delicious!
Serves 2
3 thick slices of bacon
1 poblano chile
1 whole head of garlic
Extra virgin olive oil
Fine sea salt
1 heaping tablespoon fresh flat leaf
parsley, chopped
Freshly-grated zest of 1/2 lemon
2 tablespoons unsalted butter,
brought to room temperature
1/4 cup panko bread crumbs
1/4 cup finely-grated pecorino
romano cheese
Rock salt or coarse sea salt
18 little neck clams
Ridged cast iron grill pan for roasting
the bacon
Cast iron fajita skillets for roasting the
poblano and garlic
10-inch cast iron skillet, or (even
better) a lower-profile 10-inch pan
Directions
Preheat the Artisan Fire Pizza Oven with both burners on HIGH.
To cook the bacon in the pizza oven (you can cook the bacon using
any other method you like), place the bacon slices flat on a cold cast
iron grill pan. Place the pan in the oven, directly on the cooking deck,
and cook for about 10 minutes. Rotate once or twice for even cooking.
Remove when the bacon is done, but not yet crispy. Reserve.
Cut the top off of the whole head of garlic. Place in a cast iron pan
with the cut side up. Drizzle olive oil over the top and season with salt.
Place the poblano on another pan, and put both pans into the pizza
oven. Roast the poblano until blistered, about 15 minutes, turning
once or twice. Transfer to a bowl and cover it with a plate to let the
poblano steam as it cools. Roast the garlic until the cloves are soft,
about 25 minutes, turning once or twice. Remove from the oven and
allow it to cool.
Once the poblano has cooled, remove and discard the skin, then
remove and discard the stem and seeds. Dice the chile and reserve.
Dice the bacon and reserve.
Squeeze the roasted garlic into a small bowl. Add the parsley, lemon
zest, butter and a pinch of fine sea salt. Work together with a spoon
and reserve.
In another small bowl, combine the panko and pecorino with 1
teaspoon of olive oil. Mix together thoroughly and reserve.
Place a thick layer of rock salt or coarse sea salt in the 10-inch cast iron
pan to hold the clams
Open each clam and free the meat from the shell. Nestle the half with
the clam meat into the salt. Discard the other half of the shell. Repeat
with all of the clams.
Place a dab of garlic butter, a few pieces of poblano and a few pieces
of bacon into each shell. Top them all with the bread crumb and
cheese blend.
Transfer to the oven and roast until browned and bubbly, about 10
minutes. Rotate a few times along the way for even cooking.
1.800.868.1699 51

52

Cedar-planked Barbecue Shrimp
Cooking on cedar planks infuses foods with a distinctive, aromatic flavor, and
the pizza oven’s intense heat makes it ideal for plank cooking. Because the
heat radiates from both above and below, you get maximum flavor from the
plank, while also cooking the food quickly using the broiler effect. In fact, when
your food is cooked quickly enough, there is no need to soak the plank.
Serves 2
1 tablespoon chopped dried garlic
1 tablespoon chopped dried onion
1/4 cup turbinado sugar
1 tablespoon kosher salt
2 teaspoons paprika
1 teaspoon coarsely-ground black
pepper
10 large shrimp, 9 to 12 count, shells
on
2 bunches green onions
2 cedar planks, 7 inches X 12 inches
X 3/4 inch thick (see tip at the end of
the recipe)
Metal cooling rack(s)
Directions
Preheat the Artisan Fire Pizza Oven with both burners on HIGH.
To make the barbecue rub, combine the onion and garlic in a spice
mill and grind to the desired texture. Grinding the chopped spices
yourself makes for a more flavorful rub. Add the sugar, salt, paprika
and pepper.
Peel and devein the shrimp, leaving the tails on. Partially butterfly the
shrimp while you are deveining them.
Season the shrimp liberally with the barbecue rub.
For maximum flavor, you can lightly pre-char the boards quickly on a
hot grill. This step is optional.
Arrange the shrimp on the cedar planks. Trim the green onions and
arrange them alongside the shrimp.
Place the cooling rack(s) in the pizza oven, and position the cedar
planks on top of the rack(s). This helps keep the boards from burning
too quickly.
Cook for 12 to 15 minutes, rotating the boards several times for even
cooking. Keep a spray bottle of drinking water handy to douse any
flames that might erupt at the edges or corners of the board.
Tip: Most pre-packaged cedar planks for cooking are thinner than we
like to use. For cedar planks (and any other type of wood) we prefer to
purchase 1x8 boards (a 1x8 is actually ¾ inch thick and 7 inches wide),
and cut them down to the desired length. If you don’t have a saw at
home, the hardware store or lumber yard will usually be happy to cut
them for you.
1.800.868.1699 53

54

Grilled Cheese Panini
Your pizza oven makes excellent paninis. This recipe is intended only to give
you the format. Experiment and enjoy.
Yields 1 sandwich
2 slices Tuscan bread
1 slice provolone cheese
1 slice pepper jack cheese
1 slice mild cheddar cheese
Olive oil spray
Directions
Preheat the pizza oven for cooking with the upper burner control on
HIGH and the lower burner control on LOW.
Place the cheeses between the slices of bread to make a sandwich.
Spray the outside of the bread very lightly with olive oil spray. (The
reason we’re using spray is because we want far less oil than we could
ever brush on. If you want to make a panini using more oil, put it into
a skillet in the pizza oven).
Use long tongs to transfer the panini into the oven directly on the
cooking deck. Cook for 1 minute and then rotate. Cook for 1 minute
more and then flip it over. Cook for 2 minutes more, rotating once
until the bread is browned and the cheese is melted.
Remove, slice and enjoy.
1.800.868.1699 55

56

Roasted Asparagus Spears with Prosciutto
and Herbed Cheese
This dish makes a great appetizer or side. Crispy prosciutto wraps tender
asparagus with a cheesy surprise inside.
Serves 2
3 tablespoons Boursin garlic herb
cheese
Finely-grated lemon zest from 1/2
lemon
12 spears fresh asparagus, bases cut
off
1 tablespoon extra virgin olive oil
1 tablespoon lemon juice
4 slices prosciutto
You will also need a cast iron fajita
pan or skillet.
Directions
Preheat the pizza oven for cooking with the upper burner control on
HIGH and the lower burner control on LOW. Preheat a cast iron fajita
pan in the oven.
Combine the Boursin and the lemon zest.
Toss the asparagus in a bowl with the olive oil and lemon juice.
Lay out a slice of prosciutto on a clean work surface. Lay 2 asparagus
spears across one end of the prosciutto. Place a dollop of the Boursin
mixture on the center of the spears. Press a third spear into the top
of that. Roll tightly into the prosciutto slice to make the first bundle.
Repeat 3 more times.
Place the bundles in the preheated pan and put the pan into the oven.
Roast the bundles for about 4 minutes, turning once or twice with
tongs until the prosciutto is crisp. Use caution to avoid overcooking
the asparagus.
1.800.868.1699 57

Caring for Your Pizza Oven
The hand-built sheet metal parts of your Artisan Fire Pizza Oven are warranted
for life against structural deterioration or failure. With proper care, your pizza
oven should last a lifetime.
Stainless Steel Care:
The Artisan Fire Pizza Oven is built from 304 stainless steel, which is a high-quality, non-magnetic stainless steel
that is very corrosion resistant. It is also a highly-sanitary surface.
After usage, the stainless steel may discolor from the intense heat. This condition is normal.
Always clean your stainless steel pizza oven with a mild, food-safe, organic degreaser, followed by a stainless
steel polish. Always scrub with the grain, never across. Remove all cleaner residue before lighting the pizza
oven in order to avoid a build-up of film from the cleaner.
For stubborn stains, or to fix scratches, Kalamazoo Outdoor Gourmet recommends using a Scratch-B-Gone
kit, available from us by calling 1.800.868.1699. You may also use a product called Barkeeper’s Friend. This will
remove stains, but it is likely to alter the appearance of the brushed stainless steel finish.
Never use cleaners on the cooking deck.
SALT WATER ENVIRONMENTS: Stainless steel — even the highquality stuff used in Kalamazoo Outdoor Gourmet products — is not
impervious to rust. It is corrosion-resistant. Exposure to salt air and
sea spray will eventually do it in if you don’t care for your Artisan Fire
Pizza Oven properly. The best thing you can do to protect it is to clean
it frequently. Don’t give the salt time to establish a foot hold and the
chemical reaction time to start getting nasty. In salt air environments,
we recommend cleaning all stainless steel surfaces at least every two
weeks to keep your oven in prime condition.
Cooking Deck Care:
Clean the cooking deck with a long-handled brass brush. It is best to do this while the cooking deck is hot.
Wear long, insulated gloves and use caution when doing so.
Never cook greasy, oily or buttery foods directly on the cooking deck.
Never use cleaners on the cooking deck.
Do not cook frozen pizza on the cooking deck.
Never drop the cooking deck or cause sudden impact. The deck will most likely crack.
KalamazooGourmet.com58

Caring for Your Pizza Oven CONTINUED
Burner Care:
The burners should be visually inspected once a year. To access the burners, first make sure the pizza oven
is completely cooled. Ensure the pizza oven control valves are in the OFF position and turn off the main gas
supply. Remove the roof (see Figure 5:F) and middle body (see Figure 5:D). The upper burner is now exposed.
Carefully remove the cooking decks (see Figure 5:C) and heat diffusers (see Figure 5:B). The lower burner is
now exposed as well. Visually inspect the burners to confirm they are structurally sound.
It is unlikely the burners in your pizza oven will become dirty. However, they may be cleaned using a brass
brush if necessary. Gently brush off any debris, being careful not to dislodge the burners. Clogged burner
ports may be opened up with a straightened paper clip. Do not use a toothpick or anything else that could
break off inside the burner ports.
After cleaning the burners, you must make sure the venturi opening (see Figure 13:F) is centered over the
brass orifice (see Figure 13:E). Once you have confirmed this by visually inspecting from below, reassemble the
pizza oven and visually inspect the gas hose before lighting.
FIGURE 12
A. Upper burner
B. Lower burner
C. Upper burner ignition
probes
D. Lower burner ignition
probes
FIGURE 13
C
A
D
B
E
F
1.800.868.1699 59

Caring for Your Pizza Oven CONTINUED
Orifice Cleaning:
Clogged orifices create a dangerous condition that must be resolved before the pizza oven may be used. If
you are not entirely comfortable with the procedure, please use a qualified technician or contact Kalamazoo
Outdoor Gourmet customer service at 1.800.868.1699.
The orifices can be accessed from below (See Figures 8, 9 and 10). Remove the brass orifice using a 1/2 inch
open-ended wrench. A rachetting wrench will make the job easier.
Shine a flashlight through the orifice to look for any obstructions. Remove obstructions with a needle. Use
extreme care not to enlarge the hole. Reinstall and tighten the orifice. Be certain the orifice is inserted into the
air shutter opening at the end of the burner and that it is centered. Test fire the burners and check for proper
flame characteristics.
Igniter Batteries:
The electronic ignition system is battery
operated. It uses 1 AAA battery. If you do
not hear a rapid and strong clicking sound
when you press and hold the igniter
button, you may need to change the
battery. Unscrew the button by turning
it counter-clockwise. Replace the battery
and screw the button back on.
Emptying the Crumb Tray:
WARNING: The crumb tray gets
extremely hot when the pizza oven is
operating. Empty the crumb tray only
when the oven is cool. Before lighting the
oven is a good time to empty the tray.
The tray sits on a ledge on the front of the
oven below the front shelf. Insert it fully
and check to be sure it is aligned with the
gap at the front of the cooking deck.
FIGURE 14
CRUMB TRAY UNDER
THE FRONT SHELF
IGNITER BUTTON
AND BATTERY COVER
KalamazooGourmet.com60

Troubleshooting
The troubleshooting tips here are for general information only. The information
may save you the trouble of a service call. If your pizza oven requires service,
contact Kalamazoo Outdoor Gourmet customer service at 1.800.868.1699.
Pizza oven won’t light:
Do you hear a rapid clicking noise when you press and hold the electronic ignition button? If there is no
clicking, or the clicking is slow or faint, replace the ignition battery.
If you do hear rapid clicking, but the pizza oven won’t light with the electronic ignition, try manually
lighting the oven. If the oven does not light manually, there may not be any gas getting to the burners.
Turn the pizza oven control knobs to the OFF position. Confirm that the pizza oven is connected to the
gas supply, that the main gas supply is on, or that the LP cylinder is not empty.
If the burners light, but then immediately go out when you release the knob, this is most likely the
safety device. Continue to press in the control knob in for at least 10 seconds after lighting the burner.
Pizza oven won’t get to temperature:
If the oven does not get hot within 20 minutes of starting, check the flame height of the upper burner.
On HIGH, the upper burner flame should be clearly visible in the back of the oven. The flame should
be tall, but should not touch the ceiling inside the pizza oven. If the flame is low when the upper
burner control valve is in the HIGH position, check the following:
LP cylinder has enough gas to deliver proper pressure. Change the tank if necessary. In some
situations in cold ambient temperatures, an LP cylinder will ice up, creating a drop in pressure.
If this happens, turn off the tank and let it warm up before trying again. A full tank is less likely
to ice up than a tank that is less than half full.
Main gas supply is fully on and not only partially opened.
Orifices are clear and not clogged. A clogged orifice creates a dangerous situation. Do not use
the pizza oven until the issue has been resolved.
If the fuel has been switched from liquid propane gas to natural gas, part of the process to convert the
oven includes larger orifices. It is not safe to burn natural gas with liquid propane orifices (neither is it
safe to burn the other way around). If you suspect a conversion was done improperly, do not use the
oven and contact Kalamazoo Outdoor Gourmet customer service at 1.800.868.1699.
You smell gas:
Turn off the oven immediately. Follow the leak check procedures described in this manual. Contact
Kalamazoo Outdoor Gourmet customer service at 1.800.868.1699 for assistance.
Pizzas stick to the cooking deck:
The oven is most likely not hot enough when the pizza is put in. Pizzas are also more likely to stick
when they are cold. The cooking deck must be hot, and pizza dough should ideally be at room
temperature before putting it in the oven.
The oven is producing a lot of smoke:
This is typically caused by something oily getting onto the cooking deck. If this happens, the only thing
you can do is to try and burn it off. Oily foods should never be placed directly on the cooking deck.
1.800.868.1699 61

Installation Checklist
Installer should initial next to each item:
F Specified clearances maintained
F Initial assembly completed — all tape and internal packaging removed
F Heat diffusers installed
F Crumb tray installed
F Control knobs installed
F Ceiling stone installed
F Cooking deck installed
F Igniters click when button is pressed — visible sparks from upper and lower igniter probes
F Upper and lower burners light within 4 to 5 seconds following lighting procedure.
F Manual shutoff valve is installed and accessible
F Homeowner informed of shutoff valve location
F Unit and supply connections have been tested and are free of leaks
F Leave this Use and Care Guide with the homeowner
HOMEOWNER: Please ensure the installer completes the checklist,
explaining each item to you. The installer should initial each item above
and sign below.
Installer Signature Date
KalamazooGourmet.com62

Packing List
Please ensure you have all of these parts before discarding any packaging.
A. Base Unit
B. Heat Diffusers (2)
C. Cooking Decks (2)
D. Mid-Body
E. Ceiling Stone
F. Roof
G. Lower Control Knob
H. Upper Control Knob
I. Crumb Tray
J. Door
K. Manual Ignition Wand
F
E
D
C
C
B
B
A
J
1.800.868.1699 63
I
HG
K

Artisan Fire Pizza Oven Dimensions
Do not “build-in” the pizza oven.
Maintain at least 6 inches clearance to the sides and back, and 12 inches
clearance to the top for proper ventilation.
Do not install beneath any overhead combustible structure.
For outdoor use only.
2 1/8"
GAS HOSE INLET
AT REAR OF OVEN
30 1/8"
27 1/2"
19 1/2"
30"
25 1/8"
GAS HOSE INLET
10' GAS HOSE
CONNE CTS HERE
KalamazooGourmet.com64

1.800.868.1699 65

Pizza Master’s Essential Accessories Kit
Hard-to-find pizza-making essentials to help you get the most enjoyment from your Artisan
Fire Pizza Oven. Call 800.868.1699 to order.
16-inch perforated rectangular peel
Used to transfer assembled pizza from the
oven
The same version used by Neapolitan pizza
masters
Perforated design reduces the amount of
flour on the bottom of the dough
while allowing the pie to slide off easily
Aluminum construction
6-inch articulated peel
Used when rotating pizza in the oven and to
pull the pizza from the oven
Sliding grip to make it easy to rotate and
manipulate pies
Stainless steel construction
Push-broom style brass cleaning brush with
stainless steel scraper
Clean your hot cooking deck with this long-
handled brass brush
Brass bristles clean the deck and pull crumbs
to the tray of the Artisan Fire Pizza oven
Scraper removes burnt cheese or other
trouble spots
Stacking dough boxes
Scaled-down version of the boxes restaurants
use to keep dough balls rising and ready
Hold a dozen 10-ounce dough balls
Included dough scraper for splitting and
lifting dough without bruising
Two boxes, 18 x 26 x 3.5 inches each, plus lid
16-inch aluminum pizza screen
Slide under the pizza in the oven when you
want to slow down the browning of the crust
KalamazooGourmet.com66

Kalamazoo Pizza Station
Turn your pizza oven into an outdoor pizza kitchen with room for pizza making and
entertaining. Four locking casters mean you can reposition your cooking station.
Ample prep and serving area next to the pizza
oven
Top with the 72-inch by 36-inch countertop of
your choice
Kalamazoo provides electronic templates for
your fabricator
Hidden propane tank cabinet
Wheeled station allows you to locate your
pizza station on any level surface
Additional storage in cabinet
Toppings bins with ice reservoir
Covered set of trays for keeping pizza
toppings fresh
1.800.868.1699 67
Two drawers for tools, towels and other
essentials
Full-extension stainless steel slides
Open shelving
Keep dough boxes, pizza trays, blender and
other essentials close-at-hand for pizza parties
Pizza tools rack
Handy rack for pizza peels and grill brush
from Pizza Master’s Essential Accessories set

KalamazooGourmet.com68

Craftsmanship to a higher standard.
We began our journey as Kalamazoo Sheet Metal more than a century ago. As
a custom sheet metal fabrication shop, the family-owned company relied on its
reputation for craftsmanship. Through the years, a focus on custom food and
dairy processing equipment evolved. The “dairy standard”
describes a flawless fit and finish level for stainless steel
welding. Every seam has to be finished perfectly so that the
equipment is easily cleaned and kept free from bacteria.
Kalamazoo Sheet Metal excelled at this, and also served
architectural firms and the pharmaceutical industry on a
wide variety of projects.
The Birth of the Hybrid Fire Grill™ More than 15 years ago, the founder’s great grandson was running the
business, but he wanted to do something more. And so he set out to design the world’s best grill. Leveraging
the skills of the company’s stainless steel craftsmen and women as well as his own passionate creativity, the
first Kalamazoo Hybrid Fire Grill was born. It did not follow the conventional industry template. A heavy-gauge
welded frame offered lasting durability. Casters from industrial dumpsters gave warning of its ruggedness.
A deep, hopper-like firebox improved the heat dynamics and made it easier to clean. And, above all, it was
designed to combine the convenience of a gas grill with the superior cooking capabilities of a charcoal grill.
The outcome was a gigantic departure from the previous expectations of a stainless steel grill.
The Birth of a New Company These unique grills developed a passionate and loyal following over the
next few years. The focus slowly shifted exclusively to outdoor cooking equipment, but it was still the same
craftspeople putting their skills into every bend, weld and stroke of the hand-rubbed finish. The “dairy
standard” was (and is) still alive and well.
Before long, we pioneered the first modular outdoor kitchens. The seamless rain gutter that keeps our
outdoor kitchen cabinetry weather-tight is the same rain gutter we used to fabricate the wash-down electrical
enclosures on that dairy equipment.
Today, more than a century after our humble beginnings, we are the industry leader in outdoor kitchens. Every
piece of Kalamazoo’s equipment is still built by hand with the same dedication to quality and craftsmanship.
We build it to order, and we ship directly from our factory in Kalamazoo, Michigan to homes all over the globe.
When each grill has been through the process of cutting, forming, welding, finishing, assembly and testing, it is
signed by the people who made it with their own hands.
1.800.868.1699 69

All specifications and other information contained in this Use and Care
Guide are based on the latest product information available at the time of
printing. Because Kalamazoo Outdoor Gourmet is always focused on product
improvement, we reserve the right to make changes at any time. This includes
all specifications of the product.
© 2015 Kalamazoo Outdoor Gourmet, LLC. Not to be reproduced wholly or in part without specific written
permission from Kalamazoo Outdoor Gourmet, LLC.
Kalamazoo Outdoor Gourmet
Chicago Headquarters
810 West Washington Blvd
Chicago, IL 60607
Kalamazoo Plant
8566 Krum Avenue
Galesburg, MI 49053
1.800.868.1699
KalamazooGourmet.com
KalamazooGourmet.com70

1.800.868.1699 71

KalamazooGourmet.com72
 Loading...