

Kaito KA600L User Manual

KA600L
PM
AIR
FM
AM
WB
NOAA
ENABLE
DISABLE
ALL
MULTIPLE
SINGLE
COUNTY
VOICE
SIREN
ZZZ
ALERT
%
FM/A M/SW/ LW/ WE ATH ER MULTI-B AND REC EIVER
DYNA MO & SOLA R POWER SUP PLY
WITH F LASHL IG HT & READIN G LIGHT
TEMP ERATURE AND H UM IDITY IND ICATO R
OPERATION MANUA L
D
T
E
BATT
SOLAR/CR ANK
ADAPTOR
METER

KEY FEATURE S
Than k You:
Than k you for p urcha si ng the KA 600L multi- ba nd
rece iver. Pl ease re ad t he manu al thor oughl y be fore
oper ating a nd keep t hi s book in a s afe pla ce for fu tu re
refe rence .
FM Ban d: 87.0 -1 08.0M HZ
AM (10 K): 520 -1 710KH z
AM (9K ): 522- 17 10KHz
SW: 2300 -2300 0K Hz
LW: 15 0-521 KHz
WEATHER C H1-CH 7
POWE R SUPPLY Lithi um B atter y
Adapt er
CHAR GING Li thium B at tery:
Dyna mo Char gi ng
Exte rnal Ada pt er Char ging
Sola r Charg in g
Char ging vi a PC
The ra dio can c harge c el lphon e, MP3, M P4
and ot her gad gets.
LED fl ashli ght plu s 5- LED rea ding la mp
Buil t-in dy namic w id e range s peake r for
crys tal cle ar soun d.

INDEXINDEX
LOCATIO N OF CONT RO L.... ..... ..... .. ..... ..... ....... ... 1
POWE R ON AND POW ER OFF
Powe r On and Po wer Off.... ..... ..... .. ..... ..... ..... .. ... 4
Slee p Timer.. ....... ..... ..... .. ..... ..... ..... .. ..... ..... ..... 4
Alarm O n and Alar m Off. ..... ..... ..... .. ..... ..... ..... .. .. 5
RADI O OPERATIO N
Adjus t the Volu me... .. ..... ..... .. ..... ..... ..... .. ..... ..... 7
Band S elect ion.
Sele ct AM Step ....... ..... ..... ...... .. ..... ..... ..... .. ..... . 9
TUNING I NTO STATIO NS
Manu al Tunin g in Stat io ns... ..... ....... ..... ..... .. ..... . 9
Auto Sc an Tunin g.... .. ..... ..... .. ..... ..... ..... .. ..... ..... 10
Dire ct Freq uency Ent ry...... ..... .. ..... ..... ..... .. ..... . 10
Auto Tun ing Sto rage. .. ..... ..... .. ..... ..... ..... .. ..... ... 12
List ening t o Prese t St ation ..... ....... ..... ..... .. ..... .. 1 3
Manu al Tunin g Stora ge ..... ..... ....... ..... ..... .. ..... .. 1 4
Dele te Pres et Statio ns... ..... .. ..... ..... ..... .. ..... ..... 1 5
FM RDS ..... .. ..... ..... ..... .. ..... ..... ..... .. ..... ..... .. ..... .. 1 6
WEATHER R ECEPT IO N
List ening t o the We ather R eport ..... .. ..... ..... ..... .. 17
Weathe r Emerg en cy Rece ption ..... .. ..... ..... ..... .. 18
SET THE DATE... ....... ..... ..... .. ..... ..... ..... .. ..... ..... .. 19
.... ..... .. ..... ..... ..... .. ..... ..... ....... .. 7
SET THE CLOC K.... .. ..... ..... ....... ..... ..... .. ..... ..... ..... .. 20
HUMI DITY and TEMP ER ATU RE DISP LAY... ..... .. ..... .. 21
USIN G FLASH LIGHT.... ..... ..... .. ..... ..... ..... .. ..... ..... ... 2 1
USIN G READI NG LIGHT... ..... ..... .. ..... ..... ..... .. ..... .... 21
KEY LOCK F UNCTI ON ..... ..... ..... .. ..... ..... ....... ..... ..... 22
RESE T THE UN IT..... .. ..... ..... ....... ..... ..... .. ..... ..... ..... 2 2
POWE R SUPPLY
Lith ium Bat tery .... ..... ..... .. ..... ..... ..... .. ..... ..... ....... . 23
Adapt er.... ....... ..... ..... .. ..... ..... ..... .. ..... ..... ....... ..... . 25
CHAR GING Li thium B at tery
Dyna mo Char ging. .. ..... ..... .. ..... ..... ..... .. ..... ..... ..... . 26
Exte rnal Ada pter Ch ar ging ... ..... ..... .. ..... ..... ..... .. ... 27
Sola r Charg ing.. .. ..... ..... .. ..... ..... ..... .. ..... ..... ..... .. . 27
Char ging vi a PC... .. ..... ..... .. ..... ..... ..... .. ..... ..... ..... 27
CHAR GING GA DGETS.. ..... ..... .. ..... ..... ..... .. ..... ..... .. 28
PREC AUTIO NS..... ..... ..... .. ..... ..... ..... .. ..... ..... ....... .. 29
SPEC IFICATIO N. ..... ..... ..... .. ..... ..... .. ..... ..... ..... .. ..... 30
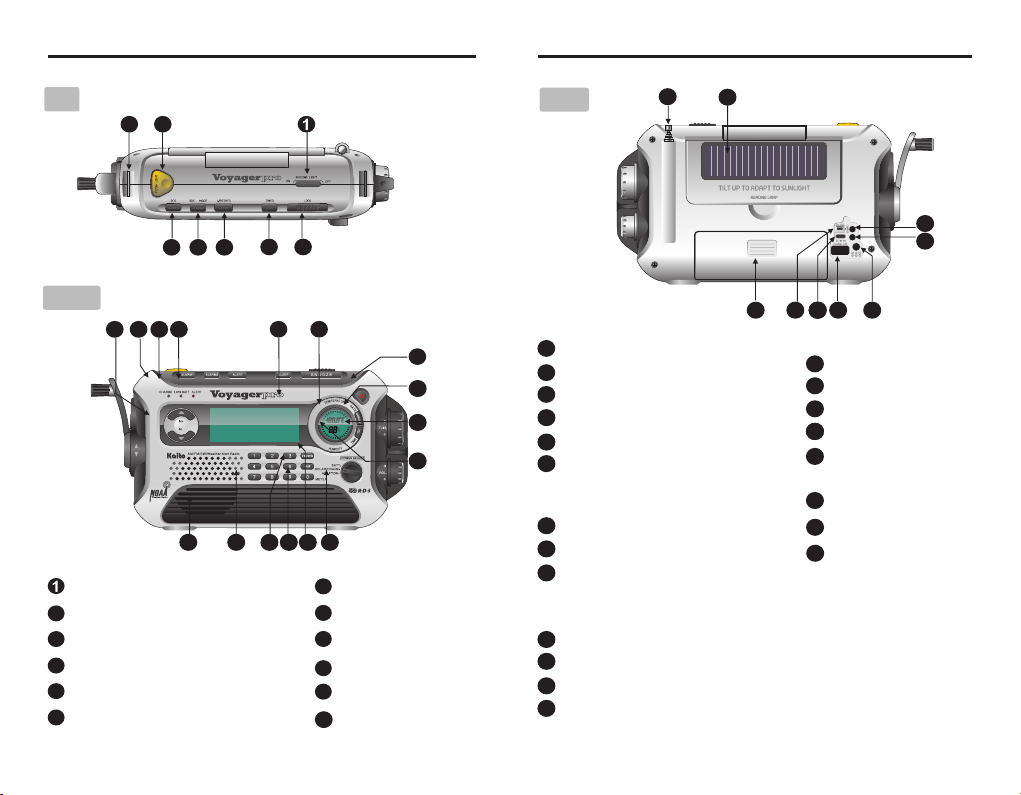
LOCATION OF CONTR OLS
%
TOP
3
2
4
5
7
6
LOCATION OF CONTR OLS
26
REAR
8
25
EAR
EAR
LINE IN
LINE IN
33
32
FRONT
15 14
13
12
16 1817 19 2 0 2 1
Reading Light Switch
Flashlight Button
2
Hand Strap Hole
3
<RDS>/<ALARM1> Button
4
<RDS MODE>/<ALARM2> Button
5
6
<ALERT> Button
11
10
9
24
23
22
<LOW BATT> Light
13
<CHARGE> Light
14
15
M+/M- Button
16
16
Speaker
Numeric Button
17
18
<AM> Button;
27 28 242429 30 31
Power On:select AM
Power Off: select step 9K/10K
19
Numeric 0 Button:select meter band
20
<FM/WB> Button
21
7
<SLEEP> Button
<SNOOZE> Button
8
9
<Power> Button
10
Temperature Indicator
11
LCD Display
12
<ALERT> Light
<POWER SELECT> Switch
LITHIUM:Lithium Battery and Solar Panel
ADAPTOR:External Adapter
Humidity Indicator
22
<DELETE> Button
23
<MEMORY> Button
24
25
Front:Solar Panel; Rear: Reading Light
1 2
26
Telescopic Antenna
27
Battery Compartment
<CHARGE> Switch
28
242429
<DC IN 5V> Port
30
<CHARGE OUT>
Port
31
<DC IN 6V> Jack
32
Line-in Jack
33
Earphone Jack
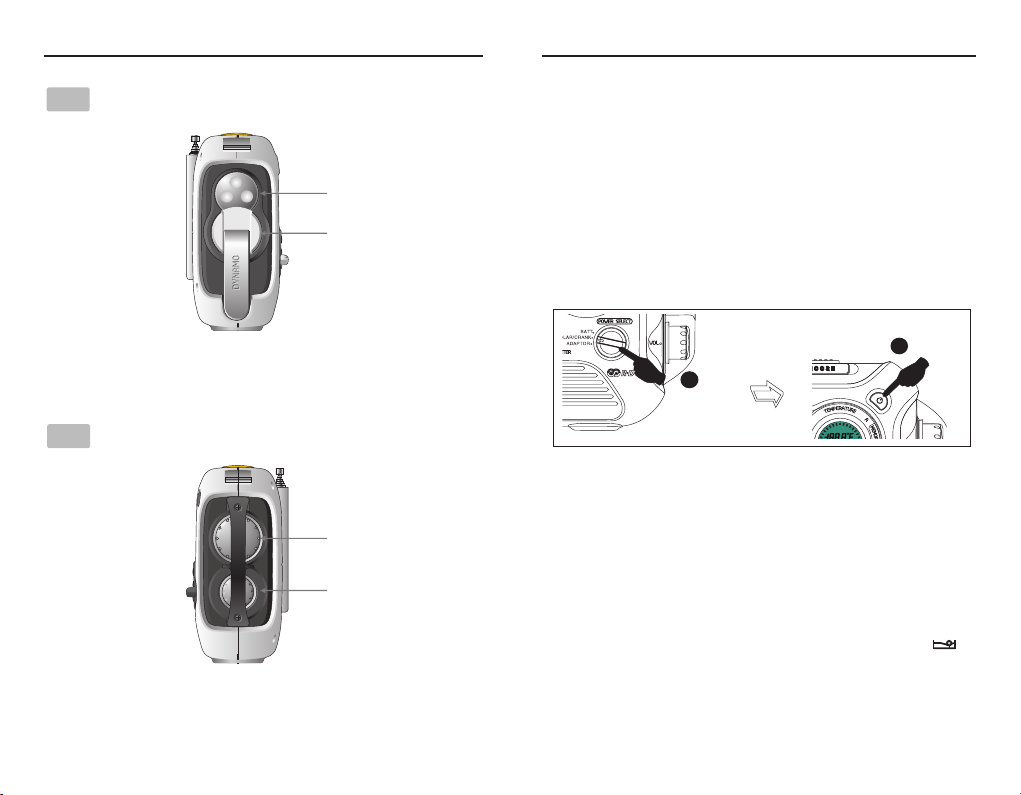
POWER ON/PO WER OFFLOCATION OF CONTR OLS
D
T
E
LEFT
RIGHT
Flashlight
Crank Handle
<TUN> Knob
<VOL> Knob
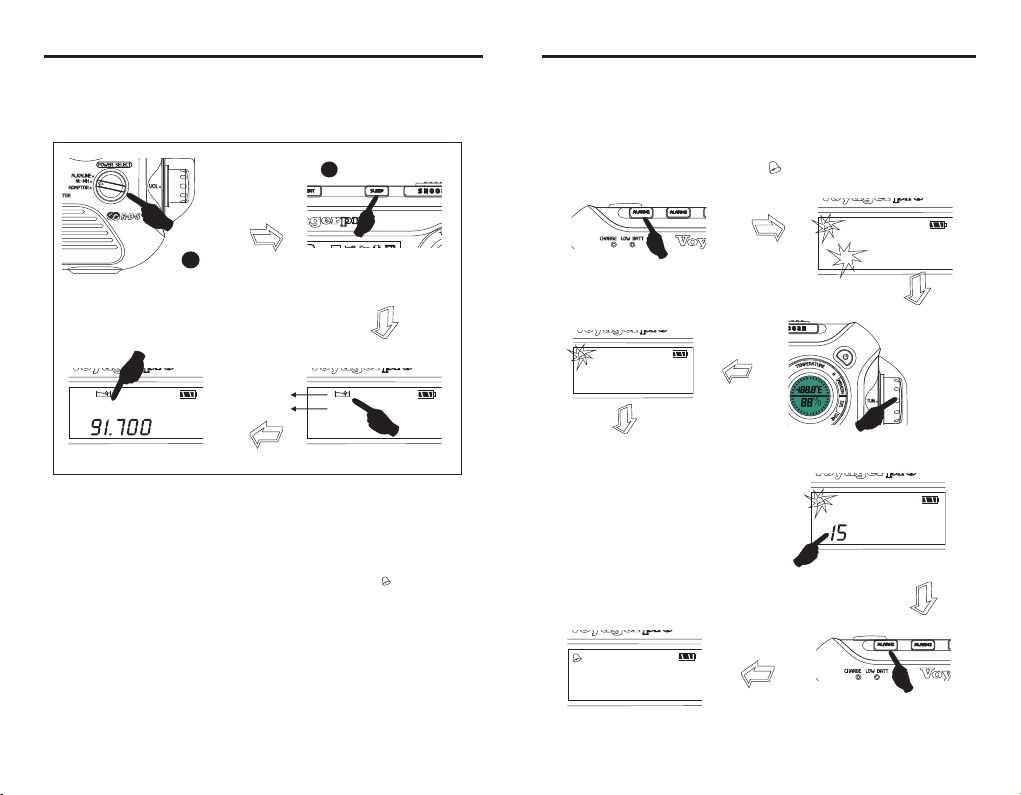
Power On and Po wer Off
1.Rotate the <POWER SELECT> to the valid charging
position.
SOLAR/CRANK/BATT..:Lithium battery
ADAPTOR. : Adapter
2.In the unit off mode, press the button <POWER> to turn on
the unit, press the button <POWER> again to turn off the
unit.
Power
9
21
Power Select
Sleep Timer
1.Ro tate th e <POWER SE LECT> t o the val id char gi ng
posi tion.
2.In t he unit o ff m od e, pres s the but ton < SLE EP >
repe atedl y to sele ct y our des ired sl eep tim er f rom
05 to 90 m inute s.
3.If y ou sele ct the slee p timer, t he unit w ill tur n on
auto matic ally af te r a few sec onds wi th the ic on " "
and th e
4. Whe n reach ing you r se tting s leep ti me,th e un it will
turn o ff a utoma ti ca
minu tes app earin g in t he disp lay.
lly.
3
4
%
D
T
E
POWER ON/PO WER OFF
VOICE
POWER ON/PO WER OFF
NOTE: If t he u nit t ur n on b y pr ess in g th e butto n< PO WER >, yo u ca n
also se le ct t he sl ee p ti me r by pr es si ng the bu tt on < SLEEP > sh or tly t o
selec t yo ur d esi re d sl ee p tim er.
Sleep Timer
7
Power Select
21
Sle ep T im er Ic on a nd S leep Ti me r
Sle ep T im er Ic on
89 M ON O
FM
Sle ep T im er
05-9 0-60- 30-10 -0 5
90
:
PM
05 39
Alarm On/Of f
The un it has tw o alarm f un ction s: alar m1 and al ar m2.
1.In t he unit o ff m od e, pres s and hol d the but ton
<ALA RM1> or < ALARM 2> w ith the i con " " fla shing
to ent er the al arm on/off fu nctio n.
The sett ing ord er : hour, mi nute, p reset ting off time .
2. Pre ss the bu tton <ALA RM1> or < ALARM 2> to ent er
the ne xt sett in g.
3. Rot ate the k nob <TU N. > to adju st the al arm
time a nd pres etting off ti me.
5 6
Example:Set the ALARM1 on at 8:05, and alarm off
after 15 minutes.
A. In the unit off mode, press and hold the button
<ALARM1> with the icon " " and the hour flashing.
1
1
Di al T IME
:
Press and Hold ALARM1
B. Rotate the knob <TUN.> to adjust the hour.
1
Di al T IM E
:
08 3 0
C. Press the <ALARM1> and
then rotate the knob <TUN.>
to adjust the minute. Press
the button <ALARM1> to
… …
set the off time by rotating
1
the knob <TUN.>
D. Press the button <ALARM1> shortly to confirm.
1
24 -a eg- 2010
:
08 05
03 30
Hour Flashes
1
Di al d elay
Off Time:01~99 minutes
Press S ho rt ly
 Loading...