

Kaito KA2031 User Manual
4
5
2
BATTERY OPERATION
("+" and "-")
1. Open the battery compartment cover.
2. Insert 3 AA size batteries into the compartment, make sure the polarity
is correct as shown on the diagram
POWER SOURCE
SPECIFICATIONS
Power Source 3 AA size batteries(DC 4.5V)
F r e q u e ncyRange
A M 5 2 0 - 17 10 K Hz
F M 8 8 - 1 0 8 M H z
T V C H 2-C H 13 MHz
W B C H 1-C H 7 MHZ
C H A N N E L FREQUENCY
1 162.550MHz
2 162.400 MHz
3 162.475 MHz
4 162.425 MHz
5 162.450 MHz
6 162.500 MHz
7 162.525 MHz
Speaker 8Ohms 1 W
Power Output 200 mW
Output Jack Earphone 32 Ohm
For any further information, please visit our website www.kaitousa.com
Or contact us at toll free number 1-866 524 8676, 909 628 6088
Kaito Electronics,Inc
5185 Cliffwood Drive, Montclair CA 91763 USA
6
1
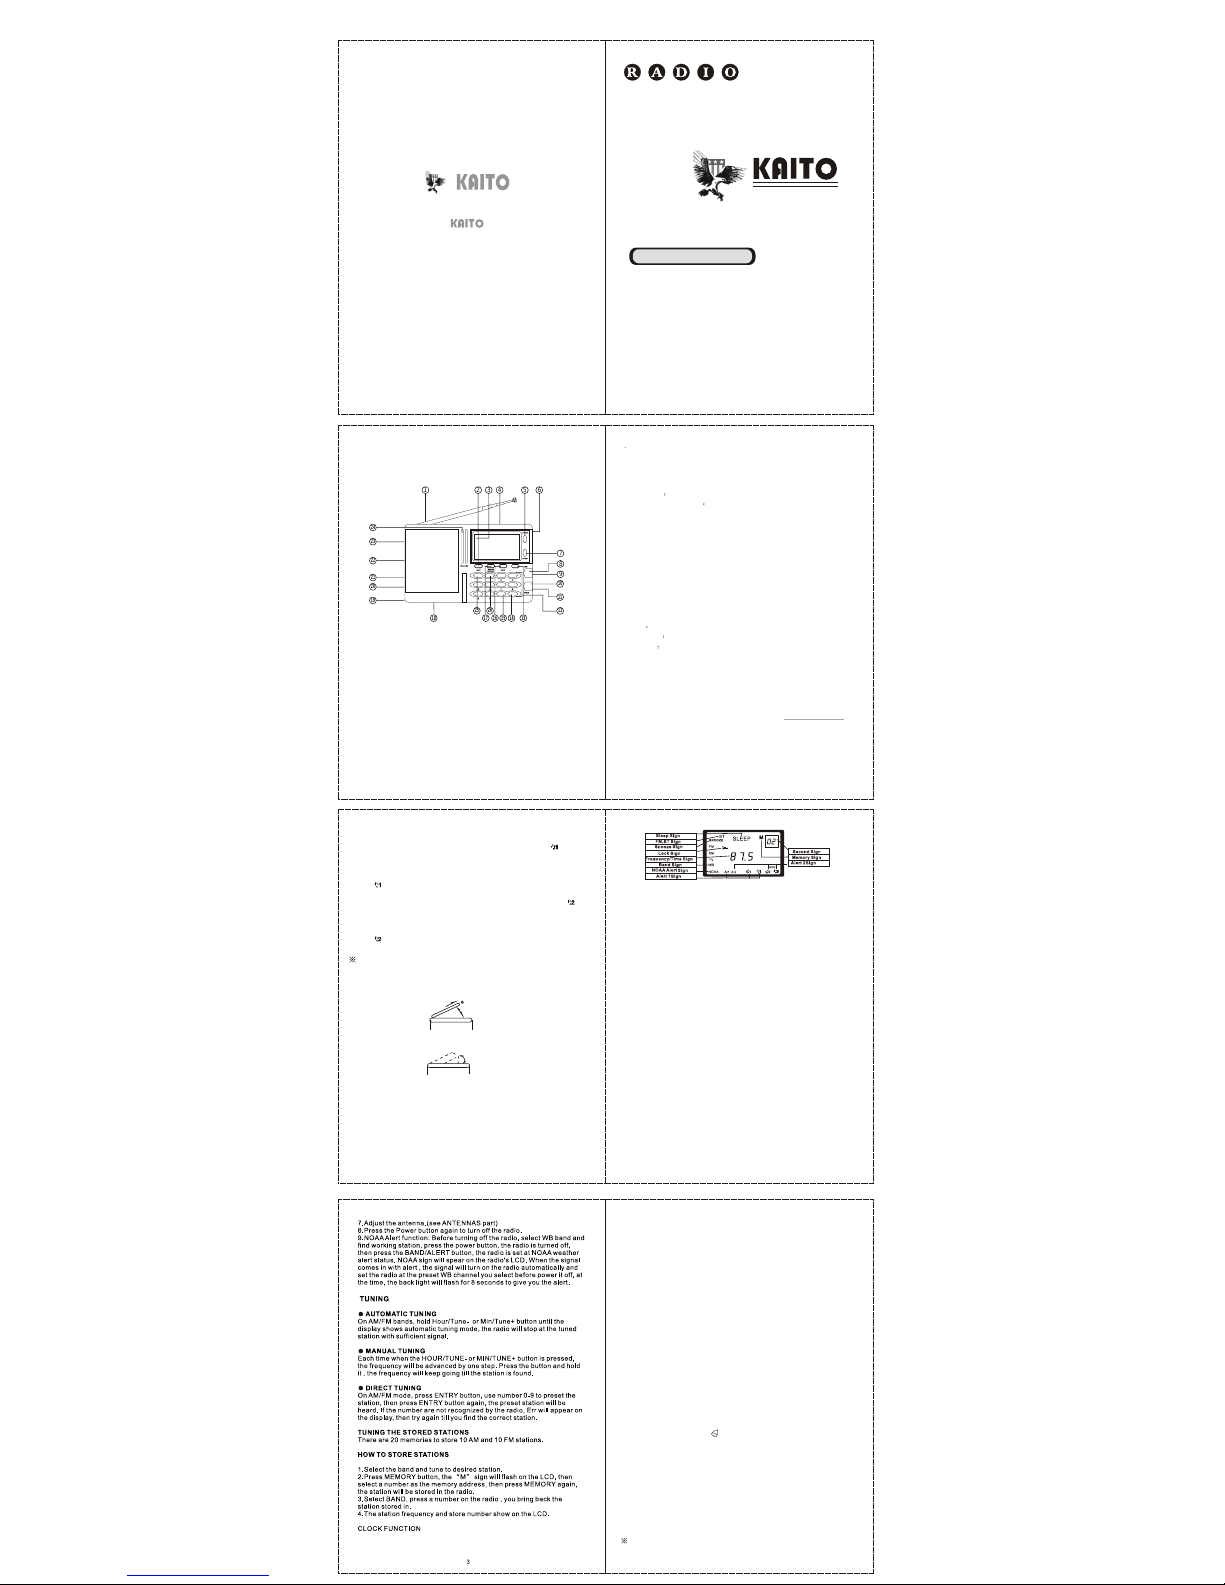
1. Telescopic Antenna
3. LCD
7. STAND BY/SLEEP
8. Tuning UP/MIN Set
10.Tuning DN./HOUR set
11. Lock Switch
12.Preset 0......9
2. Back Light Button
4. Stand (On the back side)
5. Power Button
6. Carrying Strap Holder
9. Volume Control Knob
13. Snooze Button
15. BAND Selector
17. TIME SET/MEMORY
19.Battery Compartment
20.DC Jack
21.Earphone Jack
22.DX/Local Switch
24.Volume Indicator
14. Enter Button
16. Mode Button
18. Reset (Inside battery compartment)
23. Extend Antenna Jack
25. 1/AL Set ( Alarm Set 1)
26. 2/AL Set ( Alarm Set 2)
5321 4
6
24
23
22
21
20
19
18
17
16 15 14 13
12
11
7
9
8
10
BAND/ALERT ENTER
SNOOZE
AM/FM ST/TV/WB/NOAA PLL SYNTHESIZED STEREO WORLD RECEIVER
1/ALL1 SET 2/ALL12 SET
25 26
KA2031 is manufactured for
Electronics,Inc(USA) by Kaito Enterprises Corp. In China
www.kaitousa.com
KA2031
130X93MM
PLL Digital Radio
Buttons and Names
TO PREVENT POSSIBLE DAMAGE TO THE RADIO
1.Load the batteries with correct polarity.
2.If the radio is not used for a long time, remove all the batteries out
and put it in a safe place. Avoid extreme hot or cold.
3.Remove the low batteries as soon as the sound volume gets low or
hard to receive stations.
4.Do not mix the new and low batteries when you put the batteries in.
TO USE THE AC ADAPTOR (Optional)
If you try use the AC adaptor, make sure the voltage and output polarity
is correct as specified in the radio.
RADIO OPERATION
1.Set LOCK switch to OFF.
2.Press POWER button to turn on the radio.
3.Adjust the volume to a proper level.
4.Use BAND/ALERT ( Band Selector15) to change bands between
AM/FM/TV/WB.
5.Press the Light button, the backlight will last for 8 seconds.
6.To tune the radio, you can key in or step search for the AM/FM
stations; for TV and Weather bands. On AM/FM bands, you can use the
tuning button or numbers to direct key in the frequency; in TV/WB band,
just press the tunning button to select the channels.
1. SETTING CLOCK MODE
2. ADJUSTING THE CLOCK
SLEEP TIMER
1. When the radio is turned on, press the SLEEP button, then
90 and " SLEEP " will appear on LCD. You can select the desired time
from 10 to 90 by pressing the SLEEP button, and the radio will turn off
automatically at the preset time. If the knob is pressed again, the sleep
function is cancelled.
TO SET THE ALARM TIME
YOU CAN SET TWO ALARM TIME
1. Turn off the radio;
2. Press 1/AL1 SET button, " 1 " will appear on the display. T hen p ress
TIME SET MEMORY button twice, " Al1 " will appear on the display. T he alarm
time will flashon the LCD, meanwhile press H OUR/TUNE- or MIN/TUNE+
button seperately as many times as n eeded t ill the required time is reached.
After the time flash several times,
3.When you hear the unit alarm, p ress SNOOZE button, the radio will stop
alarm, but 8 seconds later, the radio will alarm again.
Note: You have to choose AM/PM Properly.
the radio is set with the a lert 1. Then press the
POWER button to turn on the radio a nd listen to the radio.
To cancel the a lert time, press the 1/AL1 button again, th e alert is cancelled.
To select second alert, use the button 2/AL2 Set button a s the step stipulated
above.
When the radio is off, the current time displays on the LCD. When the
radio is on, press MODE button, it switches among the modes: time,
alert1, alert2, frequency and time repeatedly. If it is set to time mode, 4
seconds later, it will go back to frequency mode automatically.
When the radio is OFF, press TIME SET button, the clock number will
flash, then use the HOUR/TUNE+ button to adjust Hour, and
MIN/TUNE- button to adjust minute. After a few seconds, the time is
set automatically.
FM/TV/WB
AM
AM
The built in ferrite antenna will give you a good reception on AM, but you need
to adjust the direction to get the max reception on the AM station.
TWO TURN-ON TIMERS
The radio can be turned on at two different time.
1.When the radio is turned off, press 1/AL1 SET button twice, the " " will be
shown on the LCD display, then press TIME SET MEMORY button twice, the "
AL1 " will be shown and you can press HOUR/TUNE- and MIN/TUNE+
seperately to adjust the time. After the time flash several times, the radio wil
display " " and clock. The radio will be turned on at the preset time.
Press1/AL1 SET button, the function is cancelled.
2.When the radio is turned off, press 2/AL2 SET button twice, twice the " " will
be shown on the display, then press TIME SET MEMORY button three times, the
"AL2" will be shown and you can press HOUR/TUNE- and MIN/TUNE+
seperately to adjust the time. After the time flash several times,the radio wil
display " " and clock. The radio will be turned on at the preset time. Press
2/AL2 SET button, the function is cancelled.
Note: Make sure you select AM/PM Properly.
ANTENNAS
FM/TV/WB
Pull out the telescopic antenna and adjust its length and angle for optimum
reception.
5 Never get the radio to a chemical that might damage the case of the radio.
RADIO MAINTENANCE
1.
2.
3.
4.
If the radio is not used for a long time, remove the batteries from the battery
compartment to prevent possible battery leakage.
The radio should be kept in a place with no extreme heat or cold. Do not get
the radio in a very humidity place and never get any liquid into the radio.
Take the radio with care, any shock may damage the parts inside.
When use the radio in a moving vehicle , a cement building , use the radio
close to the open window for better reception. Any metal will have interference
on the reception.
With AM/FM/TV/NOAA Weather Bands
Disclaimer:
Due to the signal strength changes in different areas in the country, the
radio is not guaranteed to receive the NOAA alert signals, Kaito
Electronics Inc. is not responsible for any damage or loss due to the
NOAA signal is not received.
 Loading...