

Kaito KA1123 Operation Manual
KA
KA
KA
KA 112
112
112
112 3
3
3
3
FM
FM
FM
FM STEREO
STEREO
STEREO
STEREO ·
·
·
· MW
MW
MW
MW ·
·
·
· SW
SW
SW
SW DSP
DSP
DSP
DSP RECEIVER
RECEIVER
RECEIVER
RECEIVER /
/
/
/
MP3
MP3
MP3
MP3 PLAYER
PLAYER
PLAYER
PLAYER /
/
/
/ DIGITAL
DIGITAL
DIGITAL
DIGITAL RECORDER
RECORDER
RECORDER
RECORDER
Operation
Operation
Operation
Operation Manual
Manual
Manual
Manual

KEY
KEY
KEY
KEY FEATURES
FEATURES
FEATURES
FEATURES
● FM Band: 87.0 - 108.0 MHz or 64.0 – 108.0 MHz
● MW Band: 522 - 1710 KHz
● SW Band: 2.30 - 23.00 MHz
● 225 Memory Presets
● Auto Tuning Storage (ATS)
● Sleep Timer Function (05 - 90 minutes)
● Directly FM/MW/SW Recording and Built-in MIC
Recording Function
● Support MP3 and WMA Decode
● MP3 A-B Repeat
● 3 Kinds of Play Modes
● Built-in Flash Memory
● Mini-USB 2.0 Jack (High Speed)
● Key Lock Function
● Battery Power Levels Display
● LED Backlight
● Digital Volume Control
● Use 3 x AAA Size Batteries
● Radio Size: 110x69x13mm
● Accessories: Stereo Earphones, 3 x AAA Size Ni-MH
Batteries, USB Cable, Carrying Case and User Manual
NOTES:
NOTES:
NOTES:
NOTES:
1. Press Shortly: about 0.2 second; Long Press: about 2~3 seconds .
2. Please copy the files frequently. Our company will not answer for
the data destroying and losing.
3. The functions and LCD displays will be changed because of the
updated software, please take the unit as the standard.
4. Please await for a short time after changing the working mode or
operating some orders, then the unit will respond.

INDEX
INDEX
INDEX
INDEX
LOCATION OF CONTROLS...............................................1
LCD DISPLAY .....................................................................3
POWER SUPPLY ................................................................4
POWERED BY BATTERIES........................................4
BATTERY POWER
DISPLAY .......................................4
CHARGING..................................................................4
Charged by the Adaptor........................................5
Charged by the PC...............................................5
POWER ON/OFF & LOCK SWITCH..................................6
RECEPTION OF
A
RADIO.................................................7
SELECT THE BAND...................................... . .............7
ADJUST THE VOLUME...............................................7
TUNING IN STATIONS................................................8
Manual Tuning in
Stations.....................................8
Auto Tuning in Stations.........................................8
Setting the FM
Range.............. …… ......................8
Using the Antenna................................................9
SAVING STATIONS...................................................10
Manual Saving....................................................10
Auto Tuning Storage (ATS).................................11
Recall the Stored
Frequency...............................11
DELETE THE PRESET STATIONS...........................12
DIRECTLY MW (AM) / FM
RECORDING...................13

ADJUST THE DATE AND TIME........................................14
SET THE MW (AM) STEP & CLOCK MODE....................16
INDEX
INDEX
INDEX
INDEX
SET THE ALARM FUNCTION..........................................17
SET THE ALARM TIME.............................................17
SET THE ALARM MODE...........................................17
OPEN / CLOSE THE ALARM FUNCTION.................17
CONNECT THE RADIO AND PC.....................................18
SORT RULERS FOR FOLDERS & FILES........................19
PLAY MP3 & RECORD FILES..........................................20
PLAY MP3
FILES.......................................................20
Play / Pause / Stop.............................................20
Select the Folder.................................................20
FF / RW
Play.......................................................21
Select the Play Modes........................................21
A-B Repeat.........................................................21
Delete the MP3 Files..........................................22
PLAY THE RECORD FILES......................................23
Record................................................................23
Play the Record
Files..........................................2 4
NOTE ERROR..................................................................25

SPECIFICATIONS............................................................26
1
LOCATIOIN
LOCATIOIN
LOCATIOIN
LOCATIOIN OF
OF
OF
OF CONTROLS
CONTROLS
CONTROLS
CONTROLS
FRONT
FRONT
FRONT
FRONT
1. Power On/Off
11.
Working Mode Switch
2. Memory; Play ; Set FM Range 12. Telescopic Antenna
3. Freq. +; Music + 13. Neck Strap Hole
4. Freq. -; Music - 14. LCD Display
5. Delete (Memories, MP3 Files, 15. Earphone Jack;
Record Files); Stop Playing Built-in MIC Jack
6. Station -; Folder -; Adjust Time;
12H / 24H Clock Mode Setting
7. Speaker
8. Station +; Folder +; Adjust Date; MW Step 9K / 10K Setting
9. A-B Repeat; Record
10. MW/SW Band Switch; Play Mode Selection
2
LOCATION
LOCATION
LOCATION
LOCATION OF
OF
OF
OF CONTROLS
CONTROLS
CONTROLS
CONTROLS
REAR
REAR
REAR
REAR RIGHT
RIGHT
RIGHT
RIGHT SIDE
SIDE
SIDE
SIDE
16. VOL +
17. VOL -
18. Lock Switch
19. USB Jack / Charging Jack
20. Reset
21. Battery Compartment
3
LCD
LCD
LCD
LCD DISPLAY
DISPLAY
DISPLAY
DISPLAY
LCD
LCD
LCD
LCD DISPLAY
DISPLAY
DISPLAY
DISPLAY WHILE
WHILE
WHILE
WHILE RECEIVING
RECEIVING
RECEIVING
RECEIVING THE
THE
THE
THE FM
FM
FM
FM
BROADCAST
BROADCAST
BROADCAST
BROADCAST
LCD
LCD
LCD
LCD DISPLAY
DISPLAY
DISPLAY
DISPLAY WHILE
WHILE
WHILE
WHILE PLAYING
PLAYING
PLAYING
PLAYING MUSICS
MUSICS
MUSICS
MUSICS

4
POWER
POWER
POWER
POWER SUPPLY
SUPPLY
SUPPLY
SUPPLY
POWERED
POWERED
POWERED
POWERED BY
BY
BY
BY BATTERIES
BATTERIES
BATTERIES
BATTERIES
1. Open the battery cover.
2. Install 3 new rechargeable or alkaline batteries (AAA size),
then close the battery cover.
3. Turn on the unit.
Install the batteries correctly After installing the batteries,
according to the battery polarity. the LCD displays as above.
NOTES:
NOTES:
NOTES:
NOTES:
1. Please don't mix the used batteries with new ones.
2. Please don't mix the rechargeable batteries with the alkaline ones.
3. Please don't charge the alkaline batteries.
4. When the radio is not being used for a long period, remove the
batteries to avoid leakage and corrosion. If battery leakage occurs,
wipe the battery compartment with a soft cloth before inserting new
batteries.
BATTERY
BATTERY
BATTERY
BATTERY POWER
POWER
POWER
POWER DISPLAY
DISPLAY
DISPLAY
DISPLAY
1. Full 2. Medium
3. Lower, please replace 4. Exhausted, the unit will
the new batteries. turn off automatically.
CHARGING
CHARGING
CHARGING
CHARGING
You
can charge the radio by the adaptor with the mini USB
jack " ", which can charge for MP3, MP4 and cell
phone.
You
can also charge the radio by the PC.
5
POWER
POWER
POWER
POWER SUPPLY
SUPPLY
SUPPLY
SUPPLY
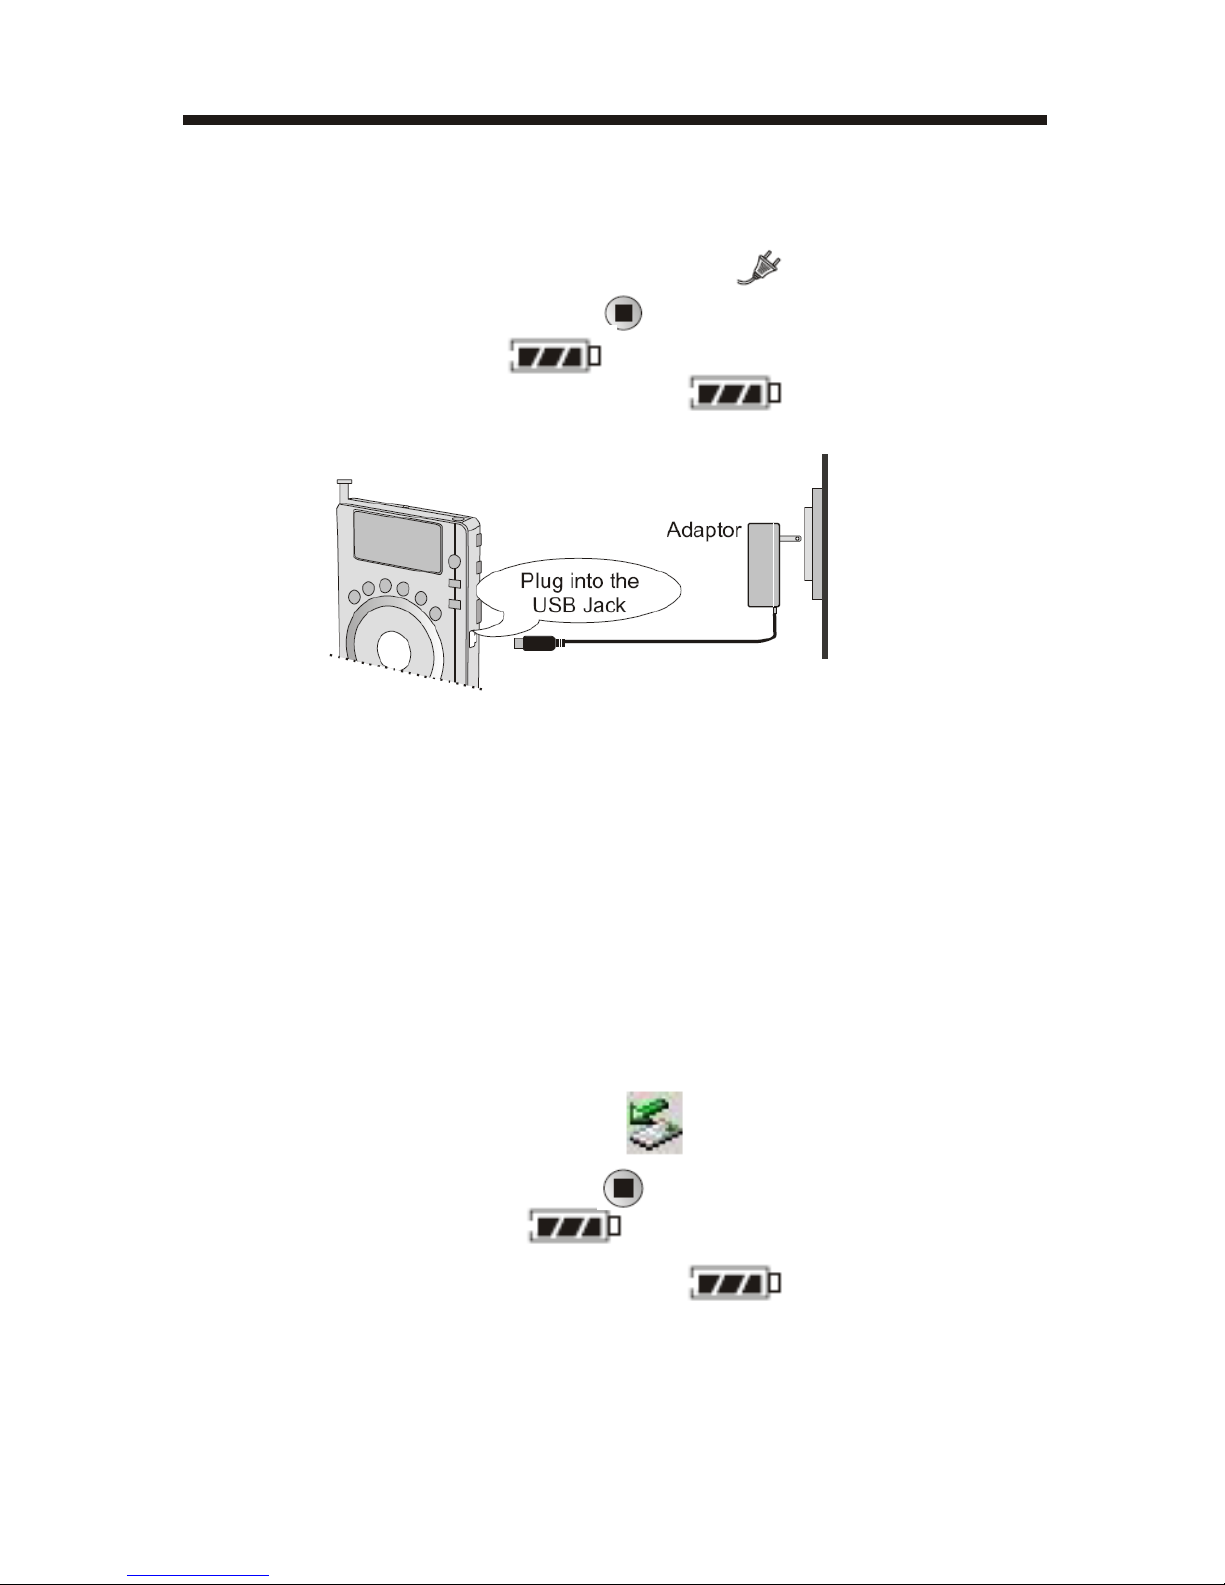
Charged
Charged
Charged
Charged by
by
by
by the
the
the
the Adaptor
Adaptor
Adaptor
Adaptor
1. Install 3 AAA size rechargeable batteries correctly.
2. Plug one port of the adaptor into the AC socket and plug
the other port into the USB jack, " " will display.
3. With the radio off, press < > shortly
to
charge. The
battery power icon " " flows.
4. When the battery power is full, " " stops flowing.
Please disconnect the adaptor and the radio.
NOTES:
NOTES:
NOTES:
NOTES:
1. While charging, please make sure the connection is ok.
2. You can know the charging time (about 2 ~ 7 hours) according to
the capacity of the rechargeable batteries.
3. Please only use the supplied adaptor for charging the radio. While
listening to the radio, please use the batteries instead of the
adaptor to avoid the disturb.
4. Please plug or unplug the adaptor with the radio off.
Charged
Charged
Charged
Charged by
by
by
by the
the
the
the PC
PC
PC
PC
1. Plug one port of the supplied USB cable into the USB jack
of the PC and the other port into the USB jack of the radio.
2. After connecting correctly, " " will display in the task
bar.
3. With the radio off, press < > shortly
to
charge, and the
battery power icon " " flows.
4. When the battery power is full, " " stops flowing.
Please disconnect the PC and the radio.
NOTE:
NOTE:
NOTE:
NOTE:
If you want to charge the unit by the PC in "MP3" or "REC" mode,
please turn o ff the unit first and then connect the unit and PC via the
supplied USB cable.
 Loading...