

Kaito KA1121 User Manual
Copyright 2007, Kaito Electronics, Inc.
For update information, visit www.kaitousa.com
Version 1.0, Printed in China

OPERATION MANUAL
The KAITO KA1121 is a frequency synthesized radio receiver with an integrated MP3
recorder/player that covers longwave, AM, shortwave, FM and NOAA weather radio bands. The
MP3 player can be used to record what is received on the radio or it can be used as a conventional
stand-alone MP3 player.
What!s included with the KA1121?
Kaito KA1121 radio with built-in MP3 player
Soft case
Quick reference guide
User Manual
AC adaptor
3 AA rechargeable (TYPE?) batteries
DF6 Ni-MH rechargeable battery for the MP3 player
Stereo earphones
External wire antenna
Warranty card
Installation CD-ROM
USB cable
MAIN FEATURES
The radio and MP3 player can work as a single integrated unit or can be used independently of
each other.
A built-in timer exists to control the on/off switching of the radio and MP3 player.
FM direct recording and external microphone recording is possible using the MP3 player.
Alphanumeric display of up to 100 user-set station names, 400 frequency memories.
LW/MW(AM)/SW dual conversion technology for superior reception results.
PC-based editing of the receiver!s frequency and station name memories.
Local, normal and distant radio sensitivity settings.
Fast/slow tuning speed selection.
External antenna jack.
28x64 matrix LCD display.
MP3 player supports WAV and WMA formats.
MP3 or microphone standalone MP3 player recording.
MP3 player A-B repeat function.
Four playback cycle modes, 6 equalizer configurations for the MP3 player.
Built-in high quality speaker
Power Supply: 3 "AA! Batteries (Radio), 1 DF6 Battery (MP# unit) and AC Power Adapter.

INDEX
Location of controls..........…………………………..1
Power supply......................................................... 3
Using the radio and MP3 Player together...............5
Setting the radio clock.............................................5
Volume control.........................................................5
Keypad lock/unlock................................................. 6
Menu functions........................................................ 6
Tuning the radio.....................................................14
Quick operations.....................................................15
Editing the FREQTXT file........................................16
Active amplifier...................................................... ..16
Using the radio without the MP3 player....................17
How to use this radio................................................ 19
FM mono/stereo ........................................................19
Local/normal/DX sensitivity selection.........................19
Selecting narrow or wide reception bandwidth.......... 19
SSB/CW reception modes..........................................20
NOAA weather band....................................................20
Using the MP3 player with the radio............................ 21
Using the MP3 player without the radio....................... 27
Connecting to a PC and transferring data.....................29
How to upgrade firmware...............................................30
Lyric display....................................................................31
Frequently asked questions.....………………………......33
Specifications ................................................................ 35
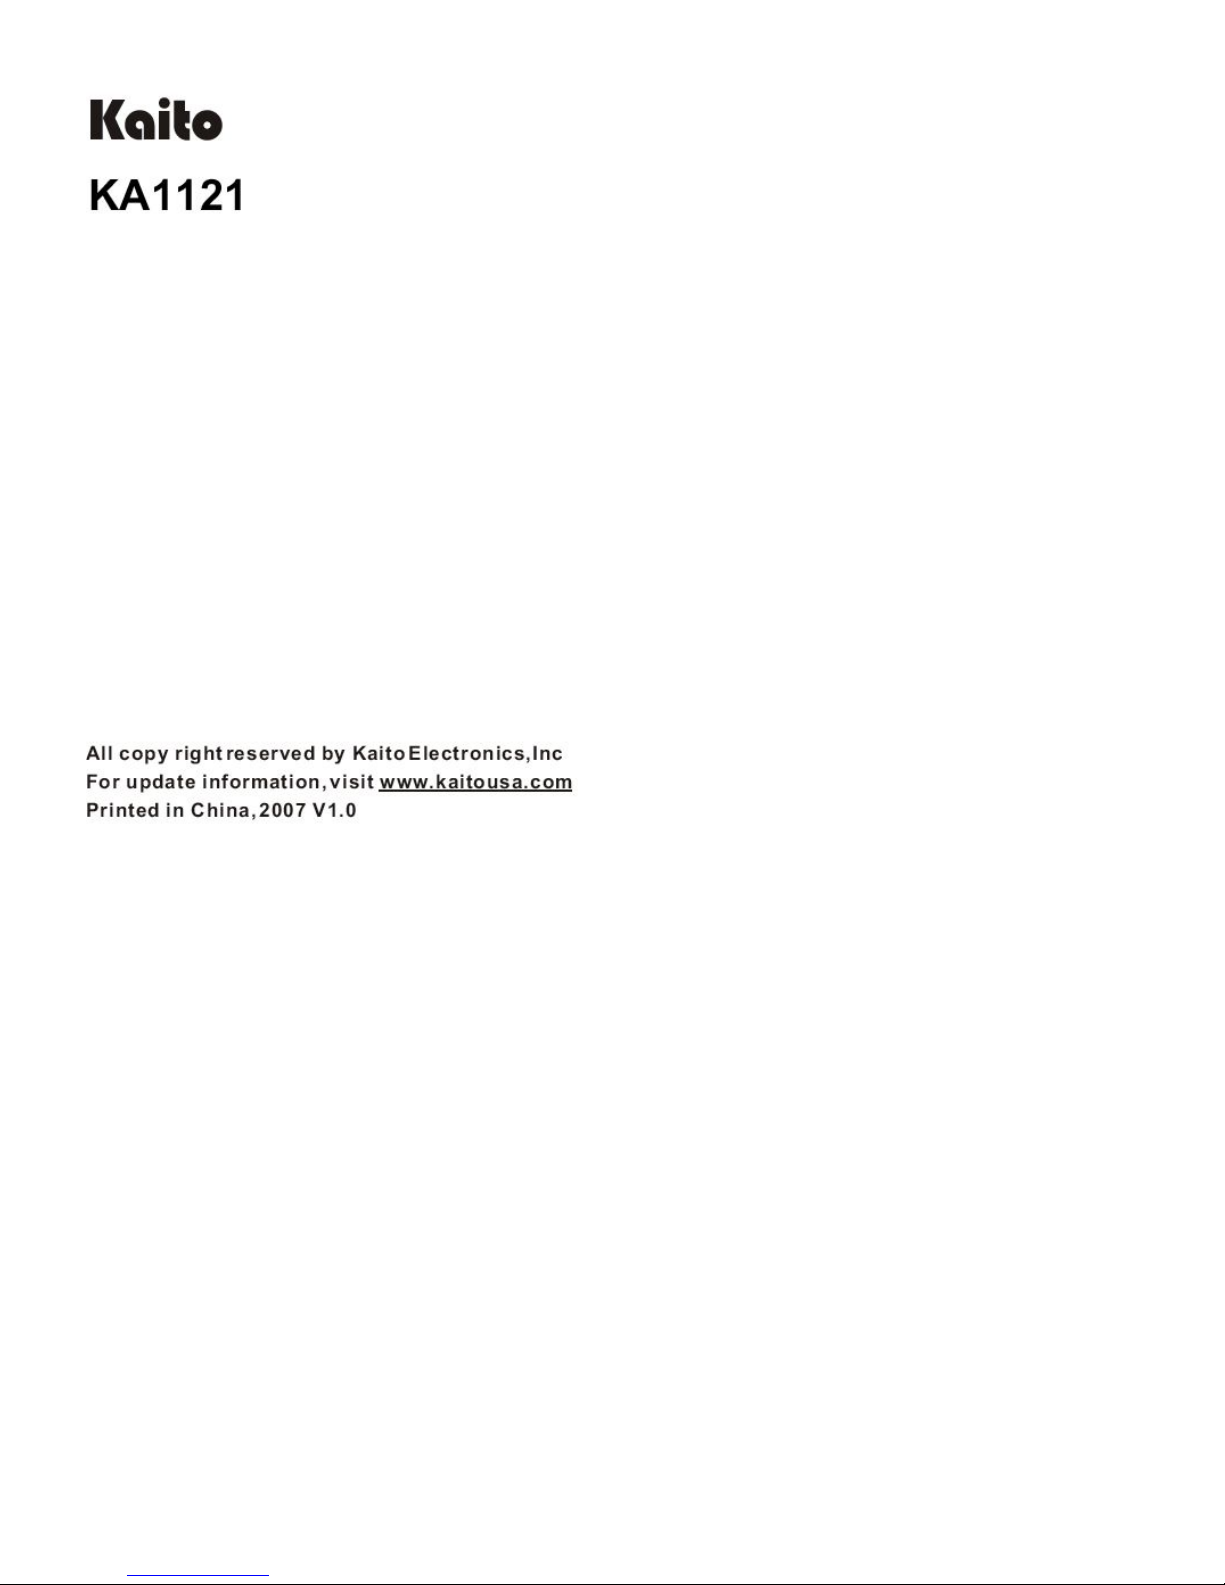
Page One:
LOCATION OF CONTROLS
#5 should read "Numeric Keypad"
These keys appear
to be "drawn" wrong
on this page of the
manual
These keys appear
to be "drawn" wrong
on this page of the
manual
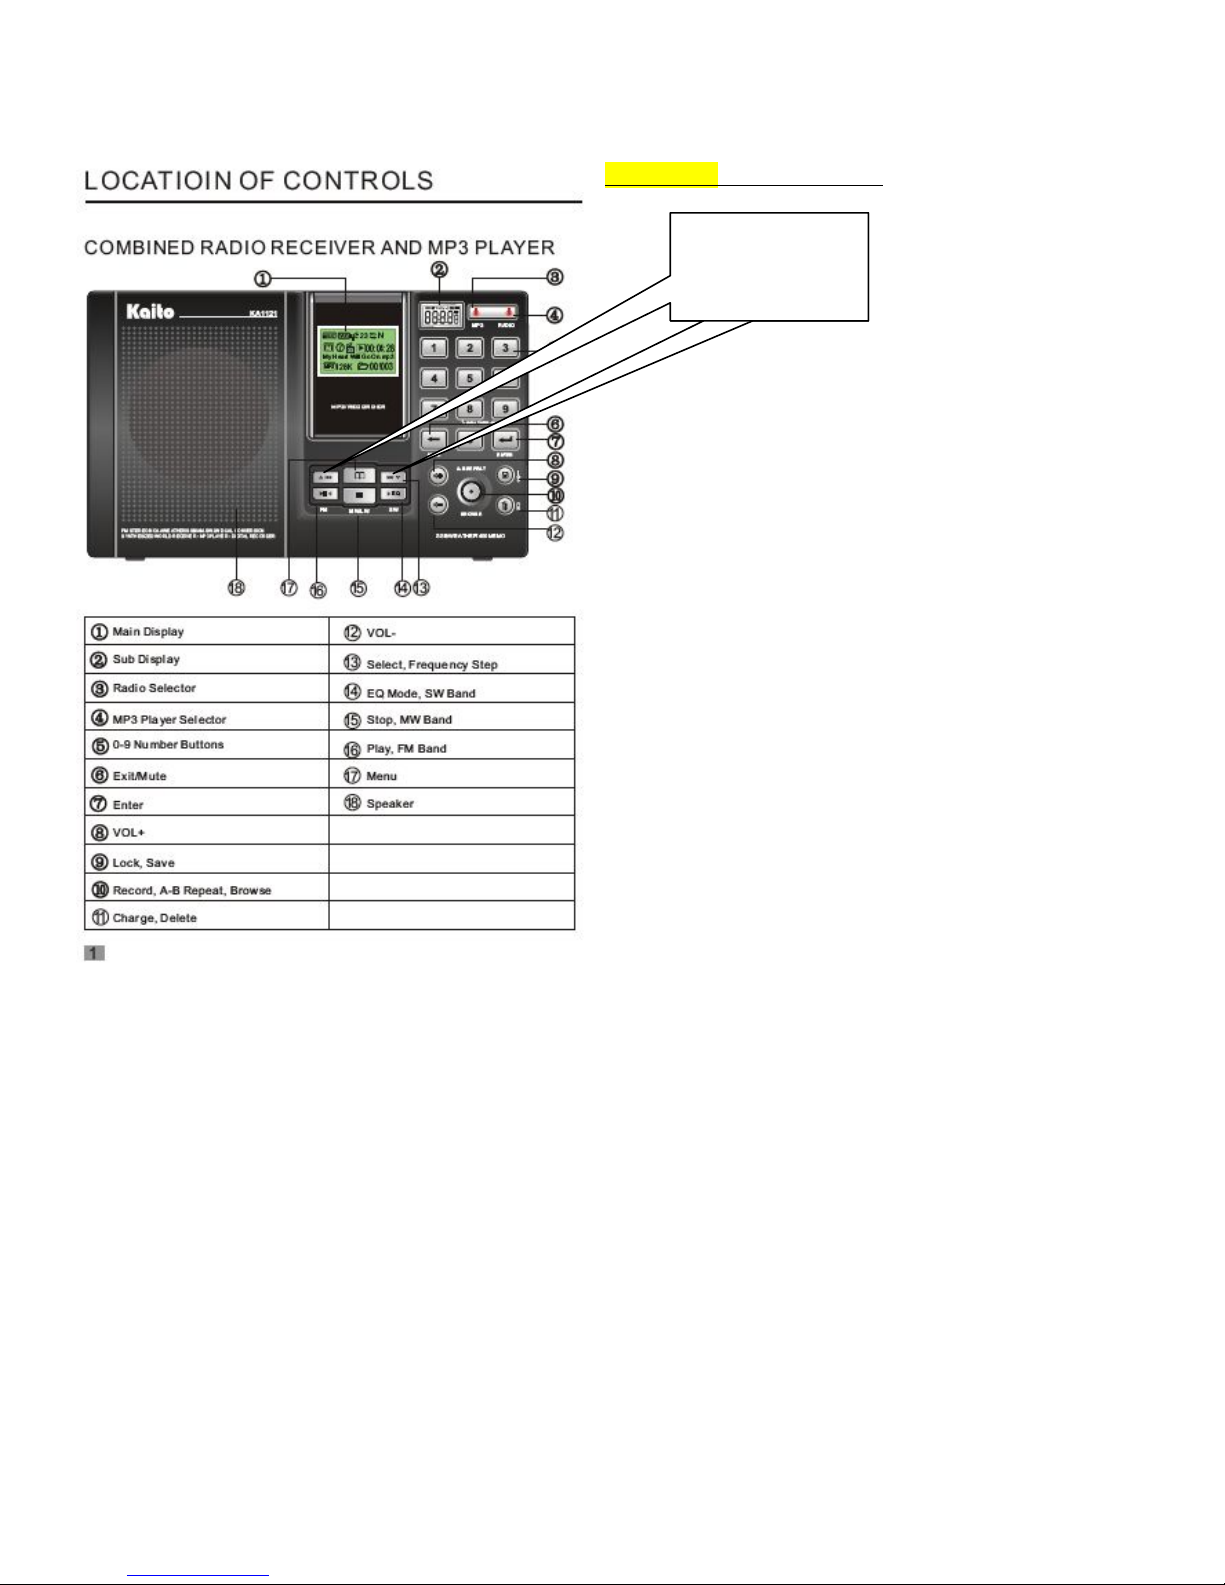
Page Two:
***FIX THE SPELLING ON ‘LOCATION’
LOCATION OF CONTROLS
Hole for Strap

Page Three:
Powering the Radio with Batteries
1. Open the battery compartment on the back of the
radio.
2. Insert 3 "AA" batteries (alkaline or rechargeable).
Note polarity signs inside the battery compartment.
3. Close the lid
Installing the Batteries for the MP3 Player
1. Open the battery compartment on the back of the
MP3 unit.
2. Insert the supplied DF6 NiMH battery. Note the
polarity signs inside the battery compartment.
3. Close the battery compartment lid
Notes on using Batteries
NOTE: When using the MP3 unit with the radio, the
DF6 battery must be installed in the MP3 unit in
order to prevent shutdown in the event of a power
failure.
Do not try to charge dry (alkaline)batteries.
Do not mix old and new batteries together.
Take the batteries out if you don't plan to use the
radio for a long period of time.
Do not use non-rechargeable batteries with the AC
adaptor plugged into the unit.
In case of battery leakage, please clean the battery
compartment immediately to avoid damage to the
radio circuits.
It is best to use batteries when listening to AM or
SW bands, as the AC adaptor may cause noise or
interfere with reception.
Page Four:
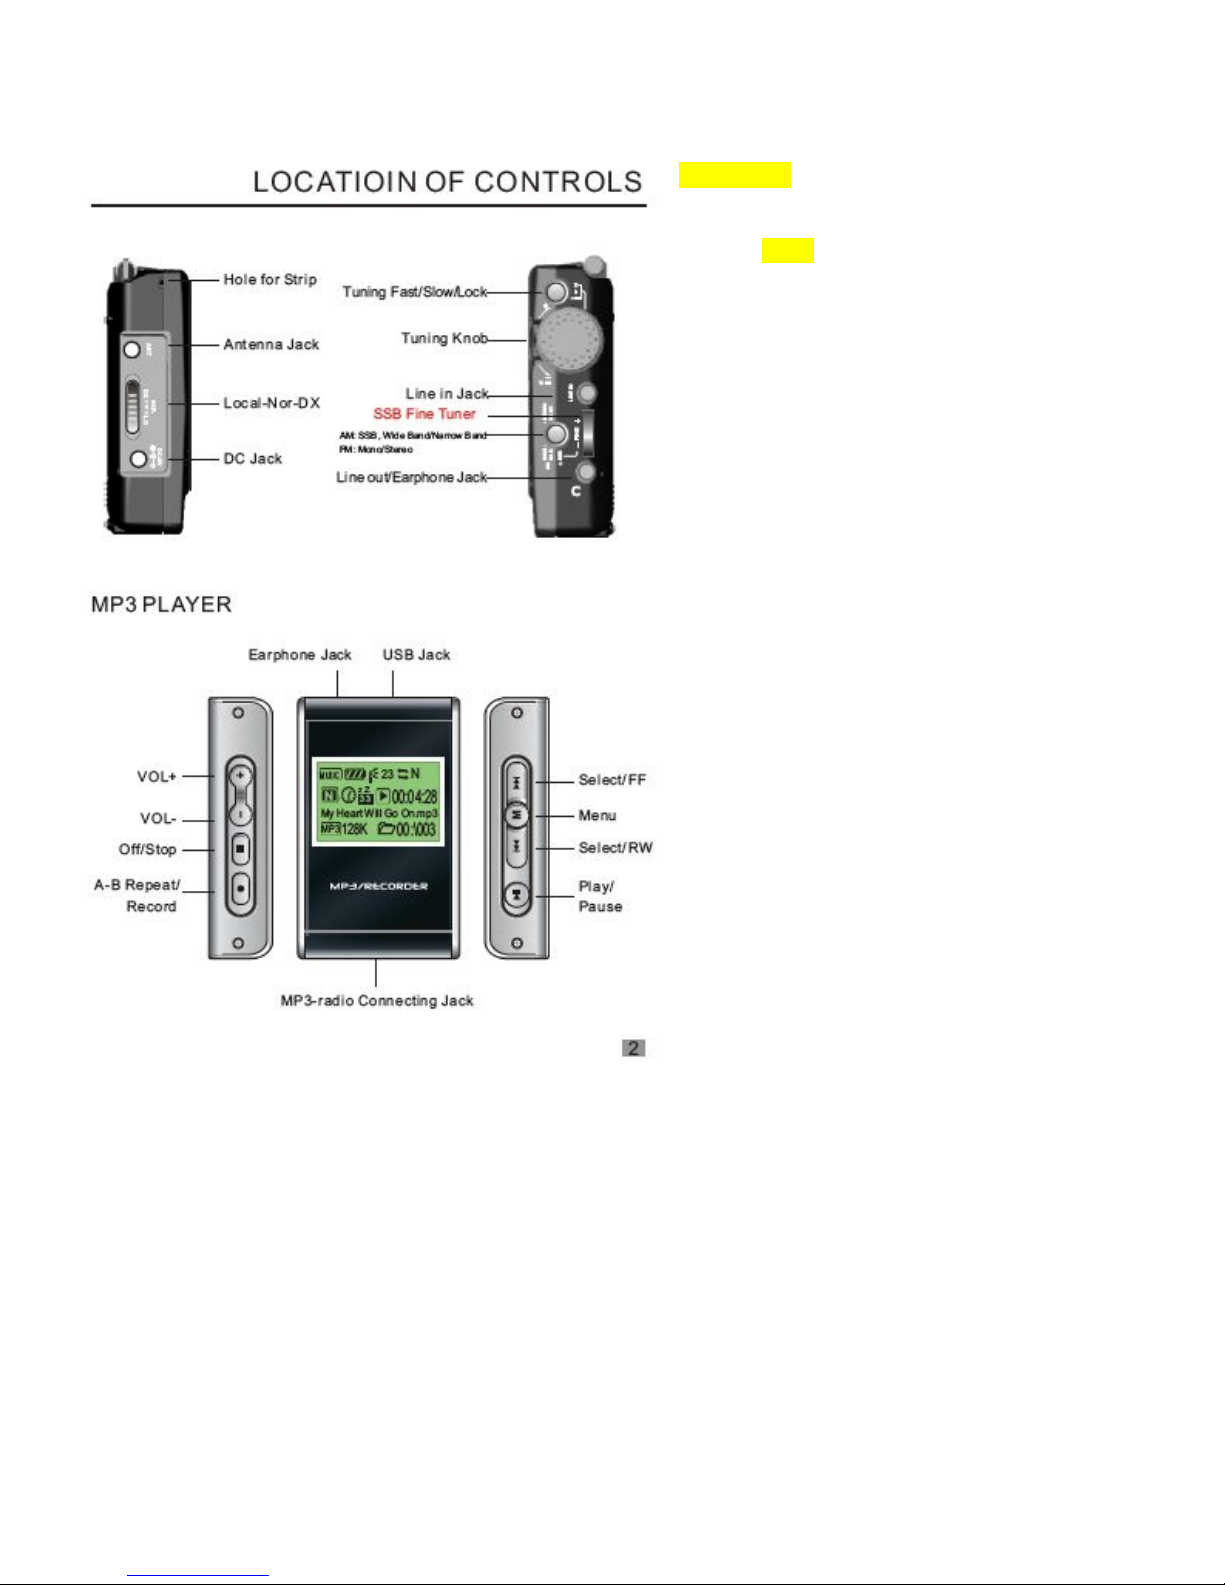
Powering the Radio with the AC Adaptor
1. Plug the supplied AC adaptor to an AC outlet as
shown above.
2. Plug the other end into the Radio's "DC Jack".
• It is normal for the AC Adaptor to become warm
during use.
• The Radio's internal batteries will be cut off when
the AC Adaptor is in use.
• If you employ the AC Adaptor for daily use,
remove the Radio's batteries.
•Use the supplied AC Adaptor only. The Radio's
software is optimized for use with this adaptor only.

Page Five:
USING THE RADIO AND MP3 UNIT TOGETHER
1. Observe the LCD screen during each step.
2. Attach the MP3 unit to the Radio
3. Supply power to the Radio (AC or Batteries)
before turning it on.
Adjusting the Radio Clock
When the Radio is turned OFF, press <button 7>
once to get into "Time Set" mode. The sub-display
will show "SET". Press <button 7> again to get into
"Entry" mode. Use the Numeric Keypad to enter the
time. Example: you will have to type "0 1 3 0" for
"1:30".
Power ON / OFF and Change Operating Mode
1. Power ON: Press <button 4> once to turn Radio
ON. The system will enter "Radio" mode.
2. Power OFF: In "Radio" mode, press <button 4>
once to turn Radio OFF.
3. Turn off Main LCD screen: In "Radio" mode,
press and hold <button 4> until the main LCD
screen shuts off.
4. Change operating mode: In "Radio" mode,
press <button 3> to switch to "MP3" mode. In
"MP3" mode, press <button 4> to switch to
"Radio" mode.
NOTE: To avoid damage to the MP3 unit, do not
insert or remove the MP3 unit while either unit
(Radio or MP3) is turned ON.
Volume Control
1. Increase Volume: Press <button 8>.
2. Decrease Volume: Press <button 12>.
3. Mute: Press <button 6>.
Page Six:
USING THE RADIO AND MP3 UNIT TOGETHER
Key Lock and Unlock
1. Lock: Press and hold <button 9>. The small
LCD will show the "lock" <symbol> symbol.
2. Unlock: Press and hold <button 9>. The "lock"
<symbol> symbol will disappear from the small
LCD.
NOTE: When Key Lock is engaged, all keys are
inactivated.
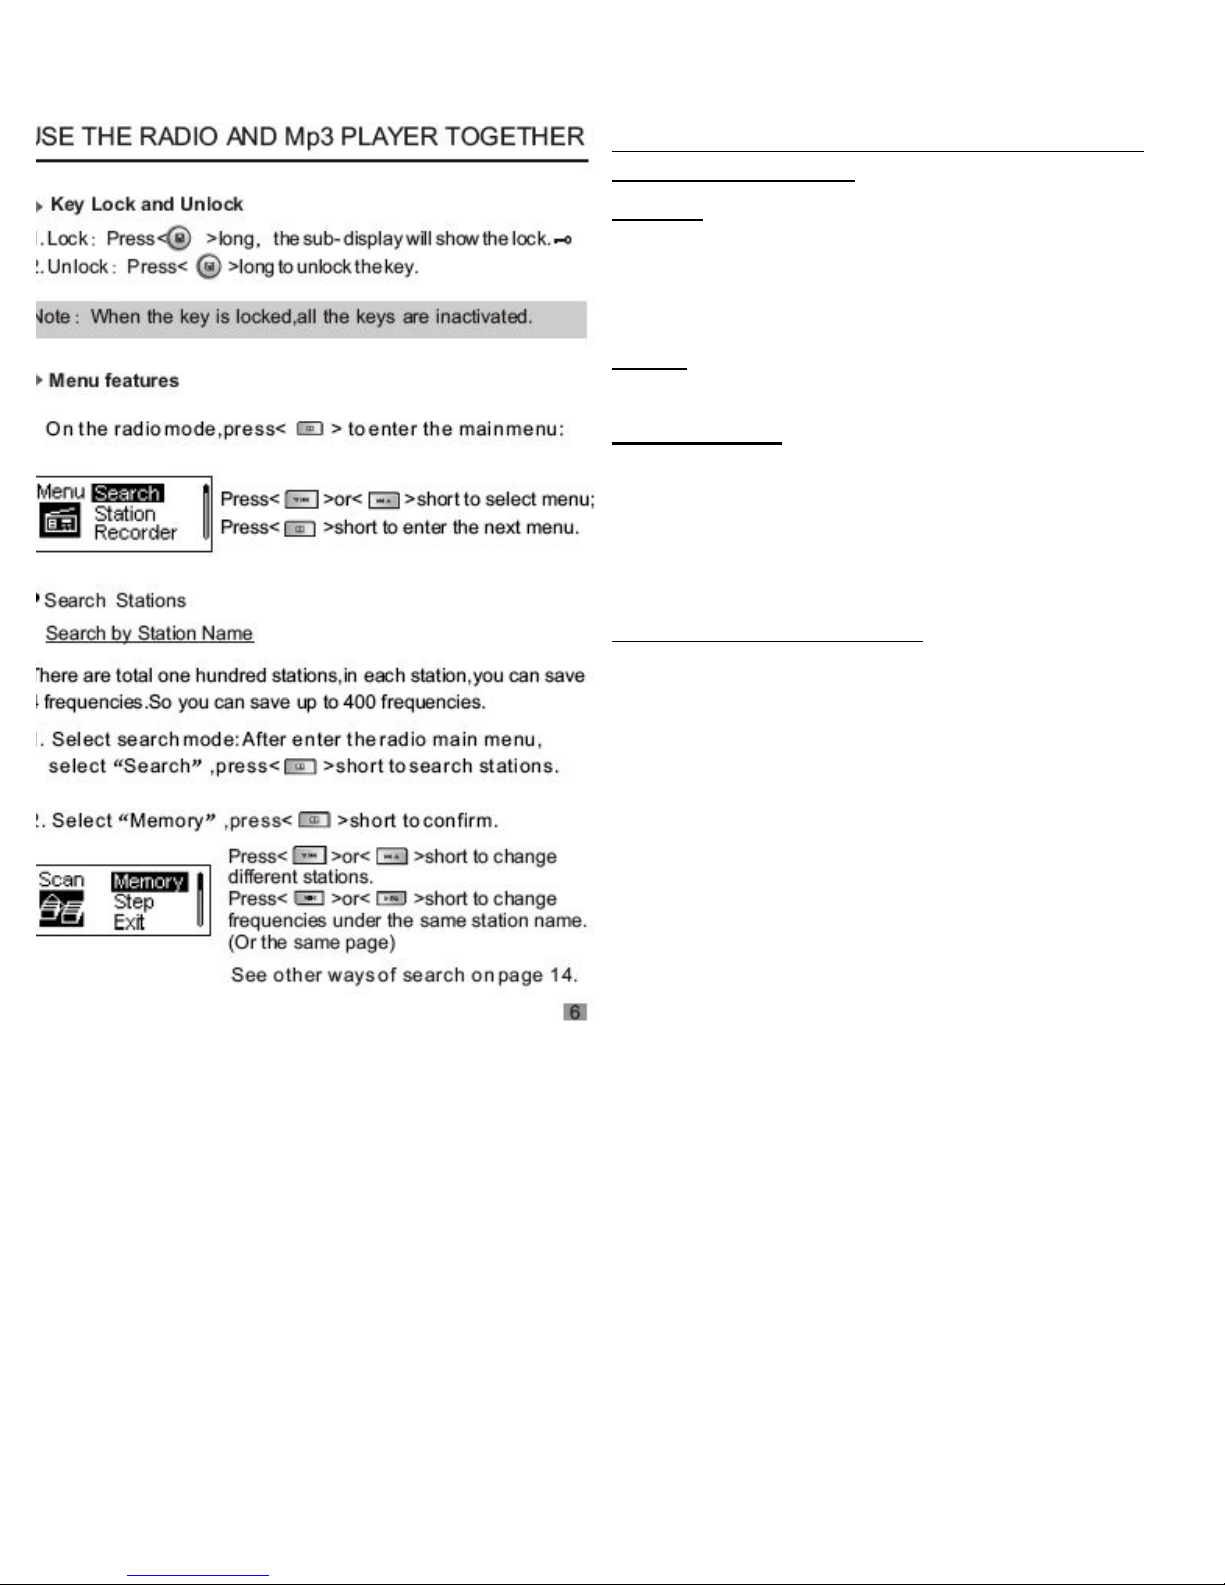
Menu Features
In "Radio" mode, press <button 17> to enter the
main Menu.
Press <button 13a> or <button 13b> to select
Menu. Press <button 17> to access the next
Menu.
Searching by Station Name
There are a total of 100 memory preset stations
available in each of 4 frequency bands, for a total
of 400 memory presets.
1. Select "Search" mode: After entering the Radio
main Menu, press <button 17> to search stations.
2. Select "Memory", then <button 17> to confirm.
Press <button 13a> or <button 13b> to change
stations.
Press <button 16> or <button 14> to change
frequencies under the same station name (Or the
same page).
See Page 14 for other ways to search.
Page Seven:
USING THE RADIO AND MP3 UNIT TOGETHER
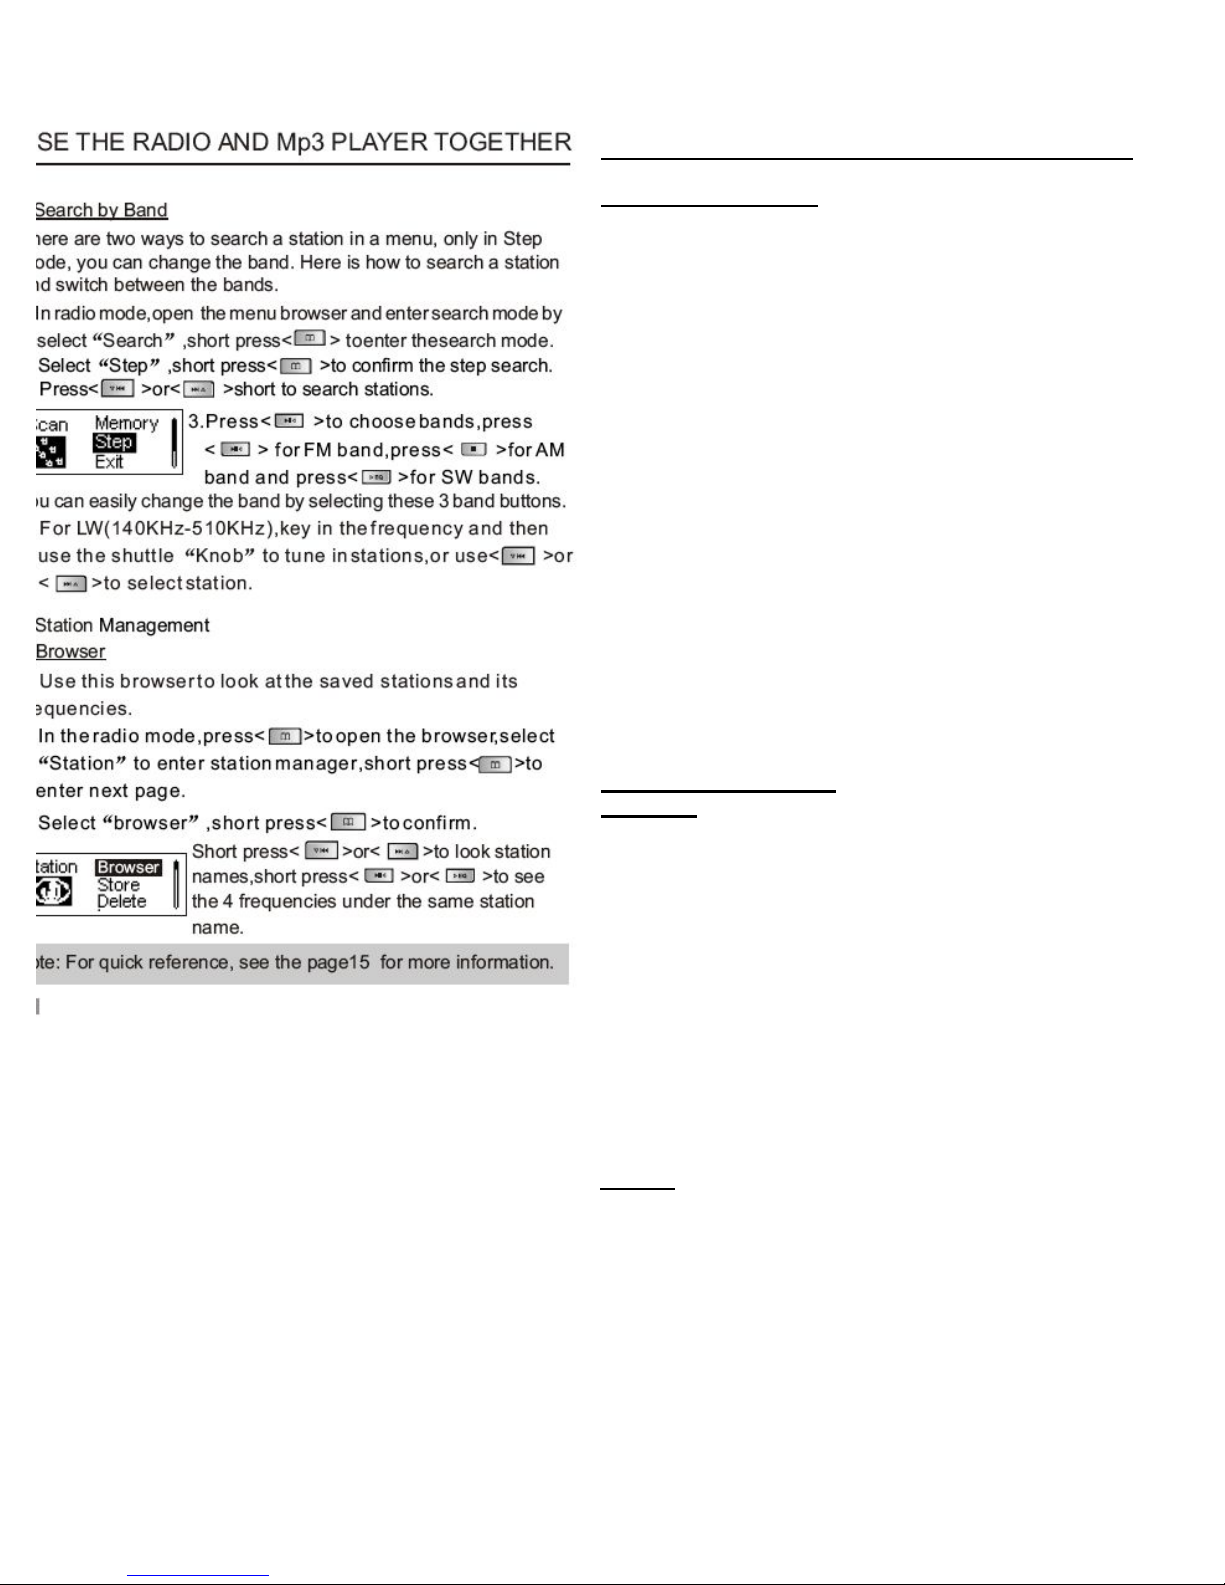
Searching by Band
There are two ways to search for a station in the
Menu. You can only change the band while
searching in "Step" mode. Here is how to do it:
1. In "Radio" mode, access the Menu and press
<button 17> to enter "Search" mode.
2. Select "Step", and press <button 17> to confirm.
Press <button 13a> or <button 13b> to search for
stations.
3. Press <button 16> to choose bands. Press
<button 16> for FM, <button 15> for AM, or
<button 14> for SW bands. You can easily change
the band by selecting one of these three buttons.
4. For LW (140KHz - 510KHz), use the Numeric
Keypad to type in the frequency, and then use the
Tuning Knob to tune specific stations. Alternately,
you may use <button 13a> or <button 13b> to
select stations.
Station Management
Browser
Use the Browser to view saved stations and their
frequencies.
1. In "Radio" mode, press <button 17> to open the
Browser. Select "Station" to enter Station
Manager, then press <button 17> to enter the next
page.
2. Select "Browser," then press <button 17> to
confirm. Press <button 13a> or <button 13b> to
view station names, or press <button 16> or
<button 14> to see the four frequencies under the
same station name.
NOTE: See the quick reference guide on Page 15
for more information.
Page Eight:
USING THE RADIO AND MP3 UNIT TOGETHER
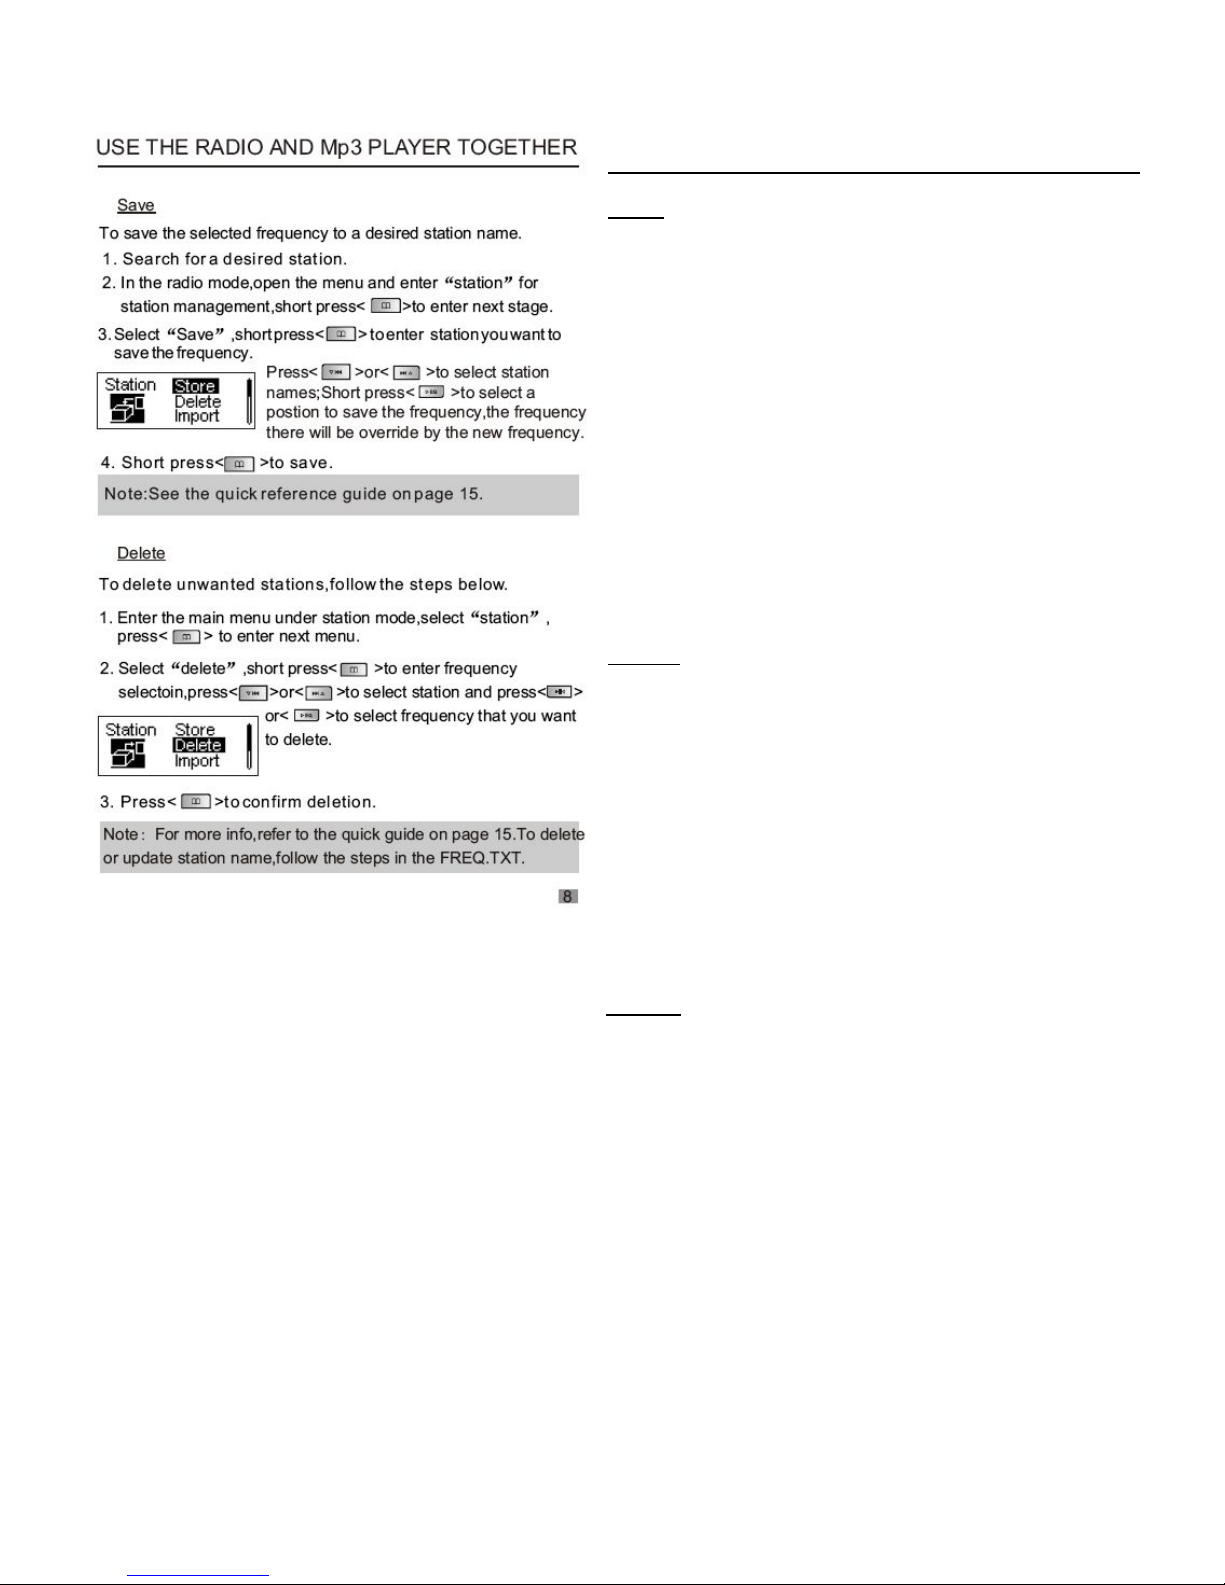
Save
To save a frequency to a desired station name.
1. Search for a desired Station
2. In "Radio" mode, access the Menu and select
"Station" for station management, then press
<button 17> to go to the next step.
3. Select "Save", then press <button 17> to enter
the station where you want to save the frequency.
Press <button 13a> or <button 13b> to select
station names. Press <button 14> to select a
memory position to save the frequency. Any
frequency already in that memory position will be
overwritten by the new frequency.
4. Press <button 17> to save.
NOTE: See the quick reference guide on Page 15
for more information.
Delete
To delete unwanted stations, follow the steps
below:
1. Enter the Main Menu under "Station" mode,
then select "Station" and press <button 17> to
access the next menu.
2. Select "Delete," then press <button 17> to enter
the frequency selection. Press <button 13a> or
<button 13b> to select station, then press <button
16> or <button 14> to select the frequency that
you want to delete.
3. Press< >to confirm deletion.
NOTE: See the quick reference guide on Page 15
for more information. To delete or update station
names, you can also follow the steps in
FREQ.TXT file available on the CD.
Page Nine:
USING THE RADIO AND MP3 UNIT TOGETHER
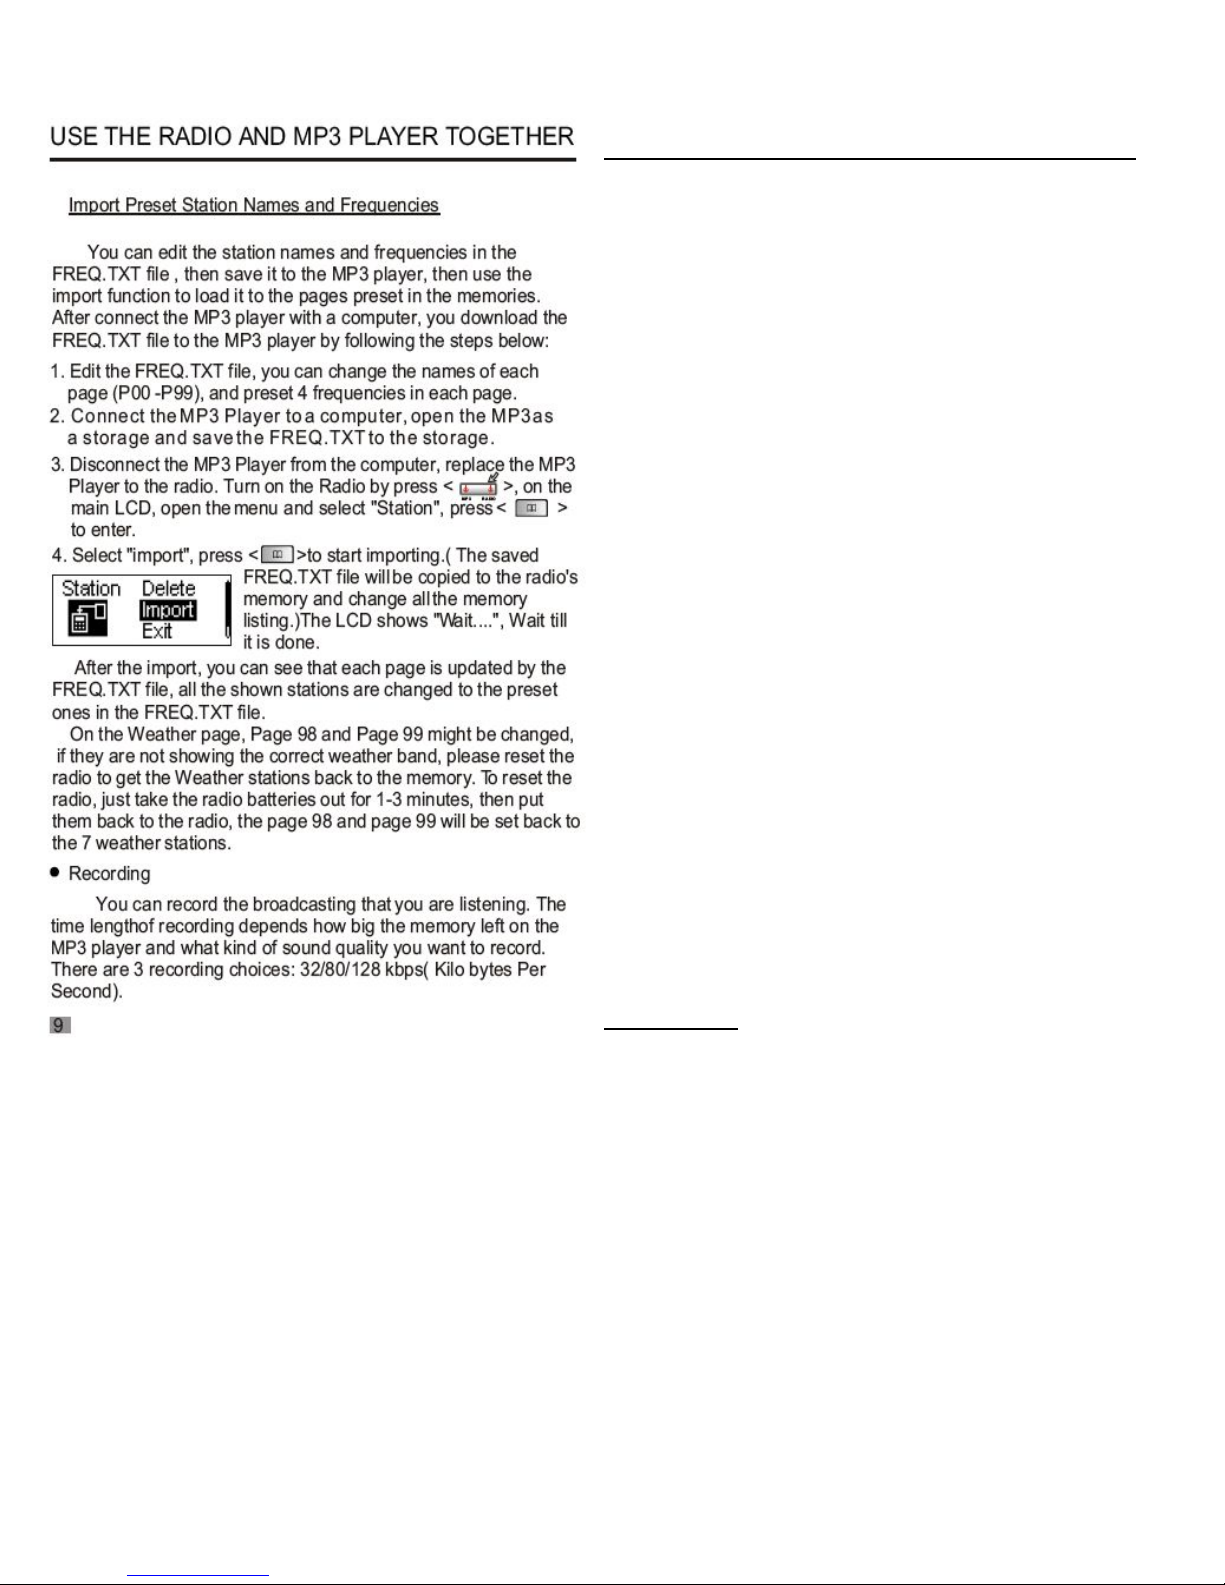
You can edit the station names and frequencies in
the FREQ.TXT file, save the FREQ.TXT file to the
MP3 unit, then use the "Import" function to load it
to the Radio's preset memory. Use the following
procedure:
1. Edit the FREQ.TXT file. You can change the
names of each page (P00 - P99), and preset 4
frequencies in each page.
2. Connect the MP3 unit to the computer, open it
as a storage device, and save the FREQ.TXT file
ot the MP3 unit.
3. Disconnect the M3 unit from the computer and
replace it in the Radio. Turn on the Radio by
pressing <button 4>. On the main LCD, access the
Menu, select "Station," and press <button 17> to
enter.
4. Select "Import" and press <button 17> to start
importing. (The save FREQ.TXT file will be copied
to the Radio's memory and update all the memory
listings. The LCD will show "Wait . . ." until it is
complete.
After importing, all pages in the Radio's memory
will be changed according to the presets in the
FREQ.TXT file.
The Weather Pages (P98 and P99) might be
changed. If the Weather Pages do not show the
correct weather bands, please reset the Radio.
This will get the default Weather stations back into
the Radio's memory. To reset the Radio, simply
remove the batteries for 1 to 3 minutes, then reinstall them. Page 98 and Page 99 should be reset
to the 7 correct Weather stations.
• Recording
You can record the current broadcast. The
duration of the recording depends on the amount of
free memory left on the MP3 unit and the sound
quality you wish to record. There are 3 sound
quality choices: 32 kbps, 80 kbps, and 128 kbps.
(kbps = kilobytes per second)
Page Ten:
USING THE RADIO AND MP3 UNIT TOGETHER
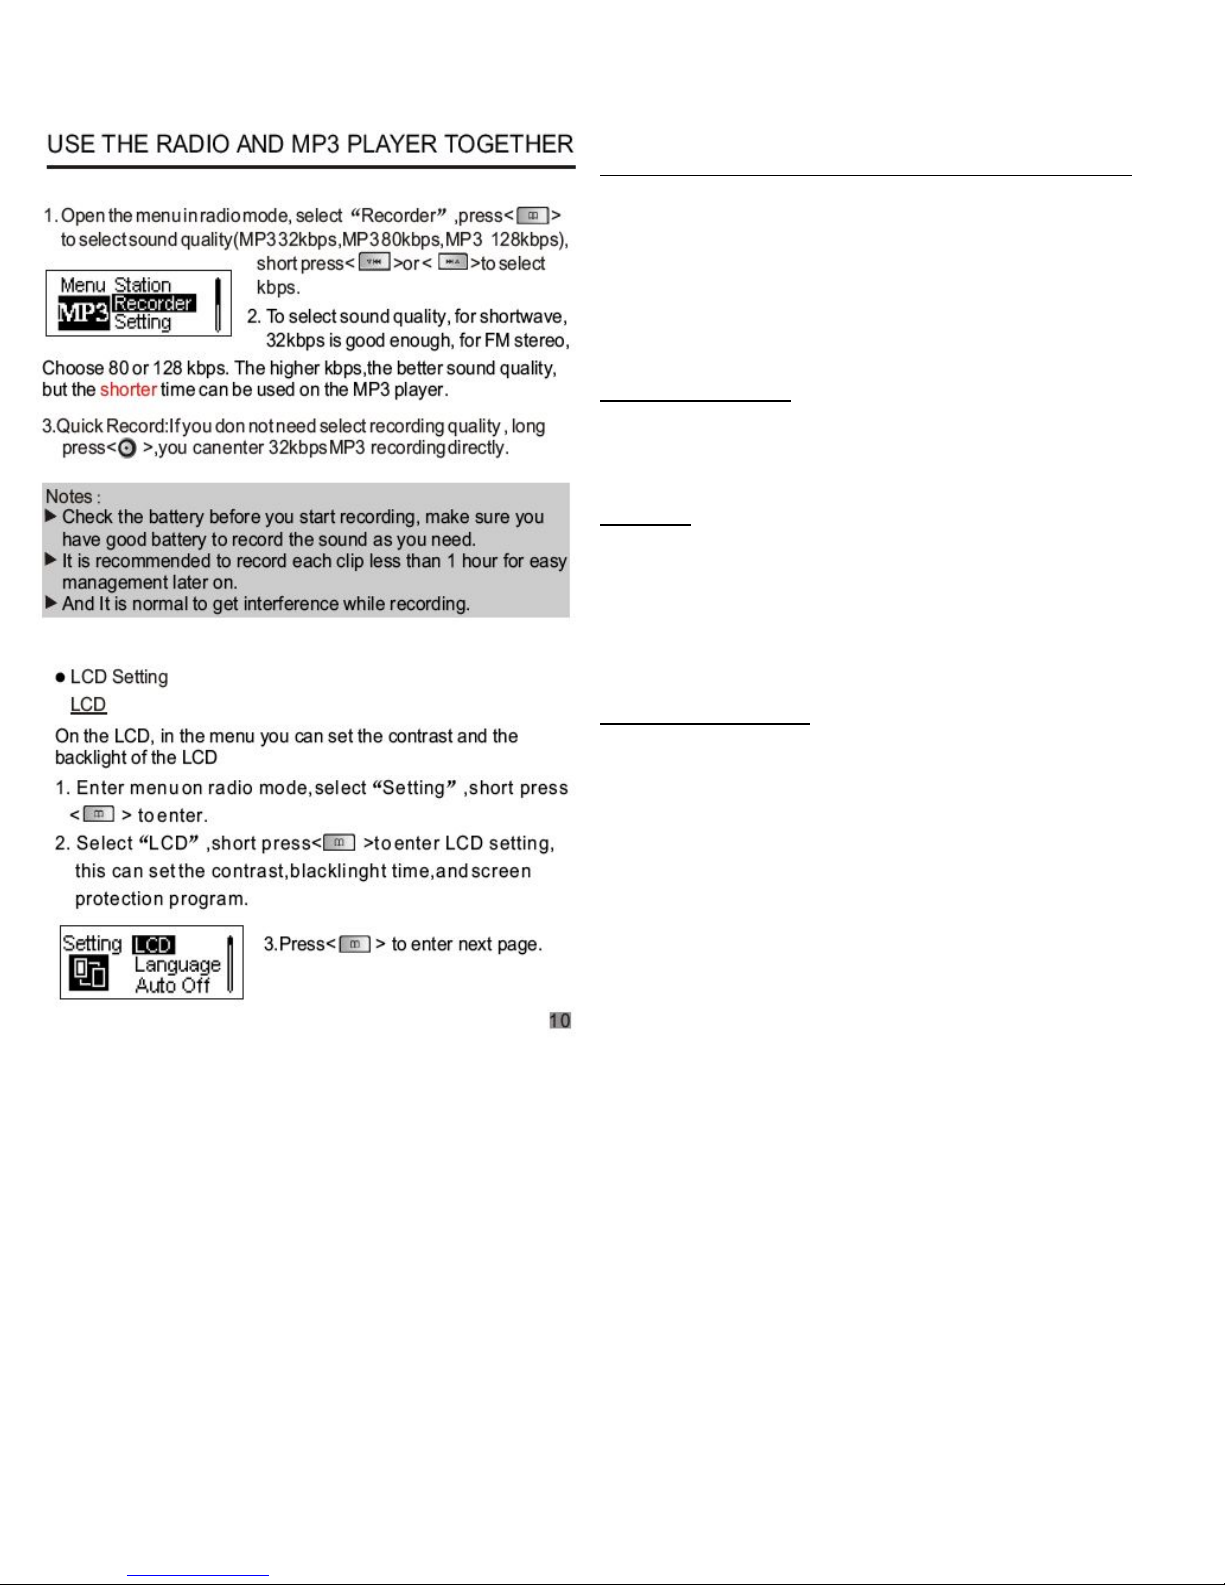
1. Open the Menu in "Radio" mode and select
"Recorder." Press <button 17> to select sound
quality (32/80/128 kbps), then press <button 13a>
or <button 13b> to select the one you want.
2. For Shortwave 32 kbps is good enough. For FM
stereo, select 80 or 128 kbps. Sound quality will be
better with a higher kbps, but recording time will be
shorter.
3. Quick Record: if you do not need the specify
the recording quality, press and hold <button 10>.
You will automatically enter 32 kbps recording
mode.
NOTES:
-Check the battery prior to recording. Make sure
you have enough battery life to record the quality
and duration you desire.
-It is recommended to record clips of less than 1
hour duration for ease of management.
-It is normal to get interference while recording.
Adjusting the LCD
The Menu will allow you to set the contrast and
backlight for the LCD.
1. Access the Menu in "Radio" mode. Select
"Setting" and press <button 17> to enter the next
menu.
2. Select "LCD" and press <button 17> to enter
your desired LCD settings. This includes contrast,
backlight time, and screen protection program.
3.Press< > to enter next page.
 Loading...