


Kaiser
5860 Lampenhalter
5861 Desktop-Beleuchtungs-Set 1
5862 Desktop-Beleuchtungs-Set 2
3140 Studioleuchte
5860 5861
5862 3140
Bedienungsanleitung
Operating Instructions
Mode d’emploi
Istruzioni per l’uso
A
B
C
5
1
2
3
4
6
7
8
10
59
D
E
11
4
12
6
F
13
2

DEUTSCH
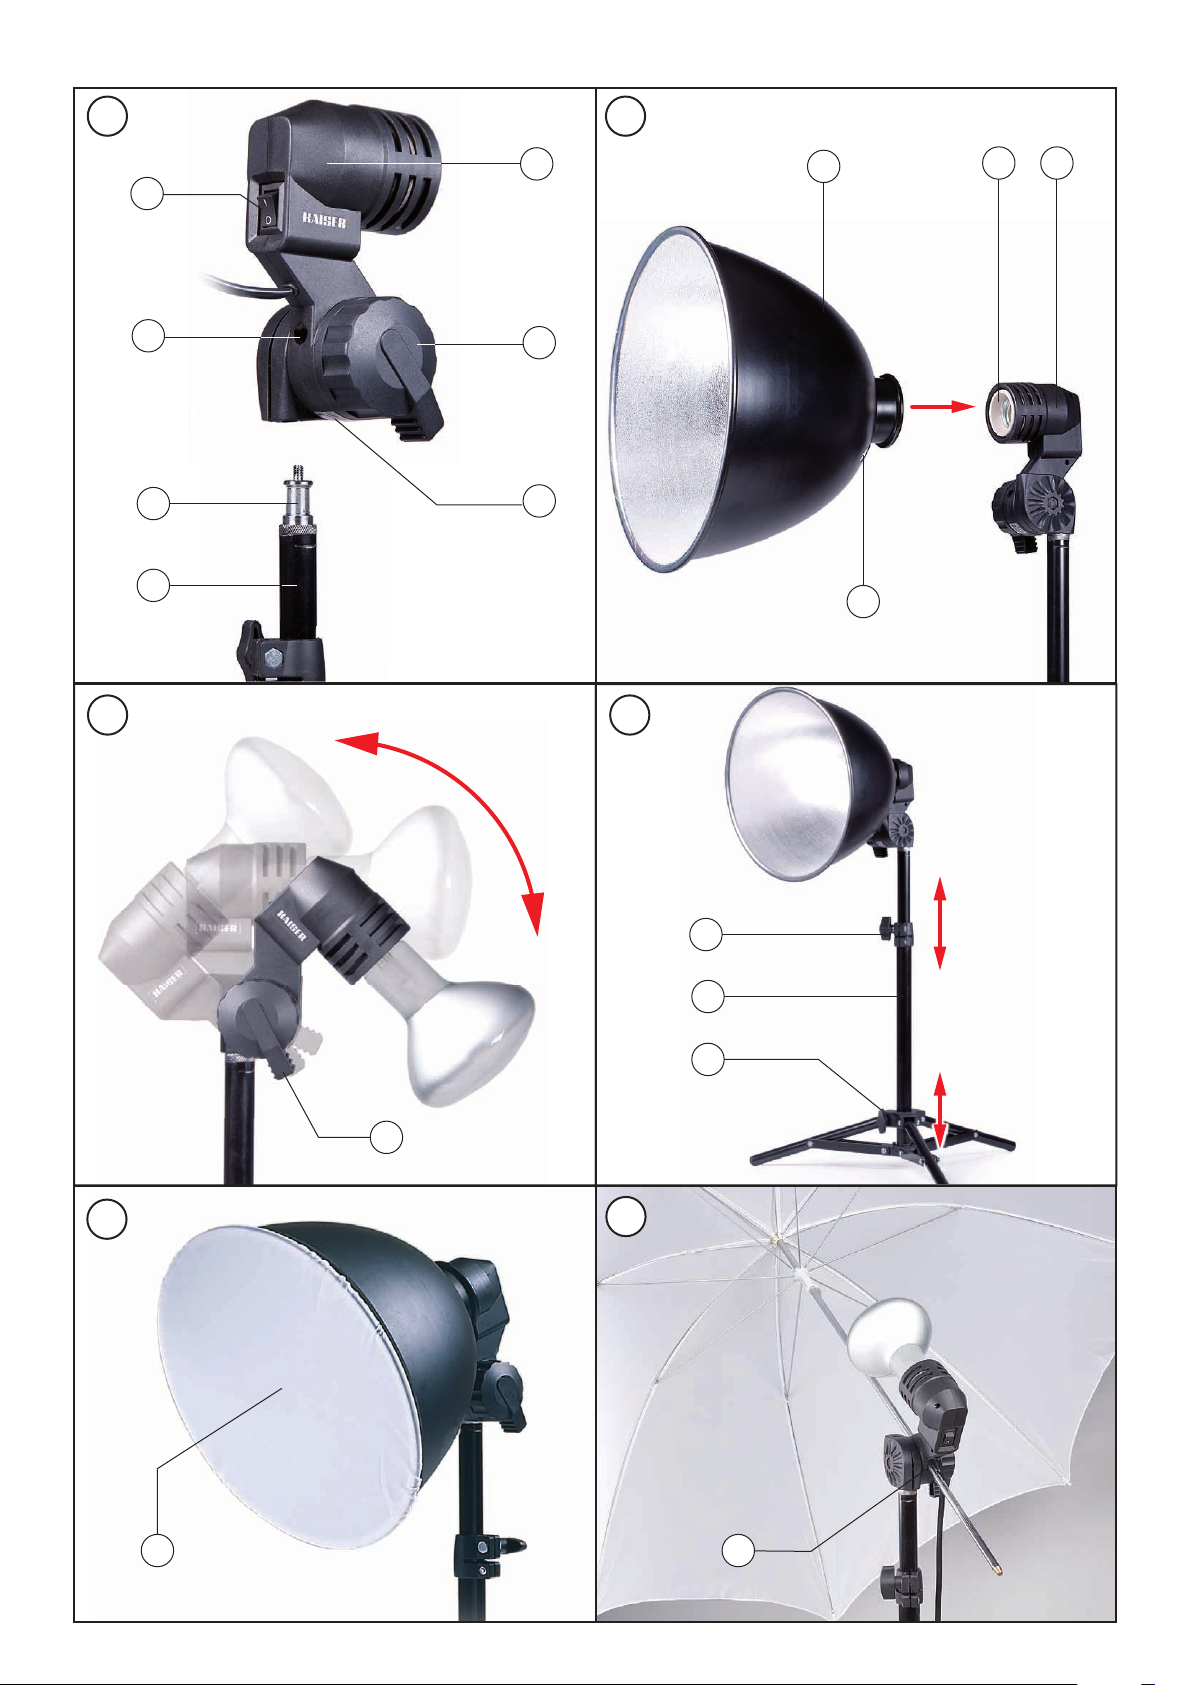
1. Lieferumfang
Lampenhalter Reflektor, ø 27 cm Stoffbespannung Desktop-Stativ
5860 Lampenhalter 1 x
5861 Desktop-Beleuchtungs-Set 1 1 x 1 x 1 x 1 x
5862 Desktop-Beleuchtungs-Set 2* 2 x 2 x 2 x 2 x
3140 Studioleuchte 1 x 1 x 1 x
*auch enthalten in den Desktop-Aufnahme-Sets 5863 und 5864
2. Inbetriebnahme
Schließen Sie den Lampenhalter (5) noch nicht ans Stromnetz
an.
Befestigen Sie den Lampenhalter auf einem Leuchtenstativ (4)
(Abb. A) bzw. einer Halterung mit 16 mm-Normzapfen (3)
(Leuchtenstativ(e) bei 5861-62 im Lieferumfang). Lockern Sie
dazu zuerst die Feststellschraube (6) und ziehen Sie diese
nach Aufsetzen des Lampenhalters auf den Normzapfen wieder fest.
Stecken Sie gegebenenfalls den Reflektor (8) (bei 3140 sowie
5861-62 im Lieferumfang) auf den Lampenhalter (5) (Abb. B).
Schrauben Sie eine geeignete Lampe (max. 250 W) in die
Keramikfassung (9). Im Lieferumfang ist/sind keine Lampe(n)
enthalten. Geeignete Lampen finden Sie im Abschnitt „7. Zubehör“.
Überprüfen Sie, ob die Netzspannung mit der auf dem Typenschild (7) angegebenen Betriebsspannung übereinstimmt.
Stecken Sie dann den Netzstecker in eine Steckdose.
Mit dem Schalter (1) wird die Leuchte ein- und ausgeschaltet.
Die Leuchte eignet sich für unbegrenzten Dauerbetrieb.
3. Neigen und Höhe verstellen
Lassen Sie die Leuchte (Lampenhalter, Lampe, gegebenenfalls Reflektor) zuerst abkühlen.
Zum Neigen der Leuchte lockern Sie zuerst die Feststellschraube (6), dann bringen Sie die Leuchte in die gewünschte Position (Abb. C). Anschließend ziehen Sie die Feststellschraube (6) wieder fest.
5861-62: Nach Lockern der Klemmschraube (11) bzw. (12)
können Sie die Höhe des Stativs ändern (Abb. D). Halten Sie
beim Lockern der oberen Klemmschraube (11) die Leuchte,
damit sich diese nicht schnell nach unten bewegen kann. Ziehen Sie die Klemmschraube nach Einstellen der gewünschten Höhe wieder fest.
4. Stoffbespannung und Reflexschirmhalterung
Die hitzebeständige Stoffbespannung (13) (bei 3140 sowie
5861-62 im Lieferumfang) dient zur Erzielung einer weicheren
Ausleuchtung (Abb. E).
Die Reflexschirmhalterung (2) ermöglicht die Verwendung
eines Reflex- oder Durchlichtschirms (Abb. F). Auch bei angesetztem Reflektor (8) (bei 3140 sowie 5861-62 im Lieferumfang) kann ein Schirm verwendet werden. Der Reflektor
verfügt dazu über eine Öffnung (10), durch die die Stange des
Schirms gesteckt werden kann. Achten Sie beim Aufstecken
des Reflektors darauf, dass sich diese Öffnung unten befindet.
wenden Sie nur Lampen mit maximal 250 Watt. Nichteinhalten dieser Vorsichtsmaßnahmen kann zur Beschädigung der
Leuchte und in Extremfällen zum Bersten der Lampe führen.
Achten Sie darauf, dass die Leuchte während des Betriebs
nicht abgedeckt ist und in Strahlrichtung mindestens 0,5 m
von hitzeempfindlichen Materialien entfernt ist.
Vermeiden Sie die Berührung der Leuchte (Lampenhalter
und Lampe, gegebenenfalls Reflektor) während des Betriebs.
Lassen Sie die Leuchte nach Gebrauch abkühlen.
Ziehen Sie vor dem Wechseln einer Lampe den Netzstecker
und lassen Sie die Leuchte abkühlen.
Eine Instandsetzung der Leuchte darf nur von Fachkräften
durchgeführt werden.
Setzen Sie das Netzanschlusskabel keinen übermäßigen mechanischen Beanspruchungen aus.
6. Wartung und Pflege
Die Leuchte ist wartungsfrei. Achten Sie darauf, dass der Reflektor (8) (bei 3140, 5861-62) frei von Flecken und Fremdkörpern ist. Entfernen Sie diese gegebenenfalls vor Inbetriebnahme. Reinigen Sie das Gehäuse der Leuchte nur mit einem
weichen, trockenen Tuch. Verwenden Sie keinesfalls Benzin
oder andere Reinigungs- und Lösungsmittel.
7. Zubehör
Geeignete Lampe für Lampenhalter 5860:
3128* Reflektorlampe 150 W, 3200 K
Geeignete Lampen für Lampenhalter 5860 mit aufgestecktem
Reflektor (mit oder ohne Stoffbespannung):
3110 Energiesparlampe 25 W, 6400 K
4356 Opallampe 75 W, 3000 K
3124 Opallampe 150 W, 3000 K
3130* Aufnahmelampe 250 W, 3000 K
3128* Reflektorlampe 150 W, 3200 K
* nicht lieferbar in 120 V-Ausführung
8. Technische Daten
Betriebsspannung: AC 230 - 240 V, 50 Hz oder
AC 120 V, 60 Hz (siehe Typenschild)
Fassung: E 27 (120 V: E 26)
Lampenbestückung (je Lampenhalter): max. 250 W
Zuleitung: ca. 3,80 m
5. Sicherheitshinweise
Vermeiden Sie unsachgemäßen Gebrauch der Leuchte, z. B.
bei Überspannung oder in Verbindung mit Ausrüstungsteilen,
die nicht speziell für diesen Leuchtentyp ausgelegt sind. Ver-
Technische Änderungen vorbehalten.

ENGLISH
1. Scope of supply
Lamp Holder
(10.6 in.) diffusion cover
Reflector, ø 27 cm
5860 Lamp Holder 1 x
5861 Desktop Lighting Kit 1 1 x 1 x 1 x 1 x
5862 Desktop Lighting Kit 2* 2 x 2 x 2 x 2 x
3140 Studio Light 1 x 1 x 1 x
*also included in the Desktop Shooting Kits 5863 and 5864
Removable
Desktop stand
2. Putting into operation
Do not connect the lamp holder (5) to the mains yet.
The lamp holder has to be mounted on a light stand (4) (Fig.
A) or a mounting system with a 16 mm standard spigot (3)
(light stand(s) are included with 5861-62). Loosen the locking
screw (6), fit the lamp holder and tighten the locking screw (6).
Attach the reflector (8) (supplied with 3140 and 5861-62) to
the lamp holder (5) (Fig. B).
Screw a suitable lamp (max. 250 W) into the ceramic socket (9). Lamps are not included. See section 7 for suitable
lamps.
Make sure that the mains voltage corresponds to the operating voltage given on the type plate (7) of the light. Then
connect the light to the mains.
The light is switched on/off with switch (1).
The light can be used for unlimited continuous operation.
3. Tilting and height adjusting
At first let the light (lamp holder, lamp, reflector (if fitted)) cool
down.
To tilt the light loosen the locking screw (6), move the light
into the required position (Fig. C) and tighten the screw again.
5861-62: To adjust the height of the stand, loosen the locking
screw (11) respectively (12) (Fig. D). Before doing so, hold up
the light to prevent it from moving downwards due to its own
weight. Tighten the locking screw again.
4. Diffusing cover and umbrella mount
The heat-resistant diffusing cover (13) (supplied with 3140
and 5861-62) can be used to achieve a softer illumination
(Fig. E).
A reflector umbrella or shoot-trough umbrella (Fig. F) can be
attached with the umbrella mount (2). The reflector (8) (supplied with 3140 and 5861-62) has an opening (10) for the
umbrella rod allowing to attach an umbrella with a mounted
reflector. When attaching the reflector the opening (10) should
be on the bottom.
5. Important notes
Use the light with care, e.g. avoid wrong voltages or connection to equipment not specifically designed for this type of
light. Use lamps with max. 250 W. If these precautions are not
observed, the light may be damaged and in extreme cases
the lamp may burst.
Make sure that the light is not covered and keep away at least
0.5 m (20 in.) from heat-sensitive substances in direction of
light during operation.
Avoid touching the light (lamp holder, lamp, reflector) when
the light is on. Let the light cool down after use.
The light may only be serviced by qualified persons.
Do not expose the mains cable to excessive physical
strain.
6. Maintenance and care
The light requires no maintenance. Make sure that the reflector (8) (with 3140, 5861-62) is free of marks and foreign bodies. If necessary remove them before use. Clean the housing
of the light only with a soft dry cloth. On no account use petrol or other cleaning agents and solvents.
7. Accessories
Suitable lamp for lamp holder 5860:
3128* Reflector lamp 150 W, 3200 K
Suitable lamps for lamp holder 5860 with attached reflector
(with or without diffusion cover):
3110 Energy saving lamp 25 W, 6400 K
4356 Opal lamp 75 W, 3000 K
3124 Opal lamp 150 W, 3000 K
3130* Photoflood 250 W, 3000 K
3128* Reflector lamp 150 W, 3200 K
*not available in 120 V version
8. Specifications
Operating voltage: AC 230 – 240 V, 50 Hz or
AC 120 V, 60 Hz (see type plate)
Socket: E 27 (120 V: E 26)
Lamps fitted
(per lamp holder): 250 W max.
Cable length: approx. 3.80 m (12.5 ft.)
Right reserved to make technical modifications.

FRANÇAIS
1. Détail des accessoires livrés
Support lampe Réflecteur, ø 27 cm Diffuseur amovible Pied d’éclairage
5860 Support lampe 1 x
5861 Kit d’éclairage de table 1 1 x 1 x 1 x 1 x
5862 Kit d’éclairage de table 2* 2 x 2 x 2 x 2 x
3140 Eclairage de studio 1 x 1 x 1 x
*aussi inclus dans les kits de prise de vue 5863 et 5864
2. Mise en œuvre
Ne pas brancher encore le support lampe (5) au secteur.
Le support lampe doit être monté sur un pied d’éclairage (4)
(Fig. A) ou sur tout système support avec un spigot standard
16 mm (3) (les pieds d’éclairages sont livrés avec les références 5861-5862). Desserrez le levier de blocage (6), installez le
support lampe et serrez le levier de blocage (6).
Fixez le réflecteur (8) (livré avec les références 3140 et 5861-
5862) sur le support lampe (5) (Fig. B).
Vissez une lampe compatible (maxi. 250 W) dans la douille
en céramique (9). Les lampes ne sont pas livrées avec les
supports. Reportez-vous au paragraphe 7 pour les lampes
compatibles.
S’assurer que la tension correspond aux caractéristiques affichées sur la plaque (7) de l’éclairage. Puis brancher le support lampe sur le secteur.
La lampe s’allume en actionnant l’interrupteur on/off au dos
du support lampe (1).
L’éclairage peut être utilisé sans limites en continu.
3. Réglage et ajustement de la hauteur
En premier, attendez que l’éclairage (support lampe, lampe et
réflecteur) refroidisse.
Pour incliner le support, desserrez le levier de serrage (6), orientez l’éclairage dans la position souhaitée (Fig. C) et resserrez le levier à nouveau.
5861-5862 : Pour régler la hauteur du pied, desserrez le bouton de serrage (11) et (12) (Fig. D). Avant de le faire, tenez la
torche afin d’éviter qu’elle ne tombe par son propre poids.
Resserrez les boutons de serrage.
En aucun cas la lampe ne doit être couverte et gardez toujours une distance d’au moins 0,5 m avec des substances
inflammables.
Evitez de toucher l’éclairage (lampe, support et réflecteur)
quand la lumière est allumée. Laissez l’éclairage refroidir après utilisation.
L’éclairage doit être mis en service uniquement par des personnes qualifiées.
Ne pas exposer le câble secteur à des contraintes physiques.
6. Soins et entretien
L’éclairage ne requiert aucun entretien. Assurez-vous que le
réflecteur (8) (avec 3140, 5861-5862) est sans coups et corps
étranger. Si nécessaire enlevez-les avant utilisation. Nettoyez
le support de lampe uniquement avec un chiffon doux. Ne
pas utiliser de pétrole ou agents nettoyants et solvants.
7. Accessoires
Lampe compatible pour support lampe 5860 :
3128* Lampe avec réflecteur, 150 W, 3200 K
Lampe compatible pour support lampe 5860 avec réflecteur
fixé (avec ou sans diffuseur amovible) :
3110 Lampe économie d’énergie 25 W, 6400 K
4356 Lampe opale 75 W, 3000 K
3124 Lampe opale 150 W, 3000 K
3130* Lampe Photoflood 250 W, 3000 K
3128* Lampe avec réflecteur, 150 W, 3200 K
*non disponible en 120 V
4. Diffuseur amovible et montage de parapluie
Le diffuseur amovible résistant à des hautes températures
(13) (livré avec 3140 et 5861-5862) peut être utilisé pour obtenir un éclairage diffusant (Fig. E).
Un parapluie réflecteur ou un parapluie diffuseur (Fig. F) peuvent se fixer sur le support lampe (2). Le réflecteur (8) (livré
avec 3140 et 5861-5862) a un trou (10) pour laisser passer
la tige du parapluie afin de monter un parapluie avec un
réflecteur. Quand on fixe le réflecteur, le trou de parapluie (10)
doit être positionné en dessous.
5. Points importants
Utilisez le support d’éclairage avec précaution ; exemple :
éviter les mauvaises tensions ou mauvais branchements, ou
tout équipement non conforme avec ce type d’éclairage.
Utilisez des lampes de 250 W maximum. Si ces instructions
ne sont pas respectées, le support de lampe peut être endommagé et dans les cas extrêmes la lampe pourrait explosée.
8. Caractéristiques
Tension de fonctionnement : AC 230 – 240 V, 50 Hz ou
AC 120 V, 60Hz (voir plaque
d`identification)
Douille : E 27 (120 V : E 26)
Puissance lampe
(pour support lampe) : maximum 250 W
Longueur câble : 3,80 m environ
Les spécifications techniques peuvent être modifiées sans préavis.

ITALIANO
1. Materiale a corredo
Porta lampada Parabola, ø 27 cm Diffusore rimovibile Stativo da tavolo
5860 Porta lampada 1 x
5861 Kit illuminatore da tavolo 1 1 x 1 x 1 x 1 x
5862 Kit illuminatore da tavolo 2* 2 x 2 x 2 x 2 x
3140 Studio Light 1 x 1 x 1 x
*compreso nel desktop shooting kit 5863 e 5864
2. Inizio delle operazioni
Non collegare il porta lampada (5) alla presa di corrente.
Il porta lampada deve essere montato su uno stativo (4)
(Fig. A) o su un sistema di montaggio con uno spigot standard da 16 mm (3) (lo stativo(i) sono a corredo del 5861-62).
Svitare la vite di bloccaggio (6), inserire il porta lampada e
stringere la vite di bloccaggio (6).
Applicare la parabola (8) al porta lampada (5) (fornito con
3140 e 5861-62) (Fig. B).
Avvitare una lampada adatta (max. 250 W) sullo zoccolo in
ceramica (9). Le lampade non sono a corredo. Per scegliere la
lampada vedere la sezione 7.
Assicurarsi che il voltaggio corrisponda al voltaggio operativo indicato sulla piastrina (7) dell’illuminatore. Collegare
l’illuminatore alla presa di corrente.
L’illuminatore può essere acceso o spento per mezzo del pulsante (1).
L’illuminatore può essere utilizzato per una operatività continuata e illimitata.
3. Inclinazione e Regolazione in altezza
Lasciare anzitutto raffreddare l’illuminatore (porta lampada,
lampada, parabola (se inserita).
Per inclinare l’illuminatore allentare la vite di bloccaggio (6),
spostare l’illuminatore nella posizione desiderata (Fig. C) e
stringere nuovamente la vite.
5861-62: Per regolare l’altezza dello stativo, svitare la vite di
bloccaggio (11) oppure (12)
(Fig. D). Prima di fare ciò, tenere saldamente l’illuminatore
per evitare che possa cadere a causa del suo peso. Stringere
nuovamente la vite.
4. Diffusore e montaggio ombrello
Diffusore resistente al calore (13) (fornito con 3140 e 5861-62)
può essere usato per ottenere una illuminazione più morbida
(Fig. E).
Un ombrello riflettente o un ombrello diffusore (Fig. F) può
essere collegato al porta ombrello (2). La parabola (8) (fornita con 3140 e 5861-62) ha un’apertura (10) per l’asta
dell’ombrello e permette di utilizzare un ombrello con la parabola montata. Quando si applica la parabola l’apertura (10)
deve trovarsi sulla parte superiore.
5. Importanti note
Usare l’illuminatore con cura. Evitare voltaggi non corretti
o collegamenti allo strumento non specificamente adatti a
questo tipo di illuminatore. Usare lampade con una Potenza massima di 250 W. Se non vengono osservate queste
precauzioni, l’illuminatore può essere danneggiato e, in casi
estremi, la lampada potrebbe bruciare.
Assicurarsi che l’illuminatore non sia coperto e tenerlo lontano almeno a 0,5 m da sostanze sensibili al calore che possono essere colpite dalla luce durante le operazioni.
Evitare di toccare l’illuminatore (porta lampada, lampada,
parabola) quando la luce é accesa. Lasciare raffreddare
l’illuminatore dopo l’uso.
L’ illuminatore può essere riparato solamente da persone
qualificate.
Non esporre il cavo rete a eccessive tensioni fisiche.
6. Manutenzione e cura
L’illuminatore non richiede manutenzione. Assicurarsi che la
parabola (8) (con 3140, 5861-62) sia libera da marchi e corpi estranei. Se necessario, toglierli prima dell’uso. Pulire la
carcassa dell’illuminatore solo con un morbido panno asciutto. In nessun caso usare petrolio o altri agenti di pulizia
e solventi.
7. Accessori
Lampada adatta per porta lampada 5860:
3128* Lampada a specchio 150 W, 3200 K
Lampade adatte per il porta lampada 5860
con parabola applicata (con o senza diffusore):
3110 Lampada risparmio energetico 25 W, 6400 K
4356 Lampada opalina 75 W, 3000 K
3124 Lampada opalina 150 W, 3000 K
3130* Lampada photoflood 250 W, 3000 K
3128* Lampada a specchio 150 W, 3200 K
*non disponibile in versione 120 V
8. Caratteristiche
Voltaggio operativo: AC 230 – 240 V, 50 Hz o
AC 120 V, 60 Hz (veda su piastra)
Zoccolo: E 27 (120 V: E 26)
Lampada a corredo
(per porta lampada): max. 250 W
Lunghezza cavo: circa 3.80 m
Ci riserviamo il diritto di eseguire modifiche tecniche.


Kaiser Fototechnik GmbH & Co. KG
Im Krötenteich 2 · 74722 Buchen · Germany
Telefon +49(0)6281 407-0 · Fax +49(0)6281 407-55
www.kaiser-fototechnik.de · info@kaiser-fototechnik.de
Printed in Germany 1211 000586000900

3
4
5
3.
Vordere, obere Kante nach hinten zur unteren
Kante drücken ...
Push front top border backwards towards the
lower border …
Poussez la bordure supérieure avant en arrière
vers la bordure inférieure ...
Empuje el borde superior frontal hacia atrás,
hacia el borde inferior ...
Premere la parte superiore frontale attraverso il
bordo inferiore …
4.
... und das Cube-Studio flach zusammenfalten.
… and fold down Cube-Studio flat.
… et repliez le Cube-Studio afin de le mettre à plat.
... y doble hacia abajo el Cube-Studio (déjelo plano).
… e appiattire il Cube-Studio.
5.
Cube-Studio an zwei gegenüberliegenden Ecken
halten (an einer Ecke Daumen oben, an der anderen Ecke vier Finger oben) ...
Hold Cube-Studio on two opposing corners (on
one corner with thumb up, on the other thumb
down) …
Tenez le Cube-Studio aux deux coins opposés
(sur un coin avec le pouce en haut, sur l'autre, le
pouce en bas) ...
Cojer el Cube-Studio de dos esquinas opuestas
(en una esquina con el pulgar arriba y en la otra
con el pulgar hacia abajo) ...
Tenere il Cube-Studio con due angoli opposti (su
un lato premendo verso il basso, sullʼaltro verso
lʼalto) …
6
7
8
6.
... zu einer „8“ verdrehen, ...
… twist it to form an "8", …
… pliez-le de manière à ce quʼil forme un «8», …
... girar para formar un "8", ...
… ruotare per formare un “8”, …
7.
... noch etwas weiter drehen und dabei die
Ringe ineinander schieben.
… twist it still more and shift the die rings into
each other.
… ramenez le cercle du bas vers le haut à la
rencontre du cercle du haut pour les superposer.
... girar aún más y cambiar el sentido de los
anillos de uno a otro.
… ruotare ancora e posizionare i due anelli
lʼuno sullʼaltro.
8.
Anschließend zusammen mit der
Frontabdeckung im Aufbewahrungsbeutel verstauen.
Place Cube-Studio and the front panel inside
the carrying case.
Rangez le Cube-Studio ainsi que la face avant
dans le sac de transport prévu à cet effet.
Guarde el Cube-Studio y el panel frontal dentro
de su estuche.
Alloggiare il Cube-Studio e il pannello frontale
nella borsa per il trasporto.
Kaiser
Cube-Studio
5893: 50 x 50 x 50 cm
5894: 90 x 90 x 90 cm
Technische Änderungen vorbehalten.
Right reserved to make technical modifications.
Droits réservés pour toutes modifications techniques.
Reservado el derecho a realizar modificaciones técnicas.
Ci riserviamo il diritto di eseguire modifiche tecniche.
6
7
Kaiser Fototechnik GmbH & Co. KG
Im Krötenteich 2 · 74722 Buchen · Germany
Tel.: +49(0)6281 407-0
Fax: +49(0)6281 40755
www.kaiser-fototechnik.de
info@kaiser-fototechnik.de
Printed in Germany 0710 000589300900
Lichtzelt
Light Tent
Tente à lumière
Tienda de luz
Gabbia di luce

Aufbau
Setting up Cube-Studio
Installation du Cube-Studio
Configuración de Cube-Studio
Montaggio del Cube-Studio
1
2
3
1.
Cube-Studio aus dem Aufbewahrungsbeutel
nehmen. Achtung! Das Cube-Studio könnte
sich bereits dabei selbsttätig entfalten.
Remove Cube-Studio from its carrying case.
Caution! Cube-Studio could spring open
automatically.
Enlever le Cube-Studio de son sac de transport.
Attention ! Le Cube-Studio peut se déplier
automatiquement.
Saque el Cube-Studio de su estuche.
Precaución! El Cube-Studio se abre como
un muelle automáticamente.
Rimuovere il Cube-Studio dalla valigia di trasporto.
Attenzione! Il Cube-Studio si può aprirsi
automaticamente.
2.
Cube-Studio aufspringen lassen.
Let Cube-Studio spring open.
Laissez le Cube-Studio se déplier.
Deje que los anillos del Cube-Studio se
abran.
Lasciare che il Cube-Studio si apra.
3.
Cube-Studio aufklappen ...
Open Cube-Studio …
Ouvrez le Cube-Studio …
Ahora abra el Cube-Studio ...
Aprire completamente il Cube-Studio ...
4
5
6
4.
... und Seitenwand nach außen ziehen.
… and pull side panel outward.
... et tirez sur le côté extérieur.
... y extraiga el panel lateral hacia afuera.
… e tirare il lato del pannello verso lʼesterno.
5.
Cube-Studio um 90° drehen, evtl. noch
etwas in Würfelform drücken.
Rotate Cube-Studio by 90°, and possibly
push it to form a cube shape.
Faites tourner le Cube-Studio à 90° et aidez-
le à prendre sa forme de cube.
Rotar el Cube-Studio 90º y posiblemente,
presiónelo para crear la forma de un cubo.
Ruotare il Cube-Studio di 90° esercitando
una pressione tale da formare un cubo.
6.
Gewünschten Hintergrund an den
Klettbändern an der Rückwand anheften.
(Die Gummischlaufen an den Klettbändern
dienen zum Einhängen weiterer Utensilien.)
Choose the desired background and attach it
with the Velcro to the rear panel.
(The elastic loops attached on one side of
the Velcro can be used for mounting additional equipment.)
Choisissez le fond souhaité et attachez-le à
lʼaide de la bande velcro sur le panneau
arrière.
(Les attaches élastiques attachées sur un
côté du velcro peuvent être utilisées pour
monter des accessoires.)
Elija el fondo deseado acóplelo con el velcro
al panel trasero.
(Los bucles elásticos acoplados a los lados,
pueden ser usados con velcro para el montaje de equipamiento adicional.)
Scegliere il fondale desiderato e applicarlo al
pannello posteriore per mezzo del velcro.
(I lacci elastici posizionati sul lato del velcro
possono essere usati per montare accessori
supplementari.)
7
Achtung! Bei Verwendung von Leuchten muss ein Sicherheitsabstand zum Licht zelt eingehal-
!
ten werden. Beachten Sie die Hinweise des Leuchtenherstellers.
Caution! If you are using lights to illuminate your subject, you have to place them in a certain distance
from Cube-Studio for safety reasons. Please refer to the instructions of the lamp manufacturer.
Attention: Pour des raisons de sécurité, positionnez les lumières pour éclairer vos objets à une certaine
distance de votre Cube-Studio. Merci de vérifier les instructions de sécurité du fabricant de lampes.
Precaución! Si estás utilizando luces para iluminar al objeto, tiene que colocarlos en una cierta distancia
del cubo. Por razones de seguridad. Observe las instrucciones de seguridad del fabricante de la lámpara.
Avvertenze! Se si usano luci per illuminare il soggetto, devono essere posizionate a una certa distanza
dal Cube-Studio per ragioni di sicurezza. Seguire le istruzioni del costruttore relative alla sicurezza.
7.
Falls gewünscht, Frontabdeckung an den
Klettbändern an die Vorderseite anheften.
(Durch die Frontabdeckung werden besonders
beim Fotografieren von glänzenden Objekten
Reflexe und Spiegelungen vermieden. Fotografiert
wird durch den Schlitz in der Frontabdeckung.)
If necessary, the front panel can be attached to the
front side with Velcro already fitted.
(The front panel is especially useful when shooting
shining subjects to avoid reflections. The camera
lens looks through the slot in the front panel.)
Si nécessaire, la face avant peut être attachée sur
le côté du cube grâce au velcro déjà en place.
(La face avant est particulièrement utile lorsque
vous prenez des photos de sujets brillants afin
dʼéviter les reflets. L'objectif de votre appareil
photo se passe dans la fente située sur la face
avant.)
Si es necesario, el panel frontal se puede poner
pegado al velcro ya instalado.
(El panel frontal es especialmente útil cuando se
captura, para evitar reflejos brillantes en el motivo.
La lente de la cámara mira a través de la ranura
del panel frontal.)
Se necessario, il pannello frontale può essere collegato alla parte frontale con il velcro già applicato.
(Il pannello frontale è utile specialmente quando si
eseguono riprese di soggetti riflettenti per evitare
riflessi. Lʼobiettivo dellʼapparecchio sporge attraverso la fessura del pannello frontale.)
Zusammenfalten
Folding up Cube-Studio
Comment replier le Cube-Studio
Doblar el Cube-Studio
Come piegare il Cube-Studio
1
2
1.
Frontabdeckung und Hintergrund entfernen.
Remove front panel and background.
Retire la face avant ainsi que le fond.
Extraiga el panel frontal y el fondo.
Rimuovere il pannello frontale e il fondo.
2.
Cube-Studio auf die Seite legen (Stabilisie -
rungsring oben).
Turn Cube-Studio to lie on a side panel (stabili-
zing ring on top).
Tournez le Cube-Studio et positionnez-le sur la
face avant (anneau stabilisateur sur le dessus).
Gire el Cube-Studio sobre un panel lateral (anil-
los de estabilización en la parte superior).
Ruotare il Cube-Studio per posizionarlo sul
pannello laterale (posizionando lʼanello sulla
parte superiore).
2 3 5
4
 Loading...