

Page 1

1
X
Complete User Guide
X Limited Edition
Action Camera
Page 2

Join the social movement and follow us on
Contents
DISCOVER: ADVENTURE
Share your footage with us on social media
@KaiserBaas #KBdiscover
To view the entire Kaiser Baas
product range visit:
www.kaiserbaas.com
Disclaimers & Warnings
Product Diagram
Getting Started
Capture Videos
Capture Photos
Eect Settings
General Settings
Playback
Battery Guide
Maintenance
FAQ
Specications
Support
04
05
07
09
11
13
15
17
17
18
19
21
23
Page 3

3 4
Disclaimers & Warnings
Before using your Kaiser Baas camera please
ensure you read and understand the following
product and safety precautions.
• DO NOT use the camera in water without
the waterproof case.
• ALWAYS check the waterproof case seal is
clean and free of debris prior to use in water.
• DO NOT attempt to open the camera or
modify it in any way. If the camera has
been opened the warranty will be void.
Maintenance and repairs should only be
performed by Kaiser Baas.
• DO NOT handle or charge the camera without
its waterproof case using wet hands. Failure
to observe this may result in damage to
camera and persons.
• ONLY recharge the camera battery using the
supplied USB cable.
• If using a wall charger, ensure that it is a
certied product for your region. AC Input:
100-240VAC 50/60Hz. DC Output: 5V 1A.
Only use a USB wall charger with suitable
approval and certication. Do not charge in
conditions outside of the 10°C - 45°C range.
If you do not know the voltage and current
of your charger, use the included cable to
charge from your computer.
• The camera should not be used in heat
exceeding 55°C (131°F).
• DO NOT drop, crush, pierce, bend, deform
or microwave the camera.
Before operating
please ensure
you have read
and understood
the safety
precautions
Page 4
5 6
G
F
K
K
J
H
G
LI
H
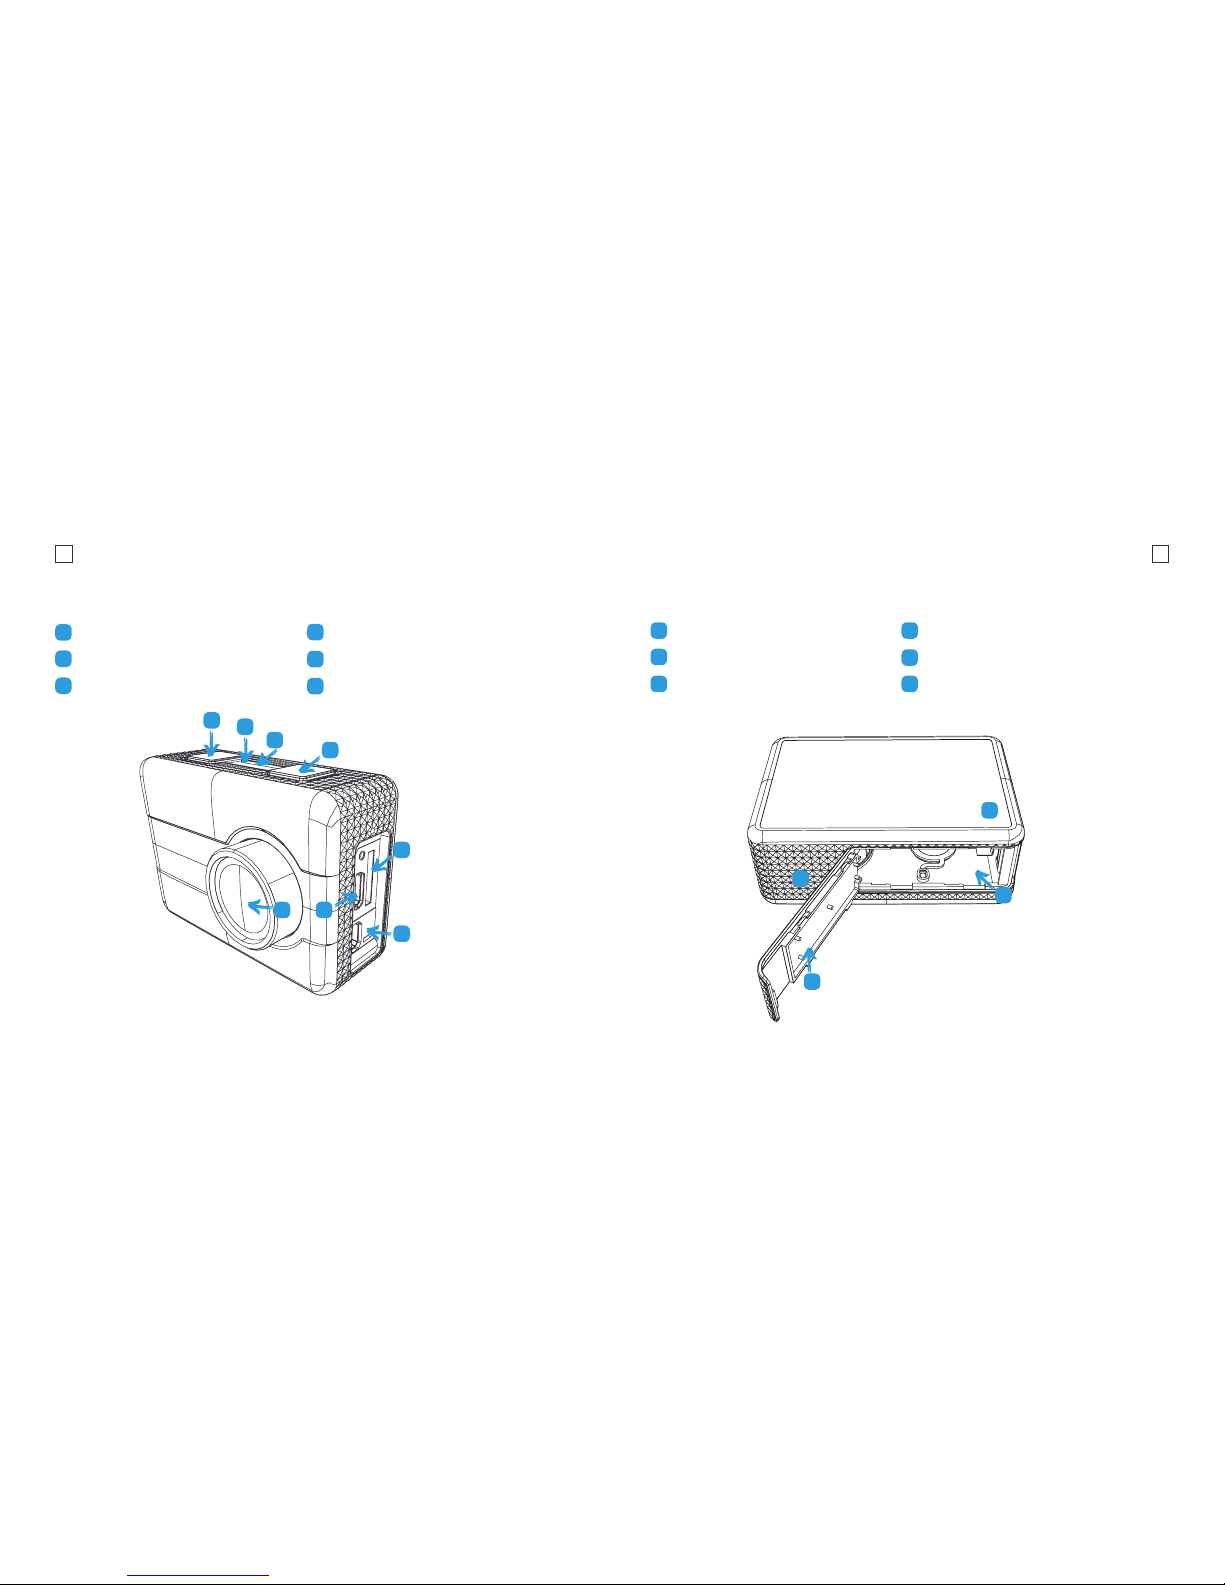
Product Diagram (Back)Product Diagram (Front)
Mode/Power Button
Menu/Record Button
Lens
MicroSD Card Slot
Micro HDMI Slot
Micro USB Port
A
A
B
B
D
I
C
C
E
D
F
E
Charge LED
Status/Power LED
LCD Screen
¼” Screw Mount
Battery Slot
Battery Door
J
L
Page 5

7 8
Getting Started
Welcome to your new Kaiser Baas
Action Camera. Before you get started
capturing footage, please review the
User Guide carefully to ensure you
get the maximum performance out
of your camera.
Battery Charging
We recommend that you charge your
camera fully before use. A full charge
takes approximately 3 hours using a 5V
0.5A Charger.
The charge LED light on the top of the
camera will be RED when charging and
will be OFF when charged. For further
important information about the battery,
see the Battery Guide (page 20).
MicroSD Card Compatibility
Your camera requires a MicroSD Card
(not included). We recommend the use of
a brand name Class 10 or higher MicroSD
Card.
There is only one correct way to insert
the MicroSD card.
Do not force the card into the slot as it
may damage the camera and card. The
maximum card size is 32gb.
Format Card
Before you start recording for the rst
time, we recommend you format the
MicroSD card. The format option is found
in the General Settings Menu.
For information on how to navigate the
menu please see the Navigation Guide.
Firmware Update
Please check the kaiserbaas.com/support
page for the latest rmware for your
camera. The current rmware can be
found in the general settings page.
Power On/Off
To power ON your camera
1. Insert the battery into the camera.
2. Hold the Power/Mode button for
5 seconds until you see the Kaiser
Baas logo appear.
Navigation
Navigate the menus and camera modes
using the 2 top buttons found on your
camera.
The Power/Mode button toggles between
Video Recording, Photo Capture,
Playback Mode and Setting Mode. Click
the power button consecutively until your
desired mode appears on screen.
Hold the Record/Menu button for 2
seconds to enter into the setup menu. To
go back or return to previous menu, hold
the Record/Menu button for 2 seconds.
When you are in a menu, the Power/Mode
button scrolls down.
Use the Record/Menu button to conrm.
Page 6

9 10
Capture Videos
Kaiser Baas cameras feature 2 key
modes; Video Recording Mode and
Photo Capture Mode. Both modes
feature dierent settings.
Video Mode
The default mode is Video Mode.
Click the Record button to start
recording.
When recording, the blue video LED
on the top of the camera will ash
continuously.
Video Settings
To access the Video Settings menu,
press and hold the Record/Menu button
for 2 seconds, and short press again
to conrm or click with the Power
Button consecutively until you reach
the Settings Mode.
Mode
Set which mode the camera is recording in.
Manual
This is the standard video recording mode.
Camera will record continuously until the
record button is pressed.
Looping
This allows you to record continuously
using footage intervals of 3/5/10 minutes.
The camera will delete the oldest loop
recording le and replace with the latest
recording when the Micro SD is full.
Auto Stop
This allows you to stop the video recording
automatically after your desired time of 1
Min/5 Min/10 Min/30 Min.
Video Resolution
Your action camera can be set to support
an array of resolutions and frame rates.
The higher the resolution, the greater the
detail and clarity of footage.
Higher frames-per-second (FPS) capture
more motion and appear smoother on
playback.
Video Quality
This setting lets you select the quality of
the videos. S.Fine is the highest quality
and largest le size. As you move down
the options, your video le sizes will be
smaller.
Scene Mode
Set the video scene mode to one of the
following options Manual, Water, Riding,
Winter, Diving, Night.
Video Resolution
Resolution FPS Aspect Ratio
1080P
(1920x1080)
30 16:9
720P
(1280x720)
60/30 16:9
Page 7

11 12
Capture Photos
Photo Mode
When you are in Video Mode, click Power/
Mode button twice to toggle to Photo
Mode.
Click the Record/Menu button to take
a photo.
Photo Settings
To enter the Photo Settings Menu, press
and hold the Record/Menu button for
2 seconds, and click the Power/Mode
button to scroll to the photo setting menu.
Mode
Change the capture mode: Manual,
Timelapse Photo, Burst & Self Timer.
Manual
This mode captures a photo every time
you click the Record button.
Timelapse Photo
Timelapse Photo mode allows you to
shoot a continuous sequence of photos.
This mode is activated by clicking the
Record/Menu button and will shoot
automatically until stopped by pressing
the Record/Menu button again.
Shoot in this mode with the following
intervals 5/10/15/30/60 seconds.
Burst
Burst mode allows you to shoot several
photos per second. Shoot in this mode
with the following intervals 3 photos/
5 photos.
Self Timer
When this mode is enabled, it lets you set
intervals for when a single photo is taken
after clicking the Record/Menu button.
2/5/10 second intervals are available.
Self Timer
Megapixels Resolution Aspect Ratio
5
2560x1920
(interpolated)
4:3
3 2048x1536 4:3
2 1600x1200 4:3
1 1280x960 4:3
Picture Quality
This setting lets you select the quality of
the images.
S.Fine is the highest quality and largest le
size. As you move down the options your
le sizes will become smaller.
Scene Mode
To set dierent scene mode: Manual,
Outdoor, Indoor, Portrait, Landscape,
Night.
Page 8

13 14
To enter the Eect Settings Menu, press
and hold the Record button for 2 seconds,
and click the Power button to scroll to the
Eects setting menu
Zoom
Digital Zoom by the following options x1,
x2, x3, x4.
Filter
Add a color lter eect to your footage.
Filters include: Black & White, Sepia,
Vivid, Natural, Negative, Warm, Cool, Red,
Green, Blue are available for your options.
AE Meter
Manually control how the camera meters/
interprets light. Available options Center,
Average or Spot. The Default Mode is
Center.
EV
Manually control the exposure/amount of
light the camera records. Intervals range:
-2.0/-1.0/+0.0/+1.0/+2.0
White Balance
Manually control the White Balance
setting.
Interval range: Auto, 3000K, 5500K,
6500K.
Effect Settings
ISO
Manually control the ISO level the
camera captures footage at. The
default option is Auto. Interval options:
Auto/100/200/400/800/1600.
Upside Down
When checked, this setting will allow you
to invert the footage captured - Useful
for when the camera is positioned
upside down.
Time Stamp
This setting will embed the Time on the
corner of your photos and videos. It is
OFF by default.
Note: That the higher the ISO
number the more noise/grain will
appear in your footage.
Page 9

15 16
To enter the General Settings Menu, press
and hold the Record button for 2 seconds,
and click the Power button to scroll to the
General Settings menu.
Control
This allows you to change the volume of
MIC.
Beep
This allows you to turn on or o the beep
sound.
LED Indicator
Select if you would like to disable the LED
lights.
Auto LCD Off
This setting lets you conserve power
while shooting. It will switch o the LCD
screen after the set interval: O/1 min/3
min/5 min.
General Settings
Auto Power Off
This will power o the camera after a
period of inactivity.Intervals of o/5/10/30
Minutes.
TV Out
Setting the desired TV standard, PAL or
NTSC.
Time Setup
Set the Date and Time.
Language
Select your desired language.
Memory Format
This option will format the MicroSD
card. Recommended prior to using any
MicroSD that has been used in other
devices.
Default
Resets all settings to the factory default.
Software Info
Displays the current Firmware Version.
Note: Formatting the card will
permanently erase all data on
the card. Be sure to backup any
content prior to formatting.
Page 10

17 18
Playback Battery Guide Maintenance
You can playback your footage on a PC
or computer/laptop.
Using the supplied USB cable, connect
the camera to your computer. Turn the
camera on, then the camera will now
appear as an external device.
You may also use a MicroSD Card reader
to view and playback les directly without
the camera.
HDTV Playback
To playback on HDTV you will need
a Micro HDMI – HDMI Cable.
When connected, the HDTV will switch
the Camera LCD screen OFF and mirror
the camera screen instead.
The camera will only output up to
1920x1080i via the Micro HDMI port.
Only use Kaiser Baas ocial batteries with
this product. Never use any third party
or unknown accessories or batteries.
To charge the camera:
1. Insert the battery into the camera.
2. Connect the USB Charging Cable to
the Micro USB port located on the
camera.
3. Connect the USB Charging Cable
to a computer or wall charger.
Adhere to these guidelines to ensure
maximum performance and longevity.
• Never use the camera in water without
the waterproof case. The camera is not
waterproof without the case.
• If camera has been used in salt water,
ALWAYS rinse the waterproof case in
fresh water to prevent corrosion.
• Regularly check the seals for debris or
dust on the door of the waterproof case
to prevent water, sand and dirt ingress.
• Never handle the camera, battery or
MicroSD Card with wet hands or in wet
conditions.
• Clean the camera lens and waterproof
case lens with a soft micro bre towel
to reduce any blurry footage due to
grease/ngerprints.
4. The camera status LED will be RED
whilst charging. Once charging is
complete the status LED light will
switch OFF.
5. A full charge cycle will take
approximately 3 hours by 0.5A/1A
charger.
WARNING!: If using a wall charger,
ensure that it is a certied product
for your region. AC Input: 100-240VAC
50/60Hz. DC Output: 5VDC 0.5A/1A.
Only use a USB charger with suitable
approval and certication. If you do not
know the output voltage/current of the
charger use a computer to charge the
battery. Do not charge in conditions
outside of the 10°C - 45°C range.
Page 11

19 20
FAQ
My camera has frozen
Try to restart the camera by holding the
power button or removing and reinserting
the battery.
Won’t read my MicroSD Card
Make sure the MicroSD has been
formatted. If you are still having trouble,
please visit kaiserbaas.com/support
for a guide on MicroSD compatibility.
What is the maximum size MicroSD
Card I can use?
The camera supports up to 32gb MicroSD
cards.
My footage les are split up?
The le system the camera uses is FAT32
and the maximum le size is 4GB. Your
camera will split les into 4GB parts.
The video length of each le will be
determined by the resolution and FPS
you have set. Lower resolutions will result
in longer les.
How do I know when the camera is
charged?
When connected to a power source and
powered OFF the camera status LED will
be o.
The audio/mic is too low/mufed
When using the camera in the waterproof
case, audio performance will be
signicantly impacted. Try using
the camera without the case for best
audio performance.
Choppy Playback
Choppy or slow playback is usually not a
problem with the le. Check the following
common solutions:
• Your computer may not support the
minimum requirements for HD playback.
Try recording at a lower resolution and
checking playback.
• Video footage is recorded using the
h.264 codec, your video player may not
support this format. Please use a video
player that supports h.264 playback.
Visit kaiserbaas.com/support for
further information on compatible video
players.
Page 12

21 22
PRODUCT SPECIFICATIONS
Shutter Speed
1/30 to 1/2000 sec
Video Looping
MOV
Sensitivity
Auto/100/200/400/800/1600
Microphone
Auto Level Control
Display
2” LCD
Format
Video: MOV H.264
Photo: JPEG
Battery
3.7V/900mAh Li-Battery
Battery Life
Video: 90 Minutes
Language
English, French, German, Spanish
Dimensions
48.2 x 44.2 x 43.6mm
Casing
68.3 x 88.6 x 55.3mm
Waterproof
Down to 40m (with waterproof casing)
Sensor
1/2.3” CMOS
Field of View
150°
Resolution
Video:
1080FHD (1920*1080 ) 30/60FPS
720P (1280*720) 30/60/120FPS
Photo: 5M, 3M, 2M
Storage Type
Micro SD card up to 32GB (not included)
Lens Elements
6
Lens Aperture
F/2.4
Lens Focus
0.5m to innity
Page 13

23 24
Got a question about your
Kaiser Baas Action Cam?
Live Chat:
www.kaiserbaas.com/support
Email:
helpdesk@kaiserbaas.com
For further information please visit:
www.kaiserbaas.com
Kaiser Baas Support
Page 14

25
KBA12040-002 | A01
 Loading...