

Page 1

X360 | Dual Lens VR Camera
USER GUIDE
Page 2

Page 3

Page 4

4
EN
X360 | User Guide
Join the social movement and follow us on
Share your footage with us on our social media
#ChallengeYourself
Need help? www.kaiserbaas.com/support
To view the entire Kaiser Baas product
range and accessories visit:
www.kaiserbaas.com
Page 5
5
EN
X360 | User Guide
Languages
English 4 - 31
Français 32-59
Espaná 60-87
Page 6

6
EN
X360 | User Guide
Table of Contents
Safety Precautions 7
What’s in the Box 8
Product Diagram 9-10
Set Up Your X360 Camera 11
Using Your X360 Camera 13
Charging the battery 13
Video Mode 14
Picture Mode 15
Menu Settings 16
Connecting X360 to a Smartphone/Tablet 18
App Interface Diagram 19
Using with VR-X Headset 20
Playback 20
360° Video Footage 21
Playback using X360 App 21
Downloading Video file to Smartphone/Tablet 22
Transferring files to PC 23
Converting Spherical 360 Video to Panoramic Video 25
Camera Reset 28
FAQ 29
Specifications 30
Contact Us 31
Page 7

7
EN
X360 | User Guide
Safety Precautions
Before using the X360 Camera please ensure you read and understand
the safety precautions.
• Do not attempt to open the case of the X360 or modify it in
any way. If the X360 has been opened the warranty will be void.
Maintenance and repairs should only be performed by Kaiser
Baas.
• Keep the X360 away from water and other liquids.
• Do not handle the X360 with wet hands. This may cause the
X360 to malfunction.
• Recharge the battery using the supplied micro USB cable (5V).
Any variation to voltage may cause the X360 to fail.
• The X360 should not be used in heat exceeding 50°C (131°F).
• DO NOT drop the X360.
• Avoid placing heavy objects on the X360.
• Do not dispose of this unit in domestic waste.
• If you have any questions, please contact us at
www.kaiserbaas.com/support.
Page 8
A B C
D
E
F
G H
8
EN
X360 | User Guide
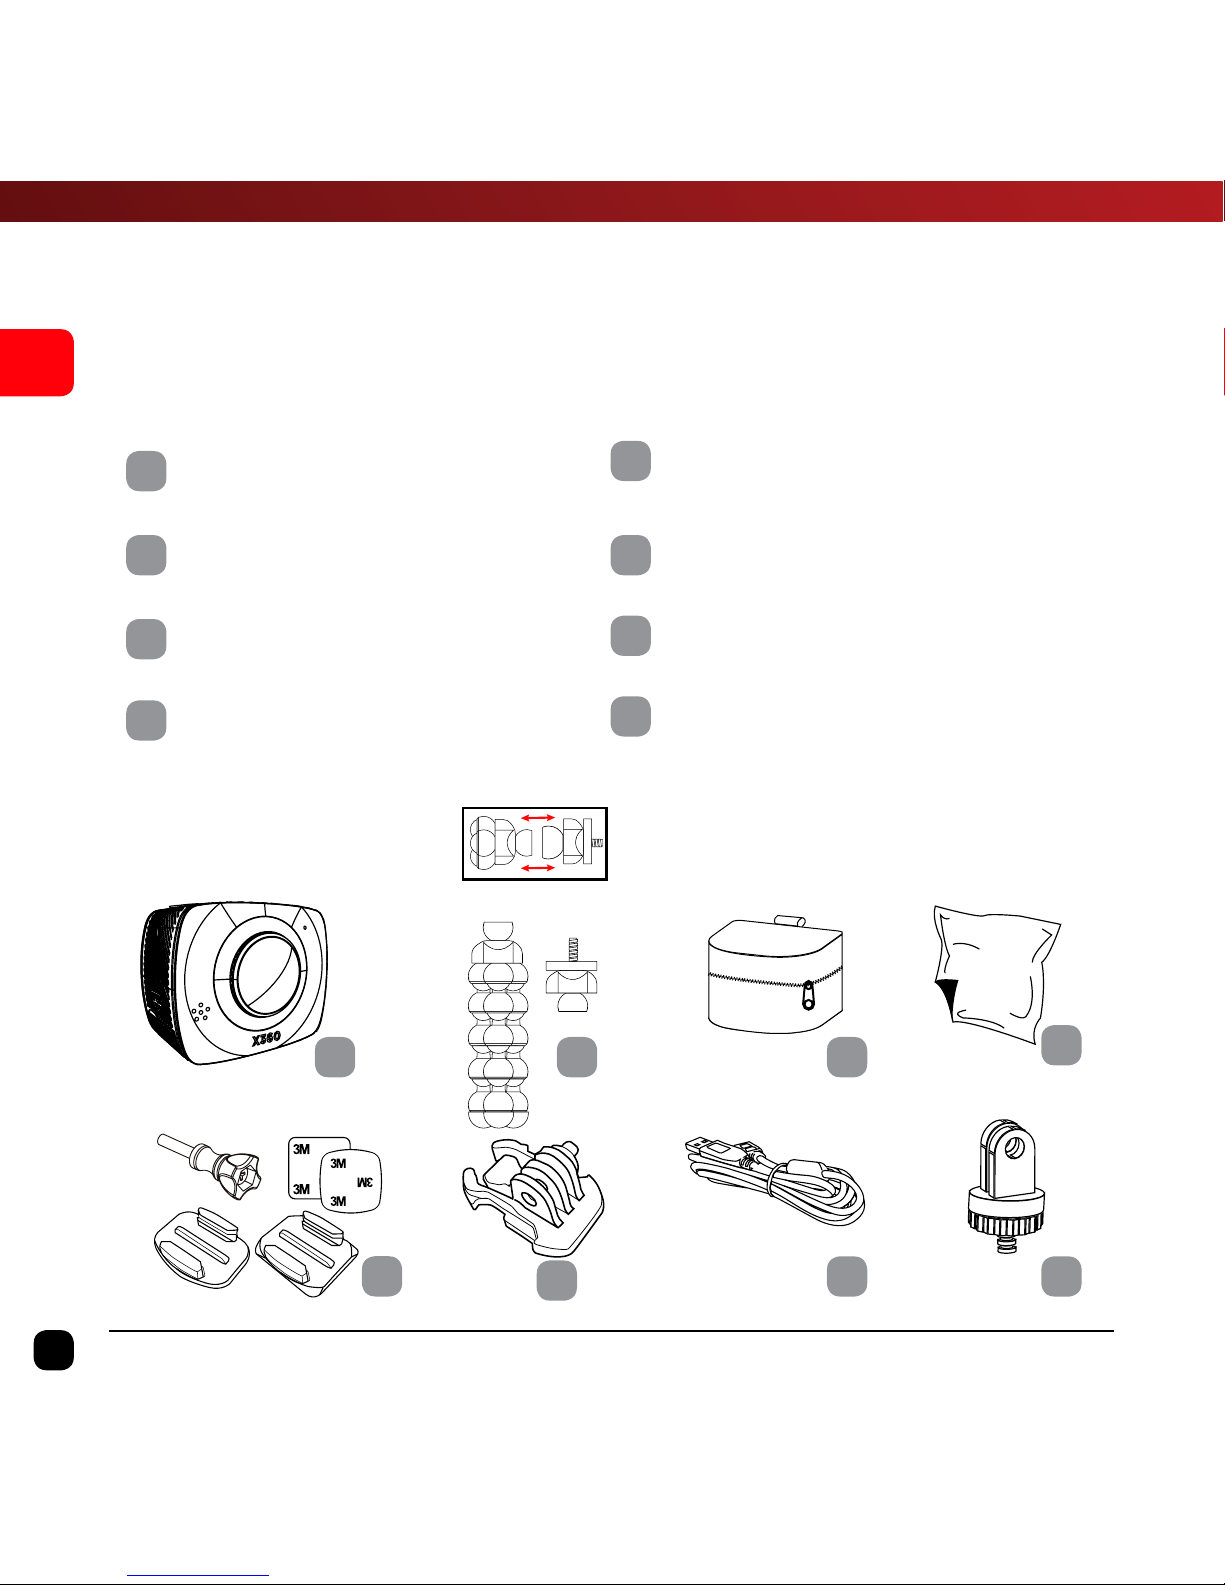
What’s in the Box
Please ensure the product package has the following contents:
A
X360 Dual Lens VR Camera
E
Flat and Curved Mount with 3M
Pads and Lock Bolt
B
Gorilla Tripod
F
Quick Release Mount
C
Carry Bag
G
USB Cable
D
Lens Cloth
H
GoPro™ Tripod Adaptor
PRESS TO LOCK
Page 9
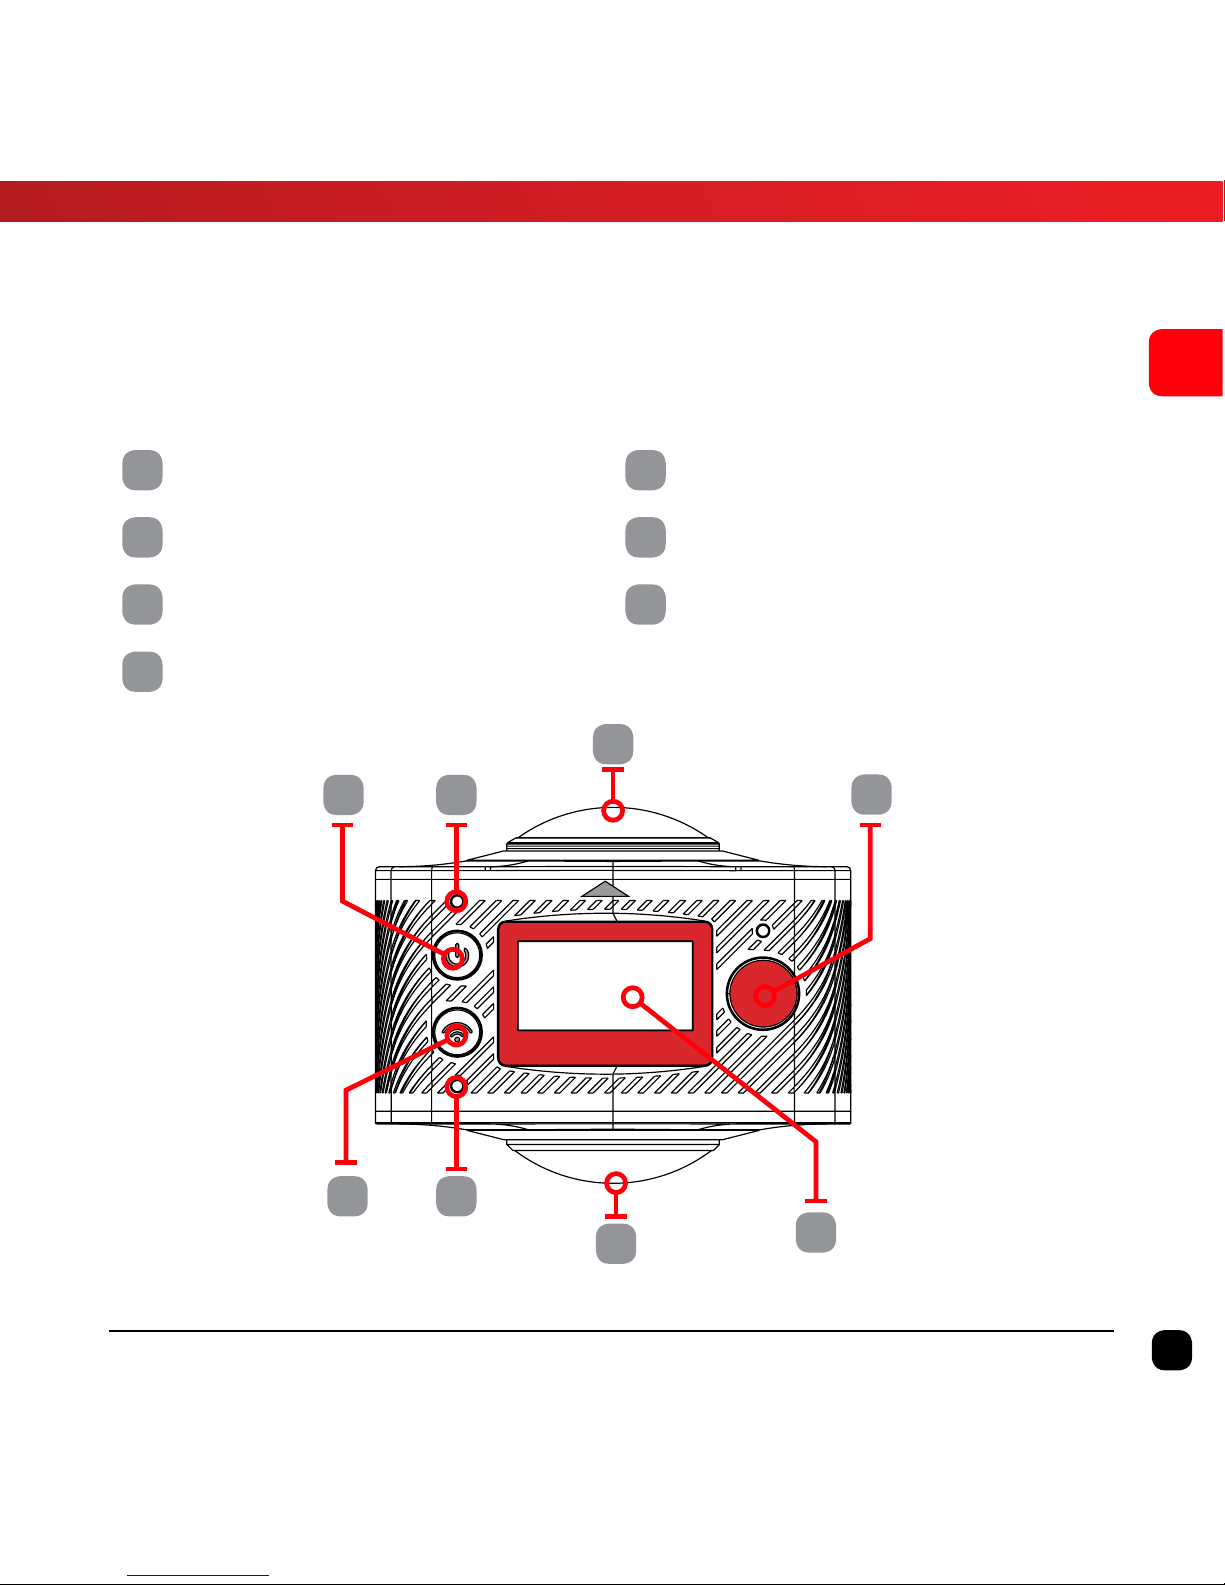
Top View
D
C
G
C
A B
FE
9
EN
X360 | User Guide
A
Power Button (Mode)
E
Wi-Fi Button (Menu, Scroll)
B
Power Indicator
F
Wi-Fi Indicator
C
Lens
G
Display
D
Record Button (OK Button)
Product Diagram
Page 10
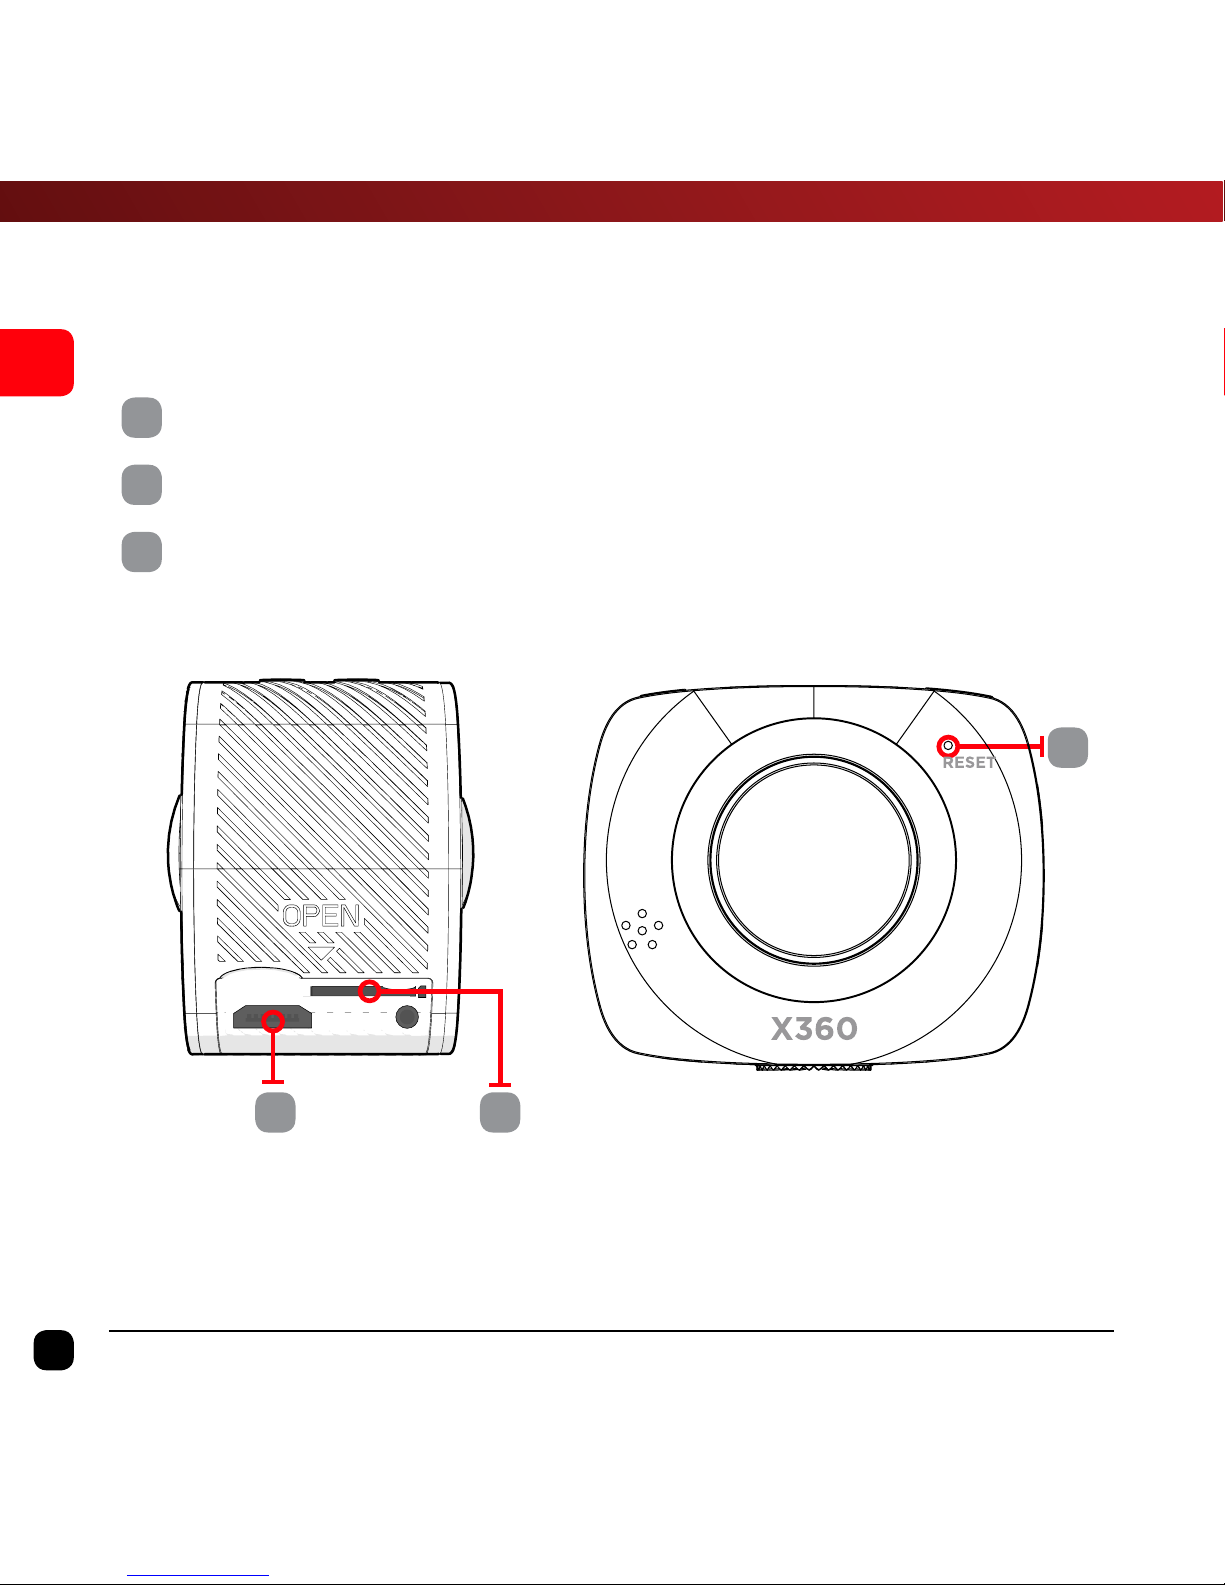
Right View
Front View
IH
J
10
EN
X360 | User Guide
H
Micro USB
I
Micro SD card
J
Reset Button
Product Diagram
Page 11

11
EN
X360 | User Guide
Set Up Your X360 Camera
Insert the Micro SD Card*
A Class-6 or Class-10 Micro SD Card up to 32GB is required. The X360
will not support a Micro SD card below class 6. There is only one correct
way to insert the Micro SD Card into the slot. Do not force the card into
the card slot, as it may damage both the X360 and the Micro SD Card.
It is recommended that you format new cards or cards that have been
previously used in other devices. To format the Micro SD card:
• Turn the X360 on, enter the Setup menu by holding
the Wi-Fi button.
• Use the Wi-Fi button to Scroll down and select the Format
option using the Record button.
• Scroll using the Wi-Fi button, select Ye s and press Record
button.
• Hold the Wi-Fi button to exit the menu.
NOTE: Formatting the card will permanently delete contents of the card. Be sure to
save any important files.
* Micro SD cards are also called TF cards.
Page 12

Hold the power button
Initializing
12
EN
X360 | User Guide
To turn the X360 ON, press and HOLD the Power button for 3 seconds.
When the X360 is turned ON, “Initializing” will appear on the screen
and the Red LED will flash. The X360 is now in Video Mode.
Page 13

13
EN
X360 | User Guide
Using Your X360 Camera
Charging the battery
Before using the X360 for the first time it is recommended that you
fully charge the battery.
Procedure:
1. Connect the X360 to an electronic device using the USB cable
provided.
2. If using a wall charger, ensure that it is a certified product for
your region. AC Input: 100-240VAC 50/60Hz. DC Output: 5VDC
0.5A/1A/2.1A. Only use a USB charger with suitable approval and
certification. Do not charge in conditions outside of the 10°C50°C range.
3. When the X360 is charging, a blue light will glow above the
power button.
4. A completely flat battery will take approximately 5 hours to fully
charge. The Blue LED will switch o when fully charged.
Note:In order to operate the camera whilst charging please ensure you are using a
wall charger.
Page 14

07:12:35
2016/01/01 00:21
14
EN
X360 | User Guide
Video Mode
Once the X360 is turned on, Video Mode is selected by default.
Press the Record Button to start recording.
When recording commences, you will see the red light on the X360
start flashing. To end recording, press the Record Button again.
Note: To watch the preview, you will need to connect the X360 Camera to a
smartphone/tablet device. Please refer to page 17 “Connecting the X360 to a
Smartphone” for more information.
Page 15

08:11:25
2016/01/01 00:45
15
EN
X360 | User Guide
Picture Mode
This mode will allow you to take snapshots.
To activate this mode:
Turn the X360 ON. Once it is ON, press and release the Power button.
This will switch the camera from Video Mode to Picture Mode.
Note: Do not hold the power button as it will turn the camera off.
You will see ( ) on the top left corner of the screen. Press the Record
button to take snapshots.
Tip: Use the Smartphone App to take photos more effectively without your hands
body in the way.
Page 16

16
EN
X360 | User Guide
Menu Settings
To access the Menu settings, press and hold the Wi-Fi Button for
3 seconds. Use the Wi-Fi button to scroll through each setting.
Use Record Button to confirm your selection.
To exit any menu item, press and hold the Wi-Fi Button for 3 seconds.
Power Save
This will set the X360 to automatically power off after 1 minute, 3 minutes or 5
minutes. Select OFF to keep the X360 ON during periods of inactivity.
Date & Time
To set the system date and time.
Language
To set the device language.
Factory Reset
This will reset the X360 to factory default settings.
System
To check the firmware version and SD card information.
Format
This will format the Micro SD card and permanently erase all data on the card.
Use wisely.
Page 17

17
EN
X360 | User Guide
Connecting X360 to a Smartphone/Tablet
The X360 allows full camera control, live previewing, playback of photos/
videos and VR playback on iOS and Android Smartphones and Tablets.
The App is only supported on iOS 8.0 and Android 4.4 or above.
1. Download the Kaiser Baas X360 App onto your Smart Device:
www.kaiserbaas.com/apps/x360-app
2. Activate WiFi on your X360 by pressing the Wi-Fi button. You
will see the Red LED under the Wi-Fi button when the Wi-Fi is
active. The Wi-Fi SSID and password will be displayed on the
camera LCD screen.
3. Go to the Wi-Fi settings on your Smartphone/Tablet and the
X360 will appear in the list of available Wireless Networks.
4. Connect your device to the X360 via WiFi.
5. The password will be displayed on the LCD screen of the X360
Camera unit, once the WiFi is turned ON (the default password
is 1234567890).
Note: Wi-Fi will be turned off automatically if the X360 is not connected to a
device within 2 minutes.
6. Once your device is connected to the X360, launch the ‘Kaiser
Baas X360’ app.
Important: Ensure the app is fully downloaded on to your Smart Phone or Tablet
before connecting it to the X360 via Wi-Fi.
Page 18

Click To Connect
18
EN
X360 | User Guide
After the first setup of the camera you must click the camera icon on
the top right [See Diagram] to connect the camera to your device.
Page 19
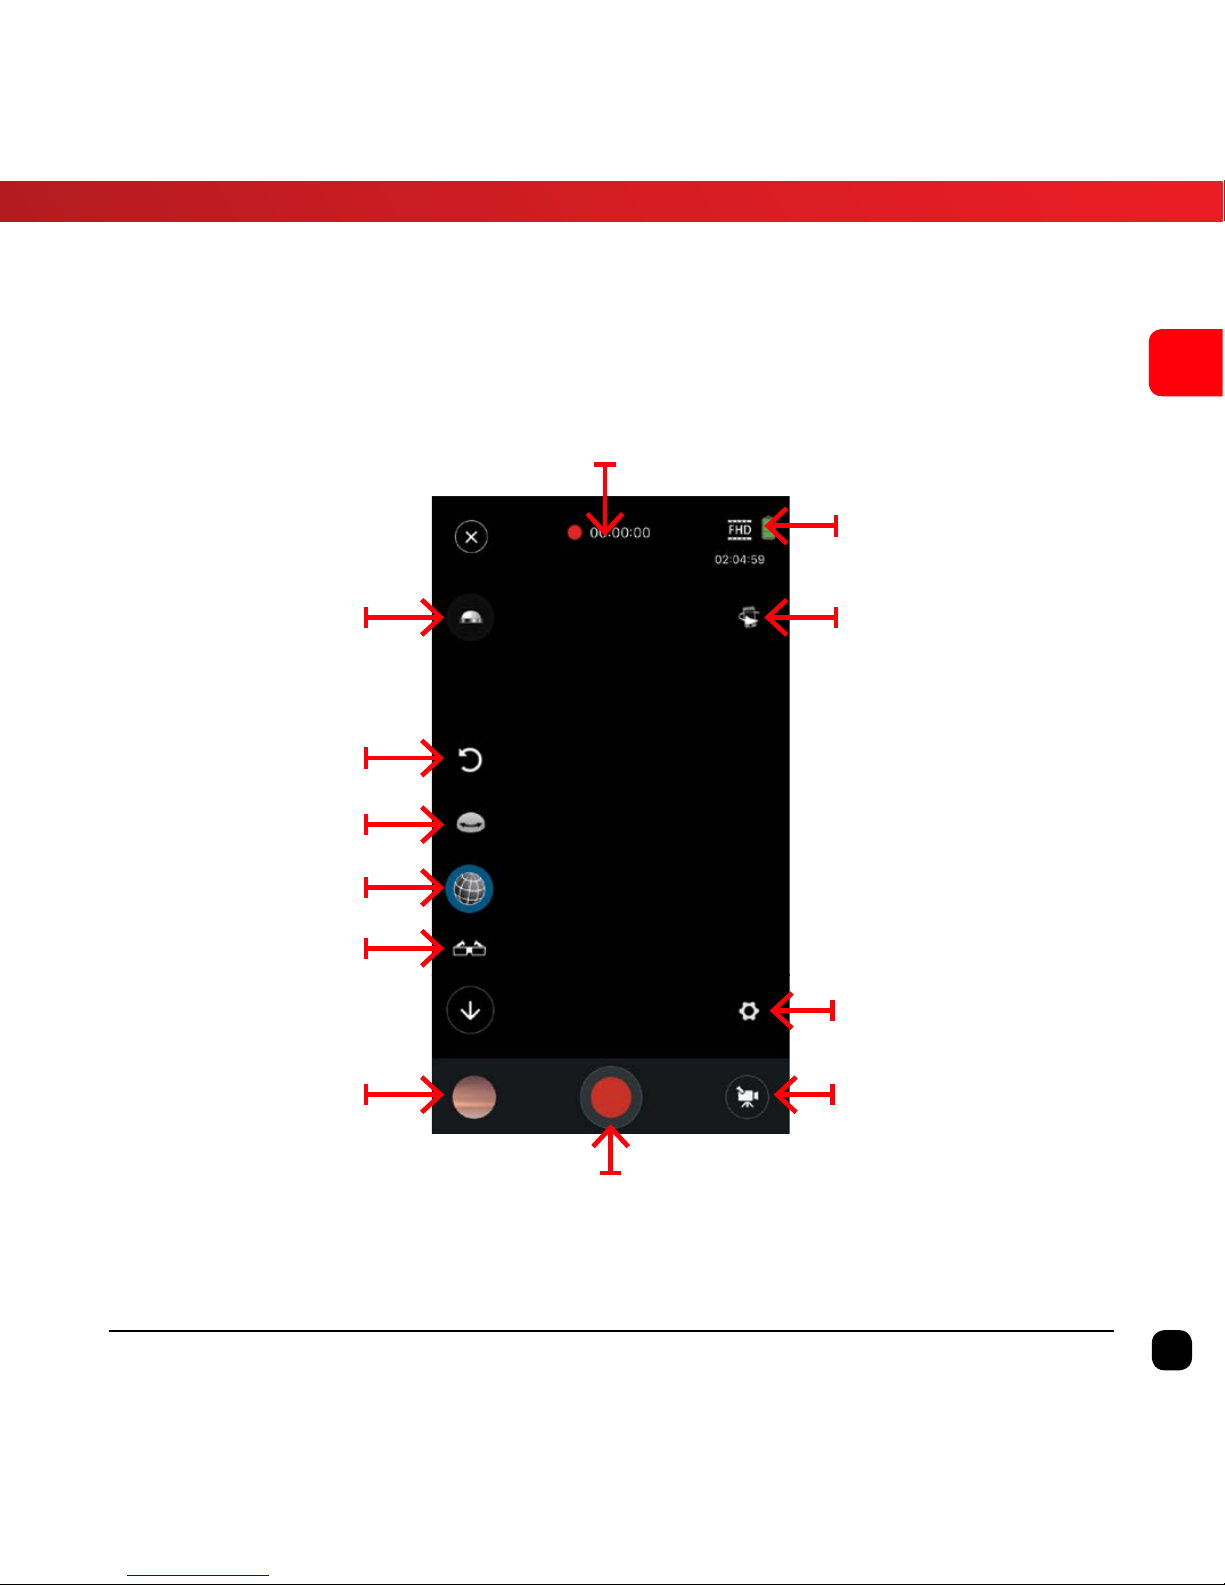
Reset Video
Invert View
Explore Mode
Dome Mode
VR Mode
Capture Mode
Settings
Gyro Mode
X360 Battery
Status
Record Duration
Record Button
Gallery
19
EN
X360 | User Guide
App Interface Diagram
Page 20

20
EN
X360 | User Guide
Using with VR-X Headset
The X360 Camera is designed to work seamlessly with a Kaiser Baas
VR-X Headset or Google Cardboard VR Viewers.
To watch your footage using a VR-X Headset or Google Cardboard VR
Viewer, simply tap this icon on the Kaiser Baas X360 app screen.
You will see the stereoscopic screen once the VR mode is active.
Ensure your VR-X Headset or VR Viewer is lined up perfectly with the
split in the screen for the best experience.
Page 21

21
EN
X360 | User Guide
Playback
360° Video Footage
The X360 records footage from both lenses onto one video file. This
means you must use Playback software on your smartphone/tablet
to view the footage interactively or use a PC/Mac playback software.
Playback using X360 App
To watch recorded videos, you need to connect the X360 to a
Smartphone via Wi-Fi.
1. Launch the Kaiser Baas X360 app.
2. Access the Gallery.
3. Tap on the file that you want to watch.
There are a number of modes to playback your 360° footage. The key
modes are as follows:
Dome View ( ) – Creates a sphere that you can rotate using either
the gyroscope or swiping.
Explore Mode ( ) – This mode allows you to pan around in 360° using
either the gyroscope or swiping.
VR Mode ( ) – Splits the footage into stereoscopic vision. This
mode allows you to view footage using a VR-X Headset or Google
Cardboard VR viewer.
Tip: Recorded Videos can also be viewed through a VR-X Headset or a Google
Cardboard VR viewer. To enable VR mode, just tap this icon ( ) on the screen.
You will see the stereoscopic screen once the VR mode is active.
Page 22

22
EN
X360 | User Guide
Downloading Video file to Smartphone/Tablet
You can download footage captured on the X360 to your Smartphone/
tablet. This will allow you to watch the video on your Smartphone
without connecting it to the X360 Camera via Wi-Fi.
To download video; click the download icon during playback or in
the gallery of the camera.
Note: The download process may get interrupted when the smartphone receives
calls or enters standby. If you are moving long videos, it is recommended that you
disable standby mode as this will ensure your video downloads without failure. If
the process fails, you will need to restart the process.
Photo Resolution
This allows you to set the image resolution to capture Photos.
Video Resolution
This allows you to set the video recording resolution.
White Balance
White balance means that the user adjusts the color temperature under different
light sources to ensure that the colors are reproduced correctly.
Format
This will format the Micro SD card and permanently erase all data on the card.
Use wisely.
Change Wi-Fi Password
This will allow you to change the Wi-Fi password of the X360 Camera.
Page 23

23
EN
X360 | User Guide
Transferring files to PC
Once you have captured videos on your X360, you are able to transfer
them onto the computer for playback.
Using the Micro USB cable supplied, connect the X360 to your
computer.
Mass Storage Mode (MSDC) will appear on the X360 screen and the
computer will detect the X360 as an external storage device.
1. Alternatively, you can remove the Micro SD card and use a card
reader (not included) to achieve the same result.
2. Select the file(s) you want to transfer to your computer by
highlighting them.
3. Either drag the files to the desired location on your computer
(this will make a copy of the file) OR right-click the file, select
Copy and right-click in the desired location on your computer
and select Paste.
TIP: You can also transfer entire folders to your computer.
Page 24

24
EN
X360 | User Guide
Upload to YouTube & Facebook
YouTube and Facebook support uploading and playback of 360°
interactive videos. In order to upload a 360° video file, you’ll need to
convert the spherical video file to panoramic video through the X360
Video Processing Tool application.
.
Page 25

25
EN
X360 | User Guide
Converting Spherical 360 Video to Panoramic Video
1. Download the X360 Video Processing Tool application from
http://kaiserbaas.com/apps/x360-app/
2. Install it on your PC and launch the X360 Video Processing Tool
application.
3. Import the 360° Video file that is saved on your computer.
Tip: To import, click Add button and browse for the saved location or you can
drag and drop the files into the application.
4. Change the output path if you want to save the file on a
dierent location.
5. Click this button to start processing the video files. You will
be able to see the progress during the conversion process.
The length of this process is based on the length of the video.
6. Once the process is completed, you can upload the panoramic
360 video file onto YouTube or Facebook.
Page 26

26
EN
X360 | User Guide
To upload 360 Videos to YouTube from your computer.
Follow the same steps as you would to add any other video to your
YouTube account.
1. Sign into your YouTube account.
2. Click on Upload at the top of the page. Before you start uploading the video you can choose the video privacy settings.
3. Select the 360 video you would like to upload from your
computer.
Note: Make sure to upload the processed video instead of the unprocessed spherical video.
4. Click Publish to finish uploading a public video to YouTube. If
you set the video privacy setting to Private or Unlisted, just click
Done to finish the upload or click Share to privately share your
video.
5. Once the upload is completed, you will be able to watch it on
YouTube
Note: Processing time varies greatly depending on the length of your original video,
file size, and upload traffic. This could take anywhere from a few minutes to several
hours. You should also expect that higher resolution formats will render more
slowly. HD may take significantly longer to appear in HD quality.
Tip: You can also watch 360° videos on YouTube apps for Android and iOS. You can
watch 360° videos in VR mode directly from YouTube with the Kaiser Baas VR-X
Headset or Google Cardboard viewer.
Page 27

27
EN
X360 | User Guide
To upload 360 Videos to Facebook from your computer:
1. Follow the same steps as you would to add any other video to
a Facebook.
2. Before publishing your video, click the Advanced tab.
3. Tick the checkbox next to your video to confirm your video was
recorded in a 360° format. This will allow your video to have the
interactive 360° controls available.
4. Click the 360 Controls tab to be able to set the initial camera
orientation and field of view for your video.
5. Click Publish.
Page 28

Camera Reset
28
EN
X360 | User Guide
Camera Reset
X360 Camera has a hard Reset button. This allows you to reset the
camera to the factory default settings.
If the camera becomes non responsive or frozen. Please reset using
this button.
Use a small pin to push the reset button whilst the camera is ON.
Page 29

29
EN
X360 | User Guide
FAQ
Q. How do I view the 360 Video?
At the moment, the 360 interactive playback option is only available on your smart
device such as phones/tablets. You can upload the video to YouTube or Facebook
and watch it on PC.
Q. The video file has two circles and wont upload to YouTube.
You must first convert the footage. Please refer to the “Upload to YouTube or
Facebook” section of the user guide.
Q. My camera freezes and I can’t record or power it o. What do I
do?
The camera has a hard reset button. Use a small pin to push the reset button.
Q. Is there a way to output to HDMI?
There isn’t the ability to output directly to HDMI.
Q. Is the X360 Camera waterproof?
No, the camera is not intended to use under the water.
Q. What type of SD card can I use?
Class 6 or Class 10 Micro SD card up to 32 GB is recommended.
Q. What is the range of Wi-Fi?
Up to 32 meters.
Q. My phone/tablet will not connect to the X360 via WIFI?
Ensure the 360 camera WIFI has not been disabled. You will see the Wi-Fi indicator
on the camera screen if the Wi-Fi is active.
Page 30

30
EN
X360 | User Guide
Specifications
Image Sensor 4MP CMOS x2
Lens F2.0- F=1.1mm
Field of View 360°
Resolution Video: 1920 x 960 px
Still photo: 3008 x 1504 px
Format Video: MOV H.264
Still photo: JPEG
Storage type Micro SD card up to 32GB (not included)
Microphone In-Built
Connectivity Wi-Fi
Interface Micro USB
Display 1” LCD
Battery Built-in 3.8V/1500mAh Li-Battery
Battery Life 80 minutes recording
Language English, French, Spanish, Chinese
Dimensions 60 x 48 x 50 mm
Weight 106g
Page 31

31
EN
X360 | User Guide
Contact Us
Need further assistance? Please visit:
www.kaiserbaas.com/support
Or email:
helpdesk@kaiserbaas.com
To view the entire Kaiser Baas product
range and accessories visit:
www.kaiserbaas.com
Page 32

CHALLENGE YOURSELF
 Loading...