

Page 1

Quick Start Guide
Visit kaiserbaas.com for more information
Page 2
CONTENTS
GETTING STARTED
01 - ENG
Before operating your R60
please ensure you have read
and understood the safety
precautions
R60 Quick Start Guide - English
Pages 01 - 06
Guide de démarrage rapide R60 - Français
Pages 07 - 14
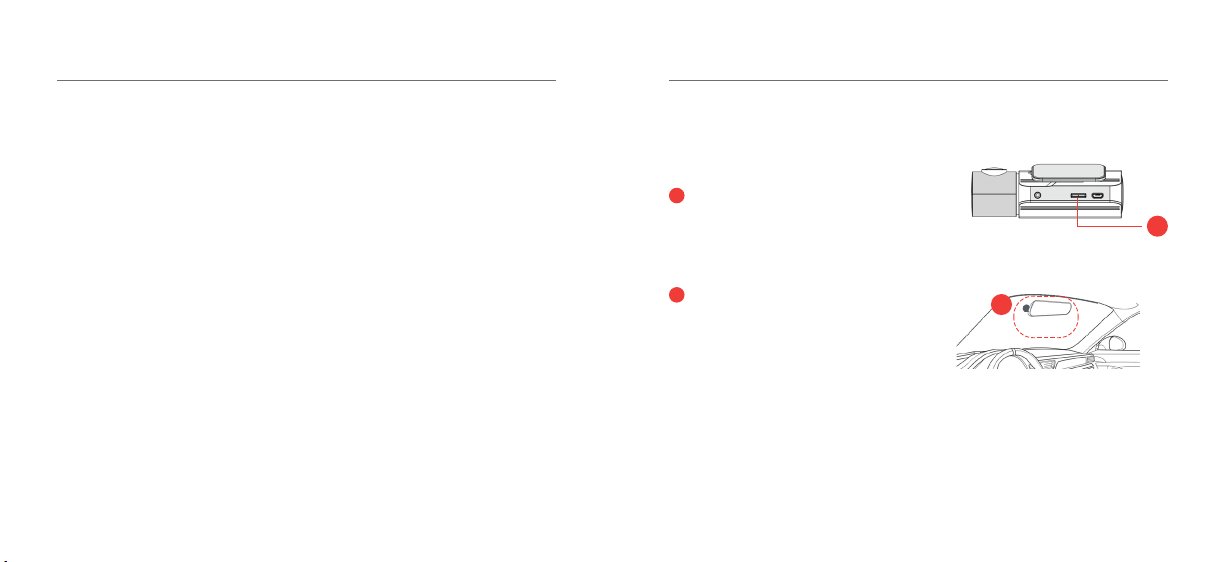
Setting up the Front
Camera & GPS
1
Insert a Micro SD card.
We recommend using a Class 10
Micro SD card (Max 64GB).
2
It is recommended that the R60 be
mounted behind the rear-view mirror.
This will allow the camera to be out
of the drivers’ eld of view, with the
power cable running around the
outside of the windscreen.
Front Camera Unit
1
2
Suggested
Page 3
GETTING STARTED
02 - ENG
GETTING STARTED
03 - ENG
3
Connect the charge/GPS cable to the
camera and plug it into the USB car
charger.
The R60 will automatically turn on
and begin recording when the vehicle
starts.
4
For optimal positioning of the GPS
module, it should be mounted as far
away from the camera as possible,
with an unobstructed view of the sky.
The camera will say “GPS Working”
when it has a solid GPS signal.
Suggested
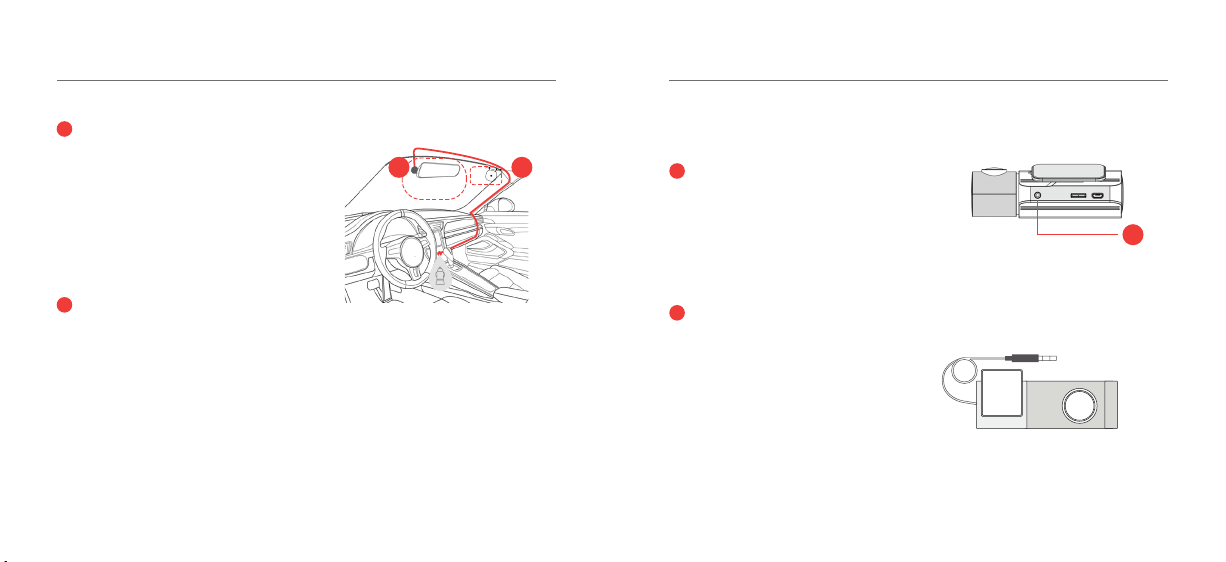
Setting up the Rear Camera
43
GPS
5
Front Camera Unit
Using the 6m rear camera cable,
connect the Micro USB end to the
rear camera unit and the 3.5mm pin
to the Video input port on the front
5
R60 camera.
6
Rear Camera Unit (6M Cable)
Mount the rear camera unit on the
rear window.
Page 4

Wi-Fi & KB APP
04 - ENG
R60 FEATURES
05 - ENG
Download the KB R60
App to get started
Open your Smartphones Wi-Fi
settings and select the Dash Cam
Network (KB R60).
Use the password 12345678
to connect.
To take a photo using hands free
control, simply wave your hand
under the R60.
The GPS module will track your
location and speed.
The camera will capture and store
videos and photos.
Other Settings
Once you’ve connected your
smartphone to the dash cam,
enter the settings page to modify
the general settings such as the
G-Sensor sensitivity, microphone
switch, volume etc.
Wave hand underneath
Page 5

PRODUCT SPECIFICATIONS
06 - ENG
R60 Dash Camera
Lens
FOV
WiFi 2.4GHz
GPS Yes
G-sensor 3 Axis
Video Information
Audio Information 8KHz, 2 Channels
Photo Information 2M (1920x1080)
Storage
Battery Type Super Capacitor
Visit www.kaiserbaas.com/support or email
helpdesk@kaiserbaas.com for support. For
the complete user guide, visit www.kaiserbaas.com
6-Glass Elements Front
4-Glass Elements Rear
145° Front
120° Rear
1920x1080 30FPS Front
1280x720 30FPS Rear
Class 10 Micro SD
Max 64GB
1. Mount
2. Front Camera
3. Rear Lens Pin
1
2
3
4
5
6
4. Micro SD Card Slot
5. Charging Slot
6. Rear Camera
Guide de démarrage rapide
Rendez-vous sur www.kaiserbaas.com pour en savoir plus
Page 6

TABLE DES MATIÈRES
08 - FR
MISE EN ROUTE
09 - FR
Assurez-vous d’avoir lu et
compris les précautions de
sécurité avant d’utiliser le R60
R60 Quick Start Guide - English
Pages 01 - 06
Guide de démarrage rapide R60 - Français
Pages 07 - 14
Conguration de la caméra
avant et du GPS
1
Insérez une carte MicroSD.
Nous recommandons une carte
MicroSD de catégorie 10 (Max 64 Go).
2
Nous recommandons d’installer
le R60 derrière le rétroviseur.
La caméra sera ainsi située hors du
champ de vision du conducteur et
le câble d’alimentation contournera
le pare-brise.
Unité de la caméra avant
1
2
Suggéré
Page 7

MISE EN ROUTE
10 - FR
MISE EN ROUTE
11 - FR
3
Connectez le câble d’alimentation et
du GPS à la caméra et branchez-le
au chargeur USB de voiture.
Le R60 s’allumera automatiquement
et commencera à enregistrer lorsque
le véhicule démarrera.
4
Pour un positionnement optimal, le
module GPS devrait être installé aussi
loin que possible de la caméra, avec
une vue dégagée du ciel. La caméra
indique « GPS en marche » lorsque le
signal GPS est robuste.
Suggéré
Conguration de la caméra
43
GPS
arrière
5
Unité de la caméra avant
À l’aide du câble de la caméra arrière
de 6 m, branchez l’extrémité Micro
5
USB à la caméra arrière et branchez la
che de 3,5 mm au port d’entrée vidéo
à la caméra avant R60.
Caméra arrière (câble de 6 m)
6
Installez la caméra arrière sur la lunette
arrière.
Page 8

APPLI WIFI ET KB
12 - FR
CARACTÉRISTIQUES DE LA R60
13 - FR
Pour commencer,
téléchargez l’application
KB R60
Ouvrez les réglages Wi pour
téléphone intelligent et choisissez
le réseau de la caméra de tableau
de bord (Dash Cam, KB R60).
Utilisez le mot de passe 12345678
pour vous connecter.
Pour prendre une photo à l’aide des
commandes mains libres, bougez
simplement votre main sous la R60.
Le module GPS eectuera le suivi de
votre localisation et de votre vitesse.
La caméra enregistrera des vidéos
et des photos.
Autres paramètres
Une fois que votre téléphone
intelligent est connecté à la caméra
de tableau de bord, allez sur la
page des réglages pour modier
les paramètres généraux, comme
la sensibilité de l’accéléromètre, le
commutateur du microphone, le
volume, etc.
Passez la main en-dessous
Page 9

CARACTÉRISTIQUES DU PRODUIT
Caméra de tableau de bord R60
Objectif
Champ de vision
Wi-Fi 2,4 GHz
GPS Oui
Accéléromètre 3 axes
Renseignements
sur la vidéo
Renseignements
sur le son
Renseignements
sur la photo
Mémoire
Type de pile Supercondensateur
6-Éléments sur vitre - Avant
4-Éléments sur vitre - Arrière
145° Avant
120° Arrière
1920x1080 30 IPS avant
1280x720 30 IPS arrière
8 KHz, 2 canaux
2M (1920x1080)
Carte MicroSD de classe 10,
max. de 64 Go
14 - FR
1
2
3
4
5
6
Visitez la page www.kaiserbaas.com/support ou
envoyez un courriel à helpdesk@kaiserbaas.com
pour obtenir une assistance. Pour obtenir le guide
de l’utilisateur complet, visitez le site
www.kaiserbaas.com
1. Socle
2. Caméra avant
3. Tige de lentille arrière
4. Fente pour carte
MicroSD
5. Fente de recharge
6. Caméra arrière
Page 10

 Loading...