

Page 1
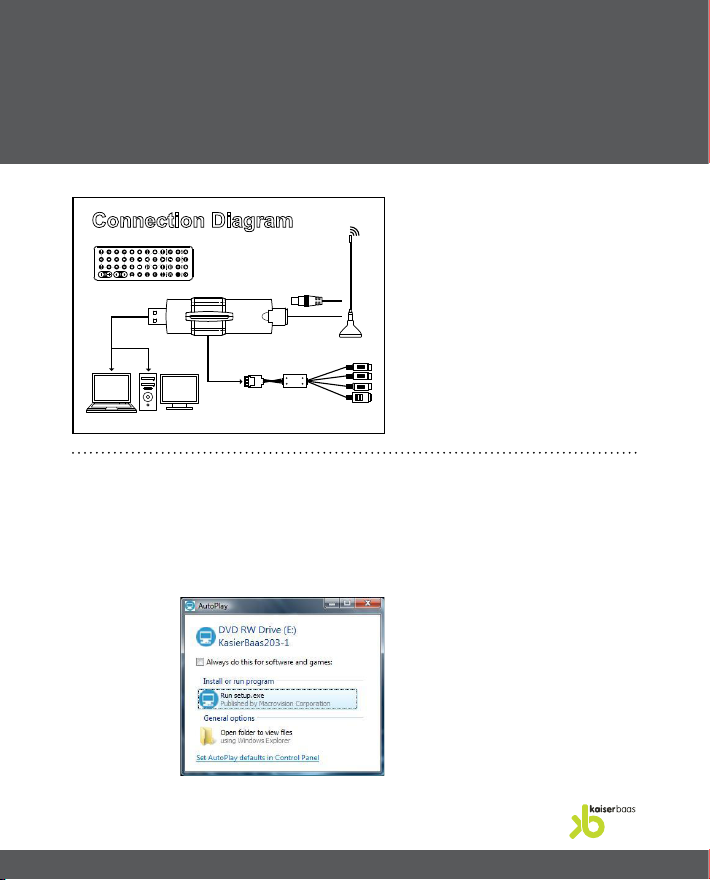
VHF/UHF
AV/S/Audio
USB
Laptop or PC
Analogue Capture
KB Hybrid USB Digital TV Tuner
Install Guide V1.0
Connect the USB TV Tuner to a
spare USB port and connect your
aerial to the aerial socket on the
USB TV Tuner. Also connect the A/V
dongle cable to the port located on
the side of the unit.
Cancel the ‘Found New Hardware’ wizard that will appear on the screen.
You are now ready to install the provided software. Once you have inserted the
installation CD into the PC the software will automatically start to run. Vista users
will see a security dialogue box requesting the user if they want the software to run
automatically -
Click ‘Run setup.exe’ to start the
installation.
1
Page 2
2
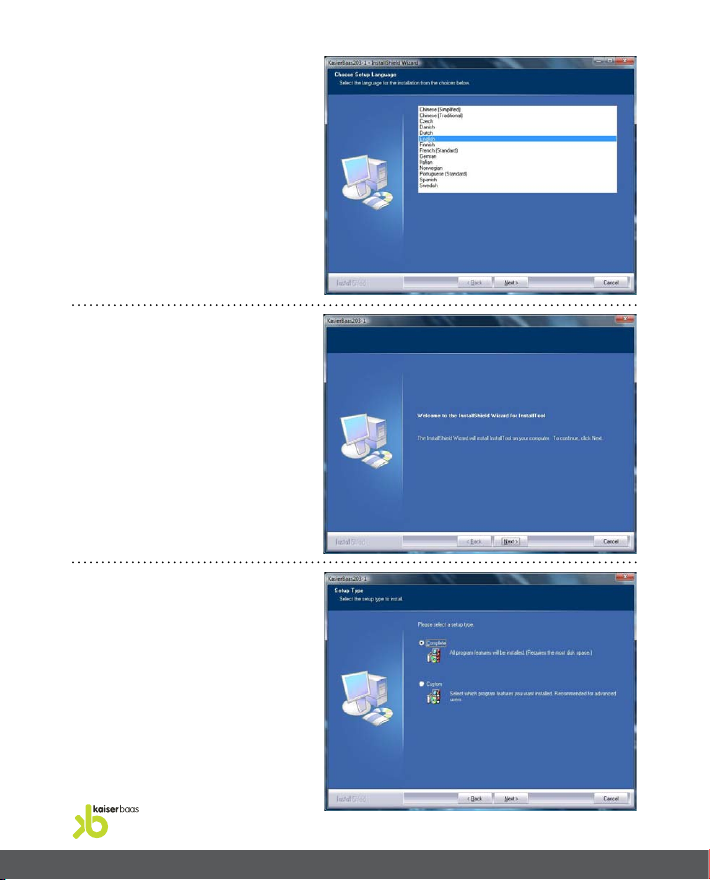
Click ‘NEXT’ at the language
selection screen shown above.
Click ‘NEXT’ on the screen shown
above.
Select ‘COMPLETE’ then click
‘NEXT’. The installation software
will start to install.
Page 3
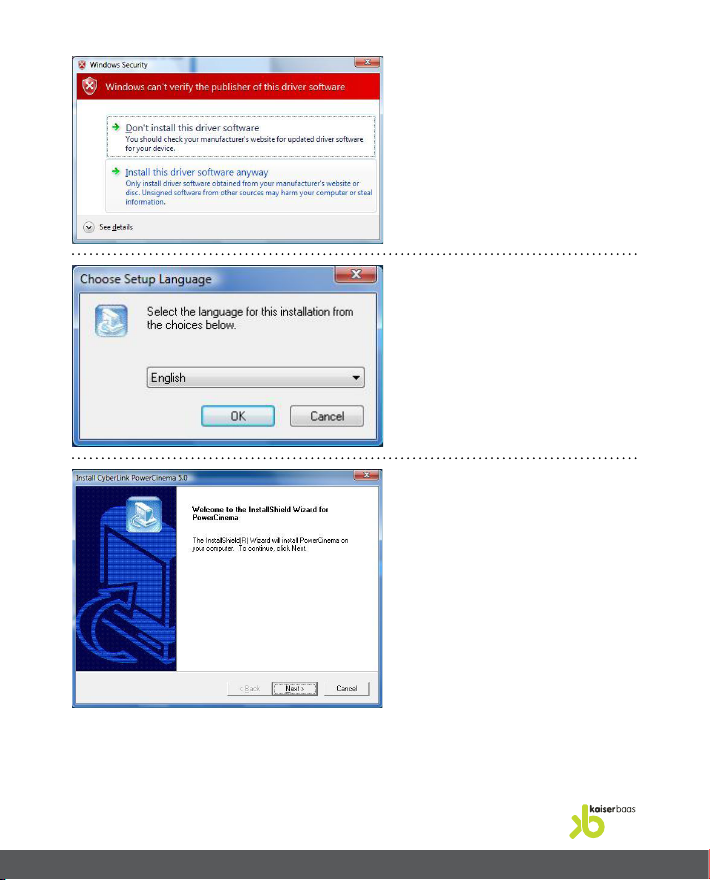
If you see the following screen
during the installation –
Select ‘INSTALL THIS DRIVER
SOFTWARE ANYWAY’, this will
install the relevant drivers for the
USB tuner.
Click ‘OK’ at the language setup
screen.
This will start the installation of the
PowerCinema software.
Click ‘NEXT’ when you see the
screen below.
3
Page 4

4
Click ‘YES’ at the license agreement
screen.
Fill out your personal details and CD-Key which is located on the CD sleeve.
Click ‘NEXT’ at the destination
location screen.
Click ‘NEXT’ at the program folder
screen.
The PowerCinema software will
now be installed.
When the software has completed
the installation click ‘FINISH’.
You will now see the following
screen –
Click ‘NEXT’ and then ‘INSTALL’.
When the installation wizard has
completed click ‘FINISH’.
Page 5

You will now see the following
screen –
Click ‘NEXT’, Click ‘YES’ at the
license agreement screen, click
‘NEXT’ then click ‘FINISH’.
You will now see the following
screen –
Click ‘NEXT’.
You will now see the screen shown
above, click ‘INSTALL’.
When the software has nished
installing select ‘LAUNCH SIM HD
SETUP’ then click ‘FINISH’.
On the next screen select ‘YES,
I WANT TO RESTART MY
COMPUTER NOW’ then click
‘FINISH’.
Your PC will now restart.
Congratulations you have nished installing your USB TV Tuner. You are now ready to run
PowerCinema to do a channel scan.
5
Page 6

6
PowerCinema Quick Install Guide
Once you launch the PowerCinema
software for the rst time you will
see the following screen –
Click ‘NEXT’.
If you are running Vista Home
Premium or Vista Ultimate you will
see the following screen (Users who
are running Windows XP will not
see this screen) –
Select ‘KEEP CURRENT BEHAVIOR’
and then click ‘NEXT’.
Select the style of monitor or screen
that you have then click ‘NEXT’ –
Page 7

Select the type of speaker setup that
you have then click ‘NEXT’ –
PowerCinema will now detect the
type of TV Tuner that you have
installed, once detected click ‘NEXT’.
Select ‘AUSTRALIA’ for your region
then click ‘NEXT’.
You have two options available for
channel scanning. Select ‘ANALOG’
for analogue reception or ‘DVB-T’
for digital reception. For this
exercise select ‘DVB-T’ then click
‘NEXT’.
Select the folder that you would
like to store your recorded les to
or keep the default folder then click
‘NEXT’.
Select the ‘SCAN CHANNELS’
button to scan for available
channels.
7
Page 8

8
The following screen will display
the amount of channels scanned.
In most capital cities the correct
amount of channels is 26 or greater.
If you live in Sydney you may
receive more channels that are not
available in other capital cities –
In Australia we are given a
very limited EPG (Electronic
Programming Guide) by the
commercial broadcasters. Please
select ‘EPG SERVICE FROM TV
SIGNAL’ and then click ‘NEXT’ –
Click ‘NEXT’ when you see the
following screen above.
The setup wizard will ask you
where you would like to store
your recorded radio les, select a
preferred directory or choose the
default folder then click ‘NEXT’.
Page 9

Click the ‘SCAN STATIONS’ button
to scan for radio stations.
When scanning has nished click
‘FINISH’.
The next screen will display the
amount of radio stations scanned.
Click ‘NEXT’ to continue.
The setup wizard will prompt you
to search for music tracks that you
may have on your PC. Skip this
option and then click ‘NEXT’.
Put in your personal details to
register the software and select
whether you want to receive a
newsletter from Cyberlink –
Click ‘NEXT’ to continue.
Click ‘FINISH’ to exit the setup
wizard.
Congratulations you are now ready to watch your favourite TV shows on your PC. For a
more comprehensive manual on all the great features in PowerCinema you will nd a
manual in PDF format located in the ‘MANUAL’ folder on the installation disc.
Attention Vista Home Premium and Vista Ultimate customers – The USB TV Tuner and
provided remote control is fully compatible with the Media Centre software included with
your operating system. Please consult the MCE install guide located in the ‘MANUAL’
folder on the installation disc for more information.
If you are having diculties following this guide or if you have any technical queries
please contact Lako Help Desk on 1300 302 306 between the hours of 9.00AM to 5.00PM
Monday to Friday or via email –helpdesk@lakopacic.com
9
Page 10

Warranty
l Improper use or handling of the tuner, cables or remote control
l Freight charges and insurance for returning back to base
l Shop soiled products including scratches, stains, marks, from everyday
use.Standard 12-month warranty from purchase invoice date of Kaiser
Baas product. You must retain proof-of-purchase to receive warranty /
replacement.
l Warranty means repairing the product wherever possible, replacing the
product, whole or part (including remote control).
l Warranty covers the following faults / defects:
A. Non-functioning tuner.
B. Damaged tuner casing upon rst receipt and opening package.
C. Corrupt installation CDs upon rst receipt and opening package.
D. Damaged cables upon rst receipt and opening package.
E. Non-functioning remote control (batteries excluded)
Warranty does not cover
l Improper use or handling of the tuner, cables or remote control
l Freight charges and insurance for returning back to base
l Shop soiled products including scratches, stains, marks, from everyday
use.
l Damaged remote control.
Page 11

Contact technical support
l If you experience problems with your Kaiser Baas product and believe it
needs to be repaired, please contact technical support on 1300 302 306
(within Australia) or +61 3 9455 7444 (from overseas). Kaiser Baas support
is the FIRST step in the return process. They will help you determine if it is
a hardware fault or the product, an accessory used with the product, or if
it is related to technical limitations of the product. Once technical support
determines that indeed that your Kaiser Baas product or accessory must be
repaired or replaced, they will instruct you on the next steps to take.
l Any product that is sent to Kaiser Baas or any of its distributors or repair
centres that do not have a clearly written RMA authorization number on the
box will be refused at reception and costs incurred for shipping and return
will not be paid for Kaiser Baas or its distributors. You can only receive a
valid RMA number from Kaiser Baas or one of its authorised subsidiaries/
distributors.
l For full return policy in Australia please read attached Return Authorisation
Procedure below. For worldwide returns please contact +61 3 9455 7444.
Returning products
l Need original receipt: When you do send a product for repair you will have to
include the original sales receipt. Please make a copy for your own records.
Your original receipt will be returned with your repaired / replacement
product. Non inclusion of the sales receipt may severely delay the processing
of your return and may result in putting your product into an out-ofwarranty status.
l Packing and Sending: When you return your product or accessory for repair
or replacement, carefully pack it with adequate cushioning so that it does
not get damaged in transit. Kaiser Baas is not responsible for products that
arrive damaged due to improper transportation. Choose your method of
transport and insurance accordingly.
Page 12

 Loading...