

Page 1

iPad PhotoScanner User Guide
Page 2

CONTENTS
Saftey notice
Product specifications
What’s in the box
Product description
Connecting the power
Turning on the iPad PhotoScanner
Docking your iPad
Installing and running the i-Scan App
Calibrating the iPad PhotoScanner
Scanning your photos and documents
Cleaning your iPad PhotoScanner
Charging your iPad
Transferring images to a computer
Frequently asked questions
Spanish version
2
3
4
5
6
8
9
11
12
16
20
23
24
25
27
Page 3

2 3
3
• Scanner type: Colour CIS sheet feed scanner
• Light source: LED (RGB)
• Scan size: Up to A4
• Scan resolution: 300 dpi
• Scan speed: 6 ppm @ A4 colour 300 dpi
• File format: JPG
• Power: 5.1V 2.1A (iPad charger not included)
• Interface: Mini USB (for power only), iPad 30-pin connector
• Size: 308 x 111 x 72 mm (W x D x H)
• Weight: 655g
Product specifications
SAFTEY NOTICE
Keep the Kaiser Baas iPad PhotoScanner away from water or moisture and dusty
areas. Avoid environments where the Kaiser Baas iPad PhotoScanner will be exposed
to direct sunlight.
Never store the Kaiser Baas iPad PhotoScanner in hot or very cold areas.
Only use the cleaning tools that have been provided with the Kaiser Baas iPad
PhotoScanner.
It is recommended to use the Kaiser Baas iPad PhotoScanner on a level, well grounded
work surface, free of excessive vibration.
Please disconnect the power supply from the Kaiser Baas iPad PhotoScanner if
unused for a long period of time.
Do not drop the Kaiser Baas iPad PhotoScanner as it may cause damage and may void
the warranty.
Do not try and disassemble or remodel the Kaiser Baas iPad PhotoScanner. Doing so
may cause the device to malfunction and may void the warranty.
PRODUCT SPECIFICATIONS
• Scanner type: Colour CIS sheet feed scanner
• Light source: LED (RGB)
• Scan size: Up to A4
• Scan resolution: 300dpi
• Scan speed: 6ppm @ A4 colour 300 dpi
• File format: JPG
• Power: 5.1 V 2.1 A (iPad charger not included)
• Interface: Mini USB (for power only), iPad 30-pin connector
• Size: 308 x 11 x 72mm (W x D x H)
• Weight: 655g
Page 4
4 5
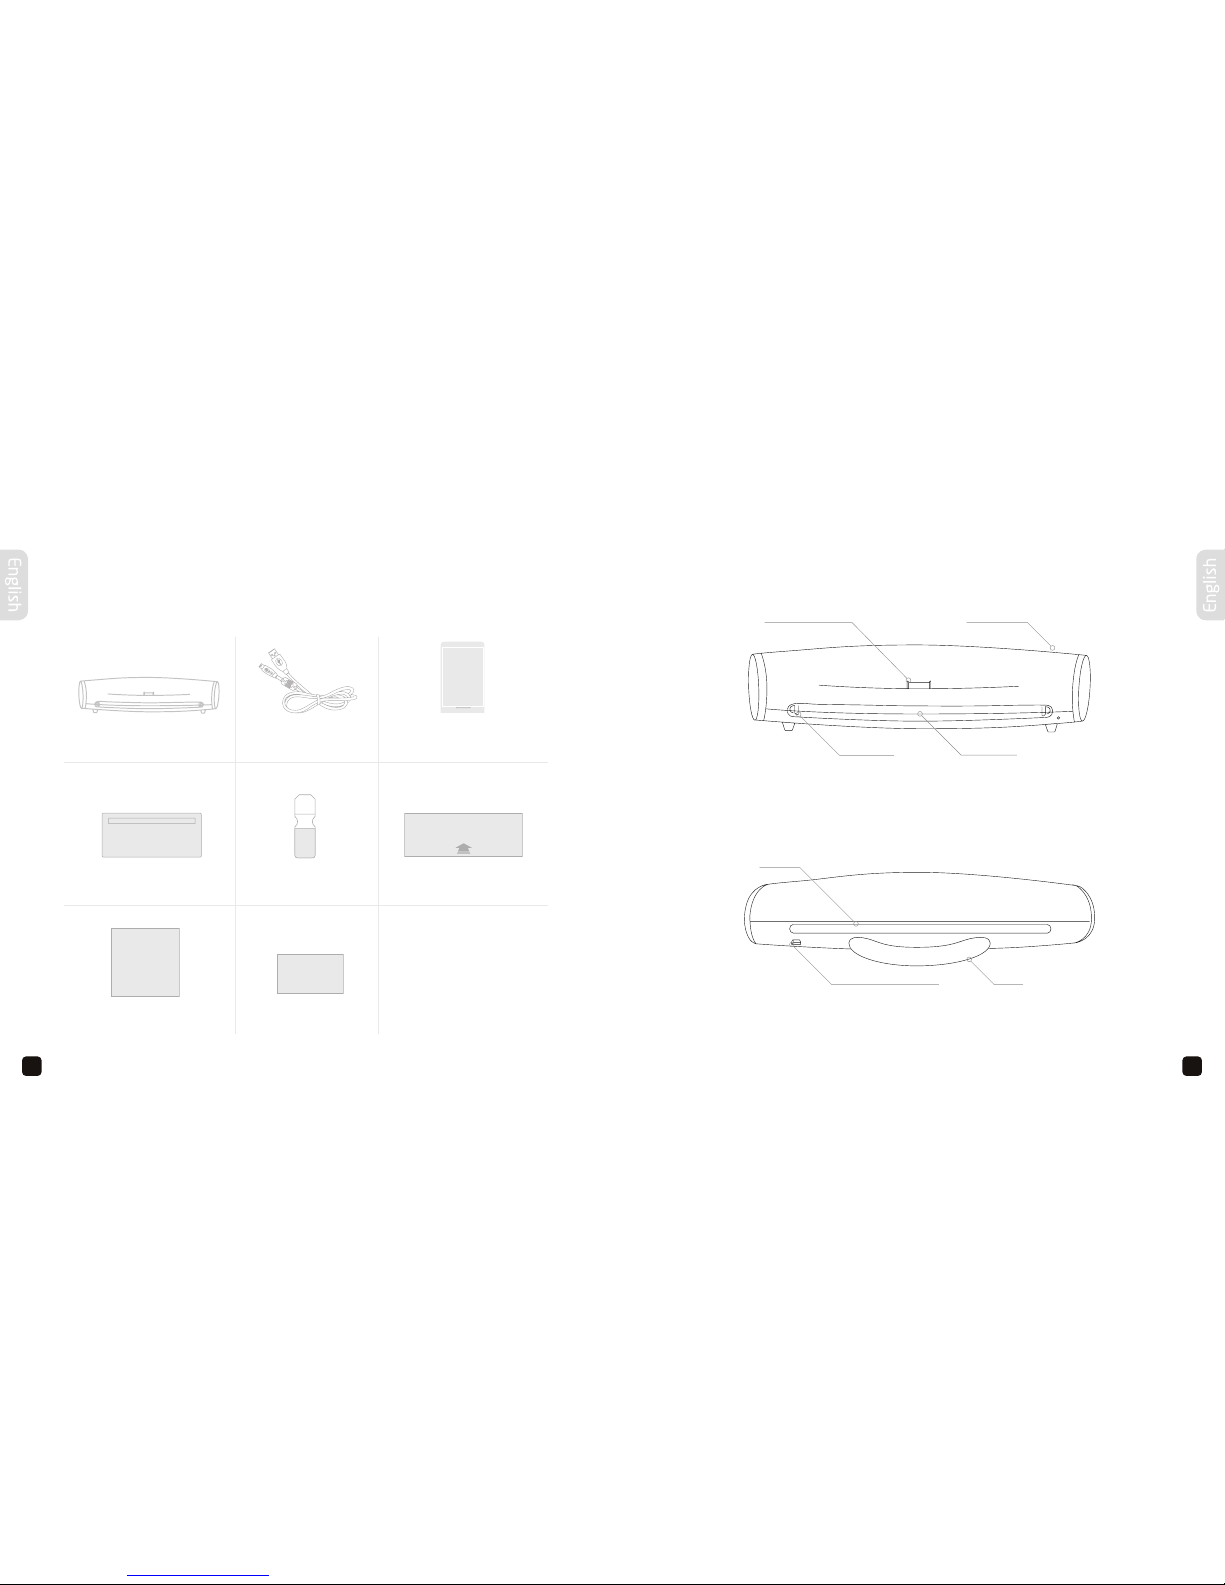
WHAT’S IN THE BOX
Unpack the contents of the box and you should have:
PRODUCT DESCRIPTION
iPad PhotoScanner USB cable Calibration Card
Photo sleeveLens cleaning toolRoller cleaning tool
User guide Warranty card
iPad dock connector Power button
Paper guide Feeding slot
Exit slot
Mini USB (for power only) Stand
Front
Rear
Page 5
6 7
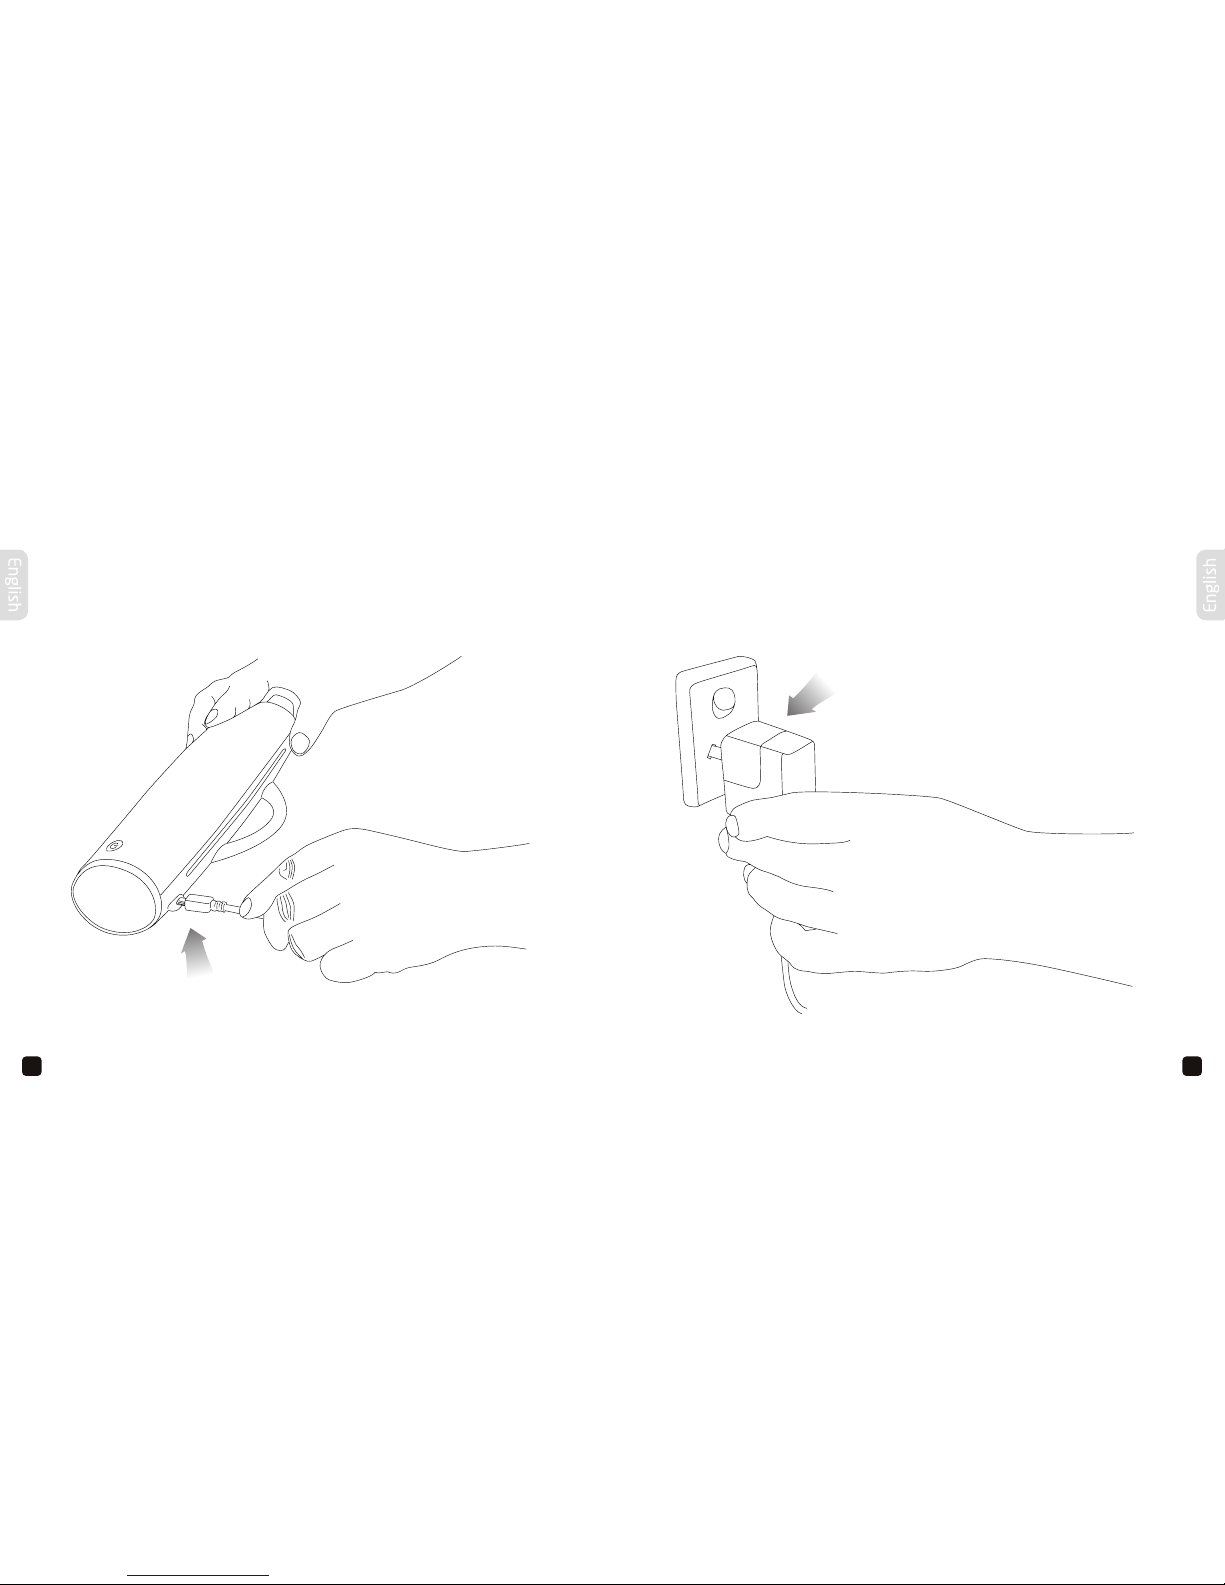
And connect the other end into your iPad charger that was supplied with your iPad –
7
CONNECTING THE POWER
Attach the USB cable into the iPad PhotoScanner. And connect the other end into your iPad charger that was supplied with your iPad.
Page 6
8 9
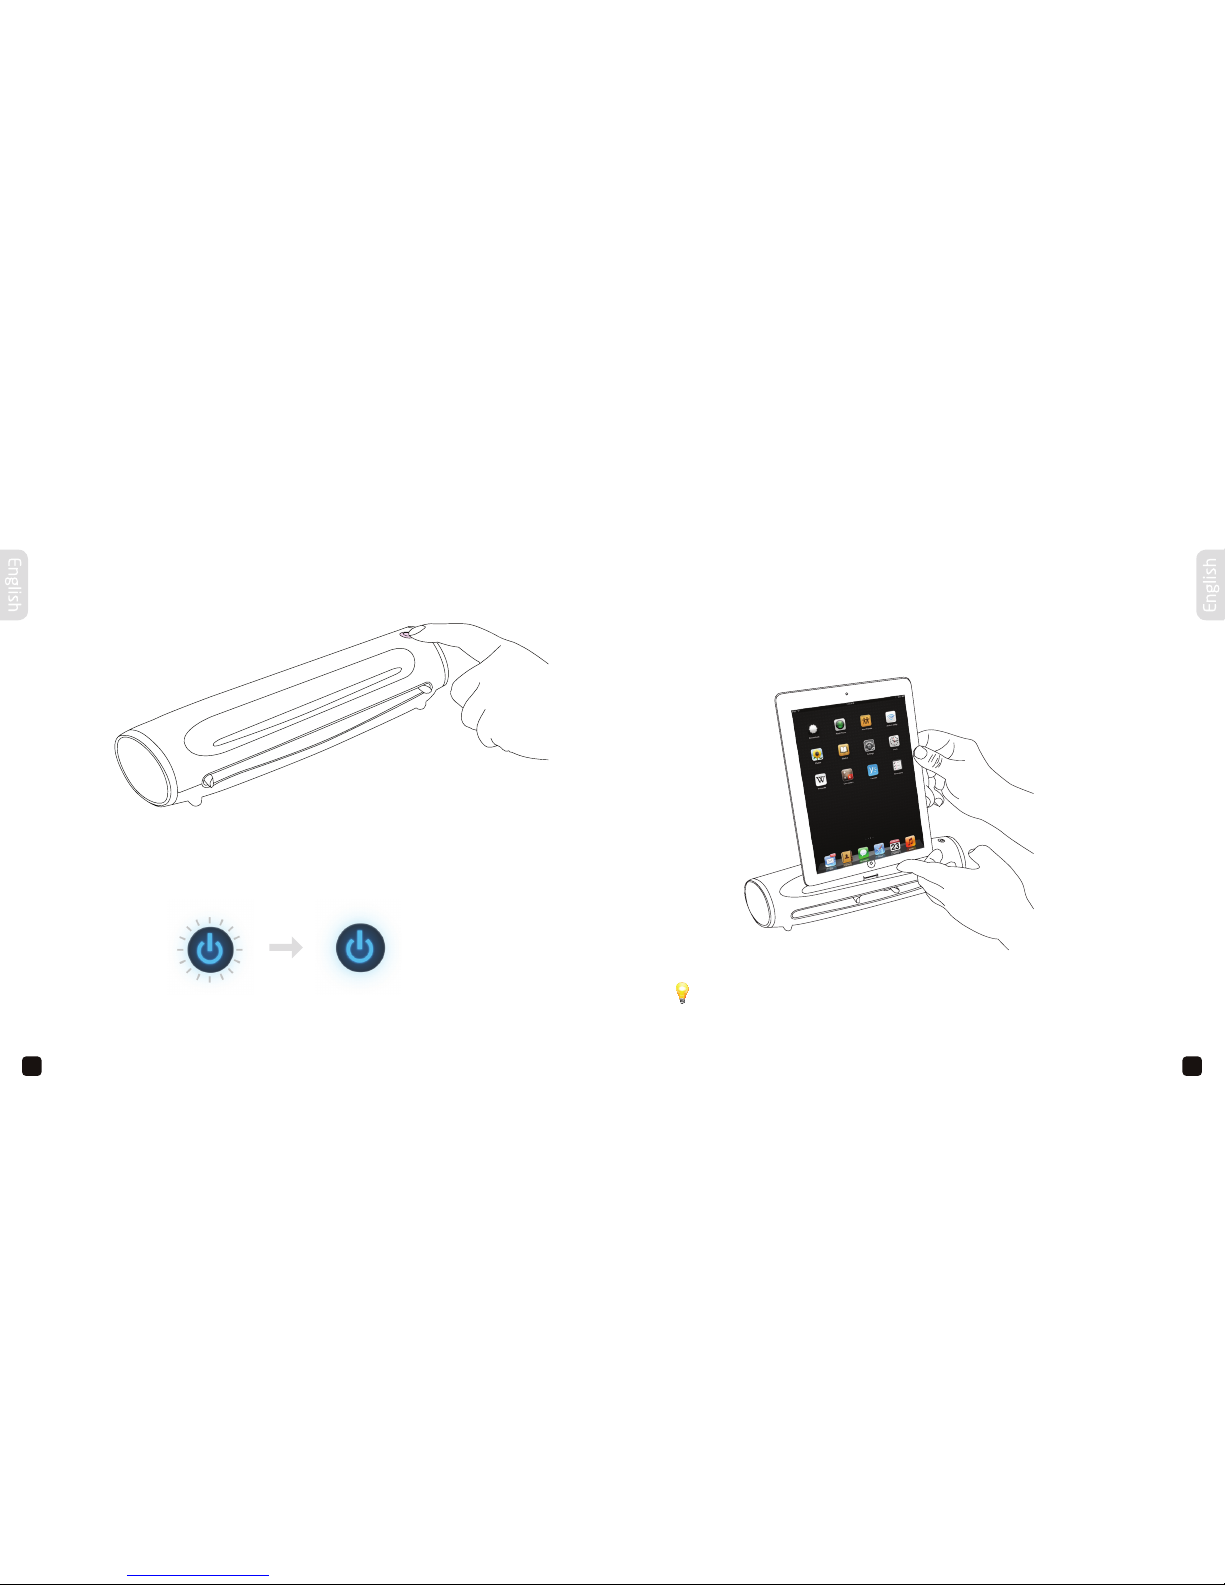
TURNING ON THE iPAD PHOTOSCANNER
Press and hold the power button for 2 seconds.
DOCKING YOUR iPAD
You are now ready to dock your iPad.
Turn on your iPad and then gently connect it to the iPad dock connector of the scanner.
You will see a blue light which will momentarily flash for a couple of seconds.
Power on
Please take care when docking your iPad on the scanner. Do not lean the iPad
towards you after it has been docked, as it may cause damage to the dock
connector and your iPad.
Page 7

10
11
DOCKING YOUR iPAD
When the iPad is first docked, you will see the following message:
INSTALLING AND RUNNING THE i-SCAN APP
The ‘Application Not Installed‘ message will appear and automatically redirect you
to the App Store to install the i-Scan App if it is not installed yet. If the message
doesn’t appear on your iPad, try the following procedures.
With the software installed, the
scanner has the ability to auto-launch
the i-Scan App, when docked.
Depending on which version of iOS
you have, the message shown here:
May or may not appear on your screen.
If it does appear, tap ‘Allow’.
An internet connection is required
to download the i-Scan App. Press
the ‘Yes‘ button to continue.
1. Click the ‘App Store‘ icon from the iPad’s home screen.
2. Type ‘i-Scan‘ in the search field. The i-Scan app will then appear in the search
results. Select the App, then click the ‘FREE’ button to install.
3. E nter your Apple ID (iTunes account) and password when prompted. When
installation is finished you will see the ‘i-Scan‘ icon on the home screen.
Ensure that your iPad has internet access via your service provider
or wireless connection.
Page 8
12
13
CALIBRATING THE iPAD PHOTOSCANNER
Before scanning photos and documents, it is recommended to calibrate the scanner
first.
Tap the ‘Settings‘ button in the top right-hand corner.
Remove the plastic cover from the calibration card, adjust the paper guide and insert
it into the scanner.
Page 9
14
15
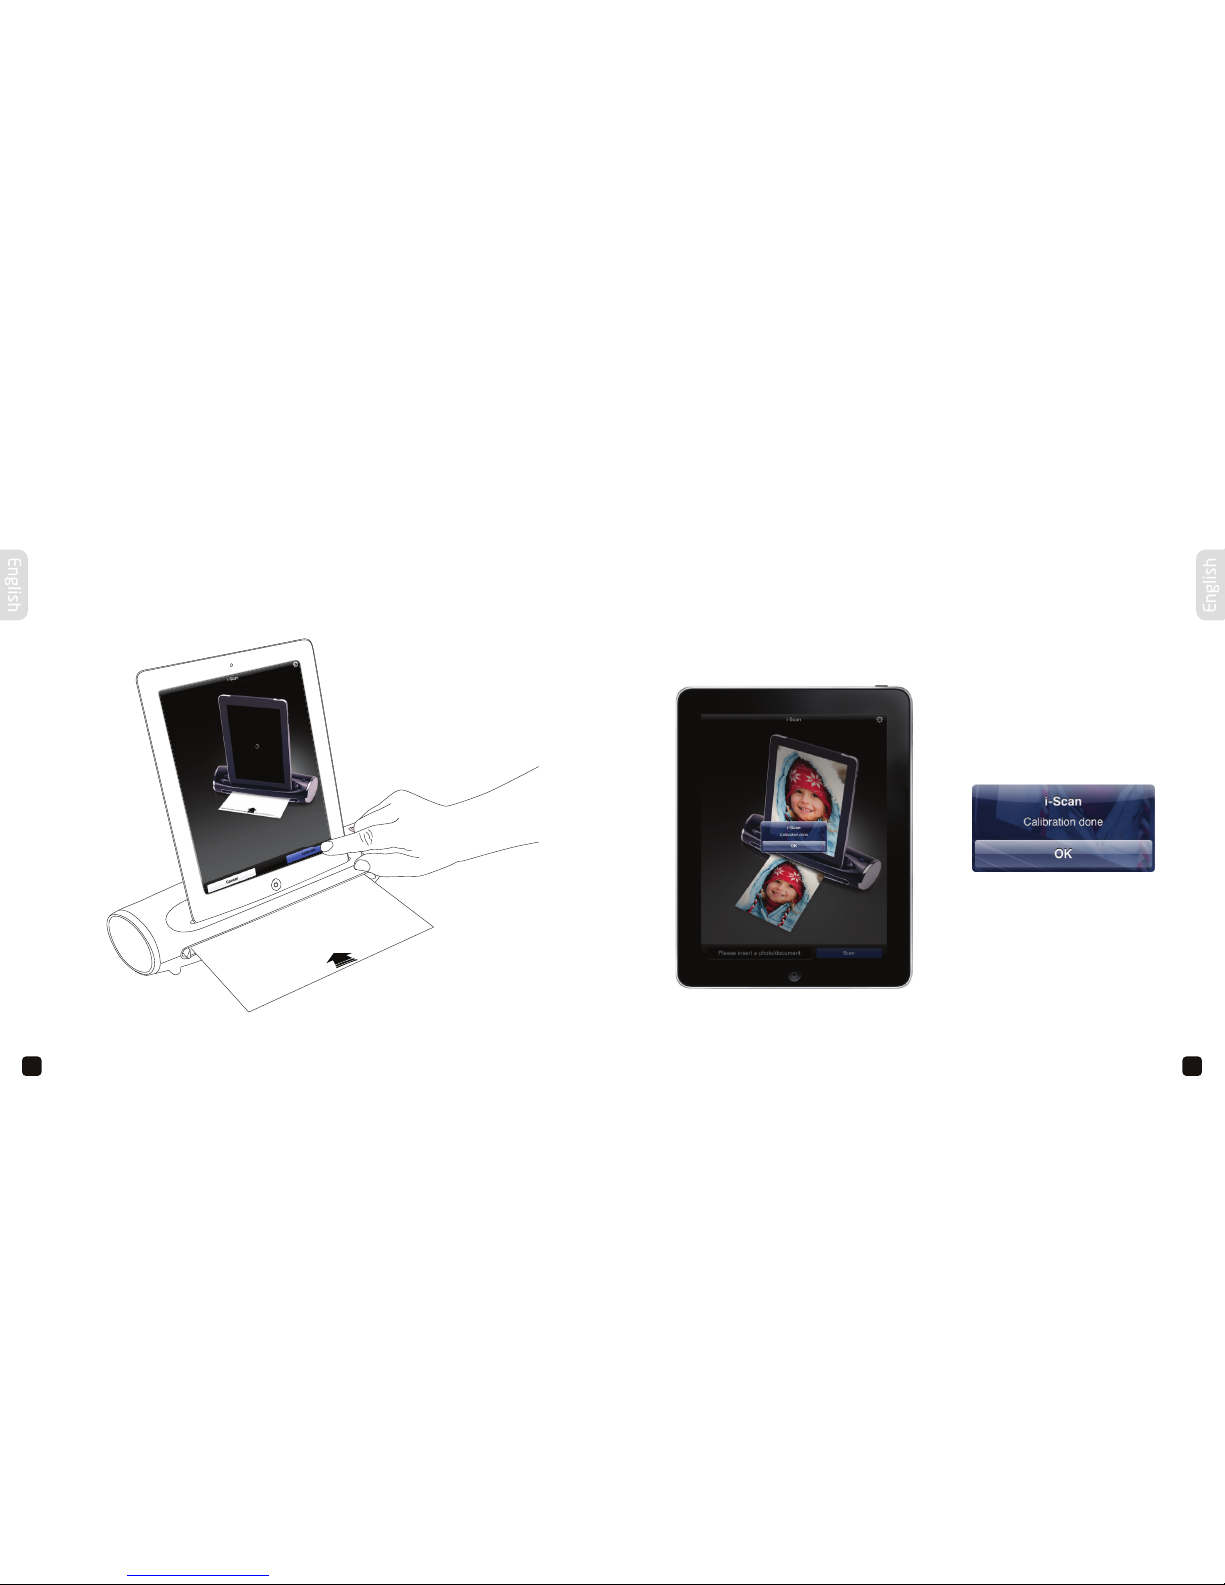
CALIBRATING THE iPAD PHOTOSCANNER
Tap the ‘Calibrate‘ button and confirm your selection. The card will feed through and the calibration will now commence.
When the calibration has completed, the calibration card will be ejected and a message
will appear on screen:
The card will feed through and the calibration will now commence.
When the calibration has completed, the calibration card will be ejected and a message
will appear on-screen –
Tap the ‘OK’ button.
Tap the ‘OK’ button
(continued)
Page 10

16
17
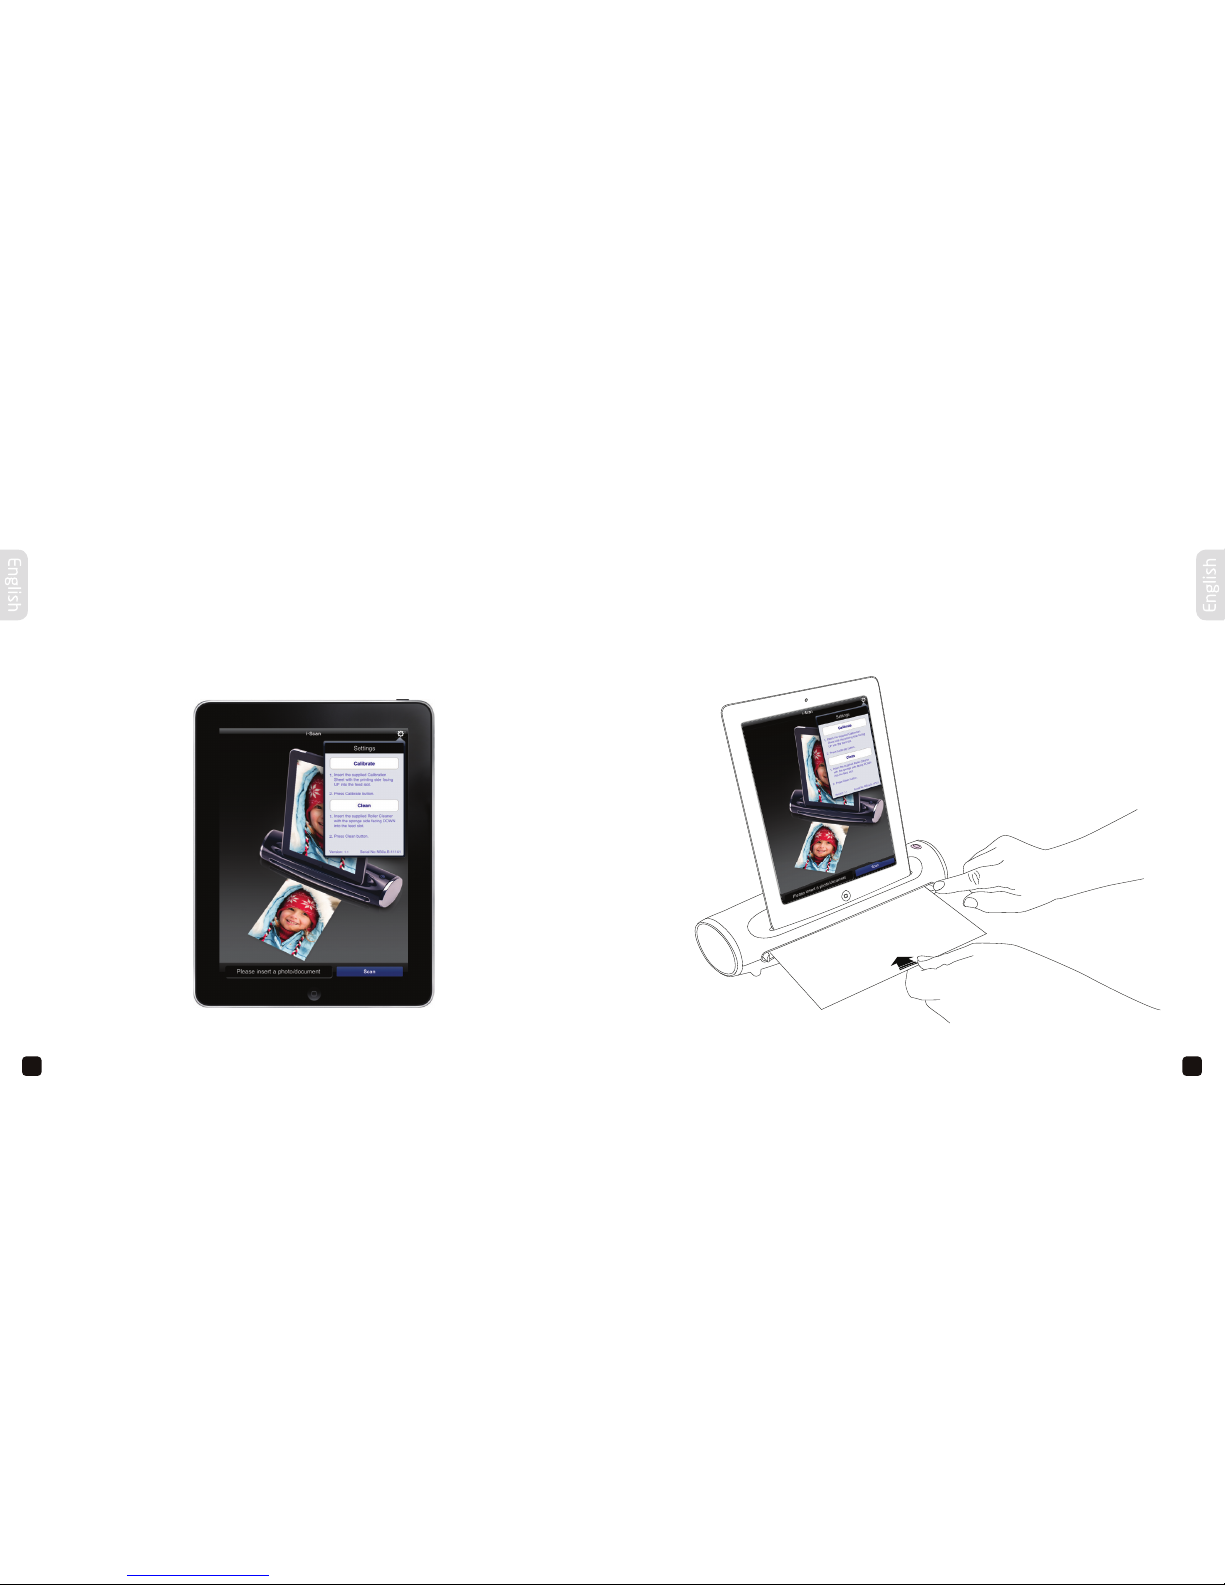
SCANNING YOUR PHOTOS AND DOCUMENTS
To scan your photos and documents, adjust the paper guide accordingly and then
insert into the scanner facing up.
When you are ready, tap the ‘Scan‘ button.
The photo or document will feed through and you will see a real-time preview directly
on your iPad
When you are ready, tap the ‘Scan’ button.
The photo or document will feed through and you will see a real-time preview directly on
your iPad –
If you are happy with the scan, tap the ‘Save’ button.
The photo or document will be saved to your iPad.
If you would like to scan the photo or document again, tap the ‘Cancel’ button and
repeat the above steps.
The iPad will not charge while you are scanning. Please ensure your iPad
has at least 20% battery available. For iPad charging please refer to page 23.
When using the scanner for the first time,
with devices running iOS6 or later, a
message ‘I-Scan Would Like to Access
Your Photos’ will appear after pressing the
‘SAVE‘ button.
Tap the ‘OK‘ button in order to save images
to your photo library.
If you select ‘Don’t Allow’, no image will
be saved to your device and you will get
an error message the next time you scan.
To solve the problem, change your privacy
settings by selecting:
Settings > Privacy > Photos > iScan Aid > ON
This will now allow the iScan Air App to access your photos.
If you are happy with the scan, tap
the ‘Save‘ button.
The photo or document will be saved
to your iPad.
If you would like to scan the photo
or document again, tap the ‘Cancel‘
button and repeat the above steps.
The iPad will not charge while
you are scanning. Please ensure
your iPad has a least 20% battery
available. For iPad charging please
refer to page 23.
Page 11

18
19
Remove the plastic cover from the photo sleeve, place the photo inside the sleeve, adjust the
paper guide accordingly and insert the sealed end into the scanner facing up -
19
When your iPad is in sleep mode, the scanner will turn off 90 seconds later.
When you are ready, tap the ‘Scan’ button.
SCANNING YOUR PHOTOS AND DOCUMENTS
If your photo is not feeding through correctly or you have old photos that have
become fragile, use the supplied photo sleeve for optimal results.
Remove the plastic cover from the photo sleeve, place the photo inside the sleeve,
adjust the paper guide accordingly and insert the sealed end into the scanner facing up.
When you are ready, tap the ‘Scan‘ button.
When your iPad is in sleep mode, the scanner will turn off 90 seconds later.
(continued)
Page 12

20
21
CLEANING YOUR iPAD PHOTOSCANNER
Over time, the scanner will accumulate dust and sticky residue, especially when
scanning photos from a photo album. To maintain the best scanning quality, it is
recommended to clean the scanner with the provided roller cleaning tool and lens
cleaning tool.
Tap the ‘Settings‘ button in the top right-hand corner.
Hold the roller cleaning tool with the sponge side facing down. Adjust the paper guide
accordingly and insert the roller cleaning tool into the scanner.
Tap the ‘Clean‘ button and confirm your selection.
Page 13

22
23
The iPad will only charge when the scanner is off -
23
It is not recommended to connect the scanner to the USB port of your computer for
charging. Please connect the USB cable to the charger that was included with your iPad.
Charging your iPad
iPad is not charging
iPad is charging
Power on
Power off
(iPad is ready to scan)
CLEANING YOUR iPAD PHOTOSCANNER
When the cleaning has completed, a message will appear on-screen. Take out the roller
cleaning tool and tap the ‘OK‘ button. Repeat the process if your photos or documents
are not feeding through correctly. To clean the lens, power off the scanner, un-lock
your iPad and disconnect the USB cable. Hold the lens cleaning tool with the sponge
facing down. Insert the lens cleaning tool into the exit slot at the rear of the scanner.
CHARGING YOUR iPAD
The iPad will only charge when the scanner is off.
Move the lens cleaner from side to side a number of times then remove. Repeat the
process if you are getting lines or streaks on your scanned photos or documents.
Power off iPad is charging
iPad is not charging
(iPad is ready to scan)
Power on
It is not recommended to connect the scanner to the USB port of your computer for
charging. Please connect the USB cable to the charger that was included with your
iPad.
(continued)
Page 14

24
25
TRANSFERRING IMAGES TO A COMPUTER
Undock your iPad from the scanner and connect it to your computer using the data
cable that was supplied with your iPad.
Windows
Click ‘Start‘, ‘Computer‘, the iPad will be detected as a ‘Portable Device‘. Double click
the iPad, and then double click the ‘Internal Storage‘ icon. Double click the ‘DCIM‘
folder, and then double click the file folder to access your photos. You can copy the
photos or documents to a folder on your hard drive or delete files saved on your iPad.
Mac
Click ‘Go‘, ‘Applications‘, select ‘Image Capture‘, your iPad should be selected under
‘Devices‘. You should now see the photos located on your iPad. You can copy the
photos or documents to a folder on your hard drive or delete files saved on your iPad.
FREQUENTLY ASKED QUESTIONS
Q. I have pressed the power button but there is no power.
A. Make sure you have connected the USB cable to your iPad charger, then connect
this to the mains power. Press and hold the power button until you see a blue light.
It is not recommended to power the scanner from the USB port of your computer.
If the scanner does not turn on, it may be faulty. Please contact our helpdesk staff
for assistance.
Q. The iPad PhotoScanner doesn’t respond when the iPad is docked.
A. Make sure you have installed the i-Scan App and docked the iPad correctly.
If your iPad is turned off or locked, turn the iPad on and make sure it is unlocked.
Q. My iPad is not charging.
A. Make sure your iPad is docked correctly and the scanner is turned off. When
the scanner is turned off, your iPad will start charging.
Q. The scanned image is poor.
A. Make sure the scanner has been calibrated before scanning. Refer to page
12 for calibration instructions. If you see lines or streaks, this indicates that
the rollers and lens are dirty. Refer to page 20 for cleaning instructions.
Page 15

Spanish
27
26
FREQUENTLY ASKED QUESTIONS
Q. The i-Scan App is not responding.
A. If the busy icon remains on-screen, try forcing the i-Scan App to close. Disconnect
and reconnect the power and then restart your iPad.
Q. My Photos and documents are not feeding through.
A. Make sure you have adjusted the paper guide according to the photo or document
that you want to scan. There may also be sticky residue on the rollers which
will need to be cleaned. Refer to page 20 for cleaning instructions. Please use
the provided photo sleeve for old or fragile photos that may not feed through
correctly.
GET IN TOUCH WITH KAISER BAAS
Need further assistance? Please visit:
www.kaiserbaas.com
Or email:
helpdesk@kaiserbaas.com
CONTENIDOS
Notas sobre seguridad
Especificaciones del producto
Qué hay en la caja
Descripción del producto
Conexión a la energía
Encendido del Escáner de fotos para iPad
Acople del iPad
Instalación y funcionamiento de la aplicación i-Scan
Calibración del escáner de fotos para iPad
Escaneo de fotos y documentos
Limpieza del escáner de fotos para iPad
Carga del iPad
Transferencia de imágenes a un ordenador
Preguntas frecuentes
Inglés versión
28
29
30
31
32
34
35
37
38
42
46
49
50
51
2
(continued)
Page 16

Spanish
Spanish
28
29
NOTAS SOBRE SEGURIDAD
Mantenga el escáner de fotos para iPad Kaiser Baas lejos del agua o humedad y áreas
polvorientas. Evite medio ambientes donde el escáner de fotos para iPad Kaiser Baas
pueda estar expuesto a la luz solar directa.
Nunca almacene el escáner de fotos para iPad Kaiser Baas en áreas con altas o muy
bajas temperaturas.
Sólo use las herramientas de limpieza que han sido provistas junto con el escáner de
fotos para iPad Kaiser Baas.
Se recomienda utilizar el escáner de fotos para iPad Kaiser Baas sobre una superficie
de trabajo nivelada, bien asentada, libre de excesivas vibraciones.
Por favor desconecte de la energía el escáner de fotos para iPad Kaiser Baas si no es
utilizado por un período largo de tiempo.
No golpee el escáner de fotos para iPad Kaiser Baas ya que puede causarle daños y
anular la garantía.
No trate de desensamblar o remodelar el escáner de fotos para iPad Kaiser Baas.
Hacerlo podría derivar en mal funcionamiento y anular la garantía.
ESPECIFICACIONES DEL PRODUCTO
• Tipo de scaner: Escáner color de alimentación con hojas CIS
• Fuente de luz: LED (RGB)
• Tamaño de escaneo: hasta A4
• Resolución de escaneo: 300 dpi
• Velocidad de escaneo: 6 ppm @ A4 color 300 dpi
• Formato de archivo: JPG
• Voltaje: 5.1V 2.1A (cargador para iPad no incluído)
• Interfaz: Mini USB (sólo para energía), pin conector iPad 30
• Tamaño: 308 x 111 x 72 mm (A x P x L)
• Peso: 655 g
Page 17

Spanish
Spanish
30
31
QUÉ HAY EN LA CAJA
Al desembalar el contenido de la caja; deberá tener:
DESCRIPCIÓN DEL PRODUCTO
Escáner de fotos para iPad Cable USB Tarjeta de calibración
Funda para fotos
Guía del usuario
Certificado
de garantía
Herramienta de
limpieza de lente
Herramienta de
limpieza del rodillo
Acople conector de iPad Botón de energía
Guía para papel Ranura de alimentación
Ranura de salida
Mini USB (sólo para energía) Base
Frente
Atrás
Page 18

Spanish
Spanish
32
33
CONEXIÓN A LA ENERGÍA
Coloque el cable USB en el escáner de fotos para iPad . Y conecte el otro extremo en el cargador que le fue suministrado con su iPad.
Page 19

Spanish
Spanish
34
35
ENCENDIDO DEL ESCÁNER DE FOTOS PARA
iPAD
Presione el botón de encendido por 2 segundos.
ACOPIE A SU iPAD
Ahora está listo para acoplar su iPad.
Encienda su iPad y luego conéctelo cuidadosamente al acople conector del escáner.
Verá una luz azul que parpadeará momentáneamente por un par de segundos.
Encendido
Por favor sea cuidadoso al efectuar el acople. No incline el iPad hacia usted luego
de haberlo acoplado, ya que puede dañar el acople conector y su iPad.
Page 20

Spanish
Spanish
36
37
ACOPLE A SU iPAD
Cuando el iPad sea acoplado por primera vez, verá el siguiente mensaje:
INSTALACIÓN Y FUNCIONAMIENTO DE LA
APLICACIÓN i-SCAN
Aparecerá el mensaje de “aplicación no instalada” y directamente lo redirigirá a
la App Store para instalar la aplicación i-Scan si es que aún no está instalada. Si el
mensaje no aparece en su iPad, pruebe los siguientes procedimientos.
Con el software instalado, el escáner
tiene la capacidad de auto-iniciar la
aplicación i-Scan, cuando es acoplado.
Dependiendo de qué versión de iOS
tenga, el mensaje mostrado aquí:
puede o no aparecer en su pantalla.
Si aparece, pulse Permitir.
Se requiere conexión a Internet
para descargar la aplicación i-Scan.
Presione el botón “Si” para continuar.
1. Haga clic el ícono “App Store” en la pantalla de inicio del iPad.
2. Escriba “i-Scan” en el campo de búsqueda. La aplicación i-Scan aparecerá entonces
en los resultados de búsqueda. Seleccione la aplicación, y luego haga clic en el
botón GRATIS para instalar.
3. Ingrese su ID de Apple (cuenta de iTunes) y contraseña cuando sea requerida.
Cuando la instalación finalice verá el ícono “i-Scan” en la pantalla de inicio.
Asegúrese de que su iPad tiene acceso
a Internet a través de su proveedor de
telefonía o conexión inalámbrica.
Page 21

Spanish
Spanish
38
39
CALIBRACIÓN DEL ESCÁNER DE FOTOS PARA
iPAD
Antes de escanear fotos y documentos, es recomendable calibrar primero el escáner.
Pulse el botón “Configuraciones” en la esquina superior derecha.
Quite la cubierta plástica de la tarjeta de calibración, ajuste la guía para papel e
insértela en el escáner.
Page 22

Spanish
Spanish
40
41
CALIBRACIÓN DEL ESCÁNER DE FOTOS PARA
iPAD
Pulse el botón “Calibrar” y confirme su selección.
La tarjeta ingresará y la calibración comenzará.
Cuando se ha completado la calibración, la tarjeta de calibración será expulsada y
aparecerá un mensaje en pantalla:
Pulse el botón “OK”.
(seguido)
Page 23

Spanish
Spanish
42
43
ESCANEO DE FOTOS Y DOCUMENTOS
Para escanear sus fotos y documentos, ajuste la guía para papel adecuadamente y
luego inserte en el escáner con la cara hacia arriba.
Cuando esté listo, pulse el botón “ESCANEAR”.
La foto o documento ingresará y observará una vista previa en tiempo real
directamente en su iPad.
Usando el scanner por primera vez,
para dispositivos ejecutando iOS6 o
posterior, el mensaje ‘I-Scan Desea Acceder
a Sus Fotos’ aparecerá después que
presione el botón ‘GUARDAR’.
Pulse el botón “OK” para guardar las
imágenes en su biblioteca.
Si selecciona la opción ‘No permitir’, ninguna
imagen se guardará en el dispositivo y
aparecerá un mensaje de error la próxima
vez que escanee. Para solucionar el
problema, cambie la configuración de
privacidad seleccionando:
Configuración > Privacidad > Fotos > iScan Aid > ON
Ahora, la App Air iScan podrá acceder a sus fotos. .
Si está conforme con el escaneo,
pulse el botón “Guardar”.
La foto o documento será guardada/o
en su iPad.
Si desea escanear la foto o
documento nuevamente, pulse el
botón “Cancelar” y repita los pasos
anteriores.
El iPad no se cargará mientras
escanee. Por favor asegúrese de
que su iPad tiene al menos 20%
de batería disponible. Para carga
del iPad por favor remítase a la
página 49.
Page 24

Spanish
Spanish
44
45
ESCANEO DE FOTOS Y DOCUMENTOS
Si su foto no ingresa correctamente o tiene fotos viejas que se han tornado frágiles,
utilice la funda provista para óptimos resultados.
Quite la cubierta plástica de la funda, coloque la foto dentro de la funda, ajuste la guía
para papel adecuadamente e inserte el borde sellado en el escáner con la cara hacia
arriba.
Cuando esté listo, pulse el botón “ESCANEAR”.
Cuando su iPad se encuentre en modo stand by, el escáner se apagará 90
segundos más tarde.
(seguido)
Page 25

Spanish
Spanish
46
47
LIMPIEZA DEL ESCÁNER DE FOTOS PARA iPAD
Con el tiempo, el escáner acumulará polvo y residuos pegajosos, especialmente al
escanear fotos de un álbum de fotos. Para mantener la mejor calidad de escaneo, es
recomendable limpiar el escáner con las herramientas de limpieza de rodillo y de lente.
Pulse el botón “Configuraciones” en la esquina superior derecha.
Sostenga el limpiador de rodillo con el lado de espuma hacia abajo. Ajuste la guía para
papel adecuadamente e inserte el limpiador de rodillo en el escáner.
Pulse el botón “Limpiar” y confirme su selección.
Page 26

Spanish
Spanish
48
49
LIMPIEZA DEL ESCÁNER DE FOTOS PARA iPAD
Cuando finalice la limpieza, aparecerá un mensaje en pantalla. Retire la herramienta
de limpieza de rodillo y pulse el botón “OK”. Repita el procedimiento si sus fotos o
documentos no están ingresando correctamente. Para limpiar la lente, apague el
escáner, desacople su iPad y desconecte el cable USB. Sostenga la herramienta de
limpieza de lente con la esponja hacia abajo. Inserte la herramienta de limpieza de lente
en la ranura de salida en la parte de atrás del escáner.
CARGA DEL iPAD
El iPad sólo cargará cuando el escáner esté apagado.
Mueva el limpiador de lente de lado a lado un número de veces luego retire. Repita
el procedimiento si está obteniendo líneas o rayas en sus fotos o documentos
escaneados.
Apagado iPad cargando
iPad no está cargando
(el iPad está listo para escanear)
Encendido
No es recomendable conectar el escáner al puerto USB de su ordenador para
cargarlo. Por favor conecte el cable USB en el cargador que fue incluido con su iPad.
(seguido)
Page 27

Spanish
Spanish
50
51
TRANSFERENCIA DE IMÁGENES A UN
ORDENADOR
Desacople su iPad del escáner y conéctelo a su ordenador usando el cable de datos
suministrado con su iPad.
Windows
Haga clic en “Inicio”, “Mi PC”, el iPad será detectado como “Dispositivo portátil”. Haga
doble clic en el iPad, y luego doble clic en el ícono “Mis documentos”. Haga doble clic
en la carpeta “DCIM”, y luego haga doble clic en la carpeta de archivo para acceder
a sus fotos. Puede copiar las fotos o documentos a una carpeta en su disco rígido o
borrar archivos guardados en su iPad.
Mac
Haga clic en “Ir”, “Aplicaciones”, seleccione “Captura de imágenes”, su iPad debería
estar listado en “DISPOSITIVOS”. Debería ver ahora las fotos localizadas en su iPad.
Puede copiar las fotos o documentos a una carpeta en su disco rígido o borrar archivos
guardados en su iPad.
PREGUNTAS FRECUENTES
P. He presionado el botón de encendido pero no hay energía.
R. Asegúrese de haber conectado el cable USB al cargador de su iPad, luego
conecte éste a la fuente principal de energía. Presione el botón de energía
hasta que vea una luz azul. No es recomendable cargar el escáner desde el
puerto USB de su ordenador. Si el escáner no enciende, puede estar
defectuoso. Por favor contáctese con nuestro personal de asistencia.
P. El escáner de fotos para iPad no responde cuando el iPad está acoplado.
R. Asegúrese de haber instalado la aplicación i-Scan y acoplado el iPad
correctamente. Si su iPad está apagado o bloqueado, enciéndalo y asegúrese
de desbloquearlo.
R. Mi iPad no está cargando.
R. Asegúrese de que su iPad esté correctamente acoplado y el escáner está apagado.
Cuando el escáner sea apagado, su iPad comenzará a cargar.
R. La imagen escaneada es mala.
R. Asegúrese de haber calibrado el escáner antes de escanear. Remítase a la
página 12 para instrucciones de calibración. Si observa líneas o rayas, esto
indica que el rodillo y la lente están sucios. Remítase a la página 20 para
instruccio nes de limpiez a the rollers and lens are dirty. Refer to page XX for
cleaning instructions.
Page 28

53
Spanish
52
PREGUNTAS FRECUENTES
P. El escáner no responde.
R. Si el ícono de ocupado permanece en pantalla, intente forzar el cierre de la
aplicación i-Scan. Desconecte y vuelva a conectar a la energía y reinicie su iPad.
P. Mis fotos y documentos no ingresan.
R. Asegúrese de haber ajustado la guía para papel de acuerdo a la foto o documento
que quiere escanear. También puede haber residuos pegajosos en el rodillo que
necesitarán ser limpiados. Remítase a la página 20 para instrucciones de limpieza.
Por favor utilice la funda provista para fotos viejas o frágiles que pueden no ingresar
correctamente.
PONTE EN CONTACTO CON EL KAISER BAAS
¿Necesitas más ayuda? Por favor, visite:
www.kaiserbaas.com
O por correo electrónico:
helpdesk@kaiserbaas.com
(seguido)
NOTES
Page 29

54
55
NOTES NOTES
Page 30

 Loading...